Have you ever wondered what makes colorful nails not just a fashion statement but a personal canvas for creativity? Whether short, long, embellished, or plain, colorful manicures are a dynamic form of self-expression that reflect our mood, style, and even our creativity. This article dives deep into the world of colorful nails design, exploring vibrant options for every style—from the understated elegance of solid colors to the whimsical charm of intricate designs. Ready to brighten your look with some colorful nails for summer? Let’s explore how these colorful canvases come to life and how you can recreate them at home.
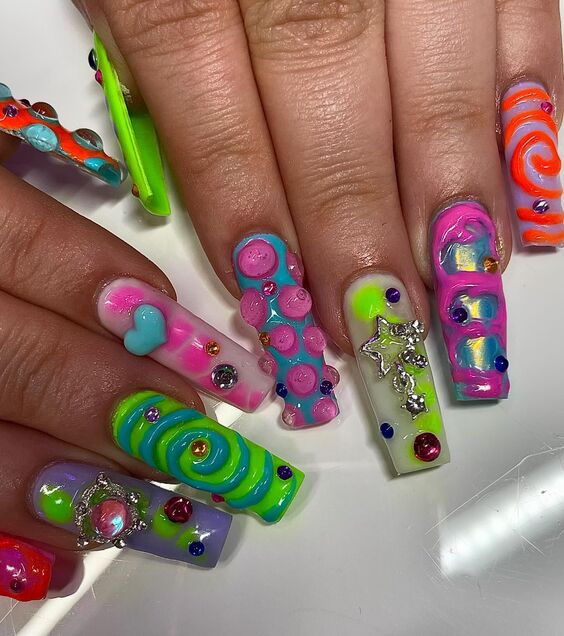
Multi-Dimensional Magic
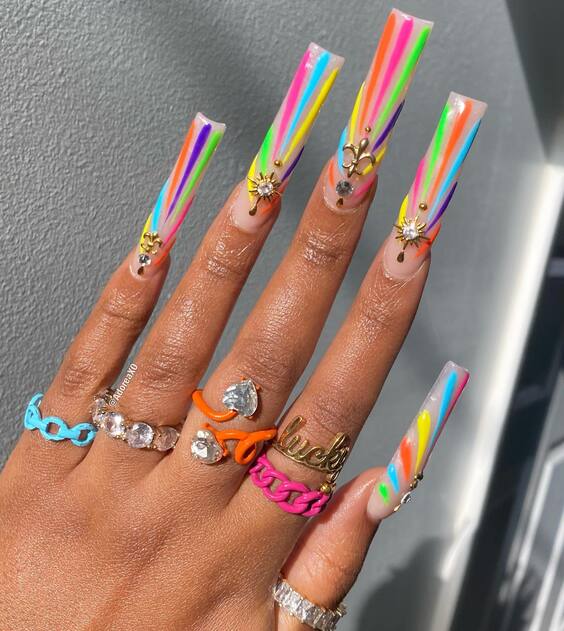
The first image reveals a daring leap into the 3D nail art trend, where nails are not just painted but sculpted. These nails are a festival of neon colors, featuring spirals, gems, and layered polish that create a tactile experience. The vivid greens and pinks aren’t just colors; they are statements, enhanced by playful accents like tiny hearts and stars that make each nail a standalone masterpiece.
Essentials for Crafting This Look
- Acrylic powder and liquid: For the 3D effects.
- Neon polishes: Essential for the base colors.
- Rhinestones and charms: Adds the playful elements.
- High-gloss topcoat: To seal everything in and add shine.
Each component, such as the vibrant neon polish from OPI’s Summer Neon Collection, contributes to the durability and pop of the nail. The charms, best sourced from Swarovski for their brilliant cuts and clarity, ensure that each nail catches the light and the eye.
DIY Steps to Achieve This Style
Start by applying a neon base layer; once dry, mix your acrylic powder with the liquid to create the 3D designs. Use a detail brush for intricate designs and place rhinestones with tweezers. Finish with a high-gloss topcoat to protect your artwork. Remember, patience is your best friend in achieving professional-level results at home.
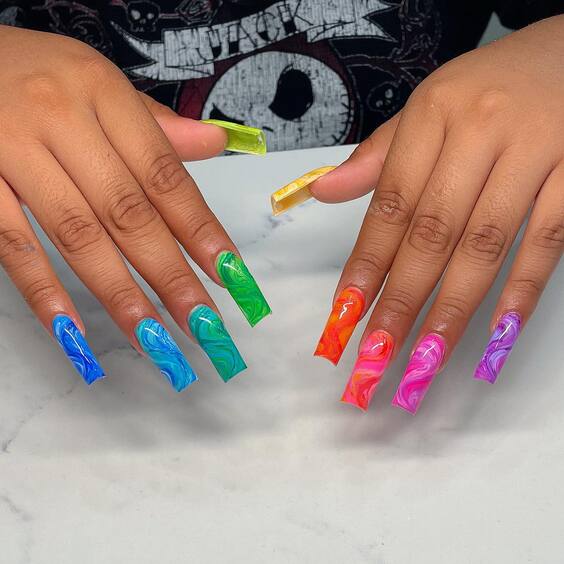
Flowing Marble Elegance
This nail design mesmerizes with its fluid marble patterns that seamlessly blend torquise blue, bright orange, and neon green. The use of translucent overlays gives the nails a glass-like finish, creating an illusion of depth that makes the colors seem to move with light.
Essential Products to Create This Look
- Marble ink or polish: For the swirling designs.
- Glossy topcoat: To achieve a glassy finish.
- Fine-tip brushes: For precise pattern creation.
Opt for products like Essie’s Glossy Topcoat for a finish that mimics glass and China Glaze’s Marble Ink collection for that perfect swirl.
How to Recreate
Begin with a clear base coat, then drop different colored inks on the nail, swirling them with a fine-tip brush. Apply a glossy topcoat to enhance the colors and achieve a smooth surface. This technique might take a few tries to perfect but is incredibly rewarding.
Sunset Spectrum
Our third look captures the soft gradients of a sunset, blending shades of pink, blue, orange, and yellow with a sophistication that looks effortless yet intricate. The subtle texture achieved through sponging gives these nails a dreamy quality.
Tools and Materials for Sunset Nails
- Sponge applicators: For the gradient effect.
- Pastel polishes: Choose high-pigment options for smooth blending.
- Matte topcoat: To soften the shine for a surreal effect.
Using a sponge to apply the polish in layers will help achieve the soft, seamless transition of colors. The OPI Pastel Range is perfect for this method due to its high pigment concentration and smooth blendability.
Step-by-Step Guide
Apply a light base color, then dab your sponge into various pastels, lightly applying them in layers to create a gradient effect. A matte topcoat will finish the look, giving it a velvety texture that’s soft to the touch and pleasing to the eye.
Playful Pops of Pastel
This vivid array captures a delightful mix of colorful nails design and playful patterns. Each nail is a canvas, featuring a variety of designs from simple geometric shapes to intricate floral motifs, using a palette of soft pastels contrasted with vibrant neons. The white base on some nails provides a crisp backdrop that makes the colors pop even more vividly, demonstrating the versatility of colorful nails summer styles.
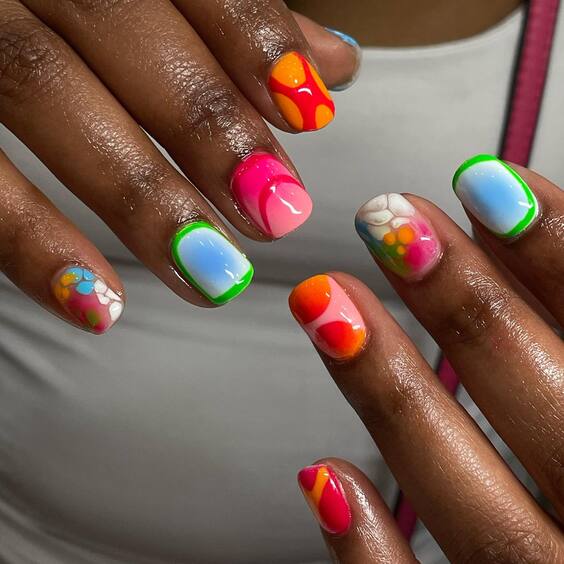
Materials Needed for This Colorful Creation
- White and neon nail polishes: Base for the bright colors.
- Detailing brushes: For intricate designs.
- Pastel polishes: For soft background hues.
Choose brands like Sally Hansen for their wide range of neon colors and Essie for their creamy pastels. The detailing brushes from Nail Artistry Essentials are perfect for achieving the fine lines and shapes seen in this style.
Guide to Creating This Nail Art
Start with a white base coat to ensure that the colors stand out. Then, using detailing brushes, paint each design element in neon and pastel hues. Alternate between bold and soft shades to keep each nail unique yet part of a cohesive set. Seal with a clear topcoat to protect your designs and enhance their longevity.
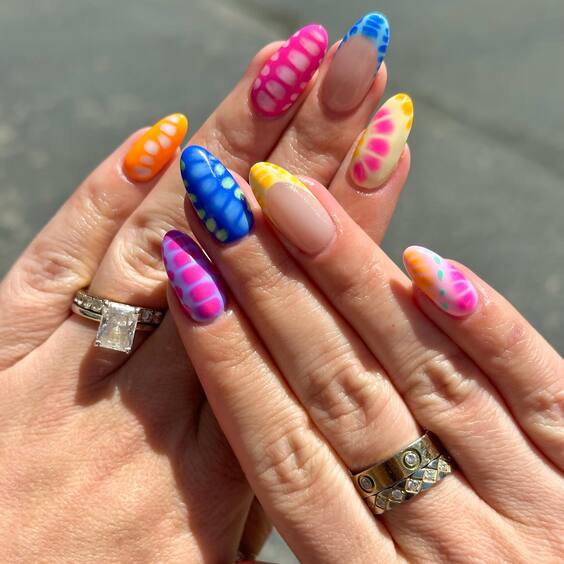
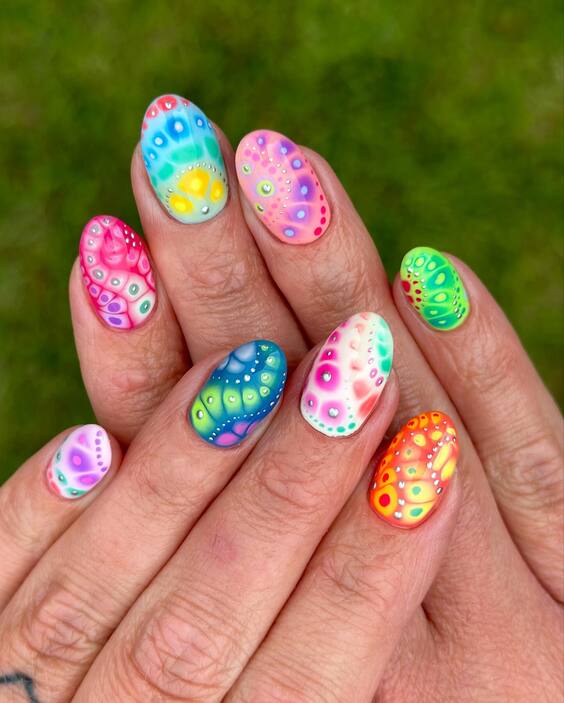
Floral Finesse
The second image presents a stunning example of colorful nails design featuring soft, translucent backgrounds with vibrant floral and star accents. This design epitomizes fun designs, with each nail offering a different scene, incorporating tiny details like flowers and smiles, perfect for colorful nails for summer.
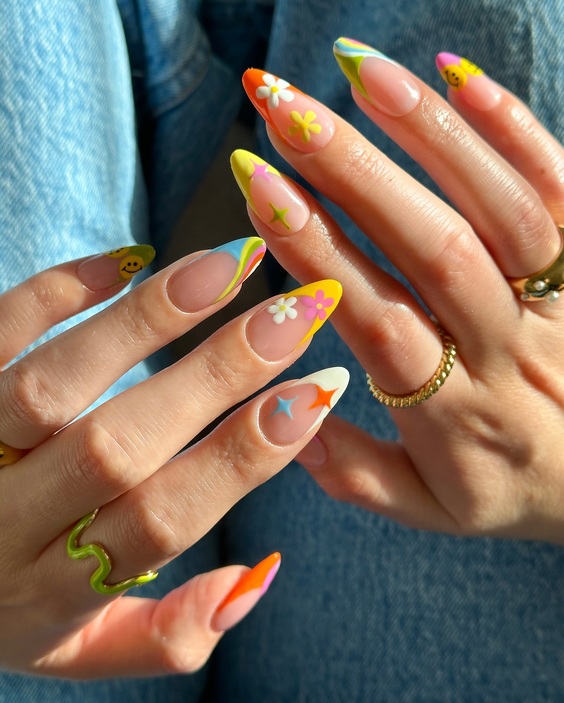
Essentials for Floral Nail Art
- Translucent polishes: For the sheer background.
- Colored acrylic paints: For detailed flower and star designs.
- Fine brushes and dotting tools: For precision in tiny details.
For the best results, utilize OPI’s Sheer Tints for the background and Acrylic Paint Set from Arteza for the vibrant flowers and stars, ensuring each design is as vivid in reality as it is in your imagination.
Steps to Achieve These Floral Designs
Apply a sheer base coat, then use a fine brush and colored acrylic paints to draw flowers and stars. Use a dotting tool to add smaller details and finish with a glossy topcoat to make the designs stand out. This style requires a steady hand and a bit of artistic flair but is incredibly rewarding when mastered.
Abstract Artistry
In this image, the focus shifts to an abstract blend of metallic sheens and matte finishes, creating a striking contrast. This sophisticated look uses different techniques like marbling and negative space to enhance the solid colors and introduce a unique design aspect. The metallics, particularly torquise blue and silver, offer a futuristic yet elegant appeal, perfect for any season.
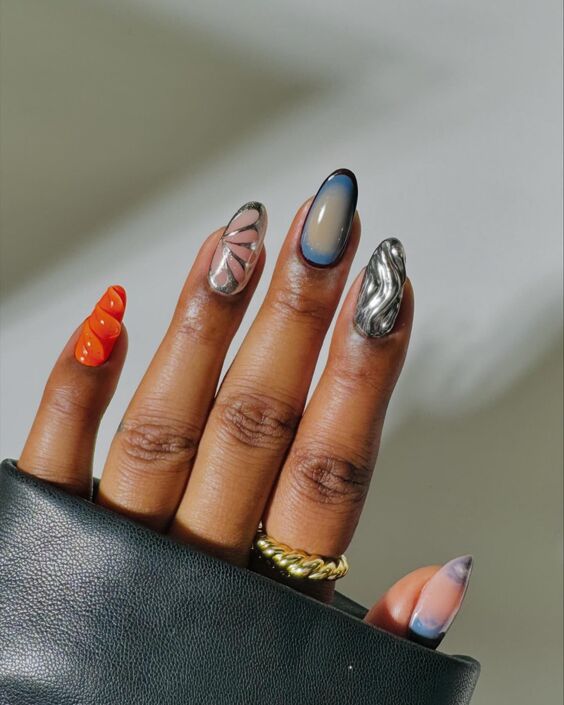
Key Products for Abstract Nail Art
- Metallic polishes: For the shimmering effects.
- Matte topcoat: To contrast the metallics.
- Striping tape: For clean lines and negative space.
For the metallic effects, use Essie’s Mirror Metallics collection, and pair it with a matte topcoat from Matte About You for the contrasting textures. The striping tape will ensure your lines are sharp and clean, adding to the abstract aesthetic.
How to Create This Metallic Abstract Look
Begin with a base coat of your choice. Apply striping tape in geometric patterns and fill in alternating sections with metallic and matte finishes. Remove the tape while the polish is still slightly tacky for crisp lines. Apply a matte topcoat over the metallic areas for an intriguing contrast, making the abstract designs pop.
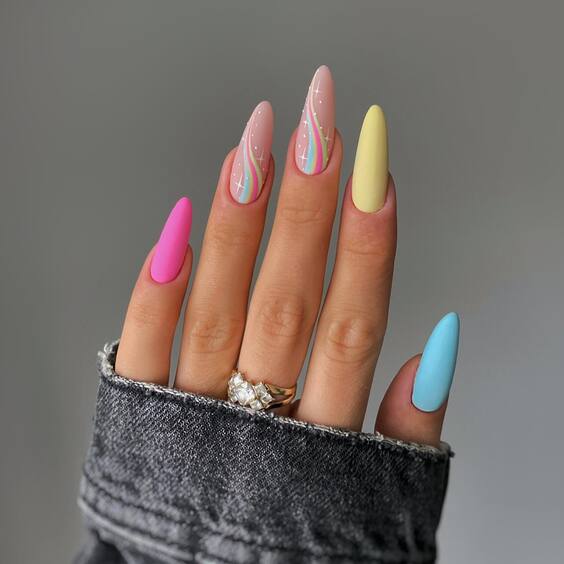
Soft Pastel Perfection
The elegance of soft pastels is beautifully displayed in this image, where each nail flaunts a different pastel shade arranged in a visually soothing gradient. The colors transition from a gentle blue to soft yellow, embodying the essence of plain summer vibes and minimalistic colorful nails design.
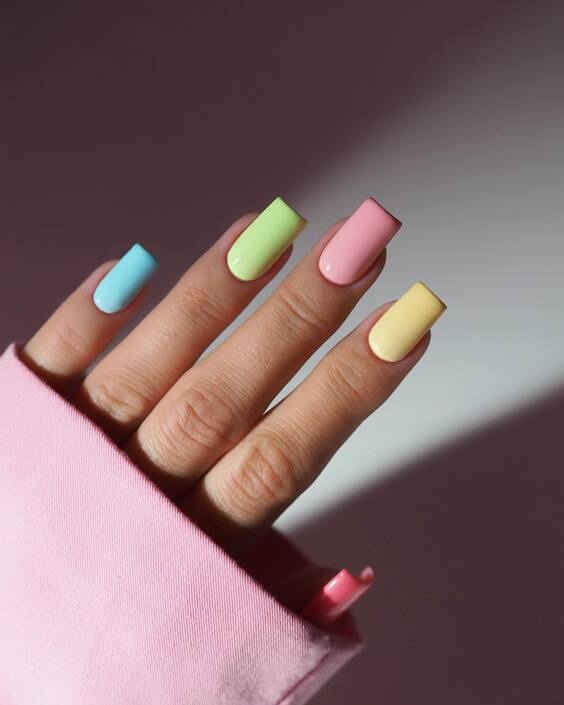
Essentials for Soft Pastel Nails
- Pastel nail polishes: Key for the soft color gradient.
- Seamless sponge: For blending the pastels smoothly.
- High-shine topcoat: To enhance the pastel colors and ensure longevity.
Brands like Essie and OPI provide excellent pastel shades that are perfect for achieving this look. The seamless sponge from Beauty Blender is ideal for creating a flawless gradient effect.
How to Create Soft Pastel Gradient Nails
Start by applying a light base coat, then use the sponge to blend the pastel shades on each nail. Focus on smooth transitions between colors. Apply a high-shine topcoat to give the nails a glossy finish and a more durable wear.
Vibrant Dot Artistry
This image captures a vibrant, playful approach to nail art, featuring a riot of colors adorned with dot patterns that give each nail a unique personality. This design is all about fun and creativity, incorporating a wide range of colors and patterns that echo the lively spirit of colorful nails for summer.
Materials Needed for Dot Art Nails
- Bright nail polishes: For the base colors.
- Dotting tools: Essential for creating precise dot patterns.
- Glossy topcoat: To seal in the design and add a vibrant shine.
For the bright and bold colors, Sally Hansen’s Insta-Dri line is perfect, offering quick-drying and vibrant hues. The dotting tools can be found in any comprehensive nail art kit, which will help achieve the precise and playful dots seen here.
Step-by-Step Guide to Dot Art
Apply your chosen bright polish as a base. Once dry, use a dotting tool to apply contrasting colors in dot patterns. Experiment with different sizes and spacing to add variety to each nail. Finish with a glossy topcoat to protect your design and add a final touch of shine.
Geometric Neon Splendor
In this stunning display, neon colors and geometric designs combine to create a striking visual impact. The clear, sharp lines and bright colors against a translucent base showcase a modern and bold take on colorful nails design.
Essentials for Geometric Neon Designs
- Neon nail polishes: For the striking colors.
- Striping tape: To create precise lines and patterns.
- Matte topcoat: To contrast the vibrant neons and enhance the geometric look.
Using products like China Glaze’s Neon collection will provide the bright, vivid colors needed for this style. The striping tape helps achieve the clean, sharp lines that define the geometric patterns.
How to Create This Geometric Design
Start with a clear or nude base coat. Apply striping tape in your desired geometric pattern. Fill in the sections with different neon colors for contrast. Carefully remove the tape, then apply a matte topcoat to give the design a modern finish and to set the colors firmly.
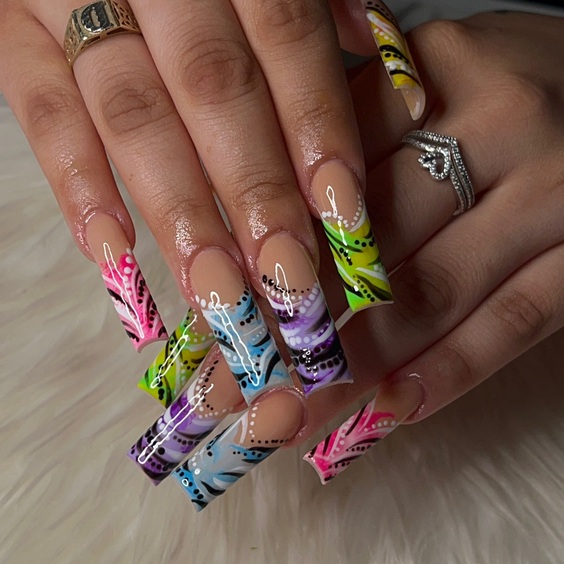
Eclectic Artistic Flair
This vibrant display showcases a variety of artistic techniques, combining abstract shapes, detailed line art, and playful color blocks. Each nail is a unique piece of art, reflecting individual creativity and a bold approach to colorful nails design. The mixture of matte and glossy finishes adds depth and intrigue to the overall appearance.
Essentials for Creating Artistic Nails
- Variety of polish finishes: Matte and glossy for contrast.
- Precision brushes: For detailed line work.
- Bright, bold polishes: To capture the vibrant hues.
Brands like Sinful Colors provide an excellent array of bold polishes that work well for such artistic expressions. Precision brushes from Nail Art Pro make the intricate detailing possible.
Guide to Artistic Nails
Begin with a base coat of your desired color. For matte sections, use a matte topcoat over the chosen areas. Use precision brushes to add detailed designs and geometric shapes. This style allows for personal expression, so feel free to experiment with patterns and color combinations that speak to you.
Pastel Gradient Elegance
The soft gradient from purple to peach in this image provides a gentle, soothing visual effect. This look is perfect for those who prefer a subtle yet colorful nails design. The almond-shaped nails offer a classic, feminine silhouette that enhances the softness of the pastel shades, making it a perfect choice for colorful nails summer styles.
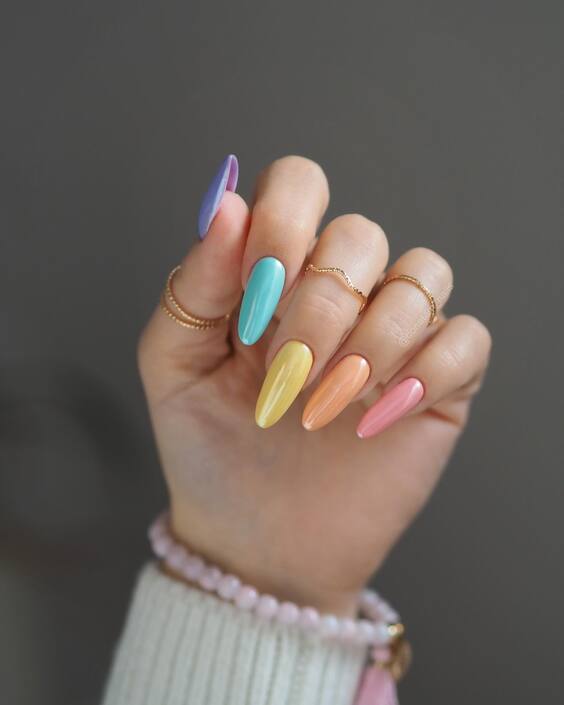
Products for Pastel Gradient Nails
- Pastel polishes: For the gradient effect.
- Sponge: To blend the colors seamlessly.
- Protective topcoat: To ensure longevity and gloss.
Pastel polishes from the Essie Spring Collection are ideal for their light, airy hues. A makeup sponge can be used to dab and blend the colors softly across each nail, achieving a flawless gradient.
Creating Pastel Gradient Nails
Apply a light base color, then use a sponge to blend the pastel polishes across the nails. Work quickly to blend the colors while the polish is still wet. A final topcoat will add shine and protect the gradient from wear and tear.
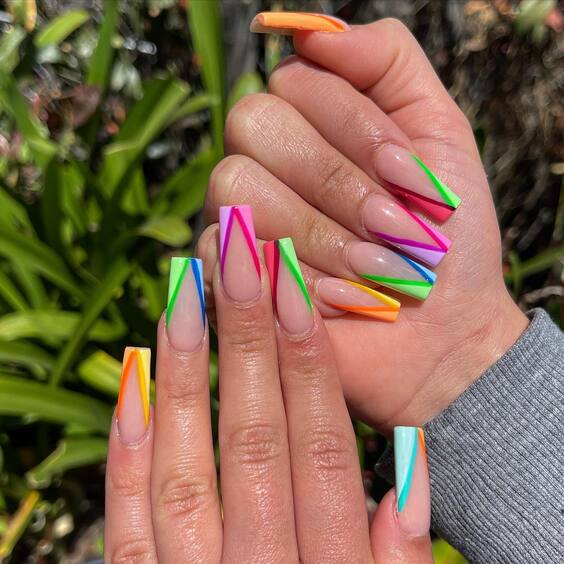
Neon Stripes and Sparkle
This image features long nails adorned with neon stripes and embellished with sparkling stones, creating a striking contrast. The vibrant colors are eye-catching and festive, ideal for a bold statement at any summer event. This design not only embodies colorful nails design but also showcases how embellishments can transform a simple manicure into a work of art.
Materials for Neon Stripes and Sparkle
- Neon nail polish: For the stripes.
- Rhinestones and embellishments: To add sparkle.
- Adhesive: For securing the embellishments.
- Striping tape: For precise lines.
Neon polishes from Neon Revolution are perfect for creating vivid, striking colors. Small rhinestones can be adhered with a strong nail glue, and striping tape will help maintain clean, sharp lines during application.
How to Achieve Neon Stripes and Sparkle
Start with a clear base coat to protect your nails. Apply striping tape to delineate where you want your neon stripes. Paint the stripes, remove the tape, and then add rhinestones and other embellishments for extra sparkle. Finish with a topcoat to seal and protect your dazzling design.
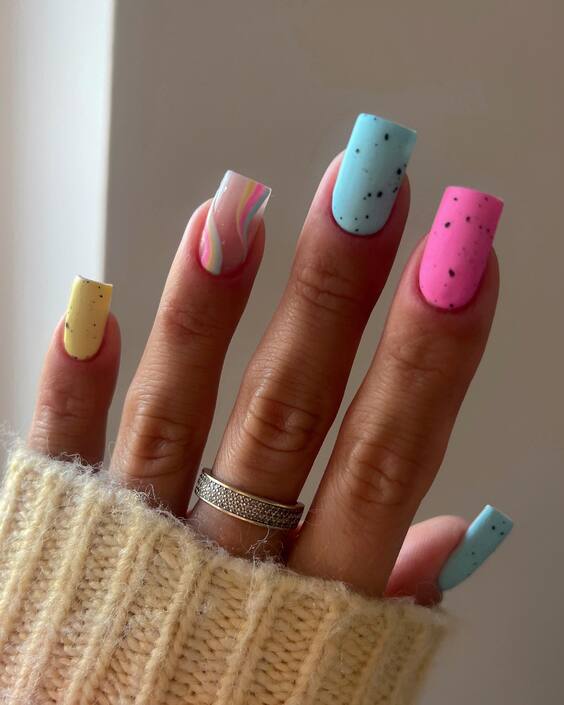
Pastel Speckle Charm
This design marries the simplicity of pastel colors with the playful addition of black speckles, offering a fresh take on classic colorful nails. Each nail features a different pastel shade, from soft yellows to cool blues, adorned with speckles that add a modern, artsy touch to the look.
Essentials for Pastel Speckled Nails
- Pastel nail polishes: For the base colors.
- Black polish or a fine-tip pen: For creating speckles.
- Topcoat: To seal in the design and add a glossy finish.
For pastel shades, the OPI SoftShades collection provides perfect hues that are subtle yet impactful. A fine-tip pen is ideal for adding precise black speckles, creating a fun and chic look.
Guide to Creating Speckled Nails
Apply your chosen pastel color as the base. Once dry, use a black polish or a fine-tip pen to dot the speckles randomly across each nail. Finish with a glossy topcoat to enhance the colors and protect the speckle design.
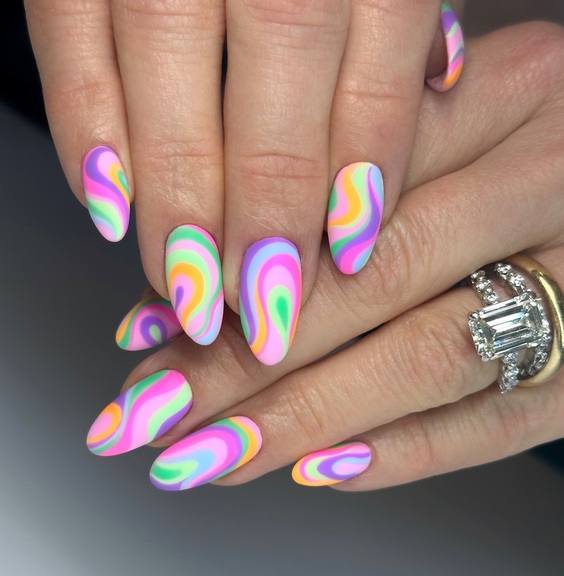
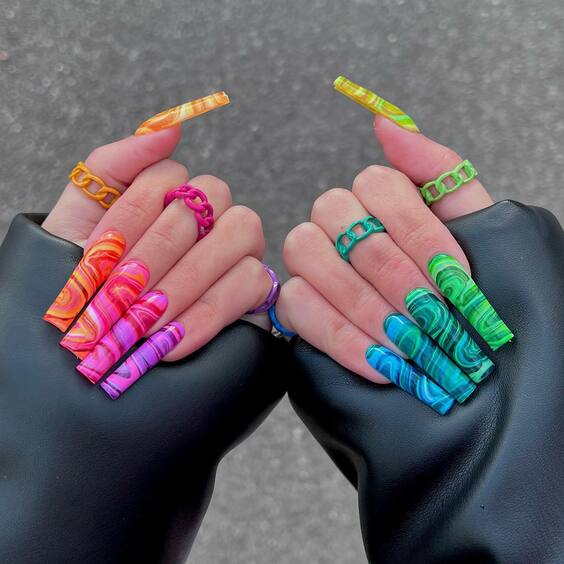
Psychedelic Swirls
The nails in this image take on a hypnotic quality with their swirling, psychedelic patterns. The vibrant mix of colors creates a mesmerizing effect, perfect for those who love to stand out with bold, colorful nails design. This style is a statement piece, combining neon hues in a flowing pattern that catches the eye.
Products for Psychedelic Nail Art
- Bright neon polishes: To achieve the vivid swirls.
- Detailing brushes: For intricate swirling patterns.
- Glossy topcoat: To give a smooth, finished look.
Neon polishes from brands like China Glaze can be used to achieve these bright, eye-catching hues. Detailing brushes will help in creating the smooth, flowing lines of the swirls.
How to Create Psychedelic Swirl Nails
Start with a white base coat to make the colors pop. Apply different colored polishes in small blobs on the nail, then use a detail brush to swirl the colors together before they dry. Finish with a glossy topcoat to smooth out the design and add shine.
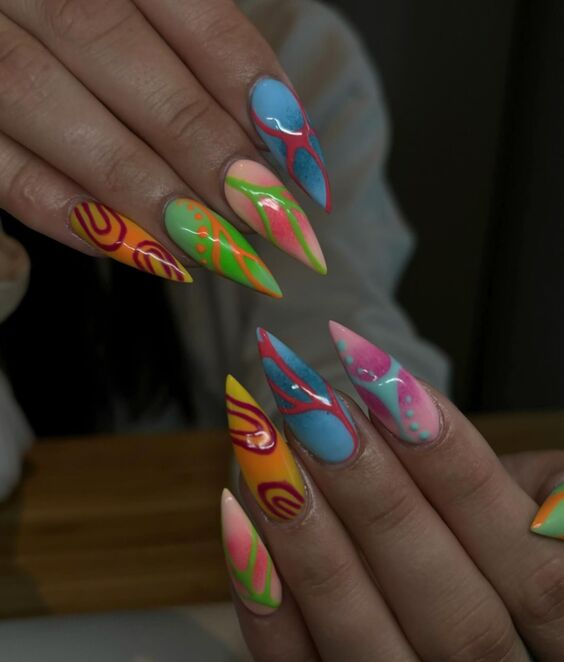
Vivid Stiletto Art
This image showcases stiletto nails as the perfect canvas for vivid and dynamic nail art. The sharp, pointed tips enhance the boldness of the designs, which feature a combination of bright colors and intricate patterns. This look is for those who dare to be different, using their nails as a bold expression of personal style.
Essentials for Stiletto Nail Art
- Bright colored polishes: For the base and details.
- Fine brushes: For precision in intricate designs.
- Protective topcoat: To ensure durability and gloss.
Using bright polishes from the Essie Neon Collection will provide the intensity needed for these designs. Fine brushes are essential for detailing, allowing for the creation of sharp, clean lines that define the patterns.
Guide to Achieving Vivid Stiletto Nails
Paint the base color first, choosing a vibrant hue that stands out. Use fine brushes to add detailed patterns over the base. These could be geometric shapes, lines, or abstract designs, depending on your preference. Seal the design with a topcoat to protect the art and enhance the colors.
Elegant Swirls and Bold Colors
This image features a sophisticated array of nails, each showcasing a different approach to integrating bold colors with elegant swirl designs. The soft pink base on some nails serves as a perfect canvas for vibrant swirls, while others display a monochromatic scheme that emphasizes shape over color.
Essentials for Creating Swirl Designs
- Soft pink polish: For a delicate base.
- Vibrant colored polishes: To create contrast with the swirls.
- Detailing brushes: For intricate swirl patterns.
- Glossy topcoat: To enhance the colors and provide a sleek finish.
Consider using Essie’s Ballet Slippers as a base for its iconic soft pink hue. For the swirls, opt for brighter shades from OPI’s Brights collection to achieve a striking contrast.
How to Create Swirled Nail Art
Begin with a soft pink base coat. Use a small detailing brush to apply vibrant polish in swirl patterns. Experiment with both tight and loose swirls to add visual interest and depth to the design. Finish with a glossy topcoat to make the colors pop and to protect the artwork.
Playful Patterns and Pastel Tones
This set of nails blends playful patterns with soft pastel tones, creating a delightful visual experience. The designs vary from simple polka dots to intricate line art, each nail featuring a unique theme but unified by the pastel palette. The addition of small embellishments adds a touch of whimsy.
Products Needed for Playful Pastel Designs
- Pastel nail polishes: As the primary color scheme.
- Dotting tools and fine brushes: For creating patterns and detailed line work.
- Tiny rhinestones or beads: To add embellishments.
- Protective topcoat: To seal in the designs.
For pastels, Sally Hansen’s Pastel Pretties Collection offers a range of beautiful, soft shades. The fine tools and embellishments can be found in comprehensive nail art kits, ideal for achieving the detailed art seen in this style.
Steps to Achieve Playful Pastel Nails
Start with a base of pastel polish. Use dotting tools to create simple patterns and fine brushes for more intricate designs. Add small rhinestones or beads to enhance the artistry. Finish with a clear topcoat to protect the designs and add a final glossy look.
Geometric Neon Lace
This final image captures a striking combination of neon colors and geometric lace patterns, creating a bold and dramatic look. The intricate lace designs are enhanced by the vivid neon backgrounds, making each nail a standout piece.
Essentials for Geometric Neon Lace Designs
- Neon nail polishes: For the vibrant background.
- Black polish or lace stencils: To create the lace patterns.
- Fine-tip brush or stamping kit: For precision in design.
- Matte topcoat: To provide a contemporary finish to the shiny neons.
The use of neon polishes from China Glaze’s Electric Nights collection will ensure that the background colors are bright and eye-catching. Lace stencils or a fine-tip brush can be used to overlay the geometric patterns.
How to Create Neon Lace Nail Art
Apply a neon polish as the base layer. Once dry, use black polish with a fine-tip brush or a stencil to create lace patterns. If using a brush, paint freehand to add a personal touch to the intricate designs. Opt for a matte topcoat to contrast the shiny neon base and give the nails a modern look.
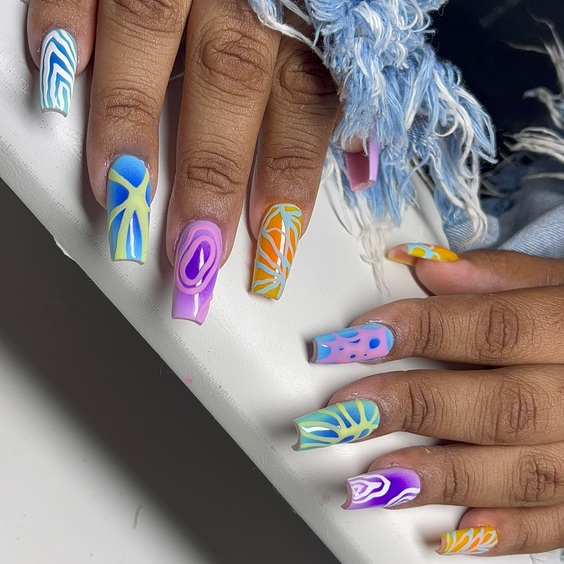
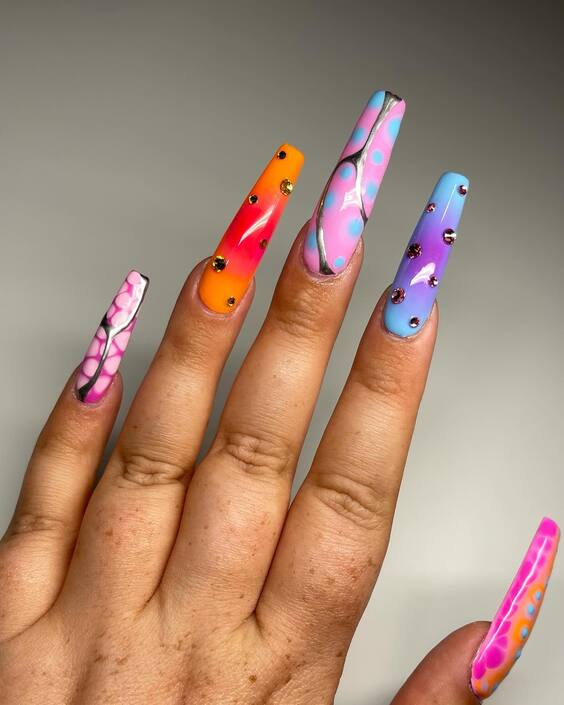
Spectrum of Sculptural Splendor
This captivating image showcases a dramatic array of sculpted nails, each a miniature artwork exhibiting a stunning spectrum of color and three-dimensional design. The swirling patterns carved into each nail are reminiscent of marble and fluid paint, displaying a variety of hues from fiery oranges to deep blues and vibrant greens.
Essentials for Creating Sculpted Nail Art
- High-quality acrylic powders: For the sculptural base.
- Pigment drops or colored acrylics: To achieve the vibrant, marbled effect.
- Fine detailing tools: For sculpting precise patterns.
- Glossy topcoat: To enhance the depth and vibrancy of the colors.
Using a range of colored acrylics from brands like Mia Secret or Young Nails can provide the brightness and consistency needed for such bold designs. Detailing tools are crucial for carving intricate patterns that make these sculptural nails stand out.
How to Create Sculpted Marbled Nail Art
Begin by mixing your colored acrylics with the acrylic powder and liquid to create a pliable mixture. Apply the mixture to the nails, sculpting the desired shape and design. Use pigment drops to swirl in additional colors before the acrylic sets. Once shaped and hardened, use fine tools to refine any details and apply a glossy topcoat to bring out the colors and ensure durability.
In this journey through the vibrant world of colorful nail art, we’ve explored an array of styles that blend creativity, color, and unique design elements. From the playful whimsy of pastel polka dots to the dramatic flair of sculptural acrylics, each style presents a way to express personal taste and fashion-forward sensibility. These designs not only highlight the technical skills required but also showcase how nails can serve as a personal canvas for expression. Whether you’re drawn to soft gradients or bold, sculptural statements, the diverse possibilities of nail art invite you to experiment and let your hands tell a colorful story. Embrace these inspirations, and let your nails become a standout accessory in your style repertoire.