19 Top Blue Nail Colors & Designs for 2024: OPI, Gel, DND & More
Are you ready to dive into the enchanting world of blue nail colors? Whether you’re a fan of bold, striking hues or prefer subtle and sophisticated shades, blue nails can be the perfect accessory for any season. From summer beach vibes to elegant winter tones, blue nail colors offer a versatile palette that suits every style and skin tone. But what makes a blue manicure stand out, and how can you achieve the perfect look at home? Let’s explore the stunning options and nail designs that will have you reaching for blue polish all year round.
Blue Elegance with a Touch of Simplicity
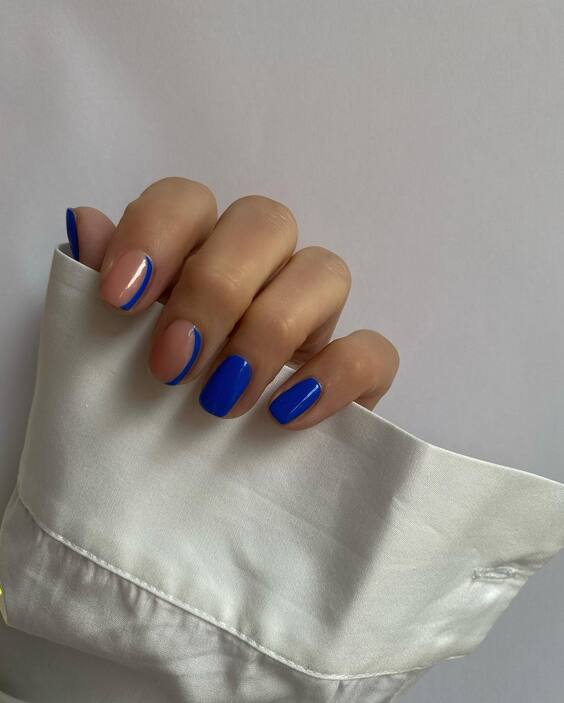
This manicure presents a minimalist yet chic approach to blue nail colors. The design features a classic royal blue polish, complemented by a single nail accent in a sheer nude with a delicate blue stripe. The combination of these elements creates a harmonious balance, making it a perfect choice for both casual and formal settings. The royal blue nails exude confidence and sophistication, while the nude accent nail adds a subtle touch of elegance. This design is ideal for those who want to experiment with blue nail colors without overwhelming their look.
Consumables and Recommendations
- Royal Blue Polish: OPI “My Pal Joey” – A vibrant and rich royal blue shade that provides excellent coverage and shine.
- Nude Polish: Essie “Mademoiselle” – A classic sheer nude perfect for a clean and subtle look.
- Blue Striping Tape: Perfect for adding precise and delicate lines.
- Top Coat: Seche Vite Dry Fast Top Coat – Ensures a glossy finish and longevity.
DIY Instructions
- Prep the Nails: Start with clean, shaped nails. Apply a base coat to protect your nails and ensure smooth application.
- Apply the Base Colors: Paint four nails with the royal blue polish and one with the nude polish. Allow them to dry completely.
- Add the Accent Stripe: Using blue striping tape, carefully place a thin line down the center of the nude accent nail.
- Top It Off: Finish with a high-quality top coat to seal the design and add shine.
Intricate Floral Ombre
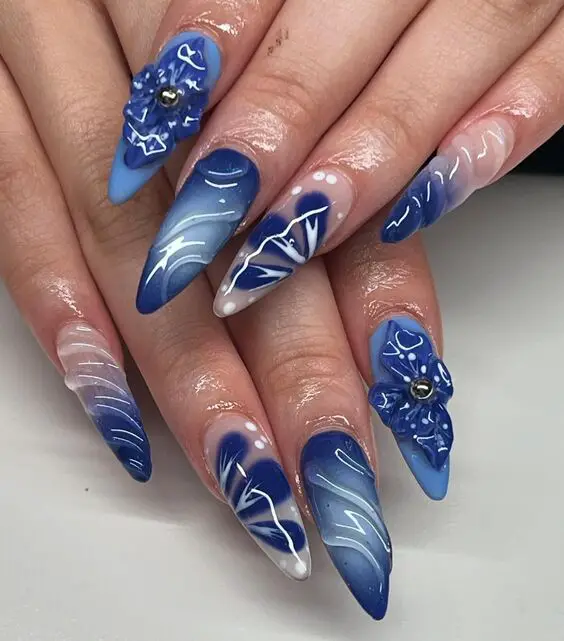
For those looking to make a statement, this intricate floral ombre design is a stunning choice. The nails feature a gradient from deep navy to a lighter sky blue, creating a beautiful ombre effect. The design is accentuated with delicate white floral patterns and 3D blue flowers, adding a touch of whimsy and artistry. The navy base provides a bold contrast, making the floral details pop. This design is perfect for special occasions or whenever you want to feel a bit more extravagant. The combination of dark and light shades showcases the versatility of blue nail colors.
Consumables and Recommendations
- Navy Blue Polish: DND “Deep Sea Navy” – A deep, rich navy perfect for creating a strong base.
- Sky Blue Polish: OPI “It’s a Boy!” – A soft, light blue ideal for ombre transitions.
- White Nail Art Pen: For drawing delicate floral patterns.
- 3D Nail Art Flowers: Blue acrylic flowers for a 3D effect.
- Rhinestones: Small rhinestones to add sparkle and dimension.
- Top Coat: Gel top coat for durability and shine.
DIY Instructions
- Base Preparation: After prepping your nails, apply the navy blue polish to the base of each nail, fading into the sky blue towards the tips. Blend well for a seamless ombre effect.
- Floral Detailing: Once the base is dry, use the white nail art pen to draw floral patterns. Place the 3D flowers and rhinestones strategically on the nails.
- Finishing Touches: Seal your artwork with a gel top coat, curing under a UV lamp for long-lasting wear.
Modern Metallic Accents
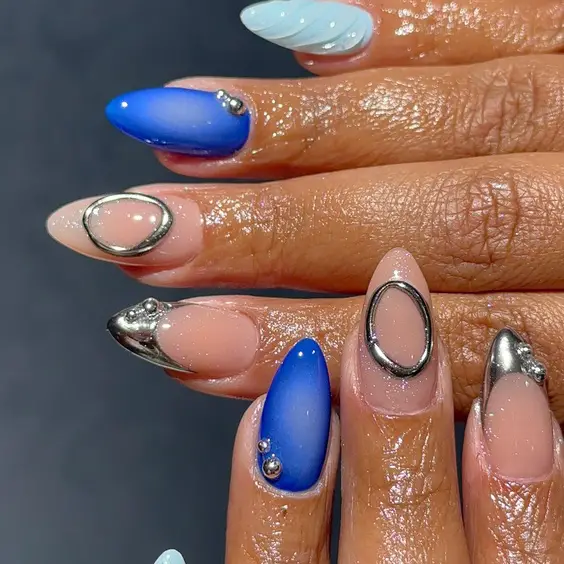
This modern design combines blue nail colors with metallic accents for a futuristic look. The nails are painted in a sleek cobalt blue, with some nails featuring metallic chrome detailing. The mixture of shiny metallic elements and vibrant blue creates a captivating contrast that is both edgy and sophisticated. The incorporation of chrome accents gives the manicure a high-fashion feel, perfect for those who love to experiment with different textures and finishes. This design is especially striking for evening events or a night out, adding a touch of glam to your ensemble.
Consumables and Recommendations
- Cobalt Blue Polish: Essie “Butler Please” – A striking cobalt blue that is both bold and chic.
- Chrome Powder: Silver chrome powder for creating metallic accents.
- Clear Gel Polish: To adhere the chrome powder.
- Nail Art Studs: Small metallic studs for additional texture.
- Top Coat: Glossy top coat to enhance the shine.
DIY Instructions
- Initial Application: Start with a base coat, then apply two coats of cobalt blue polish. Allow to dry thoroughly.
- Adding Metallic Accents: Apply a layer of clear gel polish where you want the chrome accents. Before it dries, rub the chrome powder onto the nail. Seal with another layer of clear gel polish.
- Stud Application: Place metallic studs on the desired nails using nail glue.
- Final Coat: Apply a glossy top coat to protect the design and enhance shine.
Extravagant Floral and Geometric Fusion
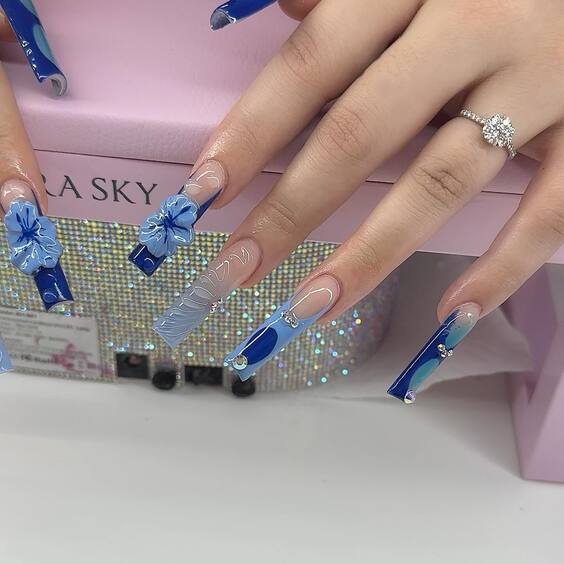
This eye-catching nail design seamlessly combines floral elements with geometric patterns, offering a creative and artistic approach to blue nail colors. The nails feature a stunning mix of cobalt blue, pastel blue, and nude, accentuated by intricate 3D blue flowers and delicate white line art. The variety of shapes and patterns on each nail creates a unique and personalized look, perfect for those who love bold and unconventional designs. The combination of shades provides a visually pleasing contrast, making this set ideal for making a statement.
Consumables and Recommendations
- Cobalt Blue Polish: DND “Blue Flame” – A vibrant cobalt shade that stands out.
- Pastel Blue Polish: OPI “I Am What I Amethyst” – A soft pastel blue for a subtle contrast.
- Nude Polish: Essie “Ballet Slippers” – A sheer nude base to balance the bold colors.
- 3D Blue Flowers: Acrylic flowers for added texture.
- White Nail Art Pen: For creating precise geometric lines and patterns.
- Top Coat: Gel top coat for a glossy, long-lasting finish.
DIY Instructions
- Prepare the Nails: Start with clean, shaped nails and apply a base coat.
- Apply Base Colors: Alternate between cobalt blue, pastel blue, and nude polish on different nails. Allow each layer to dry thoroughly.
- Add Details: Use the white nail art pen to draw geometric lines and patterns. Attach 3D flowers using nail glue.
- Finish with a Top Coat: Apply a gel top coat and cure under a UV lamp to seal the design and add shine.
Delicate Blue and White Porcelain Art
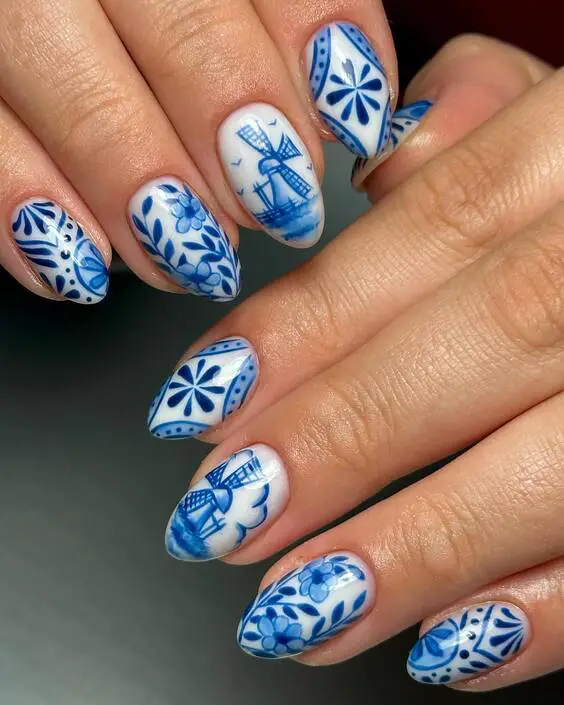
Inspired by classic porcelain designs, this manicure showcases an elegant blend of blue and white. The nails feature intricate floral and windmill motifs, reminiscent of traditional Delftware. The crisp white base serves as a perfect canvas for the delicate blue patterns, creating a sophisticated and timeless look. This design is ideal for those who appreciate detailed artistry and want a unique and classy appearance. The balance of blue and white makes it versatile, suitable for both casual and formal occasions.
Consumables and Recommendations
- White Polish: OPI “Alpine Snow” – A bright, clean white base.
- Blue Polish: DND “Blueberry Cream” – A soft blue perfect for fine detailing.
- Fine Detail Brush: Essential for painting intricate designs.
- Top Coat: Seche Vite Dry Fast Top Coat – To protect the artwork and add shine.
DIY Instructions
- Base Preparation: After prepping your nails, apply two coats of white polish. Allow it to dry completely.
- Create the Design: Using a fine detail brush, paint the blue floral and windmill patterns. Take your time to ensure precision.
- Seal the Design: Once the artwork is dry, apply a top coat to protect the design and give a glossy finish.
Starry Night Sky Design
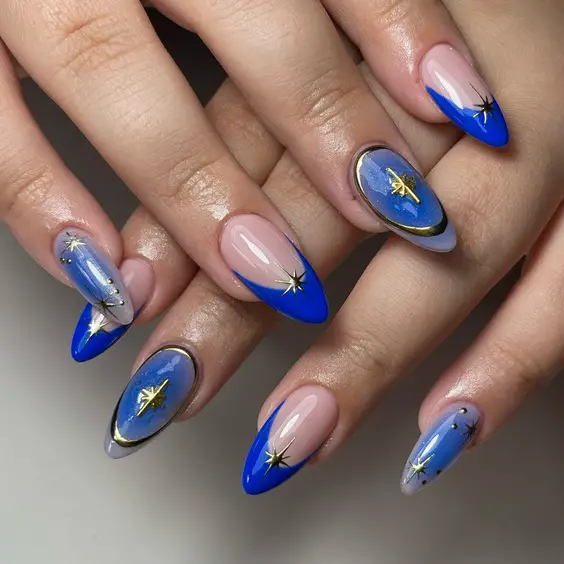
This celestial-inspired manicure captures the magic of a starry night sky. The nails feature a gradient of deep blue to pastel blue, with delicate star motifs accentuated by metallic outlines. The design combines elements of sophistication and whimsy, making it perfect for those who love a touch of fantasy in their nail art. The blend of colors creates a dreamy effect, while the gold star accents add a touch of luxury. This design is versatile, suitable for both everyday wear and special occasions, making it a must-try for fans of blue nail colors.
Consumables and Recommendations
- Deep Blue Polish: Essie “Aruba Blue” – A shimmering deep blue that mimics the night sky.
- Pastel Blue Polish: OPI “It’s a Boy!” – A soft blue for the gradient effect.
- Gold Nail Art Pen: For creating star outlines and accents.
- Fine Glitter: To add sparkle and enhance the celestial theme.
- Top Coat: Gel top coat for a high-shine finish.
DIY Instructions
- Gradient Application: Start with the deep blue polish at the base and blend into the pastel blue towards the tips. Use a sponge for a smooth gradient effect.
- Add Stars: Use the gold nail art pen to draw stars and add fine glitter for extra sparkle.
- Top Coat: Seal the design with a gel top coat and cure under a UV lamp for durability.
Playful Pastel Floral Design
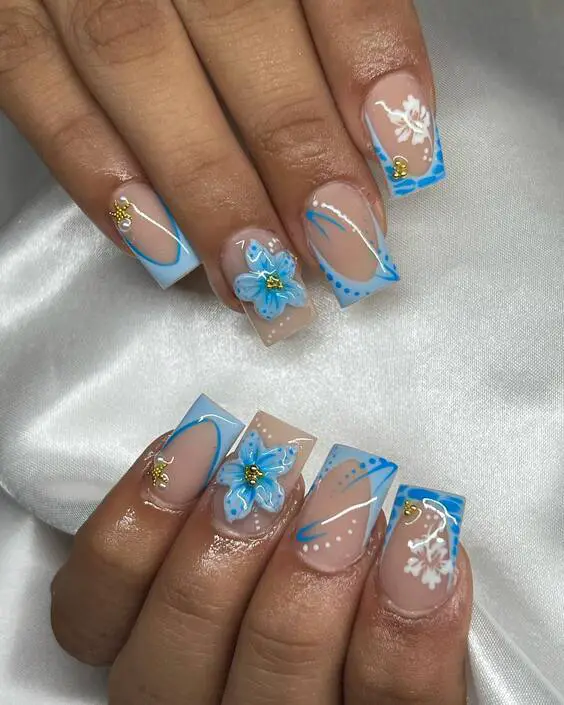
This delightful nail design features a whimsical blend of pastel blues with playful floral accents. The nails are adorned with a variety of blue hues, including sky blue, baby blue, and a hint of white, creating a soft and dreamy palette. The addition of 3D blue flowers and delicate white lines enhances the playful nature of this design, making it perfect for those who love to experiment with fun and unique nail art. The overall look is fresh and lively, ideal for the spring and summer seasons.
Consumables and Recommendations
- Sky Blue Polish: OPI “It’s a Boy!” – A gentle sky blue that’s perfect for a soft base.
- Baby Blue Polish: Essie “Mint Candy Apple” – A light, pastel blue for a sweet touch.
- White Nail Art Pen: For adding fine line details and flower accents.
- 3D Flowers: Light blue acrylic flowers for a playful 3D effect.
- Top Coat: Sally Hansen “Insta-Dri” Top Coat – Quick drying with a glossy finish.
DIY Instructions
- Base Application: Start with a base coat, followed by alternating sky blue and baby blue polishes on each nail. Let them dry completely.
- Adding Details: Use the white nail art pen to draw thin lines and small dots. Attach 3D flowers with nail glue.
- Top Coat Application: Finish with a top coat to protect the design and add shine.
Subtle Blue Gradient Elegance
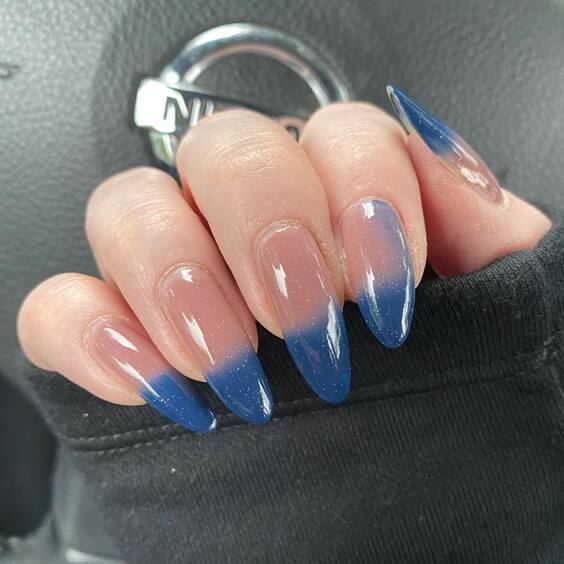
This sophisticated manicure features a subtle gradient of blue, transitioning from a nude base to a deep navy blue at the tips. The soft ombré effect is both elegant and understated, making it suitable for any occasion. This design is perfect for those who prefer a more minimalist approach to nail art while still incorporating a trendy color. The gradient technique adds a touch of modernity, making it a versatile choice for both day and night looks.
Consumables and Recommendations
- Nude Polish: Essie “Mademoiselle” – A sheer nude for a natural base.
- Navy Blue Polish: OPI “Russian Navy” – A deep, rich navy for the gradient effect.
- Makeup Sponge: For blending the gradient seamlessly.
- Top Coat: CND “Super Shiney” Top Coat – For a high-shine finish and long-lasting wear.
DIY Instructions
- Apply Base Coat: Start with a clear base coat to protect your nails.
- Create the Gradient: Using a makeup sponge, dab a small amount of navy blue polish on the tips and blend towards the base to create the gradient effect. Repeat until the desired intensity is achieved.
- Seal with Top Coat: Apply a top coat to seal the design and add a glossy finish.
Classic Navy Blue Chic
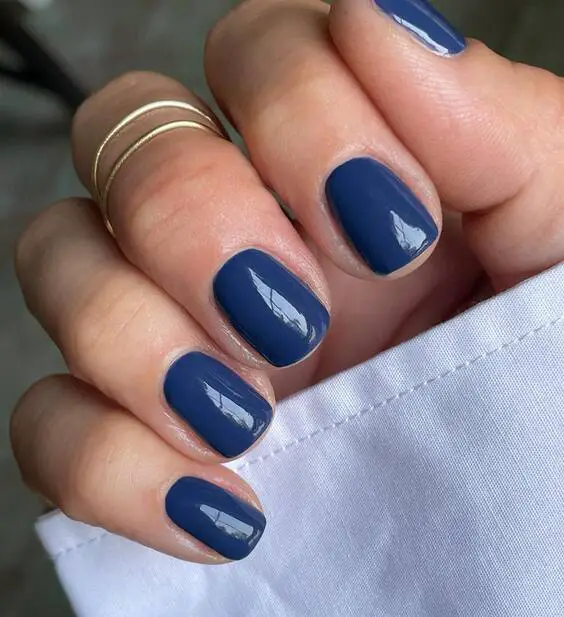
For a timeless and classic look, this simple navy blue manicure is a must-try. The rich navy shade provides a chic and sophisticated vibe, perfect for any season. The clean, solid color makes a bold statement, proving that sometimes, less is more. This versatile design can be dressed up or down, making it ideal for both professional settings and casual outings. The deep hue flatters all skin tones, making it a universally appealing choice.
Consumables and Recommendations
- Navy Blue Polish: Essie “After School Boy Blazer” – A deep navy with a glossy finish.
- Base Coat: OPI “Natural Nail Base Coat” – For smooth application and nail protection.
- Top Coat: Seche Vite Dry Fast Top Coat – To enhance the shine and durability.
DIY Instructions
- Prepare Nails: Apply a base coat to clean, shaped nails.
- Apply Navy Polish: Apply two coats of navy blue polish for full coverage. Let each coat dry completely.
- Finish with Top Coat: Seal the color with a top coat to ensure a long-lasting, glossy finish.
Aqua Geode Glamour
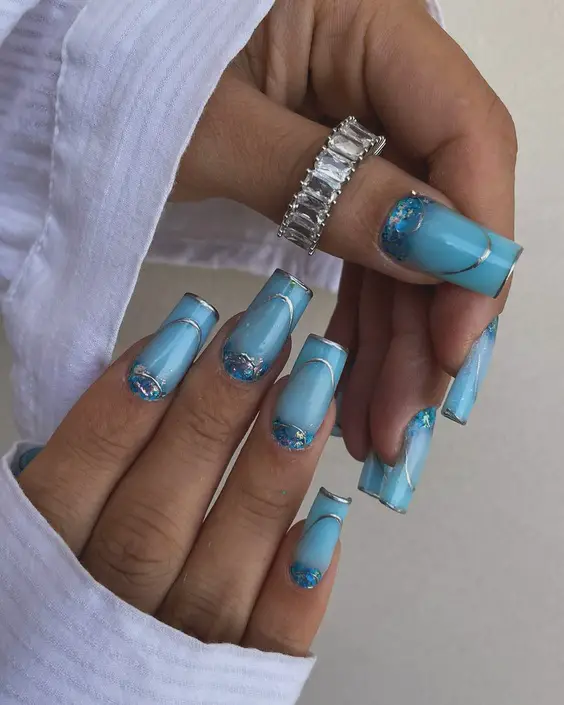
This stunning manicure captures the beauty of geodes with a glamorous twist. The nails feature a soft aqua blue base, adorned with shimmering metallic accents and intricate geode-inspired details. The use of silver foil and delicate lines gives the design a luxe feel, while the addition of tiny gemstone-like embellishments at the cuticle area adds a touch of elegance. The combination of pastel and metallic elements makes this design perfect for those who love to stand out with their nail art. This look is ideal for special occasions or whenever you want to add a bit of sparkle to your style.
Consumables and Recommendations
- Aqua Blue Polish: China Glaze “For Audrey” – A soft, Tiffany-inspired aqua blue.
- Silver Foil: For creating metallic geode details.
- Nail Art Striping Tape: For clean, precise lines.
- Gemstone Embellishments: Tiny, clear gemstones for added sparkle.
- Top Coat: Essie “Gel Couture Top Coat” – A long-lasting, high-shine finish.
DIY Instructions
- Base Color: Apply a base coat, followed by two coats of aqua blue polish. Let it dry thoroughly.
- Create Geode Details: Use silver foil to mimic the natural look of geodes, placing it strategically on each nail. Add thin lines with striping tape for definition.
- Add Gemstones: Carefully place gemstone embellishments at the cuticle area using nail glue.
- Seal the Look: Finish with a top coat to secure the design and add a glossy finish.
Electric Blue Chrome and Jewels
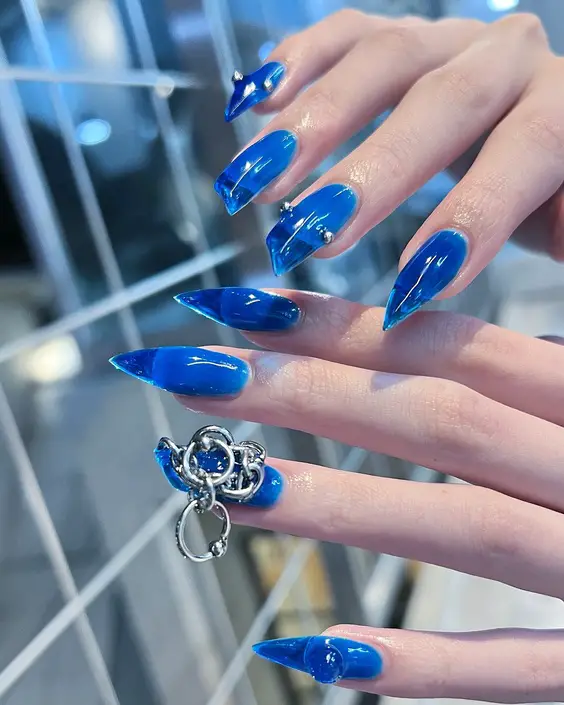
This bold and futuristic manicure combines the allure of electric blue with the shine of chrome. The nails are coated in a vivid blue chrome finish, giving them a sleek, mirror-like appearance. The addition of small metallic rings and jewels adds an edgy, high-fashion element to the design. This look is perfect for those who love to experiment with avant-garde styles and aren’t afraid to make a statement. The reflective quality of the chrome polish makes these nails especially eye-catching under lights, making them a fantastic choice for night events or parties.
Consumables and Recommendations
- Blue Chrome Polish: Born Pretty “Holographic Chrome” – A striking blue chrome for a mirror-like finish.
- Metallic Rings and Jewels: For added texture and dimension.
- Clear Gel Polish: To adhere the rings and jewels.
- Top Coat: OPI “Platinum” Top Coat – For extra shine and protection.
DIY Instructions
- Base Application: Begin with a base coat, then apply the blue chrome polish evenly. Use a sponge applicator for a smooth finish.
- Attach Rings and Jewels: Apply clear gel polish where you want to place the metallic rings and jewels. Carefully position them and cure under a UV lamp.
- Top Coat: Apply a top coat to secure the embellishments and enhance the chrome effect.
Oceanic Marble with Starry Accents
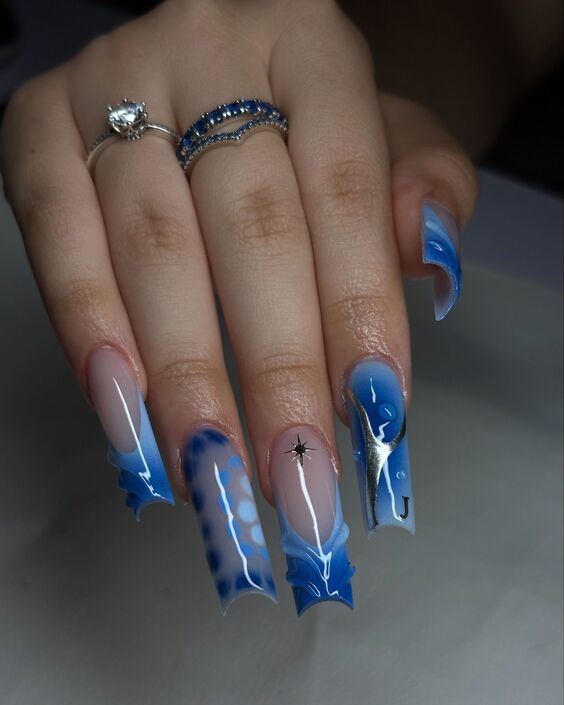
This artistic nail design brings the ocean to your fingertips with its mesmerizing marble effect. The nails feature a blend of blue tones, from deep navy to light turquoise, swirling together to create a marble-like appearance. The design is enhanced with subtle white details and small star accents, giving it a dreamy, ethereal quality. The elongated coffin shape adds to the elegance of the look, making it a perfect choice for a sophisticated yet playful style. This design is ideal for those who want to capture the beauty of the ocean in a unique and stylish way.
Consumables and Recommendations
- Navy Blue Polish: Zoya “Sailor” – A rich navy blue for depth.
- Turquoise Polish: Sally Hansen “Mint Sorbet” – A bright turquoise for contrast.
- White Nail Art Pen: For creating fine marble lines and star accents.
- Star Stickers: Small silver star stickers for added charm.
- Top Coat: Essie “No Chips Ahead” – For a durable, glossy finish.
DIY Instructions
- Base and Marble Effect: Apply a base coat, then create the marble effect using the navy and turquoise polishes. Use a toothpick to swirl the colors together.
- Detailing: Once dry, use the white nail art pen to add fine lines and star accents. Apply star stickers as desired.
- Top Coat: Seal the design with a top coat for shine and longevity.
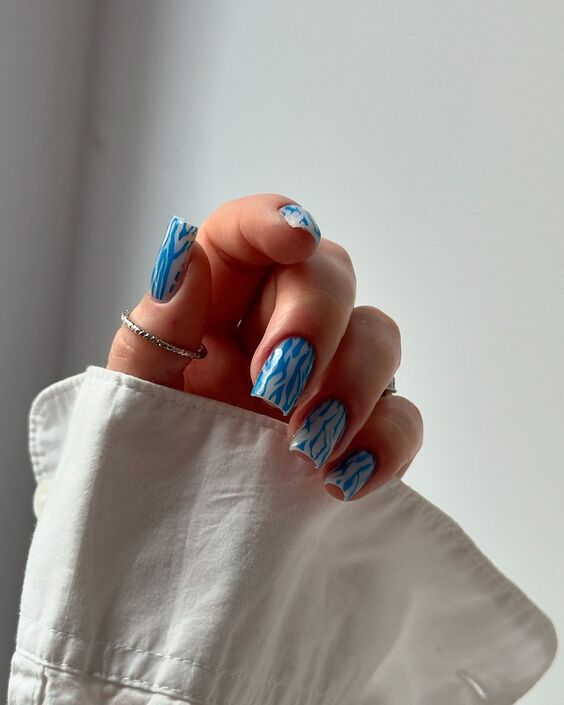
Abstract Blue Streaks
This unique manicure features a minimalist yet artistic design, with abstract blue streaks on a white base. The combination of sky blue and navy blue streaks creates a striking contrast, reminiscent of abstract art. The simplicity of the design makes it versatile and suitable for any occasion, while the unique pattern ensures it stands out. This style is perfect for those who appreciate subtle yet creative nail art and want to make a statement without overwhelming their look.
Consumables and Recommendations
- White Polish: OPI “Alpine Snow” – A crisp white base for a clean look.
- Sky Blue Polish: Essie “Find Me An Oasis” – A soft sky blue for the streaks.
- Navy Blue Polish: OPI “Russian Navy” – A deep navy for added contrast.
- Thin Nail Art Brush: For creating precise streaks.
- Top Coat: Seche Vite Dry Fast Top Coat – Ensures a long-lasting, glossy finish.
DIY Instructions
- Apply Base Color: Start with a base coat, then apply two coats of white polish. Let it dry completely.
- Create Streaks: Using a thin nail art brush, draw random streaks with the sky blue polish, followed by navy blue. Allow each color to dry before adding the next.
- Seal with Top Coat: Finish with a top coat to protect the design and add a glossy sheen.
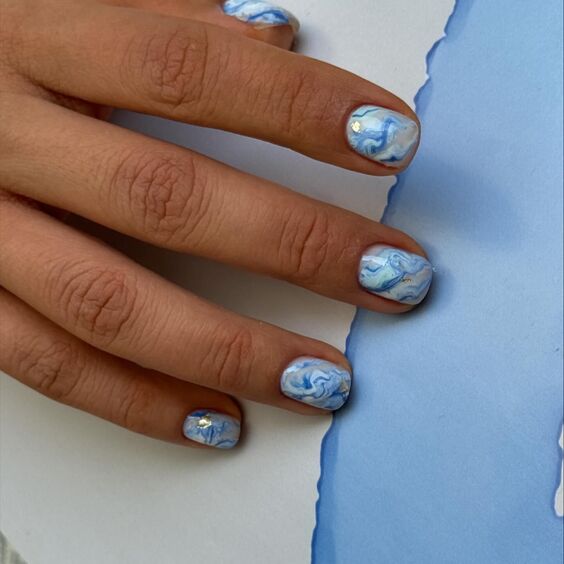
Swirled Marble Fantasy
This elegant manicure showcases a marbled design with shades of blue and white, accented with hints of gold. The swirled effect creates a soft, dreamy look, reminiscent of a cloudy sky. The addition of subtle gold flakes adds a touch of luxury, making this design perfect for both everyday wear and special occasions. The short nail length keeps the look understated and sophisticated, ideal for those who prefer a more conservative yet stylish approach to nail art.
Consumables and Recommendations
- White Polish: Essie “Blanc” – A classic white base.
- Light Blue Polish: China Glaze “Boho Blues” – A light blue for the marble effect.
- Gold Flakes: Small gold flakes for a touch of elegance.
- Toothpick: For swirling the colors together.
- Top Coat: CND “Vinylux Weekly Top Coat” – For a durable, glossy finish.
DIY Instructions
- Base Application: Apply a base coat, then a coat of white polish as the base. Let it dry.
- Marble Effect: Drop light blue polish and white polish onto the nail. Use a toothpick to gently swirl the colors together. Add gold flakes while the polish is still wet.
- Finish with Top Coat: Seal the design with a top coat to protect and shine.
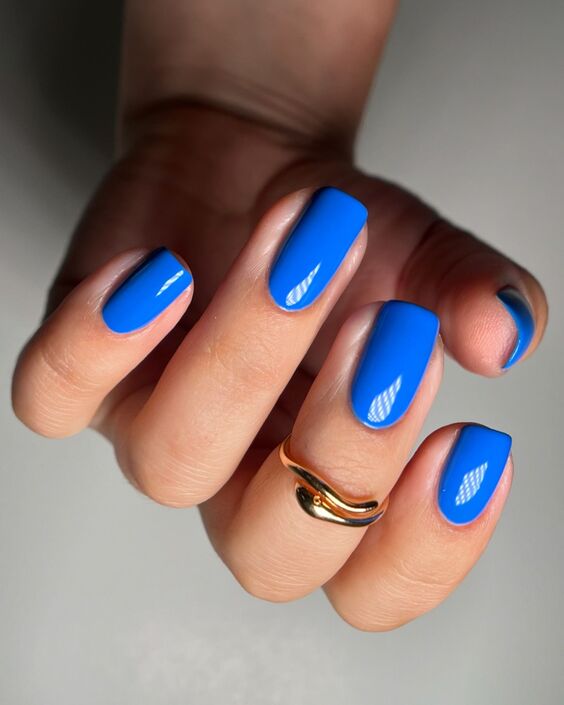
Vibrant Cobalt Blue
This vibrant cobalt blue manicure is a bold and lively choice, perfect for making a statement. The rich, deep blue color is eye-catching and modern, offering a fresh take on classic blue nails. The glossy finish enhances the color’s intensity, making it a great option for both casual and formal settings. The simplicity of the solid color allows the bold hue to take center stage, making it a versatile choice for any occasion.
Consumables and Recommendations
- Cobalt Blue Polish: Essie “Butler Please” – A striking cobalt blue with a creamy finish.
- Base Coat: OPI “Natural Nail Base Coat” – For a smooth application and protection.
- Top Coat: Sally Hansen “Mega Shine” Top Coat – For a high-shine finish and durability.
DIY Instructions
- Prepare Nails: Start with a base coat to protect your nails and ensure smooth polish application.
- Apply Cobalt Blue Polish: Apply two coats of cobalt blue polish for full, even coverage. Let each coat dry thoroughly.
- Top Coat Application: Finish with a top coat to enhance the shine and extend the wear of your manicure.
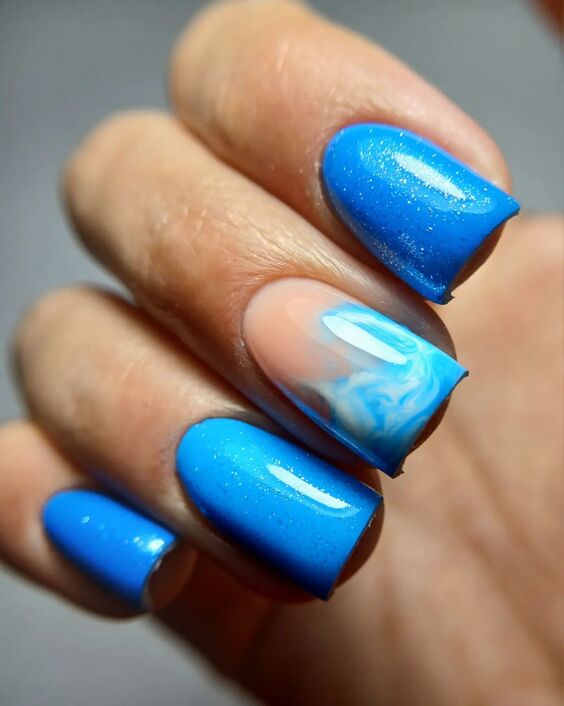
Vibrant Blue with Marble Accent
This manicure combines the boldness of vibrant blue with the elegance of a marble accent. The nails are primarily painted in a bright, electric blue, which is both eye-catching and dynamic. The standout feature is the marble accent nail, featuring a mix of white and light blue swirls on a clear base, creating a sophisticated and modern look. This design is perfect for those who want a mix of vibrant and subtle elements in their manicure, making it suitable for both casual and formal occasions.
Consumables and Recommendations
- Electric Blue Polish: OPI “Blue My Mind” – A vivid, electric blue for a bold statement.
- White Polish: Sally Hansen “White On” – For the marble effect.
- Light Blue Polish: Essie “Borrowed & Blue” – A soft blue for swirling.
- Thin Nail Art Brush: For creating the marble design.
- Top Coat: Revlon “Extra Life No Chip Top Coat” – For durability and shine.
DIY Instructions
- Base and Color Application: Start with a base coat, followed by two coats of electric blue polish on all nails except the accent nail. Let it dry.
- Marble Accent Nail: On the accent nail, apply a clear base, then drop small amounts of white and light blue polish. Use a thin brush to swirl the colors together gently.
- Top Coat: Finish with a top coat to protect the design and add a glossy finish.
Blue Spectrum and Abstract Art
This nail design features a spectrum of blue shades, creating a gradient effect across the nails. The color palette ranges from light pastel blue to a deep royal blue, with a playful abstract squiggle on the white accent nail. The combination of solid colors and abstract art adds a modern and artistic flair, making it an ideal choice for those who enjoy creative and unconventional nail designs. The use of different blue shades also makes this design versatile and suitable for various occasions.
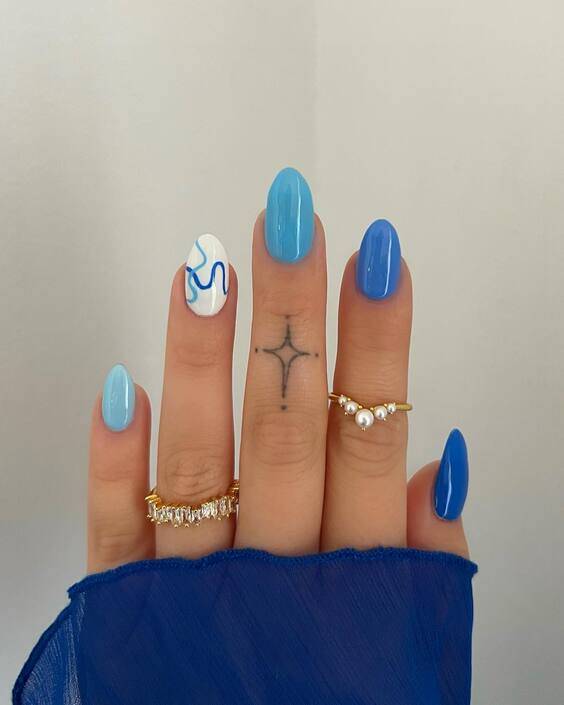
Consumables and Recommendations
- Pastel Blue Polish: OPI “It’s a Boy!” – A light, pastel blue.
- Bright Blue Polish: Essie “Butler Please” – A vibrant, cobalt blue.
- Royal Blue Polish: Sally Hansen “Pacific Blue” – A deep, rich blue.
- White Polish: OPI “Alpine Snow” – For the accent nail.
- Blue Nail Art Pen: For creating the abstract squiggle.
- Top Coat: Essie “Good to Go” Top Coat – For a quick-drying, glossy finish.
DIY Instructions
- Gradient Base: Apply a base coat, then paint each nail with a different shade of blue, starting from the lightest to the darkest. Allow each nail to dry completely.
- Abstract Accent: On the white accent nail, use the blue nail art pen to draw a playful squiggle or abstract design.
- Seal with Top Coat: Apply a top coat to seal the design and enhance the shine.
Delicate Blue Florals and Gold Accents
This delicate manicure features soft blue floral designs on a nude base, complemented by subtle gold accents. The design showcases a lovely blend of minimalistic and artistic elements, with tiny blue flowers and a single gold star detail. The nude base allows the blue flowers to stand out beautifully, while the gold accents add a touch of elegance and sophistication. This manicure is perfect for those who prefer a more understated yet stylish look, making it ideal for both everyday wear and special occasions.
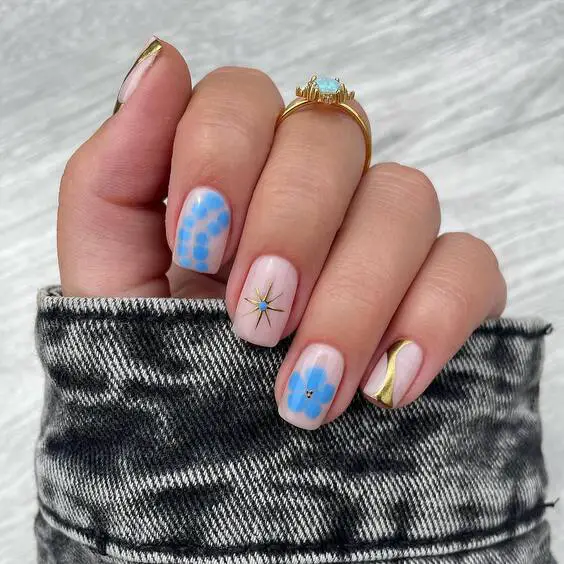
Consumables and Recommendations
- Nude Polish: OPI “Bubble Bath” – A sheer, soft nude base.
- Light Blue Polish: Essie “Find Me An Oasis” – For the floral designs.
- Gold Nail Art Pen: For adding subtle gold accents.
- Fine Detail Brush: For painting the floral designs.
- Top Coat: Zoya “Armor” Top Coat – For added protection and shine.
DIY Instructions
- Base Application: Start with a base coat, followed by a nude polish on all nails. Let it dry completely.
- Floral Design: Using a fine detail brush, paint small blue flowers on a few nails. Add a gold star accent with the gold nail art pen.
- Top Coat: Seal the design with a top coat to ensure durability and a glossy finish.
Delicate Blue Butterfly Accents
This exquisite nail design features a beautiful combination of soft white and pink with striking blue butterfly accents. The almond-shaped nails are painted with a subtle gradient from nude pink at the base to a pristine white at the tips. The standout element of this design is the detailed blue butterfly artwork on a few accent nails, adding a touch of whimsy and elegance. Gold beads are delicately placed at the cuticle line, providing a subtle, sophisticated finish. This design is perfect for those who love a mix of delicate and artistic elements, making it suitable for both special occasions and everyday wear.
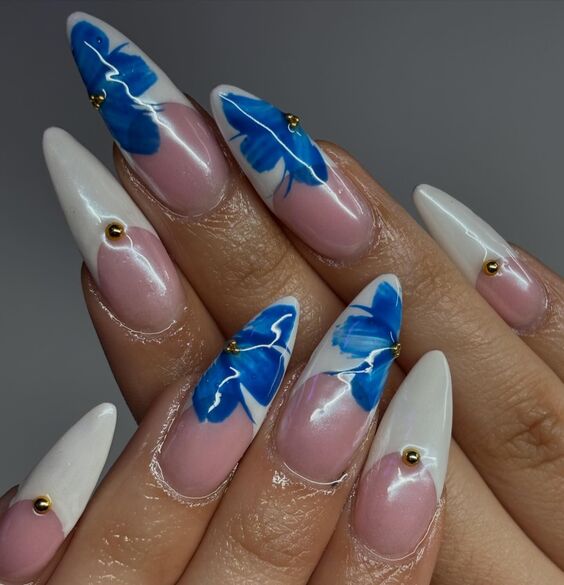
Consumables and Recommendations
- Nude Pink Polish: Essie “Ballet Slippers” – A classic nude pink for the base.
- White Polish: OPI “Alpine Snow” – A crisp white for the tips.
- Blue Nail Art Paint: For creating the butterfly details.
- Gold Beads: Small gold beads for a touch of elegance.
- Detail Brush: For precise painting of the butterfly designs.
- Top Coat: Sally Hansen “Miracle Gel” Top Coat – For a long-lasting, glossy finish.
DIY Instructions
- Base and Gradient Application: Start with a base coat, then apply the nude pink polish. Use a sponge to gently blend the white polish from the tips to create a gradient effect.
- Butterfly Artwork: With a detail brush, paint the blue butterfly accents on the desired nails. Allow the paint to dry completely.
- Adding Gold Beads: Apply a small amount of clear polish at the cuticle line and place the gold beads carefully. Secure them with a dotting tool.
- Top Coat: Finish with a top coat to protect the design and add a glossy finish.
In conclusion, blue nail colors offer a stunning array of options, from bold and vibrant shades to delicate pastels and intricate designs. Whether you’re seeking a subtle, everyday look or a show-stopping statement, there’s a blue hue to match every style and occasion. This versatile color can be both playful and sophisticated, making it a perfect choice year-round. With the right polish, tools, and a bit of creativity, you can easily achieve these beautiful blue nail designs at home. So, dive into the world of blue nails and let your manicure reflect your unique personality and flair!

