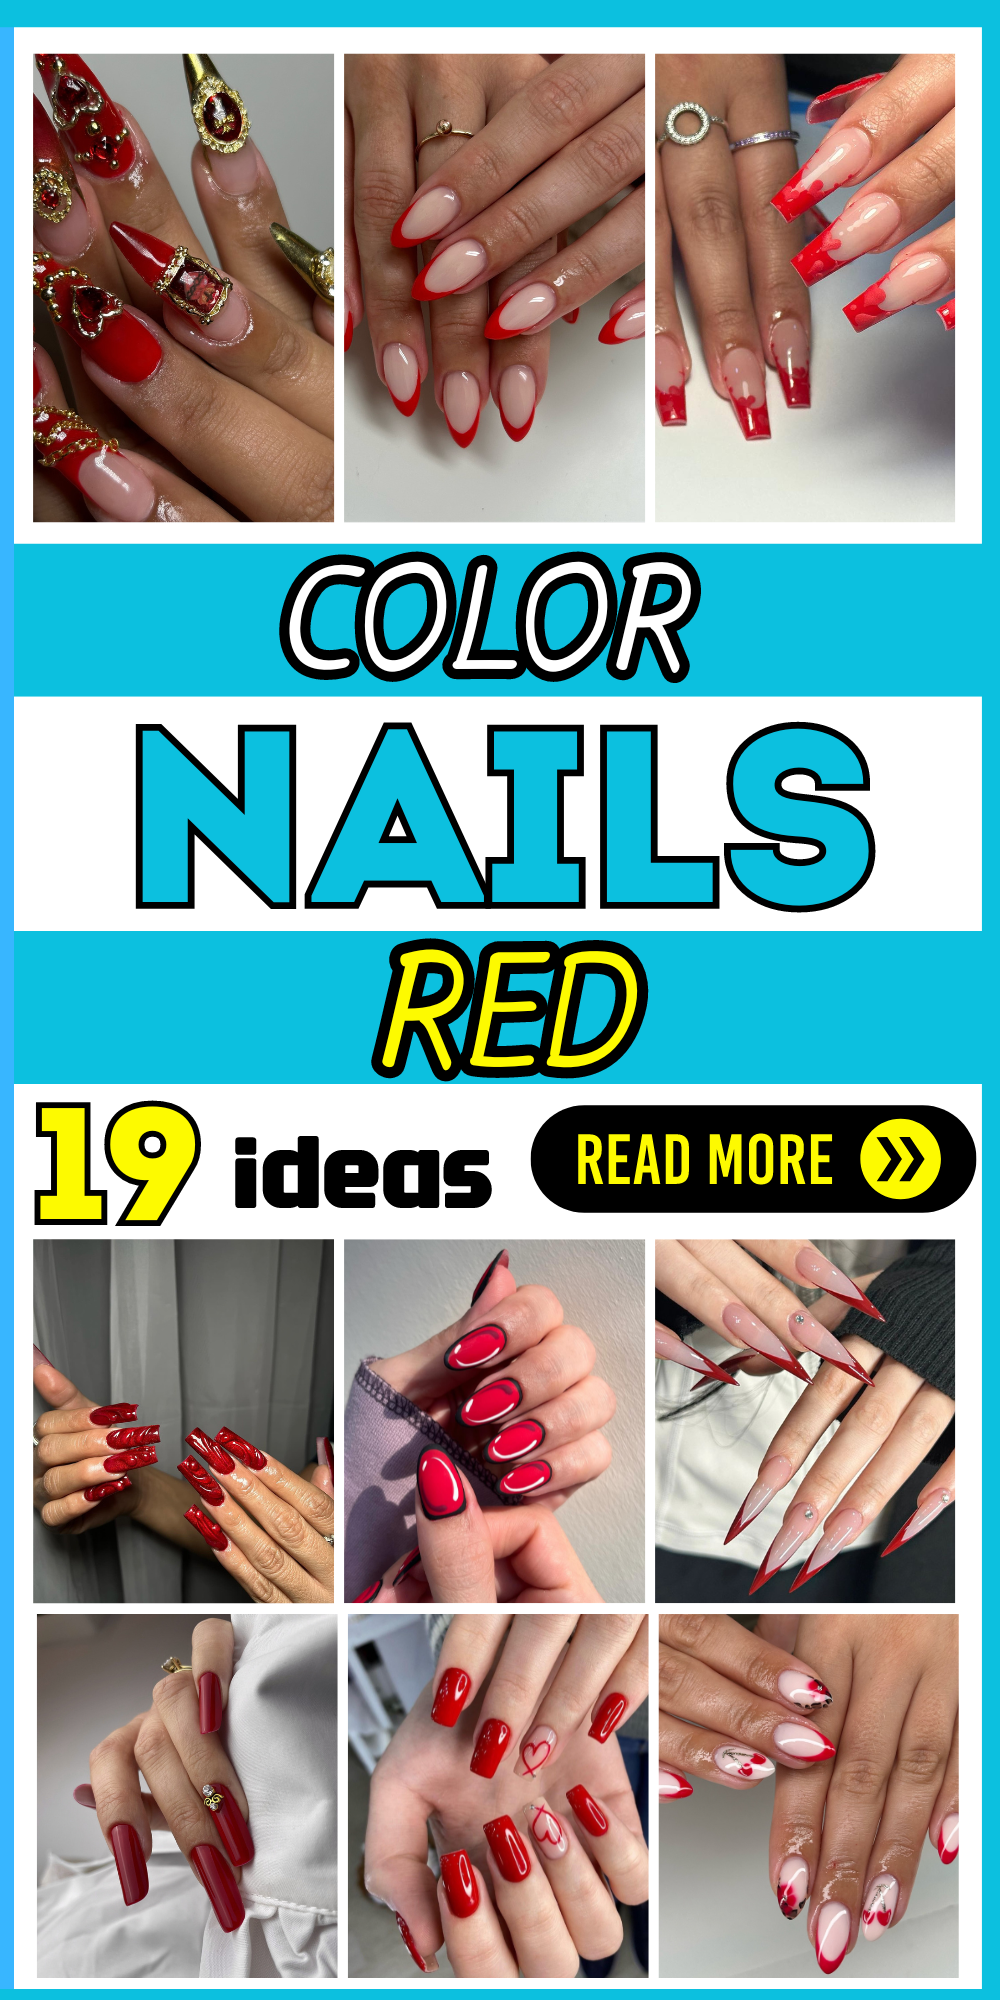
Are you looking for a bold and beautiful way to express your style through your nails? Red color nails are not just a statement of beauty—they are a declaration of confidence and allure. Whether it’s a glossy finish, a matte texture, or intricate art designs, red nails have a way of capturing attention and turning heads. Wondering how to elevate your red nail game or perhaps trying a new red design at home? Let’s dive into some of the most captivating red nail designs that could transform your nail art experience.
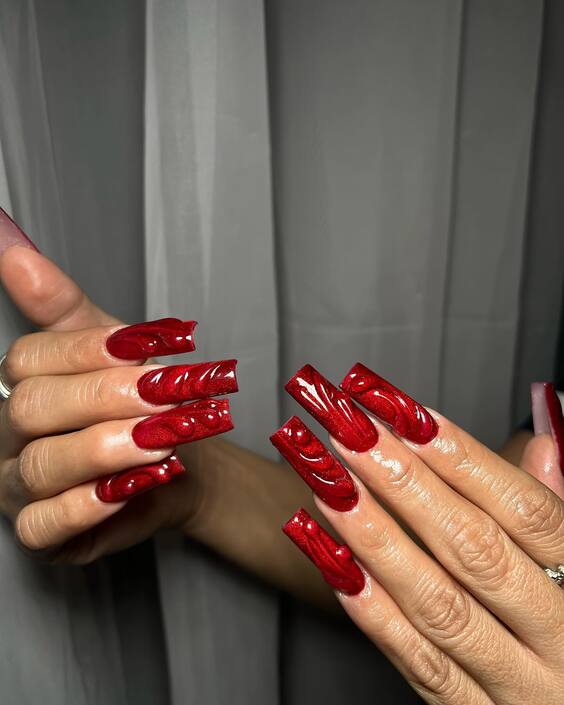
Glossy Red Swirls on Long Nails
These long, almond-shaped nails are coated in a lustrous, deep red polish, giving a classic yet bold look that’s perfect for any occasion. The swirls etched into the wet polish add a dynamic twist, making the nails not only a part of your outfit but a standout accessory. The gloss finish catches the light beautifully, enhancing the depth and richness of the red.
Materials and Recommendations
- Red Nail Polish: Choose a high-quality, deep red polish for a rich base.
- Top Coat Gloss: To achieve that enviable shine and protect the design.
- Fine Brush: For intricately etching swirls into the polish.
DIY Instructions
- Prep Your Nails: Clean, shape, and buff your nails.
- Base Coat: Apply a clear base coat to protect your nails.
- Apply Red Polish: Once the base is dry, apply two coats of red nail polish.
- Design the Swirls: While the second coat is still tacky, gently use a fine brush to etch swirl patterns.
- Top Coat: Seal your design with a glossy top coat for durability and extra shine.
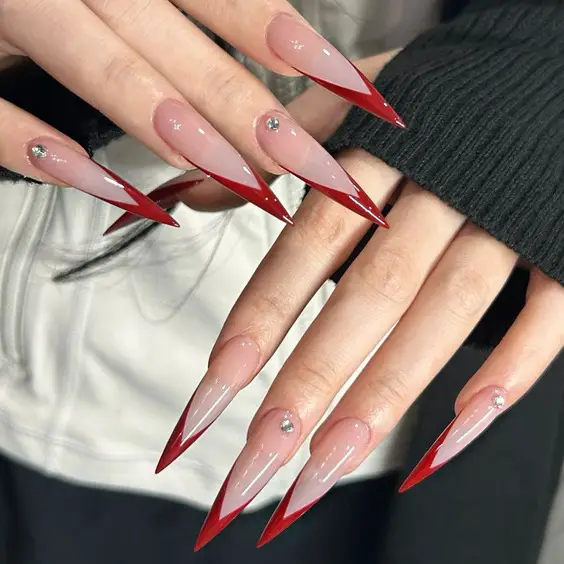
Gradient Red French Tip on Almond Nails
This modern take on the French tip features a smooth gradient that transitions from a pale pink at the base to a striking red at the tips. It’s a subtle yet trendy way of wearing red that combines the natural look of the nail with a pop of color at the tips, suitable for both casual and formal wear.

Materials and Recommendations
- Light Pink Polish: For the base.
- Red Nail Polish: For the tips.
- Sponge: To create the gradient effect.
- Top Coat: For a smooth finish.
DIY Instructions
- Apply Light Pink Polish: Start with a base of light pink polish.
- Create the Gradient: Dip a sponge in red polish and dab lightly starting from the tip, blending towards the middle.
- Clean Up: Use a small brush dipped in nail polish remover to clean the edges around your nails.
- Apply Top Coat: Finish with a clear top coat to merge the designs seamlessly.
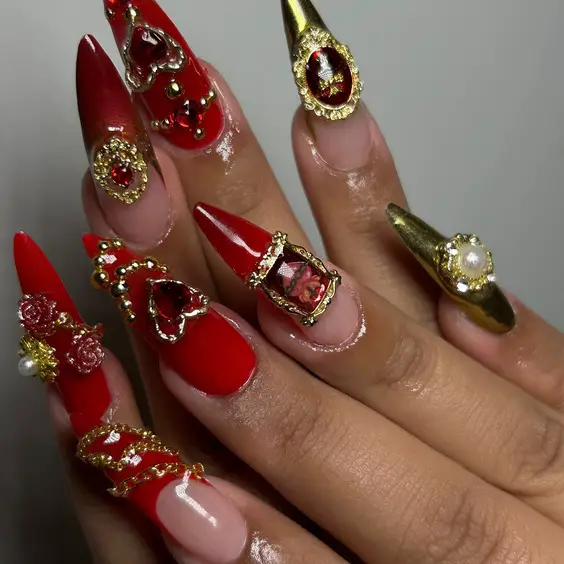
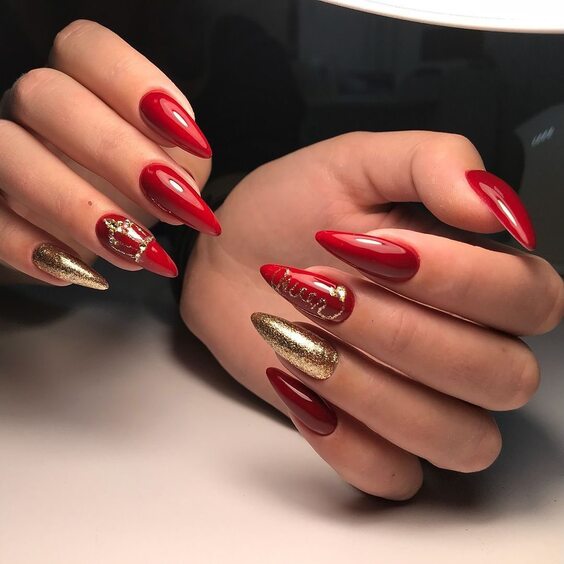
Baroque-Inspired Red and Gold Nails
These extravagant red and gold stiletto nails are a masterpiece, echoing Baroque opulence with their rich tones and ornate embellishments. Each nail presents a unique design featuring jewels, gold accents, and intricate details, making them perfect for special events or when you want to make a bold fashion statement.
Materials and Recommendations
- Red Nail Polish: A vibrant, classic red for the base.
- Gold Accents: Gold polish or thin gold stickers for detailing.
- Jewels and Pearls: Small stick-on pearls and jewels for embellishment.
- Top Coat: To secure the decorations in place.
DIY Instructions
- Apply Red Polish: Paint your nails with two coats of red polish.
- Add Gold Details: Once dry, add gold accents with polish or stickers.
- Embellish: Carefully place jewels and pearls on the nails.
- Seal with Top Coat: Apply a top coat to ensure everything stays put and adds shine.
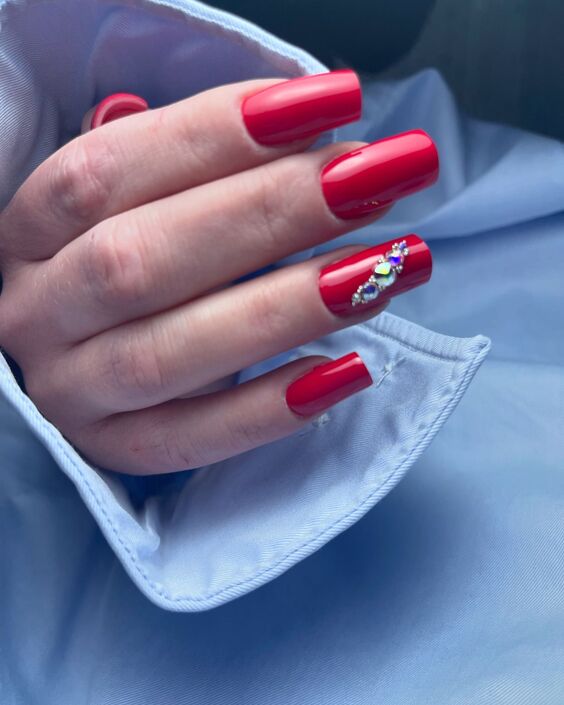
Classic Red with Gem Accents
This design exemplifies elegance with its sleek, glossy finish on square-cut nails, highlighted by a single nail adorned with gem accents. The bright red color provides a vivid backdrop for the delicate arrangement of rhinestones, creating a focal point that’s both luxurious and understated.
Materials and Recommendations
- Bright Red Nail Polish: A vibrant, high-gloss formula for the base.
- Rhinestones: A mix of sizes for dynamic visual interest.
- Nail Glue: To securely attach the gems.
DIY Instructions
- Apply Red Polish: Start with two coats of your chosen red polish for a deep, even color.
- Place Gems: Once the polish is dry, arrange the rhinestones on the ring finger using a dab of nail glue.
- Seal with Top Coat: Apply a top coat to protect the polish and secure the gems.
Red and Gold Glamour
This look marries the audacity of sharp stiletto nails with the richness of red and gold. The alternating nails of glossy red and shimmering gold offer a bold contrast, while detailed art on the accent nails adds sophistication. This design is perfect for festive seasons or making a glamorous statement.
Materials and Recommendations
- Metallic Gold Polish: For a mirror-like finish.
- Deep Red Polish: To contrast beautifully with the gold.
- Detailing Brush: For precision in creating intricate patterns.
DIY Instructions
- Alternate Colors: Paint alternate nails with red and gold polish.
- Add Details: Use a fine brush to add ornate patterns on one or two accent nails.
- Top Coat: Finish with a glossy top coat to enhance durability and shine.
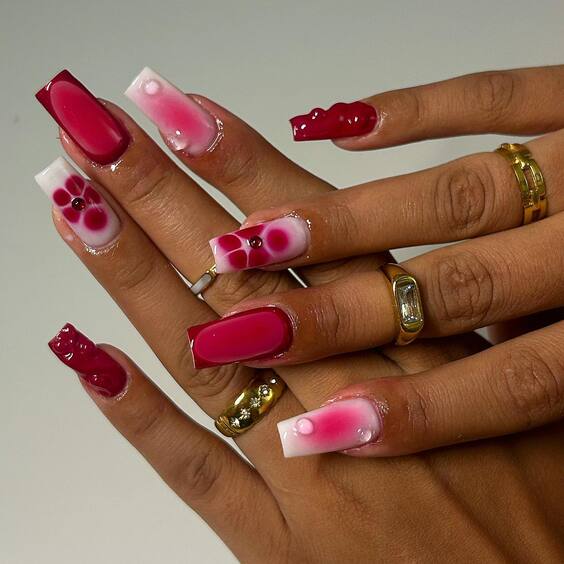
Creative Red and Pink Ombre
This creative ombre design transitions from a sultry deep red to a soft pink, encapsulating a playful yet chic aesthetic. The glossy finish and the unique drip effect add a modern twist to the ombre technique, making it a standout style.
Materials and Recommendations
- Pink and Red Nail Polishes: For the gradient effect.
- Sponge: To blend the colors seamlessly.
- Clear Glossy Top Coat: For a smooth, protective finish.
DIY Instructions
- Prepare the Base: Apply a light pink polish as the base color.
- Create the Ombre: Apply red polish to a sponge and dab gently over the base, blending as you move towards the nail tip.
- Finish with Top Coat: Apply a clear top coat for a glossy finish and to protect the design.
Whimsical Cherry Blossom Design
This charming design captures the essence of spring with cherry blossom motifs delicately painted over a translucent pink base. The red cherry fruits add a pop of color, while the green leaves provide a fresh contrast, making this design perfect for seasonal transitions or as a cheerful everyday look.
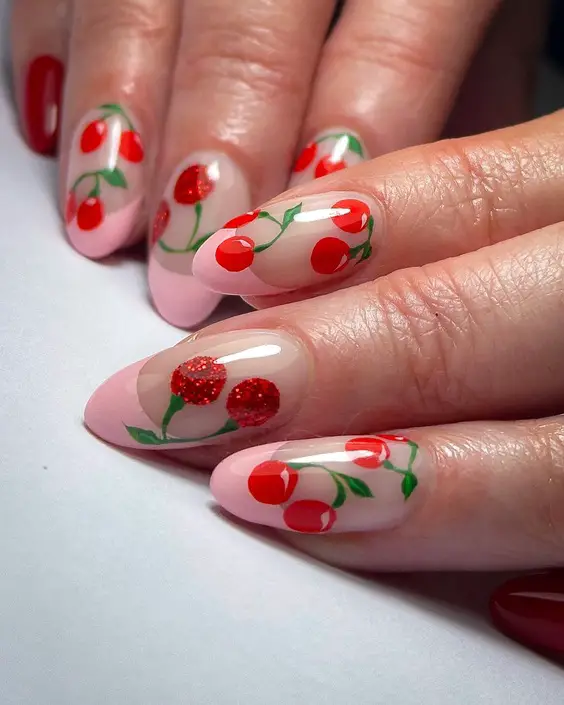
Materials and Recommendations
- Translucent Pink Polish: For a subtle, natural-looking base.
- Red and Green Acrylic Paint: For the cherries and leaves.
- Fine Detailing Brush: For precise brush strokes.
DIY Instructions
- Base Preparation: Apply two coats of translucent pink polish.
- Paint Cherry Motifs: Use a fine brush to add cherry designs in red and green.
- Seal with Top Coat: Apply a clear top coat to protect the artwork and enhance the overall look.
Red Marble Art
This striking red marble design showcases a bold aesthetic with swirling patterns of red and white. The marble effect is achieved using a water-marbling technique that results in each nail having a unique pattern. This style is particularly suited for those looking to make a dramatic statement.
Materials and Recommendations
- White and Red Nail Polishes: For the marble effect.
- Toothpick or Dotting Tool: For swirling the polish.
- Water Container: For the marbling process.
DIY Instructions
- Prepare the Water Container: Fill it with room temperature water.
- Drop Polishes: Alternately drop red and white polishes into the water.
- Create Patterns: Use a toothpick to swirl the colors gently.
- Dip Nails: One by one, dip your nails into the patterned polish surface.
- Finish with Top Coat: After drying, apply a top coat for a smooth finish.
Modern Red and White Design
This modern nail design combines stark white and deep red polishes in a geometric pattern that’s both eye-catching and stylish. The incorporation of dots and linear designs adds an artistic touch, suitable for avant-garde fashion enthusiasts or anyone looking to add a graphic element to their nail art.
Materials and Recommendations
- White and Red Nail Polishes: For the base colors.
- Striping Tape: For creating clean lines.
- Dotting Tool: For perfect dots.
DIY Instructions
- Apply Base Colors: Alternate between white and red on different nails.
- Design Patterns: Use striping tape to lay out lines and patterns.
- Add Details: Use a dotting tool to place dots strategically.
- Top Coat Application: Seal everything with a clear top coat for longevity and shine.
Starry Floral on Red
This sophisticated design features a bold red base with a translucent overlay, adorned with starry white flowers and golden centers. The combination of vibrant red and delicate floral details provides a look that is both striking and refined, ideal for formal events or as a festive season special.
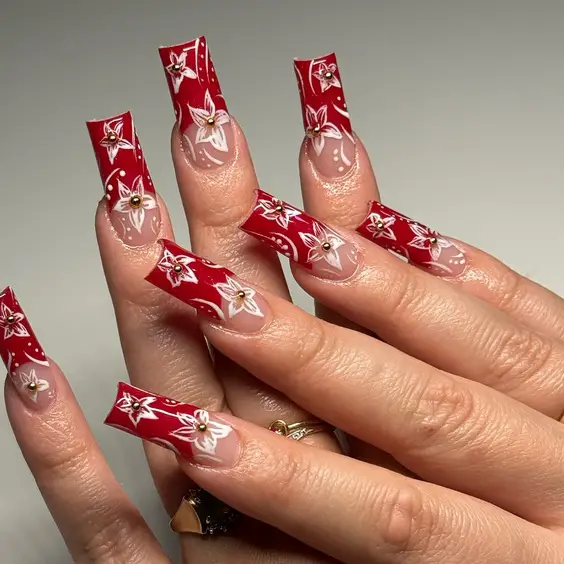
Materials and Recommendations
- Red Base Polish: For a vivid, opaque foundation.
- White and Gold Paint: For the floral accents.
- Fine Brush: For detailed petal and center designs.
DIY Instructions
- Apply Red Base: Begin with two coats of red polish for a solid color.
- Paint Flowers: Use a fine brush to draw star-shaped flowers in white and add gold centers.
- Top Coat for Protection: Seal with a glossy top coat to enhance the depth and longevity of the art.
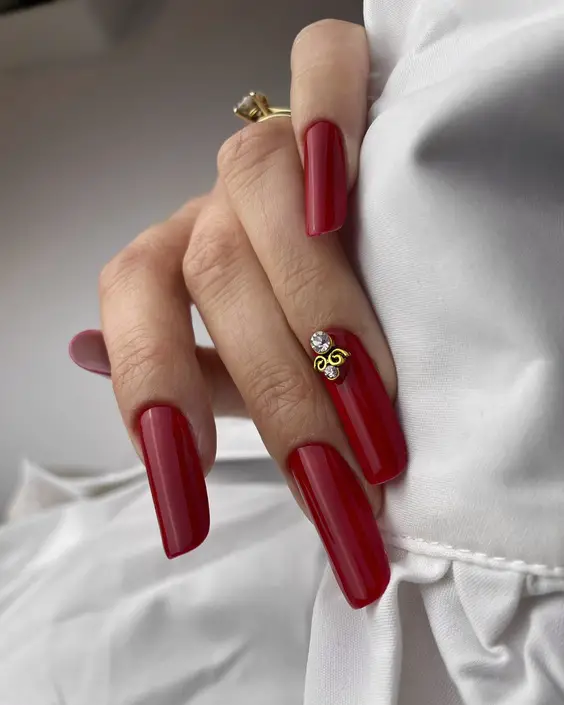
Classic Red Gloss
This classic design exudes timeless elegance with its deep, glossy red finish. The high shine on the nails reflects light beautifully, making it a perfect choice for both everyday glamour and special occasions. Simple yet profoundly stylish, this manicure complements any outfit and remains a favorite among red nail enthusiasts.
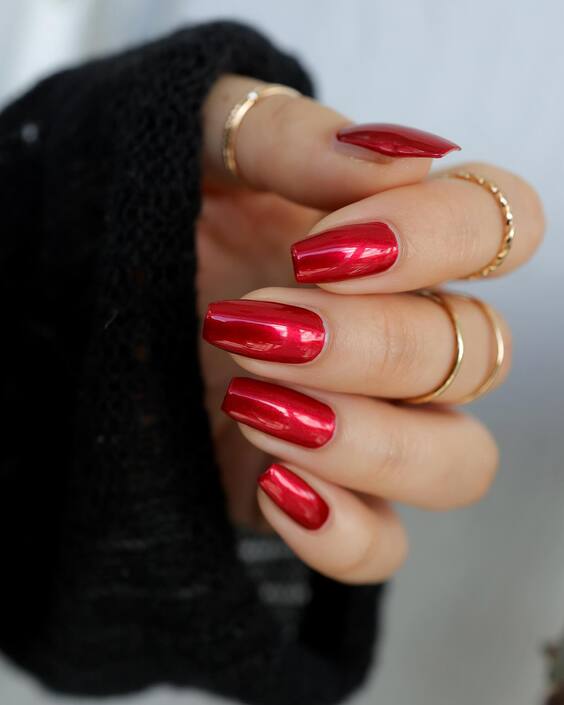
Materials and Recommendations
- High-Gloss Red Polish: To achieve a mirror-like finish.
- Top Coat: For added shine and durability.
DIY Instructions
- Base Coat: Apply a clear base coat to protect your nails.
- Red Polish Application: Add two coats of glossy red polish for full coverage.
- Seal with Top Coat: Finish with a high-gloss top coat for extra shine and protection.
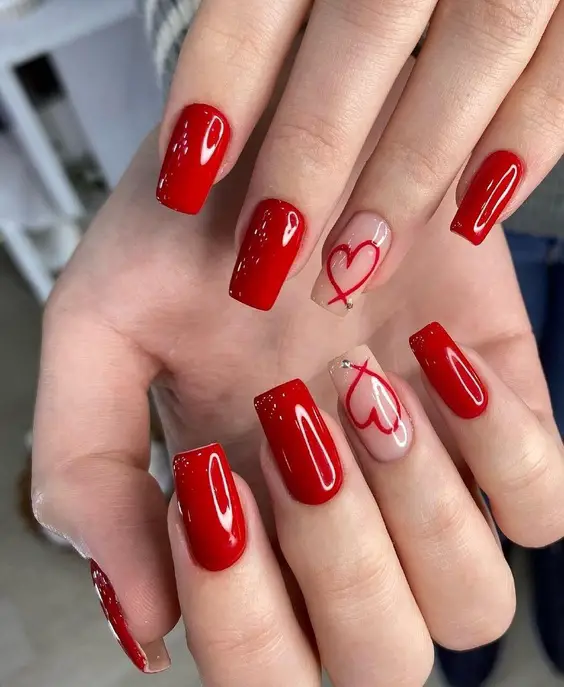
Valentine’s Day Special
Celebrating love and romance, this nail art is perfect for Valentine’s Day, featuring pink nails with red hearts and accents. The playful yet chic design combines soft pink as the base with vibrant red details, creating a sweet and loving theme suitable for the occasion or simply to express affection any day.
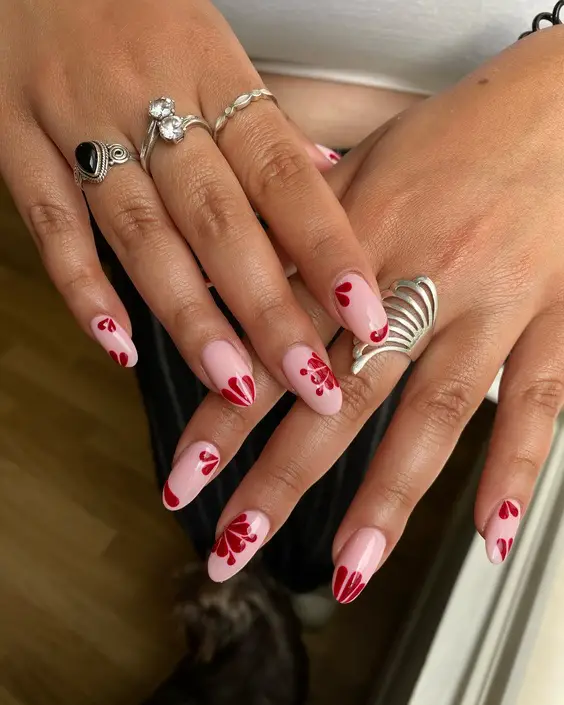
Materials and Recommendations
- Soft Pink Polish: For the base.
- Red Nail Paint: For heart accents.
- Detailing Tool or Brush: For precise heart shapes.
DIY Instructions
- Apply Pink Base: Start with two coats of soft pink polish.
- Design Hearts: Use a detailing tool to add red hearts and decorative accents.
- Top Coat Application: Seal the design with a clear top coat for a smooth finish and durability.
Abstract Red and White Art
This nail design blends modern artistry with classic elegance, featuring abstract shapes and curves in red on a soft white background. Each nail is a unique canvas, displaying different creative strokes that symbolize a free-spirited approach to traditional nail art.
Materials and Recommendations
- White Base Polish: For a clean and subtle backdrop.
- Red Nail Paint: To create the abstract designs.
- Fine Brush: For detailed and precise lines.
DIY Instructions
- Apply White Base: Start with a white base to ensure that the red designs pop.
- Sketch Designs: Use a fine brush to create abstract red patterns on each nail.
- Finish with Top Coat: Apply a top coat to protect the designs and enhance the gloss.
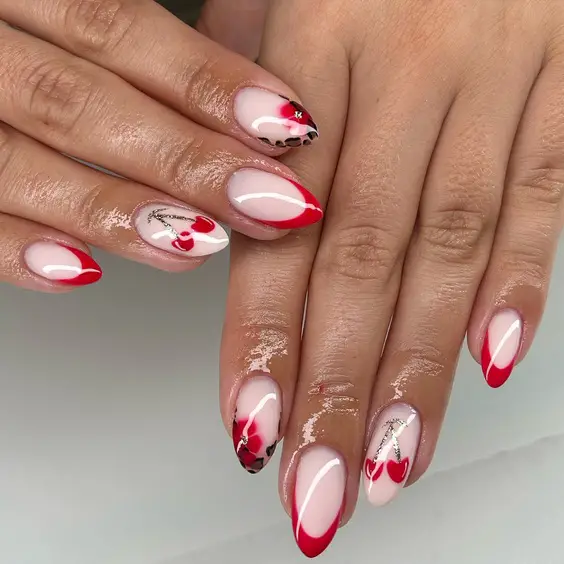
Dramatic Red Heart Tips
Embrace drama with these long, clear nails featuring bold red tips sculpted into heart shapes. This look is perfect for romantic occasions or as a statement piece at a fashion-forward event. The transparent nail section subtly showcases the natural nail, while the red heart tips draw all the attention.
Materials and Recommendations
- Clear Polish: For the base of the nail.
- Red Acrylic: To sculpt the heart tips.
- Top Coat: To ensure durability and shine.
DIY Instructions
- Prepare Nails: Apply a clear polish as the base.
- Sculpt Hearts: Use red acrylic to form the heart shapes at the tips.
- Seal with Top Coat: Finish with a top coat for a seamless blend and high gloss.
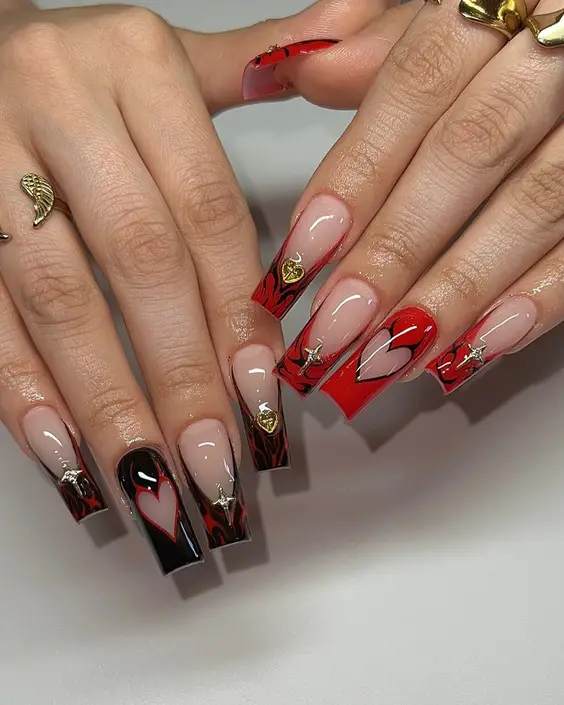
Playful Red Hearts Design
This cheerful design features vibrant red hearts over a clear base, providing a playful yet chic look. It’s perfect for expressing love and joy, whether for a special occasion or as a daily boost of happiness. Simple in execution yet bold in visual impact, these nails are sure to charm.
Materials and Recommendations
- Clear Base Coat: To showcase the natural beauty of the nails.
- Red Nail Paint: For the hearts.
- Detailing Tool: For precise heart shapes.
DIY Instructions
- Apply Clear Base: Start with a clear base coat.
- Paint Hearts: Use a detailing tool to paint small red hearts.
- Apply Top Coat: Finish with a clear top coat to protect the design and add shine.
Sophisticated Red with Golden Charm
This manicure combines a smooth, deep red finish with a single accent nail adorned with a golden charm, making it ideal for elegant occasions. The simplicity of the color with the standout charm offers a balance of understated grace and luxury.
Materials and Recommendations
- Deep Red Polish: For a rich and polished look.
- Gold Charms: As elegant nail jewelry.
- Clear Top Coat: For lasting shine and protection.
DIY Instructions
- Apply Red Polish: Paint all nails except the accent nail with two coats of deep red.
- Attach Charm: Apply a small dab of nail glue on the accent nail and place the gold charm.
- Finish with Top Coat: Apply a clear top coat over all nails to secure the charm and enhance the polish’s gloss.
Sharp Red and Transparent Edges
This design is a bold mix of sharp, geometric red tips on a transparent base, adorned with subtle silver gems. The stark contrast between the red and clear polish gives these nails a modern, cutting-edge look, perfect for fashion-forward individuals.
Materials and Recommendations
- Red Nail Paint: For the tips.
- Clear Base Polish: To maintain the transparent look.
- Silver Gems: For a touch of sparkle.
- Top Coat: To seal and protect the design.
DIY Instructions
- Prepare Base: Apply a clear base coat to all nails.
- Paint Tips: Carefully paint the tips with red, creating sharp, angular shapes.
- Attach Gems: Place a small gem at the base of each nail.
- Apply Top Coat: Seal with a clear top coat for a glossy finish and to secure the gems.
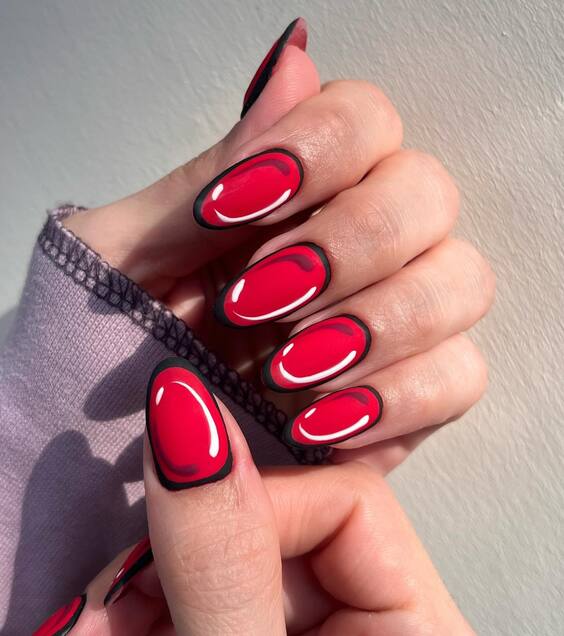
Modern Red Oval Art
This artistic design features ovals of vibrant red enclosed by a sleek black border, set against a clear background. The contrast and the oval shapes give these nails a contemporary art gallery feel, making them exceptionally unique and eye-catching.
Materials and Recommendations
- Red and Black Nail Paint: For the main art.
- Clear Base Coat: To showcase the design clearly.
- Fine Brush: For precision in outlining.
DIY Instructions
- Base Preparation: Start with a clear base coat.
- Draw Ovals: Use red paint to draw oval shapes on each nail.
- Outline in Black: Carefully outline each red oval with black paint for definition.
- Finish with Top Coat: Apply a top coat to protect the design and add shine.
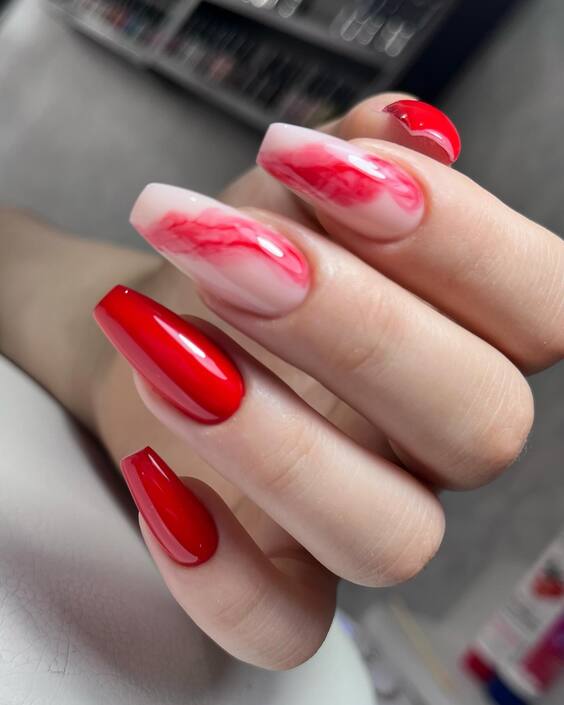
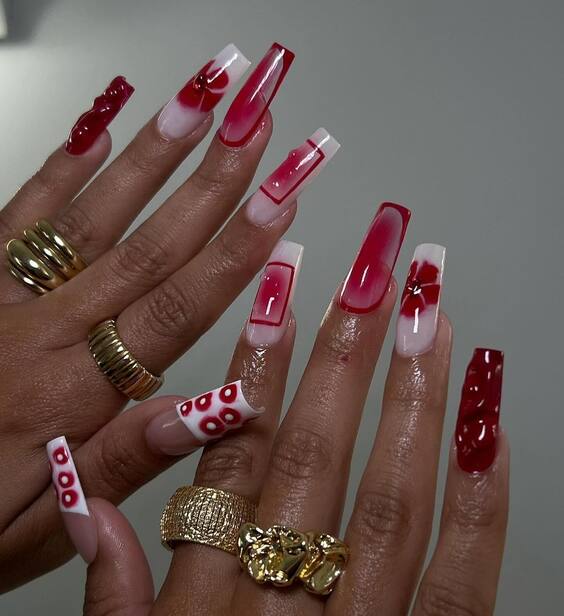
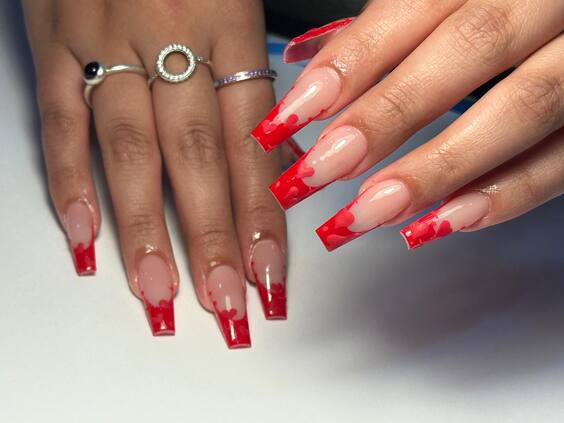
Red Drip Effect on Transparent Nails
This striking nail design features a clear base with a bold red drip effect that resembles paint or blood dripping from the tips. It’s a creative and artistic expression that plays with negative space and color dynamics, ideal for those who enjoy standout nail art that pushes the boundaries of traditional aesthetics.
Materials and Recommendations
- Clear Base Polish: For the transparent foundation.
- Red Nail Paint: To create the drip effect.
- Detailing Brush: For precise drip lines.
DIY Instructions
- Apply Clear Base: Start with a clear polish on all nails to prepare the canvas.
- Paint Red Drips: Use a detailing brush to apply red polish at the tips, dragging it downward to mimic dripping.
- Finish with Top Coat: Seal the design with a top coat to ensure durability and enhance the glossy finish.
Red nail art is not just a style choice—it’s a powerful form of self-expression that spans the spectrum from classic elegance to bold, artistic statements. Whether adorned with simple gloss, intricate designs, or avant-garde elements, red nails remain a perennial favorite that can elevate any look. This collection of designs demonstrates the versatility and enduring appeal of red nail art, offering inspiration for everyone from the minimalist to the trendsetter. Embracing red in your nail art repertoire ensures a touch of glamour and confidence that never goes unnoticed.