20 Trending Nail Colors 2024: Explore Bold Designs & Elegant Styles
Clear Abstract Geometry
The first standout style of the season plays with clear abstract geometry, encapsulating a modern art aesthetic right at your fingertips. This design uses a base of sleek, clear polish segmented by sharp lines of soft grey, contrasted boldly with bright orange beads nestled at the intersections. It’s a visual metaphor for the crisp beginnings of 2024, perfect for someone who embraces bold statements and minimalist chic.
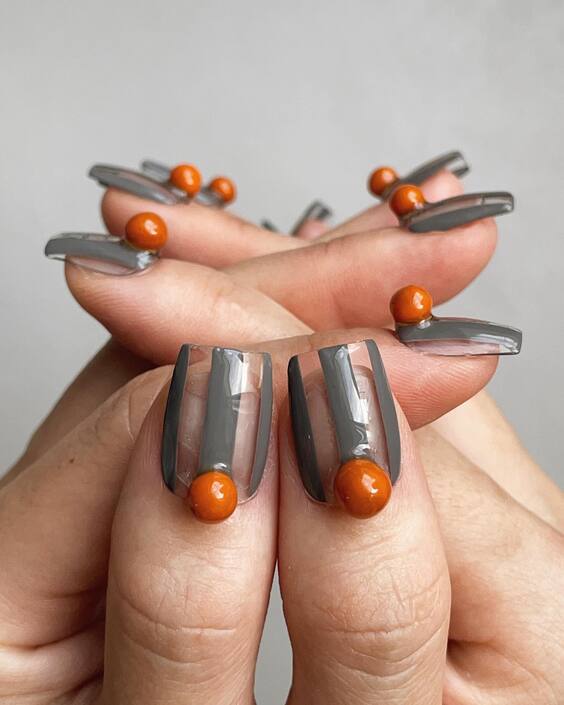
- OPI Clear Polish – for the perfect clear base
- Essie’s “Power Clutch” – for the grey stripes
- Orange Nail Beads – for that pop of color
- Recommendations: Apply the beads while the polish is tacky to ensure they stay through your busy days.
DIY Your Geometric Nails
- Start with two coats of OPI’s Clear Polish for a glossy, transparent base.
- Once dry, tape off sections to paint Essie’s “Power Clutch” for precise, clean lines.
- Add a drop of nail glue where you want your beads, then place an orange bead at each intersection.
- Finish with a top coat to seal everything in place and add extra shine.
Playful Polka Dots
Next, we dive into a playful realm with nails that feature vibrant blue polka dots over a mix of blue and soft pink bases. The cheerful polka dots, reminiscent of the early blooms in Spring 2024, provide a nostalgic yet fresh vibe, perfect for casual outings and spring picnics.
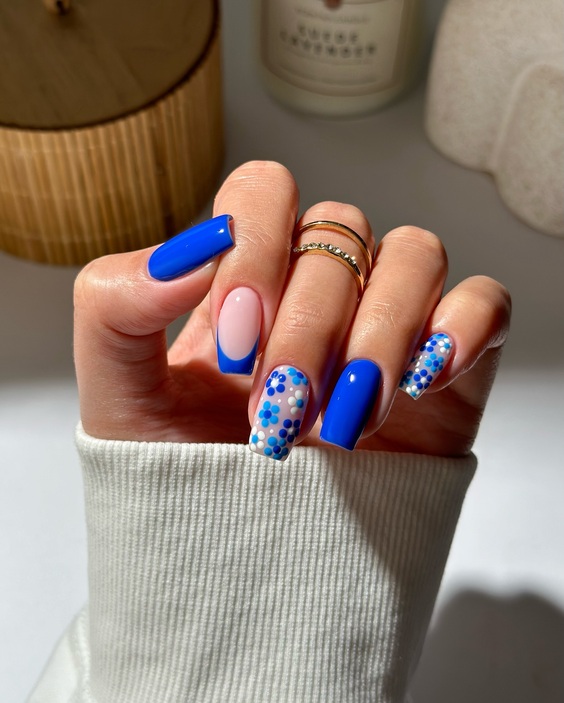
- Sally Hansen’s “Pacific Blue” – for the vibrant blue base
- OPI’s “Bubble Bath” – for the soft pink accent
- White and Blue Dotting Tools – for the perfect dot
- Recommendations: Use a fine dotting tool for more precise dot placement.
How to Achieve Polka Dot Perfection
- Paint your nails with two coats of Sally Hansen’s “Pacific Blue,” using OPI’s “Bubble Bath” on the accent nails.
- Once dry, use a dotting tool dipped in white to create uniform dots on the blue base and blue dots on the pink base.
- Apply a clear top coat to protect your design and give it a professional glossy finish.
Festive Floral Fiesta
Our final look brings a festive floral fiesta to your fingertips, blending bright pinks with touches of orange, gold, and blue floral accents. It’s a celebration of the summer season, echoing the vibrant energy of 2024’s summer festivals.
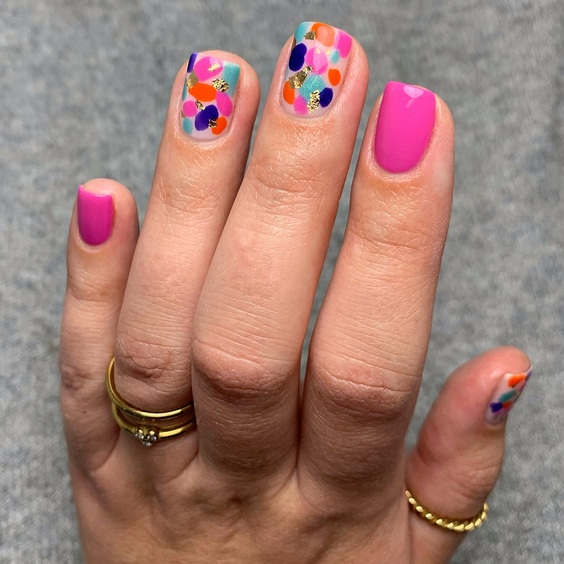
- Essie’s “Fiesta” – for the bright pink base
- Metallic Nail Stickers – for easy floral accents
- Gold Rhinestones – to add a touch of elegance
- Recommendations: The stickers are easier to manage and last longer with an overcoat.
Create Your Floral Masterpiece
- Apply two coats of Essie’s “Fiesta” for a bold pink base.
- Once dry, strategically place metallic nail stickers to create a floral pattern.
- Add a gold rhinestone at the center of each floral sticker for a glamorous touch.
- Seal with a top coat for durability and extra gloss.
Vivid Summer Blooms
The vibrant interplay of red and blue with stark black accents brings a dynamic summer vibe to your nails. This design features bold red as the base, overlaid with intricate blue flowers and connected by black lines, making a statement piece for any summer event in 2024.
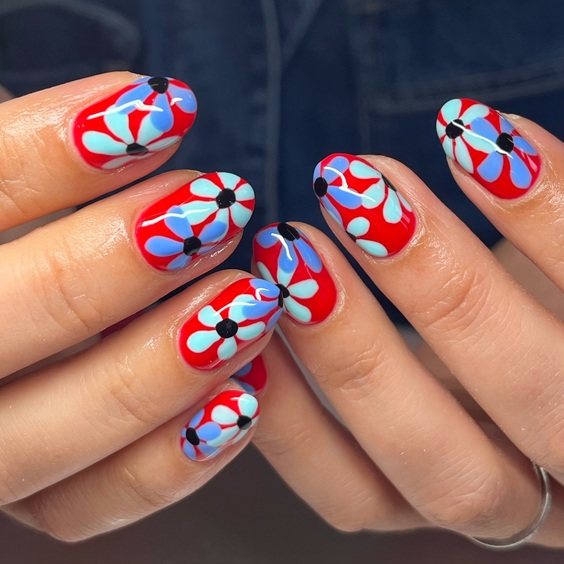
- Essie’s “Really Red” – for the fiery red base
- OPI’s “Blue My Mind” – for the floral details
- Black Nail Art Pen – for the fine connecting lines
- Recommendations: Ensure each layer is completely dry before applying the next to prevent smudging.
How to Paint Your Summer Blooms
- Apply two coats of Essie’s “Really Red” for a vibrant base.
- Use a thin brush to draw blue flowers with OPI’s “Blue My Mind.”
- Connect the flowers with fine lines using a black nail art pen.
- Finish with a clear top coat to enhance the colors and ensure longevity.
Soft Geometric Pastels
Embrace the softness of spring with these pastel pink and mint nails, adorned with geometric patterns and abstract lines. This design is perfect for a fresh, understated look that echoes the softness of early Spring 2024.
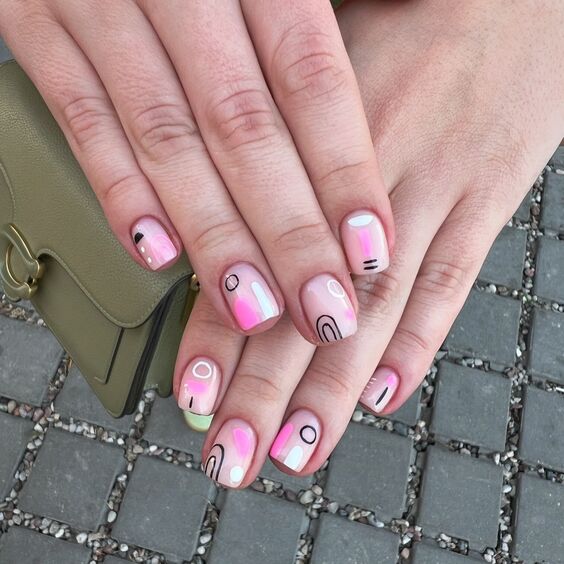
- OPI’s “Mod About You” – for the pastel pink base
- Essie’s “Mint Candy Apple” – for the mint accents
- Black and White Nail Art Pens – for detailed line work
- Recommendations: Use tape for sharp, clean lines in your geometric designs.
Creating Soft Geometric Pastels
- Start with two coats of OPI’s “Mod About You” as the base.
- Add geometric accents with Essie’s “Mint Candy Apple.”
- Detail the design with black and white nail art pens for abstract lines.
- Seal the look with a top coat for a smooth, durable finish.
Lavender Dreams
This design showcases a lovely blend of lavender and white, featuring alternating solid and patterned nails. The addition of playful leopard spots and sculpted elements makes it a perfect choice for Now and the upcoming 2024 winter season.
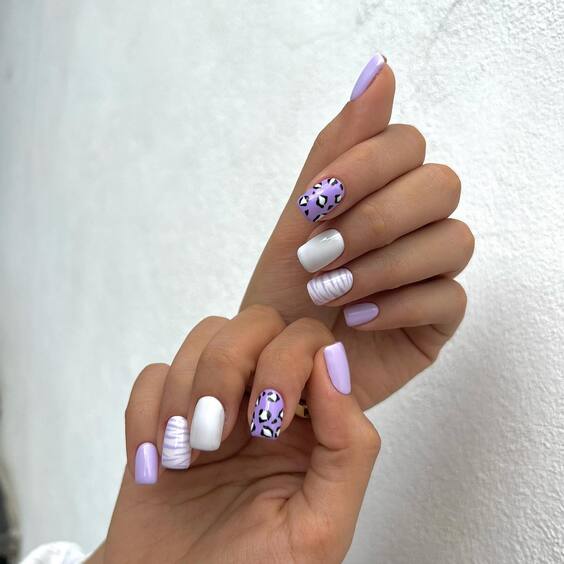
- Sally Hansen’s “Lacey Lilac” – for the lavender base
- White Sculpting Gel – for raised patterns and full coverage
- Purple Nail Art Pen – for leopard details
- Recommendations: The sculpting gel requires patience; allow ample drying time for the best results.
Crafting Your Lavender Dreams
- Paint alternating nails with Sally Hansen’s “Lacey Lilac” and white sculpting gel.
- Add leopard spots with a purple nail art pen on the lavender nails.
- Sculpt lines and patterns on the white nails using the same gel.
- Complete your design with a protective top coat for a lasting finish.
Chic Animal Print
Animal print makes a bold return in 2024, especially with this chic interpretation combining white, black, and lavender. The alternating pattern of animal print and solid colors offers a fashionable nod to both classic and modern aesthetics, making it a top pick for Now and 2024.
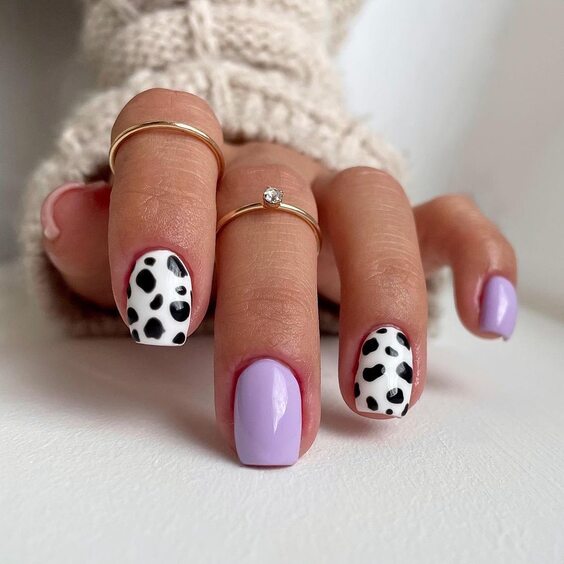
- Essie’s “Lilacism” – for the solid lavender nails
- White and Black Nail Polish – for the animal print
- Recommendations: For a smoother finish on the animal print, use a fine detail brush.
How to Achieve This Animal Print
- Paint alternating nails with Essie’s “Lilacism” and white polish.
- On the white nails, create black spots and patches to mimic animal print.
- Use a thin brush to ensure the edges of your animal prints are crisp and detailed.
- Apply a top coat to seal the design and add a glossy finish.
Neon French Tips
Embrace the resurgence of French tips with a twist by incorporating neon yellow edges over a natural pink base. This design reflects the vibrant energy of the 2024 summer and is perfect for adding a pop of color to any outfit.
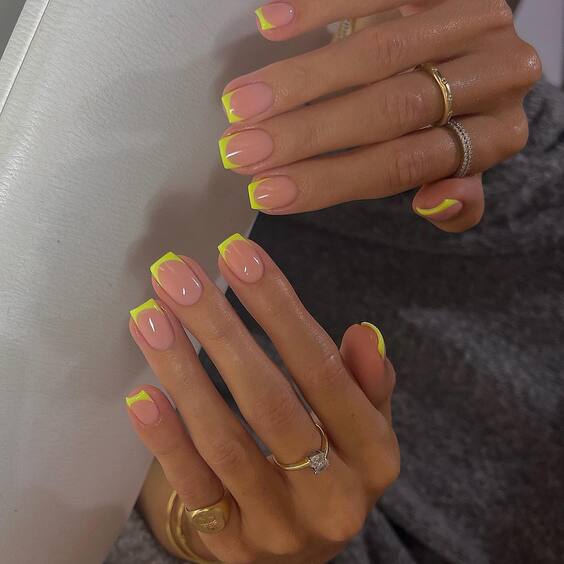
- OPI’s “Need Sunglasses?” – for the neon yellow tips
- Sally Hansen’s “Pink Slip” – for the subtle pink base
- Recommendations: Use tip guides or tape for precise and clean neon lines.
Crafting Neon French Tips
- Apply Sally Hansen’s “Pink Slip” as the base color.
- Once dry, place tip guides at the edge of your nails and apply OPI’s “Need Sunglasses?” for the neon tips.
- Remove the guides immediately after painting to ensure sharp lines.
- Finish with a clear top coat for a long-lasting vibrant look.
Swirled Pink Delight
This nail design features a delightful mix of pink swirls on a white and pink base, giving off a fun and artistic vibe. It’s a fantastic choice for expressing personality and creativity, ideal for the lively seasons of 2024 Spring and Summer.
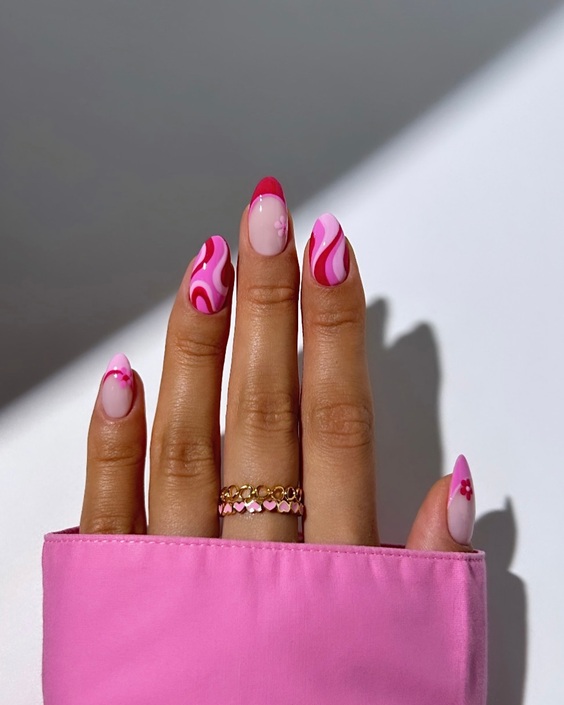
- Essie’s “Blanc” and “Pink Diamond”** – for the base layers
- Red and Pink Nail Art Pens – for the swirl details
- Recommendations: Use a dotting tool to start the swirl and drag with a fine brush to create the fluid motion.
How to Create Swirled Pink Delight
- Paint the base with alternating nails of white and light pink using Essie’s “Blanc” and “Pink Diamond.”
- Using red and pink nail art pens, create swirled patterns starting from a central point.
- Use a fine brush to extend and blend the swirls seamlessly.
- Seal everything with a top coat to ensure the art stays beautiful through the season.
Subtle Spring Florals
This design breathes a whisper of spring with its soft white base accented by delicate pink floral designs. It’s ideal for those seeking a subtle yet stylish look as we transition into the soft blooms of Spring 2024.
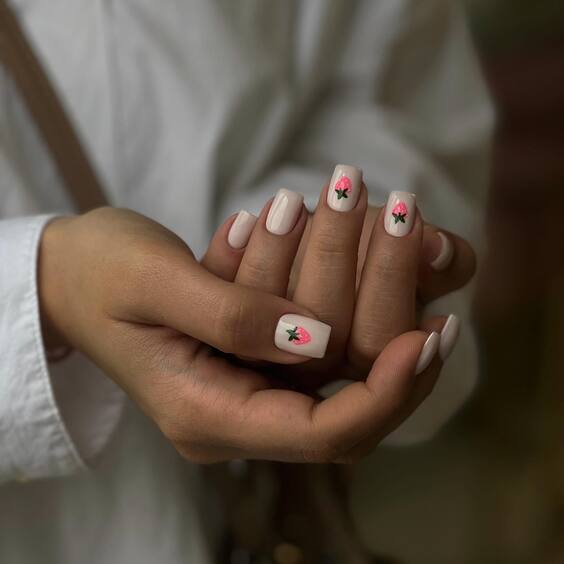
- Essie’s “Blanc” – for the pure white base
- Pink and Green Nail Art Pens – for the floral accents
- Recommendations: Use a very fine brush or a toothpick for the intricate floral details.
How to Create Subtle Spring Florals
- Start with two coats of Essie’s “Blanc” for a clean, crisp base.
- Carefully draw small pink flowers and green leaves using the nail art pens.
- Add subtle touches of yellow at the center of the flowers for a pop of color.
- Finish with a top coat to enhance the delicate art and protect your design.
Eccentric Eyes and Stars
This quirky design features a mix of eye patterns and celestial motifs on a clear base, perfect for those who love to make a bold fashion statement. The array of detailed art makes it a standout for 2024, capturing the playful and imaginative spirit of the year.
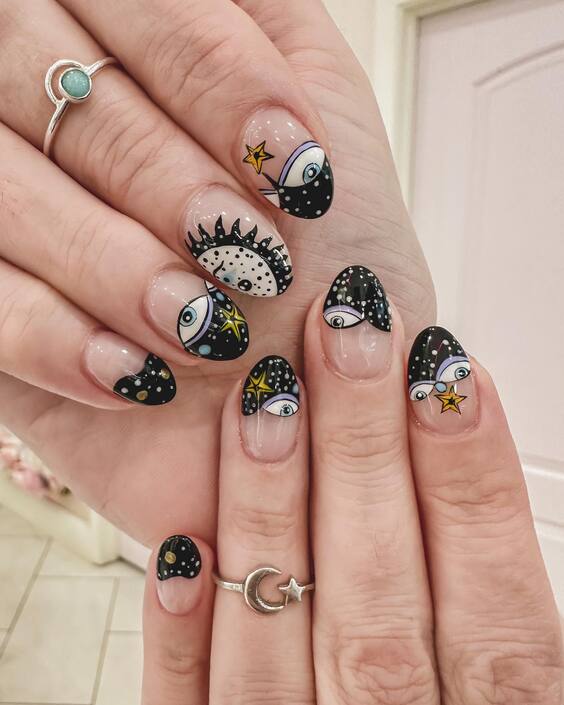
- Clear Nail Polish – as the base
- Black, White, Yellow, and Blue Nail Pens – for the detailed designs
- Recommendations: Layer a matte top coat over the design for a modern, sophisticated finish.
Crafting Eccentric Eyes and Stars
- Apply a base coat of clear polish.
- Draw various eye designs and stars using colored nail pens for vivid detail.
- Use a dotting tool for precise dots and pupils in the eyes.
- Seal with a matte top coat for a unique texture that complements the complex artwork.
Romantic Red Accents
Perfect for a night out or a special occasion in February 2024, this design mixes soft pink and striking red with heart accents to create a romantic and bold look. It’s a wonderful expression of love and passion, fitting for both Valentine’s Day and everyday elegance.
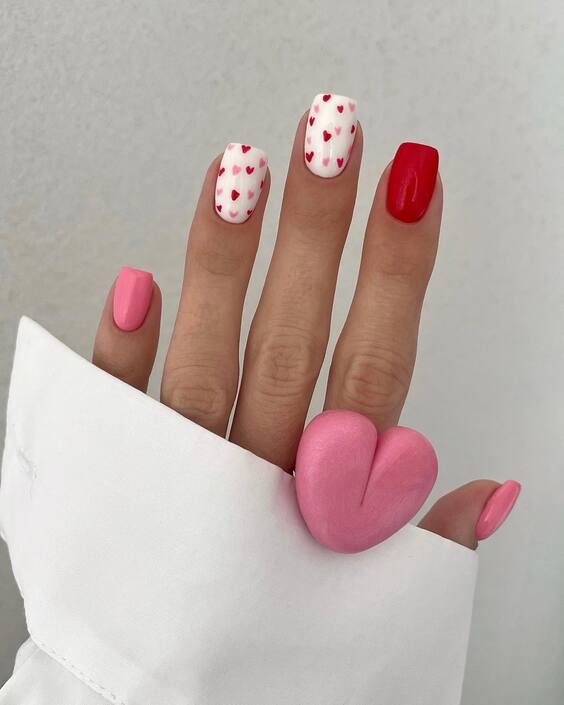
- OPI’s “Alpine Snow” – for the soft pink base
- Essie’s “Really Red” – for the vibrant red accents
- Recommendations: Use a stencil for the hearts to achieve uniform shapes and placement.
How to Paint Romantic Red Accents
- Paint the base with OPI’s “Alpine Snow.”
- Use stencils to add heart shapes with Essie’s “Really Red” on selected nails.
- For a dynamic look, alternate the placement of hearts and solid red on different nails.
- Apply a glossy top coat to give the colors depth and ensure durability.
Modern Mix-and-Match
This design cleverly combines grey tones with a pop of neon yellow and a touch of wild zebra stripes, creating a visually striking look. It’s ideal for those who love to stand out from the crowd with a mix of subdued and bright elements.
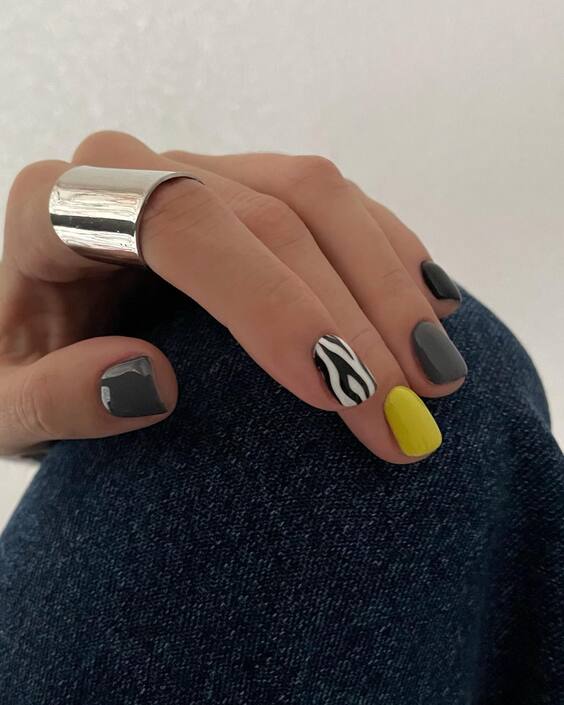
- Essie’s “Chinchilly” – for the grey nails
- OPI’s “Need Sunglasses?” – for the neon yellow nail
- Black and White Nail Art Pens – for zebra stripes
- Recommendations: For zebra stripes, use a fine brush for detailed and crisp lines.
Crafting the Modern Mix-and-Match
- Paint the thumb, index, and pinky fingers with Essie’s “Chinchilly.”
- Apply OPI’s “Need Sunglasses?” on the middle finger for a bright accent.
- Create zebra stripes on the ring finger using black and white art pens.
- Seal with a top coat for durability and a glossy finish.
Vibrant Summer Palette
Embrace the full spectrum of summer with this vibrant array of colors. Each nail flaunts a different hue, complemented by an artistic and abstract design on the ring finger, making it perfect for beach parties and summer festivals.
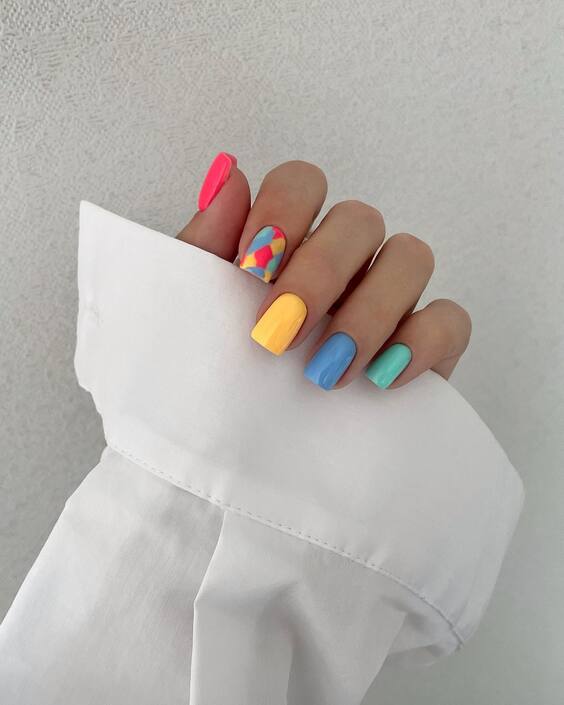
- Multiple Bright Polishes – for each nail color
- Nail Art Brushes – for the abstract design
- Recommendations: Use a sponge for the gradient effect on the abstract nail to blend the colors seamlessly.
How to Create the Vibrant Summer Palette
- Paint each nail a different color using a range of bright polishes.
- For the ring finger, apply a white base and use a sponge to dab on different colors for an abstract effect.
- Finish with a clear top coat to protect the design and enhance the colors.
Elegant Safari Fusion
This nail design combines classic shades with a bold leopard print, reflecting an elegant yet adventurous style. The neutral base tones are perfect for any season, while the detailed print adds a touch of the wild to your everyday look.
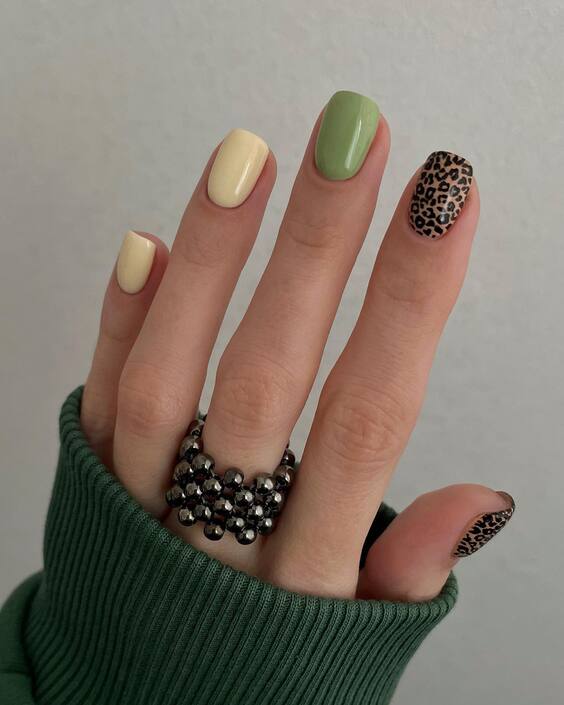
- OPI’s “Pale to the Chief” – for the neutral nails
- Black and Brown Nail Art Pens – for leopard spots
- Recommendations: Practice the leopard spots on paper first to perfect your technique before applying them to the nails.
Crafting the Elegant Safari Fusion
- Apply OPI’s “Pale to the Chief” on the thumb, index, and middle fingers.
- Use black and brown art pens to draw leopard spots on the ring and pinky fingers.
- Ensure each spot has a slightly irregular shape for a more natural look.
- Finish with a matte top coat for a sophisticated touch.
Abstract Art Fusion
This nail design melds daring colors with abstract patterns, featuring a striking combination of black, white, turquoise, and a splash of neon orange. It’s perfect for those looking to make a bold statement with their nail art, showcasing a taste for the dramatic and the unconventional.
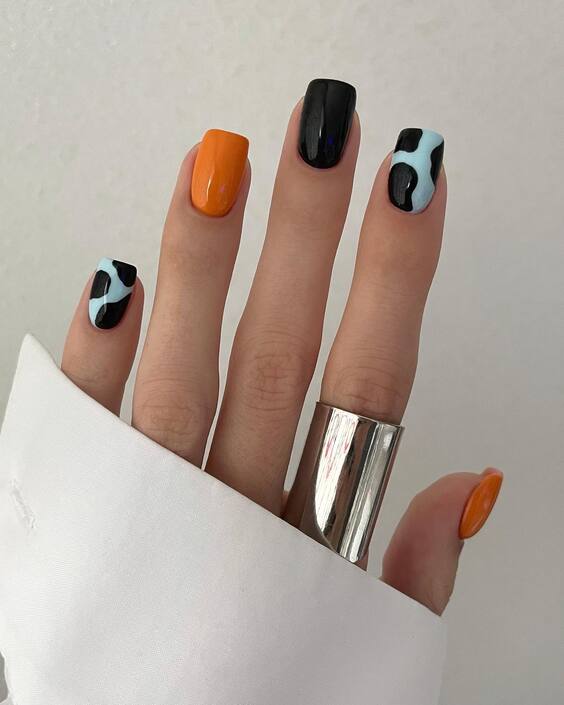
- OPI’s “No Room for the Blues” – for the turquoise accents
- Essie’s “Blanc” and “Licorice” – for the white and black details
- Neon Orange Polish – for the vibrant highlights
- Recommendations: Use a sponge for the blended turquoise and black background to create a smoky effect.
Creating Abstract Art Fusion
- Start with a base of neon orange on the thumb and pinky fingers.
- Apply a blend of black and turquoise on the middle fingers using a sponge for a smoky background.
- Paint abstract patterns with white and black polish on the ring finger.
- Seal the design with a glossy top coat to enhance the vivid colors and ensure durability.
Blue Sapphire Elegance
This nail set exudes luxury with its deep blue tones and sparkling silver accents. The use of geometric patterns and a full silver glitter nail adds a touch of elegance and sophistication, making it ideal for evening events or a sophisticated day out.
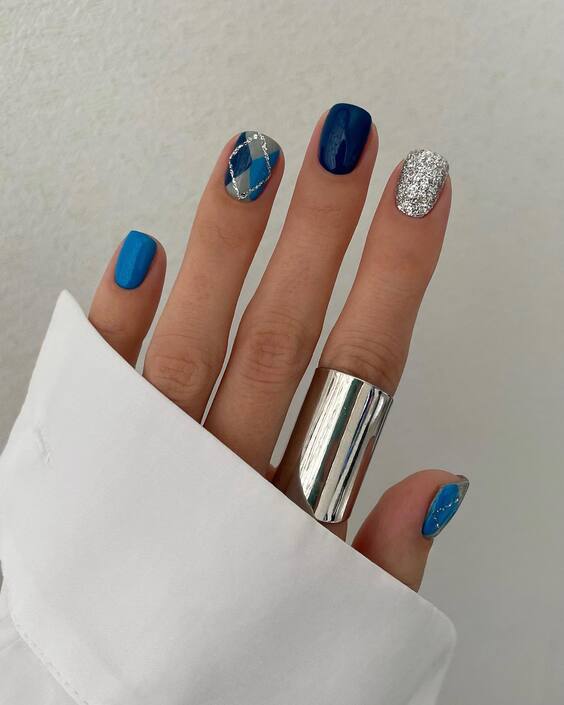
- Sally Hansen’s “Blue My Mind” – for the deep blue color
- Silver Glitter Polish – for the accent nail and details
- Recommendations: For a precise geometric design, use striping tape to create clean lines.
Crafting Blue Sapphire Elegance
- Paint all nails except the ring finger with “Blue My Mind” for a deep, rich base.
- Apply silver glitter polish on the ring finger for a dazzling effect.
- Use striping tape on the middle finger to design geometric shapes, then fill in with silver glitter.
- Complete with a top coat to ensure the glitter stays in place and adds extra shine.
Sunset Glow
This nail design captures the essence of a sunset with its soft orange hue, providing a warm and inviting look. The minimalistic approach, with a focus on solid color and a sophisticated finish, makes it suitable for both casual and formal settings.
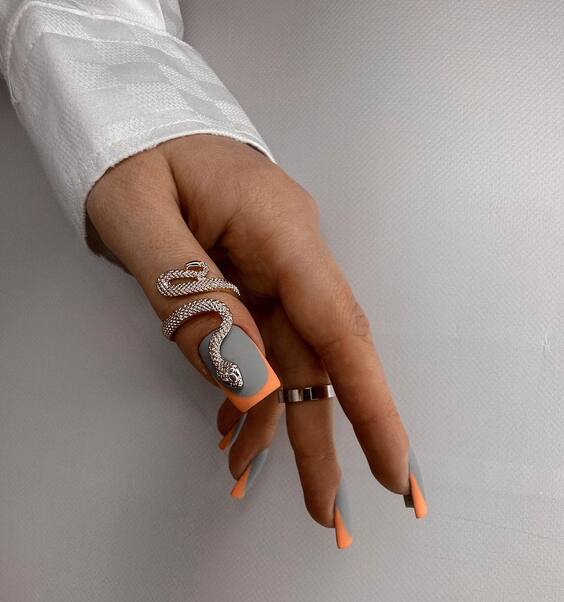
- Essie’s “Tart Deco” – for the vibrant orange base
- Recommendations: Ensure the nails are evenly coated by applying several thin layers, allowing each to dry between applications.
Painting Sunset Glow
- Apply “Tart Deco” across all nails for a uniform and striking orange shade.
- Carefully smooth out any streaks for a flawless finish.
- Opt for a matte top coat to give the vibrant orange a modern, chic look.
- Maintain the minimalistic style, focusing on the quality of the polish and the precision of application.
Contemporary Marble and Solids
This nail design harmoniously blends contemporary artistry with classic sophistication. Featuring a mix of solid green and gray colors alongside dynamic black and white marbled patterns, this set is perfect for those who appreciate the fusion of bold designs with subtle elegance.
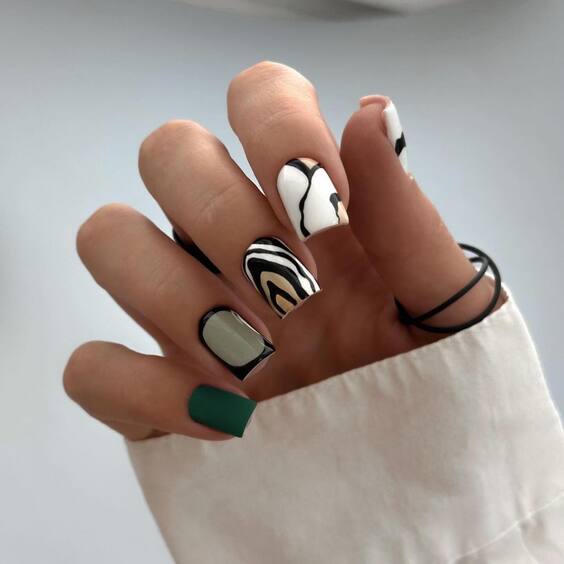
- Essie’s “Power Clutch” – for the solid gray nails
- Sally Hansen’s “Jungle Gem” – for the solid green nail
- Black and White Marble Effect – achieved with marbling tools or water marbling techniques
- Recommendations: For a smooth marble effect, lightly drag a needle through drops of black and white polish floated on water, then dip the nail into the design.
Creating Contemporary Marble and Solids
- Paint the thumb and pinky in “Power Clutch” gray and the middle finger in “Jungle Gem” green.
- For the index and ring fingers, apply a white base coat and then create the marble effect with black and white polish.
- Dip the nail into the water with the floating polish or use a fine brush to swirl the polish directly on the nail for more control.
- Seal with a glossy top coat to enhance the intricate details of the marble and solidify the overall look.
Lavender Stripes on Pastel
This elegant design captures a serene and graceful aesthetic with its pastel lavender and soft pink base, accented with delicate white stripes. It’s an ideal choice for those seeking a subtle yet visually interesting manicure that complements any spring or summer wardrobe.
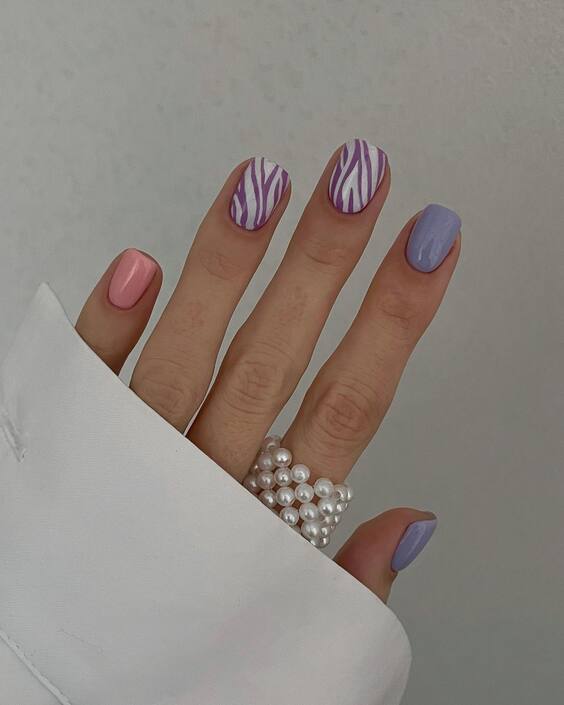
- OPI’s “Mod About You” – for the soft pink base
- Essie’s “Lilacism” – for the lavender accents
- White Striping Tape or Nail Art Pen – for the crisp white lines
- Recommendations: Place striping tape for precise lines or use a steady hand with a thin brush to draw the stripes manually.
Painting Lavender Stripes on Pastel
- Apply “Mod About You” as the base color on all nails.
- Alternate nails with “Lilacism” for a contrasting yet harmonious look.
- Use white striping tape or a thin nail art pen to add elegant stripes over the lavender nails.
- Finish with a matte top coat to give the pastel colors a contemporary flat finish.
Conclusion
This vibrant collection of nail designs for 2024 demonstrates that personal style and creativity know no bounds. Each design we’ve explored offers a unique way to express oneself, reflecting emerging trends that blend traditional techniques with modern innovations. As we continue to see, nail art is not just about color or shape but is a true form of self-expression and artistry that resonates with one’s personal style and the changing seasons. Whether you prefer the understated elegance of soft pastels or the bold statements of graphic prints, there’s always a way to make your nails stand out beautifully. So, take these inspirations, experiment with your own ideas, and let your nails be your canvas for creativity in the year ahead!

