21 Explore Fall Sparkle Nails: Top Designs with Glitter & Elegance
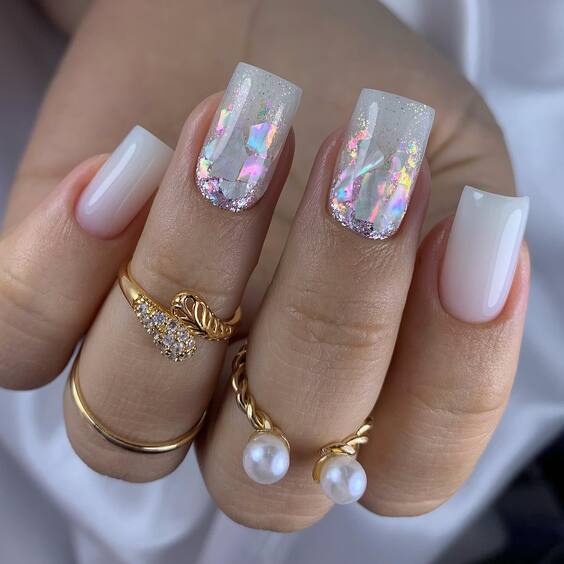
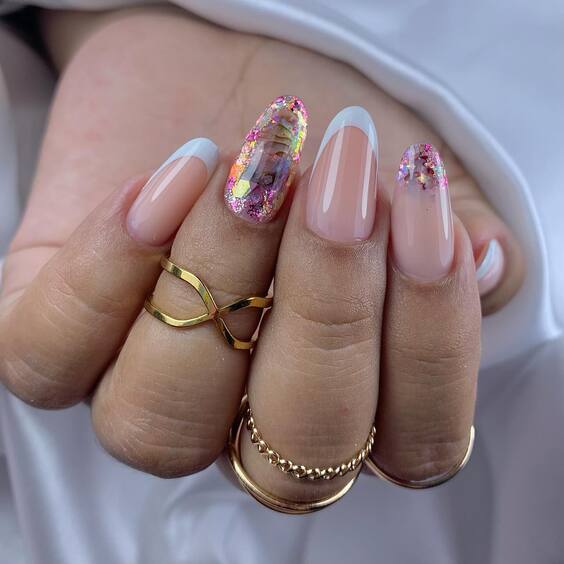
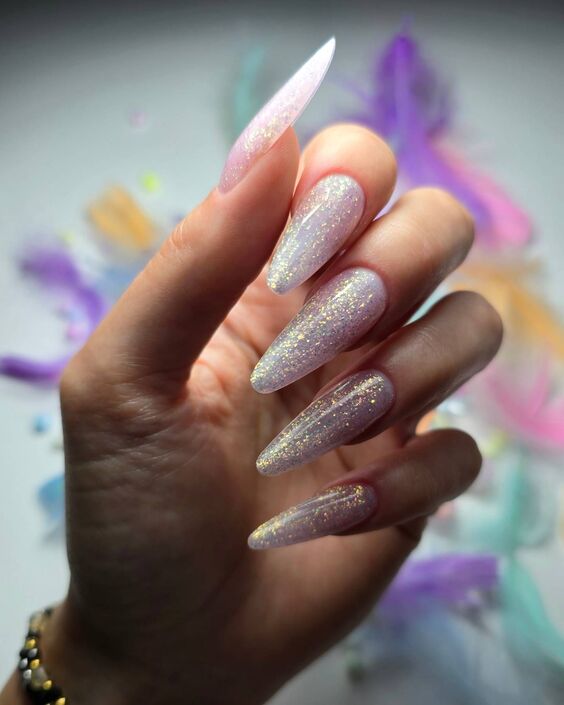
Fall Sparkle Nails with Elegant White Accents
The first nail design embodies the pristine elegance of early fall. These nails feature a base of soft, milky white transitioning into a burst of holographic glitter that captures the essence of morning dew on fallen leaves. The use of muted white combined with sparkling accents perfectly balances simplicity with a touch of autumnal drama.
Consumables Needed:
- Base coat: Prefer a strengthening formula to protect your nails.
- Milky white polish: Opt for “Alpine Snow” by OPI.
- Holographic glitter polish: “Diamond Dust” by ILNP is highly recommended for its multi-dimensional shimmer.
- Top coat: A glossy finish like Seche Vite to seal in the design and enhance durability.
DIY Instructions:
- Start with a clean, dry nail and apply a base coat to protect your nails.
- Apply two coats of milky white polish, allowing each coat to dry thoroughly.
- Tip the nails with holographic glitter polish, blending slightly into the white for a seamless gradient.
- Finish with a top coat for a glossy, durable finish.
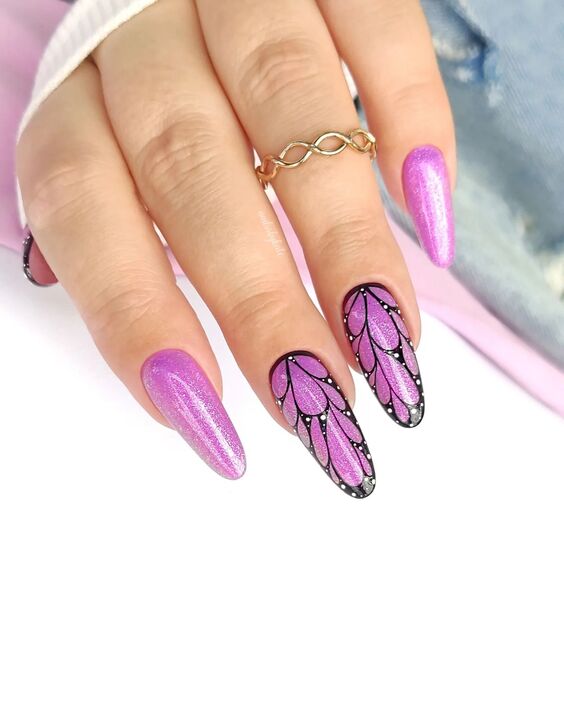
Fall Sparkle Nails with Pink and Black Charm
This design offers a dramatic take on fall sparkle nails, featuring a bold pink base overlaid with intricate black detailing. The nails are adorned with subtle pink sparkles that catch the light, adding depth and intensity to the manicure. This style is perfect for those who love a bolder, more graphic approach to their sparkle.
Consumables Needed:
- Base coat: A nourishing base to start.
- Vibrant pink polish: “Mad About You” by Essie.
- Black detail polish: “Black Onyx” by OPI for sharp, precise lines.
- Pink glitter: A fine pink glitter to sprinkle over the base.
- Top coat: A high-shine top coat to encapsulate the glitters and design.
DIY Instructions:
- Prepare your nails with a base coat.
- Apply the vibrant pink polish as the base color.
- Using a fine brush, create black detailed patterns over the pink base.
- While the black polish is still tacky, lightly dust the pink glitter over the nails.
- Seal everything with a robust top coat for longevity and shine.
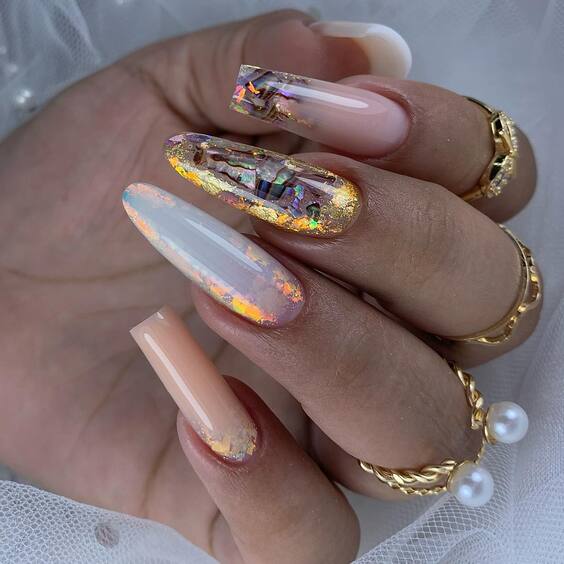
Golden Autumn Glitz
These nails capture the essence of a golden autumn afternoon. The design starts with a nude base, followed by a lavish application of gold flake glitter, creating a rich, textured look that is both sophisticated and festive.
Consumables Needed:
- Base coat: Use a fortifying base coat.
- Nude polish: “Ballet Slippers” by Essie.
- Gold flake glitter polish: “Gold Leaf” by Sally Hansen.
- Top coat: A matte top coat for a unique, contemporary finish.
DIY Instructions:
- Apply a base coat to protect the nail.
- Paint two coats of nude polish for a flawless base.
- Apply gold flake glitter polish, concentrating more flakes toward the tip for a gradient effect.
- Finish with a matte top coat for a modern twist.
Forest Green and Gold Elegance
This nail design speaks to the heart of fall with its deep forest green tones and striking gold accents. The transition from a full green coverage to a detailed gold glitter overlay creates a luxurious and festive look, perfect for autumn gatherings.

Consumables Needed:
- Base coat: A quality base coat to protect the nails.
- Forest green polish: “Envy the Adventure” by OPI.
- Gold glitter polish: “Golden Eye” by OPI for that rich, lustrous finish.
- Top coat: A long-lasting top coat to seal in the design and enhance the sparkle.
DIY Instructions:
- Begin with a base coat to protect your nails.
- Apply two coats of the forest green polish, allowing them to dry completely.
- At the tips, apply the gold glitter polish, using a sponge for a faded effect towards the middle of the nail.
- Finish with a top coat to maximize shine and durability.
Mystical Black and Iridescent Swirls
Capturing the mystery and allure of the darker days of fall, this design features a glossy black base with iridescent swirls that shimmer in pink and green hues. The swirling pattern is reminiscent of the northern lights, making it a truly enchanting choice for the season.
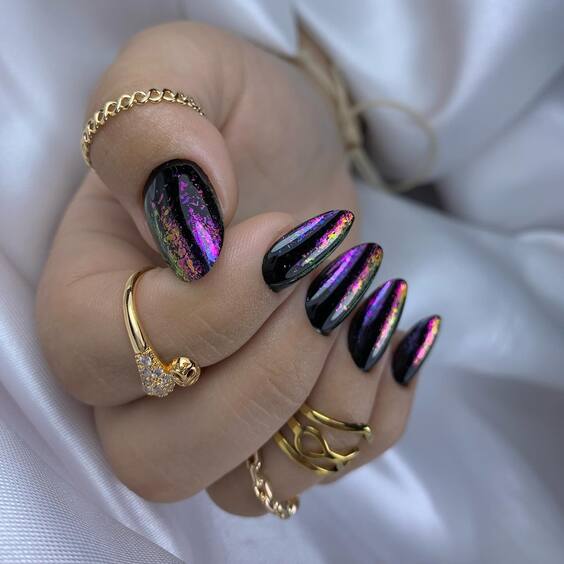
Consumables Needed:
- Base coat: Start with a solid base coat for nail protection.
- Black polish: “Licorice” by Essie.
- Iridescent top coat: “Let’s Dance” by Deborah Lippmann.
- Top coat: Opt for a high-gloss finish to enhance the iridescent effect.
DIY Instructions:
- Apply a base coat to each nail.
- Paint two coats of black polish as the foundation.
- Carefully layer on the iridescent top coat in a swirl pattern using a fine brush.
- Complete the look with a glossy top coat for extra shine and protection.
Winter Wonderland Glitter
These nails are a tribute to the winter transition, adorned with chunky silver glitter and delicate gold flakes that sparkle against a sheer nude base. The design mimics a frosty morning with sunlight reflecting off the ice—a perfect blend of subtlety and glam.
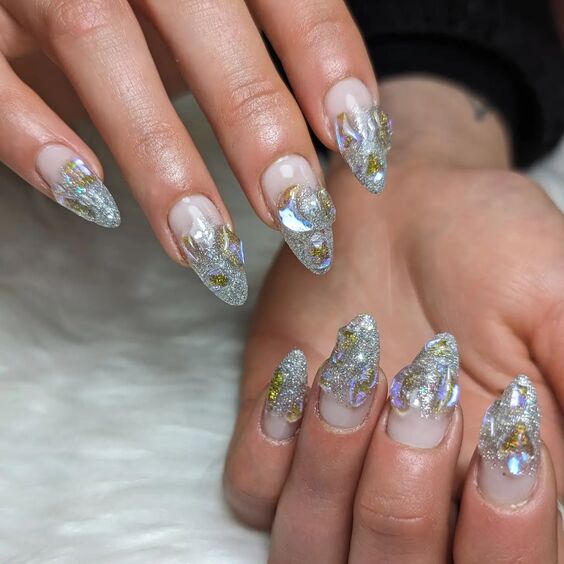
Consumables Needed:
- Base coat: A fortifying base coat to prepare the nails.
- Nude polish: “Bare With Me” by Essie.
- Silver glitter: Chunky silver glitter polish like “Set in Stones” by Essie.
- Gold flakes: Thin gold flake accents to sprinkle.
- Top coat: A durable top coat to encapsulate the glitters.
DIY Instructions:
- Begin with a base coat for protection.
- Apply a layer of nude polish as the background.
- While the nude polish is still tacky, gently press in the silver glitter and gold flakes.
- Seal the design with a strong top coat for a smooth finish and lasting wear.
Autumn Gradient and Jewels
This nail design combines a warm gradient of autumn colors with extravagant jewel embellishments. Transitioning from a vibrant orange to a subtle nude, these nails are adorned with gold flakes and colorful rhinestones, creating a rich tapestry of fall tones and textures.

Consumables Needed:
- Base coat: A base coat to protect your nails.
- Orange polish: “A Good Man-darin is Hard to Find” by OPI.
- Nude polish: “Barely There” by Sally Hansen.
- Gold flakes and rhinestones: Various sizes for a layered effect.
- Top coat: A thick top coat to secure the embellishments.
DIY Instructions:
- Apply a base coat to protect your nails.
- Paint a gradient with orange fading to nude. Use a sponge to blend the colors softly.
- Apply gold flakes and place rhinestones while the polish is tacky.
- Seal with a top coat to ensure the jewels and flakes are embedded securely.
Vivid Pink and Holographic Charm
Bright and bold, this design features a stunning hot pink base with a holographic stripe that catches every flicker of light. The nails are further enhanced with gold detailing and pink rhinestones at the base, making them a showstopper for any fall festivity.
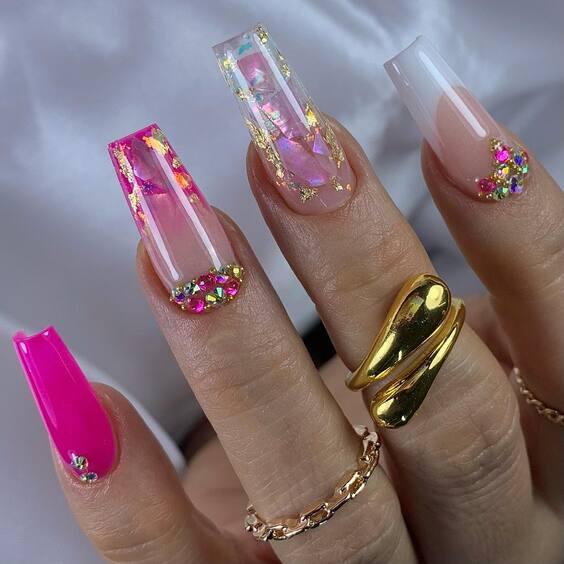
Consumables Needed:
- Base coat: Start with a base coat for durability.
- Hot pink polish: “Schmooze” by Butter London.
- Holographic striping tape.
- Gold paint for detailing.
- Pink rhinestones.
- Top coat: A gel top coat for a glossy finish.
DIY Instructions:
- Begin with a base coat to protect your nails.
- Apply two coats of hot pink polish.
- Place holographic striping tape in the center of each nail.
- Add gold detailing around the tape and place pink rhinestones at the base.
- Finish with a gel top coat for a long-lasting, glossy look.
Subtle Elegance with Sparkle
Ideal for those who prefer understated elegance, this design features a soft mauve base with a central nail fully adorned in multicolored glitter. Delicate white dotting along the cuticle line adds a touch of whimsy, making it perfect for cozy fall evenings.
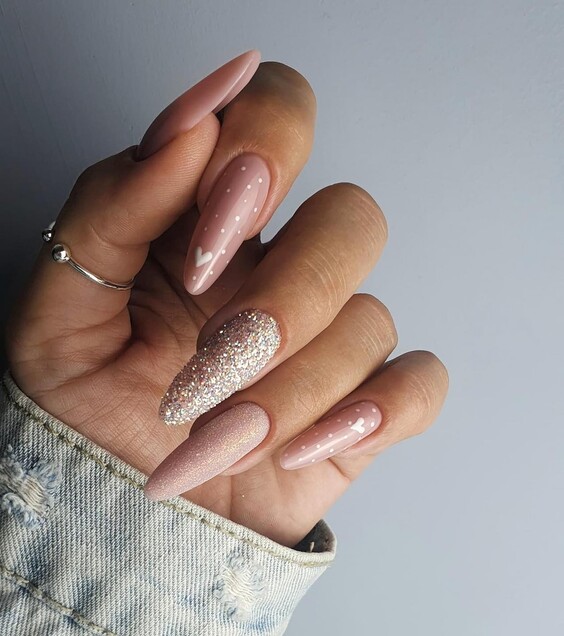
Consumables Needed:
- Base coat: A protective base coat.
- Mauve polish: “Angora Cardi” by Essie.
- Multicolored glitter polish: “Disco Ball” by Essie for the feature nail.
- White polish for dotting.
- Top coat: A matte top coat for a modern finish.
DIY Instructions:
- Apply a base coat for nail protection.
- Paint all nails in mauve, except for the ring finger, which should be covered in glitter polish.
- Use a dotting tool to apply small white dots along the cuticle line of the mauve nails.
- Finish with a matte top coat for a sophisticated, velvet-like texture.
Elegant Ombre and Rhinestone Sparkle
This refined nail design features a graceful ombre transition from a peachy nude to a clear tip, highlighted with a feature nail encrusted in multi-colored rhinestones and golden accents. The result is an exquisite balance of subtlety and celebratory sparkle, ideal for any fall occasion.
Consumables Needed:
- Base coat: A protective layer to start.
- Peach nude polish: “Apricot Nectar” by Revlon.
- Clear polish for blending into ombre.
- Multi-colored rhinestones and gold flakes.
- Top coat: A high-gloss top coat to enhance and protect the design.
DIY Instructions:
- Start with a base coat to protect the nails.
- Apply the peach nude polish at the base, gently blending into clear at the tip using a sponge.
- For the feature nail, apply a dense layer of rhinestones and gold accents while the base is tacky.
- Seal all nails with a top coat for a smooth, glossy finish.
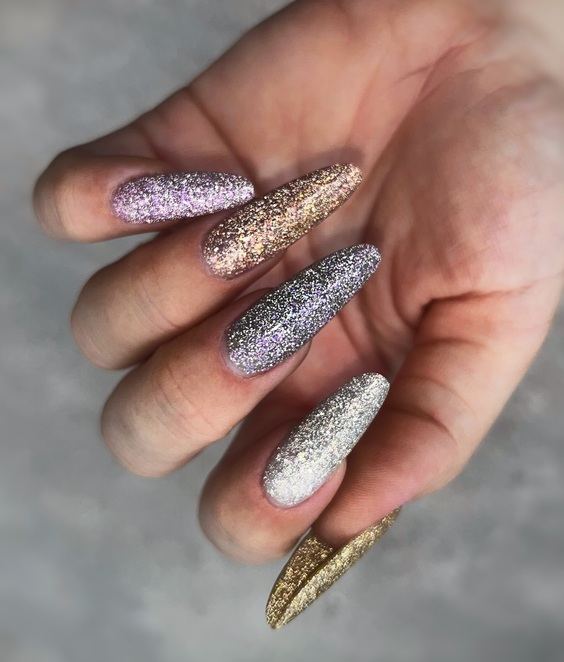
Spectrum of Sparkle: Purple to Gold
Dazzling in a spectrum of sparkles, this design showcases a dynamic blend from muted purple to shimmering gold, all in a glitter-packed finish that catches every light. It’s a bold statement piece, perfect for elevating fall wardrobes.
Consumables Needed:
- Base coat: Essential for nail protection.
- Gradient glitter polishes: Purple “Royal Flush” and gold “Golden Ticket” by Essie.
- Top coat: A durable top coat for a lasting glitter finish.
DIY Instructions:
- Prep your nails with a base coat.
- Apply the purple glitter polish at the base, blending into gold glitter toward the tips.
- Use a sponge for a seamless gradient effect.
- Finish with a top coat to set the sparkle firmly in place.
Iridescent Dream
Capturing the ethereal quality of autumnal light, this nail design features an iridescent finish that reflects a kaleidoscope of colors, mimicking the delicate shift of light at dusk. This design is ideal for those seeking a magical, almost mythical appearance for their nails.

Consumables Needed:
- Base coat: To protect and smooth out the nail surface.
- Iridescent polish: “Halo” by Orly for a full-coverage rainbow effect.
- Top coat: A top coat to magnify the iridescence and protect the finish.
DIY Instructions:
- Apply a base coat to clean, prepped nails.
- Cover the nails with two coats of iridescent polish, allowing each coat to dry thoroughly.
- Finish with a top coat to enhance the mystical shimmer and ensure durability.
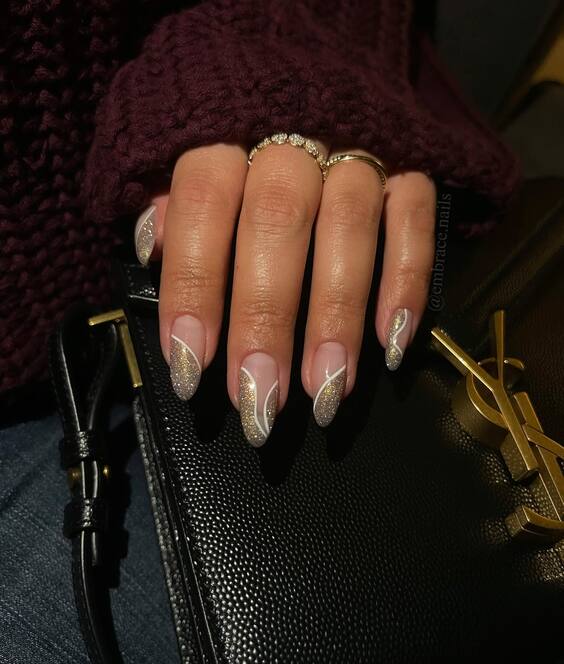
Sophisticated Nude with Silver Accents
This manicure showcases an elegant blend of soft nude hues with delicate silver glitter lines, creating a refined yet subtle sparkle. Perfect for those who appreciate minimalist beauty with a touch of glamour, it’s a chic choice for any autumnal occasion.
Consumables Needed:
- Base coat: A base coat for nail protection.
- Nude polish: “Pale to the Chief” by OPI.
- Silver glitter liner: For precise and elegant lines.
- Top coat: A top coat for a lasting glossy finish.
DIY Instructions:
- Start with a base coat to protect your nails.
- Apply two coats of nude polish, allowing it to dry completely.
- Use a thin brush or liner to add silver glitter lines along the natural curves of the nails.
- Seal with a top coat for durability and extra shine.
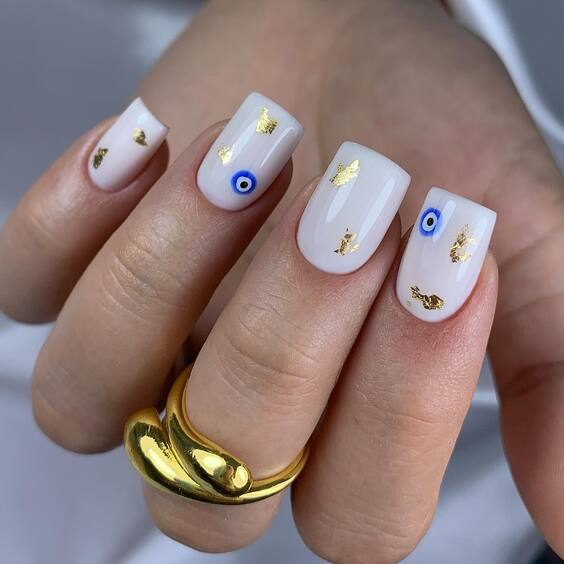
Chic White with Golden Accents and Evil Eye Motif
A white base with gold leaf accents and striking blue evil eye motifs, this design is not only eye-catching but also carries cultural significance. It’s an artful expression of protection and good luck, making it a meaningful and stylish choice for the season.
Consumables Needed:
- Base coat: Essential for protecting the nail.
- White polish: “Blanc” by Essie.
- Gold leaf: For a touch of opulence.
- Evil eye decals or hand-painted designs.
- Top coat: To ensure longevity and protect the design.
DIY Instructions:
- Apply a base coat to each nail.
- Coat the nails with two layers of white polish.
- Carefully place gold leaf pieces and add evil eye designs either through decals or painting.
- Finish with a top coat to secure the decorations and enhance their appearance.
Galactic Black with Neon Accents
Dive into the cosmos with this galactic-inspired design featuring a black base layered with sparkling holographic glitter and vibrant neon accents. It’s a bold, futuristic look that pushes the boundaries of traditional fall nail art.
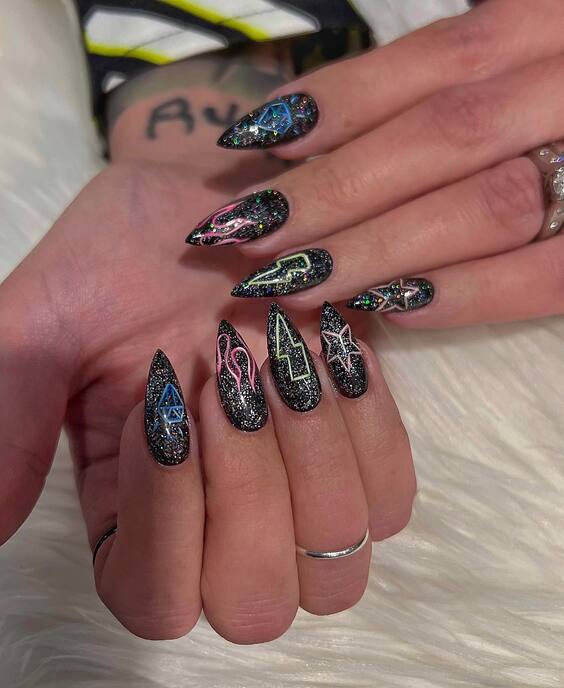
Consumables Needed:
- Base coat: A strong foundation to start.
- Black polish: “Black Out” by Sally Hansen.
- Holographic glitter: For a starry effect.
- Neon paints: Pink, green, and blue for dynamic accents.
- Top coat: A high-quality top coat for a smooth, durable finish.
DIY Instructions:
- Begin with a base coat to protect the nails.
- Apply the black polish as a background for the glitters and neon details.
- Sprinkle holographic glitter over the wet polish for a deep-space sparkle.
- Paint neon designs such as lines, shapes, or symbols to stand out against the dark background.
- Complete the manicure with a top coat to seal in the design and enhance the overall shine.
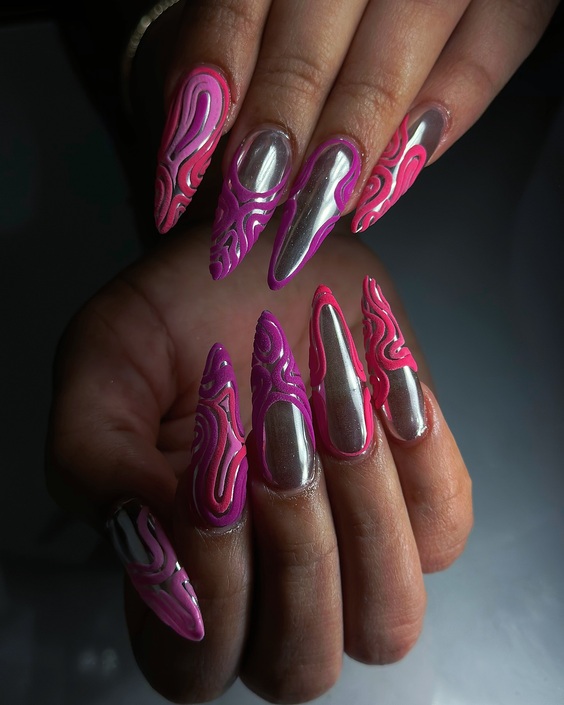
Vibrant Contrasts and Curved Elegance
This design presents a vivid display of color with a striking combination of deep purple and gold on a creamy nude base. The curved lines and segmented color blocks create a dynamic and artistic effect, perfect for those looking to make a bold fashion statement this fall.
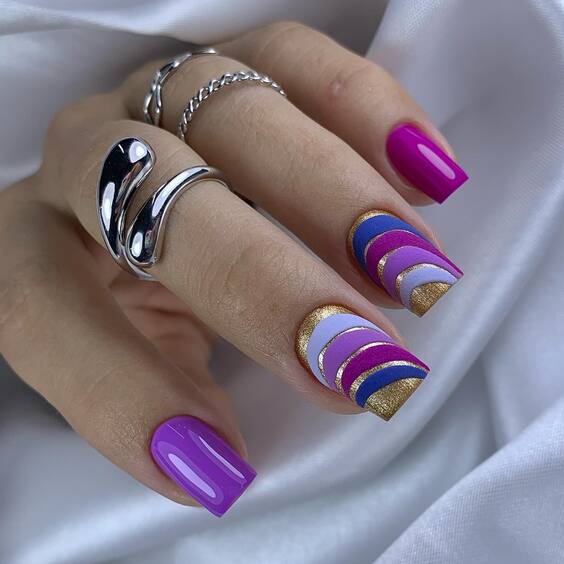
Consumables Needed:
- Base coat: To protect the nails.
- Nude polish: “Tiramisu for Two” by OPI.
- Purple polish: “Do You Have this Color in Stock-holm?” by OPI.
- Gold metallic polish: “Good as Gold” by Essie.
- Top coat: A glossy finish to enhance the design’s vibrancy.
DIY Instructions:
- Begin with a base coat to protect your nails.
- Apply a nude polish as the base color.
- Once dry, use tape to create curved sections and fill them with purple and gold polishes.
- Carefully remove the tape and let the polish dry.
- Apply a top coat for a smooth, glossy finish.
Monochrome Magic with Glitter Accents
This nail art combines classic monochrome tones with a twist of modernity, featuring black and grey marbling interspersed with pops of yellow glitter. The result is an edgy yet sophisticated look that mirrors the rich textures seen during the fall season.
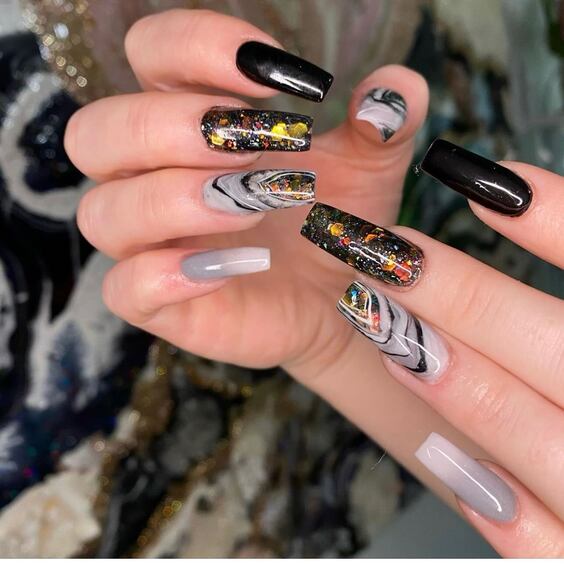
Consumables Needed:
- Base coat: Essential for nail protection.
- Black polish: “Black Onyx” by OPI.
- Grey polish: “Now and Zen” by Essie.
- Yellow glitter: For a hint of sparkle.
- Top coat: To ensure durability and shine.
DIY Instructions:
- Start with a base coat to protect your nails.
- Apply black polish as a base layer.
- Add drops of grey polish and use a nail art brush to swirl the colors together for a marble effect.
- Sprinkle yellow glitter over select areas before the polish sets.
- Seal everything with a top coat for lasting wear.
Iridescent Fairy Dust
These nails shimmer with an iridescent finish that captures the light with every move, reminiscent of magical fairy dust. The soft pink base is enhanced with subtle hints of glitter, making it ideal for those who prefer a touch of whimsy in their fall manicure.
Consumables Needed:
- Base coat: To protect the nail surface.
- Soft pink polish: “Ballerina” by Chanel.
- Iridescent glitter: For a magical sparkle.
- Top coat: A high-shine top coat to amplify the iridescence.
DIY Instructions:
- Apply a base coat to ensure nail health.
- Paint the nails with a soft pink polish.
- While the polish is still wet, lightly dust the iridescent glitter over the top.
- Finish with a high-shine top coat to enhance the glittery effect and ensure the longevity of your design.
Celestial Black with Glittery Accents
These nails make a bold statement with a sleek black base, complemented by bursts of colorful glitter and meticulously placed rhinestones. This design encapsulates a night sky aesthetic, perfect for those who wish to bring some sparkle to their fall evenings.
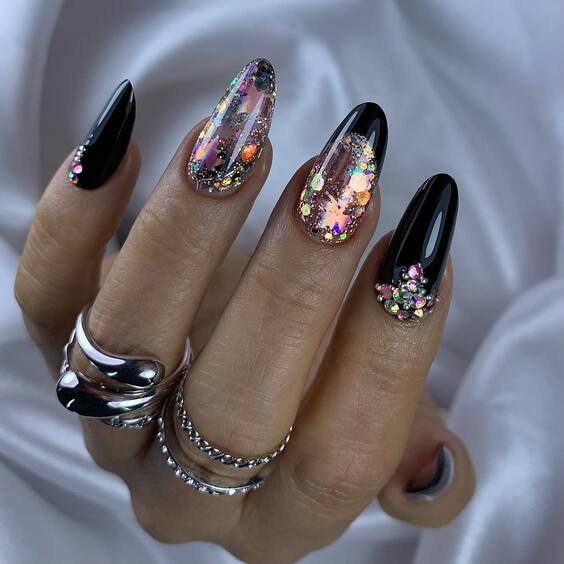
Consumables Needed:
- Base coat: A protective start to your manicure.
- Black polish: “Black Onyx” by OPI.
- Multicolored glitter and rhinestones: For dazzling accents.
- Top coat: A high-gloss finish to protect and enhance the design.
DIY Instructions:
- Apply a base coat to prepare the nails.
- Paint two coats of black polish as the base.
- Sprinkle multicolored glitter and carefully place rhinestones while the polish is still tacky.
- Seal with a top coat for a glossy finish and to secure the decorations.
Ethereal Blue Swirls
Featuring a mesmerizing swirl of blue tones enhanced by an iridescent finish, these nails evoke the serene beauty of a clear, crisp fall sky. This design is both soothing and striking, offering a refreshing twist on traditional fall colors.
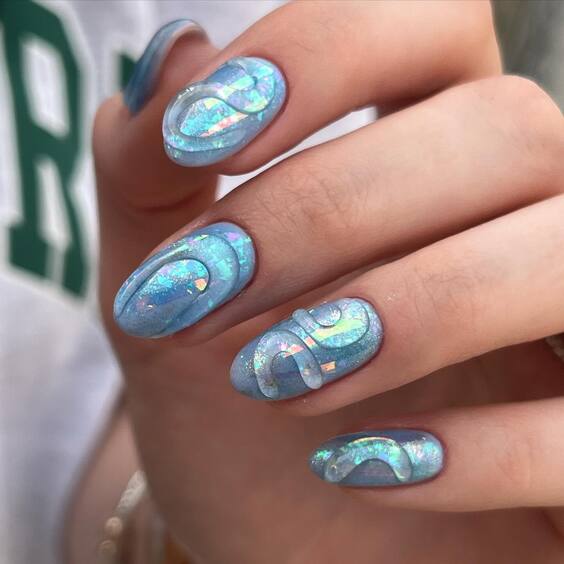
Consumables Needed:
- Base coat: Essential for protecting the nails.
- Light blue and white iridescent polish: “Bikini So Teeny” by Essie and “Pearl Jammin’” by China Glaze.
- Top coat: A clear top coat to enhance the iridescent sheen.
DIY Instructions:
- Start with a base coat to protect your nails.
- Apply a light blue base.
- Use a small brush to swirl in white iridescent polish while the base is still wet.
- Finish with a clear top coat to amplify the iridescence and ensure the longevity of your design.
Vibrant Pink and Silver Flow
These nails stand out with a vivid pink base and dynamic silver swirls, creating an almost fluid appearance. This energetic design is perfect for those who love to express their creativity and stand out from the crowd during the fall season.
Consumables Needed:
- Base coat: A strong foundation for the nails.
- Pink polish: “Mod Square” by Essie.
- Silver metallic polish: “No Place Like Chrome” by Essie.
- Top coat: A durable top coat to seal in the design.
DIY Instructions:
- Apply a base coat to protect the nails.
- Coat the nails with a vibrant pink polish.
- While the pink is still wet, use a fine brush to add silver swirls in a flowing pattern.
- Complete the look with a top coat for a glossy finish and extended wear.
As we wrap up this exploration of fall sparkle nails, we’ve seen a dazzling array of designs, from the glitzy elegance of coffin sparkle nails to the whimsical charm of iridescent finishes. Whether you prefer a subtle shimmer or bold glittery statements, there’s a style to match every mood and occasion this season. Embrace the trends and let your nails reflect the vibrant colors and cozy aesthetics of autumn. Dive into these styles, use the DIY tips to recreate your favorites, and let your nails sparkle just as brightly as the autumn leaves!