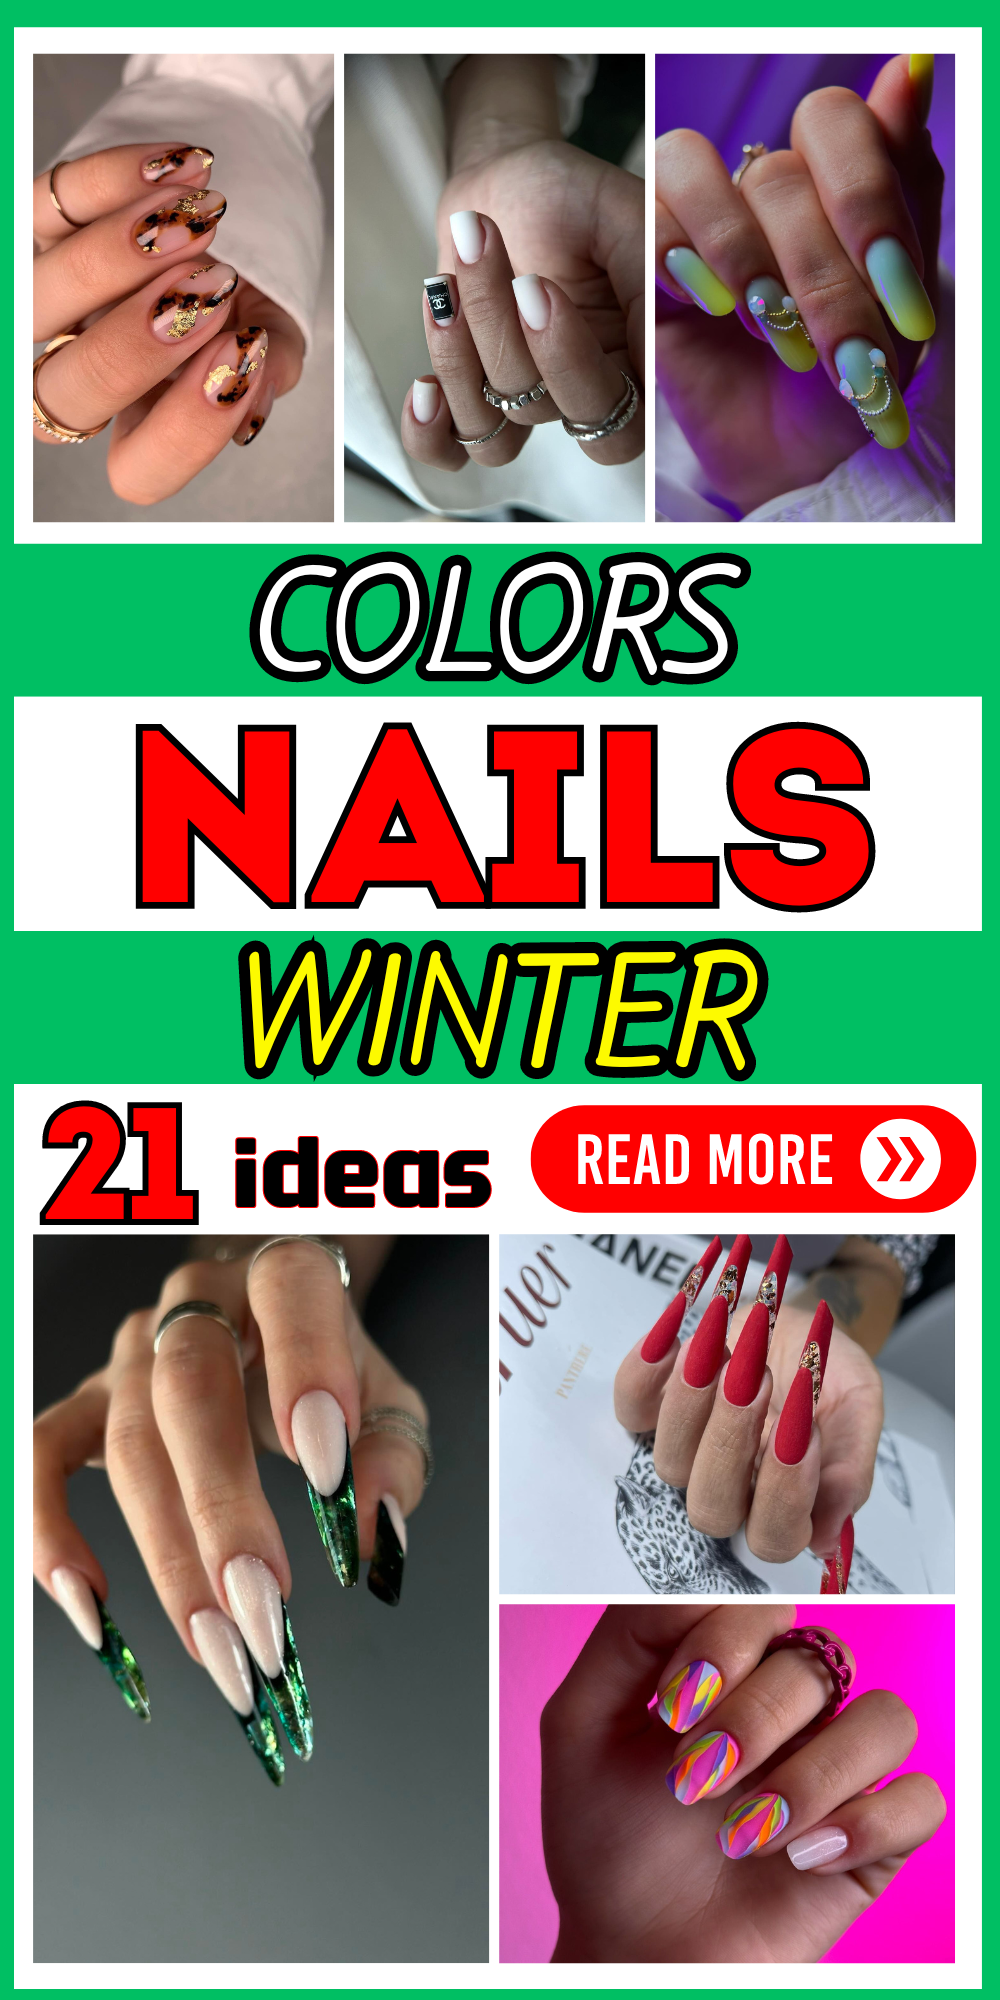
In the ever-evolving world of fashion, nail art stands out as a vibrant canvas of personal expression and style. This season, the trends extend far beyond the ordinary, offering an array of designs that cater to every taste—from the subtle elegance of pastels to the daring drama of gothic stilettos. Whether you’re preparing for a glamorous event or simply looking to add a splash of artistry to your daily look, our curated collection of nail designs showcases the latest in nail art innovation. Explore these mesmerizing styles that blend color, texture, and form to transform your nails into a statement accessory.
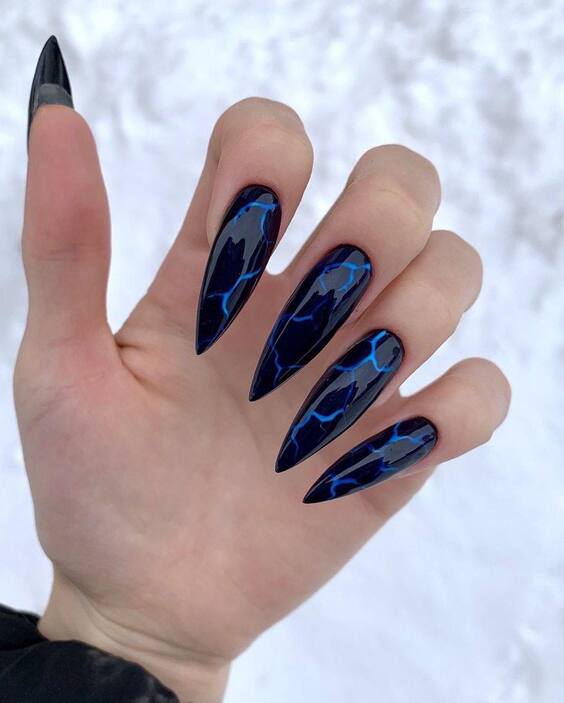
Stunning Midnight Lightning Effect
The first design showcases an electrifying midnight blue with a captivating lightning effect. This nail art mimics the chaotic beauty of a stormy winter night sky, perfect for those who love a dramatic, eye-catching look. The use of high-gloss gel enhances the depth and vibrancy of the dark blue, making each lightning strike pop with an almost 3D effect.
Consumables List
- Base Coat: CND Stickey Base Coat
- Blue Gel Polish: OPI Gel Color in “Russian Navy”
- Black Detailing Gel: Sally Hansen Miracle Gel in “Blacky O”
- Top Coat: Seche Vite Dry Fast Top Coat
- Fine Detail Brush
Recommendations: For the best results, use a fine-tip brush to create precise lightning patterns. The OPI gel color provides a deep, saturated blue that is perfect for this design.
DIY Instructions
- Prep: Start with clean, prepped nails, applying a base coat for lasting wear.
- Base Color: Apply two coats of the midnight blue gel polish, curing under a UV lamp between coats.
- Lightning Design: Using a fine brush, draw jagged lightning patterns with the black gel. Cure briefly.
- Seal: Apply a glossy top coat and cure to enhance the depth and finish of your design.
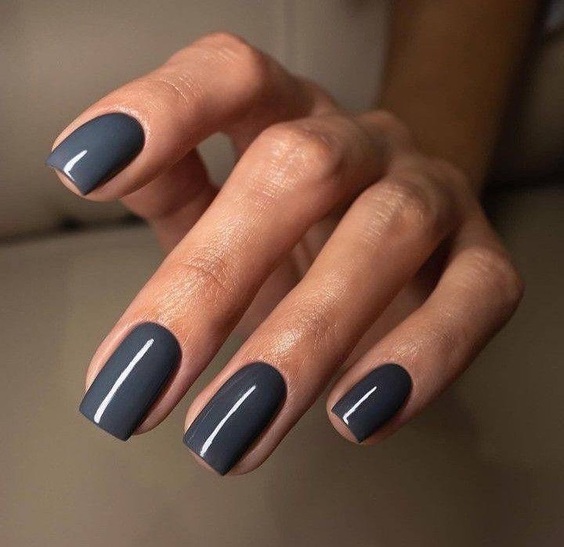
Sophisticated Charcoal Matte
The second nail design features a sophisticated charcoal gray in a trendy matte finish, ideal for those who prefer understated elegance. This color works beautifully with winter nail colors 2024 gel and complements a wide range of outfits and occasions. The matte finish provides a modern twist on a classic look, making it versatile for both day and night wear.
Consumables List
- Base Coat: Essie Here to Stay Base Coat
- Gray Matte Polish: Zoya Matte Velvet Lacquer in “Dove”
- Matte Top Coat: OPI Matte Top Coat
Recommendations: Maintain the matte finish by avoiding oils or hand creams that can add shine to the nails.
DIY Instructions
- Prep: Apply a base coat to protect your natural nails.
- Color Application: Paint two coats of the gray matte polish, letting each coat dry completely.
- Finish: Seal with a matte top coat for a flawless, non-glossy finish.
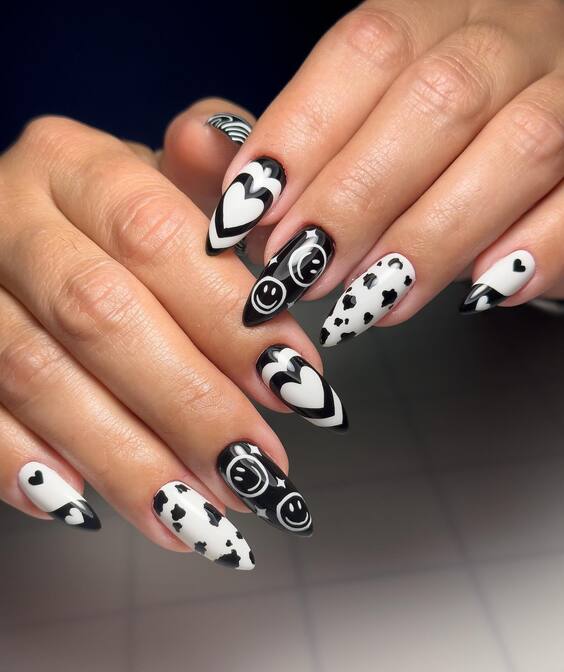
Playful Black and White Artistry
This playful design combines black and white in an artistic array of patterns including hearts, stripes, and polka dots. It’s a fun, yet chic way to express creativity while maintaining an elegant monochrome palette. This design is perfect for those who love intricate art on their nails and suits various occasions, especially during the winter season.
Consumables List
- Base Coat: Orly Bonder Rubberized Basecoat
- White Gel Polish: Gelish “Arctic Freeze”
- Black Gel Polish: Gelish “Black Shadow”
- Detailing Tool or Brush
- Glossy Top Coat: Gelish Top It Off
Recommendations: Use a detailing tool for precision in creating small and intricate designs. The contrasting glossy finish on a matte base will elevate the overall look.
DIY Instructions
- Prep: Begin with a base coat to ensure your manicure’s longevity.
- Base Color: Apply two coats of white gel polish, curing after each.
- Designs: With a fine detailing brush, paint various black patterns over the white base. Allow artistic freedom!
- Finish: Apply a glossy top coat to protect and add shine to your artwork.
Elegant Ombre with a Touch of Glitz
This nail design elegantly transitions from a soft pink to a translucent white, creating a refined ombre effect. A single nail adorned with gold and diamond-like embellishments offers a touch of luxury, making this design perfect for festive occasions or as a sophisticated everyday look. This style is a prime example of understated elegance meeting modern flair.

Consumables List
- Base Coat: OPI Natural Nail Base Coat
- Pink Polish: Essie “Muchi, Muchi”
- White Polish: Essie “Blanc”
- Glitter and Rhinestone Embellishments
- Top Coat: Sally Hansen Insta-Dri Top Coat
Recommendations: When applying rhinestones, use a dot of nail glue to ensure they stay secure longer.
DIY Instructions
- Prep: Apply a base coat to protect your nails and improve polish adherence.
- Color Gradient: Start with the pink polish at the base, blending into the white toward the tip using a sponge for the ombre effect.
- Embellishments: Place embellishments on the ring finger while the polish is tacky, then seal with a top coat.
- Finish: Apply a top coat over all nails for a glossy finish and enhanced durability.
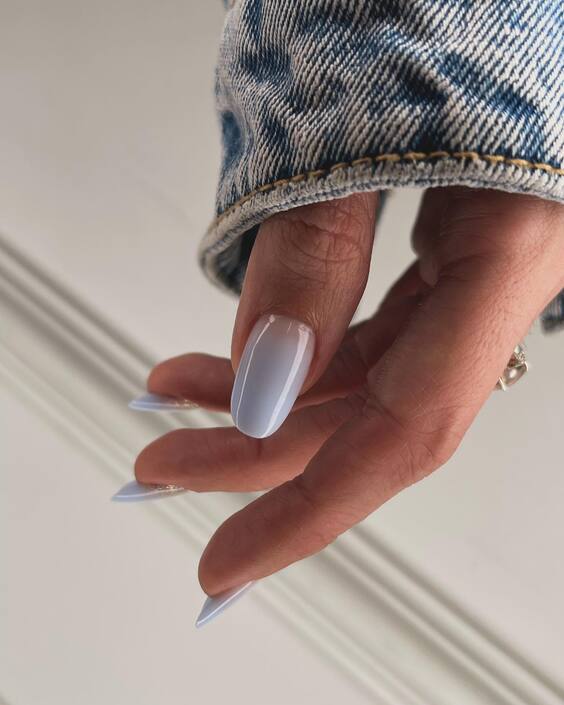
Icy Blue Stiletto Nails
These stiletto nails are painted in a serene icy blue, reminiscent of winter skies. The subtle gradient adds depth, while the pointed tips offer a daring and trendy look. Ideal for winter, these nails can add a pop of color to the chilly days and are versatile enough for both casual and formal settings.
Consumables List
- Base Coat: Base Coat by Butter London
- Blue Gradient Polish: China Glaze “Frostbite” and “White on White”
- Top Coat: Seche Vite Dry Fast Top Coat
Recommendations: For stiletto nails, regular maintenance is crucial to keep the points sharp and prevent breakage.
DIY Instructions
- Prep: Shape your nails into a stiletto style and apply a base coat.
- Gradient Effect: Apply a light blue base, then blend white from the tips down using a sponge.
- Finish: Seal with a fast-drying top coat to protect your design and add shine.
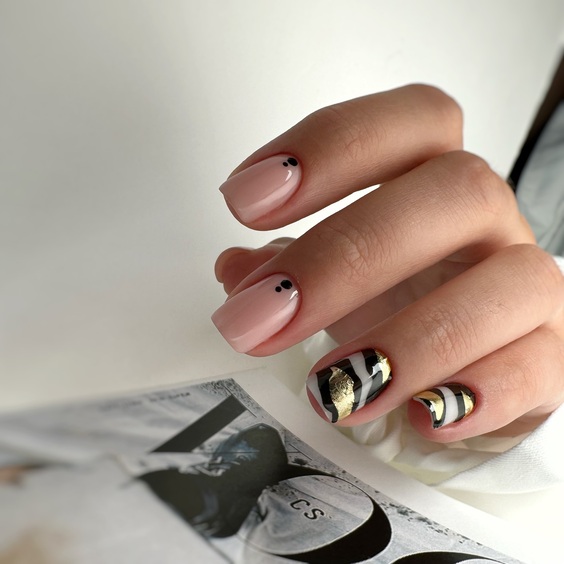
Minimalistic Chic with Geometric Accents
This design is a masterpiece of minimalistic style, featuring a nude base with bold geometric patterns on the accent nails. The use of black and gold stripes against the matte nude background creates an appealing contrast that is both modern and chic. This nail design is perfect for those who appreciate art and want to make a statement with their manicure.
Consumables List
- Base Coat: Deborah Lippmann All About That Base
- Nude Polish: OPI “Samoan Sand”
- Black and Gold Striping Tape
- Matte Top Coat: Matte Finish by OPI
Recommendations: Precision is key for the geometric patterns, so take your time or consider using pre-cut striping tape.
DIY Instructions
- Prep: Begin with a clean, dry nail surface and apply a base coat.
- Base Color: Apply two coats of nude polish and let dry.
- Design: Apply striping tape to create geometric patterns on selected nails.
- Finish: Cover with a matte top coat for a sophisticated, contemporary look.
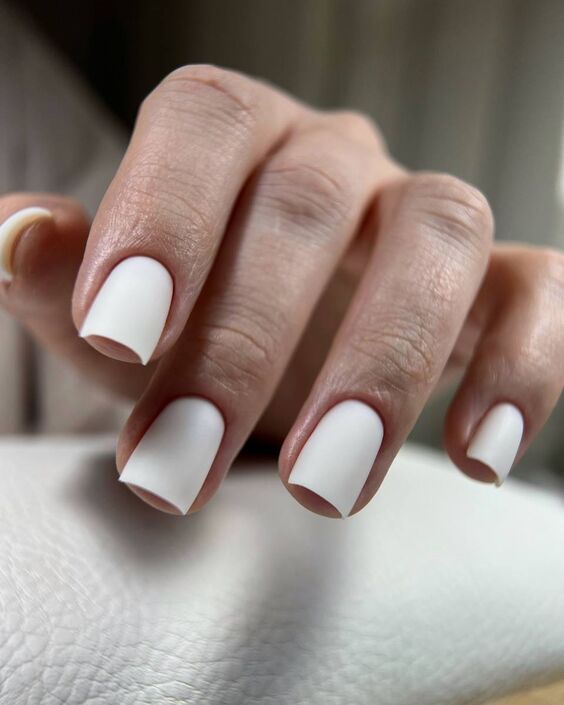
Classic White Almond Nails
These classic almond-shaped nails are painted in a flawless matte white, embodying the simplicity and elegance of winter. The clean, crisp finish makes them a perfect choice for those who appreciate minimalist beauty, offering a chic and sophisticated look that pairs well with any winter ensemble.
Consumables List
- Base Coat: Deborah Lippmann All About That Base
- White Matte Polish: Essie “Blanc” with Matte About You Top Coat
- Top Coat: Essie Matte About You Finisher
Recommendations: Ensure each layer is completely dry before applying the next to maintain the matte effect without smudges.
DIY Instructions
- Prep: Apply a base coat to clean, filed nails to ensure a smooth application.
- Color Application: Apply two coats of white matte polish, allowing thorough drying between coats.
- Finish: Seal with a matte top coat for a flawless, non-glossy finish.
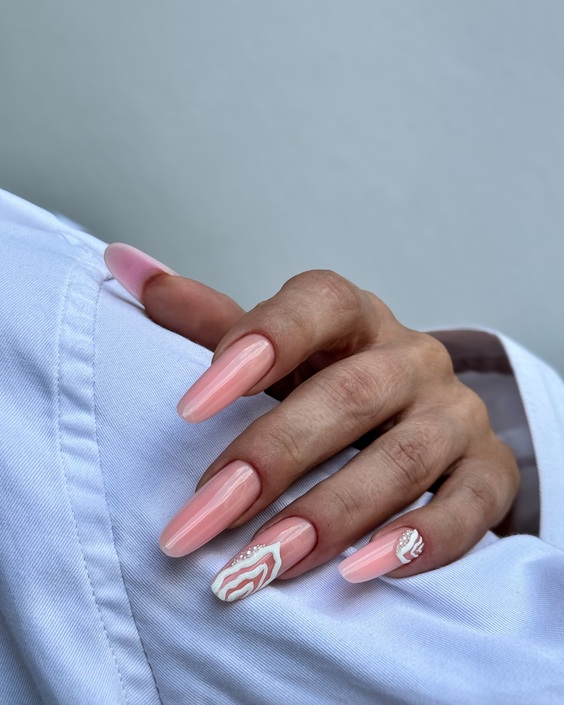
Sophisticated Pink with Marble Accent
This design features a soft pink base with a unique white marble accent nail, enhancing the overall elegance. The marble effect adds a touch of artistic flair, making it a standout choice for those looking to add a sophisticated yet creative touch to their nail art. This design is particularly suitable for winter events or casual outings.
Consumables List
- Base Coat: OPI Natural Nail Base Coat
- Pink Polish: OPI “Bubble Bath”
- White Marble Effect: Using white nail paint and a dotting tool for the marble design
- Top Coat: Seche Vite Dry Fast Top Coat
Recommendations: Use a fine brush or dotting tool to swirl the white paint on the wet pink base to create the marble effect.
DIY Instructions
- Prep: Start with a base coat to protect your nails.
- Base Color: Apply two coats of pink polish.
- Marble Effect: On the accent nail, drop small dots of white polish and use a toothpick to swirl patterns before it dries.
- Finish: Apply a glossy top coat to enhance the colors and ensure durability.
Gradient Pastel with Jewel Accents
These vibrant, pastel gradient nails transition beautifully from a minty green to a sunny yellow, adorned with delicate jewel accents and fine chain embellishments. The lively colors are reminiscent of spring but can brighten up any winter day, perfect for those who love a bold, playful manicure.

Consumables List
- Base Coat: Sally Hansen Double Duty
- Gradient Polishes: China Glaze “Lemon Fizz” and “For Audrey”
- Jewel Accents and Fine Chains
- Top Coat: INM Out the Door Top Coat
Recommendations: Apply the jewels while the top coat is still tacky to ensure they adhere properly and stay longer.
DIY Instructions
- Prep: Apply a base coat for a smooth foundation.
- Gradient Effect: Use a sponge to dab on the yellow and green polishes, blending where they meet.
- Embellishments: Place jewel accents and arrange the chains as desired.
- Finish: Seal everything with a fast-drying top coat for a glossy finish and extended wear.
Vibrant Swirls on Almond Nails
These almond-shaped nails feature a playful swirl of neon colors, creating a striking visual effect against a bright pink background. The combination of hot pink, yellow, and green swirls provides a bold statement ideal for those who love to stand out. The design embodies a fun, energetic vibe perfect for brightening up the winter months.
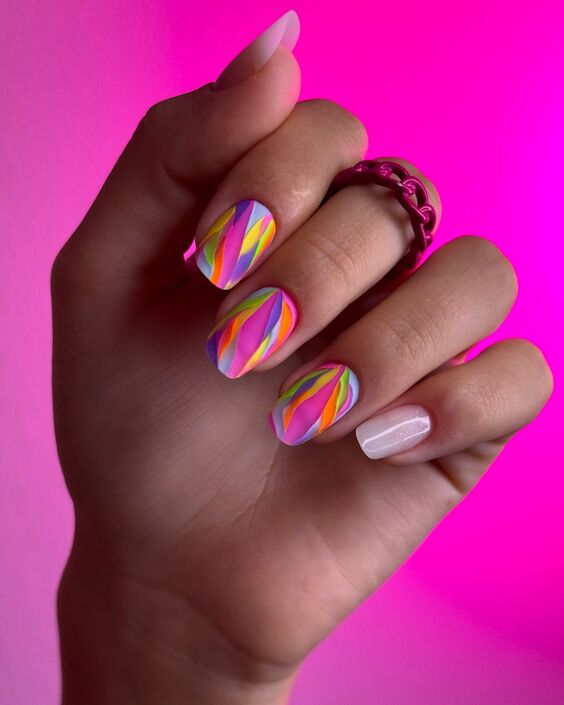
Consumables List
- Base Coat: ORLY Bonder Rubberized Base Coat
- Neon Polishes: Models Own Neon Colors in Pink Punch, Luis Lemon, and Toxic Apple
- Top Coat: INM Out the Door Fast Drying Top Coat
Recommendations: For precise swirls, use a thin nail art brush and work quickly before the base color dries to achieve clean lines.
DIY Instructions
- Prep: Apply a base coat to protect the nails.
- Base Color: Start with a solid pink base.
- Swirls: Using a fine brush, draw swirls with the neon colors. Layer the colors for depth and blend slightly where they meet.
- Finish: Seal with a glossy top coat for durability and shine.
Sunset Gradient Ombre
This nail design captures the serene beauty of a sunset with a smooth gradient transitioning from pink to yellow. The subtle blending of colors mimics the natural gradient of a sunset sky, making it a perfect choice for those who prefer a more understated yet visually striking manicure.
Consumables List
- Base Coat: Essie All in One Base
- Gradient Polishes: Sally Hansen “Sun Kissed” and “Pink Blink”
- Sponge: For dabbing and blending the gradient
- Top Coat: Essie Gel Setter Top Coat
Recommendations: Use a makeup sponge to dab and blend the colors seamlessly on the nail for the best gradient effect.
DIY Instructions
- Prep: Apply a base coat for long-lasting wear.
- Base Color: Apply a light pink as the base color.
- Gradient Effect: Sponge on yellow from the nail tip, blending it into the pink base to create the ombre effect.
- Finish: Apply a glossy top coat to enhance the smooth transition and add shine.
Edgy Black and Pink Stiletto Nails
These daring stiletto nails combine a soft pink base with dramatic black tips, offering a bold and edgy look. The contrast between the delicate pink and the stark black provides a modern twist on the classic French manicure, making it a standout choice for fashion-forward individuals.

Consumables List
- Base Coat: CND Stickey Base Coat
- Pink Polish: OPI “Put it in Neutral”
- Black Polish: China Glaze “Liquid Leather”
- Top Coat: OPI Top Coat
Recommendations: For a crisp line between the pink and black, use striping tape to separate the colors during application.
DIY Instructions
- Prep: Begin with a base coat to protect your natural nails.
- Base Color: Apply the pink polish as the base.
- Tips: Once dry, apply striping tape and paint the tips black.
- Finish: Seal with a top coat for a glossy finish and to ensure longevity.
Minimalistic Elegance with a Technological Twist
This design combines the timeless elegance of matte white ombre nails with a unique technological twist—an accent nail featuring a miniature digital display. The subtle gradient from white to translucent tips provides a clean, minimalist backdrop, making the digital motif pop. It’s a contemporary design that merges fashion with futuristic elements.
Consumables List
- Base Coat: OPI Natural Nail Base Coat
- White Matte Polish: Essie “Marshmallow” Matte
- Digital Decal/Sticker
- Top Coat: Matte About You by Essie
Recommendations: Apply the decal carefully to avoid air bubbles and ensure it aligns perfectly with the nail’s shape.
DIY Instructions
- Prep: Start with a base coat to protect your nails.
- Base Color: Apply two coats of white matte polish.
- Decal Application: Place the digital decal on the accent nail once the polish is dry.
- Finish: Apply a matte top coat to seal in the design and decal.
Extravagant Emerald Stiletto Nails
These long stiletto nails are adorned with a captivating emerald green glitter that fades into a dark, almost black hue at the tips. The high-gloss finish and dramatic length make these nails a show-stopping accessory for any glamorous event, reflecting light with every movement for a dazzling effect.
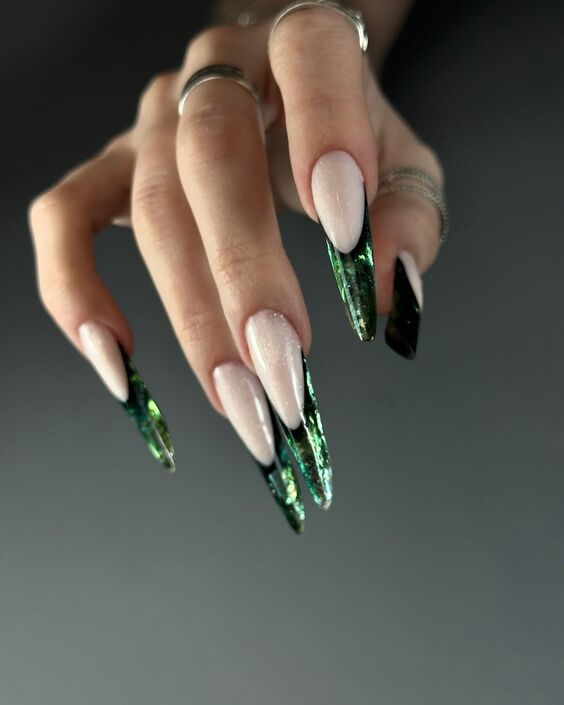
Consumables List
- Base Coat: Butter London Nail Foundation Priming Basecoat
- Green Glitter Polish: Zoya “Merida”
- Black Dip Powder: Kiara Sky “Nightmare”
- Top Coat: Seche Vite Dry Fast Top Coat
Recommendations: Layer the glitter polish over a black base for added depth and intensity.
DIY Instructions
- Prep: Prepare your nails with a base coat.
- Base Color: Apply a black polish as the base layer.
- Glitter Effect: Add green glitter polish, starting heavily at the base and thinning towards the tips.
- Blend: Use black dip powder at the tips to create a gradient effect.
- Finish: Apply a glossy top coat for a smooth, shiny finish.
Luxurious Tortoiseshell with Gold Flakes
This sophisticated design features a tortoiseshell pattern enhanced with gold leaf accents. The rich, warm tones of the tortoiseshell blend beautifully with the luxurious shimmer of the gold, offering an opulent and refined look perfect for seasonal gatherings or everyday elegance.
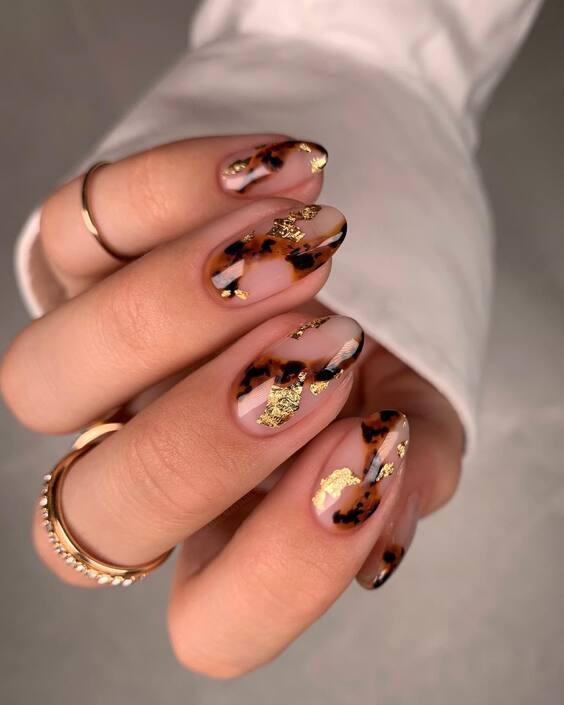
Consumables List
- Base Coat: Essie Here to Stay
- Tortoiseshell Polishes: Browns and Ambers from Sally Hansen
- Gold Leaf Flakes
- Top Coat: OPI Glossy Top Coat
Recommendations: Apply the gold flakes sparingly to maintain the subtlety of the design and to avoid overpowering the intricate tortoiseshell pattern.
DIY Instructions
- Prep: Apply a base coat to protect the nails.
- Base Color: Use a sponge to dab on the brown and amber polishes in layers, mimicking the natural pattern of tortoiseshell.
- Gold Flakes: While the polish is tacky, gently place gold leaf flakes on the nails.
- Finish: Seal with a glossy top coat to enhance the depth and preserve the design.
Gothic Sculptural Stiletto Nails
These sculptural stiletto nails take a bold approach with their gothic-inspired design. The high-gloss black polish is complemented by dynamic 3D elements that add depth and intrigue. Perfect for thematic events or expressing a daring personal style, these nails are a true work of art that pushes the boundaries of traditional nail aesthetics.
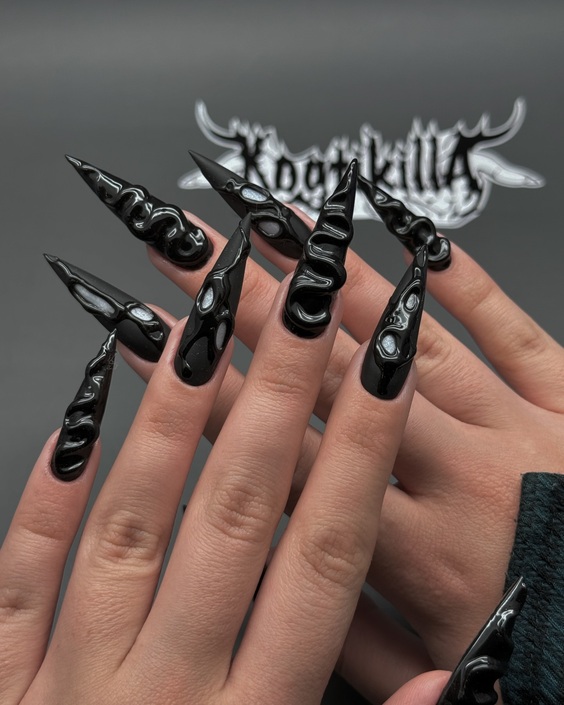
Consumables List
- Base Coat: CND Sticky Base Coat
- Black Gel Polish: Gelish “Black Shadow”
- 3D Gel for Sculpting
- Top Coat: Seche Vite Dry Fast Top Coat
Recommendations: A steady hand and patience are required for sculpting the 3D elements. Consider using a UV lamp to cure the 3D gel more efficiently.
DIY Instructions
- Prep: Apply a base coat to protect your nails.
- Base Color: Paint two coats of black gel polish, curing between each layer.
- 3D Sculpting: Use 3D gel to create the sculptural designs on each nail, then cure under a UV lamp.
- Finish: Apply a glossy top coat to enhance the shine and protect the design.
Elegant Pastel Floral Nails
This nail design features soft pastel tones with delicate floral patterns, exuding elegance and femininity. The matte finish on the floral accents contrasts beautifully with the glossy pastel base, making it an ideal choice for weddings, tea parties, or any springtime gathering.
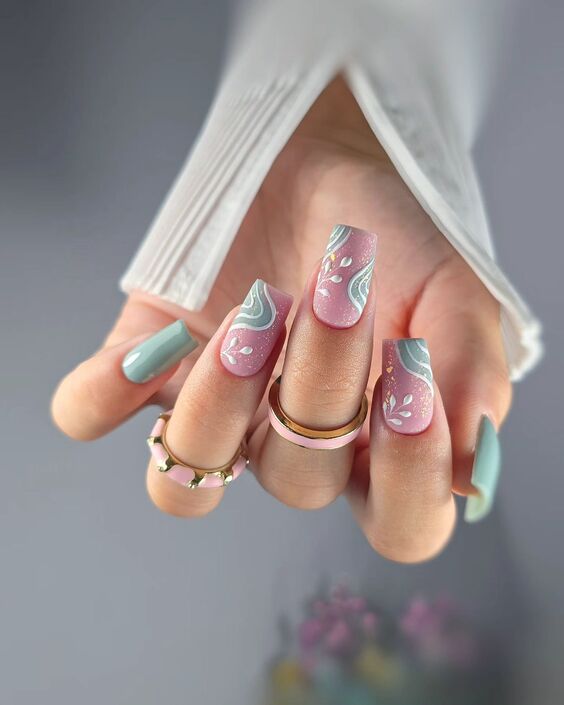
Consumables List
- Base Coat: Essie All-in-One Base
- Pastel Polishes: OPI “Let’s Be Friends” and “It’s a Boy!”
- Matte Top Coat: Essie Matte About You
- Detailing Brush
Recommendations: Use a thin detailing brush for the floral designs to ensure precision and clarity.
DIY Instructions
- Prep: Apply a base coat for smooth application.
- Base Color: Paint the nails with your chosen pastel shades.
- Floral Design: Hand-paint the floral designs using a detailing brush.
- Finish: Apply a matte top coat on the floral designs for a unique texture contrast.
Chic Pink Floral Art
Chic and understated, these nails boast a soft pink base with vibrant pink floral accents. The semi-transparent petals and crisp leaf outlines offer a fresh and clean look, ideal for everyday wear or special occasions that call for a subtle yet stylish manicure.
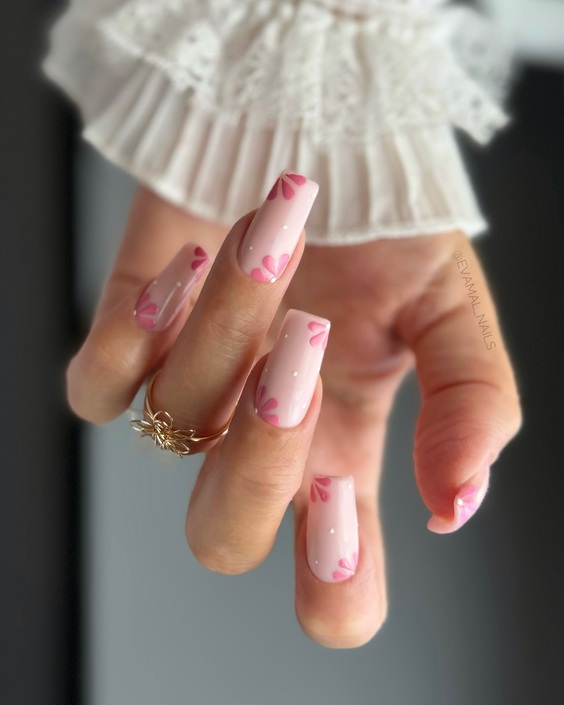
Consumables List
- Base Coat: OPI Natural Nail Base Coat
- Pink Gel Polish: Gelish “Tickle My France-y”
- White and Dark Pink Acrylic Paint for Detailing
- Top Coat: Gelish Top It Off Sealer Gel
Recommendations: Acrylic paints provide better control for detailed work like the petal and leaf designs.
DIY Instructions
- Prep: Begin with a base coat to protect the nails.
- Base Color: Apply a light pink gel polish as the base.
- Floral Details: Use acrylic paints to add floral details. Allow each color to dry before applying the next.
- Finish: Seal the design with a glossy top coat for durability and shine.
Vibrant Red Stilettos with Gold Accents
These stiletto nails make a bold statement with their vivid red matte finish and luxurious gold leaf accents. The long, tapered shape paired with the eye-catching color and metallic detailing creates a dramatic, glamorous look perfect for special occasions or making a fashion statement.
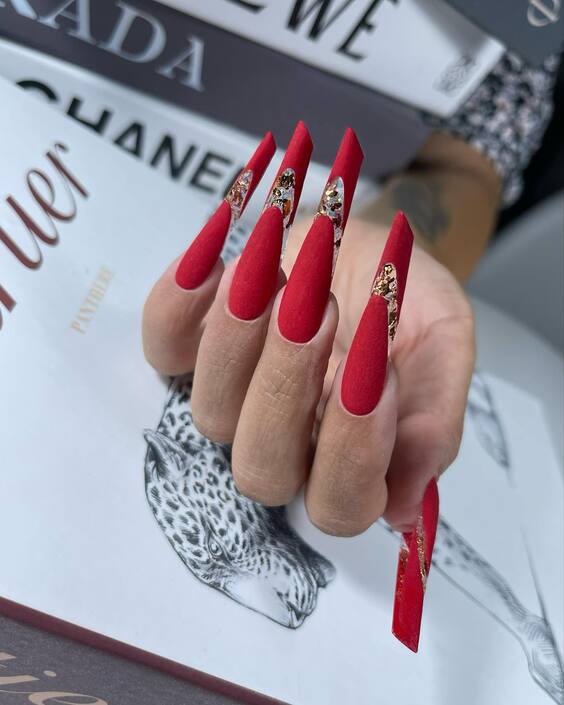
Consumables List
- Base Coat: OPI Natural Nail Base Coat
- Red Matte Polish: Essie “Russian Roulette”
- Gold Leaf: Available at craft stores
- Top Coat: Matte Finish by OPI
Recommendations: Apply gold leaf on a slightly tacky base to ensure it adheres well without additional adhesive.
DIY Instructions
- Prep: Apply a base coat to clean, filed nails.
- Color: Paint two coats of red matte polish.
- Gold Accents: Carefully place pieces of gold leaf on the tips or as desired.
- Finish: Seal with a matte top coat to maintain the velvety texture.
Smoky Marble Stiletto Nails
This design features a smoky marble effect, masterfully created using swirling shades of gray and translucent polishes. The stiletto shape adds an edgy, contemporary touch to the mystical, cloud-like pattern. These nails are ideal for those looking to combine artistry with a hint of mystery in their style.
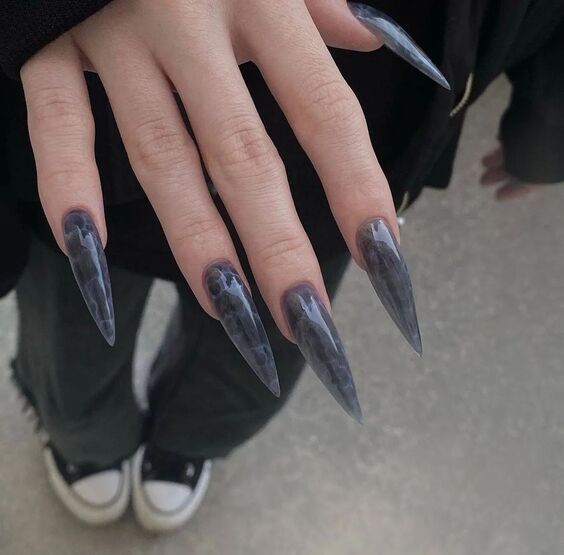
Consumables List
- Base Coat: Sally Hansen Double Duty Base and Top Coat
- Gray and Translucent Polishes: CND “Cityscape” and “Clearly Pink”
- Detailing Brush
- Top Coat: Seche Vite Dry Fast Top Coat
Recommendations: Use a dry brush technique for the marble effect to achieve a more natural, flowing design.
DIY Instructions
- Prep: Begin with a base coat for protection.
- Base Color: Apply a translucent base.
- Marble Effect: Swirl gray polish with a dry brush and blend with more translucent polish.
- Finish: Apply a glossy top coat for a deep, smooth finish.
Gothic Stiletto Nails with Metal Embellishments
These striking stiletto nails combine deep black polish with sharp metal tips and cross embellishments, exuding a bold gothic vibe. The precise application of metallic elements makes these nails not only a statement piece but also a reflection of edgy, alternative fashion.
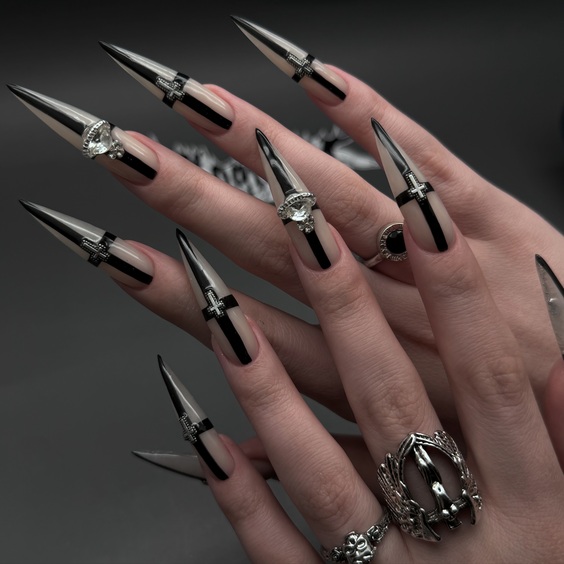
Consumables List
- Base Coat: Orly Rubberized Base
- Black Polish: China Glaze “Liquid Leather”
- Metal Tips and Cross Embellishments
- Top Coat: INM Out the Door Super Fast Drying Top Coat
Recommendations: Ensure the embellishments are securely attached using nail glue for durability and wearability.
DIY Instructions
- Prep: Apply a base coat to prevent staining and improve polish adherence.
- Base Color: Paint nails with a sleek black polish.
- Embellishments: Attach metal tips and crosses with nail glue.
- Finish: Seal everything with a fast-drying top coat for a protective shine.
Conclusion:
As we’ve explored a wide spectrum of nail art, it’s clear that the possibilities are as limitless as your imagination. From the luxurious touch of gold leaf accents on vibrant red stilettos to the mysterious swirls of smoky marble, each design offers a unique way to enhance your personal style. These trends not only reflect the latest in fashion but also offer a glimpse into the future of nail art—a future where creativity and expression know no bounds. Embrace these trends to make your nails a focal point of your ensemble and a true reflection of your individual flair.