21 Light Fall Nail Colors: Elegant & Trendy Manicure Ideas for Light Skin
Chic Coral Dream
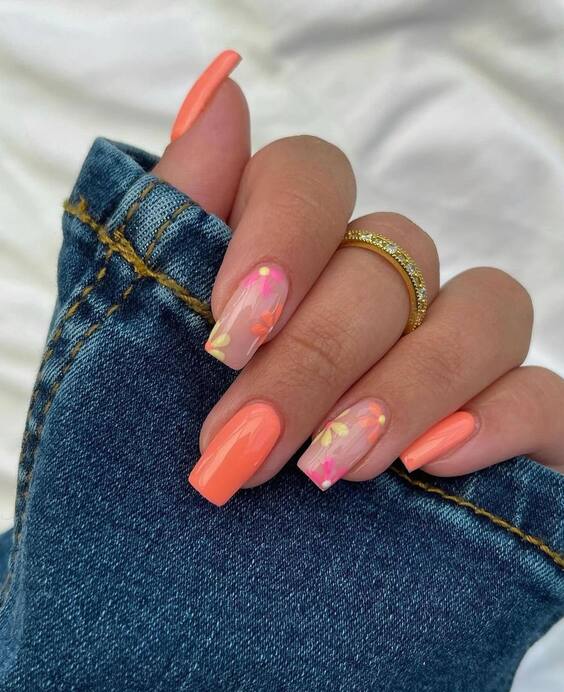
This design captures the essence of a warm autumn sunset. The nails feature a vibrant coral base, exuding warmth and vitality, perfect for the transition into fall. Each nail is adorned with delicate floral accents, blending pink and white petals with a touch of yellow, creating a harmonious and feminine look. The blend of glossy and matte finishes adds depth and dimension, making these nails a true standout.
Consumables
- Coral Nail Polish: OPI “Coral-ing Your Spirit Animal”
- White Nail Polish: Essie “Blanc”
- Pink Nail Polish: Essie “Pink Diamond”
- Yellow Nail Polish: OPI “Sun, Sea, and Sand in My Pants”
- Matte Top Coat: Sally Hansen “Big Matte Top Coat”
- Glossy Top Coat: Seche Vite “Dry Fast Top Coat”
- Nail Art Brushes: Winstonia Fine Detailing Brushes
- Nail Dotting Tools: Makartt Dotting Tools
DIY Instructions
- Prepare your nails by trimming, filing, and pushing back the cuticles.
- Apply a base coat to protect your natural nails.
- Paint all nails with the coral nail polish and let it dry completely.
- Using the nail art brushes, paint delicate flowers on each nail with the white, pink, and yellow polishes.
- Add small dots using the dotting tools to enhance the floral design.
- Seal the design with a matte top coat on the floral nails and a glossy top coat on the remaining nails for contrast.
- Allow the nails to dry completely and enjoy your chic coral dream nails.
Serene Sage Elegance
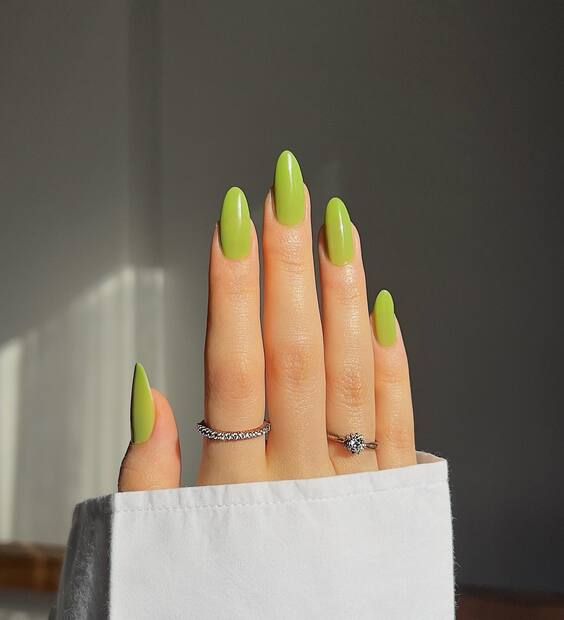
For a touch of nature-inspired tranquility, these sage green nails are perfect. The sage green shade is both calming and sophisticated, making it a versatile choice for fall. The elongated almond shape adds elegance, while the glossy finish gives a polished look. This design is ideal for those who prefer understated yet chic nails that complement any outfit.
Consumables
- Sage Green Nail Polish: Zoya “Bevin”
- Base Coat: OPI “Nail Envy”
- Glossy Top Coat: Essie “Good to Go”
- Nail File: Revlon Shape-N-Buff
- Cuticle Pusher: Tweezerman Dual-Ended Pushy
DIY Instructions
- Start with clean nails by filing them into an almond shape and pushing back the cuticles.
- Apply a base coat to protect your nails.
- Paint all nails with the sage green nail polish and let it dry.
- Apply a second coat for full coverage and an even finish.
- Seal with a glossy top coat to add shine and durability.
- Allow the nails to dry thoroughly and enjoy your serene sage elegance.
Tropical Sunset Vibes
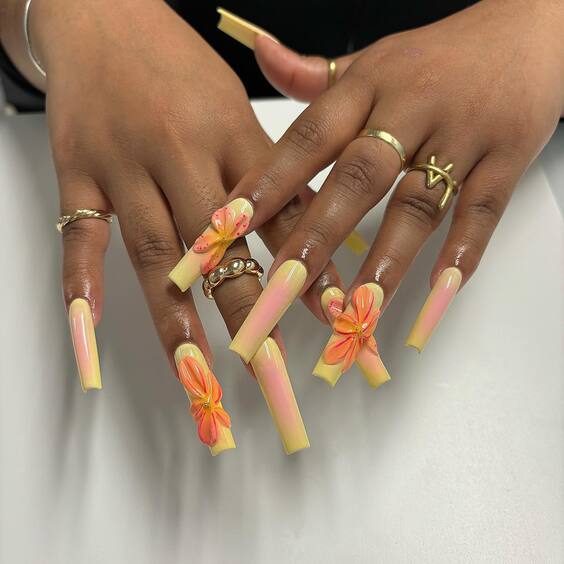
These nails are a delightful nod to tropical sunsets with their vibrant yellow and peach gradient. The design features 3D floral accents in a matching color scheme, adding an eye-catching element to the nails. The long, squared shape enhances the dramatic effect of the gradient, making these nails a perfect statement for the fall season.
Consumables
- Yellow Nail Polish: Sally Hansen “Mellow Yellow”
- Peach Nail Polish: China Glaze “Peachy Keen”
- 3D Flower Nail Art: Born Pretty 3D Floral Stickers
- Gradient Sponge: Pueen Latex-Free Nail Art Sponges
- Base Coat: Essie “All In One”
- Top Coat: Seche Vite “Dry Fast Top Coat”
DIY Instructions
- Prep your nails by shaping and buffing them, then pushing back the cuticles.
- Apply a base coat to protect your nails.
- Use the gradient sponge to apply the yellow and peach polishes, blending them to create a smooth transition.
- Apply 2-3 coats as needed for a vibrant gradient effect.
- Place the 3D floral stickers on the nails for added dimension.
- Seal with a top coat to secure the flowers and add shine.
- Let the nails dry completely and flaunt your tropical sunset vibes.
Whimsical Wildflowers
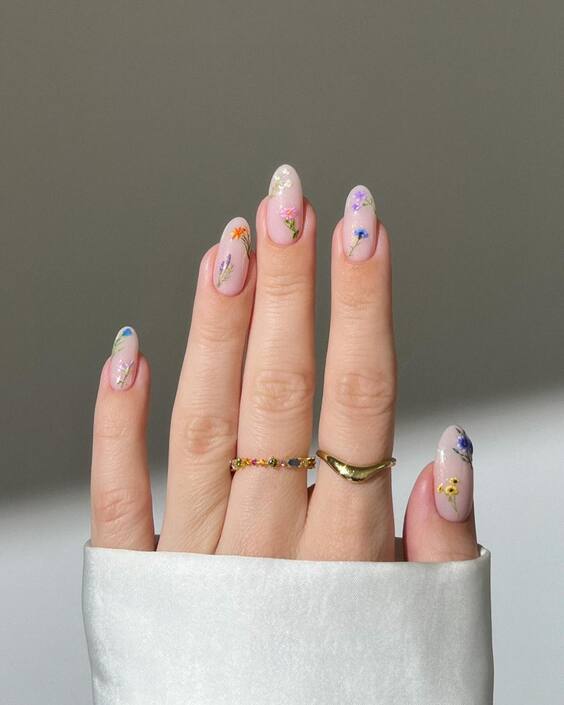
These nails are a fresh take on light fall nail colors, featuring a delicate floral design on a soft pink base. The tiny, intricate flowers in various colors add a whimsical and feminine touch, perfect for those who love a natural, garden-inspired look. The short, rounded shape keeps the design elegant and easy to wear.
Consumables
- Pink Nail Polish: Essie “Ballet Slippers”
- Floral Nail Art Stickers: Holographic Flower Nail Stickers
- Detailing Brushes: Beetles Nail Art Brushes
- Top Coat: Sally Hansen “Insta-Dri Anti-Chip Top Coat”
- Base Coat: OPI “Natural Nail Base Coat”
DIY Instructions
- Prepare your nails by trimming, filing, and pushing back the cuticles.
- Apply a base coat to protect your natural nails.
- Paint your nails with the pink nail polish and allow it to dry.
- Apply the floral nail art stickers randomly on each nail.
- Use the detailing brushes to add small touches or enhancements to the flowers if desired.
- Seal the design with a top coat to ensure longevity and shine.
- Let the nails dry thoroughly and enjoy your whimsical wildflowers.
Neon Flame Elegance
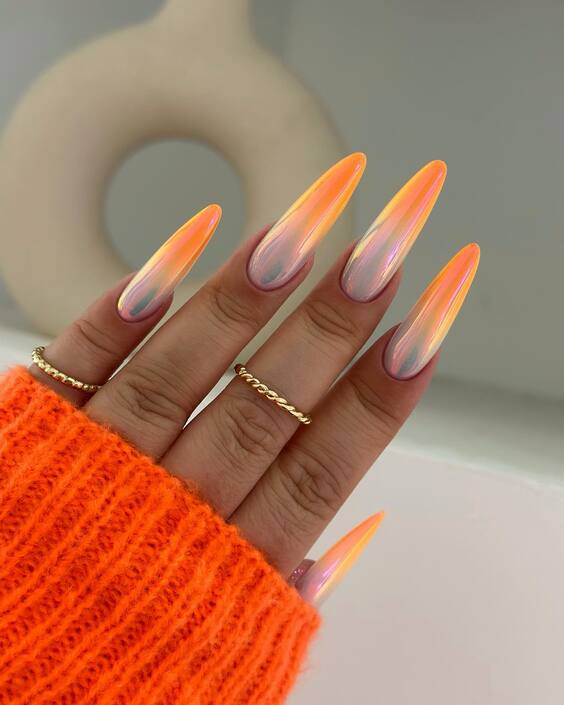
This bold design is perfect for making a statement this fall. The nails feature a striking neon orange flame effect over a neutral base, creating a vibrant and eye-catching look. The long, stiletto shape adds drama and elegance, making these nails a showstopper for any occasion.
Consumables
- Neon Orange Nail Polish: China Glaze “Orange Knockout”
- Neutral Base Polish: OPI “Samoan Sand”
- Flame Nail Art Stickers: Born Pretty Neon Flame Stickers
- Base Coat: Sally Hansen “Double Duty Base & Top Coat”
- Top Coat: Seche Vite “Dry Fast Top Coat”
DIY Instructions
- Prep your nails by shaping them into a stiletto shape and pushing back the cuticles.
- Apply a base coat to protect your nails.
- Paint your nails with the neutral base polish and let it dry.
- Apply the neon flame stickers over the base color.
- Seal the design with a top coat to secure the stickers and add shine.
- Allow the nails to dry completely and enjoy your neon flame elegance.
Sunset Ombre Delight
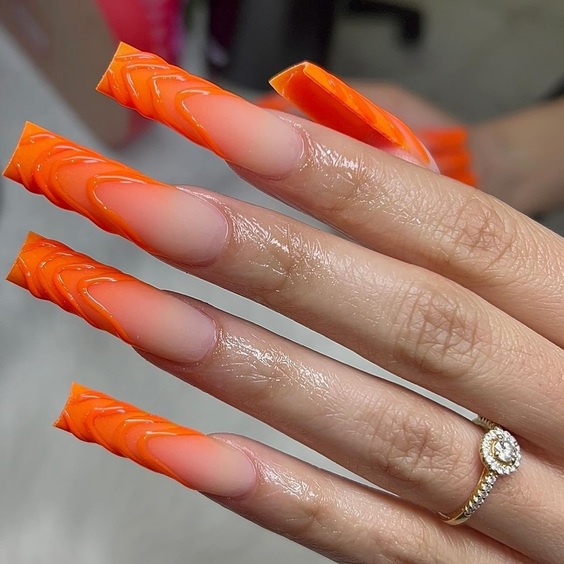
These nails are a beautiful representation of a sunset ombre effect, blending orange and pink hues seamlessly. The design features a subtle gradient that transitions smoothly from one color to the next, creating a stunning and eye-catching look. The long, coffin shape adds a touch of sophistication, making these nails perfect for a night out or a special event.
Consumables
- Orange Nail Polish: Essie “Tart Deco”
- Pink Nail Polish: Zoya “Haruko”
- Ombre Sponge: Latex-Free Nail Art Sponges
- Base Coat: Essie “First Base”
- Top Coat: Sally Hansen “Insta-Dri Anti-Chip Top Coat”
DIY Instructions
- Prep your nails by shaping them into a coffin shape and pushing back the cuticles.
- Apply a base coat to protect your nails.
- Use the ombre sponge to apply the orange and pink polishes, creating a smooth gradient effect.
- Apply 2-3 coats as needed for a vibrant ombre look.
- Seal the design with a top coat to add shine and durability.
- Let the nails dry thoroughly and enjoy your sunset ombre delight.
Neon Animal Print
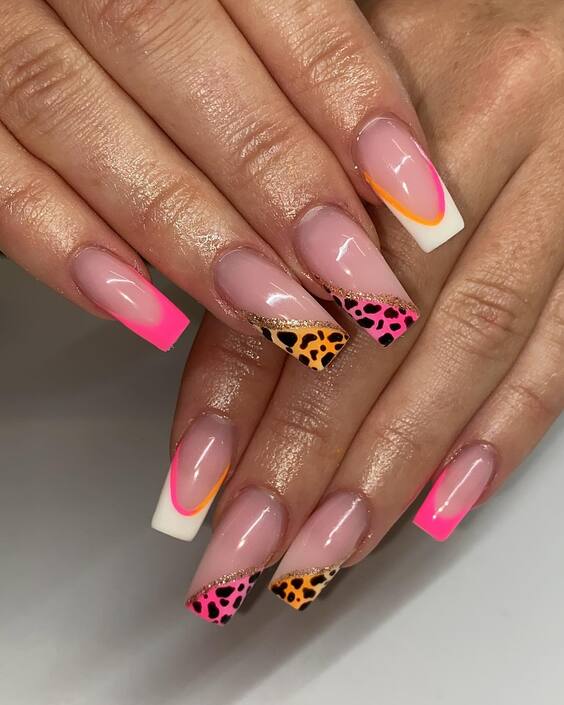
This bold design merges neon hues with an exotic animal print, creating a vibrant and trendy look perfect for fall. The nails feature a mix of neon pink, orange, and white French tips, paired with leopard print accents. The sharp, coffin shape of the nails enhances the dramatic effect of the design, making these nails a statement piece for any fall outfit.
Consumables
- Neon Pink Nail Polish: China Glaze “Pink Voltage”
- Neon Orange Nail Polish: Orly “Tropical Pop”
- White Nail Polish: Essie “Blanc”
- Black Nail Polish: OPI “Black Onyx”
- Leopard Print Stickers: Born Pretty Animal Print Stickers
- Base Coat: Sally Hansen “Double Duty Base & Top Coat”
- Top Coat: Seche Vite “Dry Fast Top Coat”
- Nail Art Brushes: Beetles Nail Art Brushes
DIY Instructions
- Prep your nails by shaping them into a coffin shape and pushing back the cuticles.
- Apply a base coat to protect your nails.
- Paint the French tips using the neon pink, orange, and white polishes.
- Use the black polish and nail art brushes to create the leopard print accents.
- Apply the leopard print stickers for additional detail if desired.
- Seal the design with a top coat to add shine and durability.
- Allow the nails to dry thoroughly and flaunt your neon animal print nails.
Blue Floral Charm
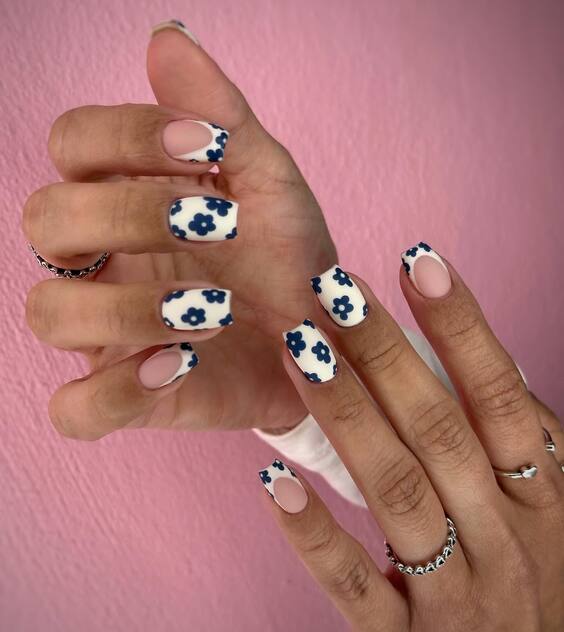
These nails feature a charming blue floral design on a nude base, perfect for a subtle yet stylish look this fall. The floral patterns add a touch of whimsy and femininity, while the square shape keeps the design modern and chic. This manicure is ideal for those who prefer a light and delicate aesthetic for the season.
Consumables
- Nude Nail Polish: OPI “Bubble Bath”
- Blue Nail Polish: Essie “Butler Please”
- Floral Nail Art Stickers: Holographic Flower Nail Stickers
- Base Coat: Essie “First Base”
- Top Coat: Sally Hansen “Insta-Dri Anti-Chip Top Coat”
- Nail Art Brushes: Winstonia Fine Detailing Brushes
DIY Instructions
- Prep your nails by trimming, filing, and pushing back the cuticles.
- Apply a base coat to protect your nails.
- Paint your nails with the nude polish and allow it to dry.
- Use the blue polish and nail art brushes to paint the floral designs.
- Apply the floral nail art stickers for added detail if desired.
- Seal the design with a top coat to ensure longevity and shine.
- Let the nails dry thoroughly and enjoy your blue floral charm nails.
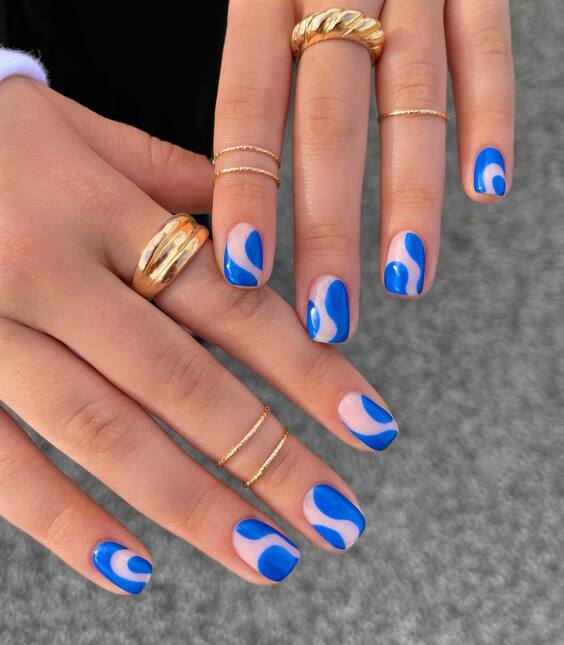
Electric Blue Waves
These nails feature an electric blue wave design on a nude base, creating a modern and eye-catching look perfect for fall. The curvy blue lines add movement and interest to the design, while the short, natural shape makes these nails both stylish and practical for everyday wear.
Consumables
- Nude Nail Polish: OPI “Samoan Sand”
- Electric Blue Nail Polish: China Glaze “I Sea the Point”
- Base Coat: Sally Hansen “Double Duty Base & Top Coat”
- Top Coat: Essie “Good to Go”
- Nail Art Brushes: Makartt Fine Detailing Brushes
DIY Instructions
- Prep your nails by trimming, filing, and pushing back the cuticles.
- Apply a base coat to protect your nails.
- Paint your nails with the nude polish and let it dry.
- Use the electric blue polish and nail art brushes to create the wave designs.
- Seal the design with a top coat to add shine and durability.
- Allow the nails to dry completely and enjoy your electric blue wave nails.
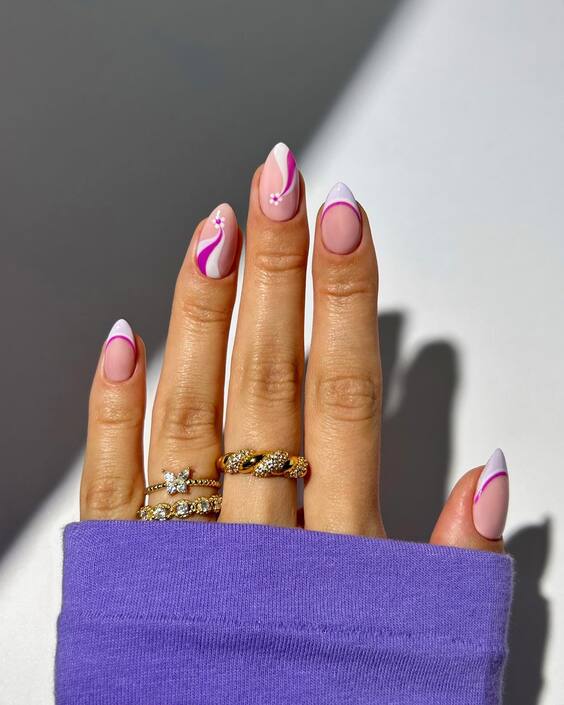
Pink Swirl Elegance
These nails feature a sophisticated swirl design with a combination of pink and white hues, creating a modern and chic look perfect for fall. The nails are elongated and almond-shaped, providing a sleek canvas for the swirling patterns. Tiny rhinestone accents add a touch of sparkle, making this design ideal for those who want to blend elegance with a bit of glamour.
Consumables
- Pink Nail Polish: Essie “Ballet Slippers”
- White Nail Polish: OPI “Alpine Snow”
- Rhinestones: Swarovski Crystal Nail Art Stones
- Base Coat: Sally Hansen “Double Duty Base & Top Coat”
- Top Coat: Seche Vite “Dry Fast Top Coat”
- Nail Art Brushes: Beetles Nail Art Brushes
- Rhinestone Picker: Wax Pencil for Rhinestones
DIY Instructions
- Prep your nails by shaping them into an almond shape and pushing back the cuticles.
- Apply a base coat to protect your nails.
- Paint your nails with the pink nail polish and let it dry.
- Use the white nail polish and nail art brushes to create the swirling designs.
- Apply the rhinestones at strategic points using the wax pencil.
- Seal the design with a top coat to add shine and secure the rhinestones.
- Allow the nails to dry completely and enjoy your pink swirl elegance.
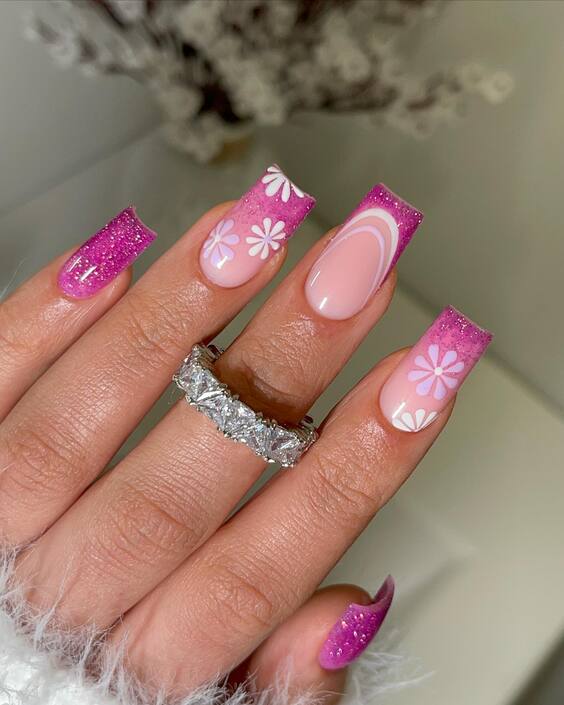
Glittery Daisy Delight
This design is a delightful mix of glitter and floral elements, perfect for adding a fun touch to your fall nails. The pink glitter French tips are complemented by daisy patterns on a nude base, creating a playful and eye-catching look. The long, squared shape of the nails provides ample space for intricate designs, making this manicure a standout choice for the season.
Consumables
- Nude Nail Polish: OPI “Samoan Sand”
- Pink Glitter Polish: China Glaze “Pink Voltage Glitter”
- White Nail Polish: Essie “Blanc”
- Base Coat: Essie “First Base”
- Top Coat: Sally Hansen “Insta-Dri Anti-Chip Top Coat”
- Nail Art Brushes: Winstonia Fine Detailing Brushes
- Glitter Topper: NYX “Pink Glitter Topper”
DIY Instructions
- Prep your nails by shaping them into a squared shape and pushing back the cuticles.
- Apply a base coat to protect your nails.
- Paint your nails with the nude polish and allow it to dry.
- Apply the pink glitter polish to the tips of your nails.
- Use the white polish and nail art brushes to paint the daisy patterns.
- Seal the design with a top coat to ensure longevity and shine.
- Let the nails dry thoroughly and enjoy your glittery daisy delight.
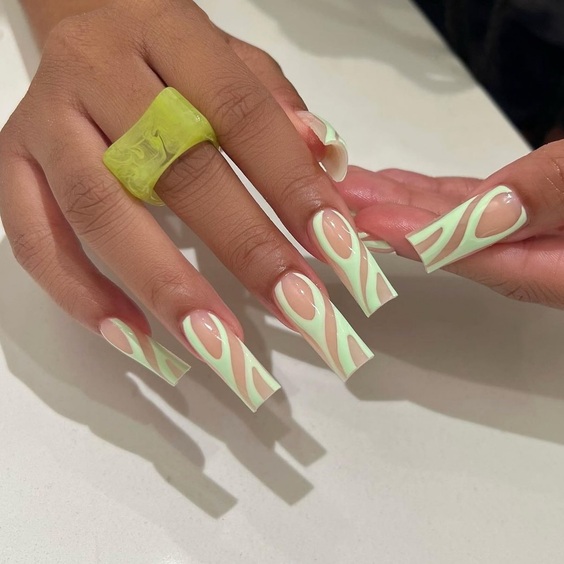
Minty Fresh Geometrics
These nails feature a fresh and modern geometric design with mint green accents on a nude base. The bold, clean lines and shapes create a striking visual effect, perfect for those who love a contemporary look. The long, coffin shape enhances the geometric patterns, making this design a trendy choice for fall.
Consumables
- Nude Nail Polish: OPI “Be There in a Prosecco”
- Mint Green Nail Polish: Essie “Mint Candy Apple”
- Base Coat: Sally Hansen “Double Duty Base & Top Coat”
- Top Coat: Seche Vite “Dry Fast Top Coat”
- Nail Art Brushes: Makartt Fine Detailing Brushes
DIY Instructions
- Prep your nails by shaping them into a coffin shape and pushing back the cuticles.
- Apply a base coat to protect your nails.
- Paint your nails with the nude polish and let it dry.
- Use the mint green polish and nail art brushes to create the geometric designs.
- Seal the design with a top coat to add shine and durability.
- Allow the nails to dry completely and enjoy your minty fresh geometrics.
Tropical Gradient with Floral Accents
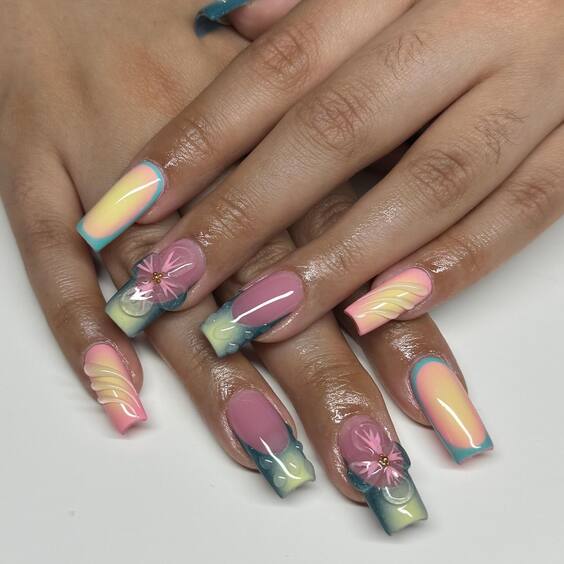
These nails are a beautiful blend of tropical gradients and intricate floral accents, perfect for adding a pop of color to your fall look. The design features a smooth transition from yellow to pink, accented with delicate blue and pink flowers. The squared shape provides a modern and bold canvas for this vibrant design, making these nails an eye-catching choice for any fall occasion.
Consumables
- Yellow Nail Polish: OPI “Exotic Birds Do Not Tweet”
- Pink Nail Polish: Essie “Mod Square”
- Blue Nail Polish: Zoya “Dory”
- 3D Floral Nail Art: Born Pretty 3D Flower Stickers
- Base Coat: Essie “First Base”
- Top Coat: Seche Vite “Dry Fast Top Coat”
- Gradient Sponge: Pueen Latex-Free Nail Art Sponges
- Nail Art Brushes: Beetles Nail Art Brushes
DIY Instructions
- Prep your nails by shaping them into a squared shape and pushing back the cuticles.
- Apply a base coat to protect your nails.
- Use the gradient sponge to apply the yellow and pink polishes, creating a smooth transition.
- Apply 2-3 coats as needed for a vibrant gradient effect.
- Place the 3D floral stickers on the nails for added dimension.
- Seal the design with a top coat to ensure longevity and shine.
- Let the nails dry thoroughly and enjoy your tropical gradient nails with floral accents.
Delicate Floral Accents
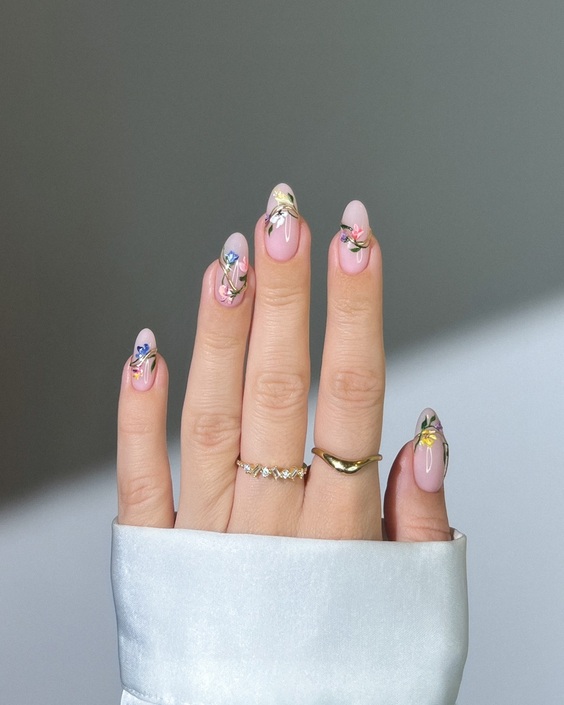
This nail design is a delicate and elegant choice for fall, featuring soft pink hues with intricate floral accents. The almond-shaped nails provide a graceful and feminine look, while the detailed flowers add a touch of nature-inspired beauty. This design is perfect for those who prefer a subtle yet sophisticated manicure that complements the light fall nail colors for light skin.
Consumables
- Pink Nail Polish: OPI “Bubble Bath”
- Floral Nail Art Stickers: Holographic Flower Nail Stickers
- Base Coat: Sally Hansen “Double Duty Base & Top Coat”
- Top Coat: Essie “Good to Go”
- Nail Art Brushes: Winstonia Fine Detailing Brushes
DIY Instructions
- Prep your nails by shaping them into an almond shape and pushing back the cuticles.
- Apply a base coat to protect your nails.
- Paint your nails with the pink polish and let it dry.
- Apply the floral nail art stickers randomly on each nail.
- Use the detailing brushes to add small touches or enhancements to the flowers if desired.
- Seal the design with a top coat to ensure longevity and shine.
- Let the nails dry thoroughly and enjoy your delicate floral accents.
Neon Coral Marble
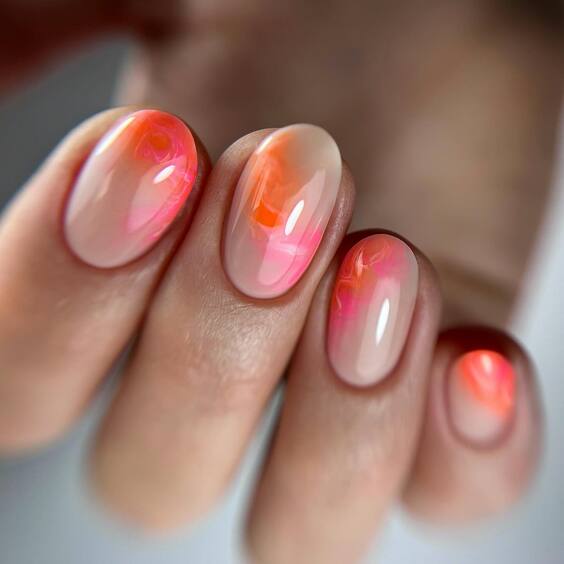
These nails are a stunning example of the marble trend, featuring neon coral swirls on a nude base. The oval shape enhances the elegant and fluid design, making these nails a perfect choice for those who want a vibrant yet sophisticated look. The combination of neon and nude creates a striking contrast, ideal for fall nail color ideas for light skin.
Consumables
- Nude Nail Polish: OPI “Samoan Sand”
- Neon Coral Nail Polish: China Glaze “Flip Flop Fantasy”
- Base Coat: Essie “First Base”
- Top Coat: Seche Vite “Dry Fast Top Coat”
- Nail Art Brushes: Makartt Fine Detailing Brushes
DIY Instructions
- Prep your nails by shaping them into an oval shape and pushing back the cuticles.
- Apply a base coat to protect your nails.
- Paint your nails with the nude polish and let it dry.
- Use the neon coral polish and nail art brushes to create the marble effect by swirling the colors together.
- Seal the design with a top coat to add shine and durability.
- Allow the nails to dry completely and enjoy your neon coral marble nails.
Dewy Ombre Delight
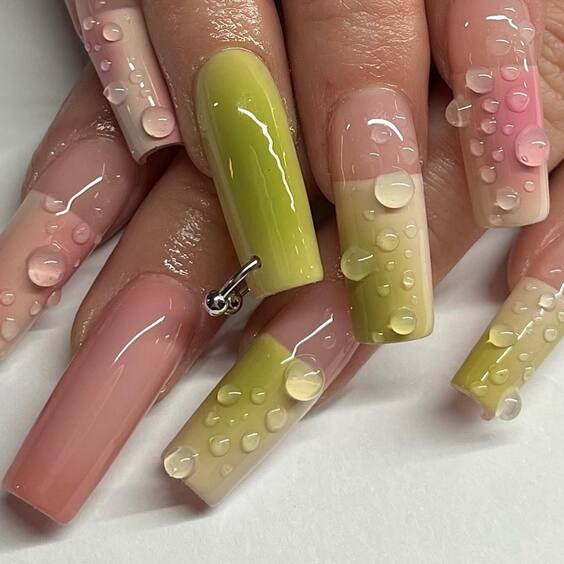
These nails feature a unique dewy effect with a soft ombre transition from pink to green. The 3D droplets add a refreshing and playful element to the design, while the long, squared shape enhances the modern look. This manicure is perfect for those who love creative and eye-catching nail art.
Consumables
- Pink Nail Polish: Essie “Fiji”
- Green Nail Polish: OPI “This Color’s Making Waves”
- 3D Droplets: Born Pretty Water Droplet Nail Art
- Base Coat: Sally Hansen “Double Duty Base & Top Coat”
- Top Coat: Seche Vite “Dry Fast Top Coat”
- Nail Art Brushes: Beetles Nail Art Brushes
DIY Instructions
- Prep your nails by shaping them into a squared shape and pushing back the cuticles.
- Apply a base coat to protect your nails.
- Paint your nails with the pink polish and let it dry.
- Use the gradient sponge to apply the green polish, creating a smooth ombre transition.
- Apply 2-3 coats as needed for a vibrant effect.
- Add the 3D droplets randomly on the nails for the dewy effect.
- Seal the design with a top coat to ensure longevity and shine.
- Let the nails dry thoroughly and enjoy your dewy ombre delight.
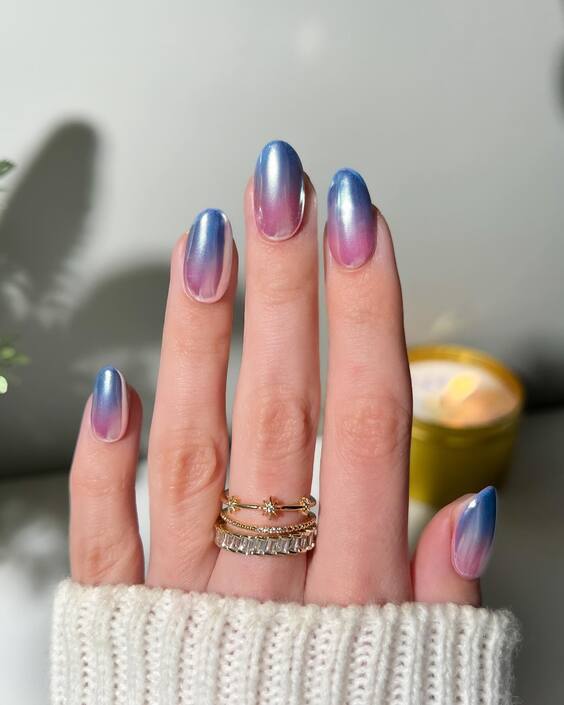
Metallic Sunset Gradient
This design captures the beauty of a sunset with its gradient from blue to pink, accented with a metallic sheen. The oval shape adds elegance to the design, making it perfect for a sophisticated fall look. The metallic finish gives these nails a glamorous and trendy vibe, ideal for evening events.
Consumables
- Blue Nail Polish: Essie “Aruba Blue”
- Pink Nail Polish: Zoya “Haruko”
- Metallic Top Coat: Sally Hansen “Big Matte Top Coat”
- Base Coat: OPI “Nail Envy”
- Top Coat: Essie “Good to Go”
- Gradient Sponge: Pueen Latex-Free Nail Art Sponges
DIY Instructions
- Prep your nails by shaping them into an oval shape and pushing back the cuticles.
- Apply a base coat to protect your nails.
- Use the gradient sponge to apply the blue and pink polishes, creating a smooth transition.
- Apply 2-3 coats as needed for a vibrant effect.
- Add a metallic top coat for a shiny finish.
- Seal the design with a top coat to add shine and durability.
- Allow the nails to dry completely and enjoy your metallic sunset gradient nails.
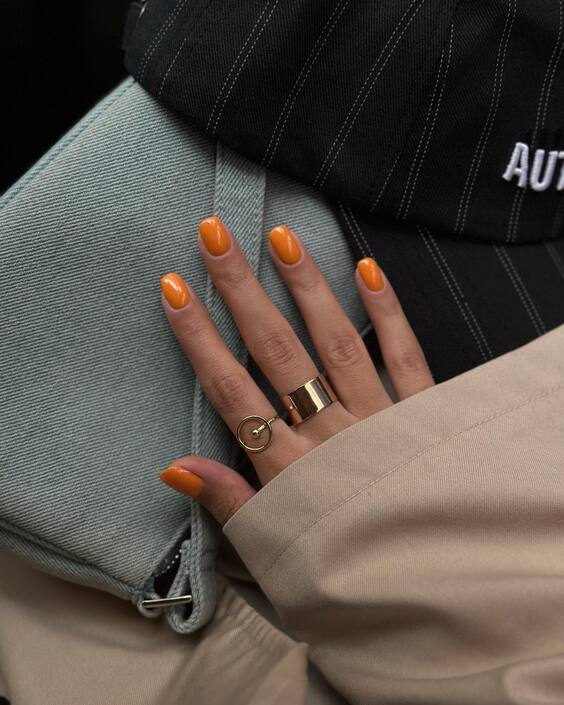
Vibrant Pumpkin Spice
These nails are a perfect tribute to the fall season with their vibrant pumpkin spice color. The rich orange hue is bold and eye-catching, making it a great choice for those who want to embrace the autumn vibe. The short, rounded shape makes this manicure practical and stylish for everyday wear.
Consumables
- Pumpkin Orange Nail Polish: OPI “A Good Man-darin is Hard to Find”
- Base Coat: Essie “First Base”
- Top Coat: Seche Vite “Dry Fast Top Coat”
- Nail File: Revlon Shape-N-Buff
- Cuticle Pusher: Tweezerman Dual-Ended Pushy
DIY Instructions
- Prep your nails by shaping them into a rounded shape and pushing back the cuticles.
- Apply a base coat to protect your nails.
- Paint your nails with the pumpkin orange polish and let it dry.
- Apply a second coat for full coverage and an even finish.
- Seal with a top coat to add shine and durability.
- Allow the nails to dry thoroughly and enjoy your vibrant pumpkin spice nails.
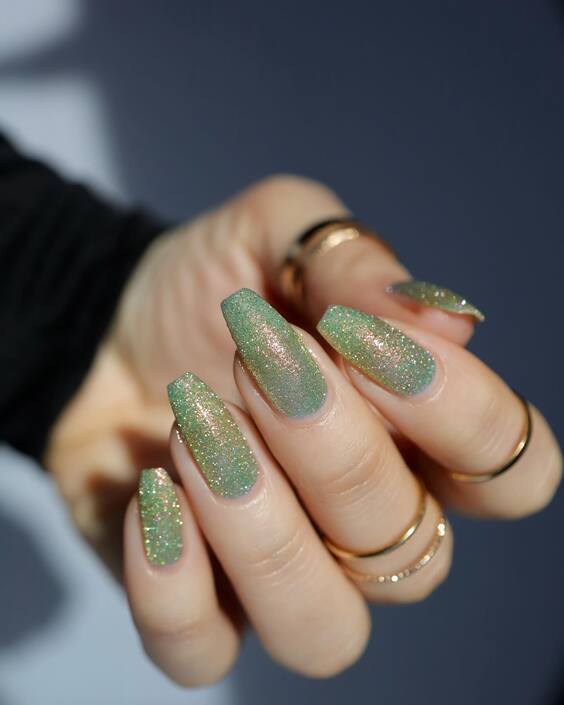
Glittery Green Glam
These nails are the epitome of glitz and glam, featuring a stunning green glitter polish that catches the light beautifully. The long, coffin shape enhances the dramatic effect of the glitter, making this design perfect for those who want to make a bold statement this fall. The glitter adds a touch of magic, ideal for any festive occasion.
Consumables
- Green Glitter Nail Polish: Zoya “Merida”
- Base Coat: OPI “Nail Envy”
- Top Coat: Seche Vite “Dry Fast Top Coat”
- Nail File: Revlon Shape-N-Buff
- Cuticle Pusher: Tweezerman Dual-Ended Pushy
DIY Instructions
- Prep your nails by shaping them into a coffin shape and pushing back the cuticles.
- Apply a base coat to protect your nails.
- Paint your nails with the green glitter polish and let it dry.
- Apply a second coat for full coverage and an even finish.
- Seal with a top coat to add shine and durability.
- Allow the nails to dry thoroughly and enjoy your glittery green glam nails.
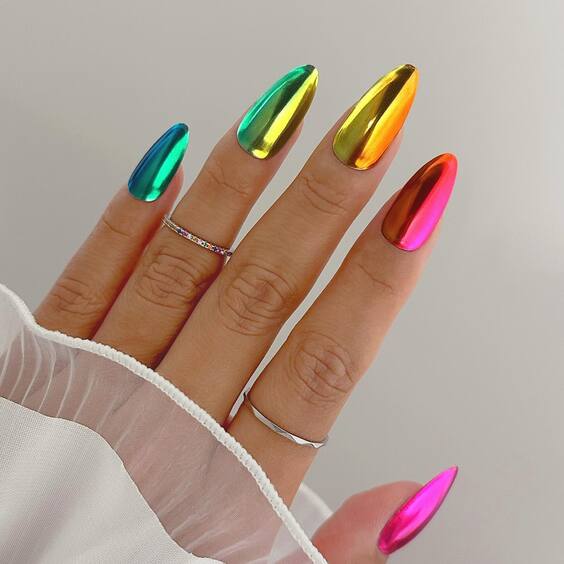
Metallic Rainbow Delight
These nails are a vibrant and fun choice for fall, featuring a metallic rainbow effect. Each nail showcases a different color, creating a dazzling and playful look. The long, stiletto shape adds a dramatic flair, making this design perfect for those who love to experiment with bold and unique styles.
Consumables
- Metallic Blue Nail Polish: China Glaze “Techno Teal”
- Metallic Green Nail Polish: Essie “For the Twill of It”
- Metallic Yellow Nail Polish: OPI “I Just Can’t Cope-acabana”
- Metallic Orange Nail Polish: Zoya “Tanzy”
- Metallic Pink Nail Polish: Sally Hansen “Pink Blink”
- Base Coat: Essie “First Base”
- Top Coat: Seche Vite “Dry Fast Top Coat”
- Nail File: Revlon Shape-N-Buff
DIY Instructions
- Prep your nails by shaping them into a stiletto shape and pushing back the cuticles.
- Apply a base coat to protect your nails.
- Paint each nail with a different metallic polish and let it dry.
- Apply a second coat for full coverage and an even finish.
- Seal with a top coat to add shine and durability.
- Allow the nails to dry thoroughly and enjoy your metallic rainbow delight.
Earthy French Tips with Embellishments
These nails feature a modern take on the classic French manicure, incorporating earthy tones and intricate embellishments. The design includes white, green, and brown tips, each adorned with tiny gold stars and pearls. The long, squared shape provides a perfect canvas for this elegant and sophisticated look.
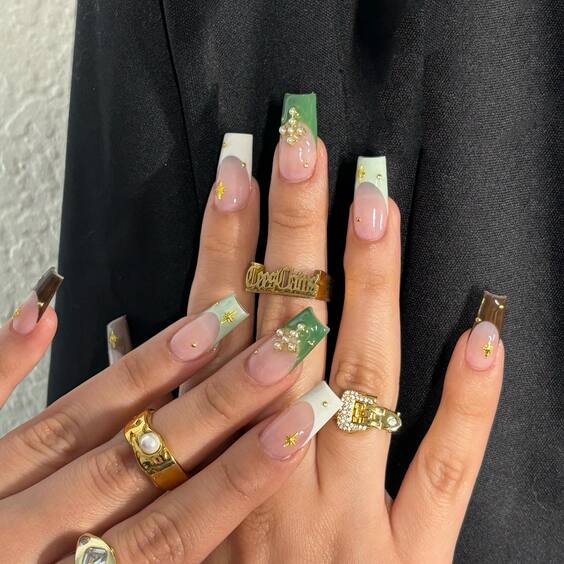
Consumables
- White Nail Polish: Essie “Blanc”
- Green Nail Polish: OPI “This Isn’t Greenland”
- Brown Nail Polish: Zoya “Louise”
- Gold Star Stickers: Born Pretty Gold Star Nail Stickers
- Pearl Nail Art: Makartt Pearl Nail Art
- Base Coat: Sally Hansen “Double Duty Base & Top Coat”
- Top Coat: Seche Vite “Dry Fast Top Coat”
- Nail Art Brushes: Beetles Nail Art Brushes
DIY Instructions
- Prep your nails by shaping them into a squared shape and pushing back the cuticles.
- Apply a base coat to protect your nails.
- Paint the tips with the white, green, and brown polishes and let them dry.
- Use the nail art brushes to add the gold stars and pearls.
- Seal the design with a top coat to secure the embellishments and add shine.
- Allow the nails to dry completely and enjoy your earthy French tips with embellishments.
In conclusion, these light fall nail colors are perfect for embracing the season with style and sophistication. Whether you prefer bold corals, serene greens, or tropical gradients, there’s a design here for every taste. Try these at home and let your nails shine this fall!

