21 Stunning Purple Nail Art Designs for Every Occasion
Have you ever wondered how to elevate your nail art game with a touch of regal elegance? Purple color nail art designs can transform your nails into a canvas of sophistication and style. Whether you’re a fan of lavender, adore combos, or love the depth of purple shades, there’s a design to match your vibe. What makes purple so universally loved in the nail art world? Let’s delve into some stunning designs that showcase the versatility and beauty of purple in nail art.
Swirling Purple Majesty
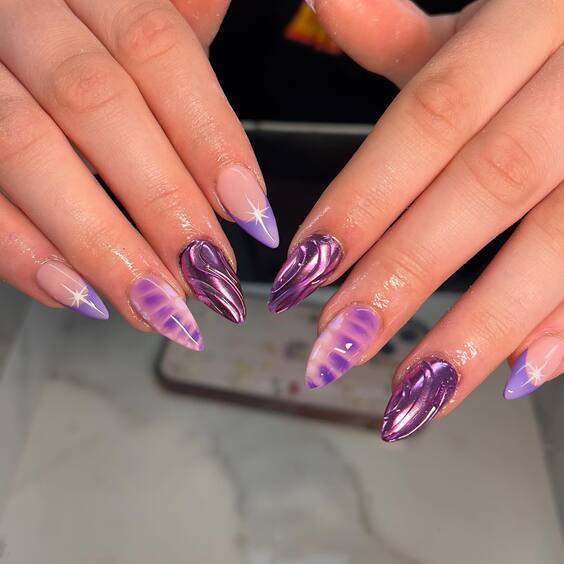
The first image captures a mesmerizing ombre nail art designs color combos purple with a gradient that smoothly transitions from a translucent lavender to a deep violet. This design not only exemplifies elegance but also demonstrates the dynamic use of purple to create depth and interest. The added swirls and subtle star accents bring a whimsical and dreamy feel to the nails, making them perfect for both everyday wear and special occasions.
List of Consumables
- Base coat: Essie Strong Start
- Purple polishes: OPI “Do You Have this Color in Stock-holm?” and Essie “Play Date”
- Top coat: Seche Vite Dry Fast Top Coat
- Accent tools: Fine-tip brush and dotting tool
DIY Instructions
- Start with a clean, buffed nail and apply a base coat.
- Once the base is dry, apply a light lavender polish as the base color.
- For the ombre effect, sponge on a darker purple from the mid-nail downwards.
- Use a fine brush to add swirls with a white polish, then place star decals.
- Seal everything with a fast-drying top coat for a glossy finish.
Purple Marble Elegance
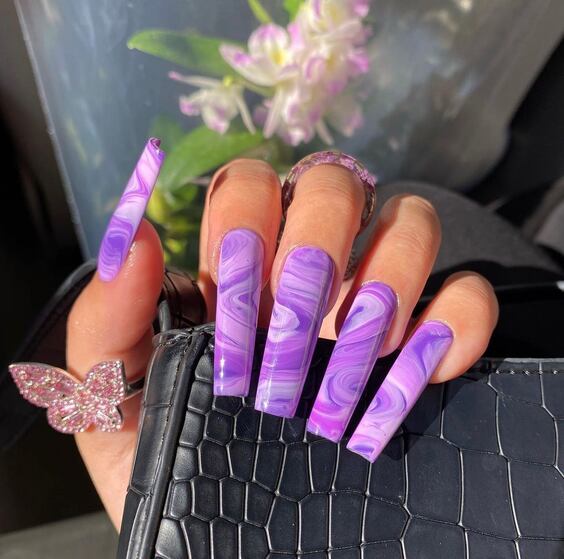
The second image showcases a funky nail art designs color combos purple featuring a unique marble effect that combines shades of purple and white to mimic natural marble. The glossy finish enhances the depth and clarity of the design, making it a standout choice for those looking to make a statement with their nails.
List of Consumables
- Base coat: Sally Hansen Double Duty
- Purple polishes: China Glaze “That’s Shore Bright” and “Lotus Begin”
- White polish: Sally Hansen “White On”
- Marbling tool: Clean toothpick or pin
- Top coat: Sally Hansen Insta-Dri Anti-Chip
DIY Instructions
- Apply a base coat to protect your nails.
- Paint your nails with a solid coat of the lighter purple polish.
- While wet, drop in spots of darker purple and white polish.
- Use a toothpick to swirl the colors gently.
- Finish with a high-gloss top coat to enhance the marble effect.
Subtle Lavender Tips
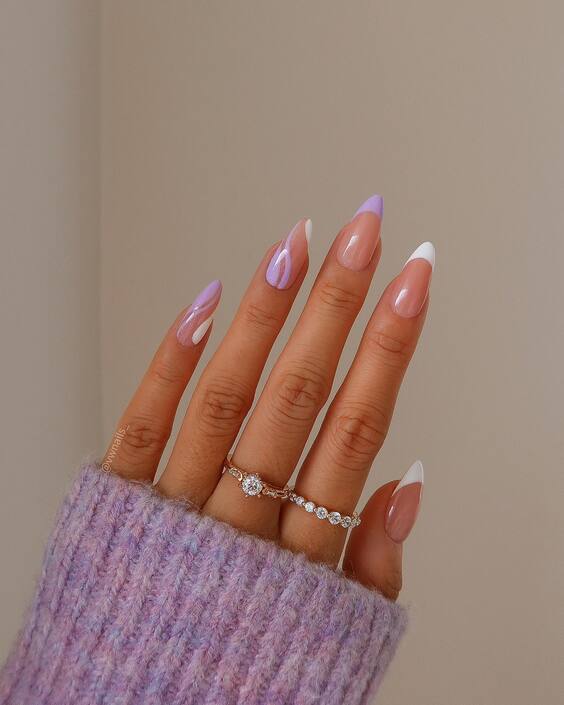
In the third image, we see a delicate simple nail art designs purple color focusing on subtle lavender tips with a natural nude base. This minimalist approach is perfect for those who prefer understated elegance, blending seamlessly with various outfits and occasions.
List of Consumables
- Base coat: CND Stickey Base Coat
- Nude polish: Essie “Ballet Slippers”
- Lavender polish: Zoya “Abby”
- Top coat: OPI Top Coat
DIY Instructions
- Prepare your nails with a base coat.
- Apply two coats of a nude polish as the base.
- Using a thin brush, carefully paint the tips with a soft lavender.
- Apply a top coat to seal the design and add shine.
Geometric Purple Passion
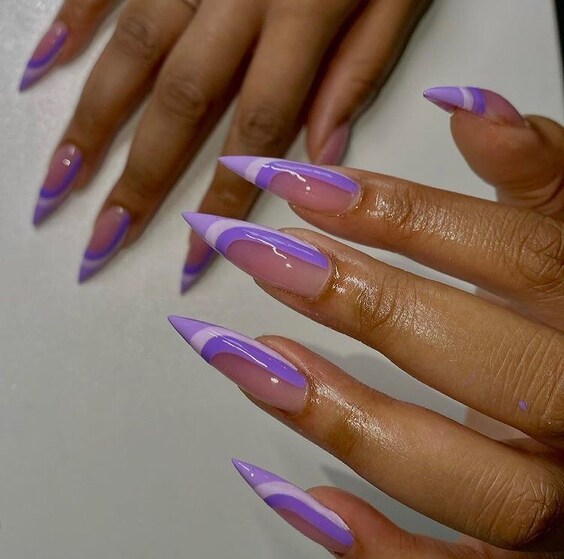
This image showcases a striking approach to purple nail art designs lavender color with alternating bands of nude and vivid purple. The precise geometric patterns on the accent nails add a modern twist to the classic stiletto shape, making this design not only fashionable but also a statement of artistic expression.
List of Consumables
- Base coat: OPI Natural Nail Base Coat
- Nude polish: Essie “Bare With Me”
- Purple polish: Orly “Purple Crush”
- Top coat: Deborah Lippmann Gel Lab Pro
- Striping tape
DIY Instructions
- Begin with a base coat to protect your nails.
- Paint all nails nude. Let dry.
- Apply striping tape to create clean lines for the purple stripes.
- Paint over with purple polish, remove tape while the polish is still wet.
- Finish with a glossy top coat to seal and add shine.
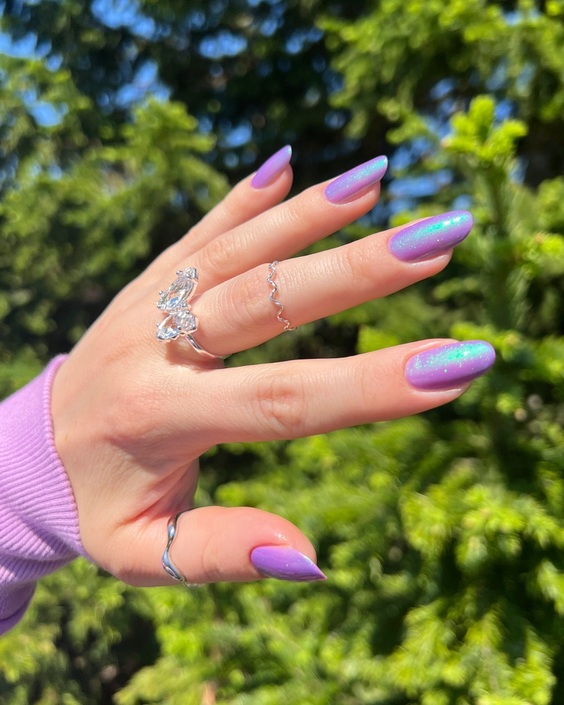
Luminous Lavender Shimmer
Featured here is a subtle yet enchanting ombre nail art designs color combos purple that incorporates a shimmering finish to reflect light beautifully. Ideal for daily wear or special events, the gradient transitions from a soft lavender at the base to a richer purple at the tips, enriched with a dusting of glitter for an extra sparkle.
List of Consumables
- Base coat: CND Sticky Base
- Purple polishes: China Glaze “Lotus Begin” and “Flying Dragon”
- Glitter top coat: Sally Hansen “Big Glitter” Top Coat
- Sponge for ombre application
DIY Instructions
- Apply base coat to all nails.
- Start with a lighter shade of lavender on the entire nail.
- Use a sponge to dab on the darker purple at the tips, blending into the base color for a smooth transition.
- Add a glitter top coat for shimmer.
- Allow to dry completely before finishing with a sealing top coat.
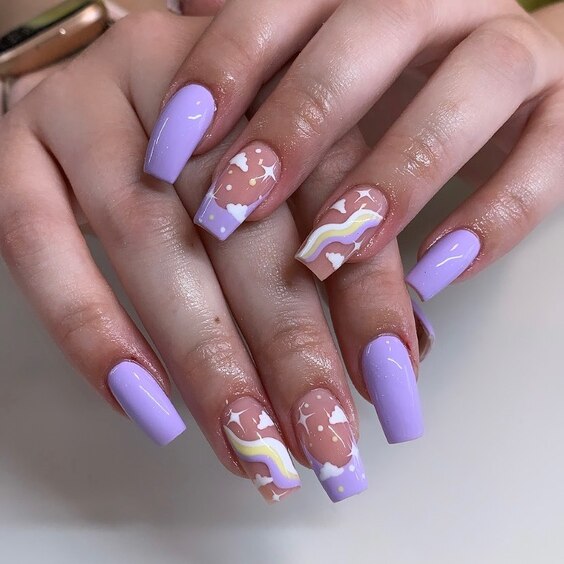
Playful Purple Clouds
This design takes a whimsical turn with funky nail art designs color combos purple featuring playful cloud patterns over a soft lavender base. The additional rainbow stripes and glitter details evoke a sense of joy and creativity, perfect for those who love to express their playful side through their manicure.
List of Consumables
- Base coat: Essie Here to Stay
- Lavender polish: Zoya “Abby”
- White polish for clouds: OPI “Alpine Snow”
- Rainbow striping polishes
- Glitter polish for accents
- Fine detail brush
DIY Instructions
- Start with a base coat to protect your nails.
- Apply two coats of lavender polish as the base color.
- Use a fine detail brush to paint clouds with white polish.
- Add thin rainbow stripes under some clouds.
- Finish with a layer of glitter polish on selected areas and a durable top coat.
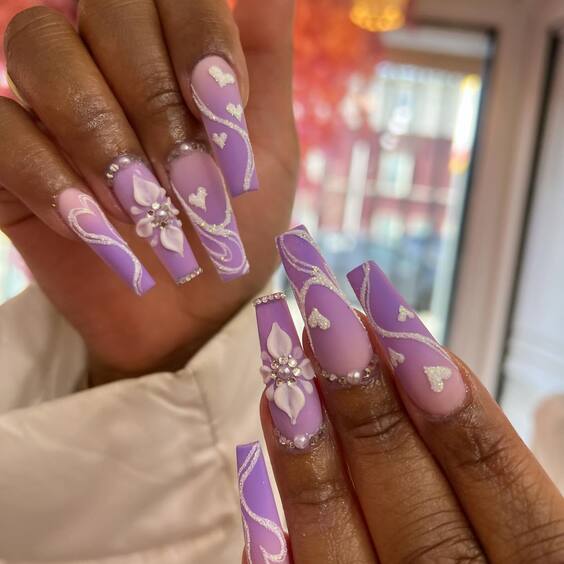
Elegant Florals and Pearls
The delicate floral motifs and pearl embellishments in this design highlight a refined and luxurious approach to purple nail art designs lavender color. The soft purple base is enhanced with white floral art and strategically placed pearls, creating a sophisticated, wedding-ready look.
List of Consumables
- Base coat: Essie All in One
- Purple polish: OPI “Lucky Lucky Lavender”
- White polish for floral designs: China Glaze “White on White”
- Pearls and rhinestone embellishments
- Nail glue
- Top coat: INM Out the Door
DIY Instructions
- Apply a base coat to protect your nails.
- Paint nails with a lavender polish as the base.
- Use a thin brush to paint delicate flowers in white.
- Adhere pearls and rhinestones with nail glue at the center of flowers.
- Seal the design with a fast-drying top coat.
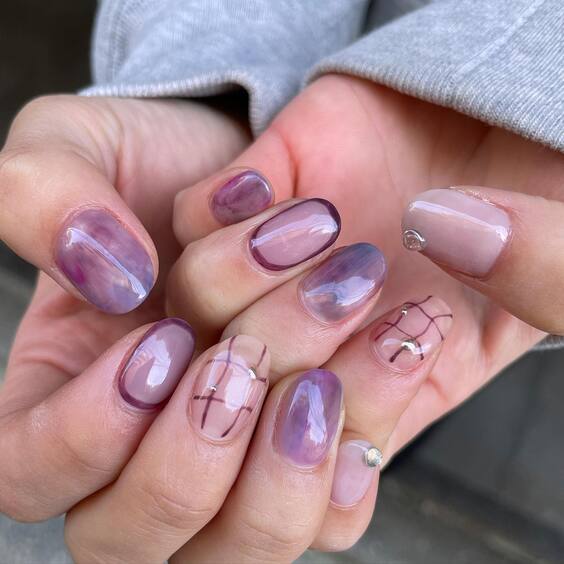
Soft Marble Hues
This image exemplifies nail art purple designs color combos with a soft-focus marble technique combining hues of purple and gray. The transparent nail tips and minimalist lines create a modern, understated look that is perfect for any occasion.
List of Consumables
- Base coat: Butter London Nail Foundation
- Purple and gray polishes: Sally Hansen “Lacey Lilac” and “Earl Grey”
- Detail brush for lines
- Top coat: Orly Glosser
DIY Instructions
- Start with a base coat.
- Apply a gradient of purple and gray polish using a sponge for the marble effect.
- Draw subtle lines with a detail brush to define the marbled design.
- Finish with a glossy top coat to enhance the visual depth.
Whimsical Cartoon Art
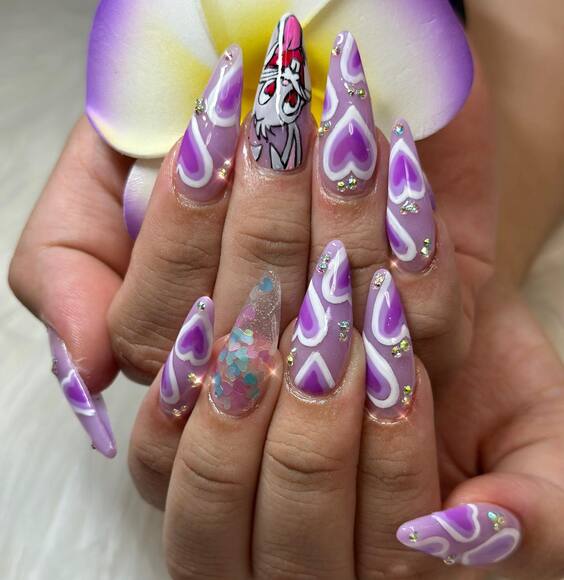
This playful design features a cartoon character integrated into the funky nail art designs color combos purple, showcasing a bold and creative approach to nail art. The use of various shades of purple, along with glitter and detailed artwork, makes this a standout choice for those who love a statement nail.
List of Consumables
- Base coat: CND Stickey
- Purple polishes: Revlon “Plum Seduction” and “Violet Frenzy”
- Acrylic paints for detailed designs
- Glitter polish
- Fine detail brushes
- Top coat: China Glaze Fast Forward
DIY Instructions
- Prep your nails with a base coat.
- Apply a light purple polish as the base.
- Paint the cartoon character using acrylic paints with a fine brush.
- Add accents and glitter details where desired.
- Seal everything with a high-gloss top coat.
Modern Purple and Yellow Split
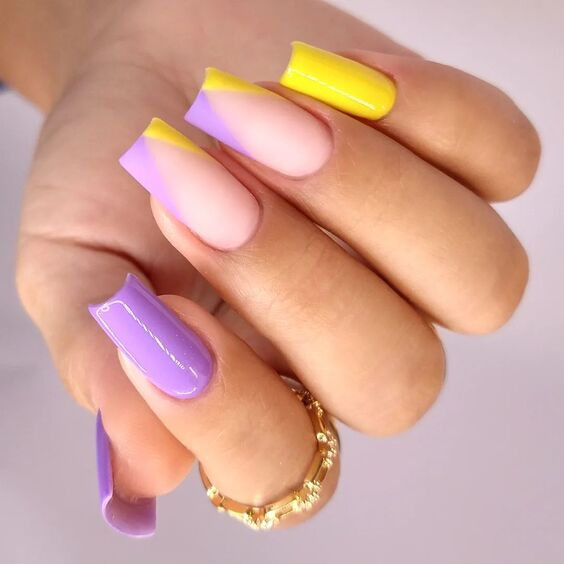
This design breaks the mold with a bold, modern twist on simple nail art designs purple color by incorporating a striking yellow split. The matte finish on the purple and glossy finish on the yellow create a playful contrast, while the clean lines between colors emphasize precision and a contemporary aesthetic.
List of Consumables
- Base coat: Orly Bonder
- Purple polish: Essie “Play Date”
- Yellow polish: OPI “Exotic Birds Do Not Tweet”
- Matte top coat for purple
- Glossy top coat for yellow
- Tape for precise lines
DIY Instructions
- Apply a base coat to all nails for protection.
- Use tape to section off halves of each nail.
- Paint one half with purple polish and apply a matte top coat.
- Paint the other half with yellow polish and apply a glossy top coat.
- Remove the tape carefully to ensure sharp lines.
Luxurious Golden Purple Fusion
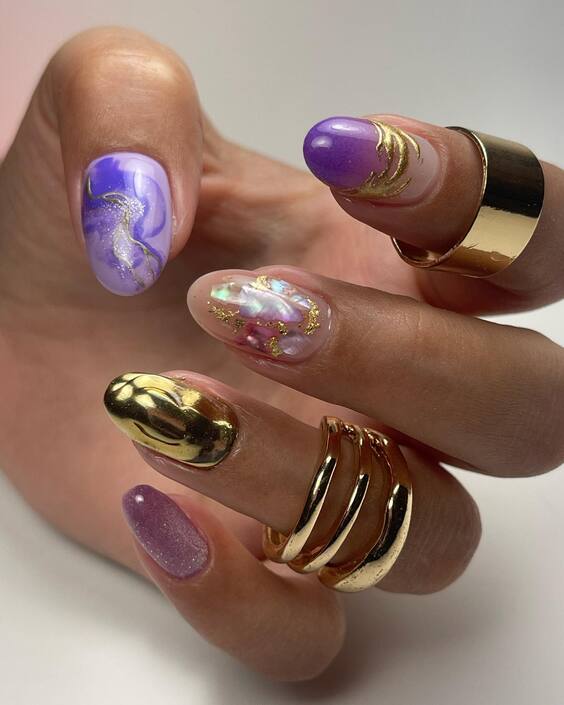
This luxurious design blends purple nail art designs lavender color with gold accents to create a regal and sophisticated look. The variety of textures from metallic to glitter and matte finishes offers a multi-dimensional feel, perfect for those who desire a touch of luxury on their fingertips.
List of Consumables
- Base coat: Chanel La Base
- Purple polish: Tom Ford “African Violet”
- Gold metallic polish: Sally Hansen “Golden-I”
- Gold flakes and glitter
- Top coat: Gucci High Gloss Lacquer
DIY Instructions
- Start with a base coat to protect the nails.
- Apply purple polish as the base color.
- Add gold metallic polish on selected nails and while still tacky, apply gold flakes.
- Use a fine brush to add glitter details for extra sparkle.
- Finish with a high gloss top coat for durability and shine.
Elegant Lavender Wisps
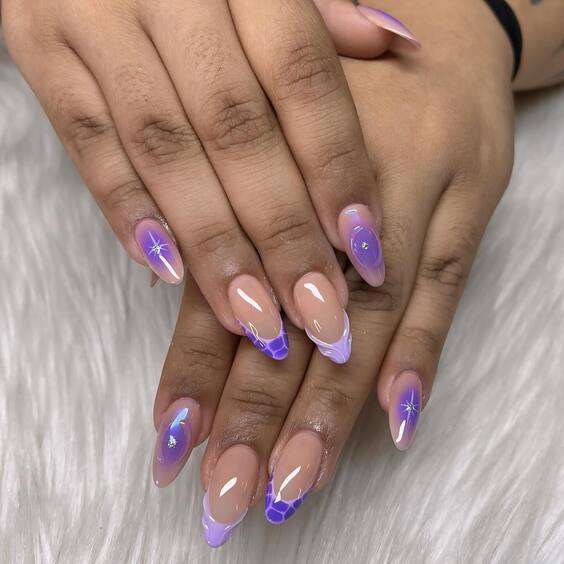
The final design showcases elegant, wispy lavender lines over a sheer base, creating a subtle yet stunning french nail art designs color combos purple. The minimalistic approach is enhanced by tiny star accents, making it ideal for everyday elegance or a special event.
List of Consumables
- Base coat: Revlon Quick Dry
- Sheer pink polish: OPI “Bubble Bath”
- Lavender polish: Essie “Lilacism”
- Top coat: Essie Gel Setter
- Mini star decals
DIY Instructions
- Apply a quick-drying base coat.
- Coat the nails with a sheer pink polish for a clean look.
- Draw fine lavender lines using a detail brush.
- Place mini star decals strategically for a delicate touch.
- Seal with a gel-like top coat for a smooth finish.
Glittering Gradient Magic
This design beautifully illustrates a gradient of purple hues enriched with glitter, creating a vibrant and eye-catching look. The transition from a soft lilac to a deeper purple on various nails adds dynamic visual interest, while the silver glitter sprinkles catch the light with every movement.
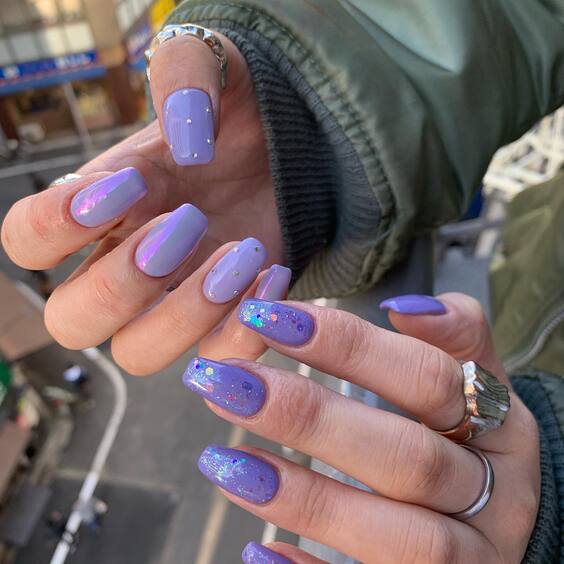
List of Consumables
- Base coat: Essie Strong Start
- Purple polishes: Revlon “Charming” and “Bold Sangria”
- Glitter polish: NYX “Twinkle, Twinkle”
- Sponge for gradient effect
- Top coat: Seche Vite Dry Fast Top Coat
DIY Instructions
- Apply a base coat to protect the nails.
- Paint a base layer with the lighter purple polish.
- Apply the darker purple using a sponge for the gradient effect toward the tips.
- While still tacky, sprinkle on the silver glitter polish.
- Seal the design with a quick-drying top coat for a smooth, glossy finish.
Vivid Purple Perfection
This image captures the essence of simple nail art designs purple color with its vivid purple polish exhibiting a striking, glossy finish. The small floral accent on the ring finger adds a delicate touch, enhancing the simplicity of the design with a hint of elegance and personality.
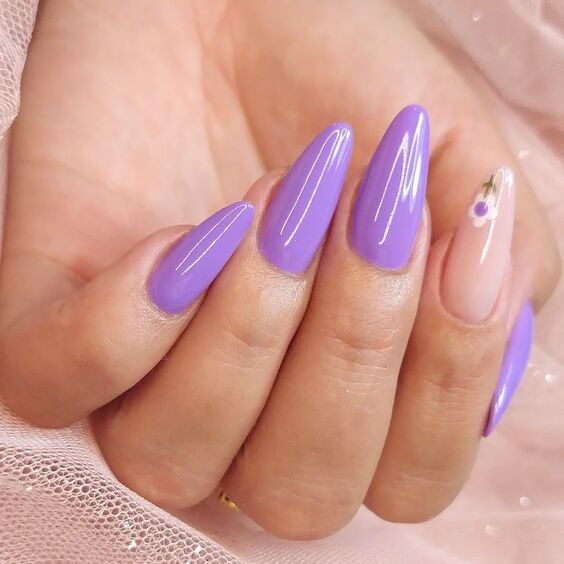
List of Consumables
- Base coat: OPI Natural Nail Base Coat
- Purple polish: China Glaze “That’s Shore Bright”
- White polish for floral details: Sally Hansen “White On”
- Top coat: Sally Hansen Mega Shine
DIY Instructions
- Start by applying a base coat for nail protection.
- Paint all nails with a rich purple polish.
- On the ring finger, use a fine brush to create a small white floral design.
- Apply a shiny top coat to enhance the color and ensure longevity.
Subtle Purple Crackle
The third design features a subtle crackle effect, combining matte and shiny finishes for a contemporary look. The use of a lighter shade underneath with a crackle polish overlay provides a sophisticated texture contrast, ideal for those seeking a unique yet understated style.
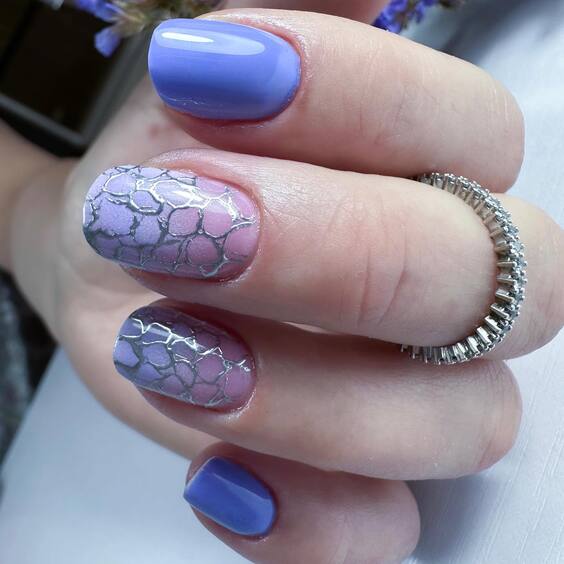
List of Consumables
- Base coat: Revlon Quick Dry
- Light purple polish: Essie “Lilacism”
- Purple crackle polish: OPI “Silver Shatter”
- Matte top coat for the base
- Glossy top coat for the crackle effect
DIY Instructions
- Apply a quick-drying base coat to all nails.
- Paint the nails with a light purple polish and apply a matte top coat.
- Once dry, overlay with purple crackle polish and allow it to shatter naturally.
- Finish with a glossy top coat over the crackle to emphasize the texture.
Intricate Purple Tapestry
This design presents an intricate tapestry of purple with flashes of pink and silver stripes, creating a dynamic and visually engaging pattern. The single white floral accent on a glittery base adds a touch of elegance, contrasting beautifully with the vivid purple.
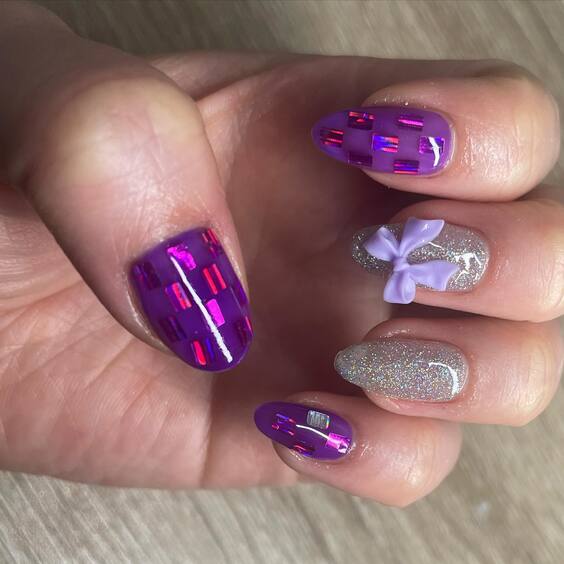
List of Consumables
- Base coat: OPI Natural Nail Base Coat
- Purple and pink polishes: Essie “Play Date” and “Mod Square”
- Silver striping polish
- Glitter polish: China Glaze “Fairy Dust”
- White polish for floral design
- Top coat: Sally Hansen Insta-Dri
DIY Instructions
- Apply a base coat to protect the nails.
- Paint alternate nails with glitter polish and a combination of purple and pink stripes.
- For the striped design, use striping tape to ensure precise lines.
- On the glitter nails, use a fine brush to paint a white floral design.
- Seal the design with a quick-drying top coat to enhance shine and durability.
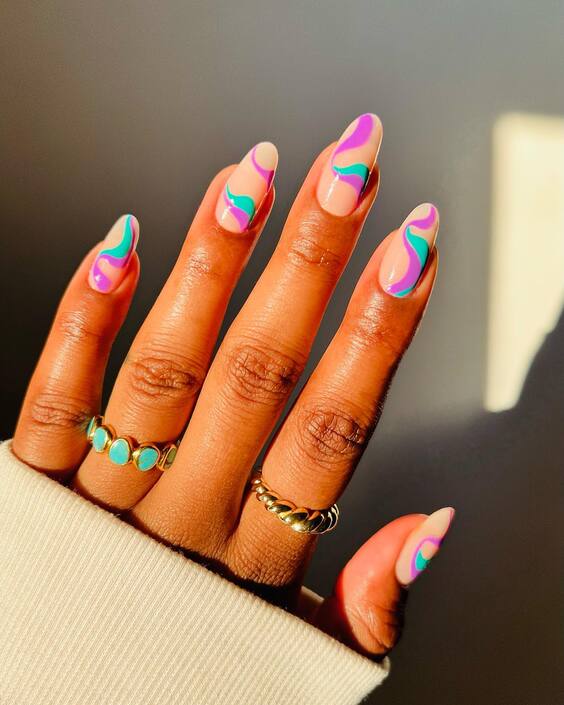
Sleek Swirls of Creativity
This nail art showcases sleek swirls of purple, teal, and pink, blending into an almost psychedelic pattern. The high gloss finish enhances the flow of colors, making the design pop with vibrancy and a modern twist.
List of Consumables
- Base coat: OPI Bond Aid
- Purple, teal, and pink polishes: OPI “Pompeii Purple,” “Amazon…Amazoff,” and “Kiss Me on My Tulips”
- Swirling tool or toothpick
- Top coat: Essie Gel Setter
DIY Instructions
- Start with a base coat to smooth the nail surface.
- Apply a light coat of purple as the base color.
- While wet, add small drops of teal and pink and swirl gently with a tool to create the desired pattern.
- Wait for the design to set slightly before applying a gel top coat for a smooth, glossy finish.
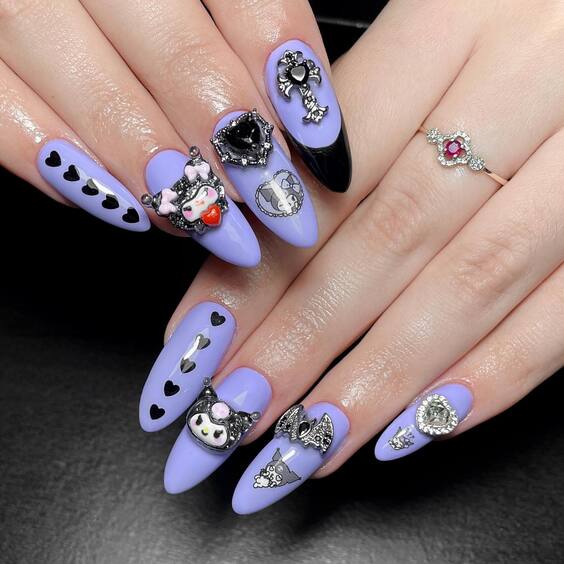
Pop Culture Purple
This playful design merges pop culture with nail art, featuring iconic characters and symbols on a lavender and black base. The mixture of matte and shiny finishes, along with detailed charm additions, creates a unique and personalized look.
List of Consumables
- Base coat: China Glaze Strong Adhesion
- Lavender and black polishes: Sally Hansen “Lacey Lilac” and “Black Out”
- Matte top coat for the base
- Glossy top coat for the designs
- Nail decals or hand-painted designs
- Charm embellishments
DIY Instructions
- Apply a base coat to all nails for protection.
- Paint alternate nails lavender and black.
- Apply a matte top coat to the lavender nails.
- Use decals or paint to add characters and symbols on the black base.
- Add charm embellishments for a 3D effect.
- Finish with a glossy top coat on the designed areas to highlight details.
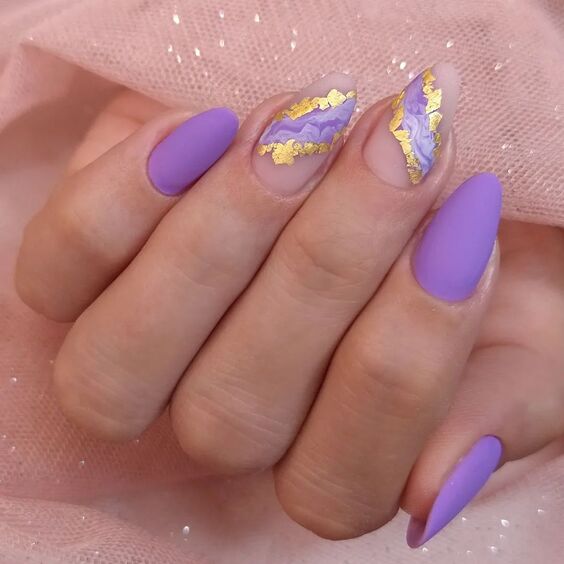
Golden Lavender Elegance
This design offers a stunning combination of matte lavender and bold metallic gold accents. The crisp lines and textured gold leaf on selective nails make this a luxurious and contemporary choice for those seeking an elegant yet striking nail art.
List of Consumables
- Base coat: OPI Natural Nail Base Coat
- Lavender polish: Essie “Go Ginza”
- Gold leaf flakes
- Matte top coat
- Glossy top coat for gold accents
DIY Instructions
- Apply a base coat to protect your nails.
- Paint all nails with a lavender polish and let dry.
- Carefully apply gold leaf flakes on accent nails using tweezers and a tiny dab of nail glue.
- Apply a matte top coat on the lavender sections and a glossy top coat over the gold for a stunning contrast.
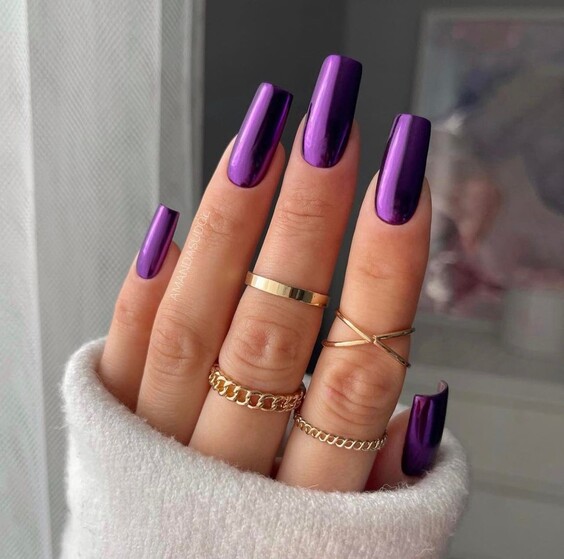
Deep Purple Shine
This nail art design features a deep, rich purple with a mesmerizing glossy finish, making each nail look like a polished gem. The simplicity of the color and the impeccable shine make this a perfect choice for those who appreciate a bold, minimalist look.
List of Consumables
- Base coat: China Glaze Strong Adhesion
- Deep purple polish: OPI “Vampsterdam”
- High-gloss top coat: Seche Vite Dry Fast Top Coat
DIY Instructions
- Start with a base coat to protect the nails from staining.
- Apply two coats of deep purple polish, allowing each coat to dry thoroughly.
- Finish with a high-gloss top coat to enhance the shine and color depth.
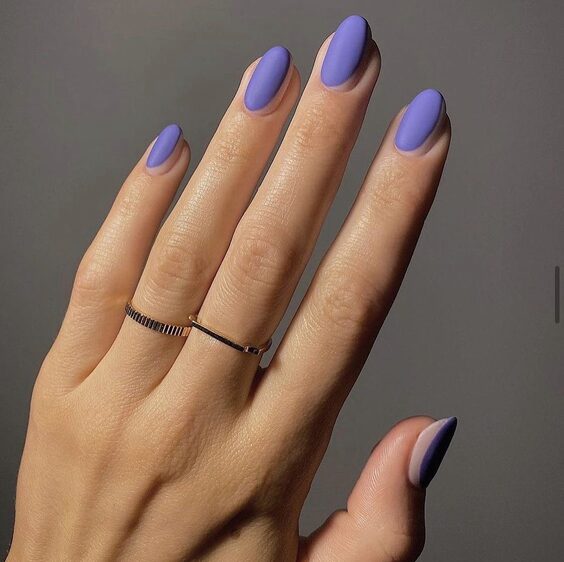
Subtle Lavender Touch
This design showcases a soft lavender hue with a matte finish, perfect for those seeking a subtle and refined look. The monochromatic styling and the matte finish provide a modern twist to a classic pastel shade, suitable for everyday wear or special occasions.
List of Consumables
- Base coat: Sally Hansen Miracle Cure
- Lavender polish: Zoya “Abby”
- Matte top coat: Matte Look Top Coat by OPI
DIY Instructions
- Apply a base coat to ensure a smooth application.
- Paint two coats of soft lavender polish, allowing ample drying time between coats.
- Finish with a matte top coat to transform the glossy finish into a chic, muted look.
In conclusion, purple nail art designs offer a versatile and striking choice for anyone looking to enhance their manicure. From the softest lavenders to the deepest violets, these designs not only cater to a variety of tastes but also adapt seamlessly to any occasion, be it casual or formal. Whether you prefer the subtle elegance of matte finishes or the glamorous sparkle of glitter and metallics, there’s a purple nail art design that perfectly matches your personal style. Embrace these creative ideas and transform your nails into a fashion statement that speaks volumes about your unique aesthetic.

