
Are you looking to make a bold statement with your nails? Dark nail colors are not just for the colder months; they’re a versatile choice that can elevate your style year-round. Whether you’re drawn to the dramatic allure of deep burgundy, the sophistication of navy blue, or the unexpected chicness of winter grey, dark nail colors offer a plethora of options to suit every season and occasion. But how do you choose the best shade and design for your look? In this article, we’ll dive into a collection of stunning dark nail designs, offering you the best inspo and ideas to make your manicure stand out. We’ll also share professional tips on how to recreate these designs at home, ensuring you achieve a salon-quality finish.
Fiery Black Flames
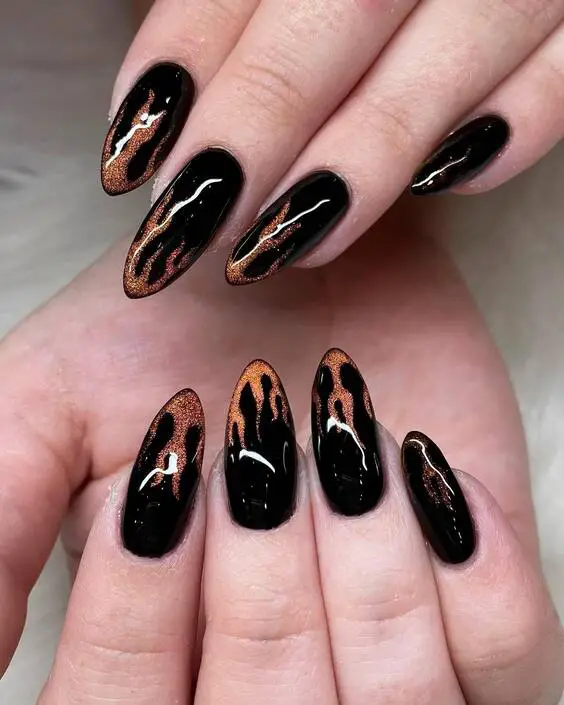
Nothing screams fierce like a set of black nails adorned with fiery flames. This design is perfect for those who want to embrace their bold side. The nails feature a glossy black base, providing a sleek and sophisticated canvas. The flames, crafted in a fiery copper hue, dance across the tips of the nails, creating a striking contrast. The metallic shimmer in the flames adds a touch of glamour, making this look perfect for a night out or any occasion where you want to make a statement. The almond shape enhances the elongation of the fingers, giving the nails an elegant yet edgy vibe.
Consumables Needed
- Black nail polish (OPI’s “Black Onyx”)
- Copper metallic polish (Essie “Penny Talk”)
- Fine nail art brush
- Top coat (Seche Vite Dry Fast Top Coat)
Author’s Recommendations: Opt for high-quality polishes to ensure the longevity and vibrancy of your manicure. The metallic polish should have a high shimmer content to really make the flames pop against the dark base.
DIY Instructions
- Start with clean, manicured nails.
- Apply a base coat to protect your natural nails.
- Paint all nails with two coats of black polish and let them dry completely.
- Using a fine nail art brush, carefully draw flame shapes starting from the tip of the nails with the copper polish.
- Allow the design to dry, then seal with a glossy top coat to add shine and protect your artwork.
Rich Plum Elegance
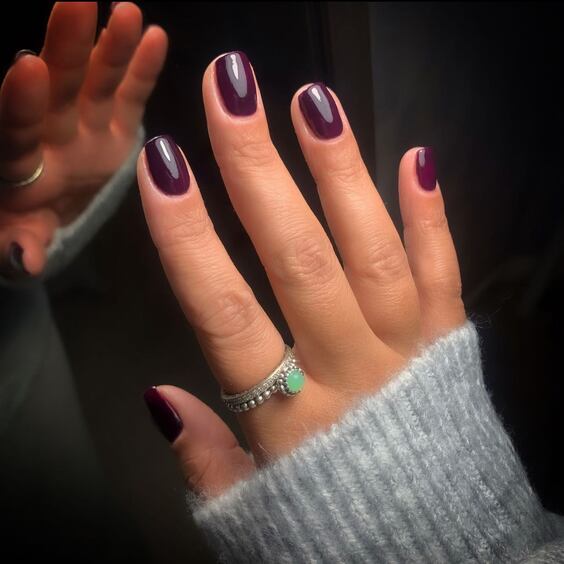
For a look that’s both chic and understated, rich plum nails are an excellent choice. This color, a perfect blend of deep purple and burgundy, offers a sophisticated option for any occasion. The glossy finish enhances the depth of the color, making it a versatile choice for both day and night. This design is particularly flattering for those with pale skin, as the rich hue beautifully contrasts with lighter tones. The nails are kept short and neatly rounded, offering a practical yet stylish option for everyday wear.
Consumables Needed
- Plum nail polish (OPI’s “Lincoln Park After Dark”)
- Base coat (CND Stickey Anchoring Base Coat)
- Top coat (Sally Hansen Miracle Gel Top Coat)
Author’s Recommendations: For a long-lasting manicure, choose a base coat that enhances adhesion and a top coat that offers durability. The plum polish should have a rich, opaque finish to achieve the desired depth of color.
DIY Instructions
- Prep your nails by filing and buffing.
- Apply a base coat to ensure smooth application and durability.
- Paint your nails with two coats of the plum polish, allowing each coat to dry in between.
- Finish with a glossy top coat to add shine and protect your nails from chipping.
Icy Blue Ombre with Feather Accents
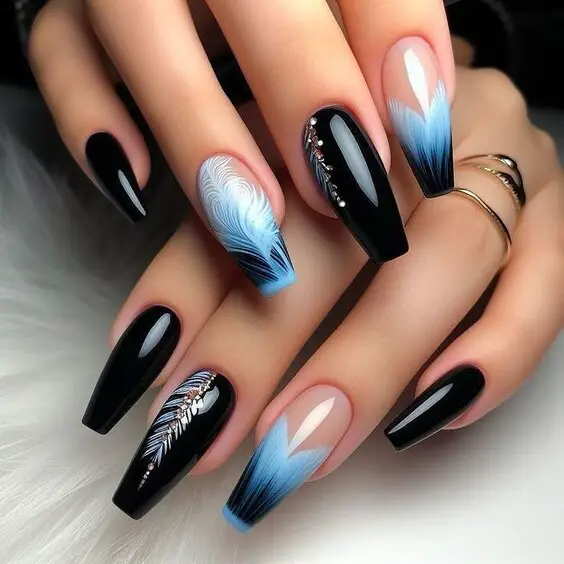
This intricate design features an ombre transition from deep navy blue to icy blue, adorned with delicate feather accents. The gradient effect is achieved with a blend of polishes, creating a seamless flow of color. The accent nails feature a delicate feather design, adding an artistic touch to the manicure. This look is perfect for those who love a touch of whimsy with their dark nail colors. The design is finished with a glossy top coat, enhancing the rich colors and intricate details.
Consumables Needed
- Navy blue polish (Essie “Midnight Cami”)
- Light blue polish (Zoya “Blu”)
- White nail polish (China Glaze “White on White”)
- Fine detail brush
- Top coat (OPI Top Coat)
Author’s Recommendations: To achieve a smooth ombre effect, use a makeup sponge for blending the colors. The feather design can be achieved with a steady hand and a fine detail brush. Practice on a piece of paper before applying it to your nails.
DIY Instructions
- Apply a base coat and allow it to dry.
- Paint the base of the nails with navy blue polish.
- Using a makeup sponge, dab the light blue polish onto the tips, blending into the navy base.
- With a fine detail brush, draw feather designs on accent nails using white polish.
- Seal the design with a glossy top coat for a smooth finish.
Edgy Matte and Red Jewel Accents
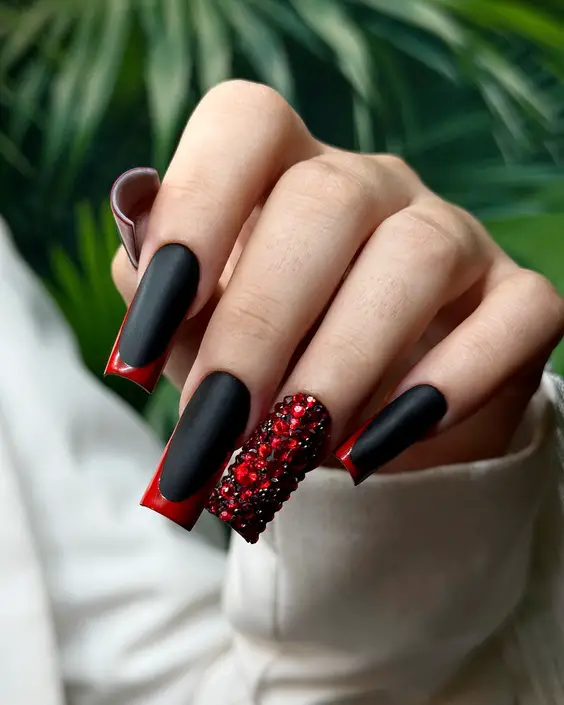
This stunning design combines the elegance of matte black nails with the boldness of red jewel accents. The nails feature a chic matte finish, perfect for showcasing the rich depth of the black color. The standout detail is the accent nail, embellished with an array of red rhinestones, adding a luxurious and eye-catching touch. The red tips on the rest of the nails offer a subtle yet striking contrast, making this design perfect for those who love to mix elegance with a hint of drama. This look is ideal for winter, as the deep tones and jewel accents align beautifully with festive and formal occasions.
Consumables Needed
- Matte black nail polish (OPI’s “Black Onyx” with a matte top coat)
- Red rhinestones (various sizes)
- Nail glue
- Red polish (China Glaze “Red Satin”)
- Top coat (matte finish)
Author’s Recommendations: Use a strong nail glue to ensure the rhinestones stay in place. The matte top coat not only enhances the black polish but also provides a perfect contrast to the glossy red tips and stones.
DIY Instructions
- Apply a base coat and let it dry.
- Paint the nails with two coats of black polish, then apply a matte top coat.
- Add red polish to the tips using a fine brush for precision.
- Apply nail glue to the accent nail and place the red rhinestones carefully, creating a dense, jewel-encrusted look.
- Finish with a matte top coat on all nails except the rhinestone accent to maintain the matte and glossy contrast.
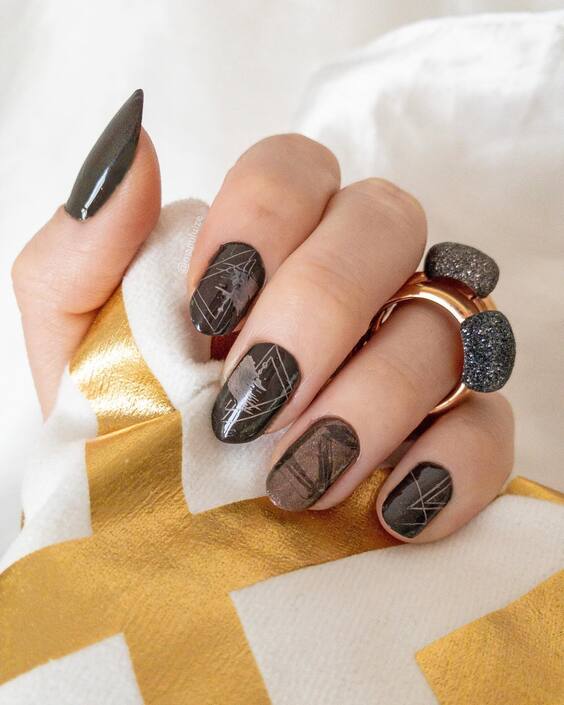
Earthy Marble with Geometric Lines
For a sophisticated and earthy look, these marble-inspired nails with geometric lines offer a unique twist. The design features a dark brown base with subtle marble patterns in lighter shades, giving the nails a natural stone-like appearance. Thin geometric lines in silver add a modern and edgy contrast, making the design versatile enough for both casual and formal settings. The short, almond shape is practical and stylish, perfect for daily wear. This design is particularly well-suited for fall, aligning with the season’s earthy tones and natural vibes.
Consumables Needed
- Dark brown nail polish (Essie “Sable Collar”)
- Light beige polish for marbling (OPI “Don’t Bossa Nova Me Around”)
- Silver nail art tape or polish
- Top coat (Seche Vite Dry Fast Top Coat)
Author’s Recommendations: For a subtle marble effect, use a dry brush technique with minimal polish. The silver lines can be achieved using nail art tape for clean, straight lines.
DIY Instructions
- Start with a base coat.
- Apply a dark brown polish as the base color.
- Use a thin, dry brush to create random marble patterns with the light beige polish.
- Once dry, apply silver nail art tape or carefully paint thin lines with silver polish.
- Seal the design with a glossy top coat.
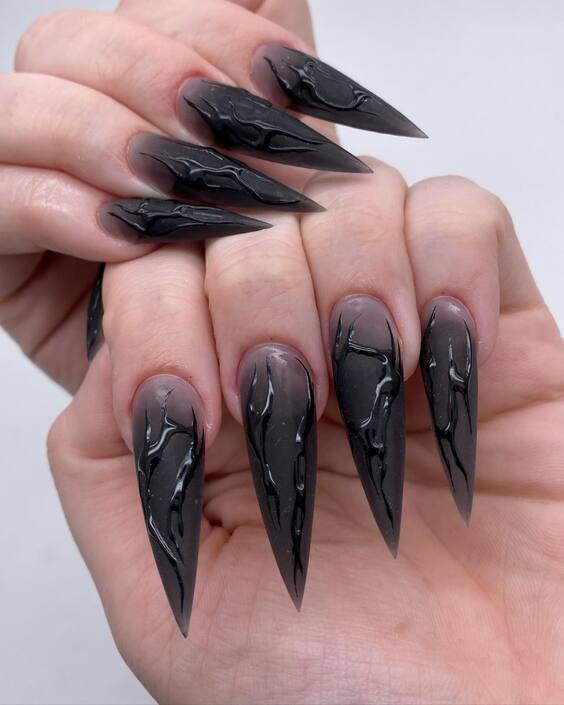
Dark and Mysterious Gothic Black
These gothic black nails are the epitome of dark elegance. Featuring a glossy black base with raised 3D details, this design exudes a mysterious and edgy vibe. The long, stiletto shape enhances the dramatic effect, making it a bold choice for those who love to stand out. The 3D elements, reminiscent of twisted branches or veins, add a unique texture and visual interest, making this a perfect choice for a statement look. This design is especially striking during winter, aligning with the season’s moody and dark aesthetic.
Consumables Needed
- Black nail polish (Essie “Licorice”)
- Clear builder gel for 3D elements
- Fine nail art brush
- UV lamp
- Top coat (OPI Top Coat)
Author’s Recommendations: For the 3D elements, practice shaping the gel on a flat surface before applying it to the nails. A UV lamp is essential for curing the gel and ensuring durability.
DIY Instructions
- Begin with a base coat to protect your nails.
- Apply two coats of black polish and cure under a UV lamp.
- Use a fine brush and builder gel to create the raised 3D patterns, curing under the lamp after each application.
- Finish with a glossy top coat to seal the design and enhance the contrast between the glossy base and the matte 3D elements.
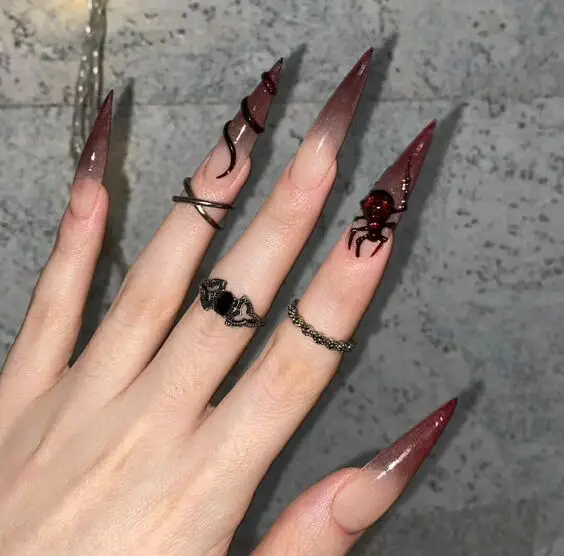
Spiderweb Stiletto Nails
These stiletto nails are perfect for those looking to embrace a dark and mystical aesthetic. The design features a soft gradient from natural pink to a deep burgundy tip, creating a subtle ombre effect. The standout feature is the intricate black spiderweb and 3D spider embellishment, adding a touch of eerie elegance. This look is ideal for a gothic-inspired theme or a standout Halloween design. The long stiletto shape elongates the fingers, giving a dramatic and edgy feel. The addition of subtle metallic accents enhances the overall mystique of the manicure.
Consumables Needed
- Clear base polish (Essie “Allure”)
- Burgundy polish (OPI “Got the Blues for Red”)
- Black nail art polish
- 3D spider embellishments
- Fine detail brush
- Top coat (Sally Hansen Miracle Gel Top Coat)
Author’s Recommendations: For the best results, ensure the ombre effect is smooth by blending the burgundy polish gradually. Use a fine detail brush to create precise spiderweb lines and place the 3D spider carefully for maximum impact.
DIY Instructions
- Apply a base coat to all nails.
- Create the ombre effect by applying burgundy polish to the tips, blending it down towards the natural pink.
- Once dry, use a fine detail brush to paint the spiderweb design with black polish.
- Attach 3D spider embellishments using nail glue.
- Seal the design with a glossy top coat to enhance the colors and protect the art.
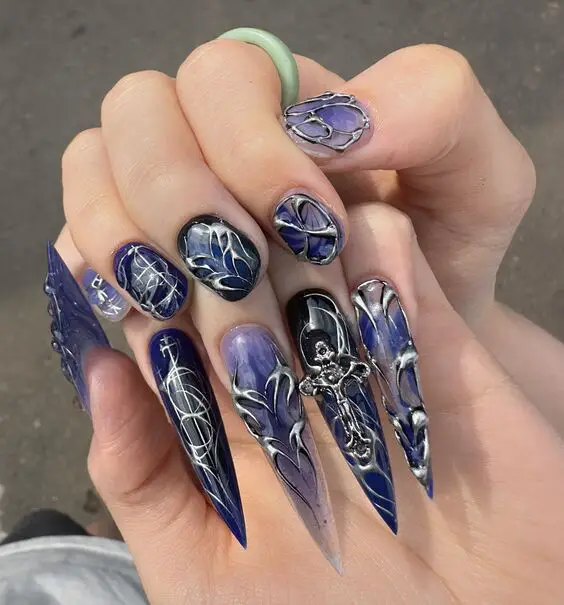
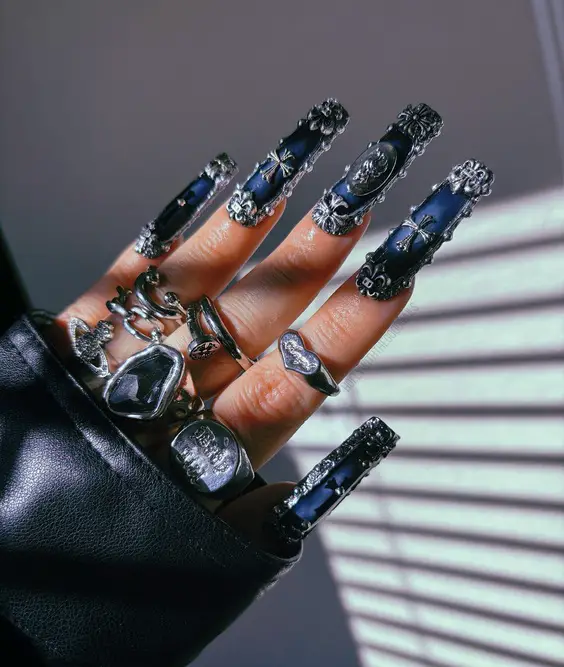
Gothic Blue and Silver Nails
This design is a masterpiece of dark elegance, combining shades of deep blue and black with intricate silver details. The nails feature a gradient base transitioning from dark navy to black, adorned with silver embellishments resembling gothic window panes. The highlight of the design is the 3D silver cross and other metal accents, adding a dramatic flair. This look is perfect for those who appreciate a gothic or baroque style, with a modern twist. The combination of dark hues and metallic elements makes it a standout choice for any special occasion, especially during the winter months.
Consumables Needed
- Navy blue polish (Zoya “Ryan”)
- Black polish (China Glaze “Liquid Leather”)
- Silver polish or chrome powder
- 3D metal embellishments (crosses, filigree designs)
- Nail glue
- Top coat (OPI Top Coat)
Author’s Recommendations: To achieve a seamless gradient, use a sponge technique. The 3D metal embellishments should be applied with strong nail glue to ensure they stay in place, especially on the longer nails.
DIY Instructions
- Begin with a base coat to protect the nails.
- Apply the navy blue polish, then use a sponge to blend in black polish at the tips, creating a gradient.
- Apply silver polish or chrome powder to accentuate the design.
- Attach 3D metal embellishments using nail glue.
- Finish with a glossy top coat to seal and protect the design.
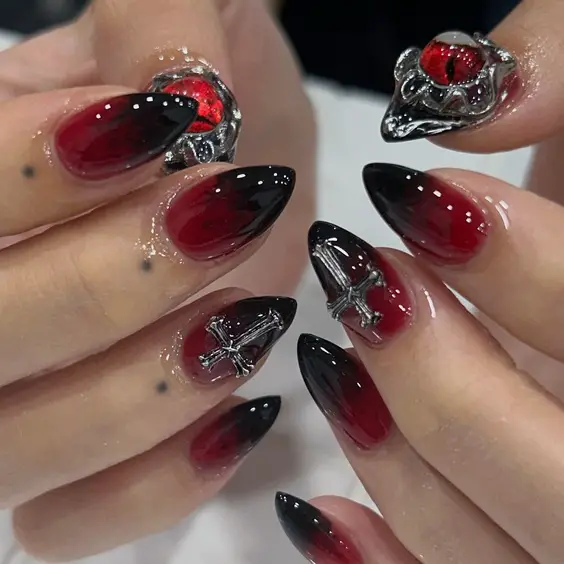
Blood Red and Black Gradient
For a look that exudes mystery and allure, these blood-red and black gradient nails are a must-try. The design features a deep red base that fades into black at the tips, creating a striking ombre effect. The accent nails are adorned with silver cross charms, adding a gothic touch. The glossy finish enhances the intensity of the colors, making the nails look almost like dripping blood. This design is perfect for making a bold statement, especially during the fall and winter seasons. The almond shape adds a classic elegance, balancing the dramatic color scheme.
Consumables Needed
- Red polish (OPI “Malaga Wine”)
- Black polish (Sally Hansen “Black Out”)
- Silver cross charms
- Nail glue
- Top coat (CND Vinylux Weekly Top Coat)
Author’s Recommendations: Use a makeup sponge for a smooth transition between the red and black polishes. The silver cross charms should be carefully placed to avoid disrupting the gradient effect.
DIY Instructions
- Apply a base coat to all nails.
- Paint the nails with red polish, then use a sponge to apply black polish at the tips, blending towards the red.
- Attach the silver cross charms to the accent nails with nail glue.
- Seal with a glossy top coat to enhance the shine and protect the design.
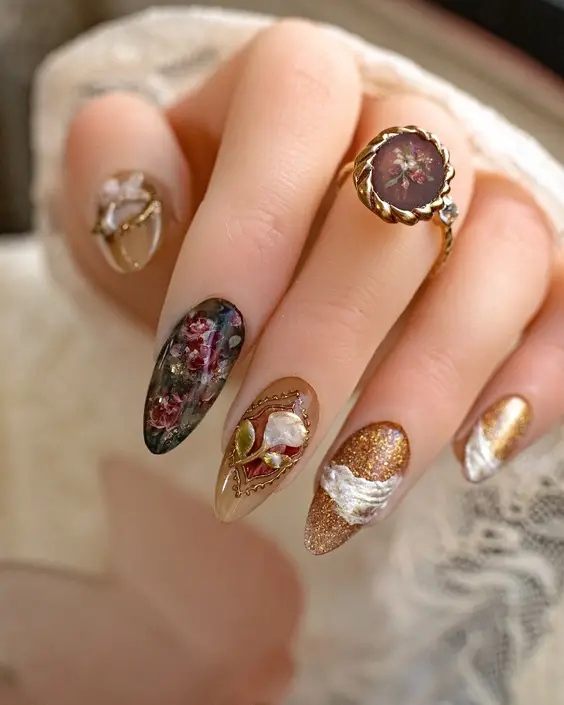
Vintage Floral Art
This vintage-inspired nail art features a combination of dark floral motifs and luxurious textures. The design includes a dark base on some nails, with intricate rose details encapsulated under a clear top layer, giving a sophisticated depth to the manicure. The other nails showcase a blend of shimmering gold and pearl-like accents, creating a lavish, opulent look. The almond shape of the nails adds to the elegance, making this design perfect for special occasions. The detailed florals are reminiscent of antique botanical illustrations, adding a timeless beauty to the nails.
Consumables Needed
- Dark green polish (OPI “Stay Off the Lawn!”)
- Clear polish (Essie “Allure”)
- Gold glitter polish (Zoya “Maria-Luisa”)
- Pearl and floral decals
- Top coat (OPI Top Coat)
Author’s Recommendations: For the best results, use high-quality decals that do not peel off easily. The gold glitter polish should be applied sparingly to keep the focus on the floral details.
DIY Instructions
- Apply a base coat to protect your nails.
- Paint a dark green polish on the base nails, and apply clear polish to the nails with floral decals.
- Carefully place the floral decals on the clear nails, sealing them with another layer of clear polish.
- Apply gold glitter polish on the accent nails, followed by pearl accents.
- Finish with a glossy top coat to seal and protect the design, adding a glossy shine.
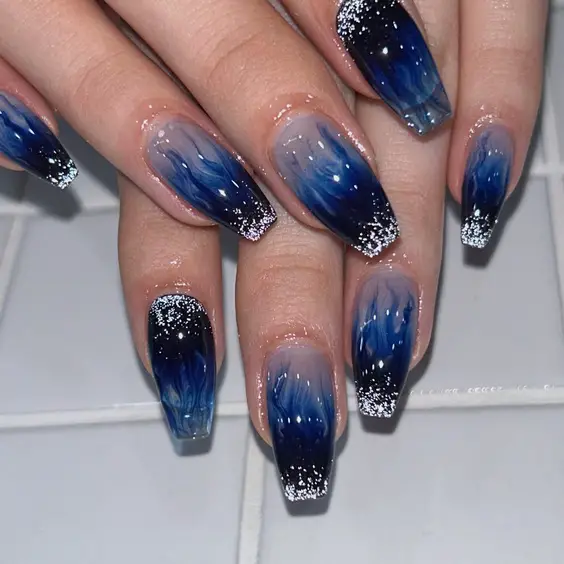
Midnight Blue Flames
These striking nails feature a gradient from a natural base to deep midnight blue, accented with delicate silver glitter at the tips. The flame-like design in the middle of the nails adds a dynamic and edgy element, perfect for those who love a bold look. The combination of blue shades creates a sense of depth and movement, reminiscent of a starry night sky. The square shape of the nails provides a modern and clean canvas for this intricate design, making it suitable for both casual and formal events.
Consumables Needed
- Light blue polish (OPI “Gelato on My Mind”)
- Dark blue polish (Zoya “Song”)
- Silver glitter polish (China Glaze “Fairy Dust”)
- Fine detail brush
- Top coat (Seche Vite Dry Fast Top Coat)
Author’s Recommendations: To achieve a smooth gradient, use a makeup sponge to blend the colors. The silver glitter should be applied sparingly to avoid overshadowing the flame design.
DIY Instructions
- Start with a base coat.
- Apply a light blue polish as the base, then use a sponge to blend in dark blue polish, creating a gradient effect.
- Use a fine detail brush to paint the flame design with the dark blue polish.
- Apply silver glitter polish to the tips for a sparkling effect.
- Seal the design with a glossy top coat to enhance the shine and protect the art.
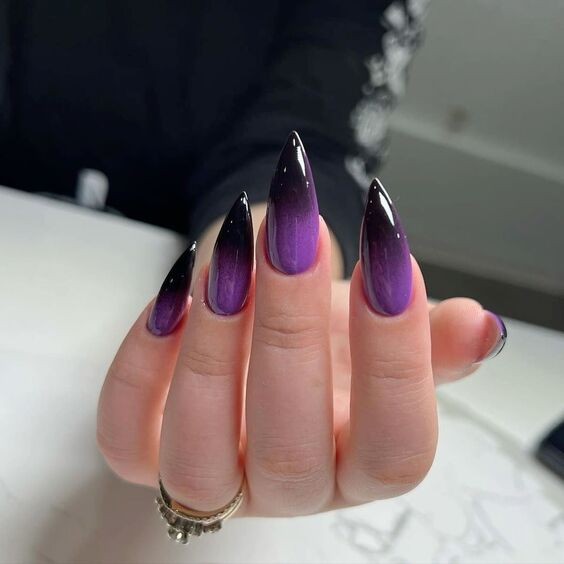
Purple Ombre Elegance
This elegant design features a seamless ombre from deep black at the base to a vibrant purple at the tips. The glossy finish adds a sophisticated sheen, making the nails look sleek and polished. The stiletto shape complements the ombre effect, elongating the fingers and adding a touch of drama. This look is perfect for those who love a chic and modern style, with a hint of bold color. The purple hue is vibrant yet sophisticated, making it suitable for any season, particularly striking during the fall and winter months.
Consumables Needed
- Black polish (Essie “Licorice”)
- Purple polish (OPI “Purple with a Purpose”)
- Top coat (CND Vinylux Weekly Top Coat)
Author’s Recommendations: For a perfect gradient, use a sponge to blend the black and purple polishes. Ensure the nails are fully dry before applying the top coat to avoid smudging.
DIY Instructions
- Apply a base coat.
- Paint the nails with black polish at the base, then use a sponge to blend in purple polish towards the tips.
- Make sure the gradient is smooth and seamless.
- Apply a glossy top coat to seal and protect the design, giving it a polished finish.
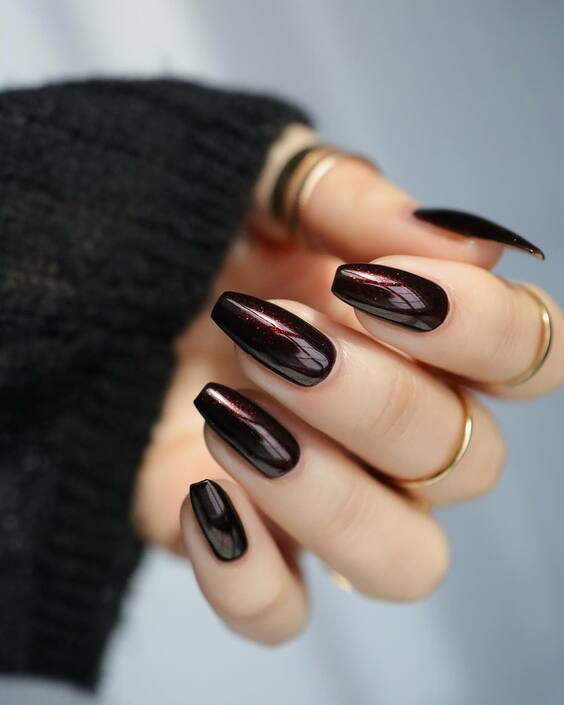
Deep Cherry Elegance
This luxurious deep cherry shade is a sophisticated choice for anyone who loves dark nail colors with a hint of elegance. The nails are painted in a rich, dark cherry polish that exudes depth and warmth, perfect for winter and fall. The glossy finish enhances the deep hue, making the nails look almost like polished gemstones. The short, almond shape adds a touch of classic style, making these nails suitable for both formal and casual settings. This color is particularly flattering for those with pale skin, offering a beautiful contrast that makes the nails stand out.
Consumables Needed
- Deep cherry polish (OPI “Malaga Wine”)
- Base coat (Essie “First Base”)
- Top coat (Sally Hansen “Miracle Gel Top Coat”)
Author’s Recommendations: For a long-lasting manicure, ensure each layer of polish is fully dry before applying the next. A high-shine top coat is essential to bring out the rich color and give a flawless finish.
DIY Instructions
- Start with a base coat to protect your nails and enhance polish adhesion.
- Apply two coats of the deep cherry polish, allowing each coat to dry completely.
- Finish with a high-shine top coat to seal in the color and add a glossy finish.
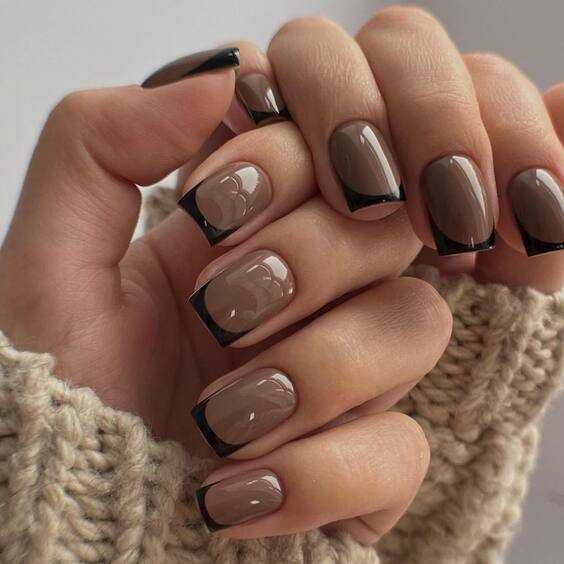
Modern Taupe French
This modern twist on the classic French manicure features a taupe base with sleek black tips. The taupe shade is a chic neutral, providing a sophisticated canvas that pairs beautifully with the bold black tips. The design includes a subtle floral accent on one nail, adding a delicate touch without overpowering the simplicity of the look. This manicure is perfect for those who appreciate a minimalist yet stylish aesthetic. The short, square shape is practical and easy to maintain, making it an excellent choice for everyday wear.
Consumables Needed
- Taupe polish (OPI “Taupe-less Beach”)
- Black polish (Essie “Licorice”)
- Fine detail brush
- Top coat (CND Vinylux Weekly Top Coat)
Author’s Recommendations: For a clean and crisp line, use nail guides or tape to define the tips. The floral accent can be achieved with a steady hand and a fine detail brush.
DIY Instructions
- Apply a base coat to start.
- Paint the nails with taupe polish, allowing them to dry completely.
- Use a fine detail brush or nail guides to apply the black polish to the tips.
- Add a subtle floral design on an accent nail using black polish.
- Seal with a top coat to protect the design and add shine.
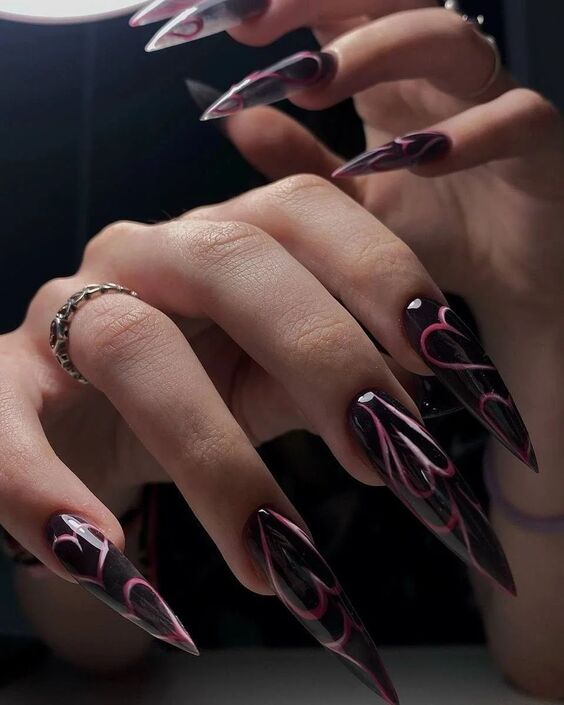
Black and Pink Heart Art
This bold design features a striking combination of black and pink, with heart-shaped art that adds a playful touch. The long stiletto shape enhances the dramatic effect, perfect for those who love a daring and edgy look. The black base is accented with pink hearts, creating a vibrant contrast that is both fun and chic. This manicure is ideal for a special occasion or a statement look, especially if you’re a fan of unique and creative nail art. The glossy finish adds a sleek and polished feel, making the design even more eye-catching.
Consumables Needed
- Black polish (China Glaze “Liquid Leather”)
- Pink polish (OPI “Pink Flamenco”)
- Fine detail brush
- Top coat (Seche Vite Dry Fast Top Coat)
Author’s Recommendations: To create precise heart shapes, use a fine detail brush and practice on a piece of paper before applying to the nails. The stiletto shape requires careful filing and shaping, so take your time for a perfect finish.
DIY Instructions
- Begin with a base coat to protect your nails.
- Apply two coats of black polish, allowing each to dry completely.
- Use a fine detail brush to paint pink heart shapes on each nail.
- Once the hearts are dry, seal with a glossy top coat to protect the art and enhance the shine.
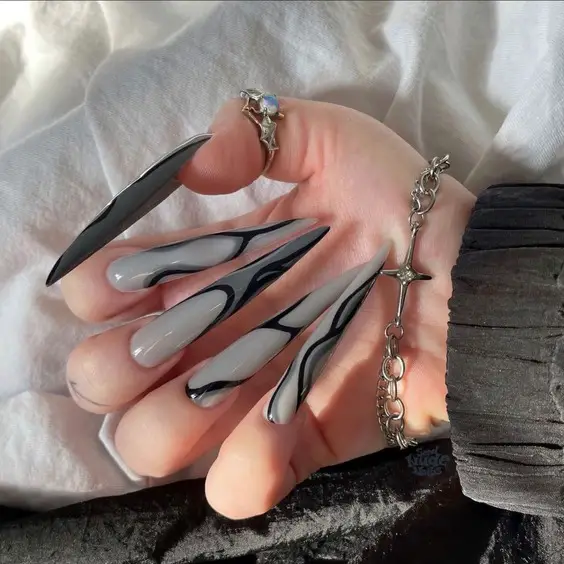
Monochrome Marble Stilettos
These striking stiletto nails feature a monochrome marble design that combines sleek grey and bold black tones. The sharp, elongated shape adds a dramatic flair, making the nails a perfect statement piece for any occasion. The swirling marble effect is both modern and timeless, offering a sophisticated and edgy look. This design is ideal for those who appreciate a minimalist aesthetic with a twist. The high-gloss finish enhances the marble effect, giving the nails a polished and refined appearance.
Consumables Needed
- Grey polish (OPI “I Can Never Hut Up”)
- Black polish (China Glaze “Liquid Leather”)
- Fine detail brush
- Top coat (Seche Vite Dry Fast Top Coat)
Author’s Recommendations: For a seamless marble effect, use a fine detail brush to blend the black and grey polishes. Practice the swirling technique on a palette before applying it to your nails.
DIY Instructions
- Begin with a base coat to protect your nails.
- Apply two coats of grey polish as the base color.
- Using a fine detail brush, swirl black polish into the grey to create a marble effect.
- Allow the design to dry, then seal with a glossy top coat to enhance the shine and protect the art.
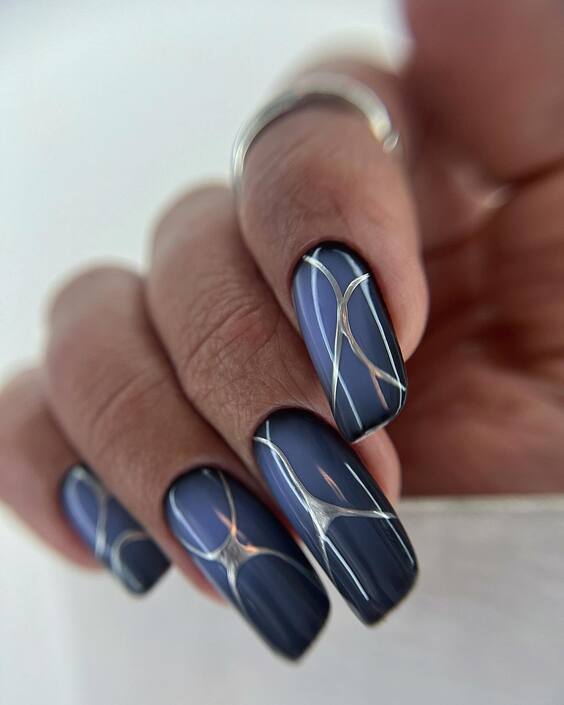
Midnight Blue Geometric Lines
This sophisticated design features a deep midnight blue base with intricate silver geometric lines. The contrast between the dark, rich blue and the metallic silver creates a striking visual effect, perfect for a modern and chic look. The short, square shape is practical yet stylish, making this design suitable for both everyday wear and special occasions. The geometric lines add a touch of elegance and complexity, transforming the nails into a piece of art.
Consumables Needed
- Midnight blue polish (Zoya “Ryan”)
- Silver striping tape or silver nail polish
- Top coat (OPI Top Coat)
Author’s Recommendations: For precise geometric lines, use silver striping tape. Ensure the base polish is completely dry before applying the tape to prevent smudging.
DIY Instructions
- Start with a base coat.
- Apply two coats of midnight blue polish, allowing each coat to dry thoroughly.
- Apply silver striping tape in geometric patterns on each nail.
- Seal with a top coat to protect the design and add a glossy finish.
Gothic Black and Silver Accents
These gothic-inspired nails are a perfect blend of dark elegance and intricate detailing. The design features a glossy black base with ornate silver embellishments, creating a luxurious and dramatic look. The nails are elongated and squared, providing a bold canvas for the detailed silver accents. The combination of black and silver offers a classic yet edgy aesthetic, making these nails ideal for formal events or adding a touch of drama to your everyday style.
Consumables Needed
- Black polish (Essie “Licorice”)
- Silver embellishments (metal charms, studs)
- Nail glue
- Top coat (CND Vinylux Weekly Top Coat)
Author’s Recommendations: Use high-quality metal embellishments to ensure they adhere properly and don’t lose their shine. A strong nail glue is essential to keep the embellishments in place.
DIY Instructions
- Apply a base coat to protect your nails.
- Paint the nails with two coats of black polish, allowing each to dry completely.
- Apply the silver embellishments using nail glue, arranging them in a symmetrical or decorative pattern.
- Seal the design with a top coat to add shine and secure the embellishments.
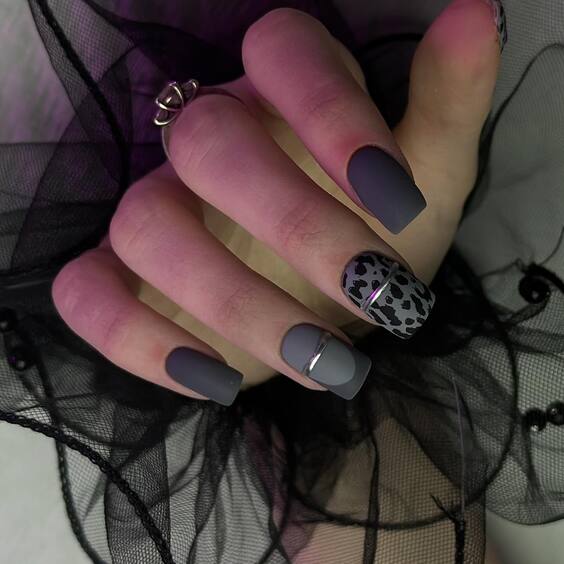
Matte Grey and Leopard Accent
This stylish design features a matte grey base with a striking leopard accent nail. The matte finish gives the nails a sophisticated and modern feel, while the leopard print adds a playful and edgy twist. The use of different shades of grey, along with the animal print, creates a unique and eye-catching look. The short, square shape is practical and chic, making these nails perfect for everyday wear with a fashionable edge. The combination of matte and glossy textures enhances the contrast, making the design stand out even more.
Consumables Needed
- Matte grey polish (OPI “Dark Side of the Mood” with a matte top coat)
- Light grey polish (Essie “Take it Outside”)
- Leopard print decals or fine detail brush for hand-painting
- Top coat (matte and glossy options)
Author’s Recommendations: For a sharp and clean look, use a matte top coat to seal the grey polish. For the leopard print, either use decals for precision or practice hand-painting with a fine detail brush.
DIY Instructions
- Apply a base coat to protect the nails.
- Paint the nails with two coats of matte grey polish.
- For the accent nail, use a light grey polish as the base and apply the leopard print design using decals or hand-painting.
- Finish with a matte top coat on all nails, except the accent nail, which can have a glossy finish for added contrast.
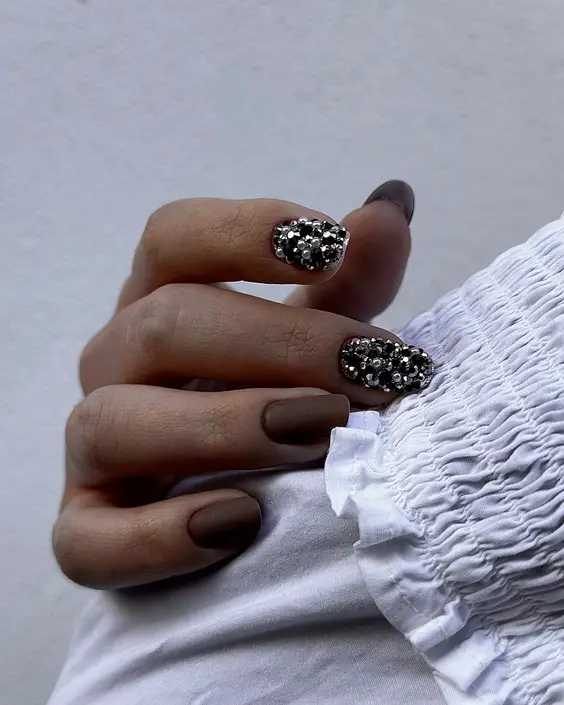
Textured Black and Silver Beads
These nails are all about texture and shine. Featuring a smooth matte black base, the accent nails are adorned with intricate silver beads, creating a striking 3D effect. The combination of matte and textured finishes gives these nails a sophisticated and luxurious feel, perfect for a night out or a special event. The short, rounded shape adds to the elegance, making the design both practical and stylish. The silver beads catch the light beautifully, adding a touch of glamour to the overall look.
Consumables Needed
- Matte black polish (Essie “Licorice” with a matte top coat)
- Silver beads or caviar beads
- Nail glue
- Top coat (matte for the base, none for the beads)
Author’s Recommendations: When applying beads, use a clear nail glue to secure them firmly. Avoid using a top coat over the beads to maintain their texture and shine.
DIY Instructions
- Start with a base coat to protect the nails.
- Apply two coats of matte black polish and let them dry completely.
- For the accent nails, apply nail glue and carefully place the silver beads in a dense, decorative pattern.
- Avoid applying a top coat over the beads to preserve their texture and shine.
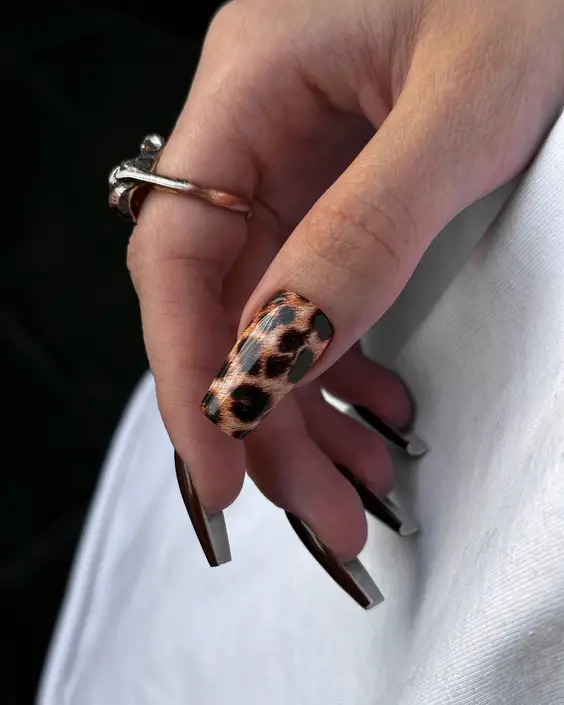
Fierce Leopard Print
This bold design showcases a fierce leopard print that is both daring and fashionable. The nails feature a rich, warm brown base with black and gold accents, creating a realistic and striking animal print. The long, tapered shape enhances the wild and exotic vibe of the design, making these nails perfect for those who love to make a statement. The glossy finish adds a sleek and polished look, making the nails appear sophisticated and trendy. This design is ideal for any season and pairs beautifully with both casual and glamorous outfits.
Consumables Needed
- Brown polish (OPI “Chocolate Moose”)
- Black polish (China Glaze “Liquid Leather”)
- Gold polish (Zoya “Ziv”)
- Fine detail brush
- Top coat (Seche Vite Dry Fast Top Coat)
Author’s Recommendations: For a realistic leopard print, use a fine detail brush to carefully place the black and gold spots. The gold should be applied sparingly for a subtle shimmer effect.
DIY Instructions
- Apply a base coat to start.
- Paint the nails with a brown polish as the base color.
- Using a fine detail brush, create irregular spots with black polish and outline them with gold polish for a shimmering effect.
- Seal the design with a glossy top coat to enhance the colors and add shine.
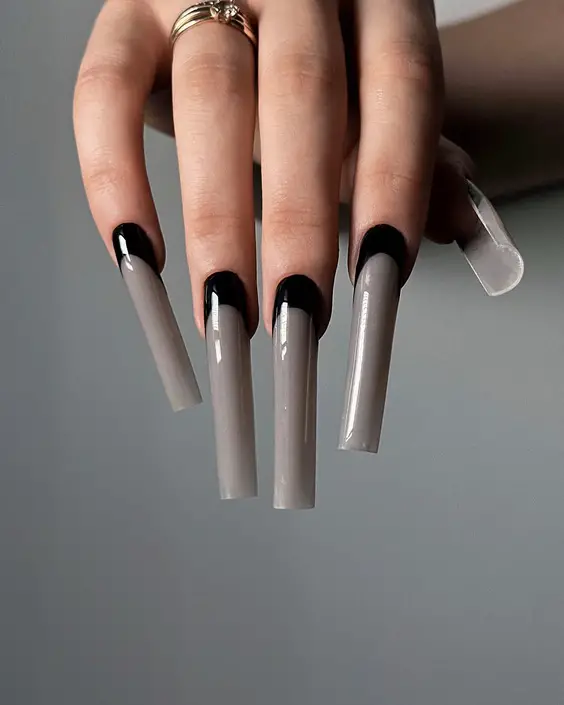
Glossy Grey and Black French Tips
This sleek and modern design features a sophisticated twist on the classic French manicure. The long coffin-shaped nails are painted with a glossy grey base, complemented by bold black tips. The high-shine finish adds a luxurious touch, making the nails look polished and refined. The combination of grey and black offers a versatile and stylish look, perfect for both casual and formal occasions. The length and shape of the nails add a dramatic flair, making this design ideal for those who love to make a statement with their manicure.
Consumables Needed
- Grey polish (OPI “I Can Never Hut Up”)
- Black polish (Essie “Licorice”)
- Top coat (Seche Vite Dry Fast Top Coat)
- Nail guides or fine detail brush
Author’s Recommendations: To achieve crisp lines for the French tips, use nail guides or a steady hand with a fine detail brush. A high-gloss top coat is essential to enhance the shine and finish of the design.
DIY Instructions
- Begin with a base coat to protect your nails.
- Apply two coats of grey polish, allowing each layer to dry completely.
- Use nail guides or a fine detail brush to paint the black French tips, ensuring sharp and clean edges.
- Finish with a glossy top coat to seal the design and add a brilliant shine.
