
Are you ready to elevate your nail game with a splash of color? Colored French tip nails are not only chic but incredibly versatile, perfect for any occasion. Whether you prefer a subtle pastel or a bold neon, there’s a design for everyone. In this article, we’ll dive into some stunning colored French tip nail designs, offering professional insights, product recommendations, and DIY tips. Let’s get started!
Classic Orange and White Design
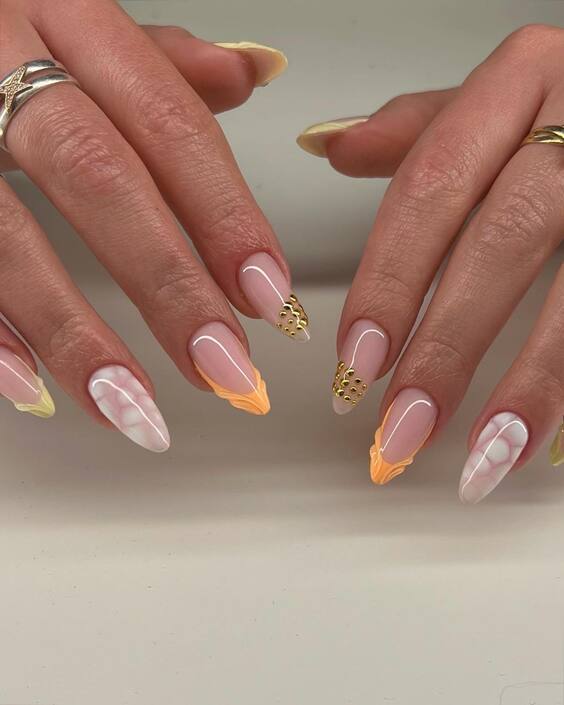
This stunning design combines the elegance of classic French tips with a modern twist of orange and white hues. The almond shape elongates the fingers, making them look slender and sophisticated. The vibrant orange tips contrast beautifully with the white accents, creating a playful yet refined look. The gold embellishments on two nails add a touch of glamour, perfect for special occasions or adding a bit of sparkle to your everyday style.
Consumables List
- Base Coat: OPI Nail Envy Original Nail Strengthener
- Orange Nail Polish: Essie Nail Polish in “Tangerine Tease”
- White Nail Polish: Sally Hansen Xtreme Wear in “White On”
- Gold Nail Stickers: Kiss Gold Nail Art Stickers
- Top Coat: Seche Vite Dry Fast Top Nail Coat
DIY Instructions
- Prep Your Nails: Start with clean, filed nails. Apply the OPI Nail Envy base coat to protect and strengthen your nails.
- Apply the Base Color: Use the Sally Hansen white polish to paint your nails, allowing them to dry completely.
- Create the French Tips: Carefully apply the Essie orange polish to the tips of your nails. Use nail guides for precision if needed.
- Add Gold Accents: Apply the Kiss gold nail stickers to the desired nails for added flair.
- Seal the Design: Finish with a coat of Seche Vite top coat to lock in your design and add a brilliant shine.
Elegant Black and Nude French Tips with Bows
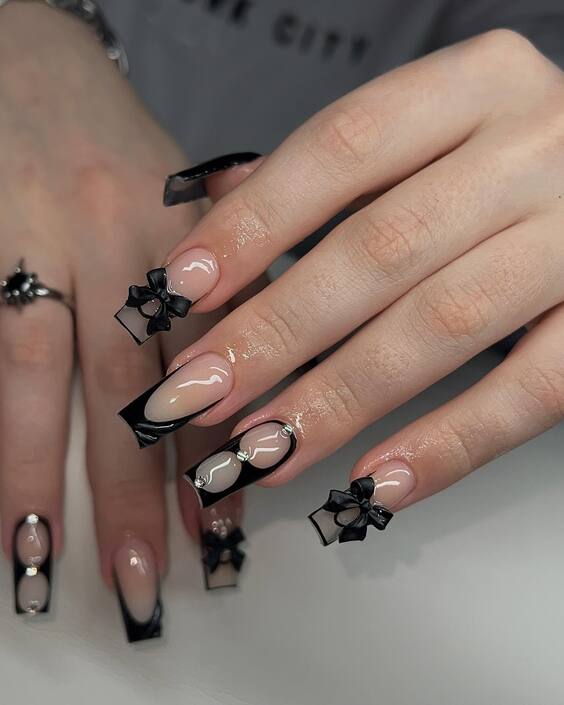
This design takes elegance to a new level with its sophisticated black and nude color palette. The square shape gives a clean, modern look, while the 3D bow accents add a unique touch of charm and femininity. This style is perfect for formal events or a night out, providing a balance between edgy and classy.
Consumables List
- Base Coat: Orly Bonder Rubberized Basecoat
- Nude Nail Polish: Zoya Nail Polish in “Cala”
- Black Nail Polish: OPI Nail Lacquer in “Black Onyx”
- 3D Bow Nail Art: Born Pretty 3D Bow Nail Decorations
- Top Coat: Essie Gel Couture Top Coat
DIY Instructions
- Prep Your Nails: Clean and file your nails to the desired square shape. Apply the Orly base coat.
- Apply the Base Color: Paint your nails with Zoya’s “Cala” nude polish. Let them dry thoroughly.
- Create the French Tips: Using the OPI black polish, carefully paint the tips of your nails. Nail guides can help with precision.
- Attach the Bows: Apply a small amount of nail glue and place the 3D bows on the tips. Press gently to secure.
- Finish with Top Coat: Apply the Essie Gel Couture top coat to seal the design and ensure durability.
Feminine Pink and White French Tips with Floral Accents
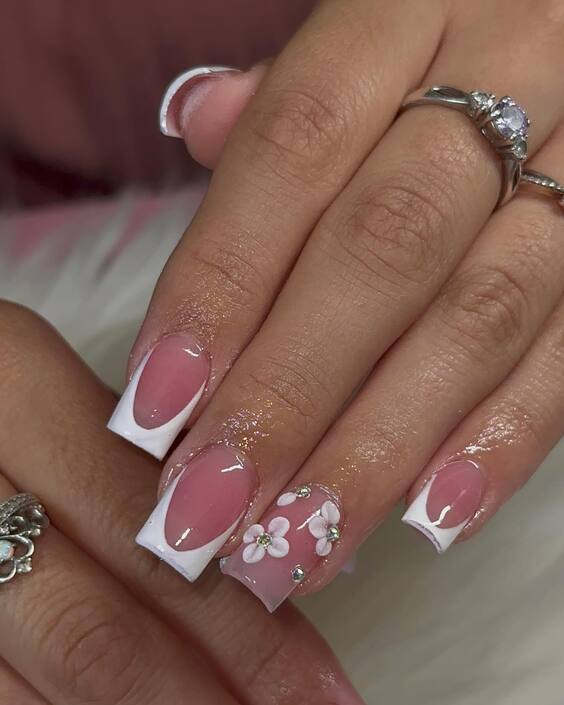
For a softer, more feminine look, these pink and white French tips with floral accents are absolutely perfect. The squoval shape is both practical and stylish, providing a comfortable wear while still looking polished. The delicate floral design adds a romantic touch, making this a great choice for weddings or spring events.
Consumables List
- Base Coat: Deborah Lippmann Hard Rock Hydrating Nail Hardener
- Pink Nail Polish: Essie Nail Polish in “Ballet Slippers”
- White Nail Polish: OPI Nail Lacquer in “Alpine Snow”
- Floral Nail Stickers: Decal Mania Floral Nail Stickers
- Top Coat: CND Vinylux Long Wear Top Coat
DIY Instructions
- Prep Your Nails: Clean and shape your nails into a squoval shape. Apply the Deborah Lippmann base coat.
- Apply the Base Color: Use Essie’s “Ballet Slippers” pink polish to paint your nails. Allow them to dry completely.
- Create the French Tips: Apply OPI’s “Alpine Snow” white polish to the tips. Use nail guides for a clean line.
- Add Floral Accents: Place the Decal Mania floral stickers on the desired nails. Press down gently to adhere.
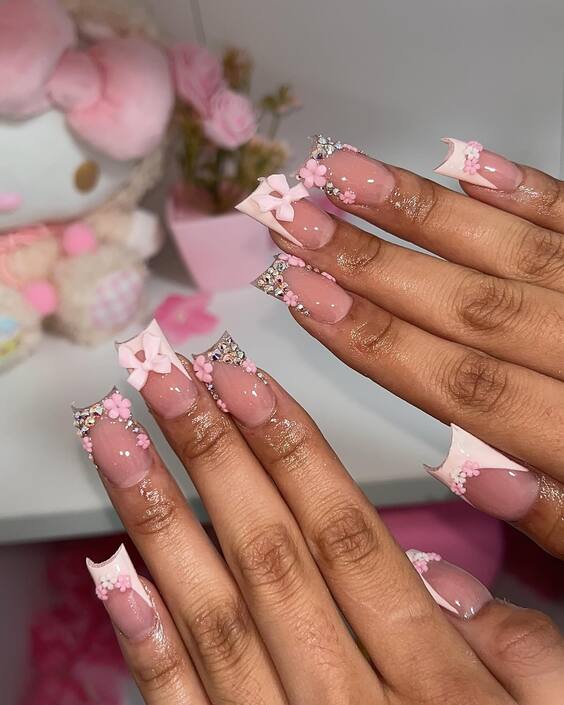
Delicate Pink and White Polka Dot French Tips
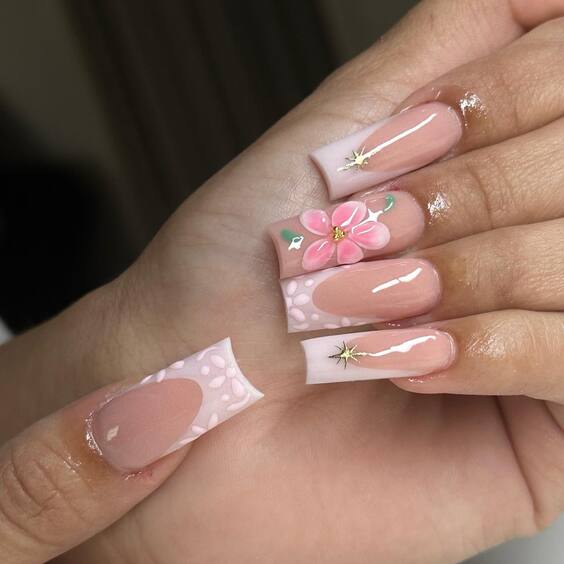
This design features a soft pink base with white polka dot French tips, exuding a whimsical and charming aesthetic. The almond shape is perfect for elongating the fingers while maintaining a practical length. The standout feature is the delicate 3D pink flower on the ring finger, adding a touch of nature-inspired elegance. A gold star embellishment on the middle finger brings a subtle hint of luxury.
Consumables List
- Base Coat: Essie Strong Start Nail Polish Base Coat
- Pink Nail Polish: OPI Nail Lacquer in “Bubble Bath”
- White Nail Polish: China Glaze Nail Lacquer in “White on White”
- 3D Flower Nail Art: Makartt 3D Flower Nail Art Decoration
- Gold Star Nail Stickers: Born Pretty Gold Star Nail Stickers
- Top Coat: Sally Hansen Miracle Gel Top Coat
DIY Instructions
- Prep Your Nails: Clean and shape your nails into an almond shape. Apply the Essie base coat.
- Apply the Base Color: Paint your nails with OPI’s “Bubble Bath” pink polish and let them dry thoroughly.
- Create the French Tips: Use China Glaze’s “White on White” polish to paint the tips, adding small polka dots with a dotting tool.
- Add 3D Flower and Gold Stars: Attach the 3D flower on the ring finger using nail glue, and place the gold star stickers on the middle finger.
- Seal with Top Coat: Finish with the Sally Hansen top coat to protect your design and add shine.
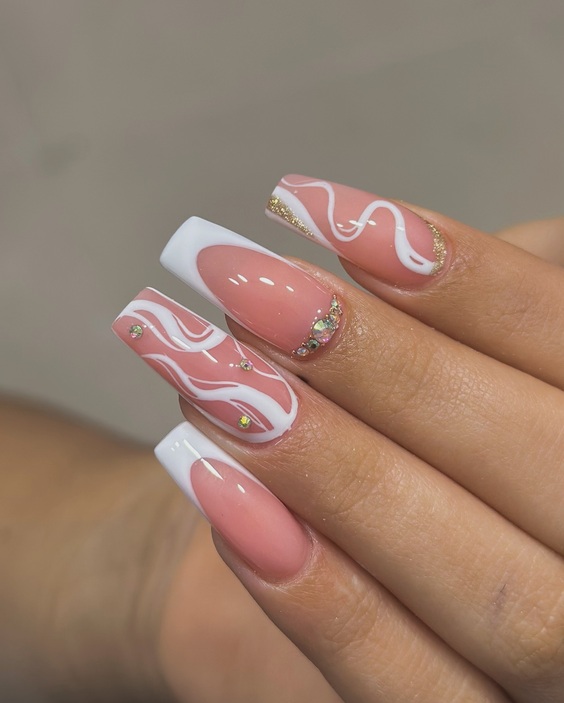
Elegant Pink and White Swirl French Tips with Rhinestones
This design blends classic French tips with a modern twist of white swirls and rhinestones. The coffin shape enhances the length and elegance of the nails. The swirls add a dynamic touch, while the rhinestones on the ring finger and pinky provide a glamorous sparkle. This look is perfect for those who want a mix of traditional and contemporary styles.
Consumables List
- Base Coat: CND Stickey Anchoring Base Coat
- Pink Nail Polish: Essie Nail Polish in “Sugar Daddy”
- White Nail Polish: Zoya Nail Polish in “Purity”
- Rhinestones: Swarovski Flatback Rhinestones
- Top Coat: INM Out The Door Top Coat
DIY Instructions
- Prep Your Nails: Clean and shape your nails into a coffin shape. Apply the CND base coat.
- Apply the Base Color: Use Essie’s “Sugar Daddy” pink polish to paint your nails. Allow them to dry completely.
- Create the French Tips and Swirls: Paint the tips with Zoya’s “Purity” white polish. Add the swirls using a thin nail art brush.
- Add Rhinestones: Apply the Swarovski rhinestones to the ring finger and pinky using nail glue.
- Seal with Top Coat: Finish with the INM top coat to ensure longevity and shine.
Classic White French Tips on Coffin Nails
A timeless classic, these white French tips on coffin-shaped nails are the epitome of elegance and simplicity. The design is sleek and sophisticated, perfect for any occasion. The glossy finish adds a modern touch, making these nails look clean and polished. This versatile style can be dressed up or down, making it a staple in any nail art repertoire.
Consumables List
- Base Coat: Orly Nail Defense Strengthening Treatment
- White Nail Polish: Essie Nail Polish in “Blanc”
- Top Coat: Seche Vite Dry Fast Top Coat
DIY Instructions
- Prep Your Nails: Clean and shape your nails into a coffin shape. Apply the Orly base coat.
- Apply the Base Color: Paint your nails with Essie’s “Blanc” white polish. Let them dry thoroughly.
- Create the French Tips: Use the same Essie white polish to create the French tips. Nail guides can be helpful for achieving a precise line.
- Seal with Top Coat: Finish with the Seche Vite top coat for a glossy and durable finish.
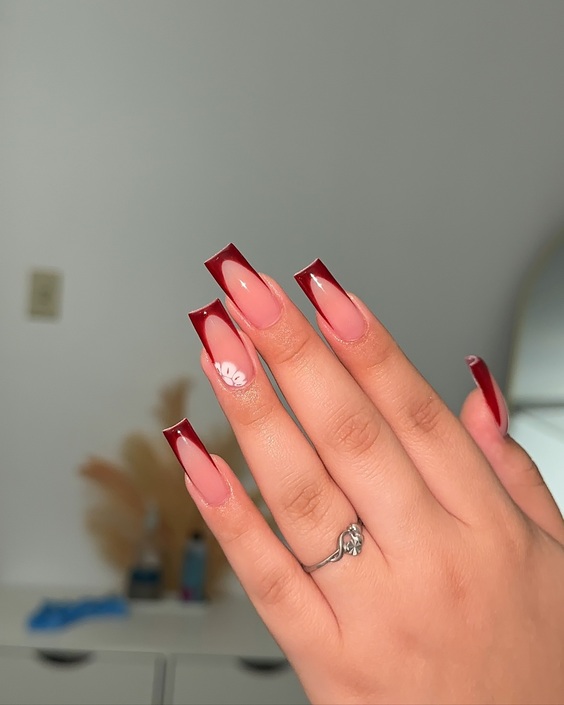
Deep Red French Tips with Floral Accent
These deep red French tips on coffin nails are a bold and sophisticated choice. The rich red color adds a touch of drama, while the delicate white floral accent on the ring finger softens the overall look. The high-gloss finish enhances the elegance, making these nails perfect for evening events or any occasion where you want to make a statement.
Consumables List
- Base Coat: Essie Ridge Filling Base Coat
- Red Nail Polish: OPI Nail Lacquer in “Big Apple Red”
- White Nail Polish: Sinful Colors Nail Polish in “Snow Me White”
- Floral Nail Stickers: Daisy Nail Stickers from Kiss
- Top Coat: Sally Hansen Insta-Dri Top Coat
DIY Instructions
- Prep Your Nails: Clean and shape your nails into a coffin shape. Apply the Essie base coat.
- Apply the Base Color: Paint your nails with OPI’s “Big Apple Red” polish for the tips and Sinful Colors’ “Snow Me White” for the accent.
- Create the French Tips: Carefully apply the red polish to the tips. Use nail guides for precision.
- Add Floral Accent: Place the Daisy nail stickers on the ring finger and press gently to adhere.
- Seal with Top Coat: Finish with the Sally Hansen Insta-Dri top coat for a durable and glossy finish.
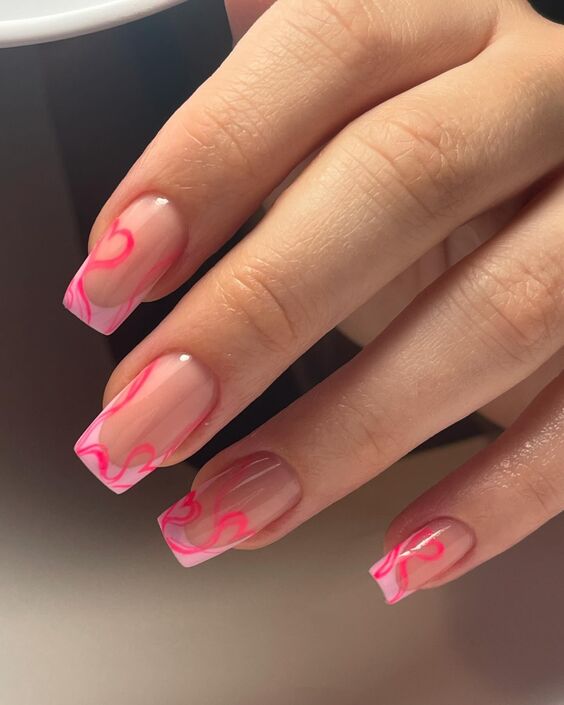
Fun Pink and Red Swirl French Tips
This playful design features pink and red swirls on French tips, creating a fun and energetic vibe. The square shape keeps the look modern and chic, while the swirls add a dynamic touch. Perfect for summer or any time you want to add a bit of fun to your nails, this design is both trendy and easy to achieve.
Consumables List
- Base Coat: OPI Natural Nail Base Coat
- Pink Nail Polish: Essie Nail Polish in “Mademoiselle”
- Red Nail Polish: Revlon Nail Enamel in “Revlon Red”
- Top Coat: INM Out The Door Top Coat
DIY Instructions
- Prep Your Nails: Clean and shape your nails into a square shape. Apply the OPI base coat.
- Apply the Base Color: Use Essie’s “Mademoiselle” pink polish for the base.
- Create the Swirl Tips: Use a thin nail art brush to apply Revlon’s “Revlon Red” in swirling patterns on the tips.
- Seal with Top Coat: Finish with the INM top coat to protect your design and add shine.
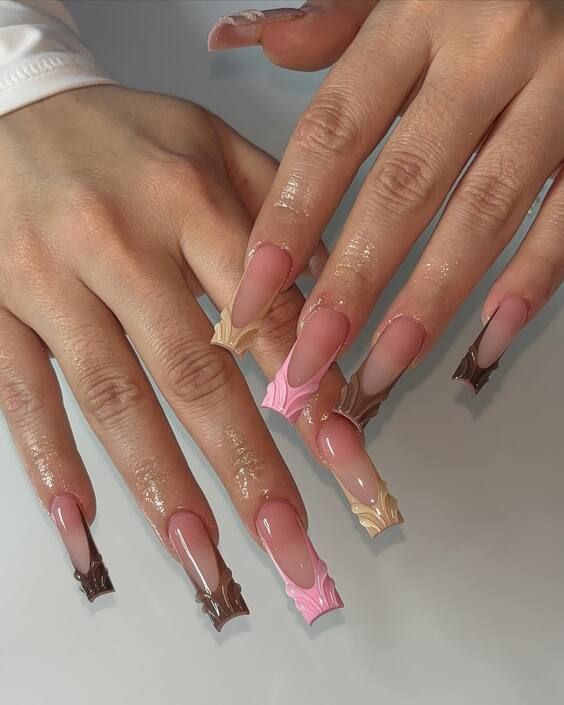
Multi-Colored French Tips with Chrome Finish
This unique design features multi-colored French tips with a chrome finish, adding a futuristic and stylish touch to the nails. The almond shape accentuates the length and gives a sleek appearance. Each nail is tipped with a different color, ranging from pink to brown, creating a visually stunning effect. The chrome finish adds an extra layer of sophistication and shine.
Consumables List
- Base Coat: Deborah Lippmann All About That Base
- Colored Nail Polishes: Essie Nail Polish in “Ballet Slippers” (pink), OPI Nail Lacquer in “Taupe-less Beach” (brown)
- Chrome Powder: Born Pretty Chrome Nail Powder
- Top Coat: CND Vinylux Long Wear Top Coat
DIY Instructions
- Prep Your Nails: Clean and shape your nails into an almond shape. Apply the Deborah Lippmann base coat.
- Apply the Base Color: Use Essie’s “Ballet Slippers” and OPI’s “Taupe-less Beach” for the tips.
- Create the French Tips: Paint each nail tip with a different color polish, then apply the chrome powder for a metallic finish.
- Seal with Top Coat: Finish with the CND Vinylux top coat to ensure a long-lasting and shiny finish.
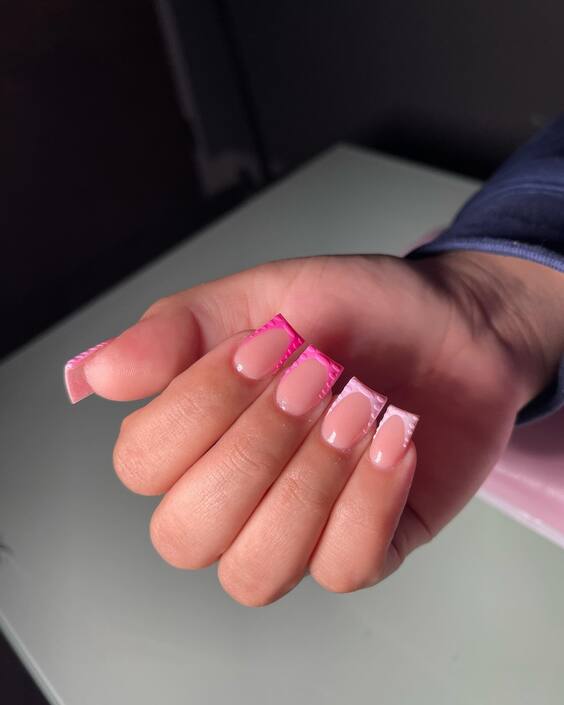
Vibrant Pink and White Square French Tips
This design combines vibrant pink and white colors on square-shaped nails, giving a youthful and energetic vibe. The striking contrast between the pink and white French tips makes the nails stand out, while the square shape keeps the look modern and stylish. This design is perfect for those who want to add a pop of color to their everyday look.
Consumables List
- Base Coat: OPI Nail Envy Nail Strengthener
- Pink Nail Polish: China Glaze Nail Lacquer in “Shocking Pink”
- White Nail Polish: Essie Nail Polish in “Blanc”
- Top Coat: Seche Vite Dry Fast Top Coat
DIY Instructions
- Prep Your Nails: Clean and shape your nails into a square shape. Apply the OPI base coat.
- Apply the Base Color: Use Essie’s “Blanc” white polish to paint the base of your nails and let them dry.
- Create the French Tips: Carefully apply China Glaze’s “Shocking Pink” polish to the tips, creating a bold French tip.
- Seal with Top Coat: Finish with the Seche Vite top coat to protect your design and add shine.
Soft Blue and White French Tips
These soft blue and white French tips offer a delicate and serene look. The almond shape is flattering and feminine, making the nails appear longer and more elegant. The light blue tips are perfect for a subtle, yet stylish look, ideal for both casual and formal settings.

Consumables List
- Base Coat: Essie Here to Stay Base Coat
- Blue Nail Polish: Zoya Nail Polish in “Blu”
- White Nail Polish: Sally Hansen Hard as Nails in “White Tip”
- Top Coat: CND Super Shiney Top Coat
DIY Instructions
- Prep Your Nails: Clean and shape your nails into an almond shape. Apply the Essie base coat.
- Apply the Base Color: Use Sally Hansen’s “White Tip” polish to paint the base of your nails.
- Create the French Tips: Apply Zoya’s “Blu” polish to the tips, creating a gentle French tip.
- Seal with Top Coat: Finish with the CND top coat for a long-lasting shine.
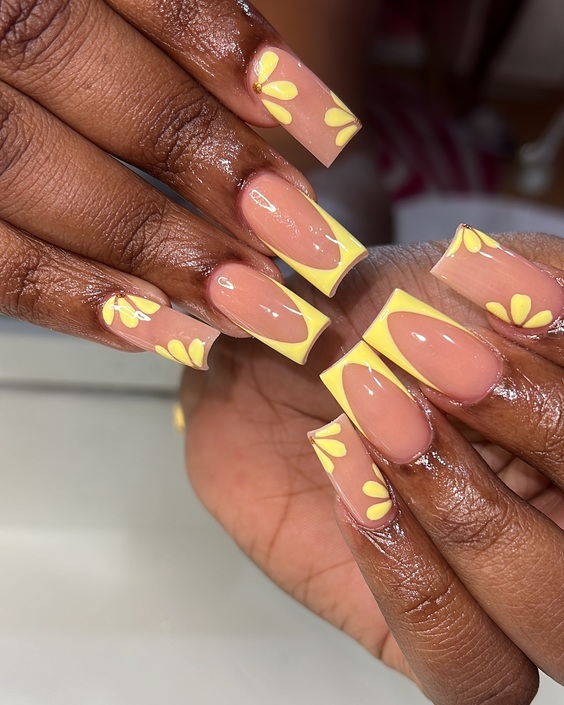
Sunny Yellow French Tips with Daisy Accents
This cheerful design features bright yellow French tips adorned with daisy accents, bringing a touch of sunshine to your nails. The square shape complements the playful look, while the daisy accents add a whimsical and joyful touch. This design is perfect for the summer, radiating positivity and fun.
Consumables List
- Base Coat: Orly Bonder Base Coat
- Yellow Nail Polish: OPI Nail Lacquer in “Sun, Sea, and Sand in My Pants”
- White Nail Polish: Sinful Colors Nail Polish in “Snow Me White”
- Daisy Nail Stickers: Floral Nail Stickers from Born Pretty
- Top Coat: Essie Gel Setter Top Coat
DIY Instructions
- Prep Your Nails: Clean and shape your nails into a square shape. Apply the Orly base coat.
- Apply the Base Color: Use Sinful Colors’ “Snow Me White” polish to paint the base of your nails.
- Create the French Tips: Carefully apply OPI’s “Sun, Sea, and Sand in My Pants” yellow polish to the tips.
- Add Daisy Accents: Place the Born Pretty daisy stickers on the nails, arranging them as desired.
- Seal with Top Coat: Finish with the Essie Gel Setter top coat to lock in your design and add a glossy finish.
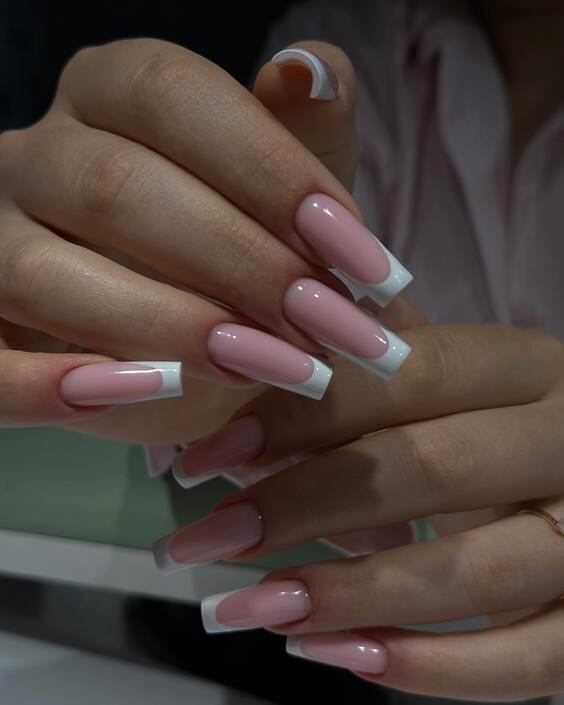
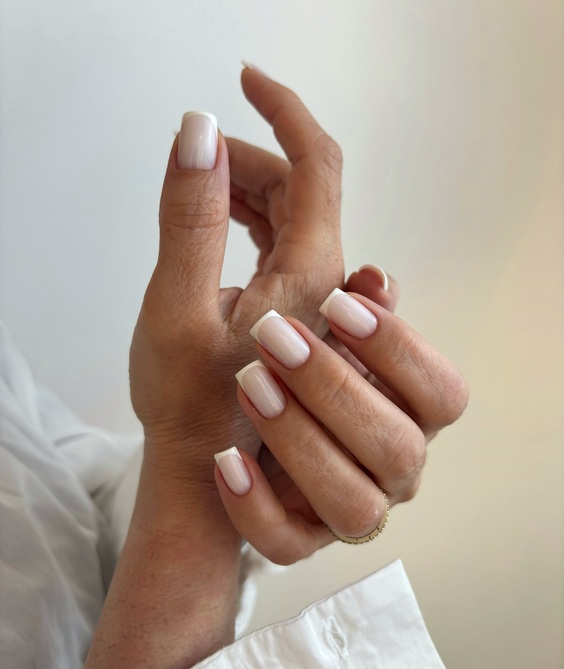
Classic White French Tips on Square Nails
These classic white French tips on square nails exude timeless elegance and simplicity. The clean lines and high-gloss finish make this design perfect for any occasion, from a casual day out to a formal event. The square shape is practical and stylish, giving the nails a polished and sophisticated look.
Consumables List
- Base Coat: Essie Ridge Filling Base Coat
- White Nail Polish: OPI Nail Lacquer in “Alpine Snow”
- Top Coat: Seche Vite Dry Fast Top Coat
DIY Instructions
- Prep Your Nails: Clean and shape your nails into a square shape. Apply the Essie base coat.
- Apply the Base Color: Use OPI’s “Alpine Snow” white polish to paint the tips of your nails.
- Create the French Tips: Carefully apply the white polish to the tips, using nail guides for a precise line.
- Seal with Top Coat: Finish with the Seche Vite top coat to add shine and protect your design.
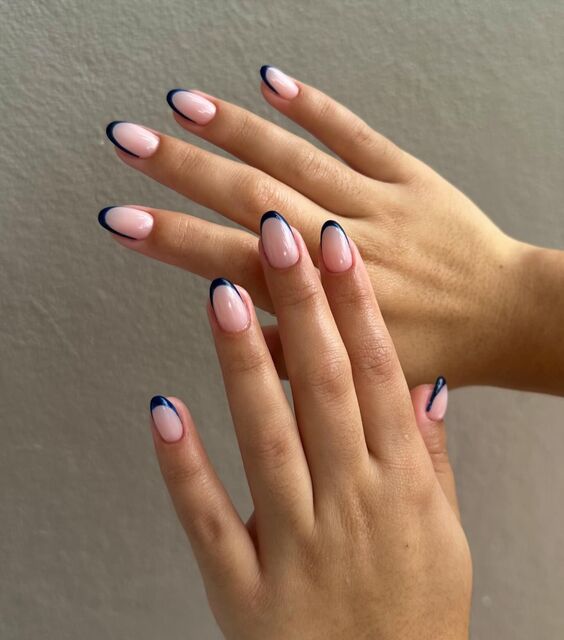
Navy Blue French Tips on Almond Nails
This design features sophisticated navy blue French tips on almond-shaped nails, providing a modern twist to the classic French manicure. The almond shape elongates the fingers, making them appear more slender and elegant. The deep navy blue tips are a chic and trendy choice, perfect for both day and night looks.
Consumables List
- Base Coat: Orly Bonder Base Coat
- Blue Nail Polish: Essie Nail Polish in “After School Boy Blazer”
- Top Coat: CND Vinylux Long Wear Top Coat
DIY Instructions
- Prep Your Nails: Clean and shape your nails into an almond shape. Apply the Orly base coat.
- Apply the Base Color: Use Essie’s “After School Boy Blazer” blue polish to paint the tips of your nails.
- Create the French Tips: Carefully apply the blue polish to the tips, using nail guides for a clean line.
- Seal with Top Coat: Finish with the CND top coat for a glossy and durable finish.
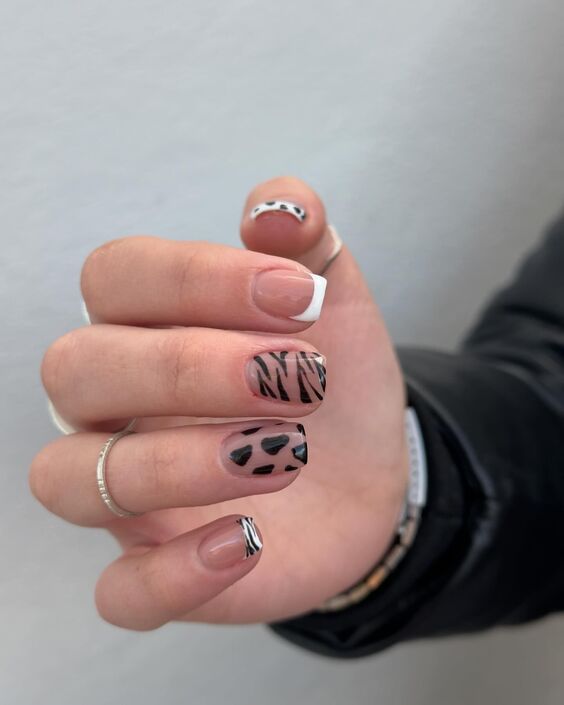
Mixed Animal Print French Tips
This fun and trendy design combines various animal prints with classic French tips. The mix of zebra, leopard, and cheetah prints adds a wild and playful element to the nails, making them a perfect statement piece. The short, square shape keeps the look practical and manageable, while the animal prints bring a touch of creativity and individuality.
Consumables List
- Base Coat: Deborah Lippmann All About That Base
- White Nail Polish: Sally Hansen Hard as Nails in “White Tip”
- Black Nail Polish: Essie Nail Polish in “Licorice”
- Nail Art Brushes: Beetles Nail Art Liner Brushes
- Top Coat: Seche Vite Dry Fast Top Coat
DIY Instructions
- Prep Your Nails: Clean and shape your nails into a short, square shape. Apply the Deborah Lippmann base coat.
- Apply the Base Color: Use Sally Hansen’s “White Tip” polish for the French tips.
- Create the Animal Prints: Use Essie’s “Licorice” black polish and Beetles nail art brushes to create zebra, leopard, and cheetah patterns on different nails.
- Seal with Top Coat: Finish with the Seche Vite top coat to protect your design and add shine.
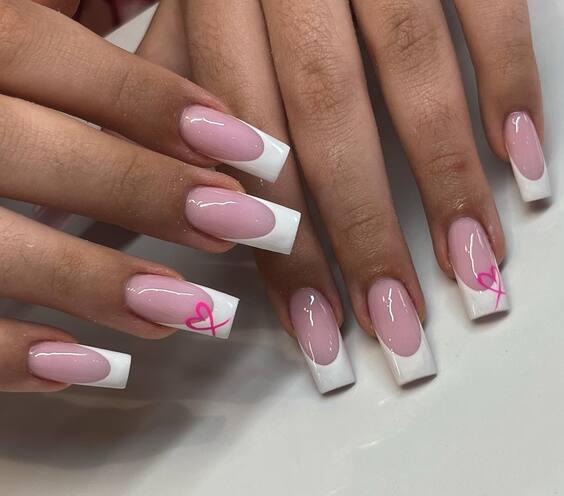
White French Tips with Pink Heart Accents
This design combines classic white French tips with a playful twist of pink heart accents. The coffin shape gives a modern edge, while the delicate pink hearts on the ring fingers add a sweet, romantic touch. The glossy finish enhances the clean and elegant look, making these nails perfect for both everyday wear and special occasions.
Consumables List
- Base Coat: OPI Natural Nail Base Coat
- White Nail Polish: Essie Nail Polish in “Blanc”
- Pink Nail Polish: China Glaze Nail Lacquer in “Pink Voltage”
- Heart Nail Stickers: Born Pretty Pink Heart Nail Stickers
- Top Coat: Seche Vite Dry Fast Top Coat
DIY Instructions
- Prep Your Nails: Clean and shape your nails into a coffin shape. Apply the OPI base coat.
- Apply the Base Color: Use Essie’s “Blanc” white polish to paint the tips of your nails.
- Add Heart Accents: Use China Glaze’s “Pink Voltage” to create small hearts on the ring fingers or apply the heart stickers.
- Seal with Top Coat: Finish with the Seche Vite top coat to protect your design and add shine.
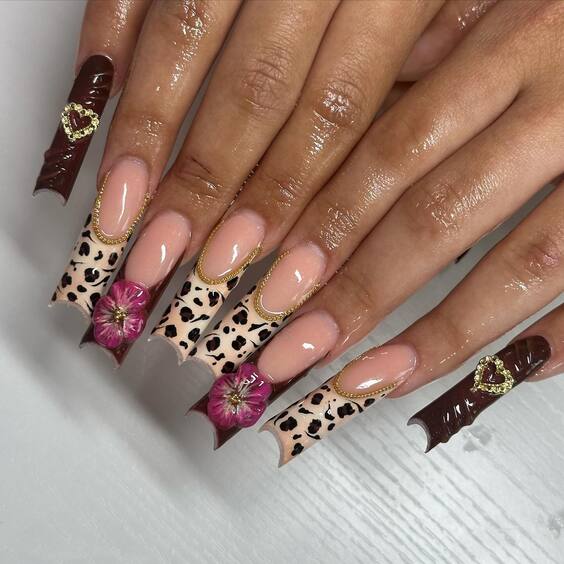
Animal Print and Floral French Tips
This bold design features a mix of animal prints and floral accents on French tips, creating a dramatic and eye-catching look. The almond shape is elongated and stylish, while the leopard print and brown hues add an exotic flair. The 3D floral accents and gold embellishments provide a luxurious touch, making these nails ideal for a glamorous night out.
Consumables List
- Base Coat: Orly Bonder Base Coat
- Brown Nail Polish: OPI Nail Lacquer in “Chocolate Moose”
- Black Nail Polish: Essie Nail Polish in “Licorice”
- 3D Flower Nail Art: Makartt 3D Flower Nail Art Decoration
- Gold Nail Stickers: Born Pretty Gold Nail Stickers
- Top Coat: CND Super Shiney Top Coat
DIY Instructions
- Prep Your Nails: Clean and shape your nails into an almond shape. Apply the Orly base coat.
- Apply the Base Color: Use OPI’s “Chocolate Moose” for the brown sections and Essie’s “Licorice” for the black animal prints.
- Add Floral and Gold Accents: Attach the 3D flower decorations and gold stickers using nail glue.
- Seal with Top Coat: Finish with the CND top coat for a glossy and long-lasting finish.
Pink and Glitter French Tips with 3D Bows
This design is a delightful mix of pink French tips, glitter accents, and 3D bows, creating a cute and glamorous look. The square shape provides a modern base, while the pink tips and glitter bring a playful and sparkly touch. The 3D bows add an extra layer of charm, making these nails perfect for a special event or a fun outing.
Consumables List
- Base Coat: Deborah Lippmann All About That Base
- Pink Nail Polish: Essie Nail Polish in “Ballet Slippers”
- Glitter Nail Polish: China Glaze Nail Lacquer in “Fairy Dust”
- 3D Bow Nail Art: Born Pretty 3D Bow Nail Decorations
- Top Coat: Seche Vite Dry Fast Top Coat
DIY Instructions
- Prep Your Nails: Clean and shape your nails into a square shape. Apply the Deborah Lippmann base coat.
- Apply the Base Color: Use Essie’s “Ballet Slippers” pink polish for the tips.
- Add Glitter Accents: Apply China Glaze’s “Fairy Dust” glitter polish over the pink tips.
- Attach 3D Bows: Use nail glue to place the 3D bows on the desired nails.
- Seal with Top Coat: Finish with the Seche Vite top coat for a glossy and protective finish.
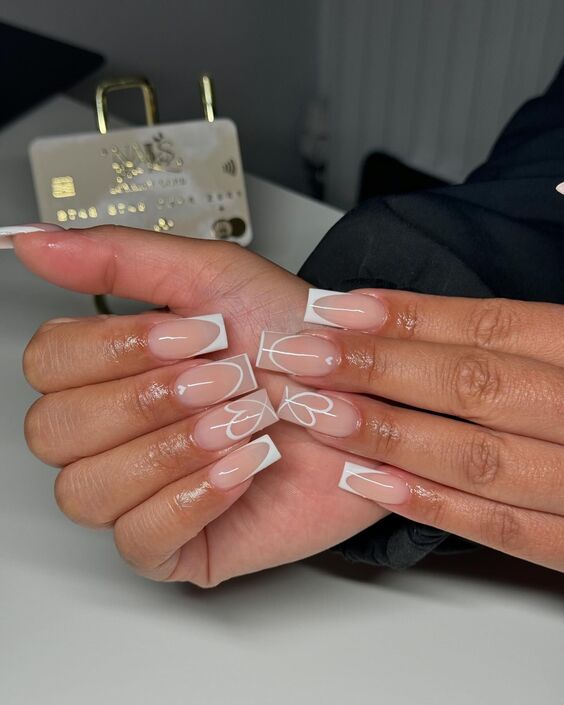
Modern White French Tips with Abstract Accents
This design features modern white French tips with abstract accents on square nails, creating a unique and contemporary look. The abstract white lines add an artistic flair to the classic French manicure, making it perfect for those who want to stand out. The high-gloss finish and clean lines enhance the overall elegance of this design.
Consumables List
- Base Coat: OPI Nail Envy Nail Strengthener
- White Nail Polish: Essie Nail Polish in “Blanc”
- Nail Art Pen: Sally Hansen Nail Art Pen in White
- Top Coat: Seche Vite Dry Fast Top Coat
DIY Instructions
- Prep Your Nails: Clean and shape your nails into a square shape. Apply the OPI base coat.
- Apply the Base Color: Use Essie’s “Blanc” white polish to paint the tips of your nails.
- Add Abstract Accents: Use the Sally Hansen Nail Art Pen to draw abstract lines on the nails.
- Seal with Top Coat: Finish with the Seche Vite top coat to protect your design and add shine.
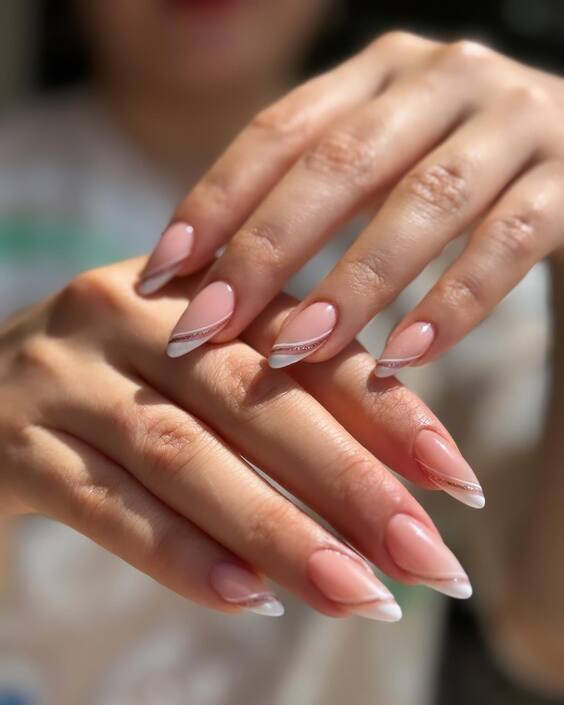
Elegant Silver and White French Tips on Almond Nails
These elegant almond-shaped nails feature silver and white French tips, offering a sophisticated and refined look. The subtle silver line between the white tip and the natural nail adds a touch of glamour without being overpowering. This design is perfect for formal events or when you want to add a bit of sparkle to your everyday style.
Consumables List
- Base Coat: Orly Bonder Base Coat
- White Nail Polish: OPI Nail Lacquer in “Alpine Snow”
- Silver Nail Polish: Sally Hansen Insta-Dri in “Silver Sweep”
- Top Coat: Essie Gel Setter Top Coat
DIY Instructions
- Prep Your Nails: Clean and shape your nails into an almond shape. Apply the Orly base coat.
- Apply the Base Color: Use OPI’s “Alpine Snow” white polish to paint the tips of your nails.
- Add Silver Line: Carefully apply Sally Hansen’s “Silver Sweep” polish as a thin line between the white tip and the natural nail.
- Seal with Top Coat: Finish with the Essie Gel Setter top coat for a glossy and durable finish.
Golden Edged French Tips on Almond Nails
This luxurious design features golden-edged French tips on almond-shaped nails, combining elegance with a touch of opulence. The golden edges provide a striking contrast against the white tips, making the nails look sophisticated and glamorous. This style is perfect for special occasions where you want to add a bit of luxury to your look.

Consumables List
- Base Coat: Deborah Lippmann All About That Base
- White Nail Polish: Essie Nail Polish in “Blanc”
- Gold Nail Polish: OPI Nail Lacquer in “Glitzerland”
- Top Coat: Seche Vite Dry Fast Top Coat
DIY Instructions
- Prep Your Nails: Clean and shape your nails into an almond shape. Apply the Deborah Lippmann base coat.
- Apply the Base Color: Use Essie’s “Blanc” white polish to paint the tips of your nails.
- Add Golden Edges: Carefully apply OPI’s “Glitzerland” gold polish along the edges of the white tips.
- Seal with Top Coat: Finish with the Seche Vite top coat to lock in your design and add a brilliant shine.
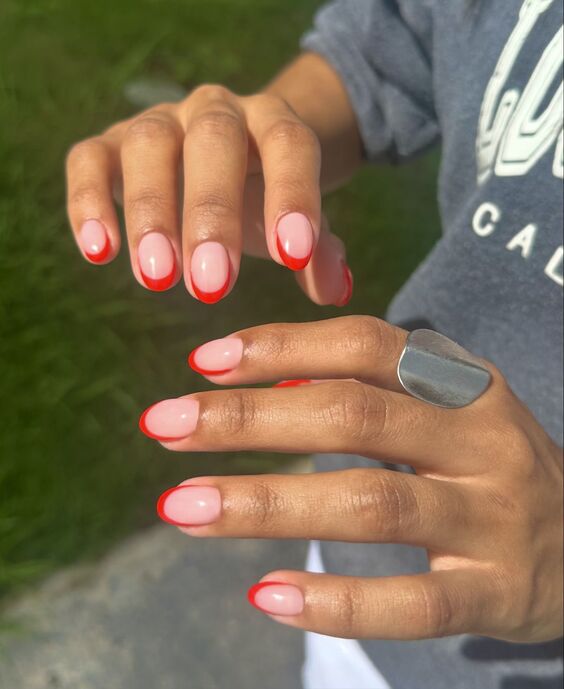
Bold Red French Tips on Round Nails
These bold red French tips on round nails are a striking and vibrant choice, perfect for making a statement. The round shape is not only practical and comfortable but also adds a touch of softness to the bold color. The high-gloss finish enhances the vivid red tips, making them stand out beautifully against the natural nail base.
Consumables List
- Base Coat: Essie Ridge Filling Base Coat
- Red Nail Polish: OPI Nail Lacquer in “Big Apple Red”
- Top Coat: Seche Vite Dry Fast Top Coat
DIY Instructions
- Prep Your Nails: Clean and shape your nails into a round shape. Apply the Essie base coat.
- Apply the Base Color: Use OPI’s “Big Apple Red” polish to paint the tips of your nails.
- Create the French Tips: Carefully apply the red polish to the tips, using nail guides for a clean line if needed.
- Seal with Top Coat: Finish with the Seche Vite top coat to add shine and protect your design.
Conclusion
Colored French tip nails offer a versatile and stylish way to express your creativity and elevate your look, whether you’re opting for a classic design with a twist or something bold and trendy. With the right tools and a bit of practice, you can easily recreate these stunning designs at home, adding a personal touch to each manicure. From delicate florals and playful swirls to luxurious gold accents and vibrant hues, the possibilities are endless. Embrace the beauty of colored French tips and let your nails make a statement this season!
