22 Stunning Blue Beach Nails: Perfect Designs for Summer 2024
Have you ever wished you could capture the essence of the summer beach with just your fingertips? Whether you’re planning a vacation or just dreaming of ocean waves, blue beach nails can bring a splash of the sea right to your hands. But what makes the perfect blue beach manicure? From soft hues mimicking a clear sky to vibrant shades that echo the deep ocean, the possibilities are as vast as the sea itself. How do you choose the right shade, shape, and style to make your summer manicure pop? Let’s dive into the world of blue beach nails and discover how to bring these designs to life, right from your home.
Blue Beach Nails Almond Design
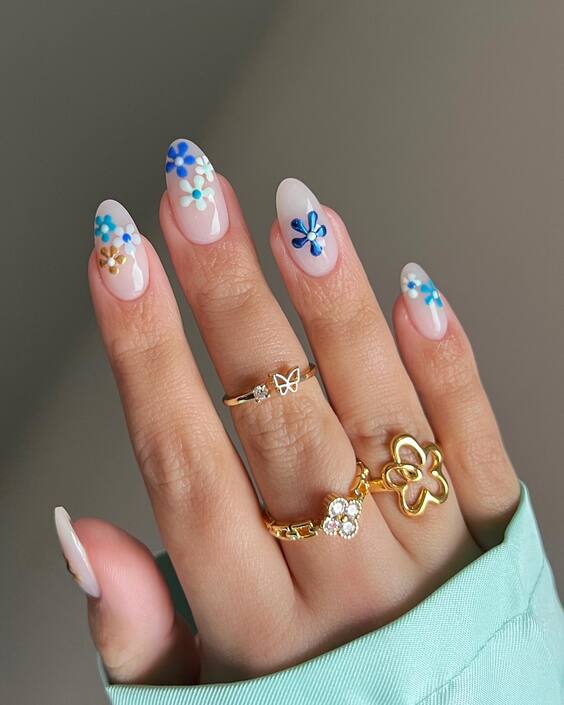
This stunning almond-shaped manicure is a true testament to the serene beauty of the beach. The use of a soft navy blue paired with delicate white accents perfectly embodies the gentle dance of ocean waves. The glossy finish adds a sense of depth, making it appear as though one could dive right into the nails. This design is ideal for those who appreciate elegance paired with a hint of nautical charm.
Consumables and Recommendations
- Base Coat: Sally Hansen Hard as Nails
- Navy Blue Polish: Essie After School Boy Blazer
- White Accent Polish: OPI Alpine Snow
- Top Coat: Seche Vite Dry Fast Top Nail Coat
- Tools: Dotting tool or small brush for detail work
These products combine durability with vibrant color, ensuring your nails look fabulous throughout your beach days or maritime evenings.
DIY Application Instructions
- Prepare your nails: Clean, file, and apply a base coat. Let it dry.
- Apply the navy blue polish: Two coats should suffice for a rich color. Allow each coat to dry thoroughly.
- Design the waves: Using a small brush or a dotting tool, create white wavy lines on one or two accent nails.
- Finish with a top coat: This will give your nails a glossy look and ensure the longevity of your design.
Blue Beach Nails Coffin Design
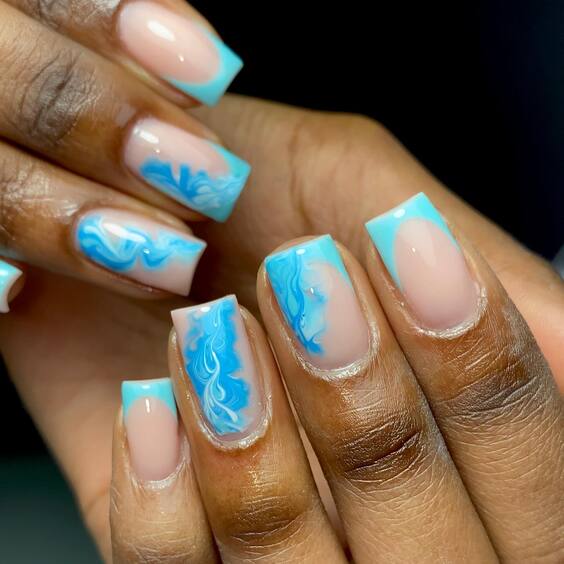
The coffin-shaped nails featured in this design are bold and impactful, showcasing a brilliant royal blue that’s both captivating and chic. The slight shimmer within the polish resembles sunlight glancing off the ocean’s surface. It’s a fantastic choice for those looking to make a statement with their nail art.
Consumables and Recommendations
- Base Coat: OPI Natural Nail Base Coat
- Royal Blue Shimmer Polish: China Glaze Frostbite
- Top Coat: Seche Vite Dry Fast Top Nail Coat
- Tools: None needed for this simple yet striking design
Opt for high-quality polishes that provide a deep, even color and a durable finish to maintain the look.
DIY Application Instructions
- Prepare your nails: Apply the base coat and let it dry.
- Apply the royal blue shimmer polish: Two coats will usually offer full coverage. Wait for it to dry between layers.
- Seal with a top coat: Ensure longevity and enhance the shine with a quick-dry top coat.
Blue Beach Nails Simple Design
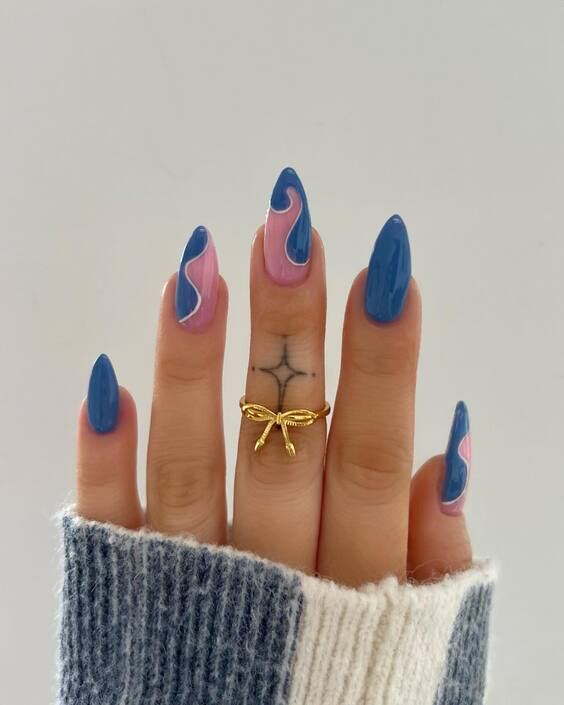
This design features a sophisticated yet simple blue beach nails look that captures the serenity of the ocean. The soft, sky blue base paired with pink and navy swirls resembles the mesmerizing ocean currents. This manicure is not just a nail design; it’s a piece of art that speaks of calm seas and gentle breezes. The square shape of the nails adds a modern touch to the overall aesthetic, making it perfect for both casual and formal summer outings.
Consumables and Recommendations
- Base Coat: CND Stickey Base Coat
- Sky Blue Polish: Zoya Blu
- Navy Blue Polish: Essie After School Boy Blazer
- Pink Polish: Essie Muchi, Muchi
- Top Coat: Seche Vite Dry Fast Top Coat
- Tools: Detailing brush for swirls
These choices ensure a smooth application and vibrant, long-lasting color that will keep your nails looking gorgeous.
DIY Application Instructions
- Prepare your nails: Start with clean, shaped nails and apply a base coat to protect them.
- Apply the sky blue polish: Wait for the first coat to dry before adding a second coat for opacity.
- Create the swirls: Dip your detailing brush in navy and pink polish to draw gentle swirls over the base. Experiment with the shapes to mimic ocean-like patterns.
- Finish with a top coat: Seal your design with a top coat to enhance the colors and ensure your manicure withstands summer adventures.
Blue Beach Nails Ocean Waves Design
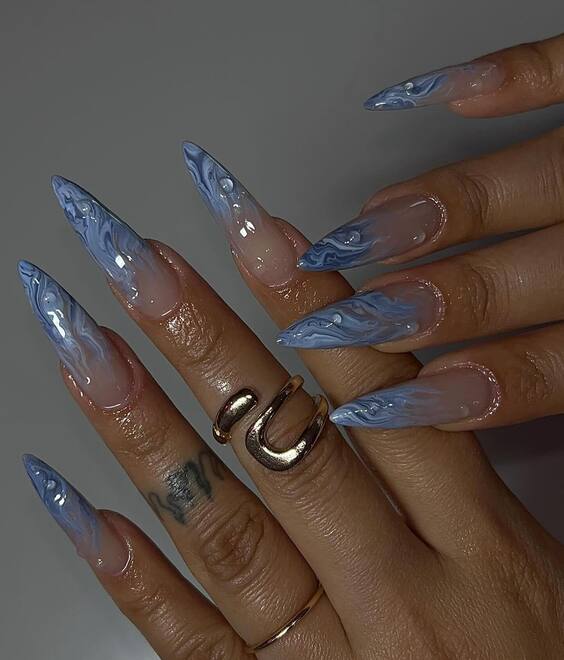
These long, coffin-shaped nails are adorned with a translucent base and ocean wave designs in shades of blue. The artwork showcases intricate details resembling gentle sea waves, offering a sense of depth and movement. This design is perfect for those who desire a bold yet elegant look that captures the dynamic beauty of the sea.
Consumables and Recommendations
- Base Coat: CND Stickey Base Coat
- Translucent Nail Polish: OPI Bubble Bath
- Blue Acrylic Paints: Various shades for the wave effects
- Top Coat: Seche Vite Dry Fast Top Coat
- Tools: Fine detail brush for painting waves
These products are chosen for their quality and ability to create detailed, long-lasting designs.
DIY Application Instructions
- Prepare your nails: Clean and shape them, then apply a base coat.
- Apply the translucent base polish: Two coats for a natural look.
- Paint the waves: Use a fine brush to apply different shades of blue acrylic paint, creating wave-like patterns.
- Seal with a top coat: This will protect your art and add a glossy finish.
Blue Beach Nails Simple Design
This manicure showcases a modern take on blue beach nails with a gradient of blue summer colors from light sky blue to deep navy. The nails are square-shaped which enhances the clean, sharp look of the gradient. This style is perfect for those who prefer a simpler yet striking nail design that can easily transition from day to night.
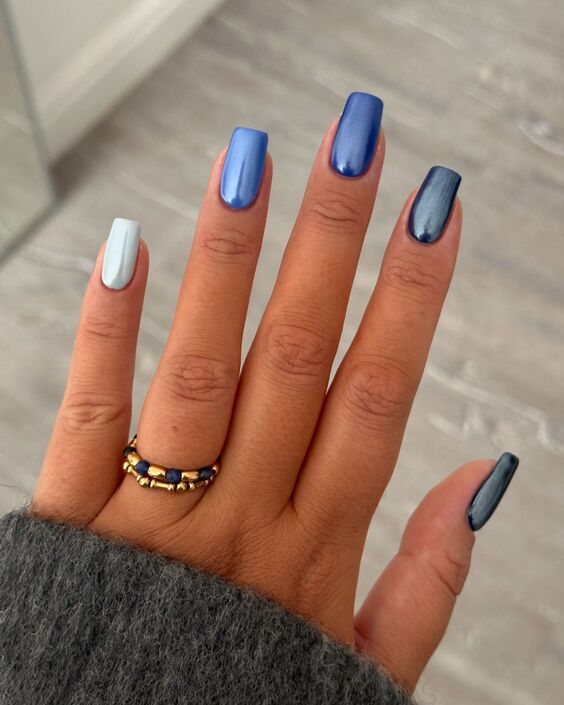
Consumables and Recommendations
- Base Coat: Essie Here to Stay
- Gradient Polishes: Light blue (Essie Saltwater Happy), medium blue (Essie Butler Please), navy blue (Essie After School Boy Blazer)
- Top Coat: Seche Vite Dry Fast Top Coat
- Sponge: For creating the gradient effect
Using high-quality polishes ensures a smooth gradient and long-lasting wear.
DIY Application Instructions
- Prepare your nails: Apply a base coat to protect them.
- Apply the light blue polish: This will be your base color.
- Create the gradient: Sponge on the medium and navy blue polishes, blending them together.
- Finish with a top coat: To ensure durability and a smooth finish.
Blue Beach Nails Vacation Design
This playful design features various beach-themed embellishments, such as seashells, starfish, and pearls, arranged artistically across the nails. The mix of textures and colors against the pale blue background creates a lively and adorable look that’s perfect for any beach vacation or summer outing.
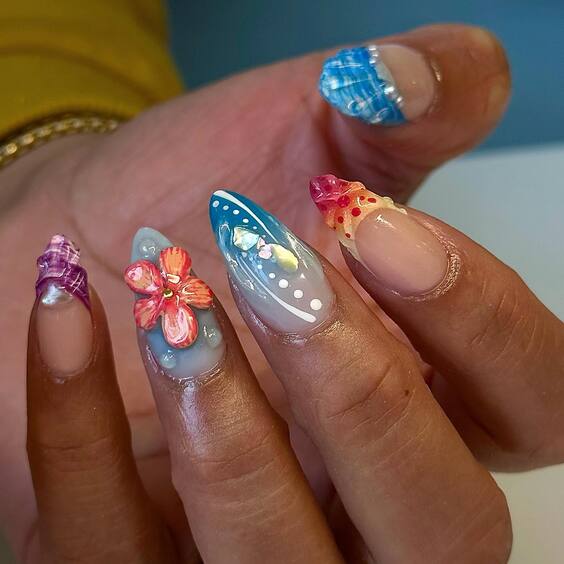
Consumables and Recommendations
- Base Coat: OPI Natural Nail Base Coat
- Pale Blue Polish: China Glaze Rain Dance The Night Away
- Embellishments: Miniature seashells, starfish, and pearls
- Top Coat: Seche Vite Dry Fast Top Coat
- Adhesive: Nail glue for securing embellishments
These materials are selected to ensure a secure and aesthetically pleasing result.
DIY Application Instructions
- Prepare your nails: Apply a base coat for protection.
- Apply the pale blue polish: Two coats for opacity.
- Attach the embellishments: Use nail glue to place seashells, starfish, and pearls on the nails creatively.
- Seal with a top coat: To protect your design and the embellishments.
Blue Beach Nails Royal Design
This set of coffin-shaped nails showcases a striking royal blue hue combined with detailed butterfly accents, presenting a vibrant yet elegant design. The light blue tips provide a perfect contrast to the deep blue, reminiscent of the clear sky meeting the ocean horizon. This manicure is perfect for anyone looking to incorporate a playful yet sophisticated element into their summer style.
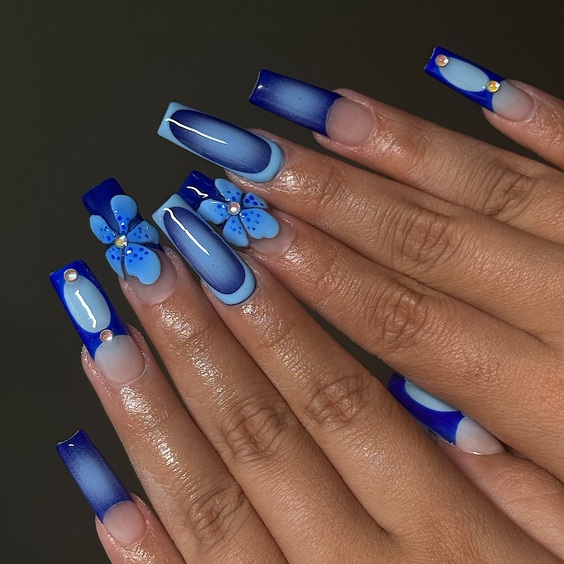
Consumables and Recommendations
- Base Coat: OPI Natural Nail Base Coat
- Royal Blue Polish: OPI Eurso Euro
- Light Blue Polish: Essie Bikini So Teeny
- Butterfly Stickers: Available at most craft stores
- Top Coat: Seche Vite Dry Fast Top Coat
- Tools: Tweezers for placing stickers
These products ensure a professional finish that is both stunning and durable.
DIY Application Instructions
- Prepare your nails: Apply a base coat to protect your nails.
- Apply the royal blue polish: Two coats for a solid base.
- Add the light blue tips: Use a thin brush to neatly apply the lighter shade on the tips.
- Place the butterfly stickers: Use tweezers to accurately place the stickers on the nails.
- Seal with a top coat: Protect your design and add shine with a fast-drying top coat.
Blue Beach Nails Holographic Design
These almond-shaped nails are adorned with a stunning blue holographic glitter that sparkles like sunlight on ocean waves. The gradient effect from turquoise to deep blue creates a mesmerizing look that’s both eye-catching and stylish, perfect for summer festivals or beach parties.
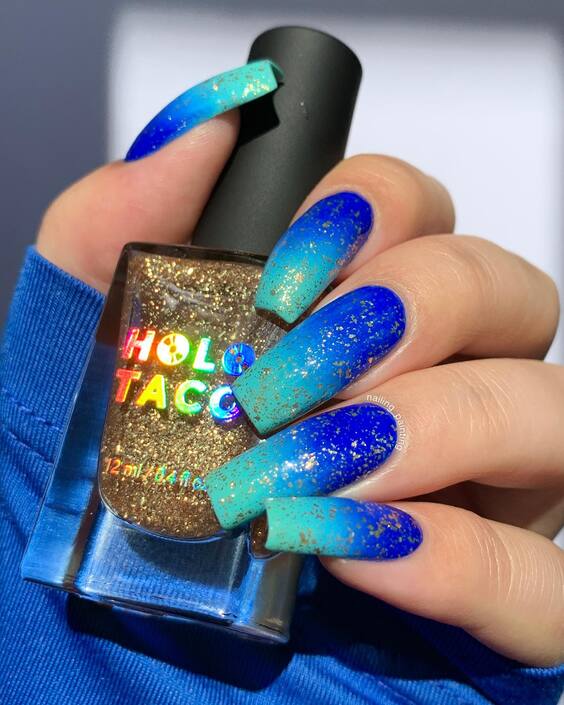
Consumables and Recommendations
- Base Coat: CND Stickey Base Coat
- Turquoise Blue Polish: China Glaze Too Yacht to Handle
- Holographic Glitter Polish: Holo Taco Blue Freezie
- Top Coat: Seche Vite Dry Fast Top Coat
- Sponge: For dabbing on the glitter
These choices enhance the sparkle and ensure the longevity of the manicure.
DIY Application Instructions
- Prepare your nails: Start by applying a base coat.
- Apply the turquoise base: This serves as the vibrant background for your glitter.
- Dab on the holographic glitter: Use a sponge for an even and concentrated application.
- Finish with a top coat: To seal in the glitter and enhance the overall shine.
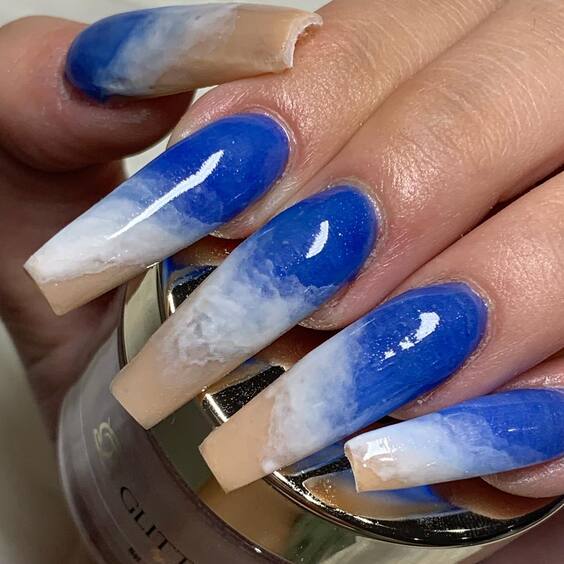
Blue Beach Nails Ocean Marble Design
This long stiletto nail design features a beautiful marble effect, mimicking the swirling ocean currents. The use of white and varying shades of blue creates a realistic and artistic representation of the sea, ideal for those who love a unique and creative nail style.
Consumables and Recommendations
- Base Coat: Essie Here to Stay
- White Polish: OPI Alpine Snow
- Blue Polishes: Various shades for marbling
- Top Coat: Seche Vite Dry Fast Top Coat
- Tools: Marbling tool or a fine brush
These materials are perfect for achieving a detailed and lasting marble effect.
DIY Application Instructions
- Prepare your nails: Clean, buff, and apply a base coat.
- Apply the base color: Start with a white polish as your canvas.
- Create the marble effect: Swirl different shades of blue using a marbling tool or a fine brush.
- Finish with a top coat: This will smooth out the surface and enhance the design’s durability.
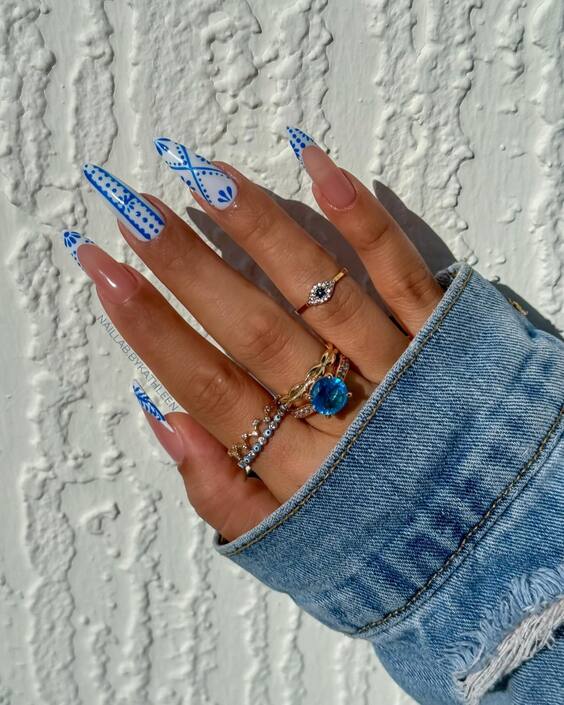
Blue Beach Nails Vacation Look
This playful design features stiletto nails with a unique blue and white pattern that mimics the vibrant beach umbrellas and the clear summer sky. The precise polka dots and stripe patterns create a fun, energetic vibe, perfect for a beach day or a casual summer outing.
Consumables and Recommendations
- Base Coat: Essie Here to Stay
- White Polish: OPI Alpine Snow
- Blue Polish: Sally Hansen Blue My Mind
- Top Coat: Seche Vite Dry Fast Top Coat
- Tools: Striping tape and dotting tool
These selections are designed to ensure crisp lines and long-lasting wear.
DIY Application Instructions
- Prepare your nails: Clean, file, and apply a base coat.
- Apply the white polish: Two coats for a solid base.
- Create the patterns: Use striping tape for precise lines and a dotting tool for polka dots.
- Finish with a top coat: This seals the design and adds a glossy finish.
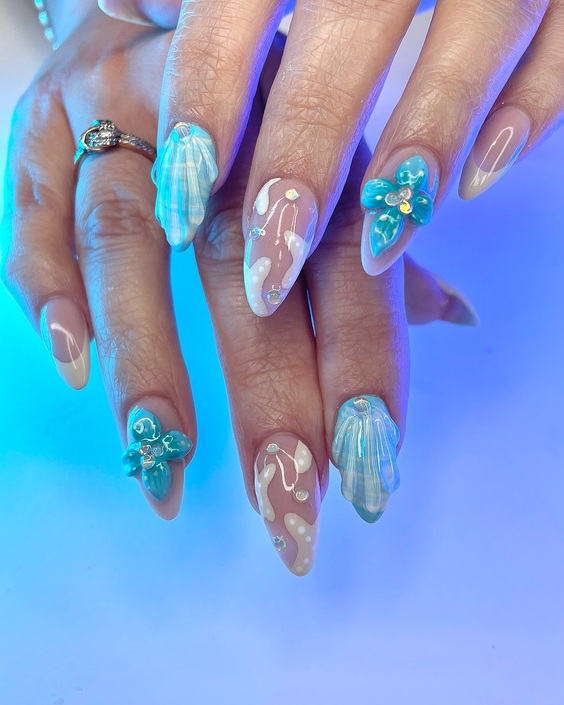
Blue Beach Nails Ocean Embellishment
These almond-shaped nails are adorned with stunning oceanic embellishments like tiny seashells and pearls, set against a shimmering pale blue background. The design evokes the treasures of the sea, making it ideal for anyone who loves intricate and detailed nail art.
Consumables and Recommendations
- Base Coat: OPI Natural Nail Base Coat
- Pale Blue Shimmer Polish: Essie Find Me An Oasis
- Embellishments: Miniature seashells, pearls, and rhinestones
- Top Coat: Seche Vite Dry Fast Top Coat
- Adhesive: Nail glue for securing embellishments
These products are chosen for their quality and ability to create a detailed, long-lasting design.
DIY Application Instructions
- Prepare your nails: Apply a base coat to protect your nails.
- Apply the pale blue shimmer polish: Two coats for a subtle, shimmering base.
- Attach the embellishments: Use nail glue to place seashells, pearls, and rhinestones creatively.
- Seal with a top coat: This will protect your design and the embellishments.
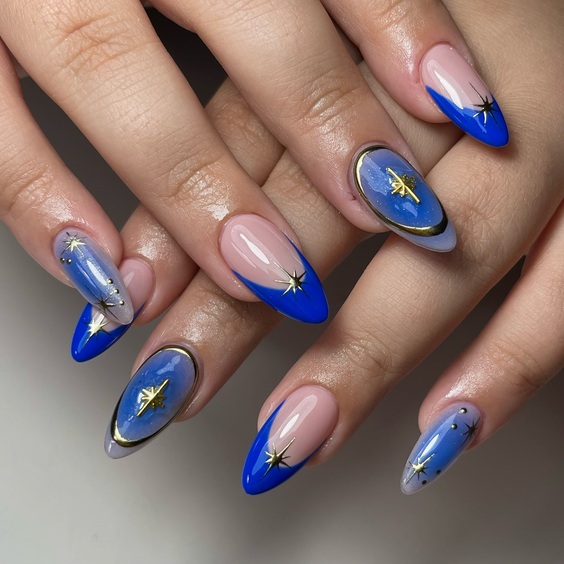
Blue Beach Nails Starry Night Design
This design features almond-shaped nails with a deep blue base highlighted by golden stars and silver crescent moons, creating a celestial theme reminiscent of a starry night over the ocean. It’s a sophisticated choice for nighttime events or a romantic evening by the sea.
Consumables and Recommendations
- Base Coat: CND Stickey Base Coat
- Deep Blue Polish: China Glaze Up All Night
- Gold and Silver Accents: Nail art stickers or thin brush and metallic polish
- Top Coat: Seche Vite Dry Fast Top Coat
These choices enhance the thematic beauty and ensure the longevity of the manicure.
DIY Application Instructions
- Prepare your nails: Start with a base coat.
- Apply the deep blue polish: This serves as the night sky.
- Add the stars and moons: Place stickers or paint them on using a fine brush and metallic polish.
- Finish with a top coat: To seal in the design and add a high gloss finish.
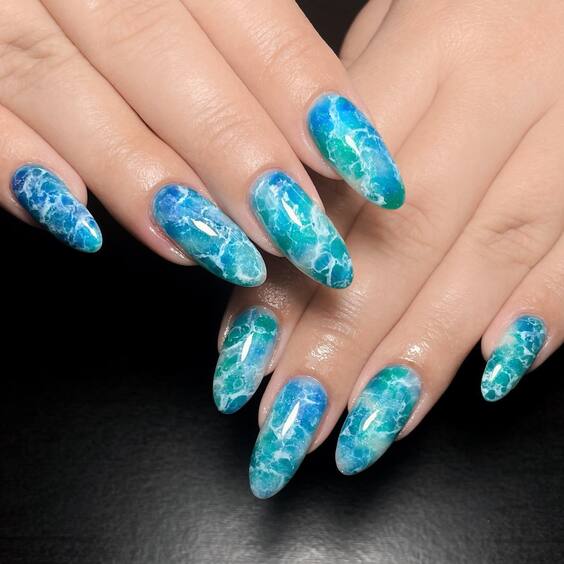
Blue Beach Nails Turquoise Marble Design
This stunning marble design combines various shades of turquoise and blue, evoking the swirling waters of a tropical sea. The glossy finish enhances the depth and realism of the marble effect, creating a dynamic and eye-catching look. This design is perfect for those who wish to carry a piece of the ocean with them wherever they go.
Consumables and Recommendations
- Base Coat: OPI Natural Nail Base Coat
- Turquoise and Blue Polishes: Essie Turquoise & Caicos and Essie Butler Please
- Marbling Tool: A fine brush or a toothpick
- Top Coat: Seche Vite Dry Fast Top Coat
These products ensure a smooth application and vivid, lasting colors that stand out.
DIY Application Instructions
- Prepare your nails: Apply a base coat to protect and smooth your nail surface.
- Apply the base colors: Swirl together turquoise and blue polishes on the nail.
- Create the marble effect: Use a marbling tool to gently blend the colors into a water-like pattern.
- Finish with a top coat: To enhance the design’s shine and durability.
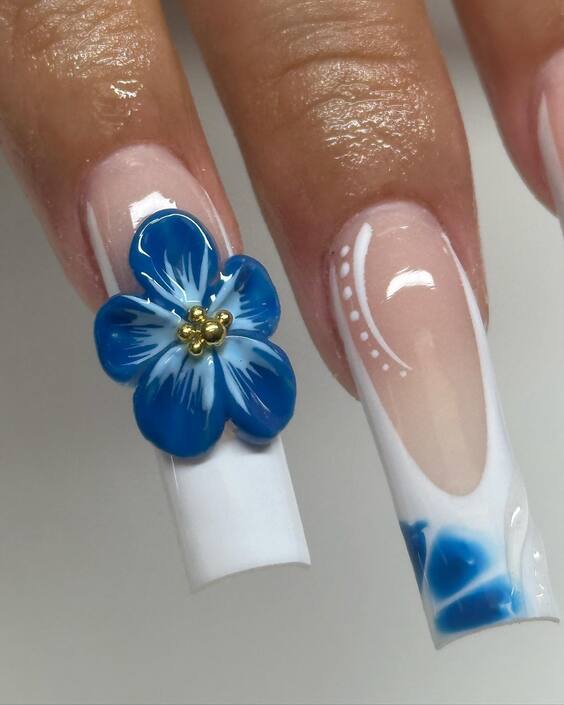
Blue Beach Nails Floral Art
This intricate design features a single blue flower on a clear base, surrounded by delicate white accents that enhance the floral theme. The three-dimensional flower adds a touch of elegance and sophistication, perfect for any summer event or as a standout everyday look.
Consumables and Recommendations
- Base Coat: CND Stickey Base Coat
- White and Blue Polishes: OPI Alpine Snow and OPI Eurso Euro
- 3D Floral Embellishments: Pre-made or DIY with acrylic
- Top Coat: Seche Vite Dry Fast Top Coat
- Tools: Fine brush for details and tweezers to place embellishments
These products will help achieve a precise and elegant floral design that is both beautiful and durable.
DIY Application Instructions
- Prepare your nails: Clean and apply a base coat for protection.
- Apply the base polish: Use a clear polish or leave it natural with only a base coat.
- Design the details: Hand-paint the white accents and prepare the blue flower.
- Attach the flower: Use a small dab of clear polish or nail glue to affix the 3D flower.
- Seal with a top coat: To protect and enhance the overall look.
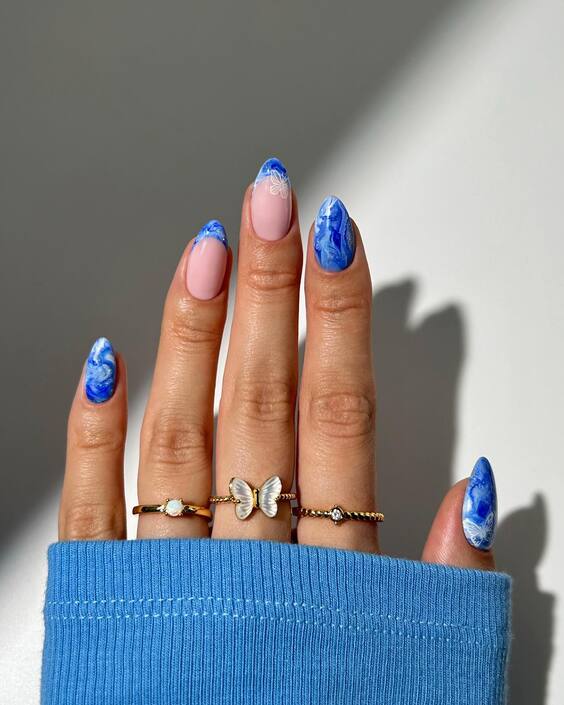
Blue Beach Nails Classic and Chic
This design cleverly balances simplicity and artistry with alternating nails painted in solid blue and detailed marble effects. The combination of soft pink and vivid blue shades offers a fresh, vibrant look that’s both stylish and suitable for any summer occasion.
Consumables and Recommendations
- Base Coat: Essie Here to Stay
- Pink and Blue Polishes: Essie Muchi, Muchi and Sally Hansen Blue My Mind
- Top Coat: Seche Vite Dry Fast Top Coat
- Marbling Tool: A fine brush or pin
These choices ensure a sophisticated look with lasting wear and an eye-catching finish.
DIY Application Instructions
- Prepare your nails: Apply a base coat to protect your nails.
- Apply the pink polish: On alternate nails for a soft background.
- Create the blue marble design: On the remaining nails, use a marbling tool with blue polish for an artistic effect.
- Finish with a top coat: For durability and shine.
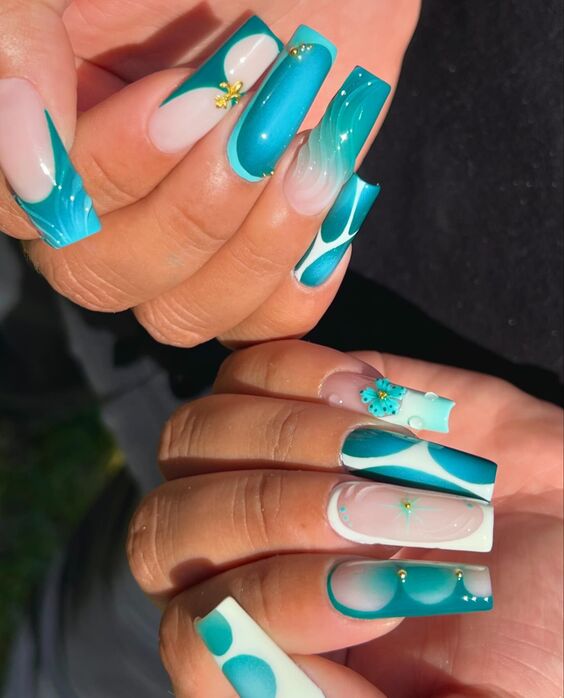
Blue Beach Nails Modern Art
This set of nails features a creative combination of clear and vibrant turquoise sections with smooth transitions and flowing designs, embellished with tiny rhinestones and delicate floral accents. This sophisticated style represents the merging of sea waves and calm beach vibes, making it a perfect choice for those who love a touch of artistic flair in their manicure.
Consumables and Recommendations
- Base Coat: Essie Here to Stay
- Turquoise Polish: China Glaze Aquadelic
- Clear Polish: OPI Top Coat used as a base
- Embellishments: Rhinestones and miniature floral decals
- Top Coat: Seche Vite Dry Fast Top Coat
- Tools: Detailing brush and tweezers for placing embellishments
These selections ensure a detailed and durable finish that enhances the artistic design.
DIY Application Instructions
- Prepare your nails: Apply a base coat for a smooth foundation.
- Design with turquoise: Paint the main sections with turquoise and use a brush for detailed edges.
- Add clear polish: Fill the negative space with clear polish for a glass-like finish.
- Embellish: Carefully place rhinestones and floral decals using tweezers.
- Finish with a top coat: To protect your design and add a glossy shine.
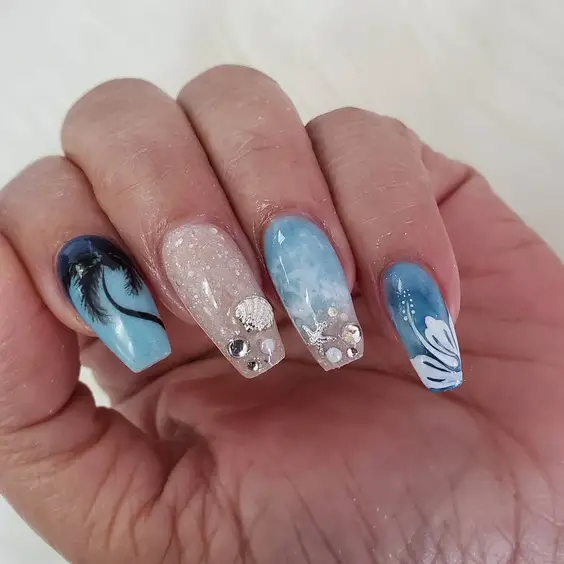
Blue Beach Nails Tropical Theme
These nails are a celebration of the tropical beach, featuring designs of palm trees and ocean waves across different nails, combined with glitter and gemstone embellishments for a dazzling effect. This design is perfect for those who love a narrative style in their manicure, telling the story of a day at the beach.
Consumables and Recommendations
- Base Coat: CND Stickey Base Coat
- Blue Polishes: Multiple shades for gradient and detail work
- Glitter Polish: Silver glitter polish for a sandy effect
- Gemstones and Decals: Small rhinestones to mimic water droplets
- Top Coat: Seche Vite Dry Fast Top Coat
These products are chosen for their ability to create a vibrant, lasting manicure that captures the essence of the beach.
DIY Application Instructions
- Prepare your nails: Start with a clean, smooth surface and a base coat.
- Paint the designs: Use various shades of blue for the ocean and sky, adding palm tree decals or hand-painting them.
- Apply glitter and gemstones: Accentuate with glitter polish and strategically place gemstones.
- Finish with a top coat: Ensure durability and enhance the overall sparkle of your nails.
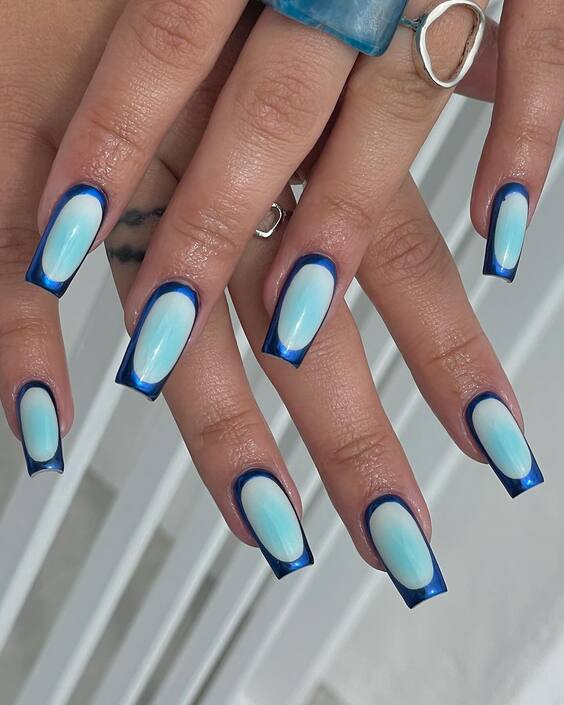
Blue Beach Nails Sleek Design
This chic design features almond-shaped nails with a sleek blue outline over a pale blue base, creating a modern and minimalistic look. The clean lines and contrasting shades of blue offer a stylish twist on traditional beach colors, making this set ideal for those who appreciate a more understated elegance in their nail art.
Consumables and Recommendations
- Base Coat: OPI Natural Nail Base Coat
- Pale Blue Polish: Essie Bikini So Teeny
- Dark Blue Polish: Essie After School Boy Blazer
- Top Coat: Seche Vite Dry Fast Top Coat
- Tools: Fine brush for precision lining
These choices help achieve a sharp and sophisticated finish that’s both modern and durable.
DIY Application Instructions
- Prepare your nails: Apply a base coat to protect and smooth your nails.
- Apply the pale blue base: Two coats for a solid, opaque background.
- Outline with dark blue: Carefully use a fine brush to create the sleek outlines.
- Finish with a top coat: To seal in the design and add a glossy finish.
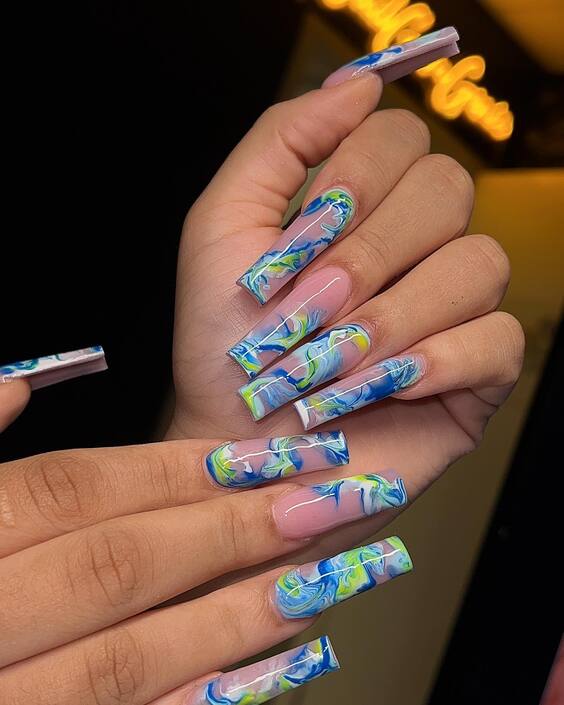
Blue Beach Nails Vibrant Swirls
This bold design features long nails with vibrant swirls of blue, green, and yellow, creating a dynamic and almost hypnotic effect. The colors flow together in a way that mimics the lively movements of tropical ocean currents. This style is perfect for those who want to make a statement with their nails, combining both artistry and boldness.
Consumables and Recommendations
- Base Coat: Essie Here to Stay
- Polishes: A variety of vibrant blues, greens, and yellows
- Top Coat: Seche Vite Dry Fast Top Coat
- Tools: Detailing brush for creating swirls
These products ensure a vivid look with a durable finish that captures the eye.
DIY Application Instructions
- Prepare your nails: Apply a base coat for protection and smoothness.
- Apply the base colors: Layer the colors in swirl patterns using a detailing brush.
- Blend the colors: While the polish is still wet, gently blend the edges to create a smooth transition.
- Finish with a top coat: This will seal in the design and add a glossy sheen.
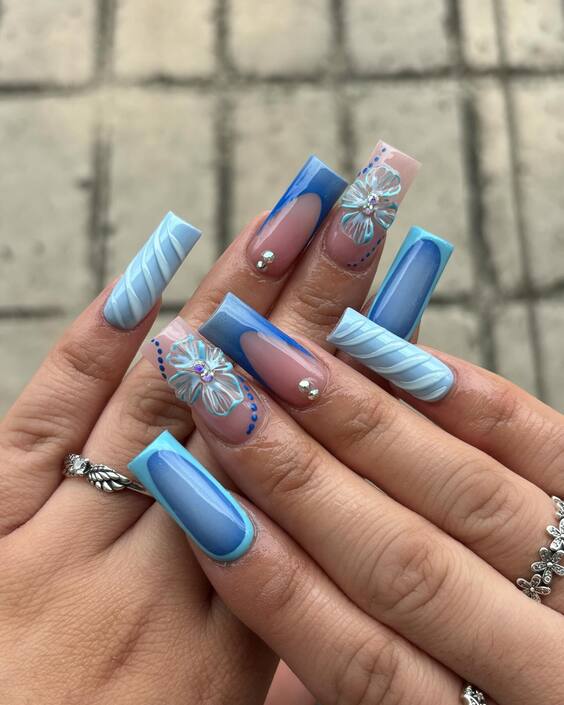
Blue Beach Nails Elegant Florals
This manicure combines soft pink and bold blue hues with elegant floral designs and striping. Accented with tiny rhinestones, the overall effect is one of refined beauty and sophistication. It’s a great choice for those who enjoy a feminine touch with a splash of vibrant color for their beach outings.
Consumables and Recommendations
- Base Coat: OPI Natural Nail Base Coat
- Pink and Blue Polishes: Sally Hansen Pink Blink and Essie Butler Please
- Top Coat: Seche Vite Dry Fast Top Coat
- Rhinestones and Floral Decals: For added elegance
- Tools: Striping tape and a fine brush for details
These choices enhance the delicacy and longevity of the manicure.
DIY Application Instructions
- Prepare your nails: Clean and apply a base coat.
- Paint the base colors: Use pink for a soft look and blue for bold stripes.
- Apply decals and rhinestones: Place floral decals and add rhinestones for a touch of glam.
- Finish with a top coat: To ensure durability and a professional finish.
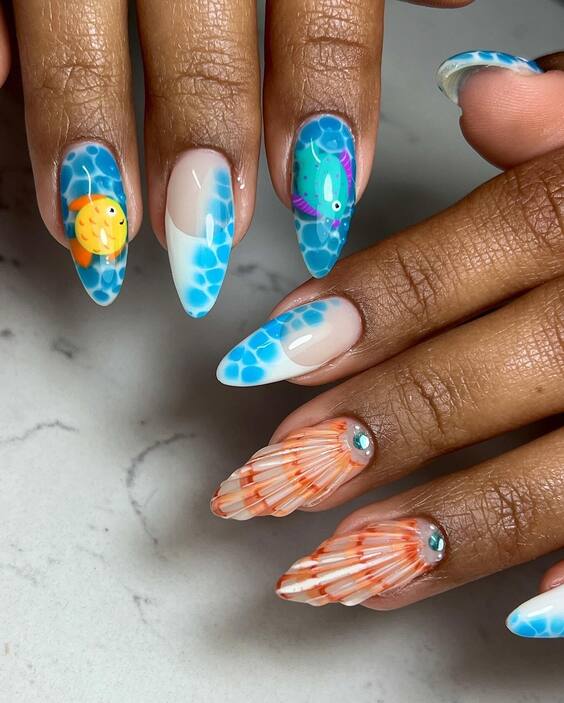
Blue Beach Nails Fun Oceanic Theme
These stiletto nails are a playful tribute to ocean life, featuring blue and white ocean wave patterns, complete with adorable fish and sea creature decals. The design is both fun and whimsical, perfect for anyone who loves the sea and its vibrant ecosystems.
Consumables and Recommendations
- Base Coat: Essie Here to Stay
- Blue and White Polishes: Essie Butler Please and OPI Alpine Snow
- Decals: Fish and other sea creature motifs
- Top Coat: Seche Vite Dry Fast Top Coat
- Tools: Detailing brush for wave patterns
These products will help create a detailed, charming look that’s both fun and eye-catching.
DIY Application Instructions
- Prepare your nails: Apply a base coat for a smooth canvas.
- Design the wave patterns: Use blue and white polishes to create the ocean waves.
- Apply decals: Add the fish and sea creature decals for a playful touch.
- Finish with a top coat: To protect your design and ensure it lasts through your beach adventures.
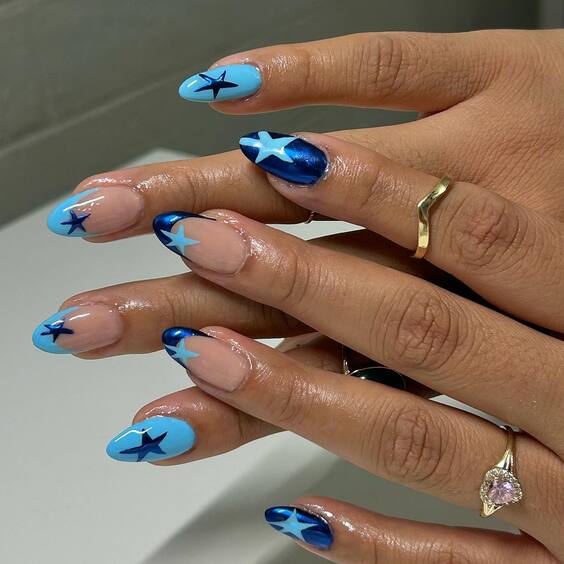
Blue Beach Nails Starry Sky Design
This exquisite design features nails painted in shades of blue with star-shaped accents, creating an effect reminiscent of a starry night sky at the beach. The varying hues of blue—from light sky blue to deep navy—provide a beautiful backdrop for the glossy stars, making this manicure ideal for night-time beach parties or romantic evening walks along the shore.
Consumables and Recommendations
- Base Coat: Essie Here to Stay
- Blue Polishes: Sally Hansen Blue My Mind for the dark blue and Essie Bikini So Teeny for the light blue
- Star Decals: Silver or reflective blue star-shaped stickers
- Top Coat: Seche Vite Dry Fast Top Coat
- Tools: Tweezers for precise decal placement
These products are selected to ensure a smooth application and a durable, eye-catching finish.
DIY Application Instructions
- Prepare your nails: Apply a base coat to protect and smooth the nail surface.
- Apply the blue polish: Start with a light blue base, then add dark blue at the tips or as desired for a gradient or layered look.
- Place the star decals: Use tweezers to apply star decals evenly across the nails.
- Finish with a top coat: This will seal in the decals and enhance the overall shine of the manicure.
As we wrap up our exploration of blue beach nails for the summer of 2024, it’s clear that this season’s trends offer something for everyone. From the vibrant swirls that capture the essence of ocean waves to the elegant florals that evoke summer gardens, these nail designs are more than just a style statement—they’re a personal expression tailored to the breezy, spirited days of summer.
Whether you prefer the playful charm of ocean-themed nails or the sophisticated allure of starry night designs, each style offers a unique way to enhance your summer look. With our DIY tips, you can recreate these stunning designs at home, ensuring your nails are not only beautiful but also a reflection of your personal style and creativity.

