
Have you ever wondered why dark red nail color holds such a timeless appeal? From the sultry depths of burgundy to the vibrant tones of cherry, dark red is not just a statement—it’s a declaration of confidence and style. But what makes this color so versatile and beloved across different styles and seasons? This article dives deep into the world of dark red nails, exploring various shades, designs, and techniques that can enhance your manicure experience.
The Timeless Elegance of Classic Reds
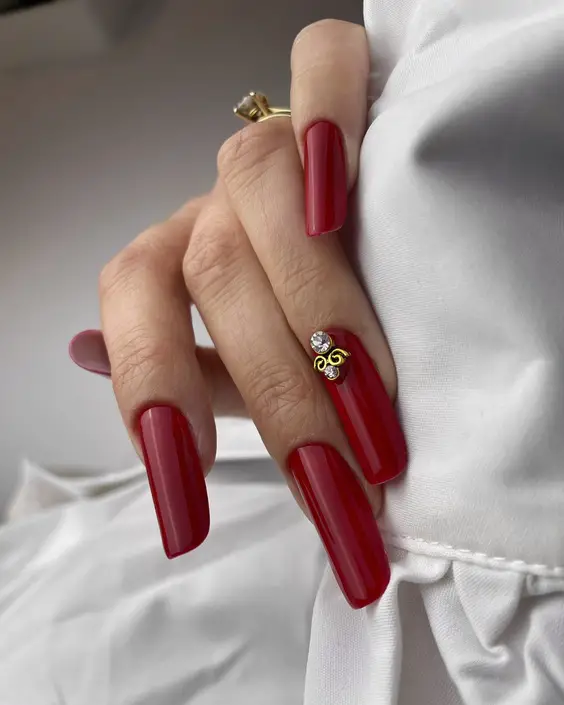
The first image captures a quintessential dark red nail color in a glossy finish that exudes sophistication. The rich, deep hue is not just visually striking; it embodies elegance and a bold confidence that’s hard to overlook. This manicure isn’t merely about color; it’s about making a statement in the most refined way possible.
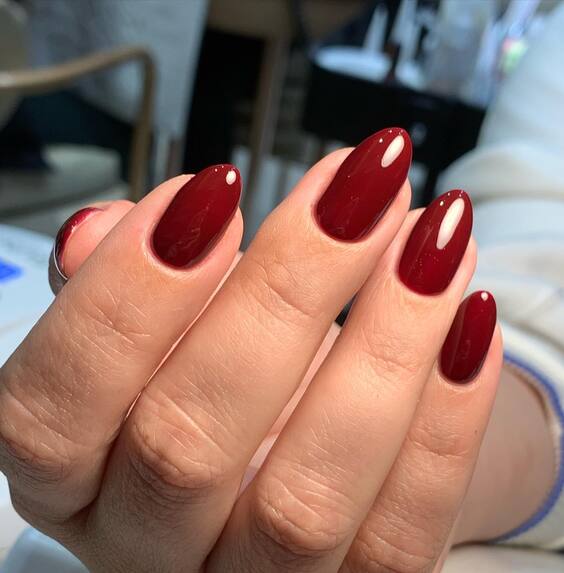
- Consumables for Classic Reds:
- Polish: OPI’s Malaga Wine
- Top Coat: Seche Vite Dry Fast Top Coat
- Base Coat: CND Stickey Base Coat
- Recommendation: Always use a base coat to prevent staining and a top coat for that glass-like finish.
DIY: Achieving the Perfect Classic Red at Home
To recreate this look, start with a clean, dry nail. Apply a base coat to protect your nails and enhance the polish adherence. Next, apply two coats of OPI’s Malaga Wine, allowing each coat to dry thoroughly. Finish with a fast-drying top coat for a sleek, durable finish.
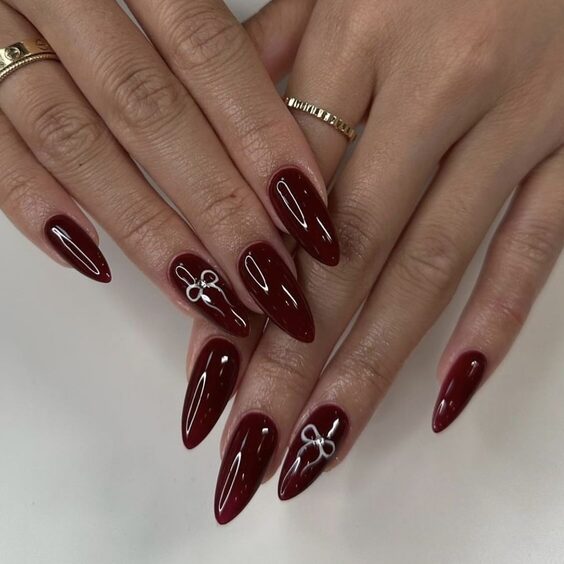
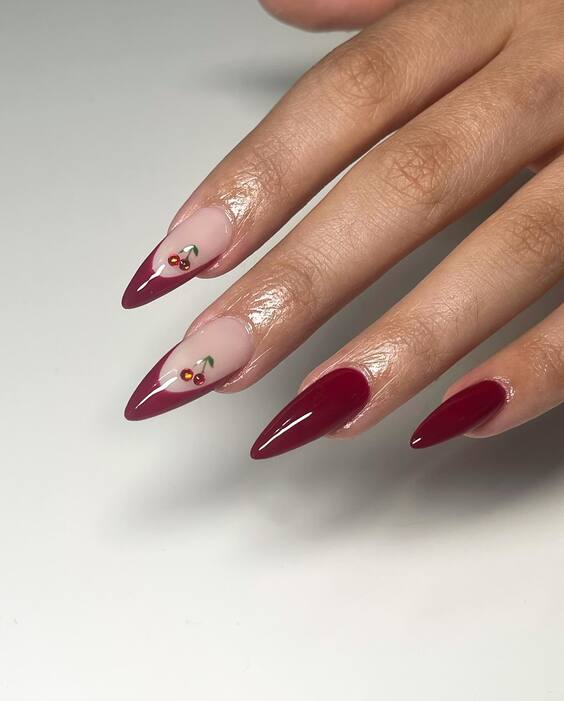
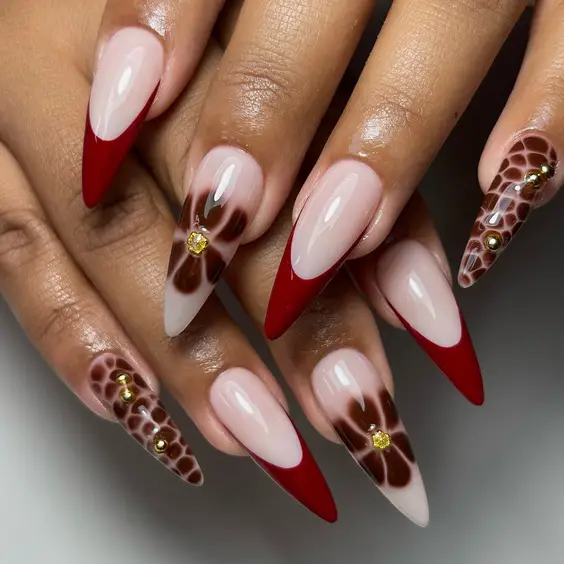
Artistic Expression with Red Details
The second image showcases an artistic rendition of dark red nail colors, where creativity flows with every brushstroke. The use of a muted pink base with bold red accents and gold detailing transforms the nails into a canvas of expression. This design is perfect for those who see their manicure as an extension of their personal style.
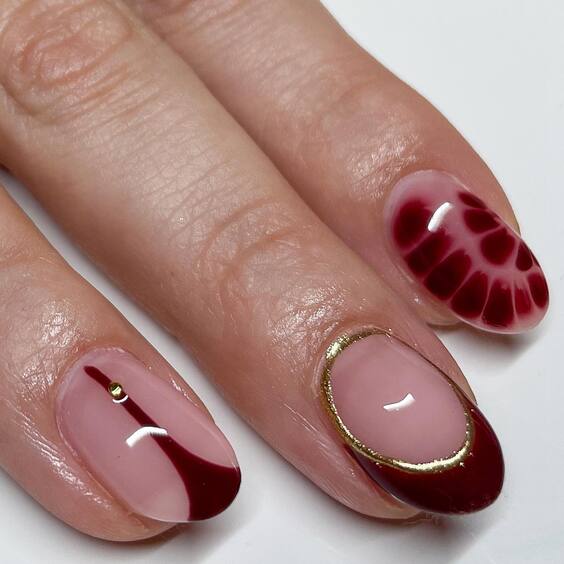
- Consumables for Artistic Red Details:
- Polish: Essie’s Wicked and Ballet Slippers
- Gold Detailing: Sally Hansen Gold Pen
- Accents: Small adhesive jewels
- Recommendation: Use thin brushes or detailing pens for precise designs and accents.
DIY: Crafting Your Artistic Red Nails
Prepare your nails with a base coat and apply a light pink shade as the base color. Once dry, use a thin brush to add dark red patterns. Add gold lines using a detailing pen, and finish with adhesive jewels for a touch of elegance. Seal everything with a top coat for lasting wear.
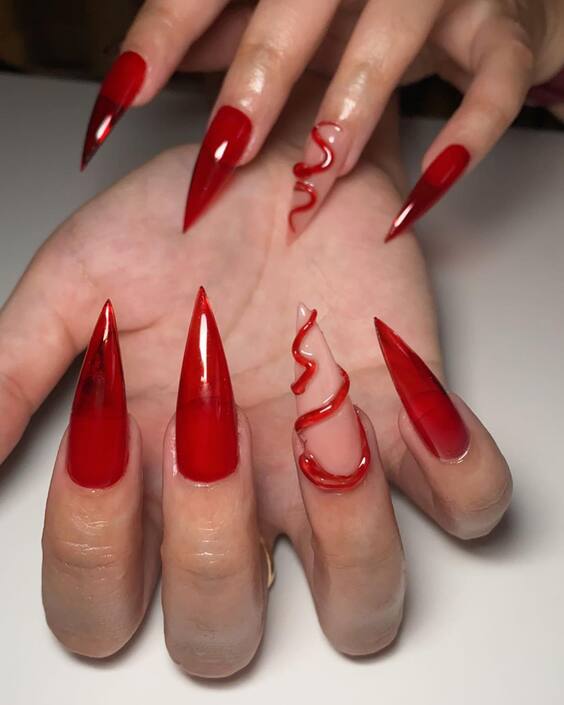
Dramatic Flair with Sculptural Reds
The third image takes dark red nail colors acrylic to a new level with its sculptural designs that are both bold and intricate. This style isn’t just about color; it’s about texture and dimension, offering a unique tactile experience that’s visually captivating.
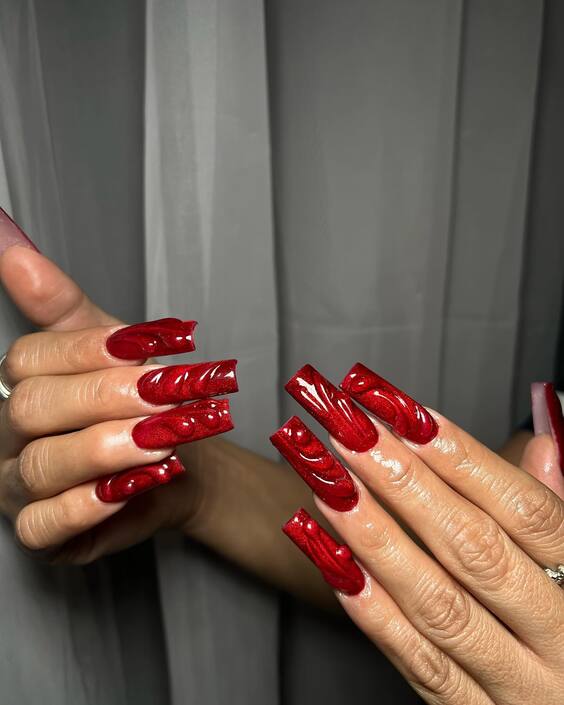
- Consumables for Sculptural Reds:
- Acrylic Powder: Mia Secret Red
- Monomer: Young Nails Monomer
- Moldable Forms: Kiss Nail Forms
- Recommendation: Working with acrylics requires precision and practice. Consider a professional for intricate designs.
DIY: Sculpting Red Acrylic Nails at Home
Begin with clean, prepped nails. Apply the nail forms and mix your acrylic powder with monomer to create the bead. Carefully place and sculpt the bead on the nails. Allow it to harden and file into your desired shape. Finish with a glossy top coat for a standout look.
Playful Elegance with Floral and Metallic Touches
The whimsical charm of the fourth image blends playful floral designs with dark red nail color, creating a lovely contrast against a soft pink backdrop. This design strikes a perfect balance between boldness and subtlety, making it ideal for those who appreciate a touch of nature in their style.
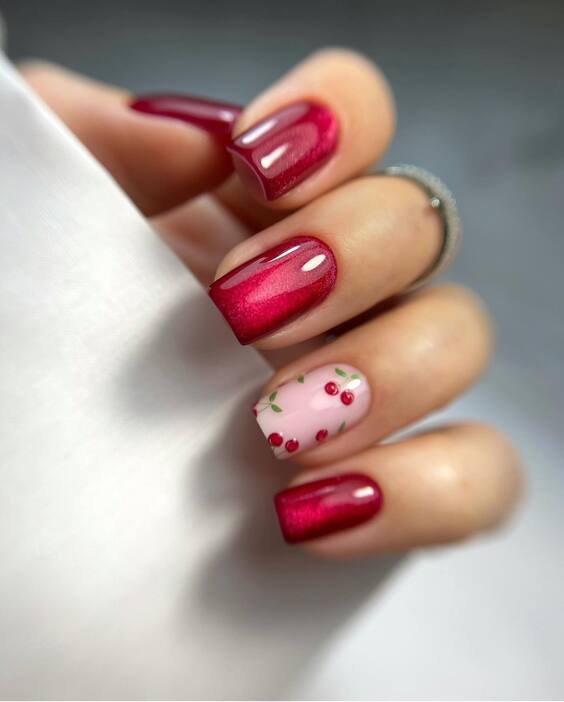
- Consumables for Floral and Metallic Touches:
- Polish: Essie’s Really Red and Ballet Slippers
- Detailing Tools: Thin brush for floral designs
- Metallic Accents: Gold foil for detailing
- Recommendation: Use a thin brush to carefully paint the flowers and apply small pieces of gold foil for a touch of luxury.
DIY: Creating Your Floral Red Manicure
Start with a pale pink base, applying two thin coats. Once dry, use a thin brush dipped in dark red polish to draw delicate flowers. Add highlights with a tiny bit of white polish in the center of each flower and gold foil for an elegant finish. Seal with a glossy top coat for durability and shine.
Dark Red Drama with Gothic Overtones
Image five elevates dark red nail color design to a dramatic realm with its gothic-inspired, sculpted acrylic nails. The blend of deep red and black, enhanced with intricate silver detailing, creates a look that’s both edgy and sophisticated.
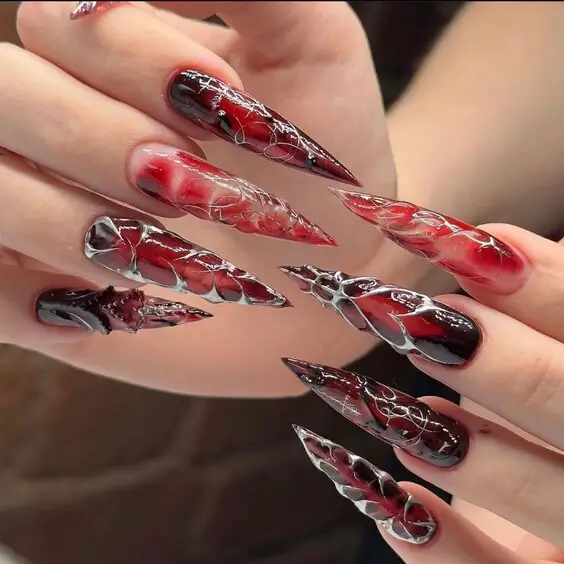
- Consumables for Gothic Sculpted Acrylics:
- Acrylic Powder: Deep red and black
- Detailing Paint: Silver acrylic paint
- Tools: Acrylic sculpting tools
- Recommendation: Visit a professional nail artist to achieve this complex and sculpted design accurately.
DIY: Steps to Achieve Gothic Acrylic Nails
Prepare your nails with a primer and apply black and red acrylic powders to sculpt the desired shape. Use silver paint to add detailed designs. It requires precision and patience, so consider practicing on a dummy hand first. Finish with a matte top coat for a hauntingly beautiful effect.
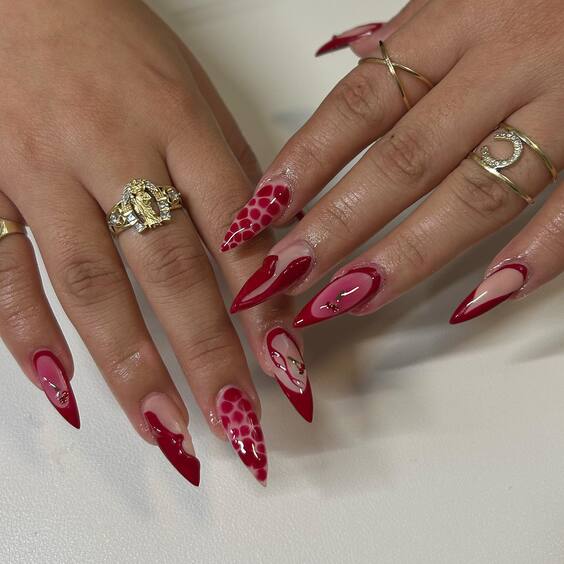
Love-Struck: Bold Hearts and Dark Contrasts
The sixth image showcases a vibrant exploration of love and passion through dark red nail color square designs. The stark contrast of black and red, coupled with heart motifs and metallic accents, makes this design a showstopper for any romantic or festive occasion.
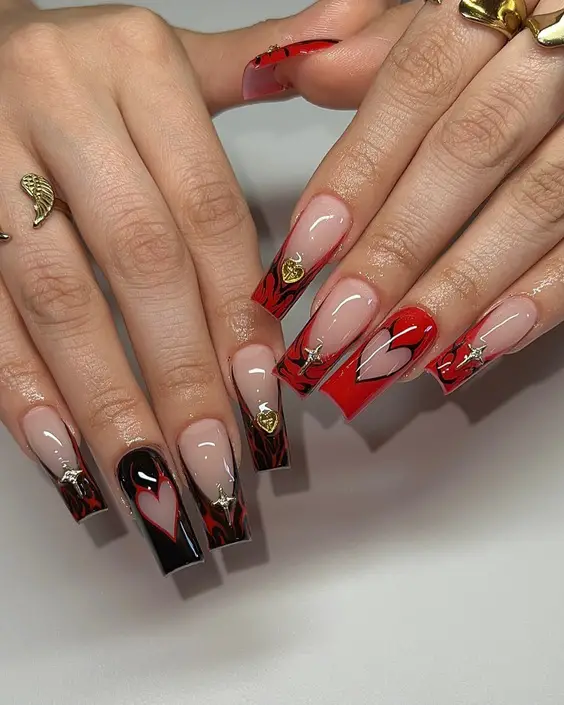
- Consumables for Bold Hearts Design:
- Polish: Glossy black and vibrant red
- Stickers: Gold heart stickers
- Detailing Tools: Detailing brush for precise edges
- Recommendation: Use high-quality stickers to ensure they adhere well and don’t peel off.
DIY: Crafting Heart-Themed Nails at Home
Apply a base coat followed by a black or red polish as the base color on alternate nails. Use a detailing brush to paint hearts or apply pre-made stickers for precision. Accentuate with gold details around the hearts for a luxurious touch. Finish with a high-gloss top coat to enhance the colors and ensure longevity.
Sophisticated Minimalism with a Touch of Art
The seventh image brings a refined elegance to dark red nail color through its minimalist design, featuring one nail with an artistic white leaf pattern over a translucent pink base. This style is perfect for those who favor a sophisticated yet understated look.
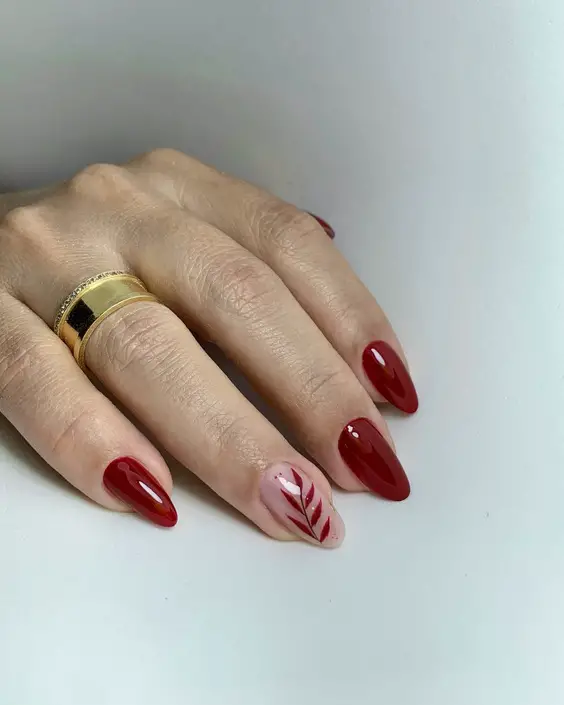
- Consumables for Minimalist Art Design:
- Polish: OPI’s Big Apple Red and Alpine Snow
- Top Coat: Essie Gel Setter
- Detailing Tool: Fine art brush
- Recommendation: For the artistic nail, use a very fine brush to delicately paint the leaf design, ensuring precision and subtlety.
DIY: Crafting This Minimalist Design at Home
Prepare your nails with a base coat, then apply two coats of dark red on all but one finger. For the accent nail, apply a light pink base and use a fine brush to paint a white leaf pattern. Finish with a glossy top coat to seal in the design and enhance the overall shine.
Metallic Sheen: Modern and Chic
The eighth image showcases a stunning combination of matte and metallic finishes in dark red nail color matte, offering a contemporary look that plays with light and texture. The matte base paired with a shimmering metallic sheen creates a captivating contrast, ideal for the modern fashion enthusiast.
- Consumables for Matte and Metallic Design:
- Matte Polish: Sally Hansen’s Red-y, Set, Run!
- Metallic Polish: Revlon’s Red-y for More
- Top Coat: Matte and Glossy (for differentiation)
- Recommendation: Apply the metallic polish only to the tips or as a gradient to create a subtle yet striking effect.
DIY: Matte with a Touch of Metallic
Start with a matte dark red as the base. Once dry, lightly sponge on a metallic red polish starting from the tips, fading toward the middle of the nails. Apply a matte top coat overall, but add a glossy top coat over the metallic areas only to accentuate the sheen.
Dark Cherry Elegance with Charms
The ninth image features deep dark cherry red nail color adorned with delicate silver charms, creating a playful yet elegant style. This design is perfect for adding a little whimsy to a classic look.
- Consumables for Cherry Red with Charms:
- Polish: China Glaze’s Velvet Bow
- Charms: Silver bow charms
- Adhesive: Nail glue for securing charms
- Recommendation: Ensure each charm is securely attached with a dot of nail glue to prevent them from catching on fabrics.
DIY: Adding Charms to Your Cherry Red Nails
Apply two coats of dark cherry red polish. Once dry, select points on each nail to attach a silver charm using a tiny drop of nail glue. Finish with a top coat to seal in the polish and secure the charms in place.
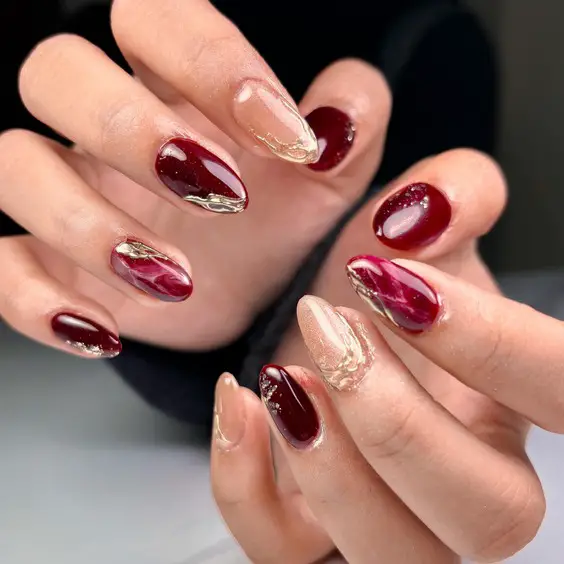
Intricate Marbling and Gold Accents
The tenth image presents a sophisticated blend of dark red nail color gel with intricate marbling and delicate gold accents. This design is perfect for anyone looking to add a luxurious and artistic touch to their manicure.
- Consumables for Marbling Design:
- Polish: Dark red gel polish and transparent gel for marbling
- Gold Leaf: Small pieces for accents
- Tools: Dotting tool or toothpick for marbling
- Recommendation: Apply the gold leaf carefully to not overpower the subtle marbling effect.
DIY: Marbling with Gold Leaf Accents
Begin by applying a base coat followed by a dark red gel polish. While the polish is still tacky, dot on some transparent gel and use a toothpick to create a marbling effect. Apply small pieces of gold leaf as accents. Cure under a UV lamp and seal with a top coat for a glossy finish.
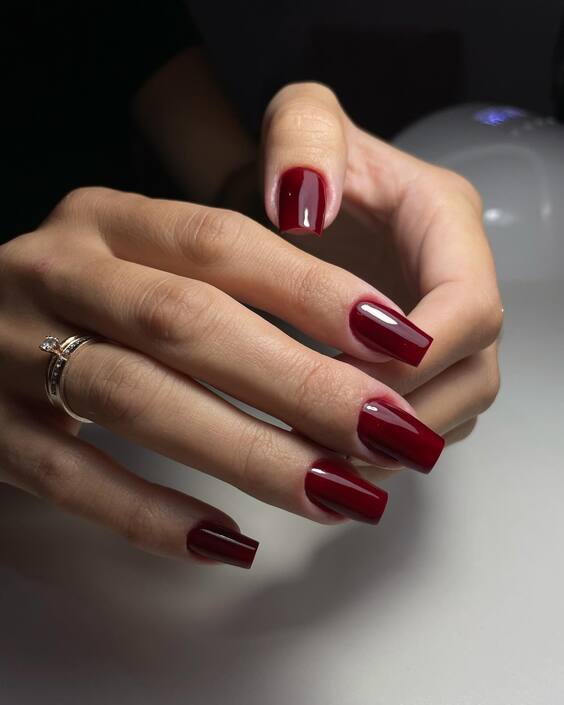
Classic Redefined: Sleek and Simple
The eleventh image captures the essence of sophistication with a simple, yet profound, dark red nail color short style. This look is a testament to the timeless beauty of a monochromatic approach, making it ideal for both casual and formal settings.
- Consumables for Classic Redefined:
- Polish: Deep red creme polish
- Top Coat: High-gloss finish
- Recommendation: Keep the nails well-groomed and neatly trimmed to enhance this classic look.
DIY: Perfecting the Classic Red Manicure
Apply a base coat to protect your nails. Paint two coats of deep red polish, ensuring each layer is thin to avoid bubbling. Finish with a high-gloss top coat to achieve a sleek and polished look.
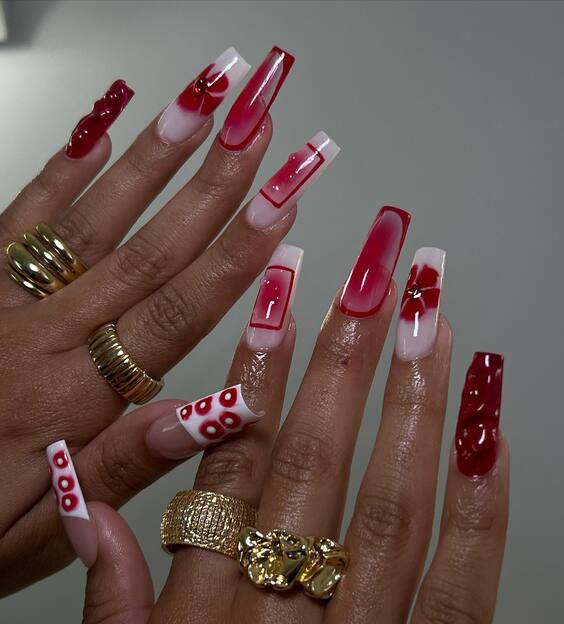
Bold Transitions: Red, White, and Patterns
The twelfth image showcases a daring design that combines dark red nail color acrylic with bold white patterns and accents. This style is perfect for those who love to stand out with dynamic contrasts and expressive nail art.
- Consumables for Bold Transitions:
- Acrylic Paints: Dark red and white
- Top Coat: Glossy for shine and protection
- Tools: Fine brush for detailed patterns
- Recommendation: Practice the patterns on paper before applying to nails to ensure precision.
DIY: Creating Bold Patterned Nails
Prepare your nails with an acrylic base. Apply dark red acrylic paint as the foundation. Using a fine brush, create white patterns or designs to contrast against the dark red. Seal with a glossy top coat to enhance the colors and protect the design.
Gradient Elegance and Sharp Accents
The thirteenth image showcases a stunning gradient effect that seamlessly blends soft whites into deep dark red nail color design. This look combines ethereal softness with bold sharpness, creating an alluring and sophisticated nail art design perfect for special occasions or casual elegance.
- Consumables for Gradient Elegance:
- Polish: Dark red and white gradient polish
- Top Coat: High-gloss for a smooth transition
- Sponging Tools: For the gradient effect
- Recommendation: Practice the gradient technique on a palette before applying to ensure a smooth color transition.
DIY: Achieving the Perfect Gradient
Start with a white base coat. Once dry, use a sponge to apply a gradient of dark red from the tips, blending into the white at the base. Repeat until you achieve the desired intensity. Finish with a glossy top coat to enhance the smoothness of the gradient.
Playful Patterns and Bold Statements
The fourteenth image captures a playful and creative approach to dark red nail color with bold patterns and dynamic designs. This nail art is for those who dare to stand out, featuring circles and unique abstract shapes that make a bold statement.
- Consumables for Playful Patterns:
- Polish: Dark red and white for contrast
- Detailing Tools: Dotting tools and fine brushes
- Top Coat: Glossy to seal and protect the designs
- Recommendation: Use stencils or freehand sketches to plan the designs before applying polish.
DIY: Crafting Bold and Playful Nail Art
Prepare your nails with a base coat of white or red. Use dotting tools and fine brushes to create contrasting patterns and designs. Be bold with shapes and sizes for a playful look. Finish with a top coat to ensure longevity and shine.
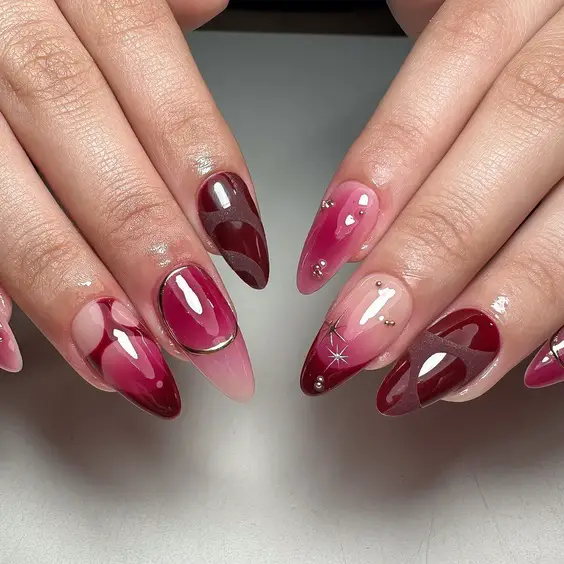
Classic V with Modern Twists
The fifteenth image reinvents the classic V-cut nails by incorporating dark red nail color matte and glossy contrasts, embellished with tiny jewels for a touch of elegance. This design is a modern twist on a classic style, ideal for those who appreciate refined beauty with an edge.
- Consumables for V-Cut Nails:
- Polish: Matte and glossy dark red
- Jewels: Small decorative gems
- Adhesive: Nail glue for securing jewels
- Recommendation: Apply jewels sparingly to maintain a sophisticated look without overloading the design.
DIY: Modern V-Cut Nails with Jewels
Apply a dark red base coat. For the V-cut, use tape to guide the matte and glossy contrast. Place small jewels at the points or along the V-lines for a subtle yet striking effect. Finish with a top coat to secure the jewels and add a final glossy touch.
Dreamy Pink Transitions with Dark Red Accents
The sixteenth image presents a dreamy blend of soft pink transitioning into bold dark red nail color, adorned with subtle star and gem accents. This design is a perfect example of how nails can be both delicate and striking, suitable for those who wish to blend softness with dramatic flair.
- Consumables for Dreamy Transitions:
- Polish: Light pink and dark red
- Accents: Tiny stars and gemstones
- Top Coat: Glossy for a seamless finish
- Recommendation: Apply the gems while the polish is tacky to ensure they adhere well without additional glue.
DIY: Creating Soft to Bold Transition Nails
Apply a light pink base coat and let it dry. Gradually sponge on the dark red from the tip, blending back into the pink to create a seamless transition. Place tiny stars and gems while the top coat is still tacky for a celestial effect.
Elegant Simplicity with a Pop of Creativity
The seventeenth image showcases a minimalist approach with two accent nails featuring creative embellishments in dark red nail color. This style is perfect for those who appreciate a clean look with a touch of artistic expression.
- Consumables for Minimalistic Designs:
- Polish: Dark red and clear polish
- Accents: Small decorative beads and paint for detailing
- Top Coat: Matte for a modern look
- Recommendation: Use a fine brush for precise placement of designs and beads.
DIY: Minimalist Design with Artistic Accents
Start with a clean, clear base. Paint the accent nails with dark red, adding small beads or painted designs for an artistic touch. Apply a matte top coat to the red nails for contrast, while keeping the clear nails glossy.
Gradient Pink to Dark Red: A Study in Saturation
The eighteenth image displays a stunning gradient effect from radiant pink to rich dark red, offering a vibrant play on color intensity. This look is ideal for those seeking to make a bold statement through color alone.

- Consumables for Gradient Effect:
- Polish: Radiant pink and dark red
- Sponging Tool: For creating a smooth gradient
- Top Coat: High-gloss to enhance the vibrancy
- Recommendation: Ensure each layer is dry before applying the next to maintain clarity and prevent blending mishaps.
DIY: Radiant Gradient Nails
Prepare the nails with a base coat. Apply pink polish as the base color. While still slightly tacky, use a sponge to apply dark red at the tips, blending into the pink towards the cuticle. Repeat until the desired intensity is achieved. Seal with a high-gloss top coat for a seamless transition and vivid color payoff.
Sculptural Artistry in Dark Red
The nineteenth image captures a striking sculptural design where dark red nail color flows in fluid, artistic forms, evoking the sensation of movement and drama. This avant-garde approach is not just a style but a statement, perfect for those who view their nails as a canvas for creative expression.
- Consumables for Sculptural Nails:
- Polish: High-gloss dark red
- Sculpting Gel: For creating raised designs
- Top Coat: High-gloss to enhance the 3D effect
- Recommendation: Experiment with different flow patterns before finalizing the design to ensure a balanced look.
DIY: Creating Fluid Sculptural Nails
Apply a base coat followed by a dark red polish as the foundation. Use sculpting gel to add volume and shape to create dynamic, flowing patterns. Cure under a UV lamp and apply a high-gloss top coat for an eye-catching finish.
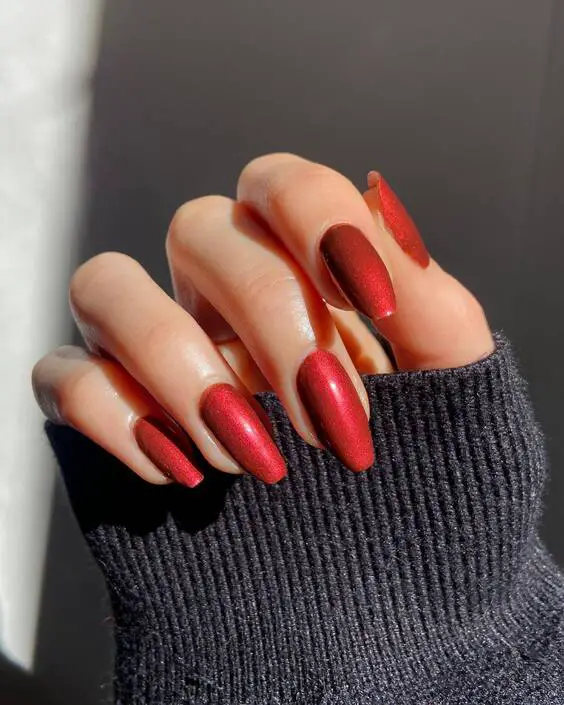
Metallic Shimmer: Elegance with a Spark
The twentieth image showcases nails coated in a shimmering metallic dark red nail color, offering a luxurious and reflective finish. This style is ideal for evening events or any occasion where you want your hands to make as much of an impression as your outfit.
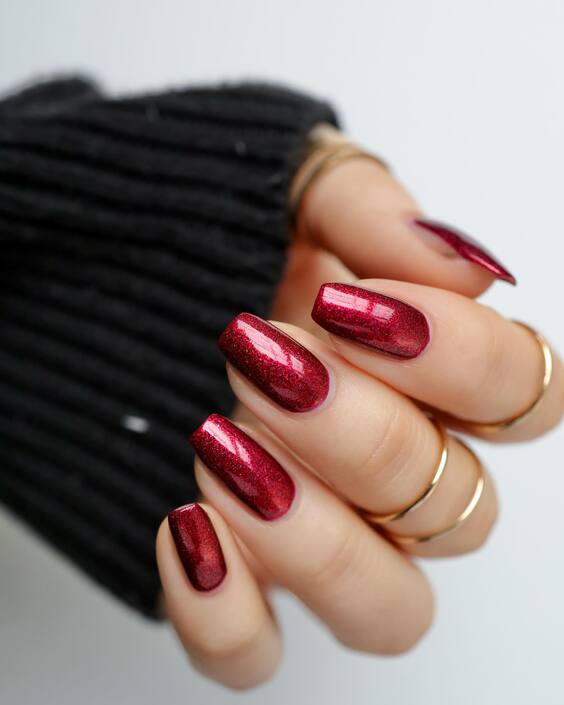
- Consumables for Metallic Shimmer:
- Metallic Polish: Dark red with metallic flakes
- Top Coat: High-gloss to maintain the shimmer
- Recommendation: Apply in even, thin layers to avoid clumping of the metallic flakes.
DIY: Achieving Metallic Shimmer Nails
Start with a smooth base coat to prevent any imperfections. Apply two coats of metallic dark red polish, allowing each coat to dry completely. Finish with a high-gloss top coat to enhance the metallic effect and ensure durability.
Classic Gloss: Timeless Sophistication
The twenty-first image epitomizes classic elegance with a simple yet profound dark red nail color in a glossy finish. This look is a testament to timeless beauty, suitable for both daily wear and special occasions.
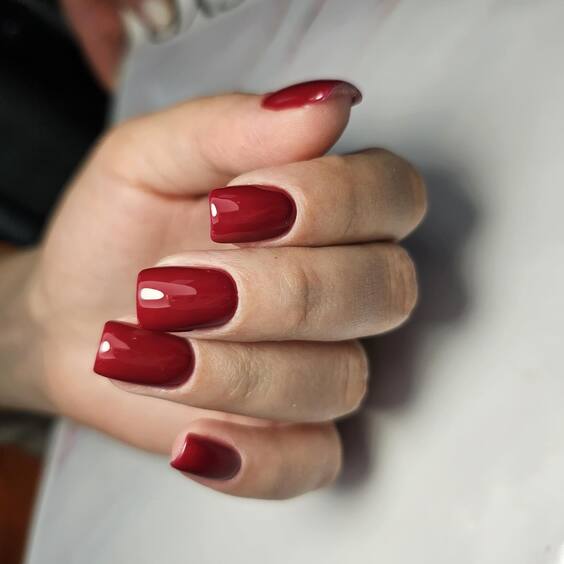
- Consumables for Classic Gloss Nails:
- Polish: Deep, rich dark red
- Top Coat: High-gloss for a sleek finish
- Recommendation: Apply a base coat to enhance the color’s richness and prevent staining.
DIY: Perfecting the Classic Gloss Look
Apply a base coat to protect your nails and enhance polish adhesion. Paint two coats of dark red polish, making sure to allow complete drying between coats. Finish with a high-gloss top coat to achieve a smooth and shiny appearance.
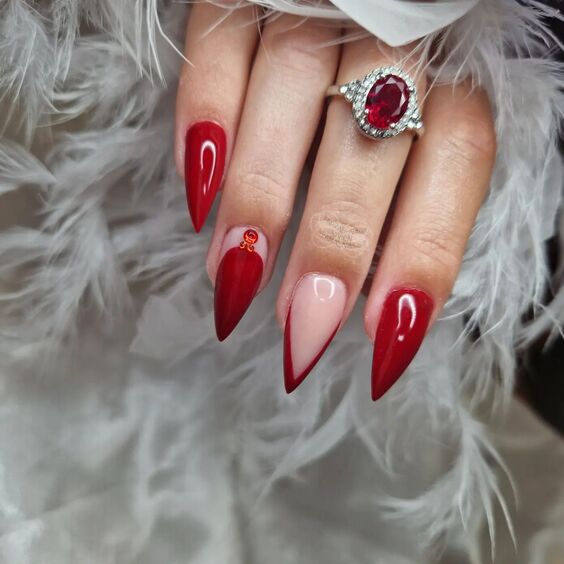
Jewel Accents on Rich Red
The twenty-second image displays a stunning application of dark red nail color with a single accent nail adorned with a golden jewel. This style combines simplicity with a touch of luxury, ideal for those who prefer a sophisticated yet understated look with a glamorous twist.
- Consumables for Jewel Accents:
- Polish: Rich dark red
- Jewel: Gold ornamental piece
- Top Coat: High-gloss to secure and enhance the jewel
- Recommendation: Attach the jewel with a drop of nail glue before applying the top coat for extra hold.
DIY: Adding Elegance with Jewels
Apply two coats of dark red polish. Once dry, select an accent nail and attach a golden jewel near the cuticle using a small amount of nail glue. Finish with a high-gloss top coat to both secure the jewel and give the nails a radiant shine.
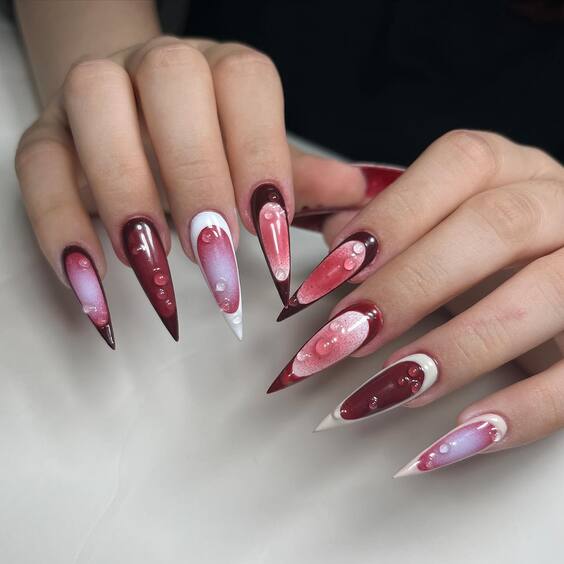
Marbled Artistry with Red Accents
The twenty-third image showcases a marbled effect that fluidly combines white and dark red, creating an impression of motion and depth on the nails. Accented with tiny golden studs, this design is perfect for those looking to make a bold artistic statement.
- Consumables for Marbled Design:
- Polish: White and dark red for marbling
- Studs: Tiny golden studs
- Top Coat: High-gloss for a smooth finish
- Recommendation: Use a detail brush or a dotting tool to swirl the colors together while still wet for the best marbled effect.
DIY: Crafting Marbled Nails with Accents
Begin with a white base coat. While wet, drop in dark red polish and use a pointed tool to swirl the colors together, creating a marbled effect. Before the polish sets, carefully place golden studs where desired. Finish with a high-gloss top coat to smooth out the surface and enhance the depth of the design.
Conclusion
From sculptural fluidity to marbled elegance, these final examples further demonstrate the versatility and artistic potential of dark red nail art. Each style offers a unique way to express personal flair and sophistication, whether through understated elegance or bold creative statements.
