23 Fall Nail Colors: Top Trends and Designs for Autumn
Are you ready to explore the rich palette of fall nail colors for 2024? As the leaves turn and the air chills, your nails can become a canvas for the season’s warmest hues and innovative designs. Whether you’re a fan of classic tones or daring new trends, this guide will unveil spectacular designs to elevate your autumn aesthetic. What makes these colors trendsetters? How can you recreate these high-fashion looks at home? Let’s unravel the artistry behind each manicure, equipping you with everything you need to be on-trend this fall.
Sultry Swirls in Monochrome
The elegance of monochrome takes a playful turn with swirls of black and teal dancing over a crisp white base. This design exemplifies a modern twist on classic fall darkness, introducing lightness and movement. The swirls are not just whimsical; they are meticulously placed to enhance the nail’s natural shape, making them a subtle yet bold statement suitable for both everyday wear and special autumn gatherings.
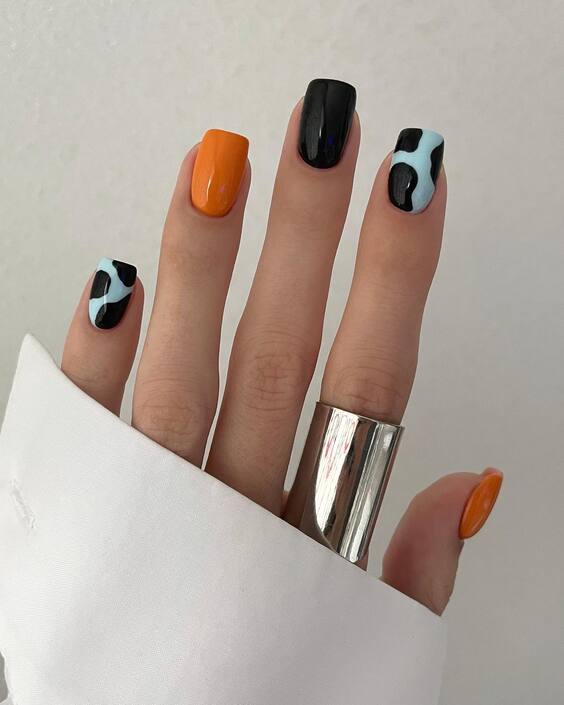
- Materials Needed:
- Base Coat: Essie’s “Blanc”
- Black Polish: OPI’s “Black Onyx”
- Teal Polish: Sally Hansen’s “Teal Good”
- Top Coat: Seche Vite Dry Fast Top Nail Coat
- Detailing Brush
These products ensure a smooth application and lasting finish, providing a professional look at home.
DIY Steps:
- Prep Your Nails: Apply a base coat to protect your nails and ensure a smooth canvas.
- Apply Base Color: Once the base coat dries, apply two coats of white polish.
- Create Swirls: Dip your detailing brush in black and teal polishes alternately, drawing swirls starting from the nail bed upwards.
- Finish Off: Seal your design with a fast-drying top coat for a glossy finish and better durability.
Elegant Artistry in Pastel
This nail design features pastel pink adorned with intricate gold patterns and petite heart appliqués, perfect for softening the bold shades typically seen in fall. The hearts are not merely decorative but are placed to catch light, adding dimension and interest to the manicure. Gold foil lines enhance the sophistication, making this design a perfect companion for your fall tea parties or romantic evenings.
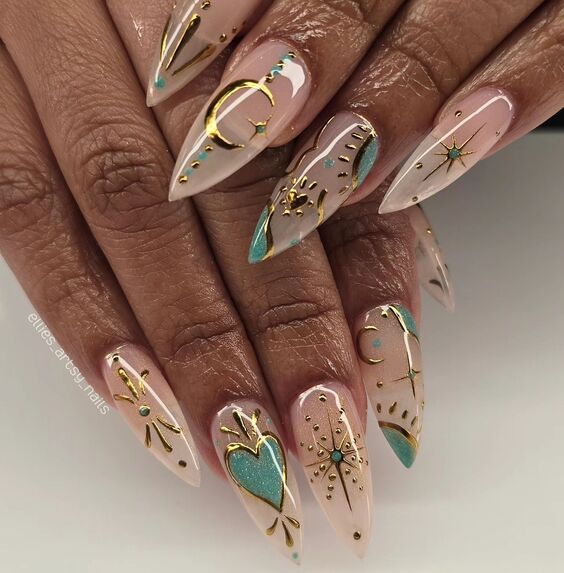
- Materials Needed:
- Base Coat: OPI Natural Nail Base Coat
- Pastel Pink Polish: Essie’s “Muchi, Muchi”
- Gold Foil Tape
- Heart Stickers
- Gold Nail Art Paint
- Top Coat: CND Vinylux Long Wear Top Coat
These elements combine to create a delicate yet durable look.
DIY Steps:
- Base Preparation: Apply the base coat and follow with two layers of pastel pink polish.
- Apply Gold Foil: Once dry, strategically place gold foil tape in thin lines across each nail.
- Add Hearts: Place heart stickers at the center or corner of the nail for a pop of love.
- Top It Off: Finish with a top coat to ensure your artwork lasts through the fall winds.
Deep Sea Embrace
Imagine the depth of the ocean on your nails; this design captures the enigmatic beauty of the sea with a marbled green finish that’s both bold and mysterious. The use of varying shades of green replicates the ever-changing colors of ocean waves. This manicure is for the daring and pairs well with chunky sweaters and bold fall accessories.
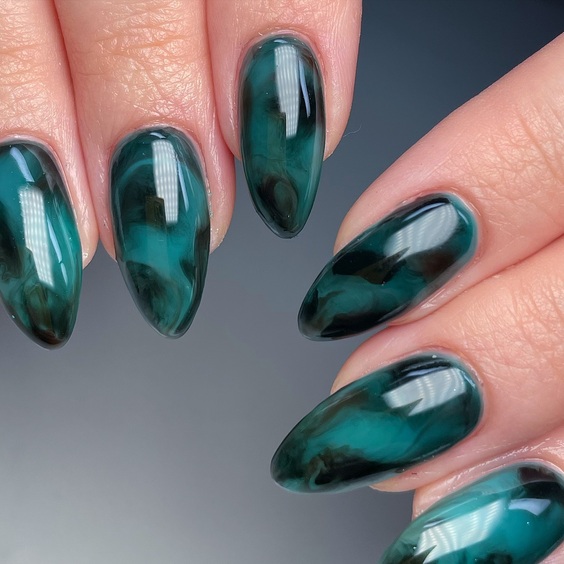
- Materials Needed:
- Base Coat: Revlon Quick Dry Base Coat
- Deep Green Polish: Chanel’s “Emeraude”
- Marbling Tool
- Top Coat: Revlon Extra Life No Chip Top Coat
DIY Steps:
- Prepare the Base: Start with a clean, dry base coat to protect your natural nails.
- Apply Green Polish: Apply a deep green polish as the base color.
- Marble Effect: While the polish is still tacky, gently swirl a lighter green using a marbling tool to create the oceanic patterns.
- Seal the Design: Apply a durable top coat to maintain the depth and integrity of the design throughout the season.
Wild Autumn Tigris
This design showcases an audacious blend of sharp black and vibrant amber, mimicking the exotic patterns of a tiger’s coat. The juxtaposition of glossy black against the fiery tiger print creates a visually captivating effect, perfect for those who wish to make a bold statement during the fall season. This nail art is not just a style choice; it’s a reflection of fearless personality.
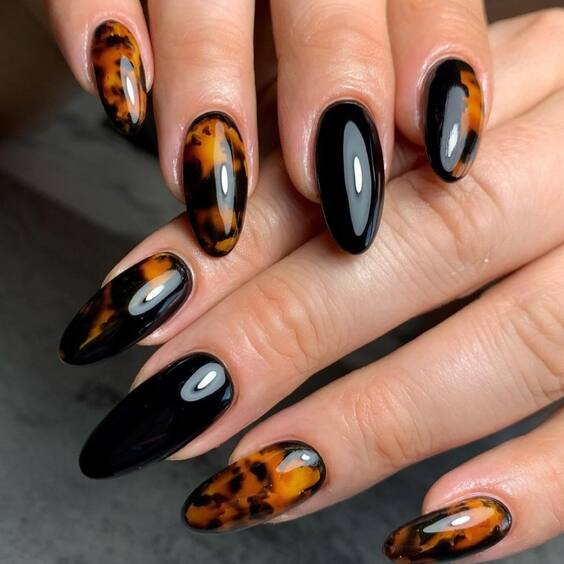
- Materials Needed:
- Base Coat: Sally Hansen Double Duty
- Black Polish: OPI’s “Black Onyx”
- Amber Marble Polish: China Glaze’s “Sunset Sail”
- Top Coat: OPI Top Coat
- Dotting Tool or Thin Brush
DIY Steps:
- Prepare the Nails: Start with a base coat to protect your nails.
- Apply Base Colors: Paint alternate nails with black and a light base color for the tiger design.
- Tiger Effect: For the amber nails, use a dotting tool to add blobs of black, then drag a thin brush through them to create the tiger stripes.
- Finish Up: Seal your design with a top coat for a stunning shine and long-lasting wear.
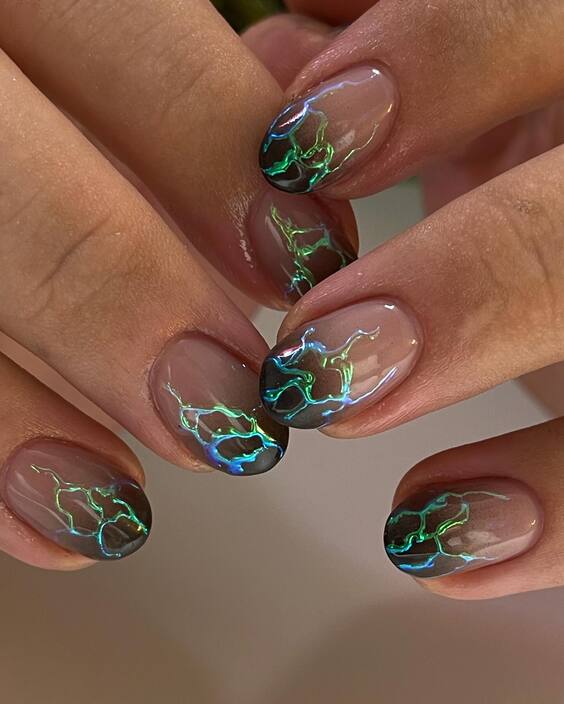
Electric Veins
This nail design features a sheer nude base with veins of electric blue that seem to pulse with life. It’s perfect for those who prefer a less overt autumn theme but still desire a hint of color and creativity. The thin, lightning-like blue lines over the translucent base create a delicate yet dynamic look, mimicking the sudden bright flashes of a fall storm.
- Materials Needed:
- Base Coat: Essie Ridge Filling Base Coat
- Nude Polish: Essie’s “Ballet Slippers”
- Electric Blue Striper Polish: LA Colors Art Deco Nail Art Lacquer
- Top Coat: Seche Vite Dry Fast Top Coat
DIY Steps:
- Base Application: Begin with a base coat to smooth any imperfections.
- Apply Nude Polish: Add two coats of a sheer nude polish.
- Draw Veins: Using the striper, carefully draw erratic, thin lines of electric blue to mimic veins.
- Seal the Art: Finish with a top coat to protect your designs and add a glossy sheen.
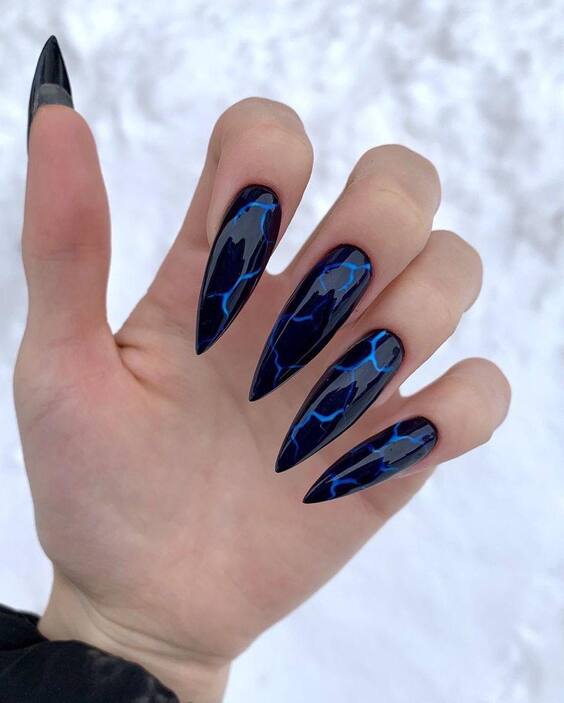
Midnight Camouflage
Inspired by the dark and mysterious winter nights, this nail art combines deep blue and black in a camouflaged pattern that’s both alluring and enigmatic. Ideal for the late fall to winter transition, these nails could complement any cold-weather attire, bringing an element of the nocturnal sky to your fingertips.
- Materials Needed:
- Base Coat: OPI Natural Nail Base Coat
- Black Polish: Revlon’s “Knockout”
- Deep Blue Polish: Essie’s “After School Boy Blazer”
- Sponge for Blotting
- Top Coat: OPI Top Coat
DIY Steps:
- Nail Prep: Apply a base coat to each nail for longevity and protection.
- Base Color Application: Paint all nails black as the base color.
- Blotting Technique: Sponge on the deep blue polish to create a camouflaged effect.
- Finish: Apply a top coat for a smooth, protective finish.
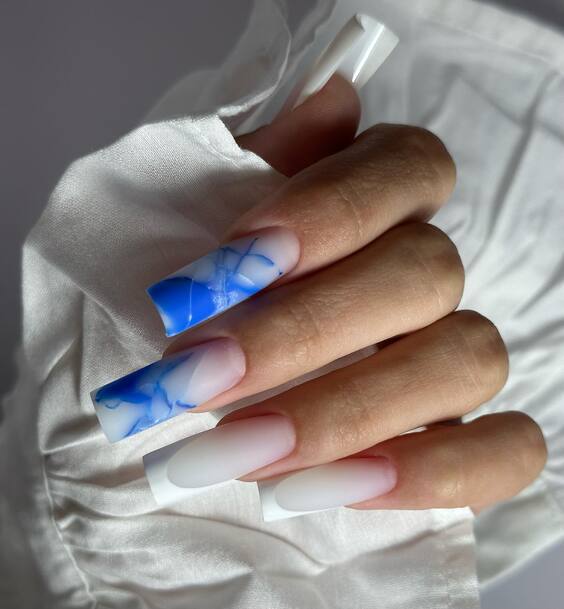
Skyward Serenity
This nail design captures the serene hues of the sky with a stunning ombre effect transitioning from a deep sky blue into a soft cloud-like white. The intricate vein-like lines over the blue evoke the image of clouds scattered by a gentle breeze. Perfect for those who wish to carry a piece of the clear fall sky with them, this design combines tranquility with sophistication.
- Materials Needed:
- Base Coat: Butter London Nail Foundation
- Sky Blue Polish: Essie’s “Butler Please”
- White Polish: OPI’s “Alpine Snow”
- Detail Brush
- Top Coat: Deborah Lippmann Gel Lab Pro
DIY Steps:
- Start with a Base: Apply a base coat to protect your nails and ensure a flawless application.
- Ombre Background: Begin with sky blue at the tips, fading into white at the base. Blend while wet to achieve a smooth gradient.
- Draw Cloud Lines: Using a detail brush, add white lines to mimic cloud patterns.
- Finish with a Top Coat: Apply a top coat for a glossy finish and to preserve your artwork.
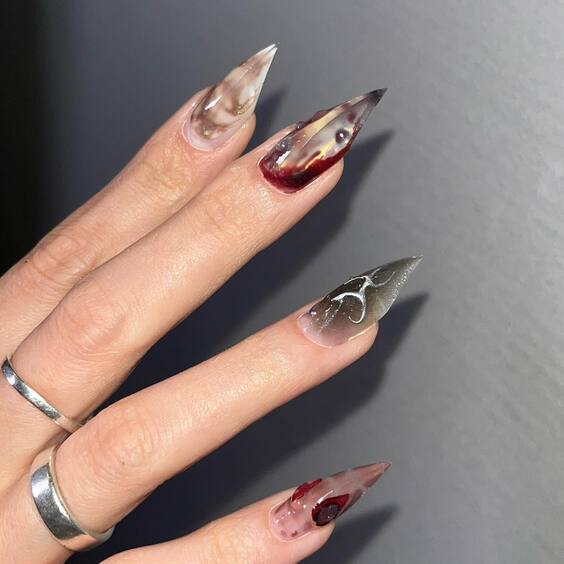
Blood Moon Eclipse
This avant-garde nail design is inspired by a lunar eclipse, featuring a dark, translucent base with splashes of blood red and hints of silver detailing. It’s an ideal choice for the bold and adventurous, perfect for thematic fall events or adding a touch of drama to everyday outfits.
- Materials Needed:
- Base Coat: Chanel Base Protectrice
- Translucent Black Polish: Jin Soon’s “Nocturne”
- Blood Red Polish: OPI’s “Malaga Wine”
- Silver Nail Art Pen
- Top Coat: Chanel Le Gel Coat
DIY Steps:
- Base Preparation: Apply a protective base coat.
- Apply Translucent Black: Use a black jelly polish for a deep but see-through look.
- Add Red Accents: Dab red polish sporadically for an eclipse effect.
- Detail with Silver: Use a silver nail art pen to add fine lines and enhance the mystical vibe.
- Seal with a Top Coat: A high-gloss top coat will provide the finishing touch.
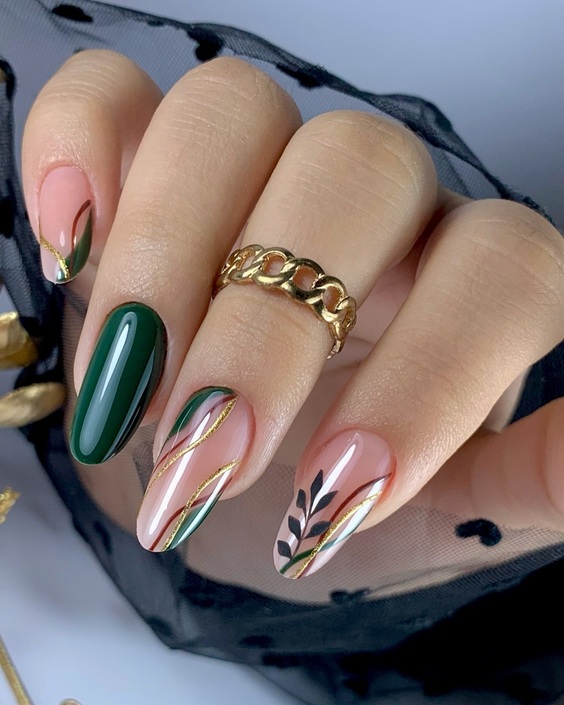
Botanical Elegance
This sophisticated design features a deep green polish paired with delicate pink and gold floral accents, symbolizing the seasonal transition from the vibrant flowers of summer to the more subdued tones of fall. This manicure suits those who appreciate a more natural, understated elegance in their style.
- Materials Needed:
- Base Coat: Essie Grow Stronger
- Deep Green Polish: Sally Hansen’s “On Pines and Needles”
- Pink Polish: Essie’s “Muchi, Muchi”
- Gold Nail Art Striper
- Top Coat: OPI Top Coat
DIY Steps:
- Apply Base Coat: Start with a nourishing base coat for healthy nails.
- Color Application: Apply two coats of deep green for the base.
- Design Florals: With a thin brush, create delicate pink flowers and add gold accents for a touch of luxury.
- Top Coat for Protection: Finish with a top coat to enhance the design’s durability and shine.
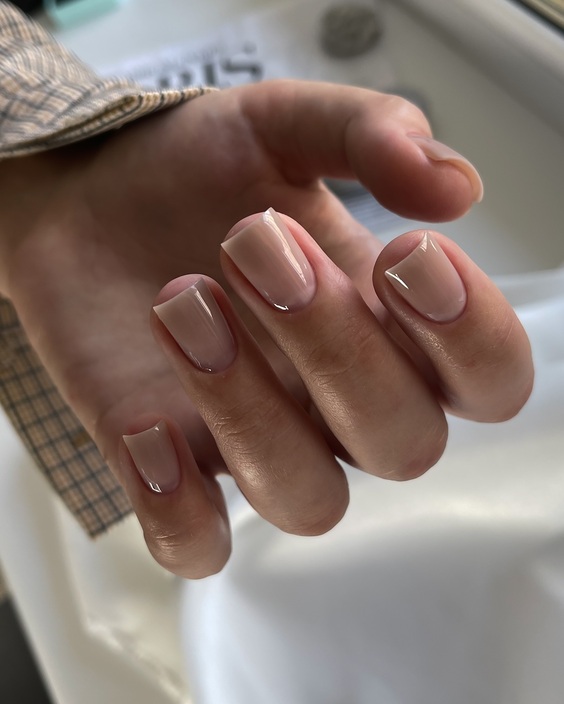
Minimalist Chic
This design celebrates the beauty of minimalism with its clean, soft pink base and barely-there gloss finish. It’s perfect for those who appreciate understated elegance or need a polished look that transitions seamlessly from day to night. The subtle sheen catches the light just enough to enhance the natural beauty of your nails without overpowering.
- Materials Needed:
- Base Coat: OPI Natural Nail Base Coat
- Soft Pink Polish: Essie’s “Ballet Slippers”
- High Gloss Top Coat: Sally Hansen Miracle Gel Top Coat
DIY Steps:
- Apply the Base Coat: Protect your nails and ensure a smooth polish application.
- Polish with Pink: Apply two thin coats of soft pink for a full but subtle color.
- Gloss It Over: Finish with a high-gloss top coat to enhance durability and shine.
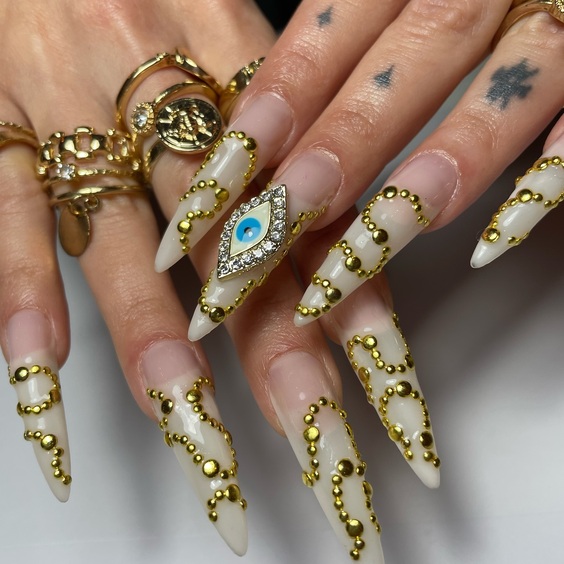
Ornate Opulence
This extravagant design uses white polish as a canvas for intricate golden embellishments, making it ideal for special occasions or anyone looking to make a statement. The detailed work, including beads and jewels, reflects a meticulous craftsmanship that’s both bold and beautiful.
- Materials Needed:
- Base Coat: Revlon Quick Dry Base Coat
- White Gel Polish: Gelish “Arctic Freeze”
- Gold Micro Beads and Rhinestones
- Nail Adhesive
- Top Coat: UV Gel Top Coat
DIY Steps:
- Base Application: Start with a base coat to protect your nails.
- White Foundation: Apply two coats of white gel polish, curing under a UV lamp after each layer.
- Embellish: Use nail adhesive to carefully place gold beads and rhinestones in your desired pattern.
- Seal with Top Coat: Apply a UV gel top coat and cure to set your design firmly.
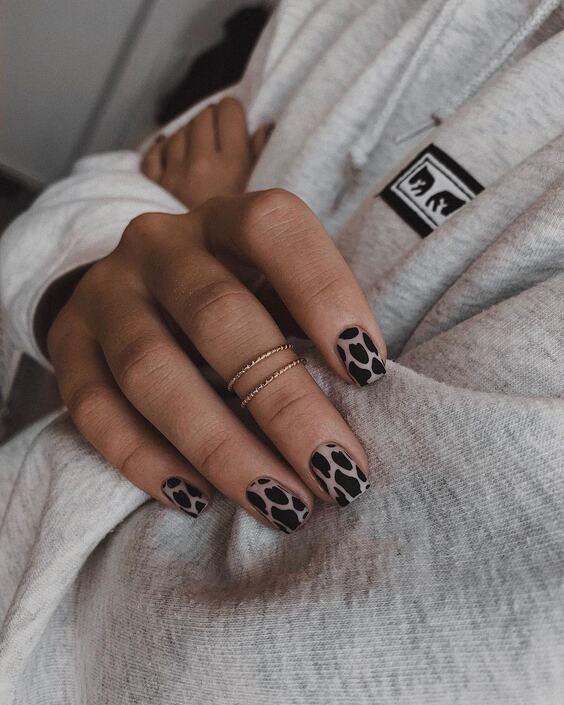
Modern Safari
Echoing the textures of the animal kingdom, this design features modern leopard spots over a muted base. It’s perfect for adding a touch of the wild to your everyday look or for coordinating with earthy, autumnal outfits.
- Materials Needed:
- Base Coat: Butter London Nail Foundation
- Muted Beige Polish: Chanel “Beige”
- Black and Grey Polishes for Spots
- Detailing Brush
- Top Coat: Essie Gel Setter
DIY Steps:
- Prepare the Nails: Apply a base coat for smooth application.
- Apply Base Color: Use a muted beige as the foundation.
- Paint Spots: With a detailing brush, add leopard spots in black and grey.
- Top Coat for Finish: Apply a top coat to protect your design and add shine.
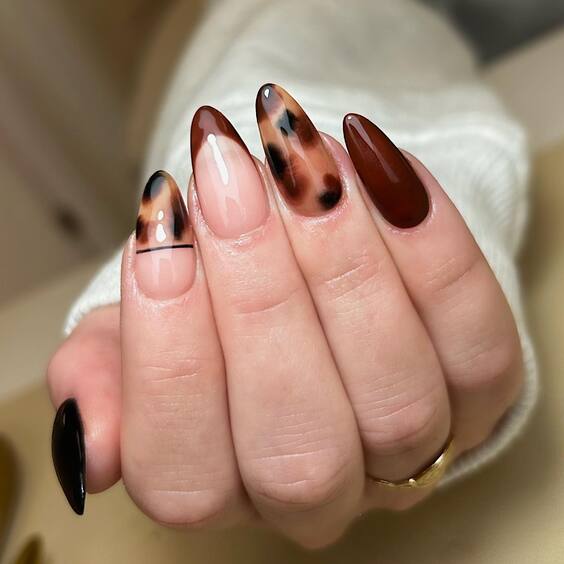
Translucent Chic
Featuring a fascinating blend of smoky transitions and bold, rich hues, this design captures autumn’s essence through contrast and harmony. The deep browns are reminiscent of fall foliage, while the translucent tipping gives a modern twist to a traditional autumn palette.
- Materials Needed:
- Base Coat: Essie Ridge Filling Base Coat
- Translucent Polish: OPI’s “Don’t Burst My Bubble”
- Deep Brown Polish: China Glaze’s “Call of the Wild”
- Top Coat: Seche Vite Dry Fast Top Coat
DIY Steps:
- Prepare the Base: Apply a ridge-filling base coat to smooth the nail surface.
- Gradient Effect: Start with a deep brown at the cuticle, blending into the translucent polish toward the tip.
- Finish with a Top Coat: Add a top coat for a glossy finish that enhances the depth and transitions of the colors.
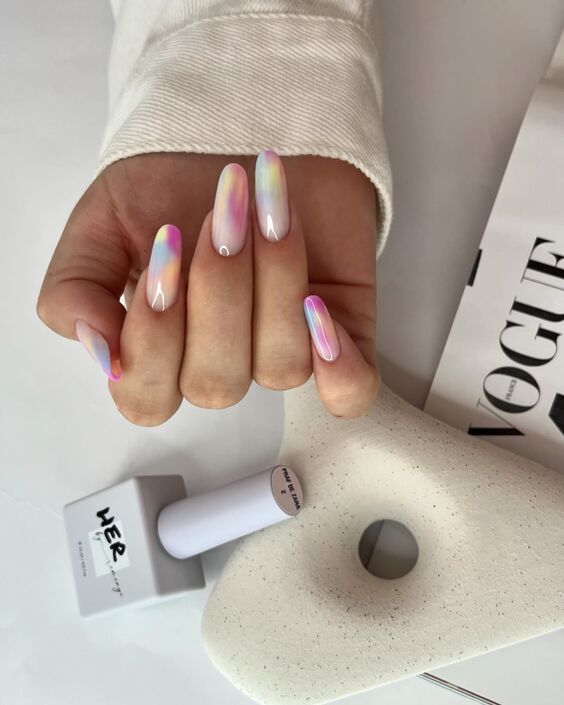
Prism Fantasy
This ethereal design uses pastel prism colors to create a light, airy feel perfect for softening the darker tones typically associated with fall. The iridescence provides a magical touch that shifts and shines with movement, like a quiet whisper of the changing seasons.
- Materials Needed:
- Base Coat: Sally Hansen Hard as Nails
- Pastel Iridescent Polish: ILNP “Birefringence”
- Top Coat: Sally Hansen Miracle Gel Top Coat
DIY Steps:
- Base Coat Application: Begin with a strong base to protect your nails.
- Iridescent Polish Application: Apply two coats of the iridescent polish, allowing each coat to dry thoroughly.
- Seal with Top Coat: A gel top coat will prolong the wear and enhance the iridescent effect.
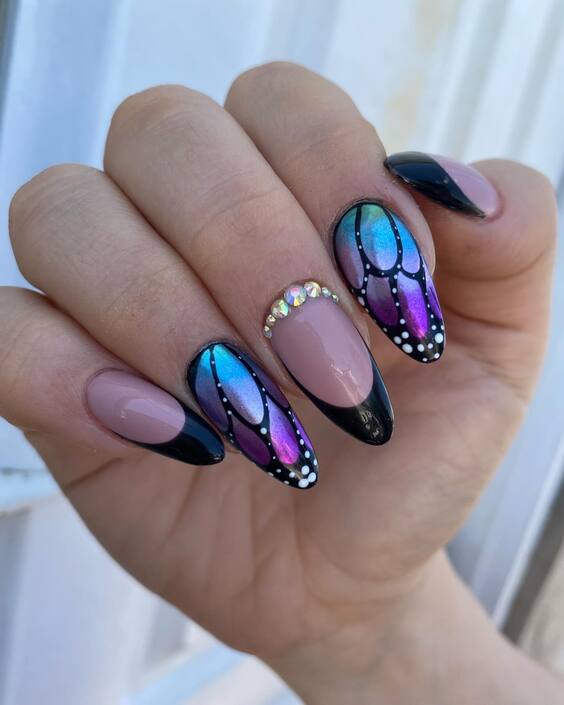
Artistic Wings
This design is for those who dare to stand out. The abstract wing patterns in vivid blues and blacks, adorned with dots and gem accents, create a dramatic, captivating look. It’s a bold statement that pairs well with the daring fashions of the fall season.
- Materials Needed:
- Base Coat: OPI Natural Nail Base Coat
- Black Polish: Essie’s “Licorice”
- Blue Iridescent Polish: OPI’s “Miss Piggy’s Big Number”
- Dotting Tool
- Rhinestones
- Top Coat: Essie Gel Setter
DIY Steps:
- Base Coat Preparation: Start with a base coat to ensure a lasting finish.
- Apply Base Colors: Use black as the primary color, with blue iridescent highlights.
- Create Patterns: Utilize a dotting tool to add intricate details and place rhinestones strategically.
- Protective Top Coat: Finish with a gel setter to protect your artistic creation and enhance the design’s depth.
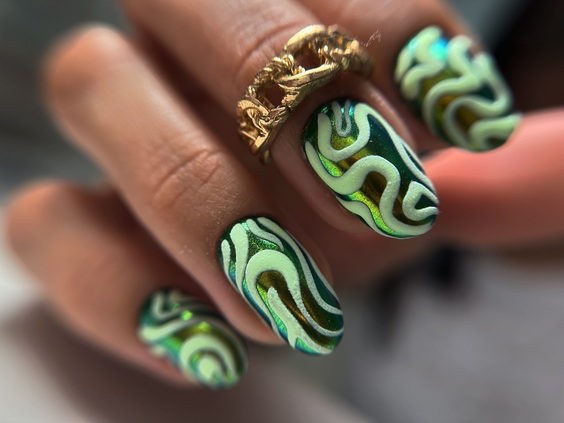
Swirling Greens
This design swirls vibrant shades of green with soft whites, creating a mesmerizing effect reminiscent of nature’s own artistry in the fall. The metallic finish adds a touch of luxury, making these nails perfect for both everyday wear and special autumnal occasions.
- Materials Needed:
- Base Coat: OPI Natural Nail Base Coat
- White Polish: Essie’s “Blanc”
- Green Metallic Polish: Zoya’s “Ivy”
- Detailing Brush
- Top Coat: Seche Vite Dry Fast Top Coat
DIY Steps:
- Base Coat Application: Begin with a base coat to protect the nails.
- Color Application: Apply a white base coat and let it dry.
- Metallic Swirls: Use a detailing brush to paint swirling patterns with metallic green polish.
- Seal with Top Coat: Finish with a fast-drying top coat for a smooth, lasting shine.
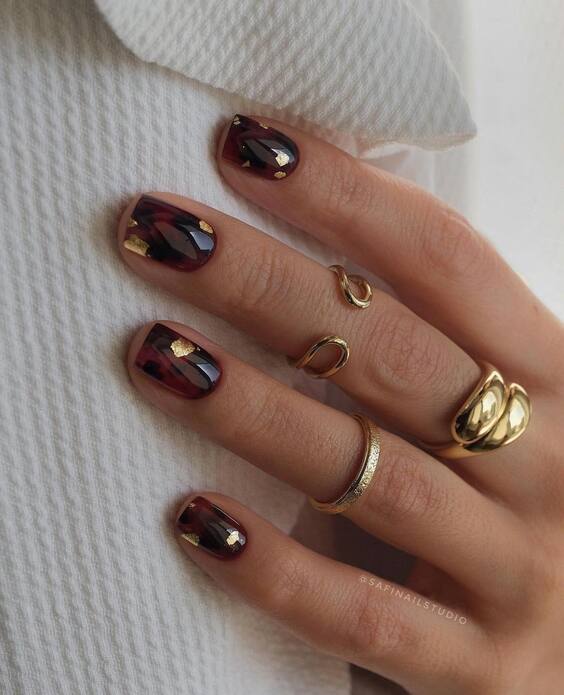
Autumn Jewels
The rich, jewel-toned base of this design is enhanced with glossy topcoats and gold accents, reflecting the luxurious and deep colors of fall foliage. This elegant look is ideal for those seeking a sophisticated, yet understated, seasonal style.
- Materials Needed:
- Base Coat: Sally Hansen Hard as Nails
- Deep Burgundy Polish: OPI’s “Malaga Wine”
- Gold Leaf Sheets
- Clear Gel Top Coat
DIY Steps:
- Base Coat Protection: Start with a strong base to ensure durability.
- Color Base: Apply two coats of burgundy for a deep, rich background.
- Gold Leaf Application: Carefully place pieces of gold leaf on the nails for a luxurious embellishment.
- Gel Top Coat: Finish with a clear gel top coat to seal in the design and add a glossy sheen.
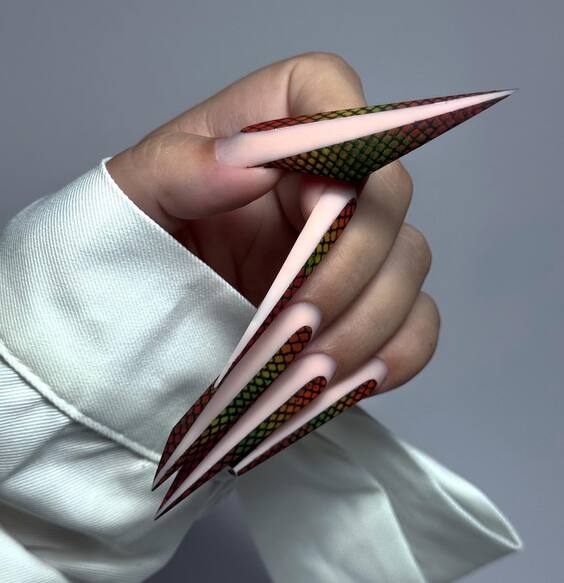
Serpentine Sharpness
With its razor-sharp silhouette and bold serpentine patterns, this nail design is for the fearless. The vivid colors and dramatic shapes make a strong fashion statement, perfect for making an impact at any fall event.
- Materials Needed:
- Base Coat: Essie Ridge Filling Base Coat
- White Polish: Chanel’s “Eastern Light”
- Multi-Color Polishes for Serpentine Design
- Fine Detailing Brush
- Top Coat: OPI Top Coat
DIY Steps:
- Smooth Base: Apply a ridge-filling base coat for a flawless polish application.
- White Base Color: Start with a solid white base to make the colors pop.
- Paint Serpentine Patterns: Use a fine brush to create intricate serpentine designs in multiple colors.
- Seal with Top Coat: A top coat will protect your artwork and enhance the overall sharpness of the design.
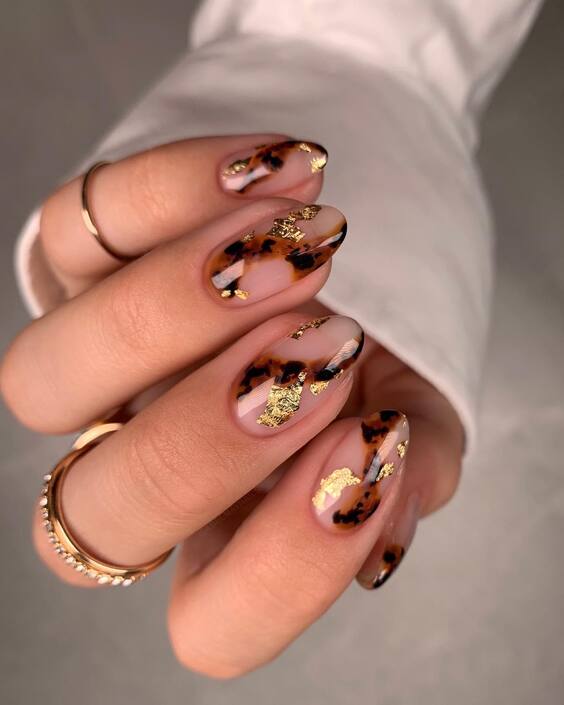
Golden Autumn Flare
This design seamlessly blends classic fall colors with luxurious gold leaf, offering a glamorous yet understated elegance. The translucent base allows the gold and warm, earthy tones to stand out, making this a perfect choice for any autumn occasion.
- Materials Needed:
- Base Coat: OPI Natural Nail Base Coat
- Translucent Nail Polish: Essie’s “Sheer Luck”
- Gold Leaf
- Autumn Tone Polishes (Orange and Black)
- Top Coat: Seche Vite Dry Fast Top Coat
DIY Steps:
- Prepare the Base: Start with a base coat to protect the nails.
- Apply Translucent Base: Use a sheer polish as the foundation.
- Add Gold Leaf: Tear small pieces of gold leaf and apply them randomly.
- Detail with Color: Add small touches of autumn-colored polish over the gold leaf.
- Seal with Top Coat: Apply a top coat to enhance durability and shine.
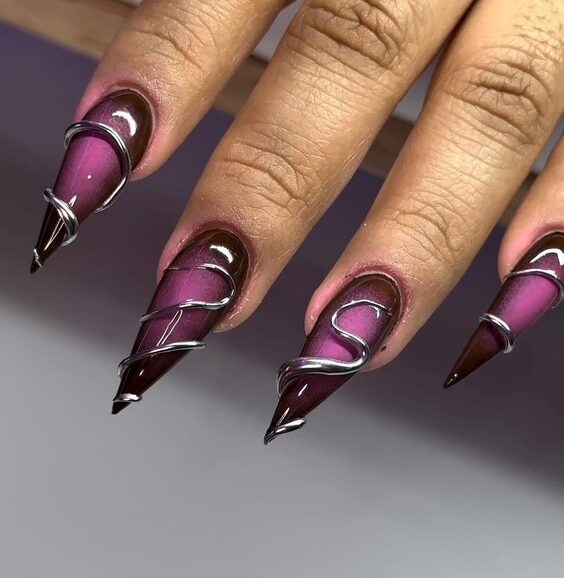
Lavender Whirl
This stunning design offers a fresh take on nail art with its swirling patterns and bold metallic finishes. The deep lavender hue paired with a glossy, sculpted finish makes these nails a statement piece, particularly striking for evening events during the fall.
- Materials Needed:
- Base Coat: Sally Hansen Hard as Nails
- Lavender Polish: Essie’s “Play Date”
- Silver Metallic Polish
- Fine Detail Brush
- Top Coat: Sally Hansen Miracle Gel Top Coat
DIY Steps:
- Base Coat Application: Apply a protective base coat.
- Lavender Base: Paint the nails with a deep lavender polish.
- Metallic Details: Use a fine brush to add swirling metallic details.
- Finish with Top Coat: A high-gloss top coat to seal the design and add a brilliant shine.
Monochromatic Mood
This nail design emphasizes a sophisticated monochrome palette, ranging from pale beige to deep espresso. The gradient effect is subtly elegant, making it suitable for any setting from the office to an evening out, reflecting the versatile and understated aspects of fall.
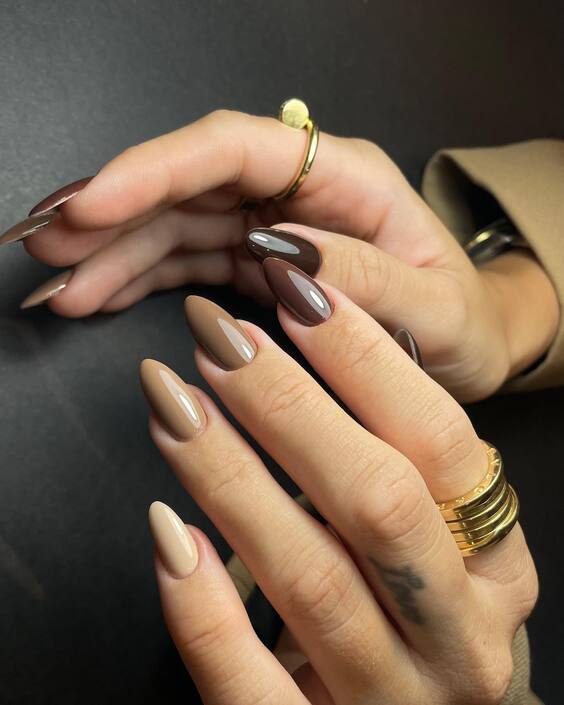
- Materials Needed:
- Base Coat: Chanel La Base
- Range of Beige to Espresso Polishes
- Sponge (for gradient effect)
- Top Coat: Chanel Le Gel Coat
DIY Steps:
- Start with Base Coat: Protect your nails with a base coat.
- Gradient Application: Apply the lightest color as the base, and use a sponge to dab on darker shades towards the tips.
- Blend for Smoothness: Ensure the colors blend seamlessly.
- Seal with Top Coat: A top coat to ensure durability and a smooth finish.
Contemporary Waves
This design brings a fresh perspective to nail art with its bold, contemporary waves. The contrast between the deep blue and pristine white gives a striking visual effect, reminiscent of the dynamic autumn skies, making this design both eye-catching and elegant.
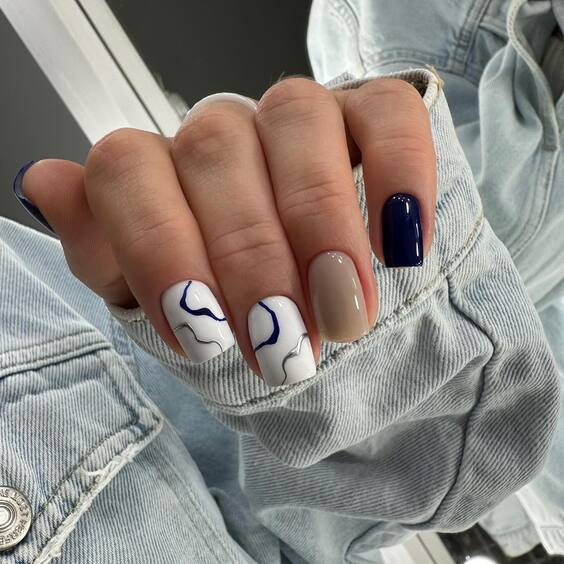
- Materials Needed:
- Base Coat: OPI Natural Nail Base Coat
- White Polish: Essie’s “Blanc”
- Blue Polish: Sally Hansen’s “Pacific Blue”
- Detailing Brush
- Top Coat: Seche Vite Dry Fast Top Coat
DIY Steps:
- Start with Base Coat: Protect your nails and ensure a smooth canvas.
- Apply White Base: Lay down a white base to help the colors pop.
- Paint Waves: Use the detailing brush to add blue waves in a dynamic, free-form pattern.
- Finish with Top Coat: Seal the design with a fast-drying top coat for durability and shine.
Elegant Drift
Inspired by the gentle drift of falling leaves, this nail design uses gradients of brown and beige to create a subtle yet sophisticated look. The clean lines add a modern twist, ideal for accessorizing any fall outfit with a touch of refined elegance.
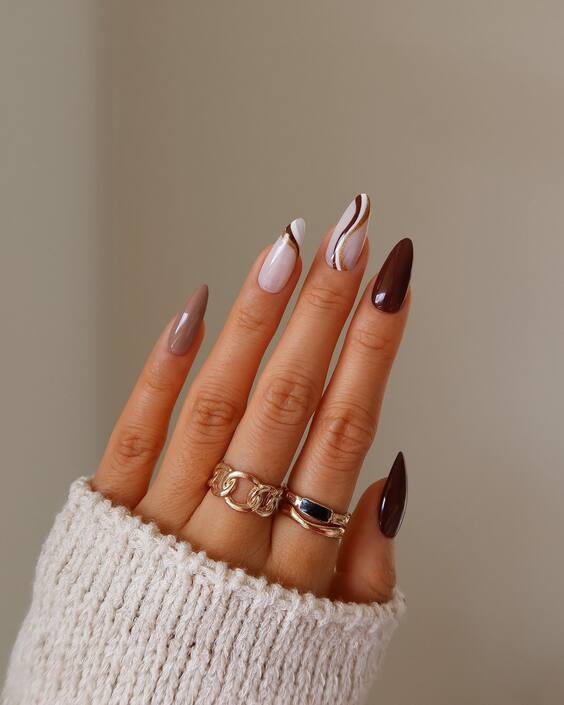
- Materials Needed:
- Base Coat: Chanel La Base
- Beige Polish: OPI’s “Don’t Pretzel My Buttons”
- Brown Polish: Essie’s “Mink Muffs”
- Detailing Brush
- Top Coat: Chanel Le Gel Coat
DIY Steps:
- Apply Base Coat: Start with a base coat to protect the nail.
- Beige Base: Apply a light beige as the base color.
- Gradient Effect: Use a detailing brush to create a gradient with brown from the nail base, fading into the beige.
- Seal with Top Coat: Finish with a high-gloss top coat for a seamless look and lasting wear.
As we conclude our exploration of Fall Nail Colors 2024, it’s clear that this season’s trends encapsulate a rich palette of creativity and elegance. From the subtle sophistication of monochromatic gradients to the bold artistry of contemporary waves, each design offers a unique way to express personal style and embrace the autumnal spirit. Whether you’re drawn to the understated elegance of gold flecks or the dramatic flair of metallic swirls, these nail designs provide not just a fashion statement but a canvas for self-expression. Embrace these trends and find your perfect fall aesthetic, allowing your nails to reflect the seasonal transition with style and sophistication.

