
Brown color nails are often overlooked in favor of more vibrant shades, but their versatility and elegance make them a fantastic choice for any occasion. From deep, dark chocolates to light, creamy beiges, brown nails can be both subtle and striking. In this article, we’ll explore various brown color nails designs, ranging from minimalist chic to bold and embellished styles. Whether you’re looking for inspiration for your next manicure or want to try out a new look at home, these designs will showcase the true beauty and versatility of brown nails. Let’s dive into these stunning ideas and discover how you can achieve them yourself.
Classic Elegance with Dark Brown Tips
The first image showcases a sophisticated brown color nails design with dark brown tips. This design is perfect for those who want a subtle yet stylish look. The dark brown tips contrast beautifully with the nude base, creating a sleek and modern manicure. The glossy finish adds an extra touch of elegance, making these nails suitable for both everyday wear and special occasions.
Consumables List
- Nude base polish: OPI “Samoan Sand”
- Dark brown polish: Essie “Wicked”
- Glossy top coat: Seche Vite Dry Fast Top Coat
- Nail art brush: Modelones Nail Art Brush Set
DIY Instructions
- Preparation: Start by cleaning and shaping your nails. Apply a base coat to protect your natural nails.
- Base Color: Apply two coats of the nude base polish and let it dry completely.
- Dark Brown Tips: Using a nail art brush, carefully paint the dark brown polish on the tips of your nails. Ensure you have a steady hand for clean lines.
- Finishing Touches: Apply a glossy top coat to seal the design and add shine.
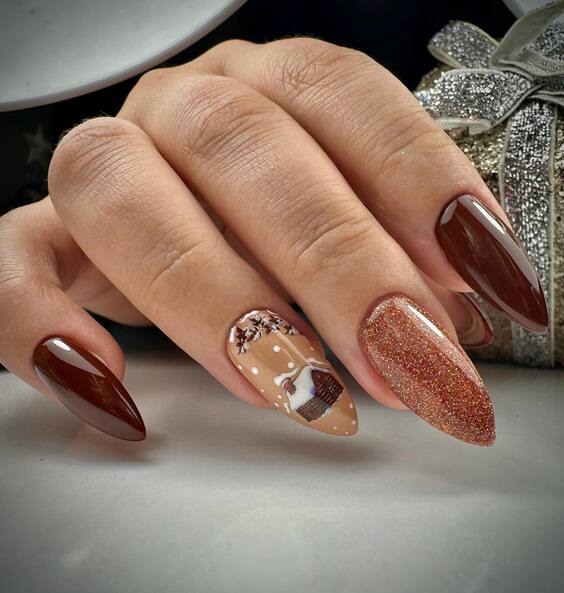
Cozy Winter Vibes with Chocolate Brown
This manicure embodies cozy winter vibes with its warm chocolate brown hue. The design features an accent nail with a detailed winter scene, adding a festive touch. The combination of glossy and glitter finishes makes these nails stand out, perfect for holiday parties or a cozy night in.
Consumables List
- Chocolate brown polish: Sally Hansen “Brownstone”
- Glitter polish: China Glaze “Fairy Dust”
- Nail art brushes: Beetles Nail Art Brush Set
- Top coat: Essie Gel Setter
DIY Instructions
- Base: Apply a base coat to protect your nails, followed by two coats of the chocolate brown polish.
- Accent Nail: On your accent nail, use nail art brushes to create a winter scene. Start with the base color and add details like snow and trees using white and brown polish.
- Glitter Finish: Apply the glitter polish over the brown nails to add a festive sparkle.
- Seal: Finish with a top coat to ensure your design lasts and remains shiny.
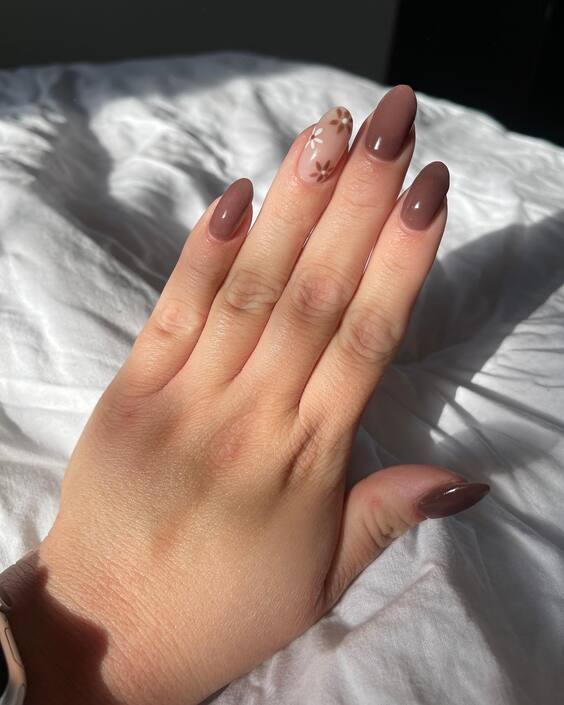
Minimalist Brown with Floral Accent
For those who prefer a minimalist approach, this design features brown color nails with a delicate floral accent. The light brown shades used here are subtle and sophisticated, while the floral design adds a touch of femininity. This look is perfect for everyday wear, offering a balance between simplicity and elegance.
Consumables List
- Light brown polish: Zoya “Louise”
- White polish for floral design: OPI “Alpine Snow”
- Detail brush: Winstonia Nail Art Detailer Brush
- Top coat: Sally Hansen Miracle Gel Top Coat
DIY Instructions
- Prepare: Clean and shape your nails, then apply a base coat.
- Base Color: Paint your nails with the light brown polish, applying two coats for full coverage.
- Floral Design: Using the detail brush, create small flowers on the accent nail with the white polish. Start with the petals and add small dots for the center of the flowers.
- Top Coat: Seal your design with a top coat to protect it and add a glossy finish.
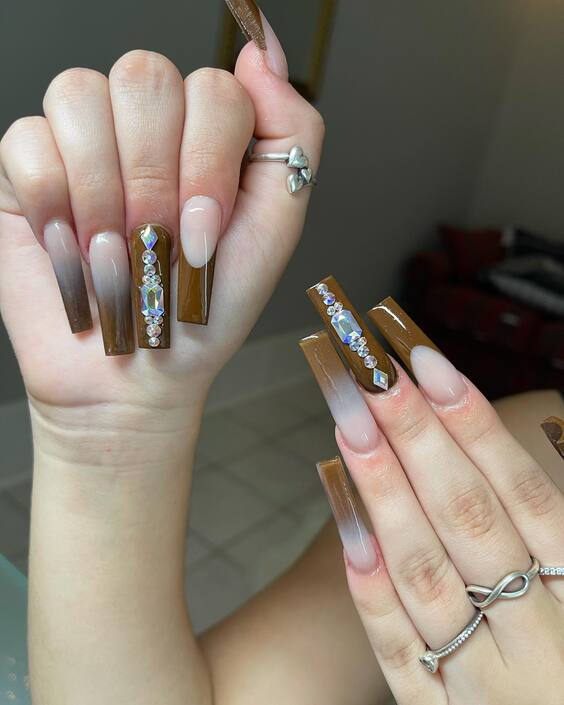
Glamorous Brown with Rhinestone Accents
This design is a show-stopper with its luxurious brown color nails and sparkling rhinestone accents. The ombre effect from a nude base to a rich brown tip adds depth and sophistication. The rhinestones are placed strategically to create a stunning focal point, making these nails perfect for a glamorous night out.
Consumables List
- Nude base polish: OPI “Bubble Bath”
- Brown polish: Essie “Partner in Crime”
- Rhinestones: Swarovski Nail Crystals
- Nail glue: IBD 5 Second Nail Glue
- Top coat: Gelish Top It Off
DIY Instructions
- Prep: Start with clean, shaped nails and apply a base coat.
- Ombre Effect: Apply the nude base polish, then use a makeup sponge to create the ombre effect with the brown polish. Dab the sponge lightly for a seamless gradient.
- Rhinestone Placement: Use nail glue to place rhinestones on the accent nails. Arrange them in a vertical line or a pattern of your choice.
- Finish: Apply a top coat to secure the rhinestones and add a glossy finish.
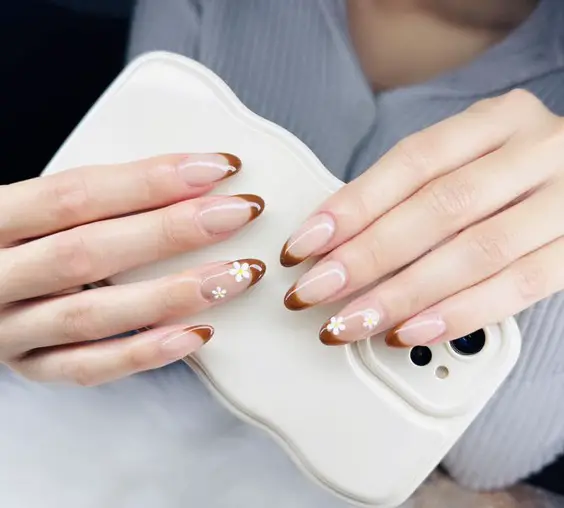
Chic Almond Shape with Daisy Accents
The almond shape is a timeless classic, and this design elevates it with brown color nails and delicate daisy accents. The brown French tips are chic and modern, while the small daisies add a playful touch. This look is ideal for anyone who wants a balance of elegance and fun.
Consumables List
- Nude base polish: Essie “Ballet Slippers”
- Brown polish: Sally Hansen “Java”
- White polish for daisies: China Glaze “Snow”
- Nail art dotting tool: PUEEN Nail Art Dotting Tools
- Top coat: CND Vinylux Weekly Top Coat
DIY Instructions
- Preparation: Clean and shape your nails into an almond shape. Apply a base coat.
- French Tips: Use the brown polish to create French tips on each nail. A nail art brush can help achieve clean lines.
- Daisy Design: Using the dotting tool, create small daisies on a few accent nails with the white polish. Add small yellow dots for the centers.
- Top Coat: Apply a top coat to protect the design and add shine.
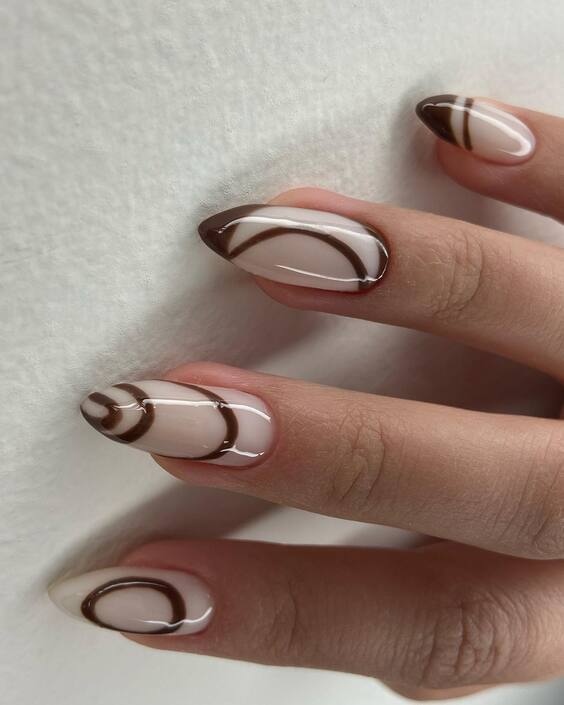
Modern Art Deco Brown
This nail design is perfect for those who appreciate modern art deco styles. The brown color nails feature abstract lines and shapes, creating a unique and eye-catching look. The combination of light and dark brown shades adds dimension and sophistication.
Consumables List
- Light brown polish: OPI “Dulce de Leche”
- Dark brown polish: Essie “Mink Muffs”
- Nail art brushes: KADS Professional Nail Art Brush Set
- Top coat: Revlon Extra Life No Chip Top Coat
DIY Instructions
- Prepare: Clean and shape your nails, then apply a base coat.
- Base Color: Apply two coats of the light brown polish and let it dry completely.
- Art Deco Design: Using the nail art brushes, create abstract lines and shapes with the dark brown polish. Let your creativity guide you to achieve a unique design.
- Top Coat: Seal the design with a top coat to ensure it lasts and remains glossy.
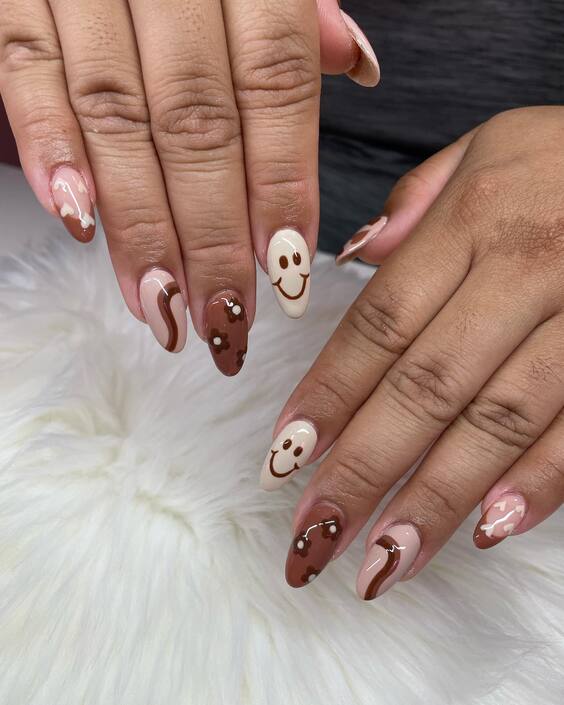
Playful Smiley Faces and Swirls
This playful design features a mix of brown color nails with smiley faces and swirls. The light and dark brown shades create a fun contrast, making this manicure perfect for those who want to showcase their personality. The smiley faces add a whimsical touch, making it a great conversation starter.
Consumables List
- Light brown polish: OPI “Samoan Sand”
- Dark brown polish: Essie “Mink Muffs”
- Nail art brushes: Beetles Nail Art Brush Set
- Top coat: Sally Hansen Miracle Gel Top Coat
DIY Instructions
- Prepare: Clean and shape your nails, then apply a base coat.
- Base Color: Paint your nails with the light brown polish, applying two coats for full coverage.
- Design: Use the nail art brushes to create smiley faces and swirls with the dark brown polish. Let your creativity flow.
- Top Coat: Seal your design with a top coat to protect it and add a glossy finish.
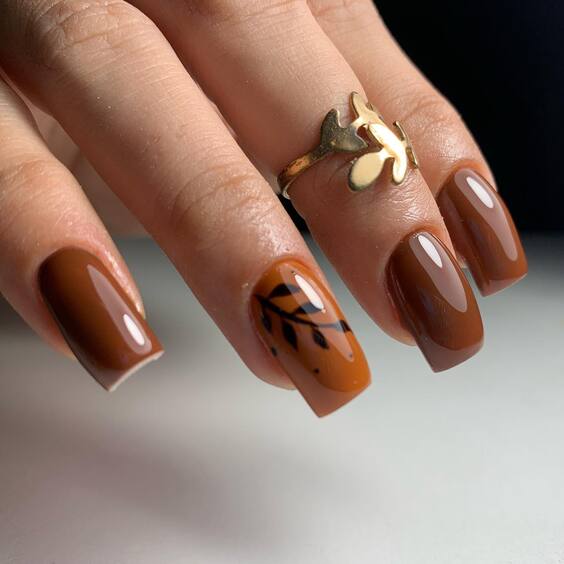
Autumn Leaves and Natural Tones
This design brings the beauty of autumn to your fingertips with brown color nails and a leaf accent. The mix of brown shades and the delicate leaf design create a natural and earthy look. This manicure is perfect for the fall season, adding a touch of nature to your style.
Consumables List
- Light brown polish: Zoya “Louise”
- Dark brown polish: Essie “Partner in Crime”
- Black polish for leaf design: OPI “Black Onyx”
- Nail art brush: KADS Professional Nail Art Brush Set
- Top coat: Essie Gel Setter
DIY Instructions
- Prepare: Clean and shape your nails, then apply a base coat.
- Base Color: Apply two coats of the light brown polish and let it dry completely.
- Leaf Design: Using the nail art brush, create a delicate leaf design with the black polish on an accent nail.
- Top Coat: Seal the design with a top coat to ensure it lasts and remains glossy.
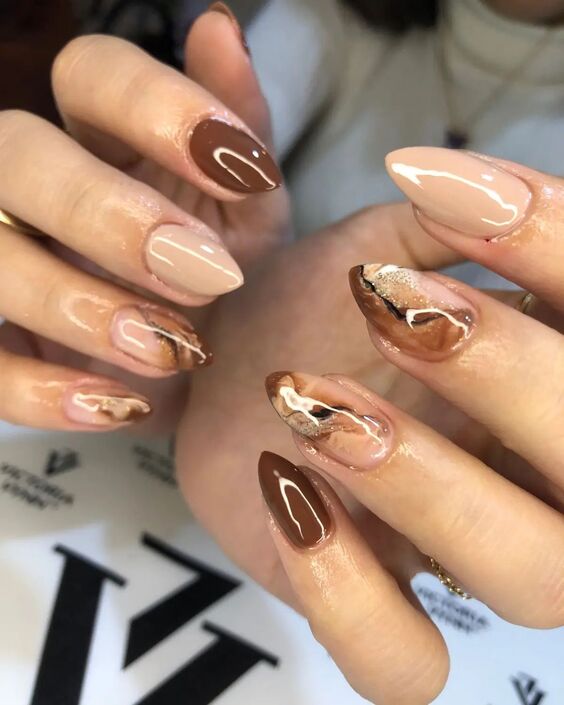
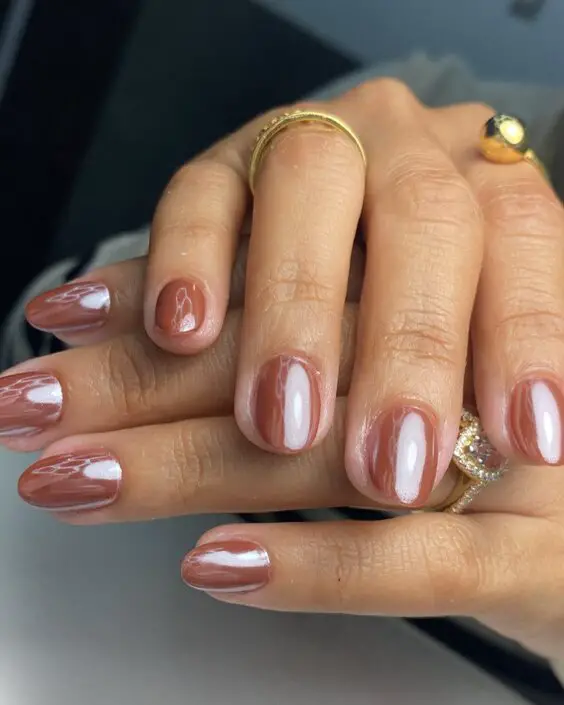
Marble Effect with Brown and Nude
The marble effect is a timeless and sophisticated design, and this brown color nails version is no exception. The mix of brown and nude shades creates a stunning marble look that is both elegant and trendy. This design is perfect for those who want a high-end, salon-quality manicure at home.
Consumables List
- Nude base polish: Essie “Ballet Slippers”
- Brown polish: Sally Hansen “Java”
- White polish for marble effect: China Glaze “Snow”
- Nail art brushes: Winstonia Nail Art Detailer Brush
- Top coat: Seche Vite Dry Fast Top Coat
DIY Instructions
- Prepare: Clean and shape your nails, then apply a base coat.
- Base Color: Apply two coats of the nude base polish and let it dry completely.
- Marble Effect: Use the nail art brushes to create a marble effect with the brown and white polishes. Swirl the colors together for a natural marble look.
- Top Coat: Seal the design with a top coat to ensure it lasts and remains glossy.
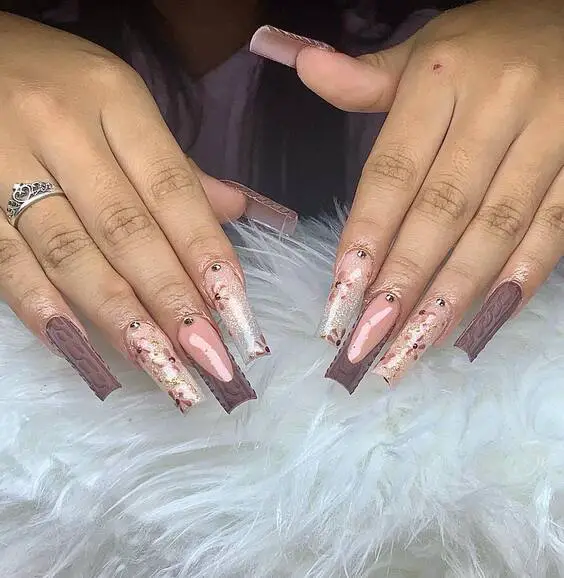
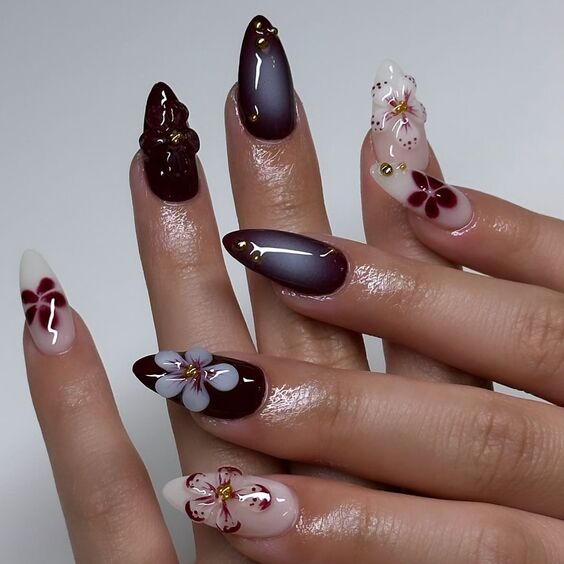
Romantic Embellished Brown
This design exudes a romantic aura with a mix of subtle pink and deep brown tones, highlighted by intricate embellishments and glitter. The vertical striping in deep brown sets a dramatic tone against the lighter background, while the crystals add a touch of elegance and luxury. It’s a sophisticated choice for special occasions or an evening out.
Consumables List
- Pink base polish: Essie “Ballet Slippers”
- Deep brown polish: OPI “Espresso Your Style”
- Glitter polish: China Glaze “Fairy Dust”
- Crystals and embellishments
- Nail glue: IBD 5 Second Nail Glue
- Top coat: Seche Vite Dry Fast Top Coat
DIY Instructions
- Base: Apply two coats of the pink base polish, letting each layer dry thoroughly.
- Striping: Use a thin brush to create vertical lines with the deep brown polish.
- Embellishments: Attach crystals along the line intersections using nail glue for a luxurious look.
- Glitter: Apply a coat of glitter polish for a sparkling finish.
- Seal the Design: Add a top coat to seal in your artwork and provide a lasting glossy finish.
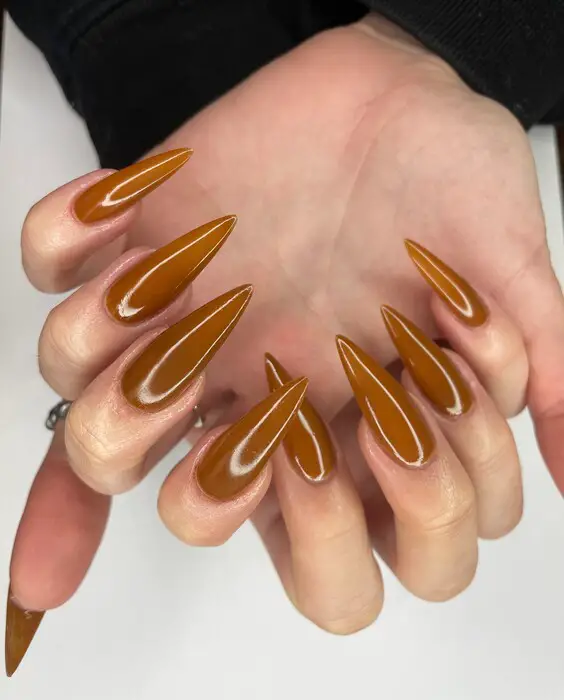
Sleek Chocolate Elegance
This look showcases a rich, glossy chocolate brown in a striking stiletto shape that’s both bold and elegant. The uniform color and high gloss give it a sleek, professional appearance, making it a versatile option that pairs well with any wardrobe choice.
Consumables List
- Chocolate brown polish: Sally Hansen “Brownstone”
- Base coat: OPI Natural Nail Base Coat
- Top coat: Sally Hansen Miracle Gel Top Coat
DIY Instructions
- Prepare: Clean and prep your nails with a base coat to protect them.
- Color Application: Apply two to three coats of the chocolate brown polish until you achieve full opacity.
- Finish: Add a high-gloss top coat to enhance the shine and prolong the durability of your manicure.
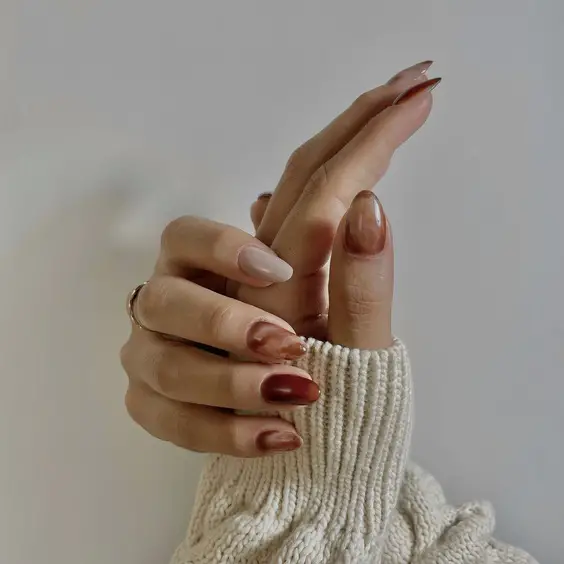
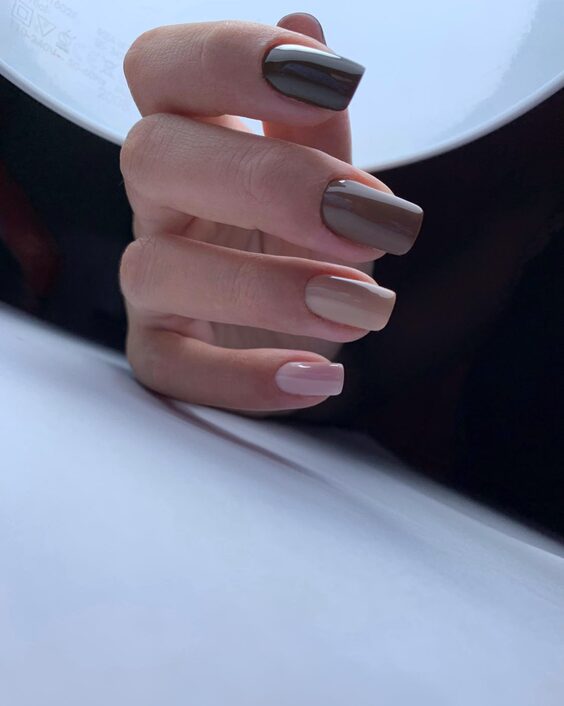
Subtle Brown Gradient
This manicure offers a subtle yet beautiful gradient from a light creamy nude to a soft brown, perfectly blending into each other for a refined look. The semi-matte finish provides a modern touch, ideal for both casual and formal settings.
Consumables List
- Light nude polish: Essie “Topless & Barefoot”
- Soft brown polish: OPI “Dulce de Leche”
- Matte top coat: Matte Look Top Coat
DIY Instructions
- Base: Start with a clean, dry nail and apply a base coat.
- Gradient Effect: Apply the light nude polish as the base color. While it’s still wet, blend in the soft brown polish at the tip using a sponge, creating a smooth gradient.
- Matte Finish: Once dry, apply a matte top coat to achieve a contemporary look.
Bold Floral and Gradient Design
This stunning design combines the depth of dark brown with a gradient effect, transitioning to a lighter shade. Each nail is adorned with intricate floral designs and small gold embellishments, creating a luxurious and detailed look. The mix of textures and colors makes this a standout manicure perfect for special occasions or when you want to make a statement.
Consumables List
- Dark brown polish: OPI “Lincoln Park After Dark”
- Light brown polish: Essie “Mink Muffs”
- White polish for floral design: OPI “Alpine Snow”
- Gold embellishments: Swarovski Nail Crystals
- Nail art brushes: Beetles Nail Art Brush Set
- Top coat: Essie Gel Setter
DIY Instructions
- Base: Start by applying a base coat to protect your nails.
- Gradient Effect: Apply the dark brown polish at the base and the light brown polish at the tips. Use a sponge to blend the colors smoothly.
- Floral Design: Using nail art brushes, create detailed floral designs on the nails with the white polish. Add gold embellishments to the center of the flowers.
- Top Coat: Apply a top coat to seal the design and ensure longevity.
Neutral Brown Palette
This manicure showcases a neutral palette of brown shades, perfect for those who prefer a more understated look. The square shape and glossy finish give it a polished and professional appearance, making it suitable for any occasion. The varying shades add depth and interest without being overly bold.
Consumables List
- Dark brown polish: Sally Hansen “Java”
- Medium brown polish: OPI “You Don’t Know Jacques”
- Light brown polish: Essie “Sand Tropez”
- Base coat: OPI Natural Nail Base Coat
- Top coat: Sally Hansen Miracle Gel Top Coat
DIY Instructions
- Prepare: Clean and shape your nails into a square shape, then apply a base coat.
- Color Application: Paint each nail a different shade of brown, using two coats for full coverage.
- Finish: Seal with a top coat to add shine and protect the manicure.
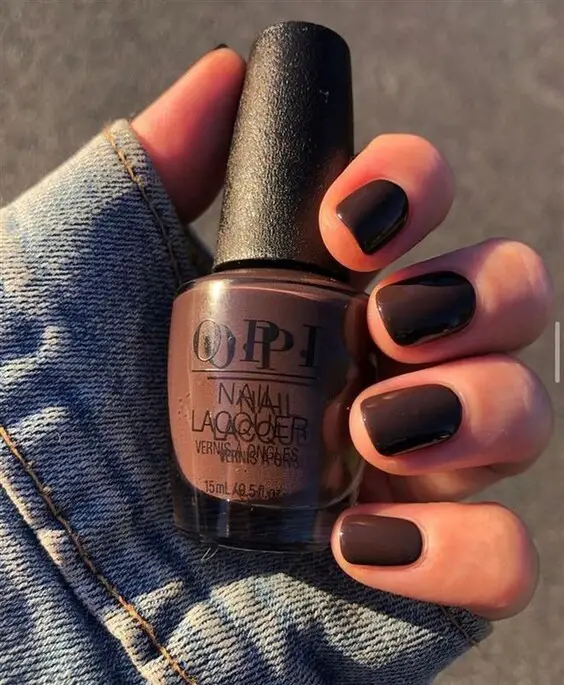
Rich Espresso Short Nails
This rich espresso-colored manicure features short, rounded nails with a high-gloss finish. The deep brown shade is both sophisticated and versatile, suitable for any season and occasion. The simplicity of the design lets the color stand out, making it a chic choice for a polished look.
Consumables List
- Espresso brown polish: OPI “Espresso Your Style”
- Base coat: OPI Natural Nail Base Coat
- Top coat: Seche Vite Dry Fast Top Coat
DIY Instructions
- Prepare: Clean and shape your nails, then apply a base coat.
- Color Application: Apply two coats of the espresso brown polish for full opacity.
- Finish: Apply a top coat to add a glossy finish and protect the manicure.
Elegant Brown Waves
This design features a mix of brown shades with elegant wave patterns. The combination of dark brown and soft pink creates a modern and stylish look. The wave patterns add a dynamic touch, making the nails appear longer and more refined. This design is perfect for those who want a sophisticated yet trendy manicure.
Consumables List
- Dark brown polish: Essie “Wicked”
- Soft pink polish: OPI “Bubble Bath”
- White polish for wave accents: OPI “Alpine Snow”
- Nail art brushes: Winstonia Nail Art Detailer Brush
- Top coat: Seche Vite Dry Fast Top Coat
DIY Instructions
- Preparation: Clean and shape your nails, then apply a base coat.
- Base Colors: Apply the dark brown polish on alternating nails and the soft pink polish on the remaining nails. Use two coats for full coverage.
- Wave Patterns: Using the white polish and a nail art brush, create wave patterns on the pink nails. Add additional brown accents as desired.
- Top Coat: Apply a top coat to seal the design and add a glossy finish.
Glossy Chocolate Almonds
This manicure showcases a glossy chocolate brown on almond-shaped nails. The rich, deep brown color is both elegant and versatile, making it suitable for various occasions. The almond shape elongates the fingers, while the glossy finish adds a touch of sophistication.
Consumables List
- Chocolate brown polish: Sally Hansen “Brownstone”
- Base coat: OPI Natural Nail Base Coat
- Top coat: Sally Hansen Miracle Gel Top Coat
DIY Instructions
- Prepare: Clean and shape your nails into an almond shape, then apply a base coat.
- Color Application: Apply two coats of the chocolate brown polish for full opacity.
- Finish: Apply a top coat to add shine and protect the manicure.
Classic Short Browns
This classic look features short, rounded nails painted in a rich brown hue. The simplicity of the design allows the deep brown color to shine, making it a timeless choice. The short length is practical for everyday wear, while the glossy finish adds a touch of elegance.
Consumables List
- Rich brown polish: OPI “Espresso Your Style”
- Base coat: Essie First Base Coat
- Top coat: Essie Gel Setter
DIY Instructions
- Prepare: Clean and shape your nails, then apply a base coat.
- Color Application: Apply two coats of the rich brown polish for full opacity.
- Finish: Seal with a top coat to add a glossy finish and ensure durability.
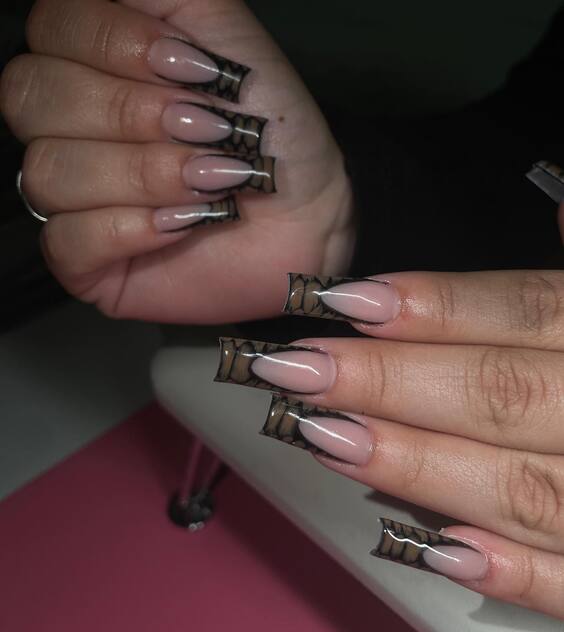
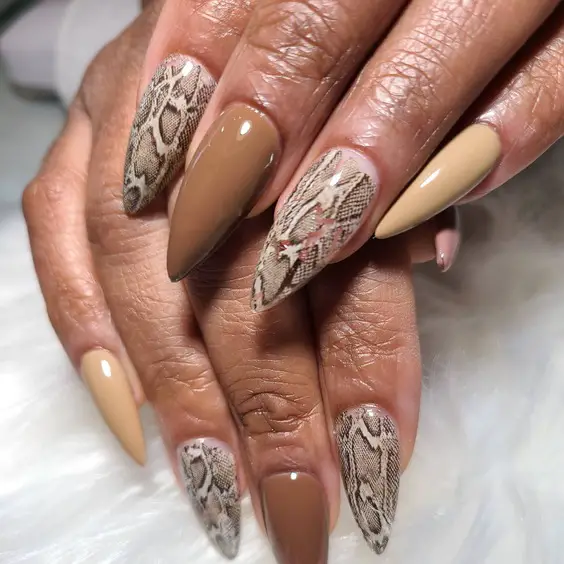
Snakeskin Accents with Earthy Browns
This nail design combines earthy brown tones with bold snakeskin accents. The mix of solid colors and intricate patterns creates a striking balance of sophistication and edge. The combination of almond and stiletto shapes adds a modern twist, making this a perfect choice for those who want to make a statement with their manicure.
Consumables List
- Light brown polish: Essie “Sand Tropez”
- Dark brown polish: OPI “Espresso Your Style”
- Snakeskin nail stickers or stamps
- Base coat: OPI Natural Nail Base Coat
- Top coat: Sally Hansen Miracle Gel Top Coat
DIY Instructions
- Prepare: Clean and shape your nails, then apply a base coat.
- Base Color: Apply the light brown polish on alternating nails and the dark brown polish on the remaining nails. Use two coats for full coverage.
- Snakeskin Design: Apply snakeskin nail stickers or use a stamping kit on the accent nails.
- Top Coat: Seal the design with a top coat to ensure longevity and add shine.
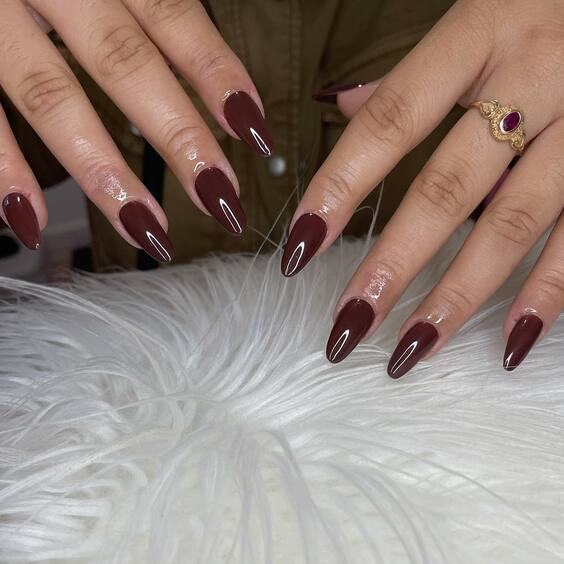
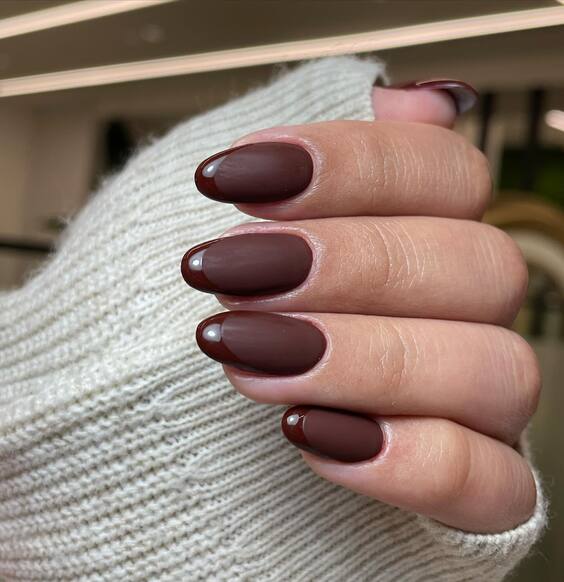
Deep Burgundy Elegance
This manicure features a deep burgundy color on almond-shaped nails, creating an elegant and timeless look. The rich, dark shade is perfect for the fall and winter seasons, adding a touch of sophistication to any outfit. The glossy finish enhances the luxurious appearance of this design.
Consumables List
- Burgundy polish: Essie “Bordeaux”
- Base coat: OPI Natural Nail Base Coat
- Top coat: Seche Vite Dry Fast Top Coat
DIY Instructions
- Prepare: Clean and shape your nails into an almond shape, then apply a base coat.
- Color Application: Apply two coats of the burgundy polish for full opacity.
- Finish: Apply a top coat to add a glossy finish and protect the manicure.
Gold-Leaf Accented Browns
This design pairs a soft nude base with rich brown tips, accented with gold leaf for a touch of luxury. The almond shape adds elegance, while the gold leaf provides a glamorous and artistic flair. This manicure is perfect for special occasions or when you want to add a bit of sparkle to your look.
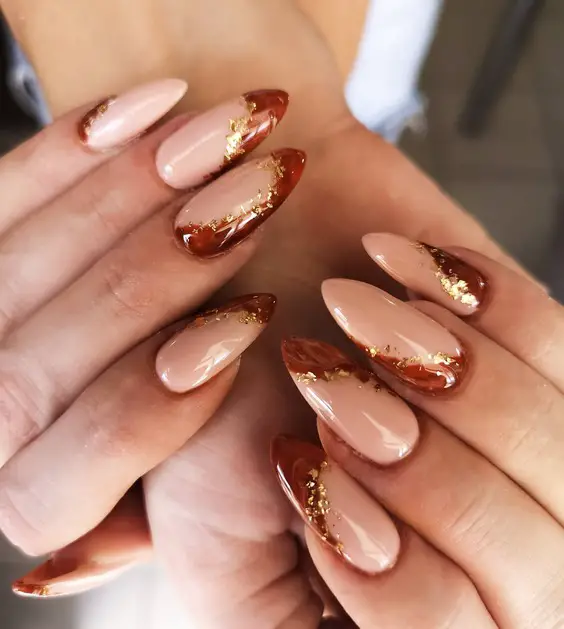
Consumables List
- Nude base polish: OPI “Bubble Bath”
- Brown polish: Essie “Mink Muffs”
- Gold leaf flakes
- Nail art tweezers: Beetles Nail Art Tweezers
- Top coat: CND Vinylux Weekly Top Coat
DIY Instructions
- Prepare: Clean and shape your nails into an almond shape, then apply a base coat.
- Base Color: Apply the nude base polish and let it dry completely.
- Brown Tips: Use the brown polish to create tips on each nail.
- Gold Leaf: Apply the gold leaf flakes to the brown tips using nail art tweezers while the polish is still tacky.
- Top Coat: Seal the design with a top coat to ensure it lasts and remains glossy.
Chic French Brown Tips
This chic design features a classic French manicure with a twist, using a rich brown color instead of the traditional white. The rounded tips add a soft and elegant touch, making this look both sophisticated and trendy. It’s a perfect choice for those who want a timeless design with a modern update.
Consumables List
- Base nude polish: OPI “Bubble Bath”
- Brown tip polish: Essie “Mink Muffs”
- Base coat: OPI Natural Nail Base Coat
- Top coat: Seche Vite Dry Fast Top Coat
DIY Instructions
- Preparation: Clean and shape your nails, then apply a base coat.
- Base Color: Apply two coats of the nude polish and let it dry completely.
- French Tips: Using the brown polish, paint the tips of your nails carefully to achieve a rounded French tip look.
- Top Coat: Apply a top coat to seal the design and add a glossy finish.
Shimmering Marble Brown
This shimmering marble design combines a rich brown base with delicate white marbling, creating a luxurious and eye-catching effect. The subtle shimmer adds depth and dimension, making this manicure perfect for both daytime and evening wear. It’s an elegant and refined look that is sure to turn heads.
Consumables List
- Brown shimmer polish: Zoya “Autumn”
- White polish for marbling: OPI “Alpine Snow”
- Nail art brushes: Winstonia Nail Art Detailer Brush
- Top coat: Essie Gel Setter
DIY Instructions
- Prepare: Clean and shape your nails, then apply a base coat.
- Base Color: Apply two coats of the brown shimmer polish and let it dry completely.
- Marble Effect: Using the nail art brush, create delicate white marbling patterns over the brown base.
- Top Coat: Seal the design with a top coat to ensure it lasts and remains glossy.
Conclusion
Brown color nails offer a world of possibilities for nail art enthusiasts. Their rich hues and adaptable nature make them suitable for any season, event, or personal style. From the luxurious shimmer of marbled designs to the sophisticated elegance of classic French tips, brown nails can be as understated or as bold as you like. With the detailed descriptions and DIY instructions provided, you can easily recreate these stunning looks at home. Embrace the elegance and versatility of brown color nails, and let your nails become a canvas for creativity and style.
