23 Stunning Nail Color Ideas for 2024: Tortoiseshell, Celestial, and Neon Designs
Nail art has evolved into a vibrant and creative form of self-expression, offering endless possibilities for every personality and occasion. From intricate designs to bold colors, the right nail art can complement your style and boost your confidence. In this article, we’ll explore a diverse range of stunning nail designs for 2024 that cater to different tastes and preferences. Whether you’re a fan of classic elegance, playful patterns, or modern twists, these ideas will inspire you to experiment with your nails and express your unique style.
Tortoiseshell and Black Elegance
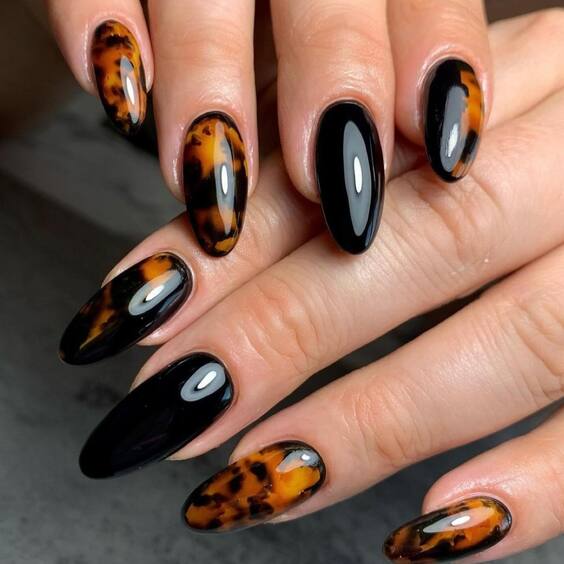
The tortoiseshell and black nail design is a timeless blend of elegance and trendiness. This manicure features a glossy black base on alternate nails, while the remaining nails are adorned with tortoiseshell patterns. The rich brown and amber hues of the tortoiseshell design create a stunning contrast against the deep black, resulting in a look that’s both sophisticated and eye-catching. The glossy finish enhances the overall appeal, making this design perfect for both casual and formal occasions.
Consumables List
- Black nail polish: OPI Black Onyx
- Tortoiseshell nail wraps: ManiMe Tortoiseshell Wraps
- Glossy top coat: Seche Vite Dry Fast Top Coat
- Base coat: Essie First Base
- Nail file and buffer: Tweezerman Neon Filemates
DIY Instructions
- Prep your nails by filing and buffing them into the desired shape. Apply a base coat to protect your nails.
- Apply two coats of black polish on alternate nails and let them dry completely.
- For the tortoiseshell effect, use nail wraps or polish. Apply according to the product instructions, ensuring a smooth finish.
- Seal the look with a glossy top coat to add shine and durability.
- Enjoy your chic and trendy nails, perfect for any occasion!
Celestial Chic with Gold and Teal
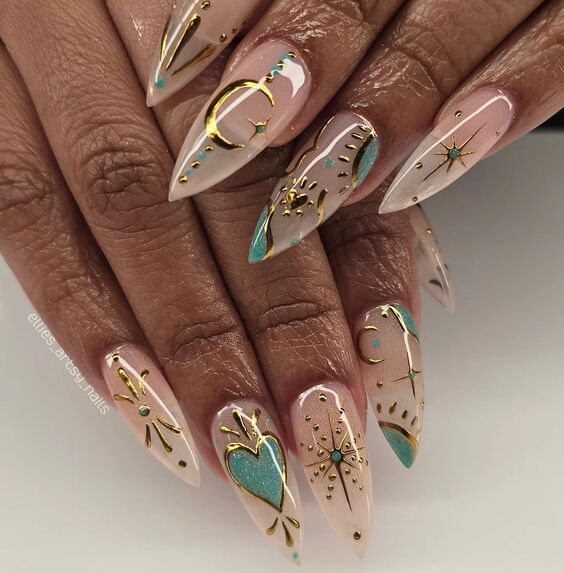
This celestial-themed nail design is a magical blend of delicate gold accents and pops of teal. The clear base provides a perfect canvas for intricate designs featuring moons, stars, and hearts, creating a whimsical and elegant look. The gold detailing adds a touch of luxury, while the teal elements bring a refreshing vibrancy. This design is versatile enough for both everyday wear and special events, making it a must-try for anyone looking to add a bit of sparkle to their nails.
Consumables List
- Clear nail polish: Essie Clear Top Coat
- Gold nail art foil or stickers: Born Pretty Gold Nail Stickers
- Teal nail polish: Sally Hansen Teal Good
- Nail art brushes: Beetles Nail Art Brush Set
- Glossy top coat: Sally Hansen Miracle Gel Top Coat
DIY Instructions
- Start with a clear base coat to protect your nails.
- Apply the gold foil or stickers in celestial patterns using nail art brushes for precision.
- Add teal accents with a fine nail art brush, creating hearts, stars, and other details.
- Seal with a glossy top coat to ensure the design lasts and shines.
- Admire your celestial nails, perfect for stargazers and dreamers alike!
Edgy Barbed Wire Design
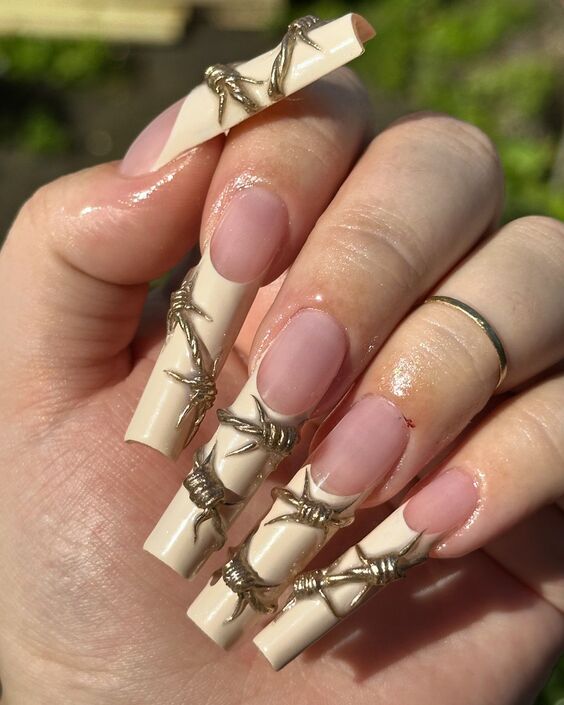
For those who love an edgy look, the barbed wire nail design is a bold statement. Featuring a nude base color with intricate metallic barbed wire details, this design is both daring and sophisticated. The contrast between the soft nude and the striking metallic elements creates a visually stunning effect. Perfect for anyone looking to add a bit of attitude to their style, this manicure is sure to turn heads.
Consumables List
- Nude nail polish: Essie Ballet Slippers
- Metallic nail art tape or wire: Amazon Metallic Nail Art Tape
- Nail scissors: Revlon Nail Scissors
- Nail glue: KDS Nail Tip Glue
- Glossy top coat: Essie Gel Setter Top Coat
DIY Instructions
- Prepare your nails by shaping and buffing them, then apply a base coat.
- Paint your nails with two coats of nude polish and let them dry completely.
- Cut the metallic tape or wire into small pieces to create the barbed wire effect.
- Carefully apply the metallic pieces to your nails using nail glue, arranging them to resemble barbed wire.
- Finish with a glossy top coat to secure the design and add shine.
- Show off your edgy nails and embrace your inner rock star!
Vivid Pink Glamour
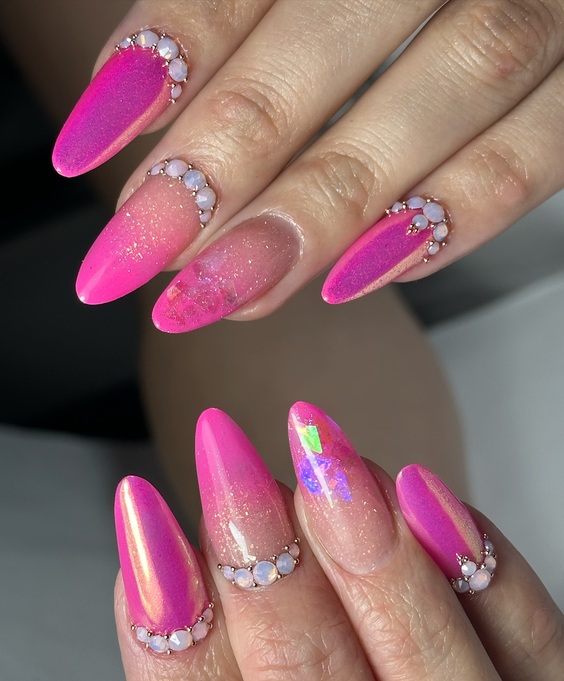
This vibrant pink nail design is a perfect choice for those who love to make a statement. The hot pink base is complemented by a glittery finish and accented with opalescent gems, creating a look that’s both fun and luxurious. The combination of solid color and sparkling details adds depth and dimension, making these nails ideal for both everyday glam and special occasions. The glossy finish enhances the vividness of the pink, ensuring your nails stand out.
Consumables List
- Hot pink nail polish: Essie Mod Square
- Glitter top coat: China Glaze Fairy Dust
- Opalescent gems: Kiss Gel Fantasy Nails
- Nail glue: Kiss Precision Nail Glue
- Glossy top coat: Seche Vite Dry Fast Top Coat
- Base coat: OPI Natural Nail Base Coat
DIY Instructions
- Start by prepping your nails with a base coat to protect them.
- Apply two coats of hot pink polish and let them dry completely.
- Add a layer of glitter top coat for extra sparkle.
- Carefully place the opalescent gems on your nails using nail glue, focusing on creating a balanced design.
- Seal with a glossy top coat to keep the gems in place and add shine.
- Enjoy your dazzling pink nails, perfect for adding a touch of glamour to any look!
Pastel Rainbow Hues
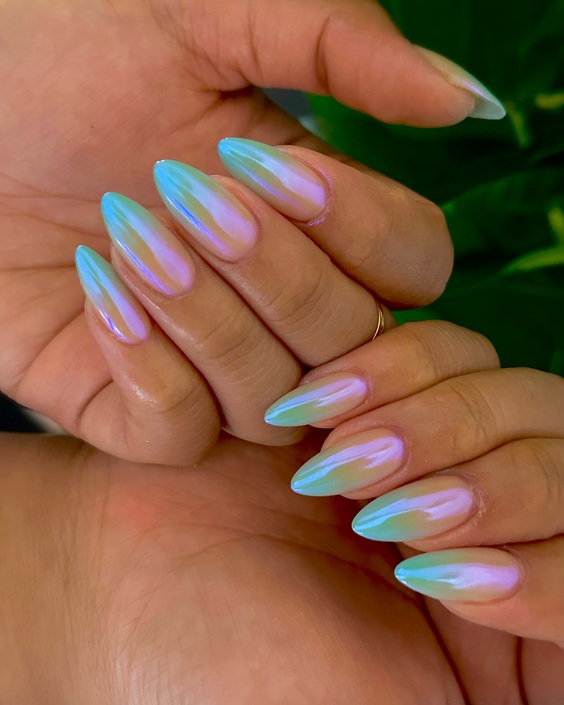
This pastel rainbow nail design is a dreamy and delicate look that’s perfect for any season. The soft gradients of pastel blue, pink, and green create a serene and ethereal effect. The smooth transitions between the colors give the nails a seamless and fluid appearance, making them look almost magical. This design is perfect for those who love a subtle yet eye-catching manicure.
Consumables List
- Pastel blue nail polish: Essie Bikini So Teeny
- Pastel pink nail polish: Zoya Dot
- Pastel green nail polish: OPI How Does Your Zen Garden Grow?
- Sponge for gradient effect: Beauty Blender Mini
- Glossy top coat: Sally Hansen Miracle Gel Top Coat
- Base coat: Essie First Base
DIY Instructions
- Apply a base coat to protect your nails.
- Paint a base layer of pastel blue on all nails and let it dry completely.
- Using a sponge, apply pink and green polishes to create a gradient effect. Dab gently to blend the colors seamlessly.
- Repeat the sponging until you achieve the desired intensity.
- Finish with a glossy top coat to smooth out the gradient and add shine.
- Admire your pastel rainbow nails, a perfect blend of subtlety and charm!
Deep Green Marble
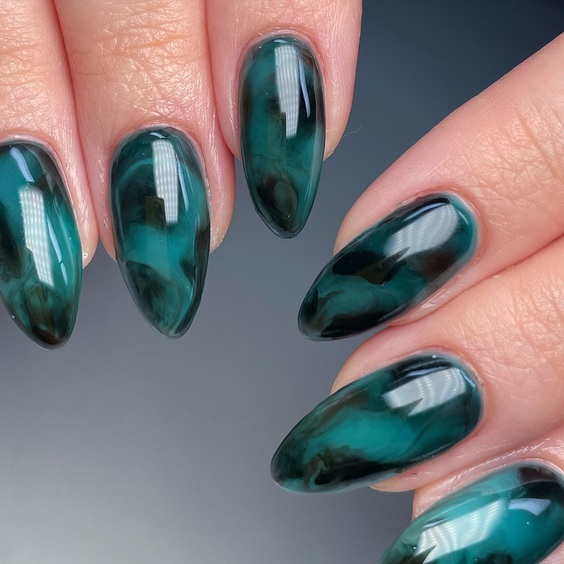
The deep green marble nail design is a sophisticated and luxurious choice. The dark green base with black marbling creates a rich and dramatic look. The glossy finish gives the nails a polished appearance, while the marble effect adds depth and texture. This design is perfect for those who prefer a more elegant and understated manicure with a touch of drama.
Consumables List
- Dark green nail polish: OPI Jade is the New Black
- Black nail polish: Essie Licorice
- Thin nail art brush: Beetles Nail Art Brush Set
- Glossy top coat: Seche Vite Dry Fast Top Coat
- Base coat: Orly Bonder Basecoat
DIY Instructions
- Prepare your nails by applying a base coat.
- Apply two coats of dark green polish and let them dry completely.
- Using a thin nail art brush, create marbling effects with black polish. Draw random lines and blend slightly for a natural look.
- Allow the design to dry, then seal with a glossy top coat.
- Enjoy your sophisticated green marble nails, perfect for adding a touch of elegance to any outfit!
Green and Gold Starry Tips
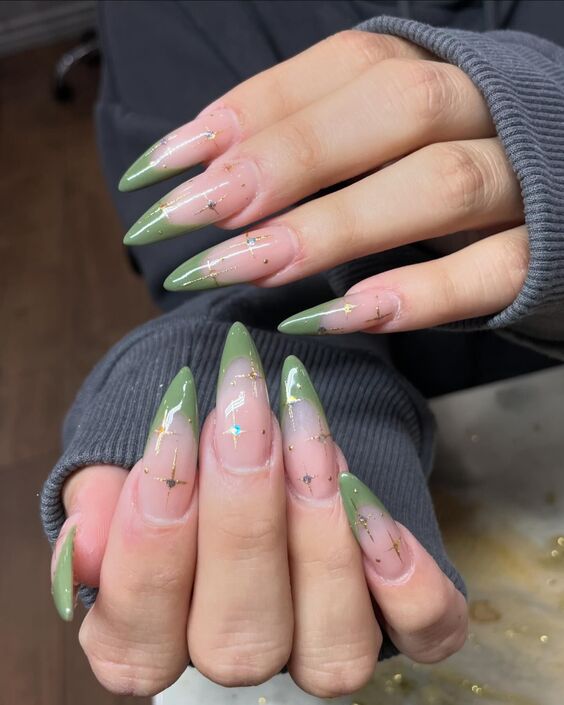
This green and gold starry nail design is a beautiful blend of elegance and subtlety. The nude base with green tips creates a modern French manicure twist, while the delicate gold star accents add a whimsical touch. The stars are strategically placed to catch the light, giving a sparkling effect. This design is perfect for those who love understated elegance with a hint of magic.
Consumables List
- Nude nail polish: Essie Ballet Slippers
- Green nail polish: OPI Suzi – The First Lady of Nails
- Gold star stickers: Born Pretty Gold Star Stickers
- Nail glue: Kiss Precision Nail Glue
- Glossy top coat: Seche Vite Dry Fast Top Coat
- Base coat: Orly Bonder Basecoat
DIY Instructions
- Apply a base coat to protect your nails.
- Paint the tips of your nails with green polish, creating a modern French manicure look.
- Place gold star stickers on the nude part of your nails, using nail glue for secure application.
- Seal with a glossy top coat to keep the stars in place and add shine.
- Enjoy your starry green nails, perfect for any season or occasion!
Vibrant Orange Flames
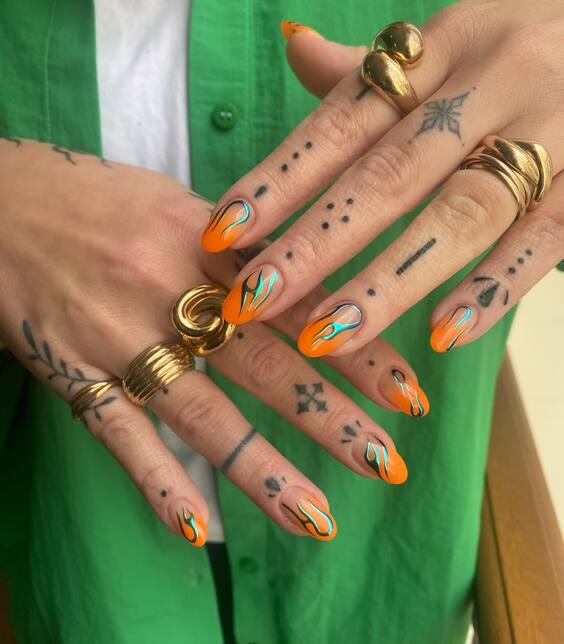
The vibrant orange flame nail design is bold and eye-catching, perfect for those who love to stand out. The bright orange base is accented with blue and white flame designs, creating a dynamic and edgy look. This design is great for showcasing your personality and adding a fun twist to your manicure. The contrast between the solid orange and the intricate flames makes this design pop.
Consumables List
- Bright orange nail polish: Essie Fear or Desire
- White nail polish: OPI Alpine Snow
- Blue nail polish: Essie Butler Please
- Thin nail art brush: Beetles Nail Art Brush Set
- Glossy top coat: Sally Hansen Miracle Gel Top Coat
- Base coat: Essie First Base
DIY Instructions
- Start with a base coat to protect your nails.
- Apply two coats of bright orange polish and let them dry completely.
- Use a thin nail art brush to paint flame designs with blue and white polishes, creating a striking contrast.
- Seal the design with a glossy top coat to add shine and durability.
- Show off your fiery nails, perfect for making a bold statement!
Classic Tortoiseshell
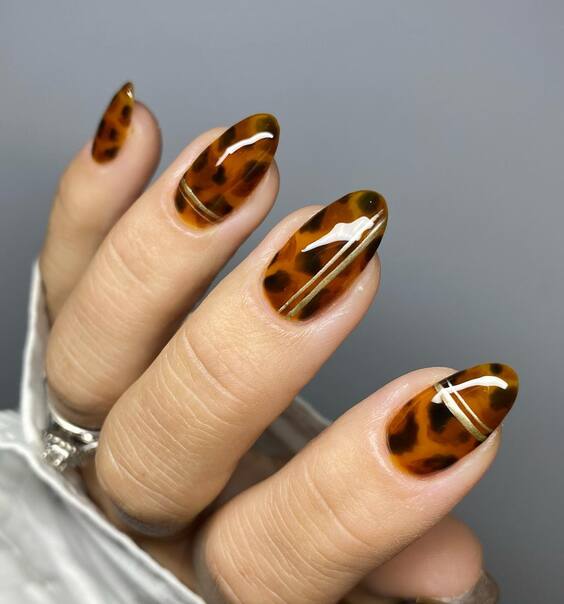
The classic tortoiseshell nail design is a timeless and elegant choice. The rich brown and amber hues create a sophisticated look that’s perfect for any occasion. The glossy finish enhances the depth and complexity of the tortoiseshell pattern, making these nails look polished and refined. This design is versatile and can easily complement various styles and outfits.
Consumables List
- Tortoiseshell nail polish: ManiMe Tortoiseshell Wraps
- Brown nail polish: Essie Partner in Crime
- Amber nail polish: OPI A Man-Darin is Hard to Find
- Nail file and buffer: Tweezerman Neon Filemates
- Glossy top coat: Seche Vite Dry Fast Top Coat
- Base coat: OPI Natural Nail Base Coat
DIY Instructions
- Prep your nails by filing and buffing them into the desired shape. Apply a base coat to protect your nails.
- Apply the tortoiseshell nail wraps according to the product instructions, ensuring a smooth finish.
- Enhance the look with brown and amber polishes, adding depth to the design.
- Seal with a glossy top coat to add shine and durability.
- Enjoy your elegant tortoiseshell nails, perfect for any occasion!
Oceanic Fantasy Nails
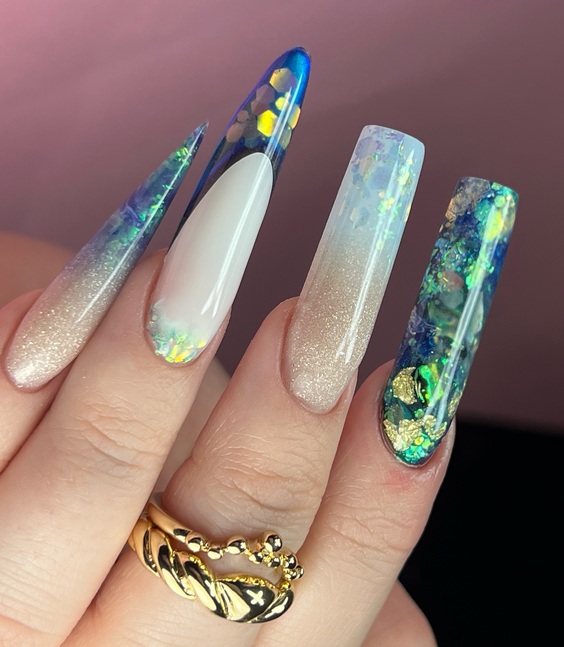
The oceanic fantasy nail design is a breathtaking blend of blues, greens, and iridescent flakes, creating a look that’s both enchanting and luxurious. The combination of solid blue and white bases with shimmering holographic accents mimics the mesmerizing depths of the ocean. The varying textures and layers add dimension, making these nails look dynamic and full of life. This design is perfect for those who love to stand out with a unique and glamorous manicure.
Consumables List
- Blue nail polish: Essie Aruba Blue
- White nail polish: OPI Alpine Snow
- Holographic flakes: Holo Taco Flakie Holo Taco
- Nail art brushes: Beetles Nail Art Brush Set
- Glossy top coat: Seche Vite Dry Fast Top Coat
- Base coat: Orly Bonder Basecoat
DIY Instructions
- Prep your nails by applying a base coat.
- Paint your nails with blue and white polishes on alternate nails and let them dry completely.
- Apply holographic flakes using nail art brushes to create an oceanic effect. Layer the flakes for added depth.
- Seal with a glossy top coat to lock in the design and add shine.
- Enjoy your oceanic fantasy nails, perfect for adding a touch of magic to any look!
Pink Ombre Delight
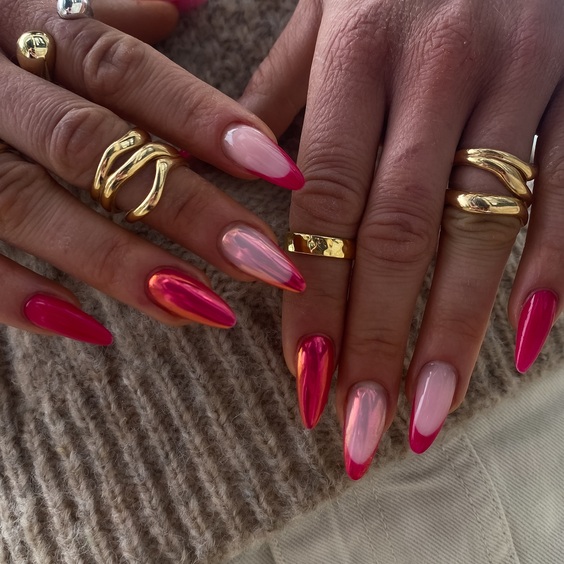
This pink ombre nail design is a delightful and feminine choice. The gradient from deep pink to light blush creates a soft and elegant look. The shiny finish enhances the ombre effect, making the transition between colors smooth and seamless. This design is versatile and can be worn for both casual and formal occasions, adding a touch of sweetness to your style.
Consumables List
- Deep pink nail polish: Essie Watermelon
- Blush pink nail polish: OPI Bubble Bath
- Ombre sponge: Beauty Blender Mini
- Glossy top coat: Sally Hansen Miracle Gel Top Coat
- Base coat: Essie First Base
DIY Instructions
- Apply a base coat to protect your nails.
- Paint a base layer of blush pink on all nails and let it dry completely.
- Using an ombre sponge, apply deep pink polish at the tips and blend towards the middle for a smooth gradient.
- Repeat the sponging until you achieve the desired intensity.
- Finish with a glossy top coat to smooth out the gradient and add shine.
- Admire your pink ombre nails, a perfect blend of elegance and charm!
Starry Night Elegance
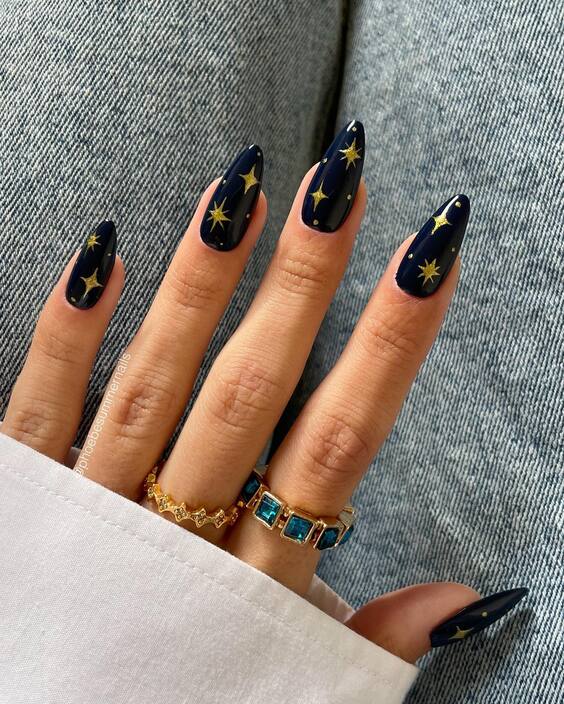
The starry night nail design is an elegant and timeless choice. The deep navy blue base with gold star accents creates a sophisticated look reminiscent of a clear night sky. The glossy finish adds depth and shine, making the stars appear to twinkle. This design is perfect for those who appreciate classic beauty with a touch of whimsy.
Consumables List
- Navy blue nail polish: Essie After School Boy Blazer
- Gold star stickers: Born Pretty Gold Star Stickers
- Nail glue: Kiss Precision Nail Glue
- Glossy top coat: Seche Vite Dry Fast Top Coat
- Base coat: OPI Natural Nail Base Coat
DIY Instructions
- Prepare your nails by applying a base coat.
- Apply two coats of navy blue polish and let them dry completely.
- Place gold star stickers on your nails using nail glue for secure application.
- Seal with a glossy top coat to keep the stars in place and add shine.
- Enjoy your starry night nails, perfect for any elegant occasion!
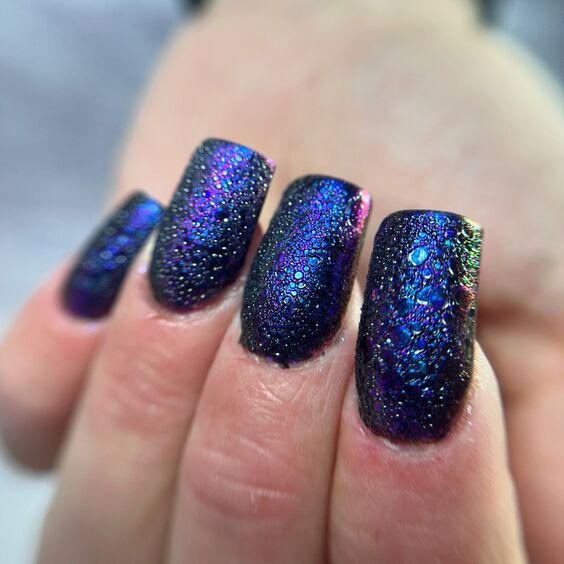
Galaxy Glitter Nails
The galaxy glitter nail design is an out-of-this-world choice for those who love a bit of sparkle. The deep black base is covered in multicolored glitter, creating a look that mimics the night sky filled with stars. The texture and shine of the glitter add a captivating dimension to the nails, making them perfect for parties or special events. This design is bold and eye-catching, ideal for anyone looking to make a statement.
Consumables List
- Black nail polish: Essie Licorice
- Multicolored glitter polish: ILNP Mega (S)
- Glossy top coat: Seche Vite Dry Fast Top Coat
- Base coat: OPI Natural Nail Base Coat
- Nail file and buffer: Tweezerman Neon Filemates
DIY Instructions
- Prep your nails by filing and buffing them into the desired shape. Apply a base coat to protect your nails.
- Apply two coats of black polish and let them dry completely.
- Add the multicolored glitter polish over the black base, ensuring even coverage.
- Seal with a glossy top coat to add shine and durability.
- Enjoy your galaxy glitter nails, perfect for shining bright at any event!
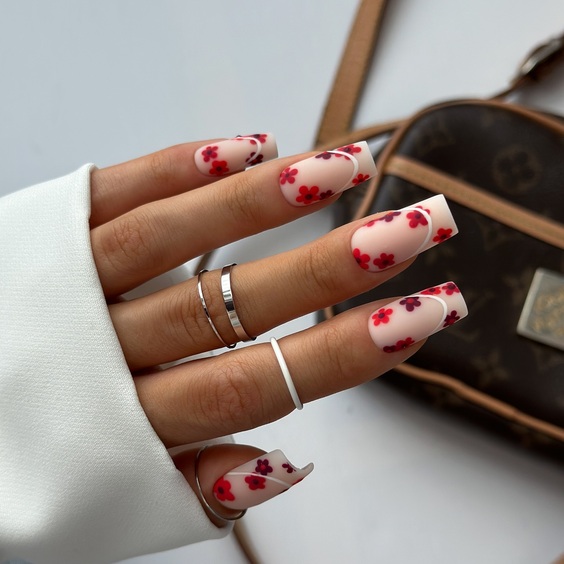
Floral French Manicure
This floral French manicure is a fresh and charming take on the classic French tips. The nude base with white tips is adorned with small red flowers, creating a look that’s both elegant and playful. The floral accents add a touch of whimsy, making this design perfect for spring and summer. It’s a great choice for those who want a simple yet beautiful manicure.
Consumables List
- Nude nail polish: Essie Ballet Slippers
- White nail polish: OPI Alpine Snow
- Red nail polish: Essie A-List
- Dotting tool: Beetles Nail Art Tools
- Glossy top coat: Sally Hansen Miracle Gel Top Coat
- Base coat: Orly Bonder Basecoat
DIY Instructions
- Apply a base coat to protect your nails.
- Paint the tips of your nails white to create a French manicure look.
- Using a dotting tool, create small red flowers on the nude part of your nails.
- Seal with a glossy top coat to ensure the design lasts and shines.
- Enjoy your floral French manicure, perfect for adding a touch of nature to your style!
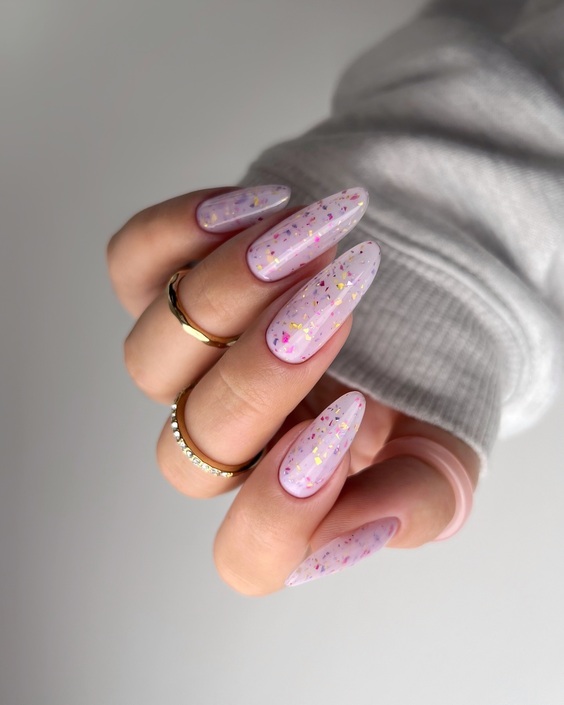
Lavender Confetti Nails
The lavender confetti nail design is a fun and festive choice. The soft lavender base is sprinkled with multicolored confetti, creating a playful and cheerful look. The combination of pastel and bright colors makes this design perfect for parties and celebrations. The glossy finish adds a polished touch, ensuring your nails look neat and vibrant.
Consumables List
- Lavender nail polish: Essie Lilacism
- Confetti top coat: China Glaze Techno
- Glossy top coat: Seche Vite Dry Fast Top Coat
- Base coat: Essie First Base
- Nail file and buffer: Tweezerman Neon Filemates
DIY Instructions
- Prep your nails by filing and buffing them into the desired shape. Apply a base coat to protect your nails.
- Apply two coats of lavender polish and let them dry completely.
- Add a layer of confetti top coat to achieve the festive look.
- Seal with a glossy top coat to keep the confetti in place and add shine.
- Admire your lavender confetti nails, perfect for any celebration!
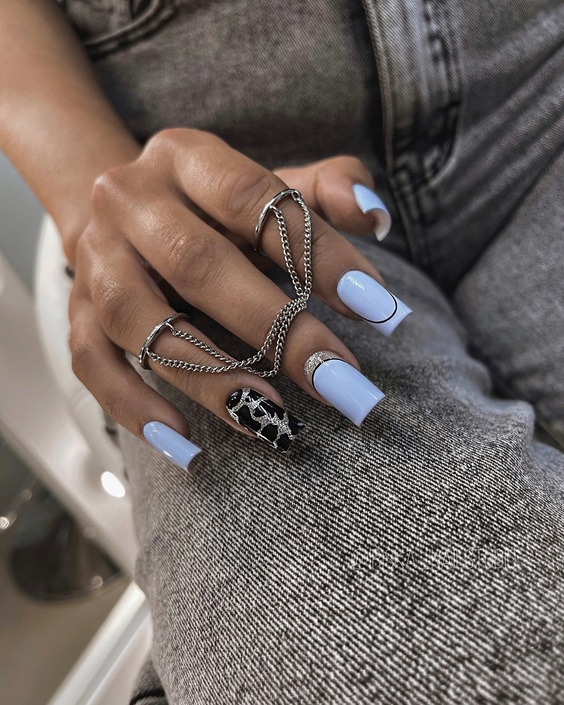
Sky Blue and Black Contrast Nails
This sky blue and black contrast nail design is modern and edgy, perfect for those who love to experiment with bold colors. The light blue nails are accented with a unique black pattern on one nail, creating a striking contrast. The design also includes a subtle silver curve on one nail, adding a touch of elegance. This look is versatile and can be worn both casually and formally.
Consumables List
- Sky blue nail polish: Essie Bikini So Teeny
- Black nail polish: OPI Black Onyx
- Silver nail tape: Born Pretty Silver Nail Tape
- Nail art brush: Beetles Nail Art Brush Set
- Glossy top coat: Seche Vite Dry Fast Top Coat
- Base coat: Orly Bonder Basecoat
DIY Instructions
- Apply a base coat to protect your nails.
- Paint your nails with sky blue polish and let them dry completely.
- Using a nail art brush, create a black pattern on one nail for contrast.
- Add a silver curve on another nail using silver nail tape.
- Seal with a glossy top coat to add shine and durability.
- Show off your chic blue and black nails, perfect for any occasion!
Blue Floral French Tips
The blue floral French tip design is a delicate and charming choice. The white base with blue and green floral accents creates a fresh and elegant look. The flowers are strategically placed to enhance the French tip style, adding a touch of nature and whimsy. This design is perfect for spring and summer, providing a subtle yet beautiful manicure.
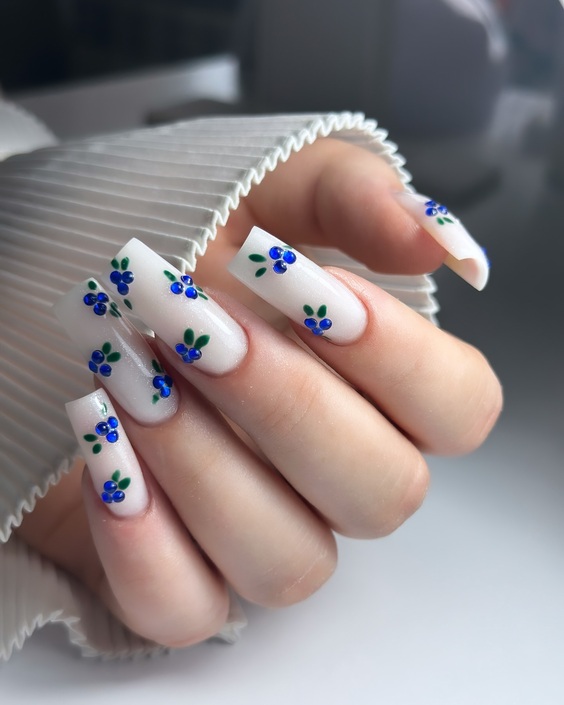
Consumables List
- White nail polish: OPI Alpine Snow
- Blue nail polish: Essie Butler Please
- Green nail polish: OPI Green Come True
- Dotting tool: Beetles Nail Art Tools
- Glossy top coat: Sally Hansen Miracle Gel Top Coat
- Base coat: Essie First Base
DIY Instructions
- Apply a base coat to protect your nails.
- Paint the tips of your nails white to create a French manicure look.
- Using a dotting tool, create small blue flowers and green leaves on the tips.
- Seal with a glossy top coat to ensure the design lasts and shines.
- Enjoy your floral French tips, perfect for a fresh and elegant look!
Glittering Pink Ombre
The glittering pink ombre nail design is a stunning and glamorous choice. The gradient from soft pink to glittery tips creates a beautiful ombre effect. The added glitter provides a sparkling finish, making these nails perfect for special occasions. This design combines elegance with a touch of fun, making it versatile for various settings.
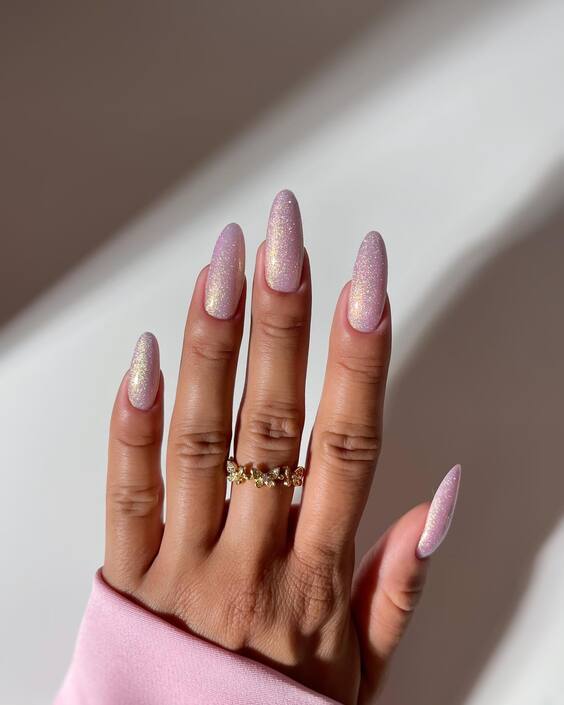
Consumables List
- Soft pink nail polish: Essie Ballet Slippers
- Pink glitter polish: China Glaze Fairy Dust
- Ombre sponge: Beauty Blender Mini
- Glossy top coat: Seche Vite Dry Fast Top Coat
- Base coat: Orly Bonder Basecoat
DIY Instructions
- Apply a base coat to protect your nails.
- Paint a base layer of soft pink on all nails and let it dry completely.
- Using an ombre sponge, apply pink glitter polish at the tips and blend towards the middle for a smooth gradient.
- Finish with a glossy top coat to smooth out the gradient and add shine.
- Admire your glittering pink ombre nails, perfect for any special occasion!
Sunny Daisy Nails
The sunny daisy nail design is a cheerful and vibrant choice perfect for the warmer months. The bright yellow polish is accented with delicate white daisy designs on a couple of nails, creating a fresh and playful look. The daisies add a touch of nature and whimsy, making these nails perfect for outdoor events and casual gatherings. The glossy finish enhances the bright colors, making your nails look lively and polished.
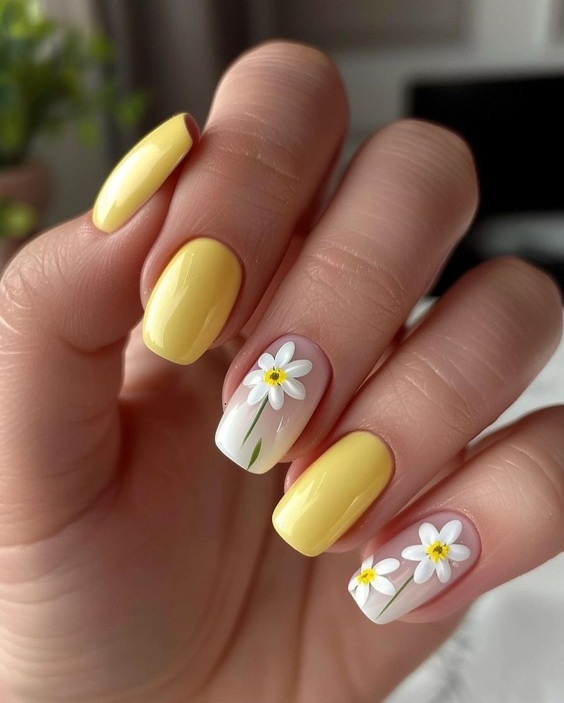
Consumables List
- Yellow nail polish: OPI Sun, Sea, and Sand in My Pants
- White nail polish: Essie Blanc
- Green nail polish: OPI Green Come True
- Dotting tool: Beetles Nail Art Tools
- Glossy top coat: Seche Vite Dry Fast Top Coat
- Base coat: Essie First Base
DIY Instructions
- Apply a base coat to protect your nails.
- Paint your nails with yellow polish and let them dry completely.
- Using a dotting tool, create white daisies on a couple of nails, adding green stems and centers for detail.
- Seal with a glossy top coat to ensure the design lasts and shines.
- Enjoy your sunny daisy nails, perfect for adding a touch of brightness to your style!
Lilac Love Nails
The lilac love nail design is a soft and romantic choice. The pastel lilac base is decorated with delicate white heart outlines, creating a look that’s both sweet and sophisticated. The subtle shimmer in the polish adds a touch of elegance, making these nails perfect for both everyday wear and special occasions. The glossy finish enhances the pastel color, giving your nails a smooth and polished appearance.
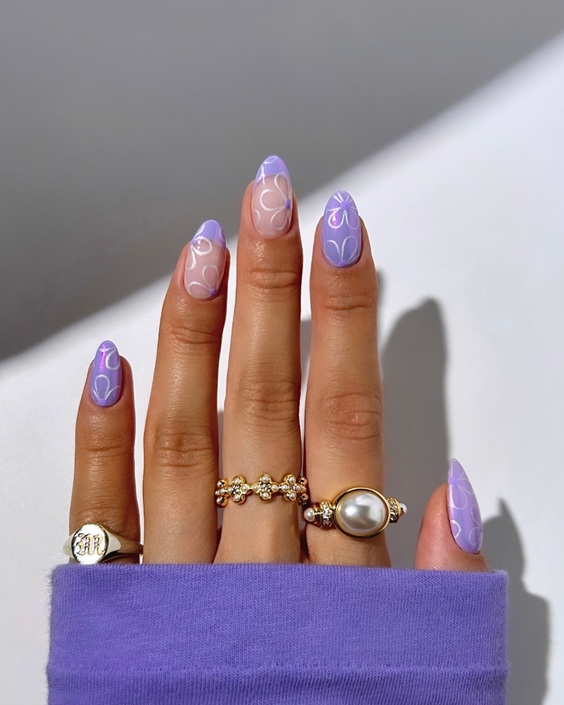
Consumables List
- Lilac nail polish: Essie Lilacism
- White nail polish: OPI Alpine Snow
- Fine nail art brush: Beetles Nail Art Brush Set
- Glossy top coat: Sally Hansen Miracle Gel Top Coat
- Base coat: Orly Bonder Basecoat
DIY Instructions
- Apply a base coat to protect your nails.
- Paint your nails with lilac polish and let them dry completely.
- Using a fine nail art brush, draw delicate white heart outlines on each nail.
- Seal with a glossy top coat to ensure the design lasts and shines.
- Enjoy your lilac love nails, perfect for a touch of romance in your look!
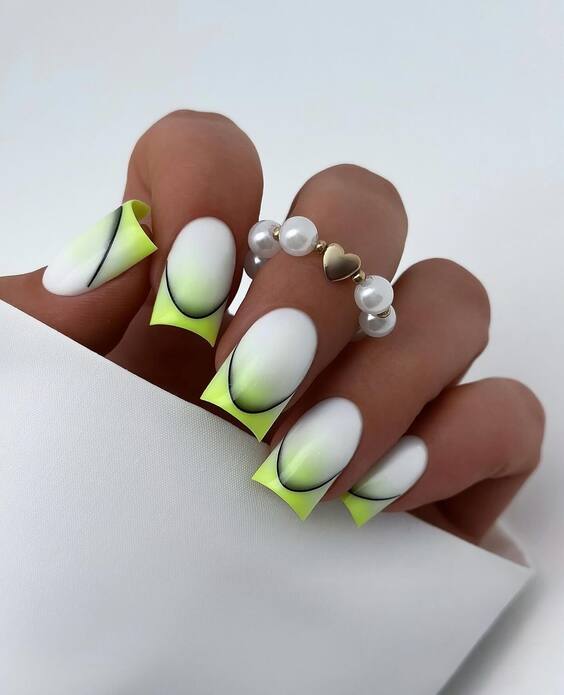
Neon Geometric Nails
The neon geometric nail design is a bold and modern choice. The white base with neon yellow geometric shapes creates a striking contrast that is sure to turn heads. The addition of black lines adds definition and depth to the design, making it stand out even more. This look is perfect for those who love to make a statement with their nails.
Consumables List
- White nail polish: OPI Alpine Snow
- Neon yellow nail polish: China Glaze Celtic Sun
- Black nail polish: Essie Licorice
- Fine nail art brush: Beetles Nail Art Brush Set
- Glossy top coat: Seche Vite Dry Fast Top Coat
- Base coat: Orly Bonder Basecoat
DIY Instructions
- Apply a base coat to protect your nails.
- Paint your nails with white polish and let them dry completely.
- Using a fine nail art brush, draw neon yellow geometric shapes on each nail.
- Add black lines to define the shapes and add depth.
- Seal with a glossy top coat to ensure the design lasts and shines.
- Show off your neon geometric nails, perfect for a bold and modern look!
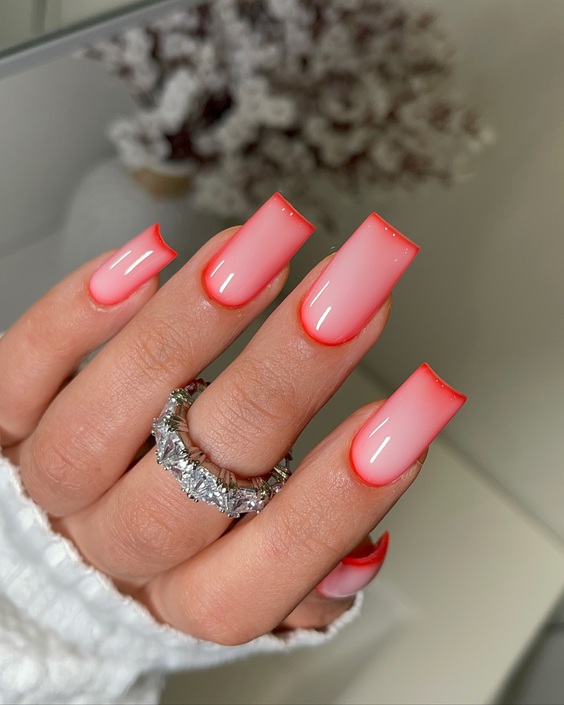
Coral French Tips
The coral French tips nail design is a vibrant and modern twist on the classic French manicure. The soft pink base transitions into a striking coral tip, creating a beautiful ombre effect. This look is perfect for those who want to add a pop of color while maintaining a sophisticated style. The glossy finish enhances the smooth gradient, making these nails look polished and professional.
Consumables List
- Soft pink nail polish: Essie Ballet Slippers
- Coral nail polish: OPI Aloha from OPI
- Ombre sponge: Beauty Blender Mini
- Glossy top coat: Seche Vite Dry Fast Top Coat
- Base coat: Orly Bonder Basecoat
DIY Instructions
- Apply a base coat to protect your nails.
- Paint a base layer of soft pink on all nails and let it dry completely.
- Using an ombre sponge, apply coral polish to the tips and blend towards the middle for a smooth gradient.
- Finish with a glossy top coat to smooth out the gradient and add shine.
- Admire your coral French tips, perfect for a vibrant yet elegant look!
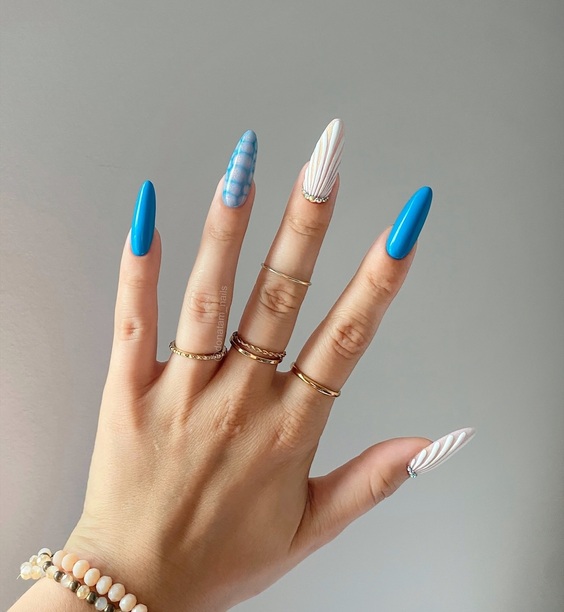
Blue and White Mix
The blue and white mix nail design is a playful and unique choice. The combination of solid blue, blue plaid, and white with colorful swirls creates a dynamic and eye-catching look. This design is perfect for those who love to experiment with different patterns and colors. The glossy finish ties the different elements together, making the nails look cohesive and stylish.
Consumables List
- Solid blue nail polish: Essie Butler Please
- White nail polish: OPI Alpine Snow
- Blue plaid nail polish: Essie Baguette Me Not
- Nail art brushes: Beetles Nail Art Brush Set
- Glossy top coat: Sally Hansen Miracle Gel Top Coat
- Base coat: Essie First Base
DIY Instructions
- Apply a base coat to protect your nails.
- Paint alternate nails with solid blue and white polish, letting them dry completely.
- Using nail art brushes, create blue plaid patterns on some nails and colorful swirls on others.
- Seal with a glossy top coat to add shine and durability.
- Show off your blue and white mix nails, perfect for a fun and creative look!
Conclusion
These beautiful and innovative nail designs are perfect for showcasing your personal style and creativity. Whether you prefer the timeless elegance of tortoiseshell, the whimsical charm of celestial patterns, or the bold statement of neon geometric shapes, there’s a nail art design here for everyone. With detailed instructions and a list of consumables, you can easily recreate these looks at home. So, grab your nail polish and tools, and let your nails be the canvas for your next artistic masterpiece. Happy nail painting!

