19 Top Fall Beach Nail Designs to Try: Seasonal Trends for Your Nails
Ethereal Mermaid
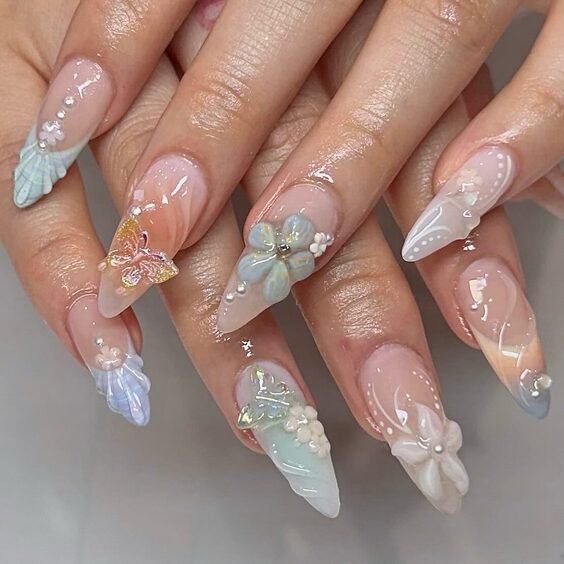
The Ethereal Mermaid design captures the essence of a mystical beach encounter. Featuring a dreamy pastel palette with iridescent shells and delicate pearl embellishments, these nails blend soft peach and pale blue hues seamlessly. Subtle glitter highlights mimic the shimmering seaside, making each nail look like a precious underwater gem.
Consumables List
- Base Coat: Zoya Anchor Base Coat
- Polishes:
- Peach: Essie “Peach Side Babe”
- Pale Blue: OPI “It’s a Boy”
- Iridescent Glitter: ILNP “Fame”
- Embellishments:
- Miniature Shells
- Micro Pearls
- Top Coat: Essie Gel Setter
Recommendations: The use of iridescent glitter under a glossy top coat will enhance the ethereal quality. Apply pearls and shells with nail glue for durability.
DIY Instructions
- Apply a base coat to protect the nails.
- Layer peach and pale blue polishes in a gradient fashion.
- Add a thin layer of iridescent glitter over the gradient.
- Decorate with shells and pearls at the cuticle or tips.
- Seal with a gel setter top coat for a smooth finish.
Coastal Sunrise
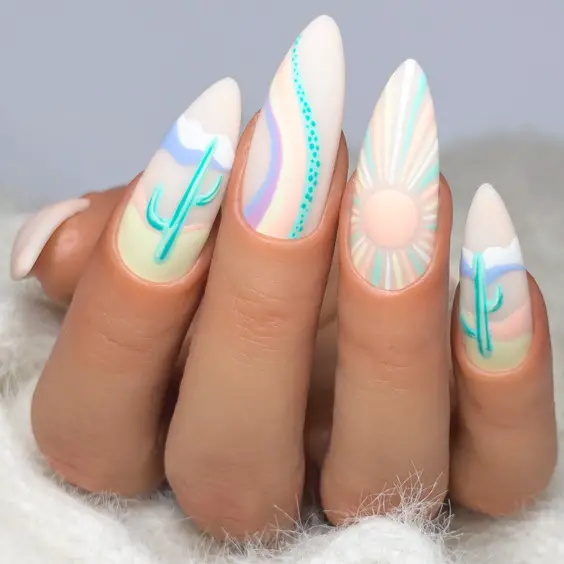
Coastal Sunrise nails are inspired by the serene moments of a sunrise at the beach. This design utilizes soft gradient techniques, featuring coral and sandy hues that transition into a pale, sky blue. Delicate wave-like patterns in white and a hint of gold foil capture the first light reflecting off gentle morning waves.
Consumables List
- Base Coat: Deborah Lippmann Base Coat
- Polishes:
- Coral: China Glaze “Flip Flop Fantasy”
- Sand: Sally Hansen “Camelflage”
- Sky Blue: Essie “Bikini So Teeny”
- White for Waves: OPI “Alpine Snow”
- Gold Foil
- Top Coat: Revlon Quick Dry Top Coat
Recommendations: For the gradient, use a makeup sponge for best blending results. The gold foil should be applied sparingly to mimic the sparkle of sunlight.
DIY Instructions
- Start with a protective base coat.
- Sponge on the gradient starting with coral at the base, followed by sand and then blue.
- Draw subtle wave patterns using white polish.
- Apply bits of gold foil over the waves for a shimmering effect.
- Finish with a quick-dry top coat for lasting shine and protection.
Fruity Delight
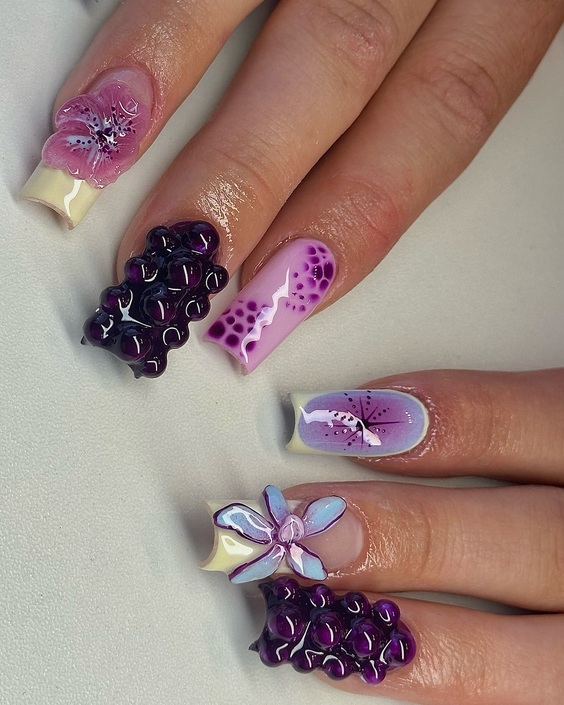
Fruity Delight nails bring a playful and vibrant twist to fall beach aesthetics. These nails boast rich plum and berry shades, contrasted with a creamy lavender and adorned with 3D fruit designs such as grapes and blackberries. The glossy finish enhances the juicy appearance of the fruit motifs, making this design not only fun but also strikingly unique.
Consumables List
- Base Coat: OPI Natural Nail Base Coat
- Polishes:
- Plum: Essie “Bahama Mama”
- Berry: OPI “Miami Beet”
- Lavender: Zoya “Heather”
- 3D Fruit Nail Art
- Top Coat: Sally Hansen Insta-Dri Top Coat
Recommendations: The 3D fruit designs should be crafted using polymer clay or purchased as ready-made nail art. Apply a thick top coat to secure and highlight the textures.
DIY Instructions
- Apply a base coat to each nail.
- Paint the base colors in plum, berry, and lavender.
- Attach the 3D fruit designs while the polish is tacky.
- Seal with a heavy-duty top coat to ensure the fruit designs are well-protected and prominent.
Vibrant Tropical Fusion
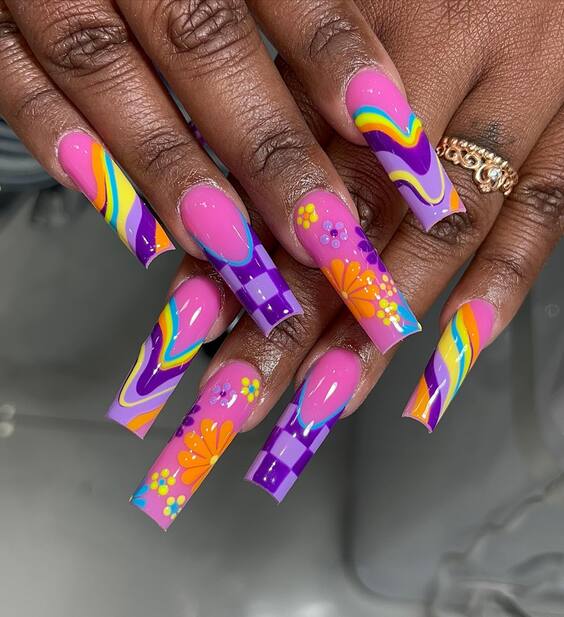
The Vibrant Tropical Fusion nails burst with lively colors and intricate patterns reminiscent of tropical flora. Featuring a bold pink base, the design is elevated with neon stripes, floral accents, and playful dots. This set uses a blend of purple, yellow, and orange to create a captivating visual flow that energizes and excites—a perfect match for a fall beach vibe with a tropical twist.
Consumables List
- Base Coat: OPI Natural Base
- Polishes:
- Pink Base: Essie “Mod Square”
- Neon Stripes: China Glaze “Turned Up Turquoise” and “Highlight of My Summer”
- Orange, Yellow Accents: OPI “Exotic Birds Do Not Tweet” and “No Tan Lines”
- Dotting Tools
- Top Coat: OPI Top Coat
Recommendations: Precision in placement of the floral and dot accents is key. Using a dotting tool, add small dots of contrasting colors to enhance the tropical theme. These polishes are chosen for their vibrancy and longevity.
DIY Instructions
- Prep your nails with a base coat to ensure polish adherence.
- Apply two coats of the pink base color.
- Once dry, use thin brushes to add neon stripes and floral patterns.
- Add dots strategically to fill gaps and enhance the overall design.
- Finish with a clear top coat to seal and add gloss.
Seashell Elegance
Seashell Elegance nails capture the delicate beauty of the beach with a sophisticated palette. This design features soft blue and sandy tones accented with actual tiny seashell and pearl embellishments, giving it a three-dimensional look that mimics the treasures of the sea. The gentle gradient mimics the ocean’s horizon, while gold accents add a touch of luxury.
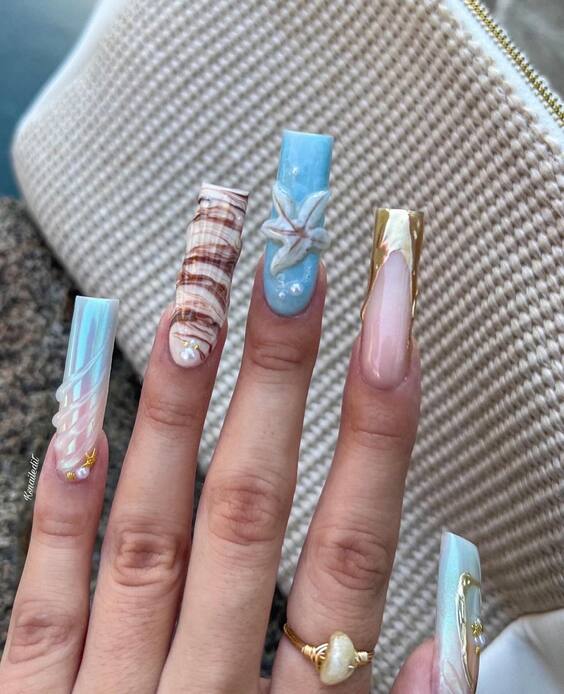
Consumables List
- Base Coat: Butter London Nail Foundation
- Polishes:
- Soft Blue: Essie “Bikini So Teeny”
- Sandy Gradient: Sally Hansen “Bare It All”
- Gold Accents: Revlon “Gold Coin”
- Embellishments:
- Mini Seashells
- Tiny Pearls
- Top Coat: Essie Gel Setter
Recommendations: For a seamless gradient, use a sponge to softly dab and blend the transition between colors. Attach embellishments with nail glue for a secure hold.
DIY Instructions
- Begin with a base coat to protect your nails.
- Apply the soft blue polish as a base, and then create a gradient with the sandy polish.
- Carefully place seashells and pearls using tweezers and a dot of nail glue.
- Accentuate with gold polish for an elegant finish.
- Apply a gel top coat for a smooth, lasting finish.
Oceanic Swirls
Oceanic Swirls is a design that evokes the mesmerizing patterns of ocean waves. Featuring a white and blue marbled effect, this look uses water-marbling techniques to mimic the natural swirls of sea foam and tide pools. Subtle touches of clear polish give it a glass-like finish, enhancing the depth and fluidity of the patterns.
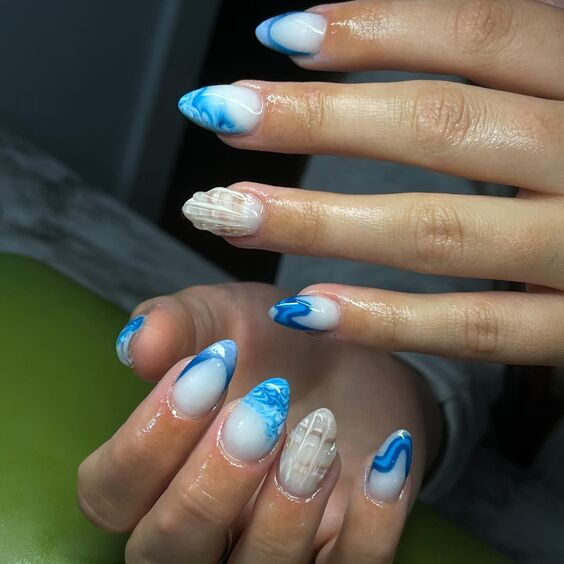
Consumables List
- Base Coat: Deborah Lippmann Hard Rock
- Polishes:
- White Base: OPI “Alpine Snow”
- Blue Marbling: Zoya “Blu” and “Yummy”
- Top Coat: Deborah Lippmann Gel Lab Pro
Recommendations: Water-marbling can be tricky, so practice on a disposable surface first. Use room temperature water for best results.
DIY Instructions
- Apply a base coat to prevent staining and improve polish adhesion.
- Paint nails with a white base coat.
- Drip blue polishes into a cup of water and swirl gently with a toothpick.
- Dip your nails into the design, one at a time, then clean up the edges.
- Finish with a gel-like top coat for a glossy, durable finish.
Seashore Treasures
Seashore Treasures nails artfully combine the natural beauty of the ocean’s gifts with intricate craftsmanship. These nails feature real seashell and starfish embellishments embedded in a clear acrylic, complemented by golden swirls that mimic the undulating waves. The nails’ soft, muted background of seafoam green and sandy beige provides a perfect canvas for the oceanic elements to shine.
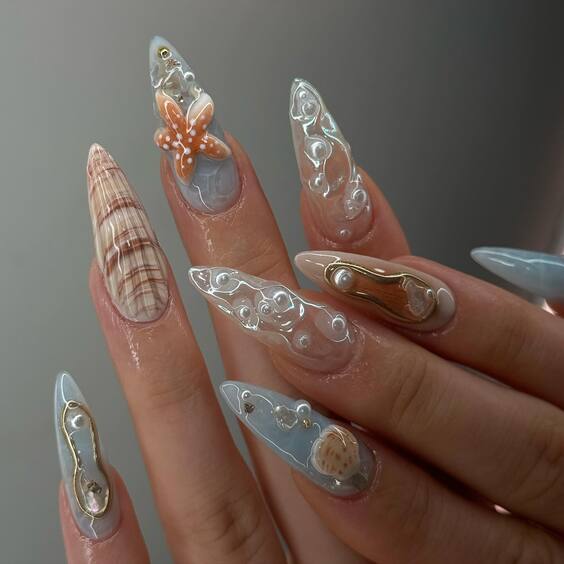
Consumables List
- Base Coat: Essie All in One
- Polishes:
- Seafoam Green: China Glaze “For Audrey”
- Sandy Beige: OPI “Be There in a Prosecco”
- Clear Acrylic Overlay
- Embellishments:
- Real Seashells
- Mini Starfish
- Gold Nail Art Paint
- Top Coat: Sally Hansen Miracle Gel Top Coat
Recommendations: The real shell pieces should be thinly sliced to conform smoothly to the nail’s curvature. Use a fine brush for the gold swirls to maintain elegance and precision.
DIY Instructions
- Apply a base coat to protect the nails.
- Paint a base layer of seafoam green and sandy beige, blending slightly where they meet.
- Arrange the seashell and starfish pieces on the tacky polish, then encase with clear acrylic.
- Paint golden swirls around the embellishments to enhance the underwater theme.
- Seal everything with a high-gloss gel top coat for durability and shine.
Tidal Reflections
Tidal Reflections nails reflect the calm and serene nature of a quiet beach day. Using a cool palette of sea green and soft silvery hues, this design features a glossy finish that mirrors the reflective quality of water. Subtle bubble and starfish accents add a playful yet sophisticated touch to the look.
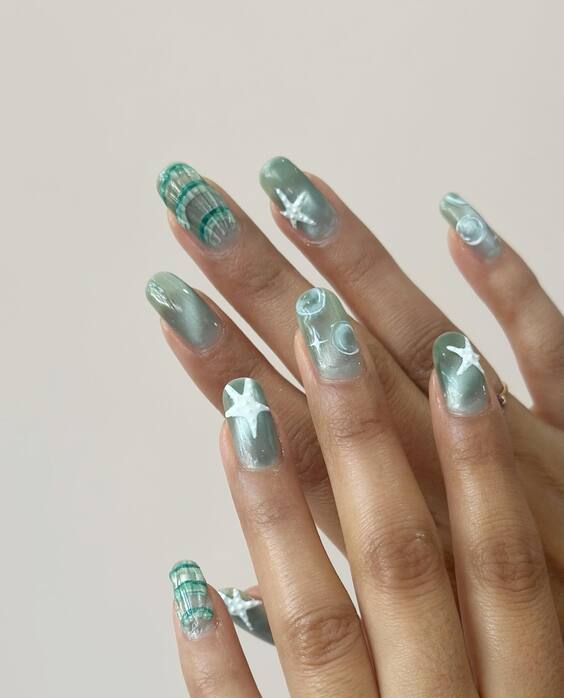
Consumables List
- Base Coat: OPI Natural Nail Base Coat
- Polishes:
- Sea Green: Essie “Mint Candy Apple”
- Silver: Revlon “Silver Dollar”
- Embellishments:
- Clear Bubble Beads
- Silver Starfish Decals
- Top Coat: Seche Vite Dry Fast Top Coat
Recommendations: For a flawless mirror finish, apply several thin layers of the silver polish, allowing each to dry completely. The bubble beads should be placed while the top layer is still wet to ensure they adhere properly.
DIY Instructions
- Start with a clear base coat to enhance nail strength.
- Apply two layers of sea green polish as the base color.
- Add a layer of silver for a reflective finish.
- While still tacky, strategically place bubble beads and starfish decals.
- Complete with a fast-drying top coat to lock in the design.
Coastal Whimsy
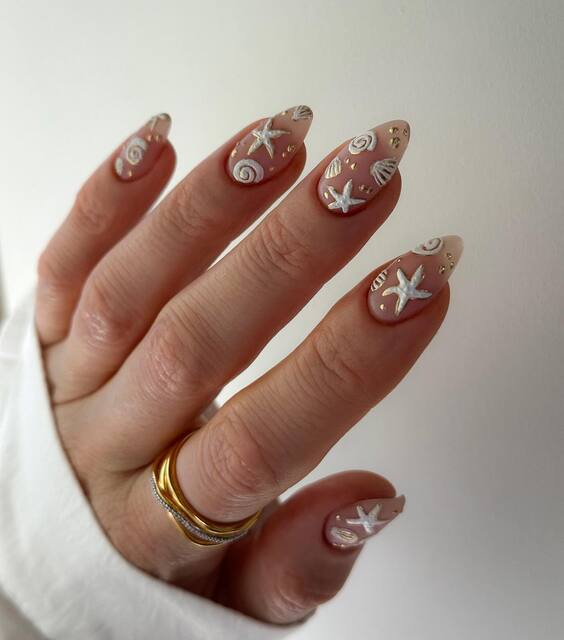
Coastal Whimsy nails bring a charming twist to traditional fall beach themes by incorporating whimsical spiral and starfish designs atop a creamy taupe base. Each nail features delicate hand-painted accents in white and beige, creating a soft, sandy texture that’s both tactile and visually appealing.
Consumables List
- Base Coat: Zoya Anchor Base Coat
- Polishes:
- Taupe: OPI “Dulce de Leche”
- White and Beige for Accents: Sally Hansen “White On” and “Almost Almond”
- Embellishments:
- White Starfish Decals
- Top Coat: Zoya Armor Top Coat
Recommendations: Use a fine detail brush for the spiral and starfish accents to ensure precision. White starfish decals should be used sparingly to maintain the nails’ elegant simplicity.
DIY Instructions
- Prep nails with a base coat to prevent staining.
- Paint a smooth taupe base.
- Hand-paint spirals and textures using white and beige polishes.
- Apply starfish decals to accentuate the beach theme.
- Finish with a protective top coat to enhance durability and shine.
Sunset Splendor
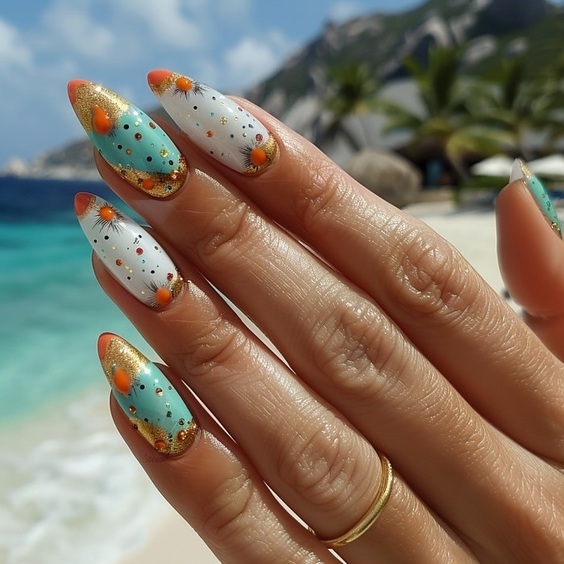
Sunset Splendor nails feature a radiant display of sunset colors against a pristine white background, mimicking the beautiful transition of colors in the sky at dusk. Orange and turquoise teardrops represent the vibrant hues of the sun setting over the ocean, while tiny golden flakes add sparkle, resembling the last rays of the sun glittering on the water.
Consumables List
- Base Coat: OPI Start-to-Finish Base & Top Coat
- Polishes:
- White Base: Essie “Blanc”
- Orange: China Glaze “Orange Knockout”
- Turquoise: OPI “Can’t Find My Czechbook”
- Gold Flakes: Nubar “Gold Leaf”
- Top Coat: CND Vinylux Weekly Top Coat
Recommendations: Use a fine-tip brush to create precise teardrop shapes and apply gold flakes sparingly to avoid overpowering the delicate sunset effect.
DIY Instructions
- Apply a base coat to protect your nails.
- Paint a white base to act as the canvas.
- Once dry, paint orange and turquoise teardrops along the tips and midsection of the nails.
- Add gold flakes for an added touch of elegance and shimmer.
- Finish with a glossy top coat to seal and enhance the colors.
Marine Serenity
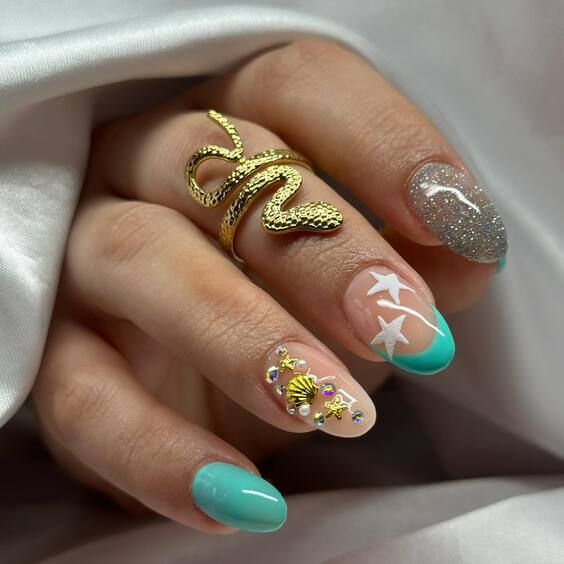
Marine Serenity nails bring the tranquility of the ocean to your fingertips. This design features a serene mix of mint green and aqua, complemented by soft white accents creating a gradient effect that mimics sea foam and waves. A gold seahorse charm adds a touch of marine life whimsy, making these nails perfect for ocean enthusiasts.
Consumables List
- Base Coat: Deborah Lippmann Hard Rock
- Polishes:
- Mint Green: Sally Hansen “Mint Sorbet”
- Aqua: Zoya “Wednesday”
- Embellishments:
- Gold Seahorse Charm
- White Starfish and Shell Decals
- Top Coat: OPI Glossy Top Coat
Recommendations: Layer the colors lightly to achieve a natural gradient look. The seahorse charm should be secured with a dot of nail glue to ensure it stays in place.
DIY Instructions
- Begin with a protective base coat.
- Apply mint green polish as the base layer.
- Gradually sponge on aqua polish from the tips to create a fading effect.
- Position the gold seahorse charm on the ring finger.
- Scatter a few starfish and shell decals for a complete marine theme.
- Seal with a glossy top coat for a smooth finish.
Emerald Depths
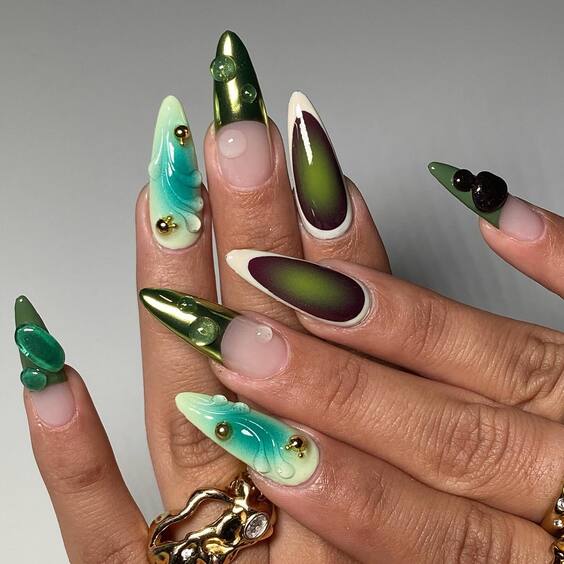
Emerald Depths is inspired by the deep hues found in the ocean’s depths. This design uses a palette of emerald green and rich plum, accented by translucent green stones and golden beads, creating a luxurious and deep sea aesthetic. The glossy finish and the sculpted shapes of the nails add a modern twist to this marine-inspired look.
Consumables List
- Base Coat: OPI Natural Nail Base Coat
- Polishes:
- Emerald Green: Essie “Off Tropic”
- Plum: OPI “Lincoln Park After Dark”
- Embellishments:
- Translucent Green Stones
- Golden Beads
- Top Coat: Essie Gel Setter
Recommendations: Use a sculpting gel to create dramatic, high-rise effects on the nails, especially for embedding the stones and beads.
DIY Instructions
- Apply a strong base coat to protect the nails.
- Paint the base colors in emerald green and plum, arranging them in a marbled or blocked pattern.
- Embed green stones and golden beads into the wet polish or gel.
- Encase everything with a clear gel to ensure the embellishments are secure.
- Finish with a high-gloss gel setter for a durable, shiny look.
Oceanic Flair
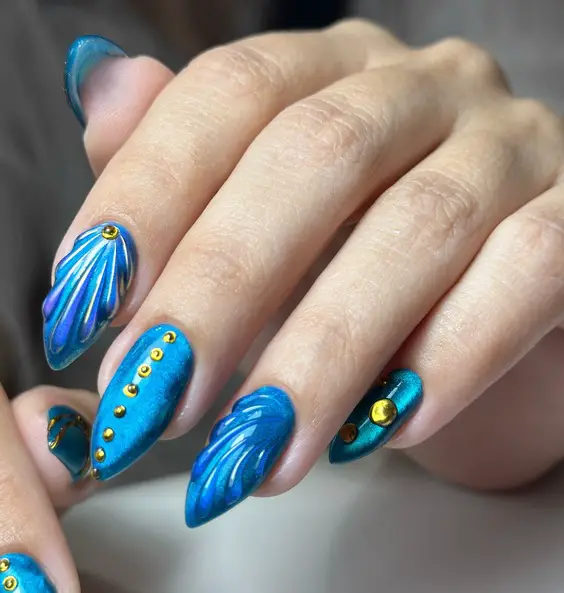
Oceanic Flair nails exhibit a dynamic play of deep ocean blue and vibrant turquoise, accented with sculptural elements that emulate sea waves and marine textures. The incorporation of gold studs enhances the luxury feel, making each nail appear as a crafted piece of art reminiscent of treasures from the deep sea.
Consumables List
- Base Coat: Sally Hansen Double Duty
- Polishes:
- Ocean Blue: OPI “Yoga-ta Get This Blue!”
- Turquoise: China Glaze “Aquadelic”
- Embellishments:
- Gold Studs
- Top Coat: Revlon Extra Life No Chip Top Coat
Recommendations: Use a silicone tool to sculpt the wave patterns and place the gold studs while the polish is still tacky for better adherence.
DIY Instructions
- Apply a protective base coat.
- Paint the base with a blend of ocean blue and turquoise to create a seamless transition.
- Sculpt wave patterns using slightly thicker layers of polish.
- Add gold studs strategically to mimic the appearance of marine flora or corals.
- Seal with a durable top coat for a glossy, lasting finish.
Coral Reef Dream
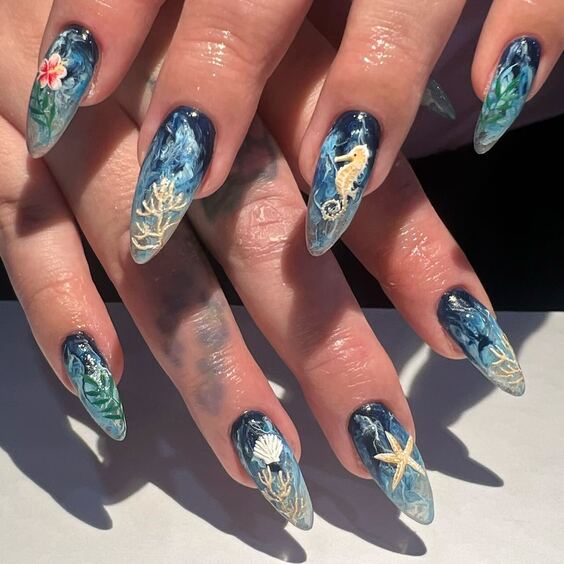
Coral Reef Dream nails take inspiration from the intricate life forms found in coral reefs. These nails feature detailed paintings of coral branches, starfish, and other marine flora in shades of blue and green, set against a clear aqua background that represents the underwater world. Small hand-painted fish add a lively touch to the whole design.
Consumables List
- Base Coat: Essie Smooth-e
- Polishes:
- Aqua Base: Essie “Mint Candy Apple”
- Blue and Green for Details: Sally Hansen “Blue Me Away!” and “Green Thumb”
- Top Coat: CND Super Shiney Top Coat
Recommendations: Use fine brushes for the detailed painting, allowing each layer to dry thoroughly to avoid smudging.
DIY Instructions
- Start with a base coat to prevent staining.
- Apply a light aqua base coat.
- Paint detailed coral and marine designs using blue and green.
- Add miniature fish and other sea creatures as accents.
- Finish with a high-gloss top coat to enhance the vibrancy of the colors.
Sandy Shores
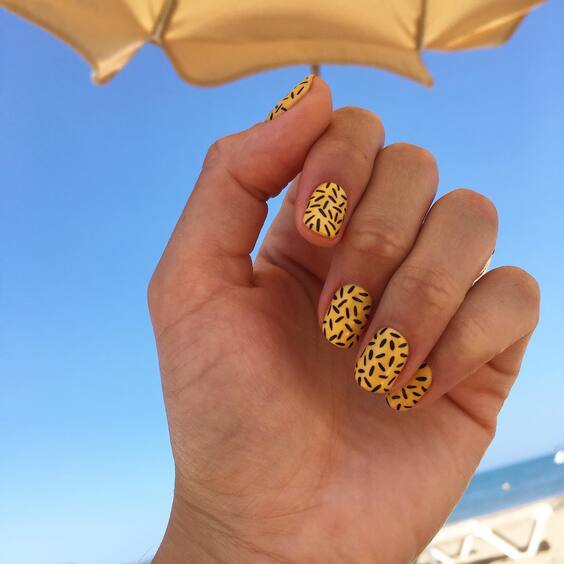
Sandy Shores nails capture the essence of a sunny beach day with their bright yellow base and black palm leaf stencils, creating a stark yet cheerful contrast that embodies the vibrancy of beach life. This design is perfect for those who appreciate bold patterns and want to carry the warmth of the sun on their nails.
Consumables List
- Base Coat: OPI Natural Nail Base Coat
- Polishes:
- Yellow: OPI “I Just Can’t Cope-acabana”
- Black for Palm Leaves: Essie “Licorice”
- Top Coat: Seche Vite Dry Fast Top Coat
Recommendations: Use stencils for the palm leaves to achieve sharp and precise designs.
DIY Instructions
- Apply a base coat to protect your nails.
- Paint a sunny yellow as the base color.
- Place palm leaf stencils over the base once it’s dry and apply black polish.
- Remove the stencils carefully to reveal clean lines.
- Seal the design with a quick-drying top coat for a smooth and protective finish.
Soft Sea Breeze
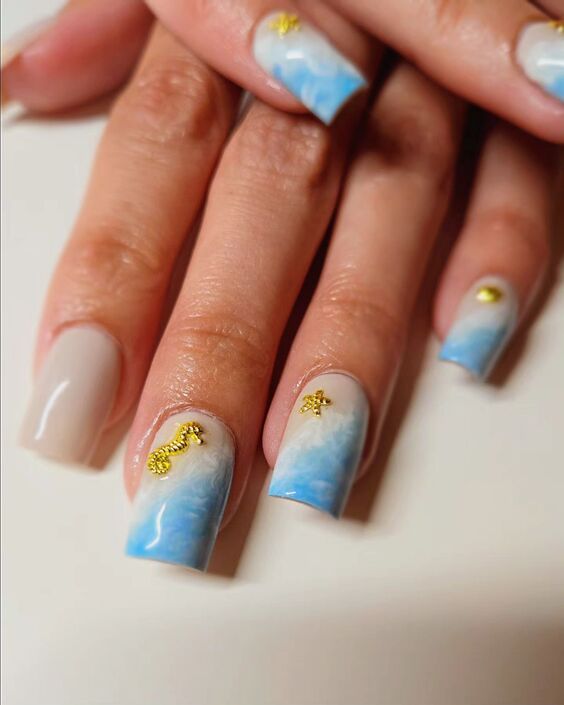
Soft Sea Breeze nails evoke the tranquil colors of the sky and sea at dawn. This design features a delicate gradient from a soft sky blue to a deeper ocean blue, embellished with tiny gold starfish and seashell accents, adding a touch of nautical charm.
Consumables List
- Base Coat: Orly Bonder
- Polishes:
- Sky Blue: Essie “Bikini So Teeny”
- Ocean Blue: China Glaze “Bermuda Breakaway”
- Embellishments:
- Gold Starfish and Seashell Accents
- Top Coat: Essie Gel Setter
Recommendations: The key to a smooth gradient is blending the colors while they are still slightly wet. Use a sponge for the best effect and apply embellishments with a tiny dot of nail glue.
DIY Instructions
- Apply a base coat to protect your nails.
- Start with a sky blue base, and while it’s still wet, blend into the deeper ocean blue at the tips using a sponge.
- Carefully place the gold starfish and seashell accents on the nails.
- Seal everything with a gel setter top coat for a long-lasting glossy finish.
Tropic Wonder
Tropic Wonder nails feature vibrant scenes of beach life and marine flora. Each nail is like a miniature canvas, showcasing detailed art of fish, coral, and seawater splashes in a palette of bright blues, teals, and white, making this design a vivid portrayal of underwater wonders.

Consumables List
- Base Coat: Sally Hansen Miracle Cure
- Polishes:
- White: OPI “Alpine Snow”
- Teal: Essie “Naughty Nautical”
- Bright Blue: OPI “Blue My Mind”
- Top Coat: OPI Top Coat
Recommendations: For detailed designs like these, thin nail art brushes are essential. Patience and steady hands will yield the best results.
DIY Instructions
- Start with a base coat to ensure a smooth canvas.
- Apply a white base to help the colors pop.
- Use thin brushes to paint the fish, coral, and water splashes in various shades of blue and teal.
- Apply a top coat to protect the designs and add shine.
Sunset Stripes
Sunset Stripes nails combine the serene hues of a beach sunset with stylish patterns. This design uses a warm palette of orange, pink, and a hint of blue, arranged in striped patterns along with silhouette palm trees and beach scenes, capturing the essence of a perfect beach evening.
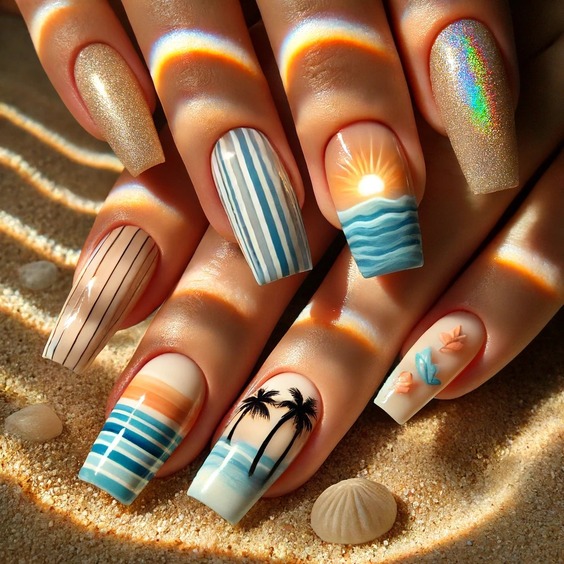
Consumables List
- Base Coat: CND Stickey Base Coat
- Polishes:
- Orange: China Glaze “Sunset Sail”
- Pink: Essie “Watermelon”
- Light Blue: Sally Hansen “Breezy Blue”
- Top Coat: Seche Vite Dry Fast Top Coat
Recommendations: Use tape or nail vinyls to create clean lines for the stripes and apply colors one at a time to prevent smearing.
DIY Instructions
- Apply a base coat to prevent staining.
- Use nail vinyls to partition sections for stripes.
- Paint each stripe in the selected sunset colors, allowing each to dry before applying the next color.
- Carefully place silhouettes of palm trees and beach scenes.
- Finish with a fast-drying top coat to protect and enhance the design.
Coral Charm
Coral Charm nails are a playful mix of vibrant oceanic hues and tropical designs, perfect for anyone looking to add a splash of color and fun to their nail art repertoire. This design features a bold coral pink, a deep sea blue, and a sky blue with delicate coral and starfish motifs painted on alternating nails, providing a lively contrast that captures the essence of marine life.
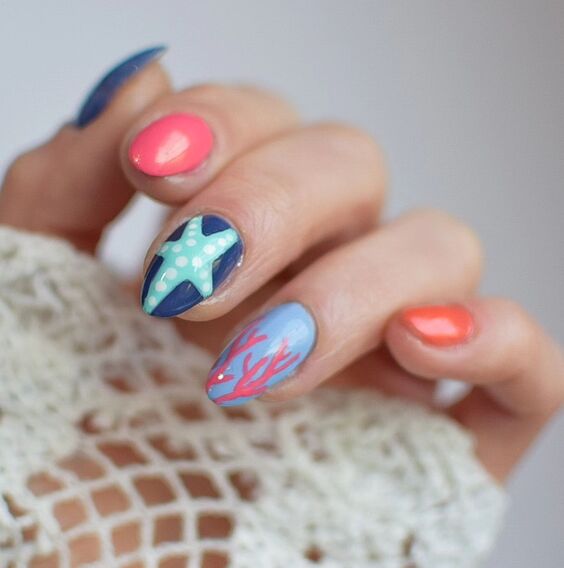
Consumables List
- Base Coat: Orly Rubberized Base
- Polishes:
- Coral Pink: Essie “Sunday Funday”
- Deep Sea Blue: Sally Hansen “Pacific Blue”
- Sky Blue: OPI “Can’t Find My Czechbook”
- Top Coat: Butter London Hardwear Shine UV Topcoat
Recommendations: For intricate designs like the coral and starfish, use a very fine brush for precision. Practice the motifs on paper before attempting on nails to ensure clarity and detail.
DIY Instructions
- Start by applying the rubberized base coat for a long-lasting application.
- Paint the thumb, middle, and pinky fingers in coral pink, and the index and ring fingers in sky blue.
- On the blue nails, use deep sea blue to paint delicate coral branches and starfish motifs.
- Allow each coat to dry thoroughly before applying the next to prevent smudging.
- Once the designs are complete, seal them with a UV topcoat to enhance durability and maintain shine.
Conclusion
We hope this collection of fall beach nail designs has inspired you to experiment with your own nail art creations. Each design offers a unique blend of autumnal tones and beach-themed aesthetics, providing a perfect way to keep the spirit of summer alive while embracing the cooler, more subdued vibes of fall. So grab your favorite polishes and start painting—a world of creative possibilities awaits at your fingertips. Remember, the best accessory is a set of beautifully manicured nails that reflect your personal style and the beauty of the season. Happy painting!

