19 Top Fall Marble Nails 2024 Designs: Unleash Your Creativity with Unique Patterns and Colors
Are you ready to dive into the rich, swirling patterns of fall marble nails 2024? As the leaves turn and pumpkin spice fills the air, why not bring some seasonal cheer to your nails? Whether you’re a fan of bold, dramatic styles or prefer something subtly elegant, the diverse world of fall marble nails offers something for everyone. How do these intricate designs come to life? What shades capture the essence of autumn? Let’s explore the trendy possibilities and discover how you can recreate these mesmerizing looks at home.
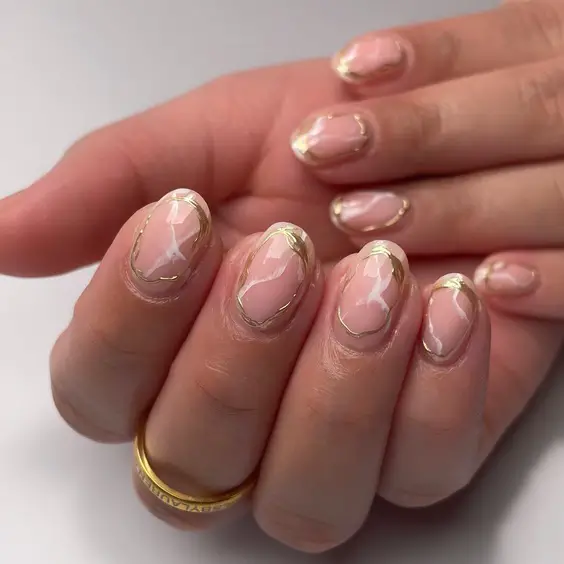
Elegant Gold Edges
This design features a soft pink base with delicate white marbling and gold accents along the edges. The combination of pink, white, and gold creates a sophisticated and chic look that’s perfect for fall. The smooth finish and subtle marbling make these fall marble nails ideal for both casual and formal occasions.
Consumables Needed
- Base Coat: For nail protection and smooth application.
- Soft Pink Nail Polish: As the base color.
- White Nail Polish: For the marble effect.
- Gold Nail Tape or Polish: To create the elegant edges.
- Top Coat: For a glossy and long-lasting finish.
- Marbling Tool: To achieve the intricate marble design.
The gold nail tape adds a luxurious touch, while the soft pink polish provides a delicate backdrop for the marble effect.
DIY Instructions
- Start with a base coat to protect your nails.
- Apply two coats of soft pink nail polish and let it dry.
- Use a marbling tool to create white marble patterns over the pink base.
- Carefully apply gold nail tape or polish along the edges of each nail.
- Seal with a glossy top coat to protect the design and add shine.
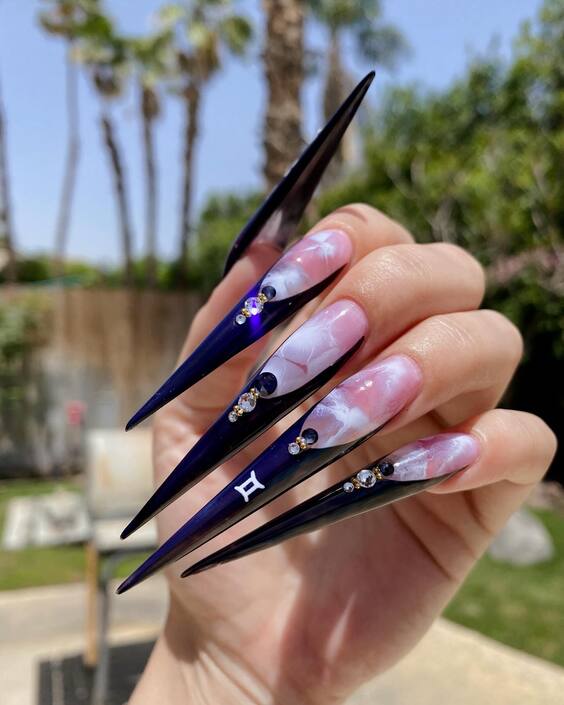
Navy Stiletto Drama
This dramatic set of fall marble nails acrylic almond features a striking navy base with intricate white and pink marble accents. The stiletto shape, known for its elongated and edgy look, adds a touch of boldness. The blend of deep navy and soft pink marbling creates a stunning contrast, perfect for those looking to make a statement this fall.
Consumables Needed
- Base Coat: To protect natural nails.
- Navy Blue Nail Polish: As the primary color.
- White and Pink Nail Polishes: For the marble effect.
- Rhinestones: For added glam and sparkle.
- Top Coat: To seal and shine.
- Detail Brush: For precise marble patterns.
Using high-quality polishes ensures vibrant colors and long-lasting wear, especially important for intricate designs like these.
DIY Instructions
- Apply a base coat and let it dry.
- Paint your nails with navy blue polish, applying two coats for full coverage.
- Use a detail brush to create white and pink marble patterns on each nail.
- Add rhinestones for an extra touch of glamour.
- Finish with a top coat to protect the design and add a glossy finish.
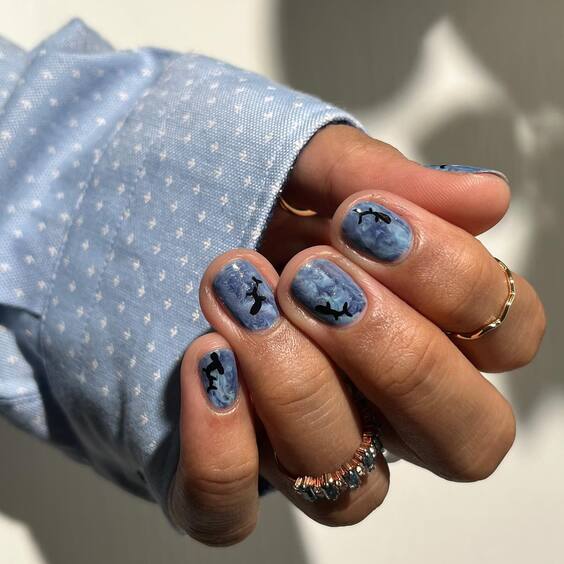
Subtle Blue Swirls
This design showcases a serene blue base with subtle black marbling and delicate swirl accents. The short length of these nails makes them practical while still being stylish. The combination of blue and black marbling captures the essence of cool autumn evenings, making these fall marble nails short both versatile and trendy.
Consumables Needed
- Base Coat: To ensure smooth application and protect nails.
- Light Blue Nail Polish: For the base color.
- Black Nail Polish: For the marbling effect.
- Thin Detail Brush: To create the intricate swirls.
- Top Coat: To add a glossy finish and protect the design.
The light blue base is perfect for fall, while the black swirls add a touch of mystery and sophistication.
DIY Instructions
- Start with a base coat to protect your nails.
- Apply two coats of light blue nail polish and let it dry.
- Use a thin detail brush to create black marble patterns and swirls on each nail.
- Finish with a top coat to seal the design and add shine.
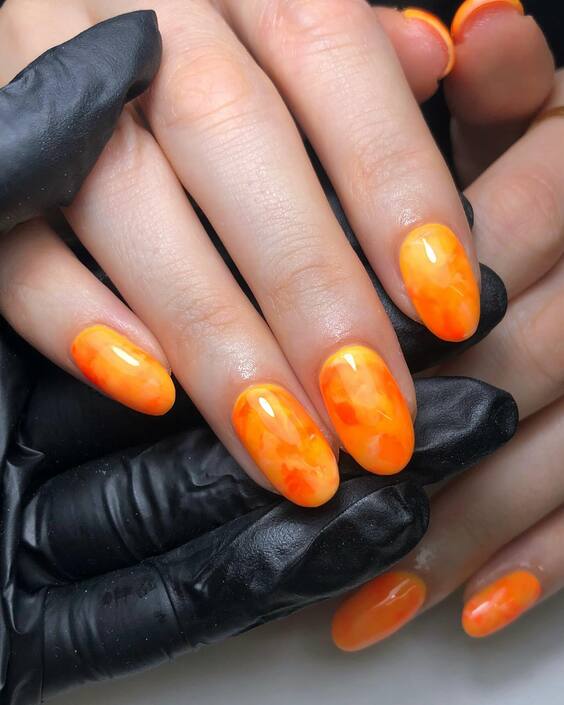
Vibrant Orange Pop
These vibrant orange nails feature a lively marble effect that’s perfect for capturing the energy of fall. The short, rounded shape is practical and chic, making these fall marble nails orange a great choice for everyday wear. The bright orange base combined with the intricate marbling creates a fun and eye-catching design.
Consumables Needed
- Base Coat: For nail protection.
- Bright Orange Nail Polish: As the primary color.
- Yellow and White Nail Polishes: For the marble effect.
- Marbling Tool: To create the intricate patterns.
- Top Coat: For a glossy finish and durability.
The combination of bright orange with yellow and white marbling reflects the vibrant colors of autumn leaves.
DIY Instructions
- Apply a base coat to protect your nails.
- Paint your nails with bright orange polish, applying two coats for full coverage.
- Use a marbling tool to create yellow and white marble patterns over the orange base.
- Seal with a glossy top coat to protect the design and add shine.
Pink and White Elegance
This design features a beautiful blend of pink and white marbling on a clear base. The almond shape elongates the fingers, providing a feminine and elegant look. The marbling effect in shades of pink makes these nails perfect for both casual outings and special occasions.
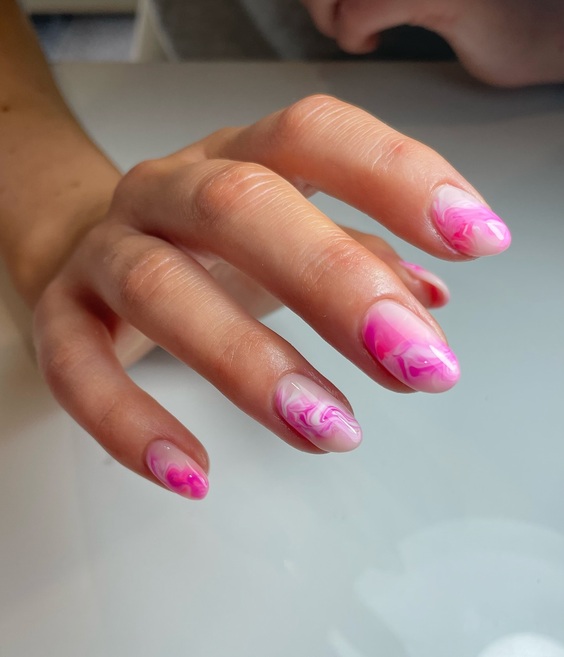
Consumables Needed
- Base Coat: To protect natural nails.
- Clear Nail Polish: As the base.
- Pink and White Nail Polishes: For the marbling effect.
- Marbling Tool: To create intricate designs.
- Top Coat: For a glossy finish.
The pink and white marbling adds a delicate touch, making this design both sophisticated and stylish.
DIY Instructions
- Apply a base coat to protect your nails.
- Use clear nail polish as the base and let it dry.
- With the marbling tool, create pink and white swirls over the clear base.
- Finish with a top coat to seal the design and add shine.
Square Gold and White
This set features a square shape with a delicate pink base and subtle white marble accents, enhanced by gold foil flakes. The square shape is both modern and practical, while the gold flakes add a touch of luxury to the design.
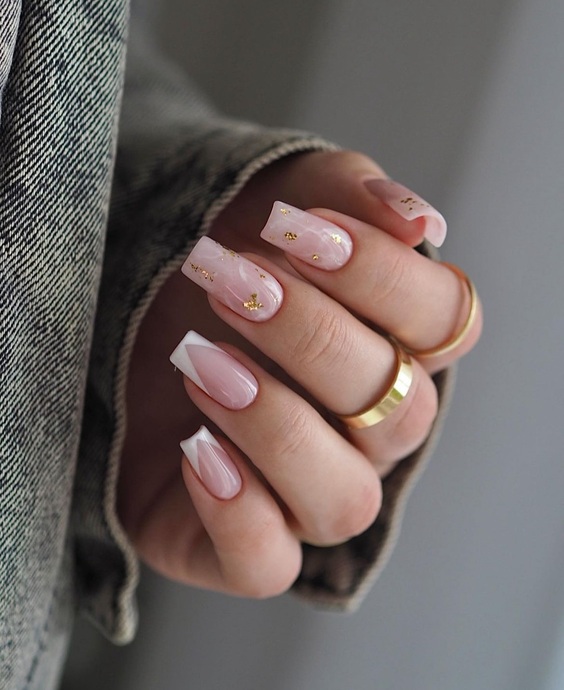
Consumables Needed
- Base Coat: For nail protection.
- Light Pink Nail Polish: As the base color.
- White Nail Polish: For the marble effect.
- Gold Foil Flakes: For added luxury.
- Top Coat: For a glossy finish and protection.
- Marbling Tool: To achieve the marble effect.
The gold foil flakes give this design a luxurious feel, perfect for special occasions.
DIY Instructions
- Start with a base coat to protect your nails.
- Apply two coats of light pink nail polish and let it dry.
- Use the marbling tool to create white marble patterns over the pink base.
- Add gold foil flakes for a touch of luxury.
- Seal with a glossy top coat to protect the design and add shine.
Pastel Rainbow Delight
These nails feature a stunning blend of pastel colors with a marble effect. The oval shape is elegant and practical, making these nails perfect for daily wear. The soft pastel colors combined with the marble effect create a dreamy and whimsical design.
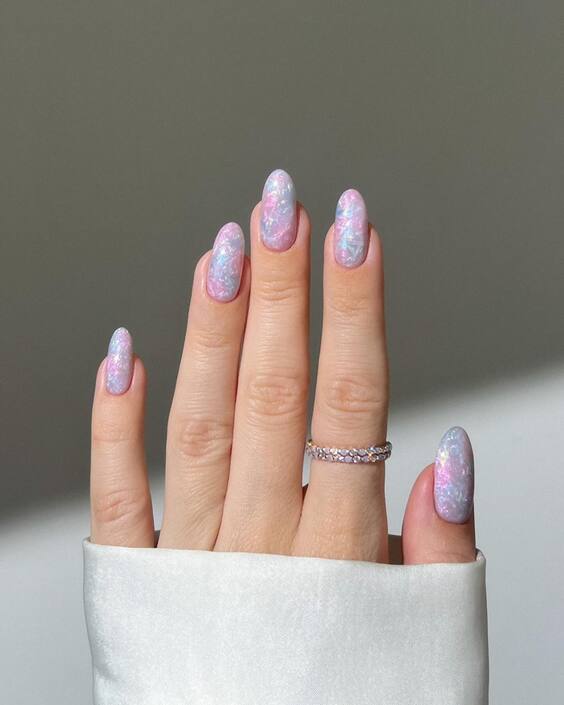
Consumables Needed
- Base Coat: To protect natural nails.
- Pastel Nail Polishes: In various colors for the base.
- White Nail Polish: For the marble effect.
- Marbling Tool: To create the intricate patterns.
- Top Coat: For a glossy finish.
The pastel colors provide a soft and dreamy look, perfect for those who prefer a more subtle nail design.
DIY Instructions
- Apply a base coat to protect your nails.
- Use pastel nail polishes as the base, applying two coats for full coverage.
- Use the marbling tool to create white marble patterns over the pastel base.
- Seal with a top coat to protect the design and add shine.
Neutral Chic
This design features a neutral base with brown and beige marble accents. The long square shape adds a modern twist to the classic marble design. The neutral colors make these nails versatile and suitable for any occasion.
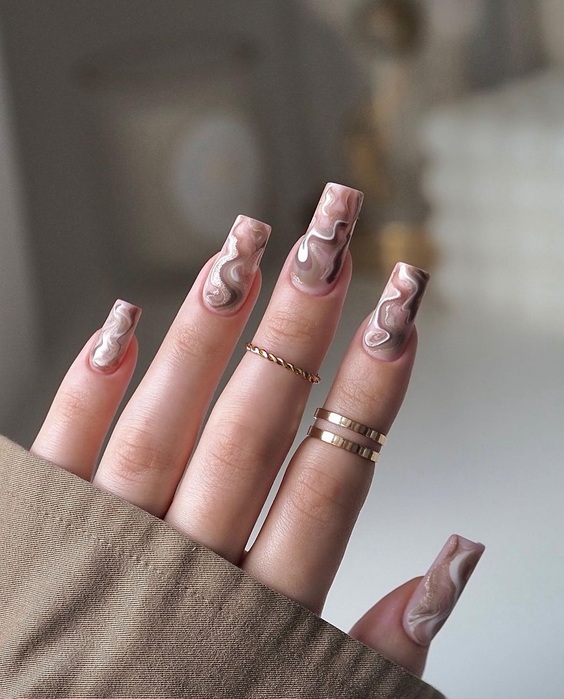
Consumables Needed
- Base Coat: For nail protection.
- Neutral Nail Polish: As the base color.
- Brown and Beige Nail Polishes: For the marble effect.
- Marbling Tool: To create the intricate designs.
- Top Coat: For a glossy finish.
The neutral colors and marble effect create a chic and sophisticated look, perfect for fall.
DIY Instructions
- Apply a base coat to protect your nails.
- Use neutral nail polish as the base, applying two coats for full coverage.
- Use the marbling tool to create brown and beige marble patterns over the base.
- Seal with a glossy top coat to protect the design and add shine.
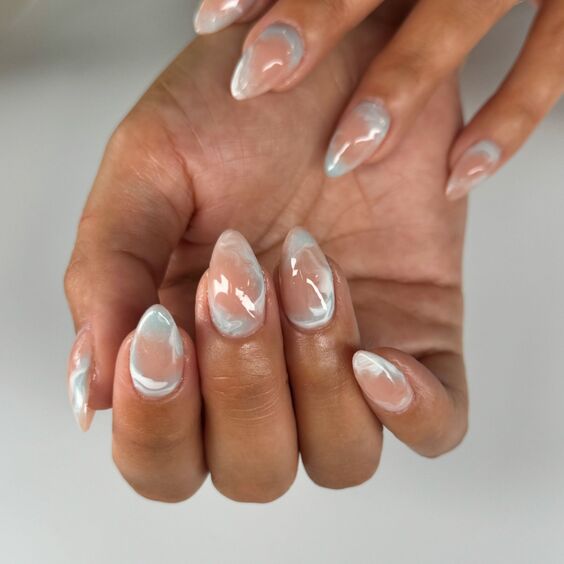
Soft Almond Marble
This design features a soft almond shape with delicate white marbling on a nude base. The gentle swirls and subtle color palette make these nails perfect for a minimalist fall look. The almond shape elongates the fingers, adding elegance and sophistication.
Consumables Needed
- Base Coat: For nail protection.
- Nude Nail Polish: As the base color.
- White Nail Polish: For the marble effect.
- Marbling Tool: To create intricate designs.
- Top Coat: For a glossy finish.
The soft almond shape and delicate marbling make these nails a versatile choice for any fall occasion.
DIY Instructions
- Apply a base coat to protect your nails.
- Use nude nail polish as the base, applying two coats for full coverage.
- Use the marbling tool to create white marble patterns over the nude base.
- Seal with a top coat to protect the design and add shine.
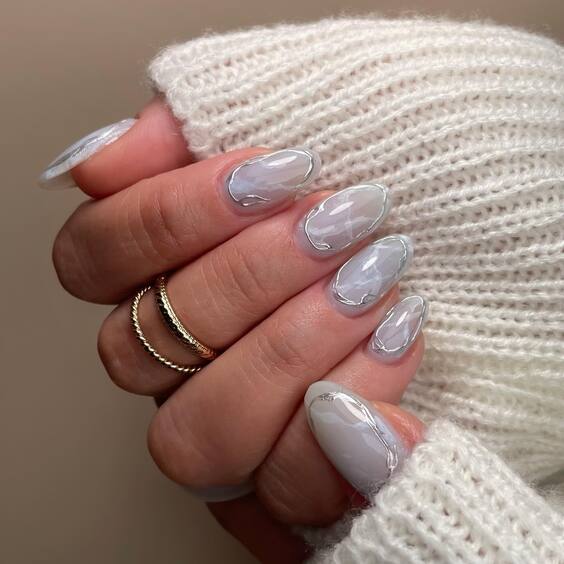
Frosted Elegance
These nails feature a frosted, glass-like finish with delicate white marbling. The oval shape adds a touch of classic elegance, while the frosted effect gives the nails a modern twist. The white marbling adds subtle detail, making these nails perfect for a sophisticated fall look.
Consumables Needed
- Base Coat: For nail protection.
- Frosted Clear Nail Polish: As the base.
- White Nail Polish: For the marble effect.
- Marbling Tool: To create intricate designs.
- Top Coat: For a frosted finish.
The frosted finish and white marbling create a chic and understated look, ideal for both casual and formal settings.
DIY Instructions
- Apply a base coat to protect your nails.
- Use frosted clear nail polish as the base, applying two coats for full coverage.
- Use the marbling tool to create white marble patterns over the frosted base.
- Seal with a frosted top coat to protect the design and add a matte finish.
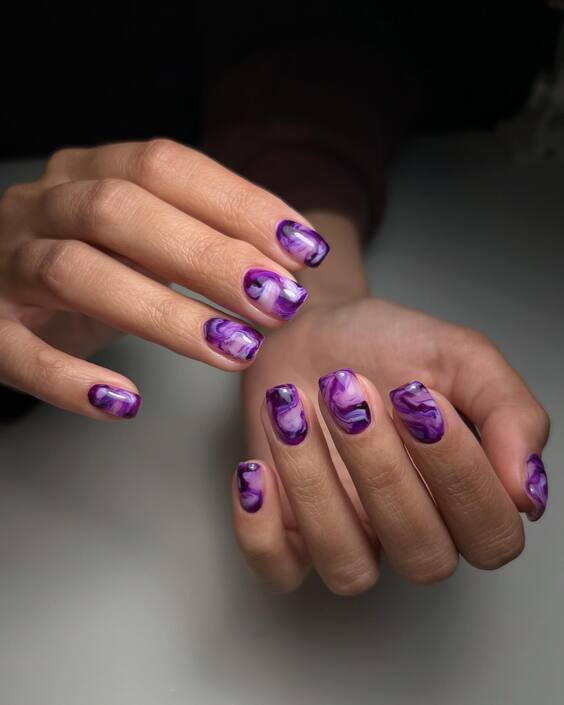
Purple Passion
These nails feature a vibrant purple base with intricate white and pink marble patterns. The square shape adds a modern twist, making these nails perfect for those who love bold and eye-catching designs. The combination of purple and marble creates a stunning visual effect, ideal for making a statement this fall.
Consumables Needed
- Base Coat: For nail protection.
- Purple Nail Polish: As the base color.
- White and Pink Nail Polishes: For the marble effect.
- Marbling Tool: To create intricate designs.
- Top Coat: For a glossy finish.
The vibrant purple base combined with white and pink marbling makes these nails a standout choice for any fall event.
DIY Instructions
- Apply a base coat to protect your nails.
- Use purple nail polish as the base, applying two coats for full coverage.
- Use the marbling tool to create white and pink marble patterns over the purple base.
- Seal with a top coat to protect the design and add shine.
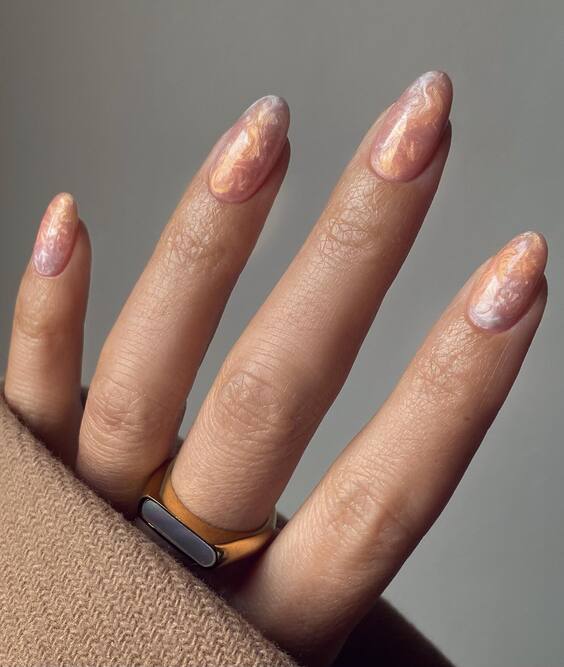
Golden Peach Glow
This design features a peach base with delicate gold marbling. The almond shape adds elegance, while the gold accents provide a touch of luxury. The combination of peach and gold creates a warm and inviting look, perfect for the fall season.
Consumables Needed
- Base Coat: For nail protection.
- Peach Nail Polish: As the base color.
- Gold Nail Polish: For the marble effect.
- Marbling Tool: To create intricate designs.
- Top Coat: For a glossy finish.
The peach base and gold marbling create a warm and luxurious look, ideal for autumn gatherings.
DIY Instructions
- Apply a base coat to protect your nails.
- Use peach nail polish as the base, applying two coats for full coverage.
- Use the marbling tool to create gold marble patterns over the peach base.
- Seal with a top coat to protect the design and add shine.
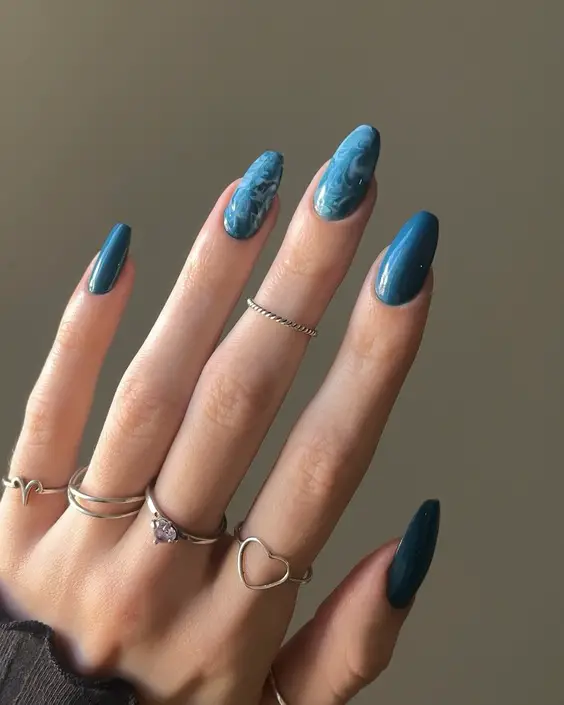
Teal Marvel
These nails feature a stunning teal base with intricate dark blue marble patterns. The almond shape adds a sleek, sophisticated look, while the rich colors create a vibrant, eye-catching design. The combination of teal and dark blue marbling is perfect for making a bold statement this fall.
Consumables Needed
- Base Coat: For nail protection.
- Teal Nail Polish: As the base color.
- Dark Blue Nail Polish: For the marble effect.
- Marbling Tool: To create intricate designs.
- Top Coat: For a glossy finish.
The deep, rich colors of teal and dark blue make these nails perfect for a dramatic fall look.
DIY Instructions
- Apply a base coat to protect your nails.
- Use teal nail polish as the base, applying two coats for full coverage.
- Use the marbling tool to create dark blue marble patterns over the teal base.
- Seal with a top coat to protect the design and add shine.
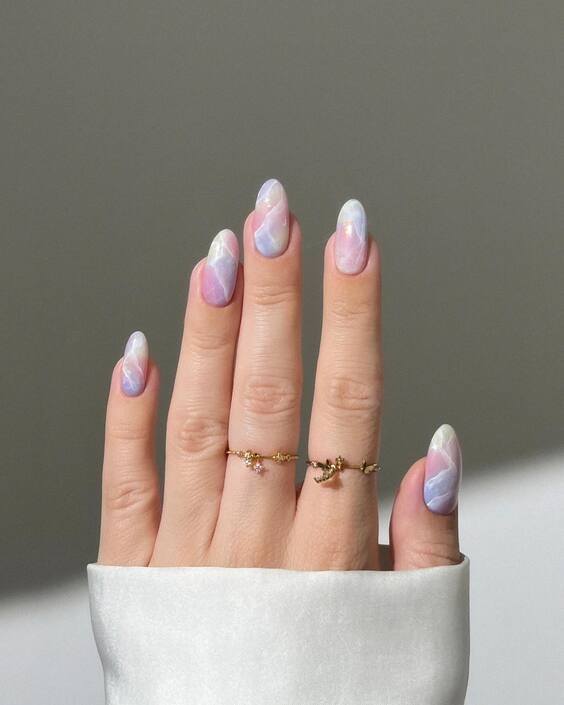
Pastel Harmony
This design showcases a soft blend of pastel colors with a marble effect. The oval shape is both elegant and practical, making these nails perfect for everyday wear. The pastel hues combined with the marble effect create a delicate and sophisticated look, ideal for those who prefer a more subtle fall style.
Consumables Needed
- Base Coat: For nail protection.
- Pastel Nail Polishes: In various colors for the base.
- White Nail Polish: For the marble effect.
- Marbling Tool: To create intricate patterns.
- Top Coat: For a glossy finish.
The soft, pastel colors and elegant marble effect make these nails perfect for any occasion.
DIY Instructions
- Apply a base coat to protect your nails.
- Use pastel nail polishes as the base, applying two coats for full coverage.
- Use the marbling tool to create white marble patterns over the pastel base.
- Seal with a top coat to protect the design and add shine.
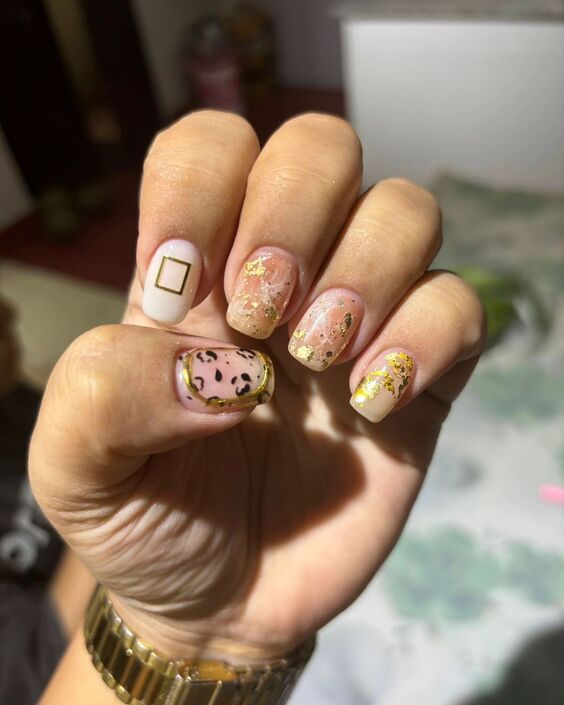
Golden Leopard
These nails feature a unique combination of gold foil, clear base, and leopard print accents. The short, square shape adds practicality and modernity, making these nails perfect for everyday wear. The gold foil and leopard print add a touch of luxury and playfulness to the design, creating a bold statement.
Consumables Needed
- Base Coat: For nail protection.
- Clear Nail Polish: As the base.
- Gold Foil Flakes: For luxury accents.
- Leopard Print Stickers or Nail Polish: For the print design.
- Top Coat: For a glossy finish.
The combination of gold and leopard print creates a unique and eye-catching design, perfect for those who love bold and playful styles.
DIY Instructions
- Apply a base coat to protect your nails.
- Use clear nail polish as the base, applying two coats for full coverage.
- Apply gold foil flakes on selected nails for luxury accents.
- Add leopard print stickers or use nail polish to create the print design.
- Seal with a top coat to protect the design and add shine.
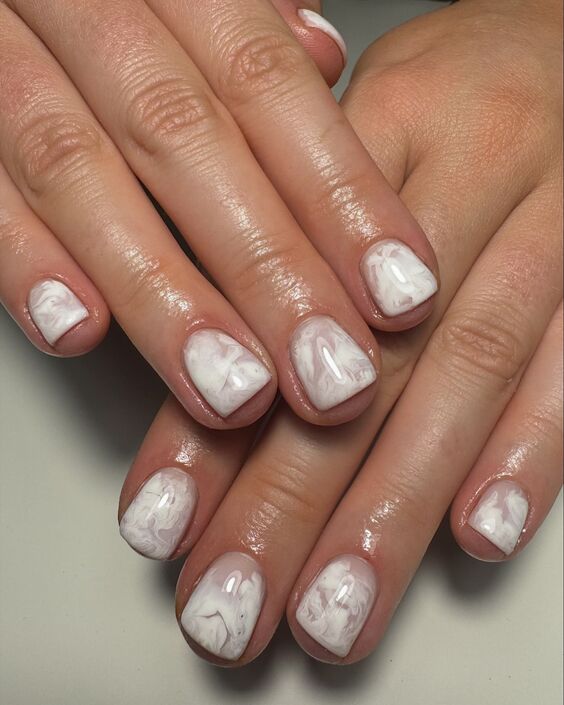
Classic White Marble
This design features a classic white marble effect on a nude base. The short, rounded shape adds practicality and elegance, making these nails perfect for any occasion. The white marble effect is timeless and sophisticated, creating a chic and polished look.
Consumables Needed
- Base Coat: For nail protection.
- Nude Nail Polish: As the base color.
- White Nail Polish: For the marble effect.
- Marbling Tool: To create intricate designs.
- Top Coat: For a glossy finish.
The classic white marble effect is perfect for those who prefer a timeless and elegant nail design.
DIY Instructions
- Apply a base coat to protect your nails.
- Use nude nail polish as the base, applying two coats for full coverage.
- Use the marbling tool to create white marble patterns over the nude base.
- Seal with a top coat to protect the design and add shine.
Earthy Abstract
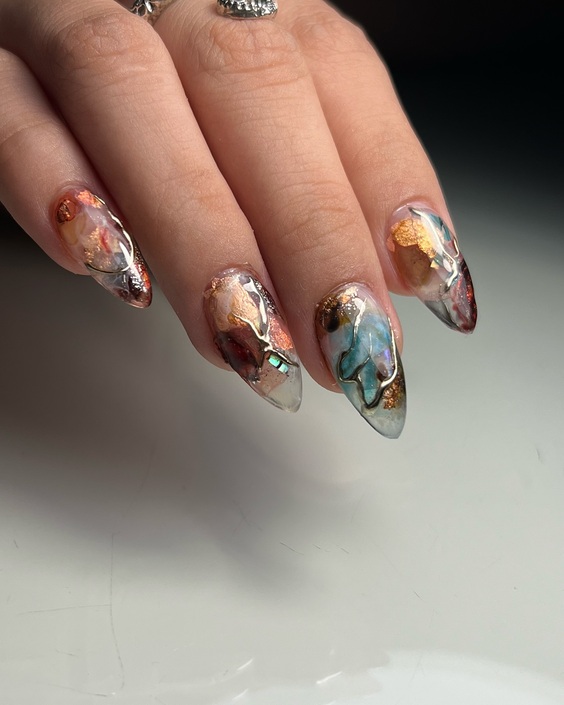
This design features an earthy palette with abstract marbling, incorporating shades of brown, gold, and turquoise. The pointed almond shape adds an edgy yet elegant touch. The rich, warm colors and abstract patterns make these nails a perfect choice for fall, capturing the essence of autumn leaves and earthy tones.
Consumables Needed
- Base Coat: For nail protection.
- Brown, Gold, and Turquoise Nail Polishes: For the base and marbling.
- Marbling Tool: To create intricate abstract designs.
- Top Coat: For a glossy finish.
The combination of warm and cool tones creates a visually striking and unique nail design, perfect for making a statement this fall.
DIY Instructions
- Apply a base coat to protect your nails.
- Use a combination of brown, gold, and turquoise nail polishes as the base, applying two coats for full coverage.
- Use the marbling tool to create abstract marble patterns with the different colors.
- Seal with a top coat to protect the design and add shine.
Turquoise Waves
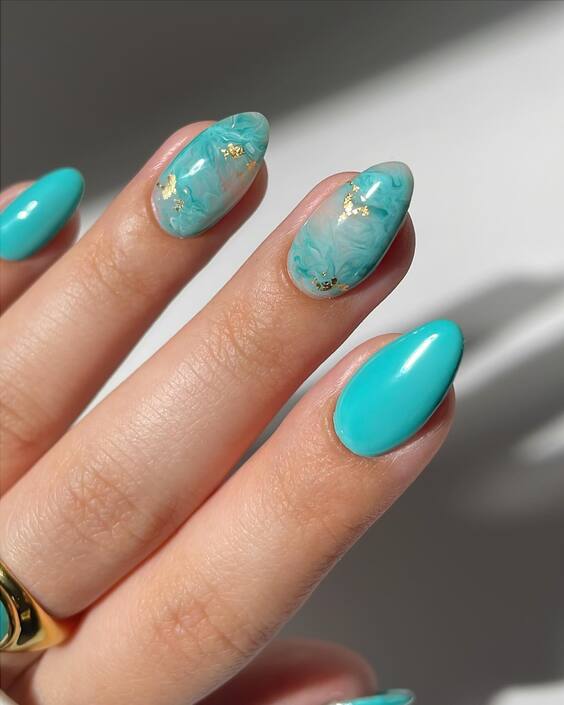
This design features a vibrant turquoise base with delicate white marbling and gold accents. The oval shape adds elegance and sophistication, making these nails perfect for both casual and formal occasions. The bright turquoise color combined with the intricate marble effect creates a fresh and lively look, ideal for fall.
Consumables Needed
- Base Coat: For nail protection.
- Turquoise Nail Polish: As the base color.
- White Nail Polish: For the marble effect.
- Gold Foil Flakes: For luxury accents.
- Marbling Tool: To create intricate designs.
- Top Coat: For a glossy finish.
The combination of turquoise, white, and gold makes these nails a standout design for the fall season.
DIY Instructions
- Apply a base coat to protect your nails.
- Use turquoise nail polish as the base, applying two coats for full coverage.
- Use the marbling tool to create white marble patterns over the turquoise base.
- Add gold foil flakes for a touch of luxury.
- Seal with a top coat to protect the design and add shine.
Rustic Charm
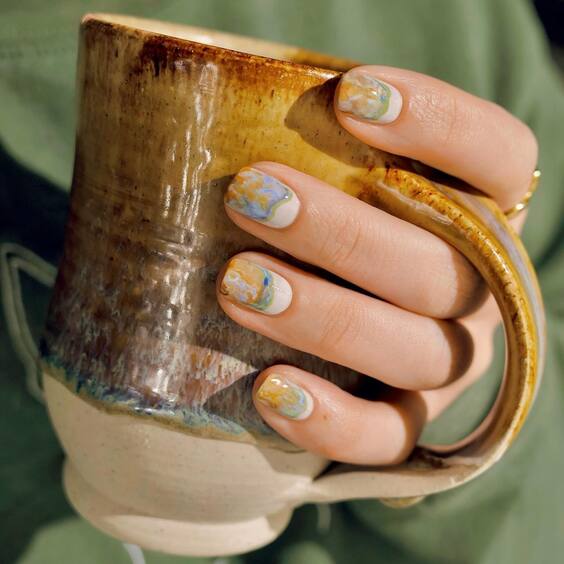
This design showcases a rustic charm with muted tones of green, blue, and brown, creating a marbled effect that is both cozy and sophisticated. The short, rounded shape makes these nails practical and stylish. The earthy color palette and delicate marbling capture the essence of a fall countryside, making these nails perfect for the season.
Consumables Needed
- Base Coat: For nail protection.
- Muted Green, Blue, and Brown Nail Polishes: For the base and marbling.
- Marbling Tool: To create intricate designs.
- Top Coat: For a glossy finish.
The rustic colors and intricate marbling create a charming and sophisticated look, perfect for a cozy fall day.
DIY Instructions
- Apply a base coat to protect your nails.
- Use muted green, blue, and brown nail polishes as the base, applying two coats for full coverage.
- Use the marbling tool to create marble patterns with the different colors.
- Seal with a top coat to protect the design and add shine.
This season, let your nails reflect the beauty of fall with these intricate and stylish fall marble nails ideas. Whether at a coffee shop or the pumpkin patch, your nails will carry the essence of autumn wherever you go.

