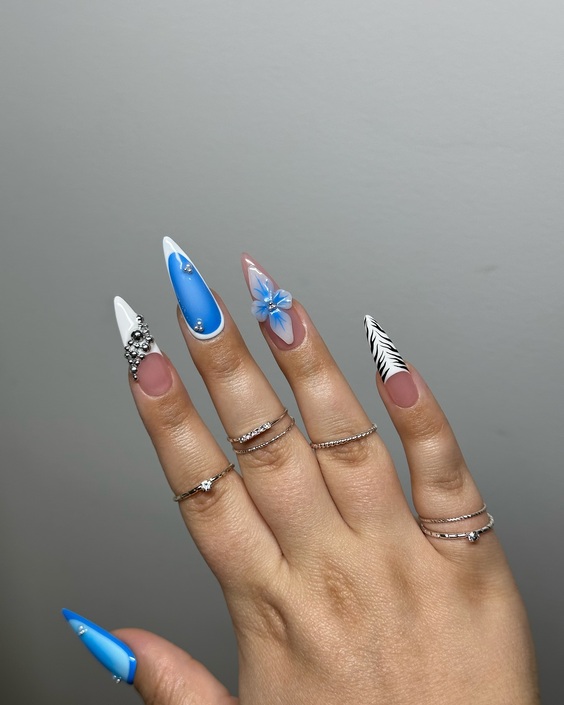
19 Trendsetting Fall 2024 Nail Designs to Elevate Your Style
Are you ready to dive into the world of cute fake nails for fall 2024? As the leaves change color, why not let your nails do the same? From the subtly elegant to the boldly expressive, this season’s trends offer something for every style. Whether you’re a fan of sleek minimalism or over-the-top embellishments, this guide will walk you through some of the most captivating designs for the upcoming season. What’s your nail mood this fall
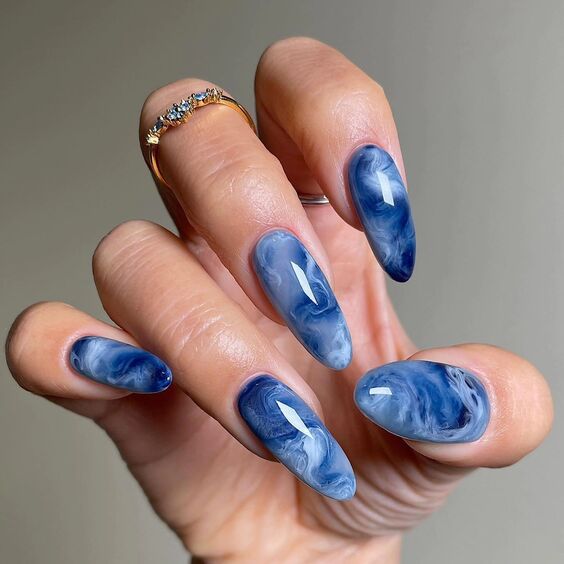
Oceanic Blue Swirls
Dive into the deep blue with these mesmerizing oceanic swirls. The swirling patterns mimic the tranquil movements of sea waves, crafted in shades of deep and light blue. This design not only captures the essence of the ocean but also embodies a serene elegance perfect for the fall season. The glossy finish adds a touch of sophistication, making these nails a perfect choice for both day and night occasions.
Materials and Recommendations:
- Base coat: Sally Hansen Hard as Nails
- Blue nail polishes: Essie in shades “Deep Dive” and “Surf’s Up”
- Top coat: Seche Vite Dry Fast Top Coat
- Detailing tool: Dotting tool or a fine brush
Creating this look requires a steady hand and patience, particularly when swirling the two blue shades together. The use of a high-quality top coat like Seche Vite ensures the design lasts longer and retains its glossy finish.
DIY Instructions:
- Start by applying a clear base coat to protect your natural nails.
- Apply two coats of “Deep Dive” as the base color.
- While the second coat is still tacky, gently dab “Surf’s Up” using a fine brush and swirl the colors together to create the wave effect.
- Allow the design to dry completely before applying a glossy top coat for a smooth finish.
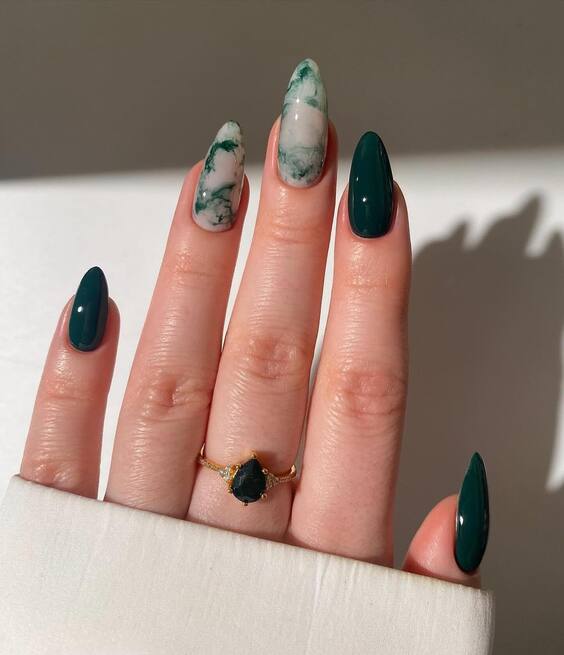
Emerald Marble Elegance
The emerald green marble design is a true reflection of fall’s richness. This sophisticated look features a combination of dark green and white swirls, resembling natural marble. It’s an artistic choice for those who appreciate an earthy yet luxurious aesthetic. The glossy finish and gold fleck accents elevate the overall appearance, making it suitable for formal events.
Materials and Recommendations:
- Base coat: OPI Natural Nail Base Coat
- Green nail polish: OPI “Jade is the New Black”
- White nail polish: OPI “Alpine Snow”
- Gold flakes: Nail Art Gold Leaf Flakes
- Top coat: CND Vinylux Weekly Top Coat
This design demands precision and creativity, especially when blending the colors to achieve the marble effect. The addition of gold flakes should be done sparingly to enhance the luxurious feel without overpowering the green and white marble pattern.
DIY Instructions:
- Apply a base coat to protect your nails.
- Paint your nails with “Jade is the New Black.”
- While the base is still wet, add small dots of “Alpine Snow” and use a detail brush to swirl the colors together, mimicking a marble effect.
- Add a few gold flakes for an added touch of glamour.
- Seal everything with a top coat for durability and shine.
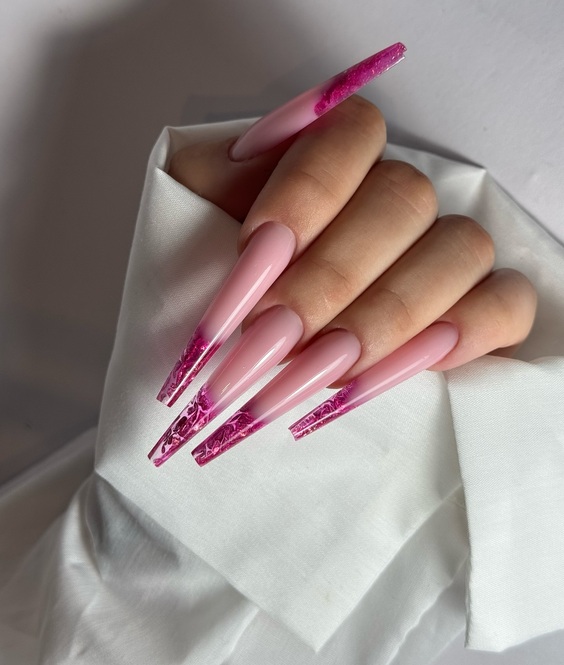
Pink Precision Artistry
Embrace a bold and feminine flair with these striking pink precision nails. The design features a soft pink base with vibrant pink detailing at the tips, creating an eye-catching contrast. The sharp lines and glittered accents bring a playful yet sophisticated element, perfect for those who want to make a statement this fall.
Materials and Recommendations:
- Base coat: Orly Bonder Rubberized Basecoat
- Pink nail polishes: Deborah Lippmann “Chantilly Lace” for the base and “Hot Hot Hot” for the accents
- Glitter polish: Sally Hansen “Pink Diamond”
- Top coat: Essie Gel Setter Top Coat
- Detailing tape for precise lines
For achieving precise and clean lines, detailing tape is invaluable. The glitter polish should be applied sparingly to maintain elegance while still catching the eye.
DIY Instructions:
- Apply the rubberized base coat to prep the nails.
- Paint the nails with “Chantilly Lace” as the foundation color.
- Once dry, use detailing tape to mark off the tips and apply “Hot Hot Hot” for a bold contrast.
- Add a strip of “Pink Diamond” glitter over the pink tips for a sparkling finish.
- Seal the design with a gel top coat for a durable and glossy appearance.
Citrus and Bloom
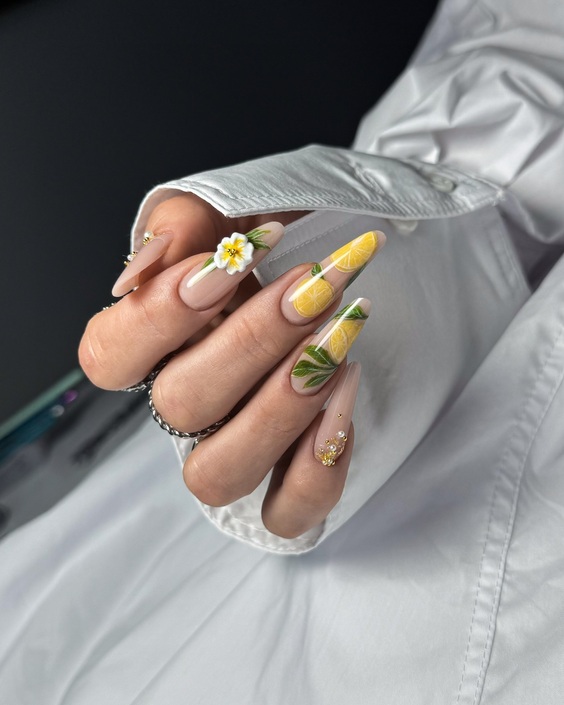
This design is a delightful blend of summer and fall with its bright citrus-inspired colors and floral accents. The nails feature a neutral base with hand-painted lemon and lime slices, paired with delicate white flowers that give a fresh and vibrant look, ideal for transitioning into the cooler season.
Materials and Recommendations:
- Base coat: CND Stickey Base Coat
- Nail polishes: OPI “Lemonade Stand by Your Man” and “Green-wich Village”
- Detail brush for intricate floral and citrus patterns
- Top coat: China Glaze Fast Forward Top Coat
Painting fruits and flowers requires a detail brush for precision. The vibrant shades of yellow and green should be used to mimic the freshness of citrus, providing a contrast to the muted base.
DIY Instructions:
- Start with a base coat to ensure longevity.
- Apply a light beige or nude polish as the base color.
- With a detail brush, hand-paint the lemon and lime slices using yellow and green polishes.
- Add small white flowers with a dotting tool or the tip of a detail brush.
- Finish with a fast-drying top coat to protect your artwork and add shine.
Whispering Feline Whimsy
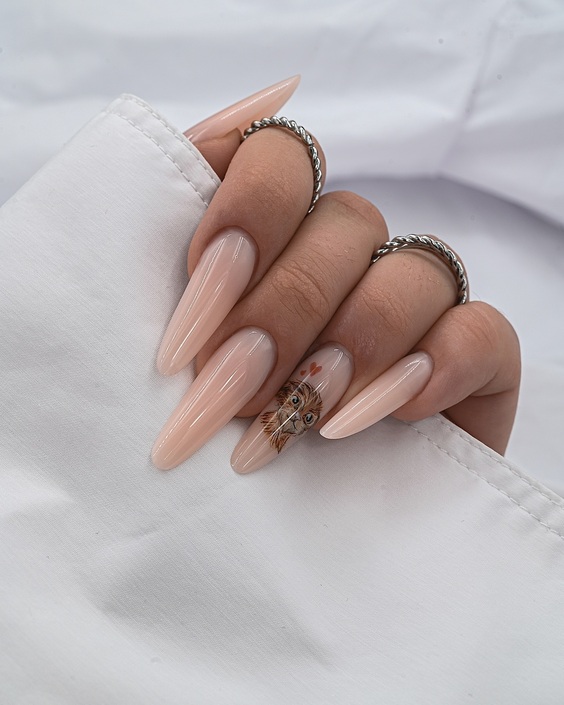
For cat lovers, these nails are a dream. The design features a nude base with a beautifully detailed portrait of a cat, highlighted with subtle brown and beige tones. This nail art is not only a nod to pet enthusiasts but also adds an artistic touch to any fall outfit, combining whimsy with elegance.
Materials and Recommendations:
- Base coat: Essie Strong Start Base Coat
- Nude polish: Essie “Ballet Slippers”
- Brown and beige nail art paints
- Fine detail brush for the cat portrait
- Top coat: Butter LONDON Hardwear Shine UV Topcoat
Achieving the feline portrait requires a steady hand and a fine detail brush. The choice of subtle tones ensures the design remains sophisticated and not overly whimsical.
DIY Instructions:
- Apply a strong base coat.
- Paint the nails with “Ballet Slippers” for a clean and neutral canvas.
- Carefully draw the cat’s face using brown and beige paints with a detail brush.
- Once the art has dried, apply a UV top coat for a long-lasting glossy finish.
Retro Neon Waves
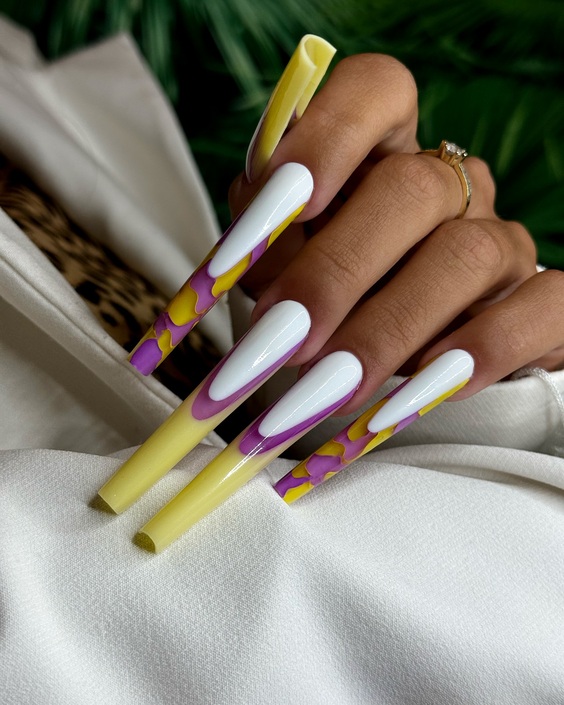
Step back into the retro vibe with these neon wave-patterned nails, embodying the playful spirit of the ’80s. The design features stark white as the base with waves of yellow and purple creating a dynamic contrast. This pattern is not only eye-catching but also perfectly matches the energetic ambiance of fall festivities.
Materials and Recommendations:
- Base coat: Revlon Quick Dry Base Coat
- White nail polish: OPI “Alpine Snow”
- Neon polishes: China Glaze “Plur-ple” and “Yell-oh”
- Wave stencil or freehand with a detail brush
- Top coat: Revlon Extra Life No Chip Top Coat
The key to this look is the precision in creating smooth, flowing waves. Use stencils for more defined shapes or a steady hand for freehand painting.
DIY Instructions:
- Apply a base coat to protect your nails and help the polish adhere better.
- Paint a white base with “Alpine Snow”.
- Once dry, position the wave stencil or freehand draw waves with “Plur-ple” and “Yell-oh”.
- Carefully fill in the waves, alternating colors for contrast.
- Finish with a high-gloss top coat for durability and shine.
Blushing Edges
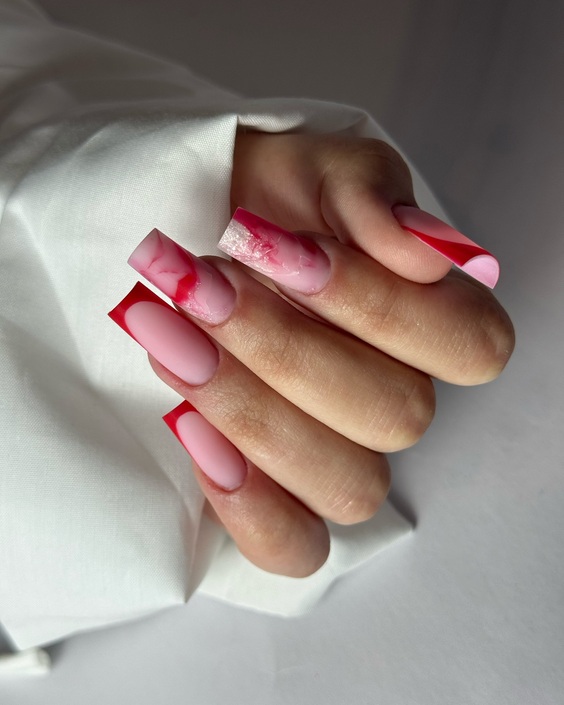
This elegant design combines soft pink with bold red edges, creating a sophisticated yet daring look. The translucent pink base with vivid red framing offers a modern twist on the classic French manicure, ideal for those who appreciate subtlety with a splash of color.
Materials and Recommendations:
- Base coat: Sally Hansen Double Duty Base and Top Coat
- Pink gel polish: Gelish “Light Elegant”
- Red nail tape for crisp edges
- Top coat: Sally Hansen Miracle Gel Top Coat
Achieving the sharp red edges will be easier with nail tape, ensuring a clean and precise line.
DIY Instructions:
- Begin with a base coat for lasting adhesion.
- Apply two coats of “Light Elegant” for a sheer pink base.
- Use red nail tape to create a border at the tips, then seal with a top coat for a glossy finish and to prevent peeling.
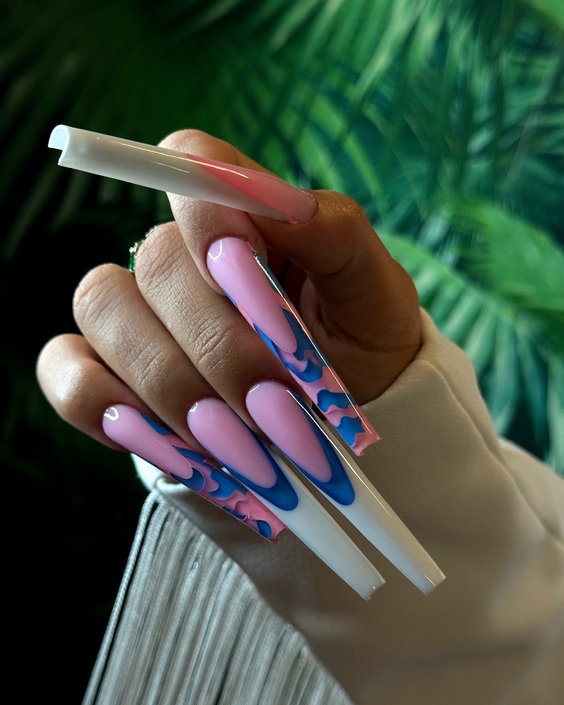
Flowing Pink and Blue
Embrace the fluidity of watercolors with this nail design, where soft pink meets a splash of blue in a seamless blend. The airy and whimsical pattern is perfect for adding a touch of artistic flair to your fall wardrobe, ideal for both casual outings and special occasions.
Materials and Recommendations:
- Base coat: OPI Natural Nail Base Coat
- Pink and blue polishes: Essie “Muchi, Muchi” and “Bikini So Teeny”
- Detailing brush for blending
- Top coat: Essie Speed Setter
Creating this watercolor effect involves blending the colors while they are still slightly wet, using a detail brush to mix and merge hues gently.
DIY Instructions:
- Apply a base coat to start.
- Paint a base of “Muchi, Muchi”.
- While the base is tacky, add drops of “Bikini So Teeny” and use a detailing brush to blend the edges softly, creating a watercolor effect.
- Finish with a fast-drying top coat to capture the fluid design.
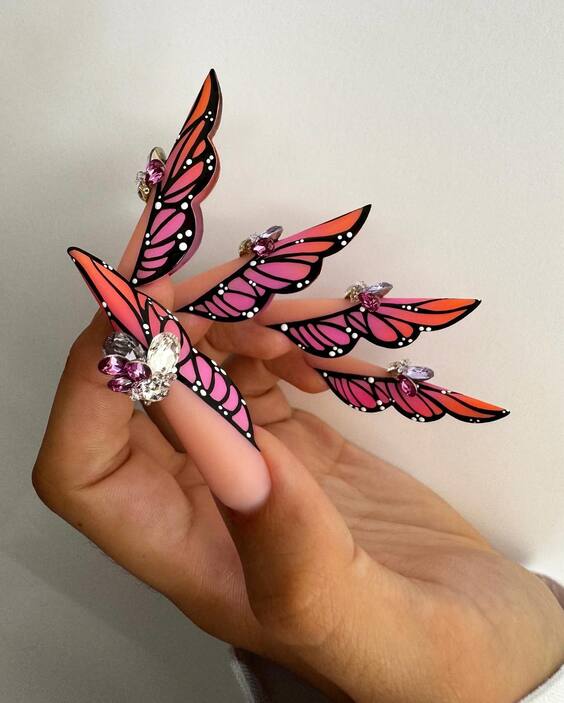
Butterfly Fantasy
This nail art is nothing short of a fantastical escape, featuring extended nails that transform into butterfly wings, complete with black and pink patterns and crystal embellishments. It’s a bold and artistic statement piece, perfect for special events or fashion statements in the fall season.
Materials and Recommendations:
- Base coat: Orly Bonder Rubberized Base Coat
- Pink and black polishes: China Glaze “Bottoms Up” and “Liquid Leather”
- Rhinestones and crystals: Assorted sizes for added sparkle
- Top coat: Glisten & Glow Top Coat
This design requires precision in both polish application and the placement of embellishments to achieve the butterfly wing effect.
DIY Instructions:
- Apply a base coat to protect your nails.
- Paint the base of the nails in a light pink shade.
- Use black polish to draw the intricate patterns of butterfly wings.
- Attach rhinestones and crystals while the polish is tacky to ensure they adhere well.
- Seal with a high-gloss top coat for durability and an extra shine.
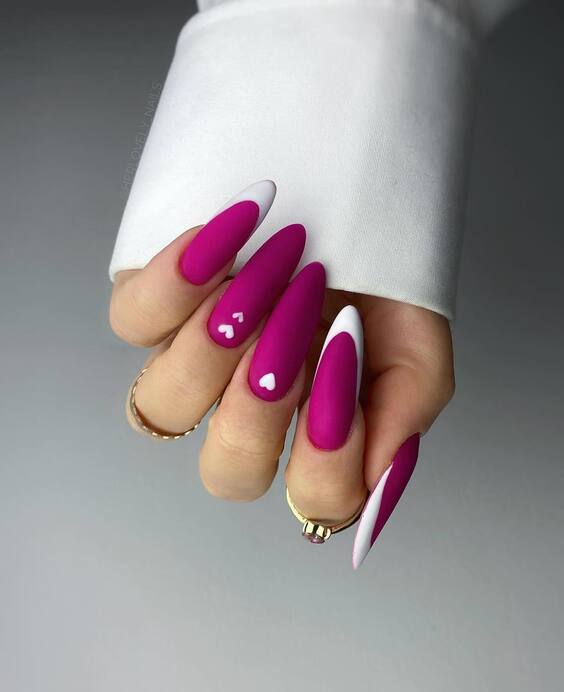
Magenta Magic
These nails exude simplicity with a twist, featuring a bold magenta shade combined with white accents in a modern artistic design. It’s a playful yet elegant style, suitable for both everyday wear and special occasions in the fall.
Materials and Recommendations:
- Base coat: Essie Here to Stay Base Coat
- Magenta polish: OPI “Mad for Madness Sake”
- White polish: Sally Hansen “White On”
- Top coat: Sally Hansen Insta-Dri Top Coat
For those who love a minimal but striking look, this design balances bold colors with subtle artistic touches.
DIY Instructions:
- Start with a base coat to ensure a smooth application.
- Apply two coats of magenta polish as the base.
- Use a thin brush to add white accents in abstract shapes or dots.
- Finish with a quick-drying top coat to enhance the glossiness and protect the design.
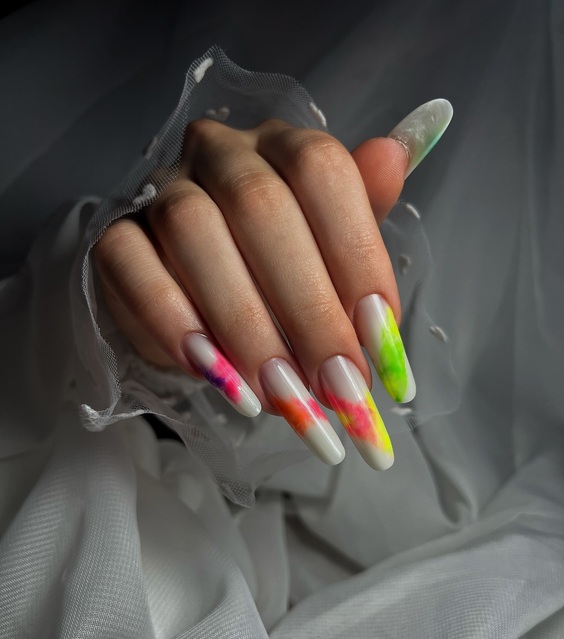
Neon Splash
Capture the essence of neon lights with these multi-colored, translucent tips. This design uses vibrant neon colors blended on a clear base to create a look reminiscent of a colorful aurora in the night sky, perfect for adding a pop of color to your fall outfits.
Materials and Recommendations:
- Base coat: Deborah Lippmann Gel Lab Pro
- Neon polishes: A mix of neon pigments from the Americanails Neon Acrylic Collection
- Detailing brush for smooth gradients
- Top coat: Seche Vite Dry Fast Top Coat
Blending different neon pigments requires a soft brush and a light hand to achieve the seamless gradient effect.
DIY Instructions:
- Apply a base coat to clean, dry nails.
- Start with a clear polish base.
- While the base is still wet, dab on neon pigments using a detailing brush, blending the colors softly into each other.
- Allow the design to dry completely before applying a top coat for a glossy finish.
Sunlit Gold Flecks
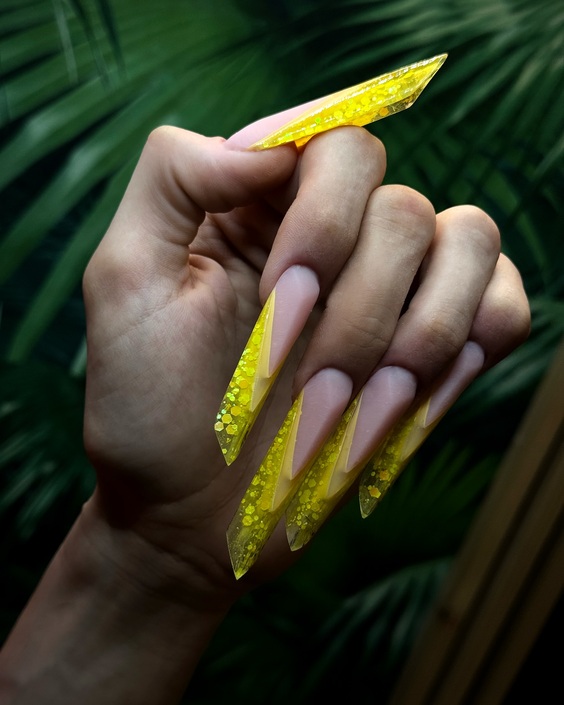
This vibrant nail design captures the essence of sunlight with its golden yellow tones and embedded flecks, creating a dazzling effect. The nails, with their dramatic length and pointed tips, make a bold statement that is both luxurious and eye-catching, ideal for brightening up the cooler fall days.
Materials and Recommendations:
- Base coat: OPI Natural Nail Base Coat
- Yellow polish: Sally Hansen “Mellow Yellow”
- Gold fleck polish: Deborah Lippmann “Boom Boom Pow”
- Top coat: Seche Vite Dry Fast Top Coat
The combination of yellow and gold requires precise application to ensure the flecks distribute evenly and enhance the radiant effect.
DIY Instructions:
- Begin with a base coat to protect the nails and enhance polish adhesion.
- Apply two coats of “Mellow Yellow” for a solid, vibrant base.
- Layer “Boom Boom Pow” over the yellow, focusing on the tips to maximize the sparkling fleck effect.
- Seal with a fast-drying top coat for a glossy finish and extended wear.
Winter’s Edge
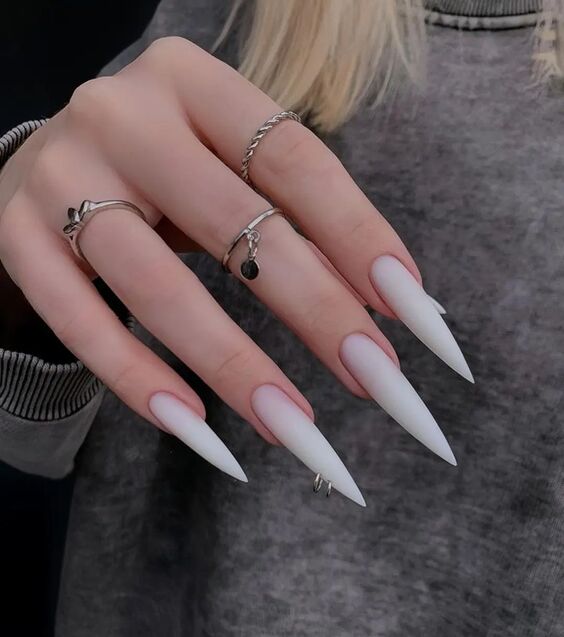
This sleek and icy design features long, sharply pointed nails with a clear to white gradient, resembling the frosty touch of winter. The minimalist aesthetic is punctuated by a subtle pink hue at the nail bed, giving it a naturally elegant vibe perfect for fall and winter transitions.
Materials and Recommendations:
- Base coat: Essie Strong Start
- White polish: OPI “Alpine Snow”
- Gradient sponge for a smooth transition
- Top coat: OPI Top Coat
Achieving the perfect gradient involves a gentle dabbing technique with the sponge, blending the white polish softly into the clear base.
DIY Instructions:
- Apply a base coat to start.
- Use a sponge to apply “Alpine Snow” at the tips, gently dabbing towards the middle to create a faded gradient effect.
- Once the gradient is satisfactory, apply a top coat to smooth out the texture and add shine.
Glittering Ombré Elegance
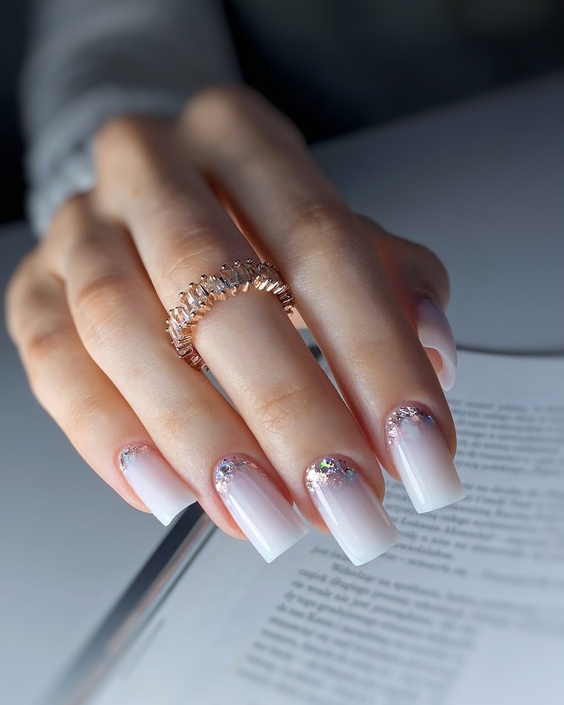
These nails blend subtlety with sparkle through a beautiful ombré transition from clear to white, sprinkled with delicate glitter. The design is sophisticated and understated, with just enough glitz to make a statement at festive occasions or daily wear during the fall season.
Materials and Recommendations:
- Base coat: CND Stickey Base Coat
- Clear and white polishes: Sally Hansen “Sheer Ecstasy” and “White On”
- Silver glitter polish: Essie “Set in Stones”
- Top coat: INM Out the Door Top Coat
Creating this ombré effect with glitter requires layering the polishes and glitter strategically to achieve a seamless blend.
DIY Instructions:
- Start with a protective base coat.
- Apply “Sheer Ecstasy” over the entire nail.
- While the base is still tacky, gently sponge “White On” onto the tips, blending towards the middle.
- Before the polish dries, sprinkle “Set in Stones” over the tips, tapering off towards the nail bed.
- Seal with a top coat for a smooth, durable finish.
Soft Elegance
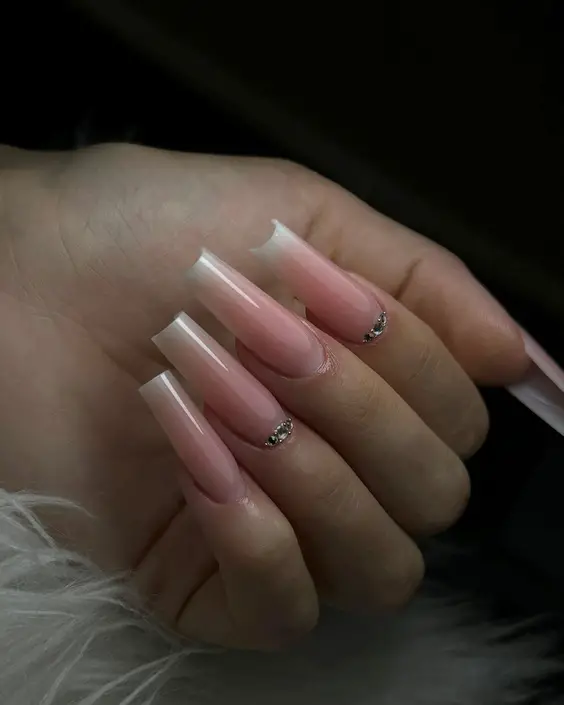
This design emphasizes understated elegance with its soft pink base and clear tips, adorned with a delicate row of crystals at the transition. Perfect for those seeking a subtle yet glamorous look, it combines the simplicity of a French manicure with the sparkle of fine jewelry.
Materials and Recommendations:
- Base coat: Butter LONDON Nail Foundation Priming Basecoat
- Pink polish: Essie “Ballet Slippers”
- Clear polish for the tips
- Crystal embellishments
- Top coat: Chanel Le Gel Coat
The application of crystals should be done with precision to maintain a neat and orderly appearance.
DIY Instructions:
- Apply a base coat to prepare the nails.
- Paint the nails with “Ballet Slippers” stopping just short of the tips.
- Apply clear polish to the tips.
- Add a row of crystal embellishments along the line where the pink meets the clear polish.
- Seal with a top coat to ensure durability and enhance the shine of the crystals.
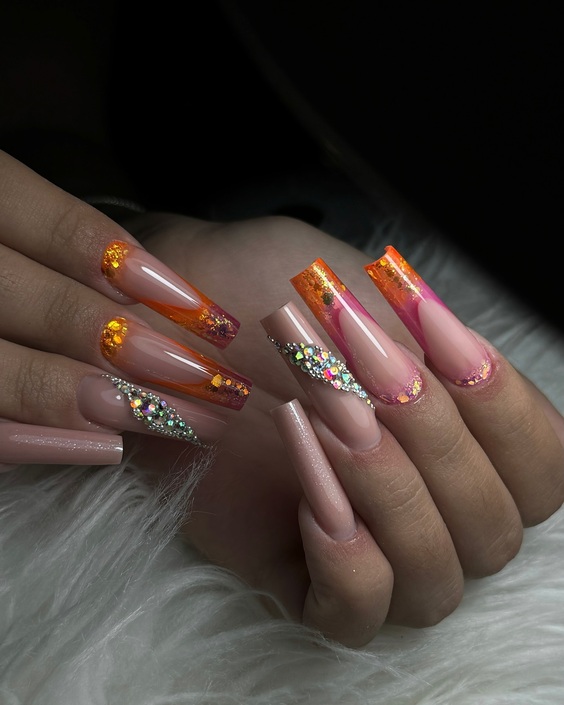
Carnival of Colors
This lively and colorful design is reminiscent of a carnival, featuring a base of muted pink with vibrant orange, pink, and glitter accents on the tips. This dynamic combination is perfect for those looking to add a pop of color and personality to their fall wardrobe.
Materials and Recommendations:
- Base coat: OPI Natural Nail Base Coat
- Pink and orange polishes: Sally Hansen “Tickled Pink” and “Sun Kissed”
- Glitter polish: Nails Inc. “Chelsea Square”
- Top coat: Essie Good to Go
For a flawless finish, apply the glitter last to avoid color mixing and ensure each hue stands out distinctly.
DIY Instructions:
- Start with a base coat to protect the nails.
- Apply “Tickled Pink” as the base color.
- Carefully add “Sun Kissed” to the tips, blending slightly into the pink.
- Apply “Chelsea Square” over the colored tips for a glittering finish.
- Complete the look with a fast-drying top coat to seal in the colors and add gloss.
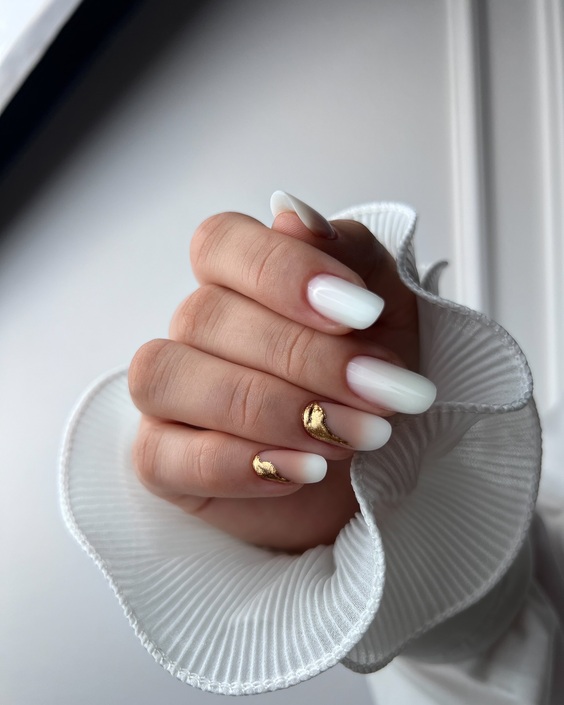
Golden Crescent
Elegant and refined, this design showcases a crisp white base with a gold crescent at the base of each nail, offering a modern twist on traditional nail art. This minimalist yet luxurious style is perfect for sophisticated gatherings or an upscale everyday look.
Materials and Recommendations:
- Base coat: Deborah Lippmann Hard Rock
- White polish: Essie “Blanc”
- Gold leaf for the crescent detailing
- Top coat: Sally Hansen Miracle Gel Top Coat
Applying the gold leaf requires a gentle touch to ensure it adheres neatly without tearing.
DIY Instructions:
- Prepare the nails with a base coat for strength and protection.
- Paint the nails with two coats of “Blanc” for a solid white background.
- Carefully apply gold leaf at the nail base to form a crescent shape.
- Seal the design with a top coat to ensure longevity and to keep the gold leaf in place.
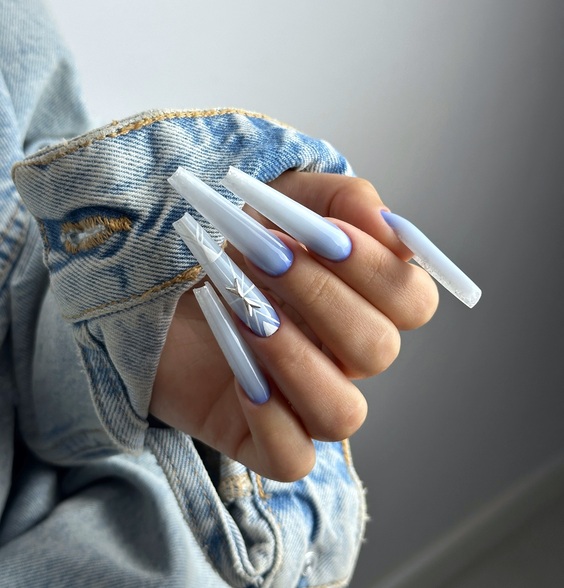
Denim Frost
This design perfectly marries fashion with nail art, featuring a crisp white and soft blue gradient that mimics the cool tones of denim. Enhanced with a detailed silver star and white geometric patterns, these nails are a fresh take on the classic winter aesthetic, making them a perfect choice for both casual and dressy occasions this fall.
Materials and Recommendations:
- Base coat: Revlon Quick Dry Base Coat
- White polish: China Glaze “White on White”
- Blue polish: Essie “Bikini So Teeny”
- Silver nail decals
- Top coat: ORLY Glosser Super High Shine Top Coat
Achieving the gradient effect requires a sponge for dabbing the colors together softly, creating a seamless transition from white to blue.
DIY Instructions:
- Apply the base coat to prepare the nails for painting.
- Paint the base of the nails with “White on White”.
- Use a sponge to apply “Bikini So Teeny” from the midpoint to the tips, blending it into the white.
- Once dry, apply silver star decals and add geometric details using a fine brush.
- Finish with a high-shine top coat to enhance the overall look and prolong wear.

