20 Stunning Pastel Nail Designs for Every Occasion – Explore Now!
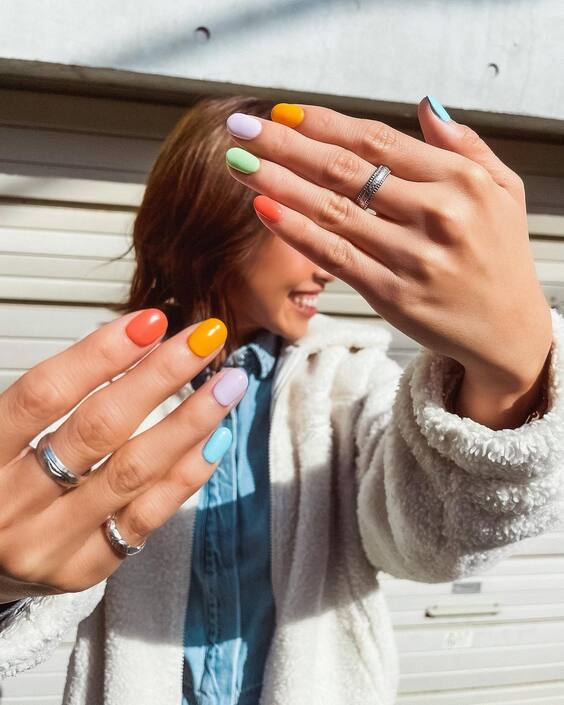
Rainbow Delight
Pastel color nails are all about embracing soft hues and a touch of creativity. In this design, each nail is painted with a different pastel shade, creating a delightful rainbow effect. This look is perfect for those who love to experiment with colors and want their nails to be a canvas of joyful hues. The smooth, glossy finish adds a sophisticated touch, making these nails suitable for both casual and formal settings.
Consumables
- Base coat: OPI Natural Nail Base Coat
- Nail polish: Essie Nail Polish in shades of Lilacism, Mint Candy Apple, Tart Deco, Bikini So Teeny, and Peach Daiquiri
- Top coat: Seche Vite Dry Fast Top Nail Coat
- Nail brush set: Beetles Nail Art Brush Set
DIY Instructions
- Apply the base coat to clean, dry nails.
- Select your pastel shades and apply each color to a different nail, using thin, even strokes.
- Allow the polish to dry completely before applying a second coat for full opacity.
- Use a nail brush to clean up any edges for a professional finish.
- Seal the design with a glossy top coat to enhance the shine and longevity.
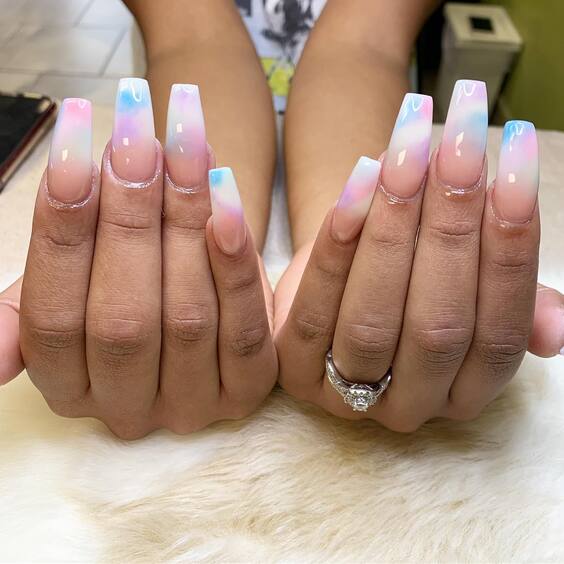
Dreamy Ombre
This pastel ombre design is a dreamy combination of soft pinks, blues, and purples. The seamless gradient effect transitions beautifully from one color to the next, giving the nails a sophisticated and ethereal appearance. This style is perfect for those who prefer a more subtle and elegant nail design that still incorporates the lovely pastel palette.
Consumables
- Base coat: Sally Hansen Hard as Nails
- Nail polish: China Glaze Nail Lacquer in shades of Something Sweet, Refresh Mint, and Secret Periwinkle
- Makeup sponge: Beauty Blender
- Top coat: INM Out the Door Top Coat
DIY Instructions
- Apply the base coat and let it dry.
- On a makeup sponge, apply stripes of the pastel colors in the order you prefer.
- Dab the sponge onto your nails, gently blending the colors to create an ombre effect.
- Repeat the dabbing process until you achieve the desired gradient intensity.
- Clean up around the nails with a brush dipped in polish remover.
- Finish with a top coat to smooth out the ombre and add shine.
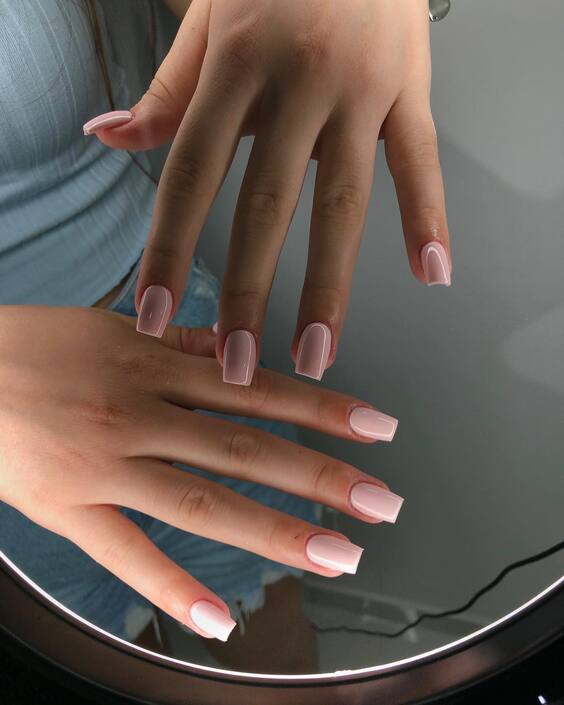
Classic Pastel Pink
Pastel pink nails are a timeless choice that exudes elegance and simplicity. This design features a classic pastel pink shade that is perfect for any occasion, from a casual day out to a formal event. The soft pink hue complements all skin tones and adds a touch of femininity to your look.
Consumables
- Base coat: Essie First Base
- Nail polish: Zoya Nail Polish in shade Dot
- Top coat: Deborah Lippmann Addicted To Speed Ultra Quick-Dry Top Coat
DIY Instructions
- Apply the base coat to protect your nails.
- Apply the pastel pink polish in thin, even coats, allowing each coat to dry completely.
- For a more opaque look, apply a second coat of polish.
- Clean up any excess polish around the nails with a brush dipped in acetone.
- Apply a top coat to seal the color and add a glossy finish.
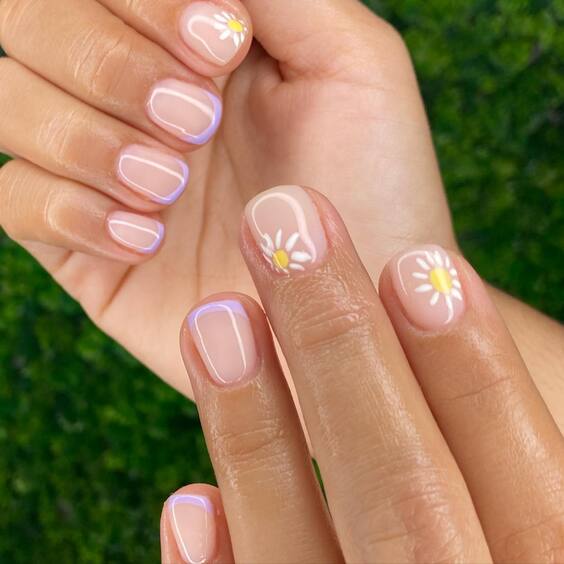
Delicate Blossoms
The elegance of pastel colors truly shines through in this understated yet stunning design. Each nail presents a sheer pink base, adorned with delicate white daisy designs that evoke a sense of springtime freshness. This design not only highlights the beauty of minimalism but also showcases the precision in artistry, making it perfect for those who appreciate subtle beauty.
Consumables List
- Base coat: Essie Ridge Filling Base Coat
- Pastel pink polish: OPI Soft Shades Pastel
- White polish for daisy designs: Sally Hansen White On
- Top coat: Seche Vite Dry Fast Top Coat
- Daisy nail stickers or a fine nail art brush
DIY Instructions
Start with a clean, buffed nail. Apply a ridge-filling base coat to smooth any imperfections. Once dry, apply two coats of the pastel pink polish. For the daisies, either use pre-made stickers or hand-paint with a fine brush using white polish. Position the daisies randomly for a natural look. Finish with a top coat for a lasting glossy effect.
Pastel Playground
This playful nail design embraces the pastel spectrum by incorporating multiple shades into one cohesive look. Each nail features a different pastel color with exquisite adornments such as tiny pearls and gold flakes, creating a glamorous yet fun appearance. This style is ideal for those looking to make a statement with their nails, merging classic elegance with modern trends.
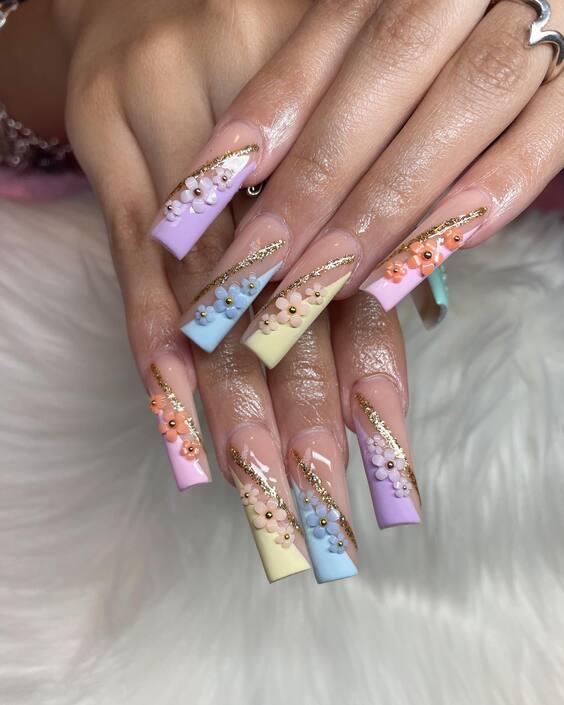
Consumables List
- Base coat: CND Stickey Base Coat
- Pastel polishes: Essie Spring Collection
- Gold flake top coat: ILNP Gold Flakes
- Micro pearls: Tiny Bead Pearls from Born Pretty
- Nail glue for pearls
- High-gloss top coat: Seche Vite
DIY Instructions
Apply a base coat to protect your nails and ensure better polish adhesion. Paint each nail a different pastel shade from the Essie Spring Collection. Once dry, apply a thin layer of nail glue and carefully place the micro pearls along the nail bed or in a pattern you desire. Add accents of gold flakes with a top coat mixed with the flakes. Seal everything with a high-gloss top coat for durability and shine.
Elegant Ombre
Ombre nails are a beautiful way to blend two pastel colors, creating a smooth, gradient effect. This particular design uses a soft lavender that fades into a mint green, edged with a thin gold line for a refined touch. It’s an excellent choice for those who prefer a sophisticated yet understated look.
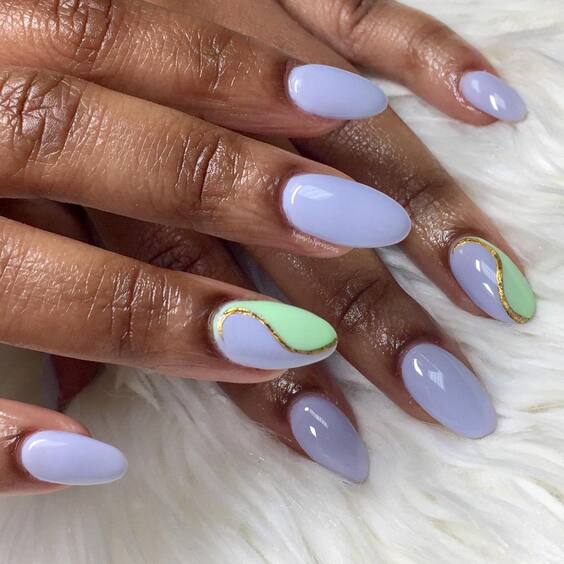
Consumables List
- Base coat: OPI Natural Base Coat
- Lavender polish: China Glaze Lavender Luxe
- Mint green polish: Essie Mint Candy Apple
- Gold striping tape
- Sponge for ombre effect
- Top coat: Sally Hansen Miracle Gel Top Coat
DIY Instructions
Begin by applying a base coat. Once that’s dry, apply a light layer of lavender polish as the base color. Using a sponge, dab onto the nail a blend of lavender and mint green polish, starting from the cuticle and fading towards the tip. Apply the gold striping tape at the transition line to define the colors distinctly. Finish with a top coat to seal the design and add a glossy finish.
Creative Clouds
This innovative design captures the essence of a sky on a serene day. The combination of soft pastel blues, purples, and whites creates a cloud-like effect, ideal for those who love themed nails with a touch of whimsy. Each nail features a unique pattern, making this set truly one-of-a-kind.
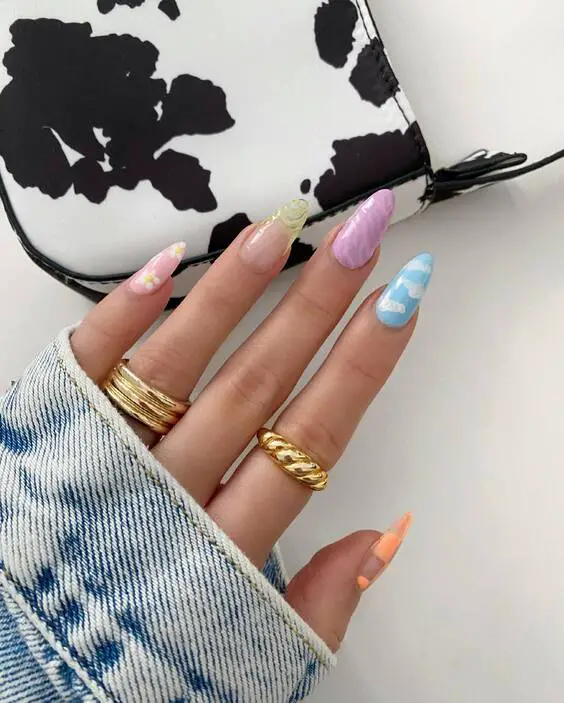
Consumables List
- Base coat: OPI Natural Nail Base Coat
- Pastel blue and purple polishes: Essie Play Date and Bikini So Teeny
- White polish for cloud details: Sally Hansen White On
- Detailing brush for precise art
- High-gloss top coat: Seche Vite Dry Fast
DIY Instructions
After applying a base coat, alternate between pastel purple and blue as base colors on each nail. Use a small detailing brush to dab on white polish in cloud patterns. Keep the designs soft and blended by lightly feathering the edges of the clouds with the brush. Seal with a high-gloss top coat for a smooth, durable finish.
Pastel Flames
This daring design takes pastel nails to a new level by incorporating a flame motif. The soft pink base serves as the perfect backdrop for the white flame accents, which are highlighted with a subtle iridescent shimmer. This style is perfect for those looking to combine classic elegance with a modern twist.
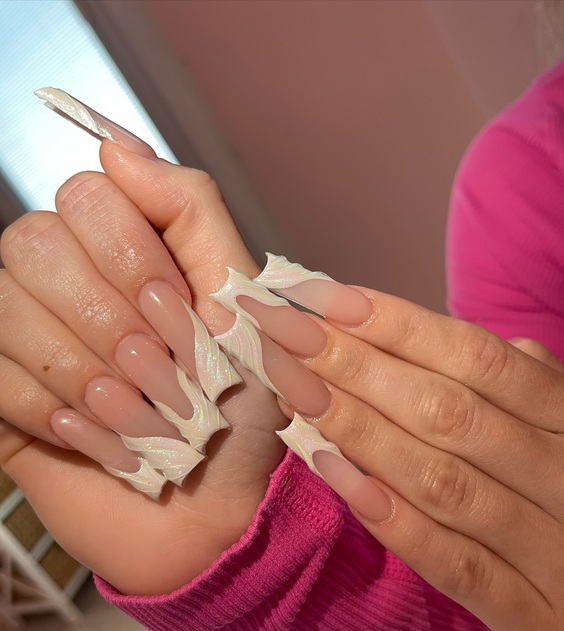
Consumables List
- Base coat: China Glaze Strong Adhesion Base Coat
- Pastel pink polish: OPI Pink-ing of You
- Iridescent white polish: ILNP Luna
- Fine detail brush for flame designs
- Quick-dry top coat: Seche Vite
DIY Instructions
Apply the base coat to prepare your nails. Next, paint a solid coat of pastel pink. Using a fine detail brush, draw flame designs starting at the cuticle and flicking upward. Fill the flames with iridescent white polish for a shimmering effect. Finish with a quick-dry top coat to protect your design and add shine.
Sweethearts and Rainbows
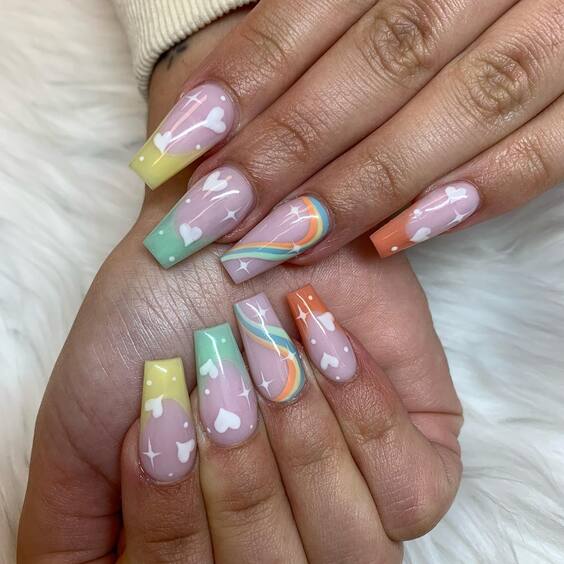
Celebrating the charm of pastels, this nail design uses soft pink as a base and incorporates rainbow stripes and heart accents. Each nail tells a story of love and joy, making it a perfect choice for festive occasions or just to brighten a regular day.
Consumables List
- Base coat: Sally Hansen Double Duty Base & Top Coat
- Pastel pink polish: Essie Muchi, Muchi
- Multi-colored striping tape
- Heart stickers or a stencil
- Top coat: INM Out the Door Top Coat
DIY Instructions
Start with a base coat to protect your nails. Apply two coats of pastel pink polish as the foundation. Once dry, use striping tape to create thin rainbow lines on selected nails. For the hearts, either place stickers or use a stencil with a contrasting pastel polish. Seal everything with a top coat for a glossy, enduring finish.
Blossom Beauty
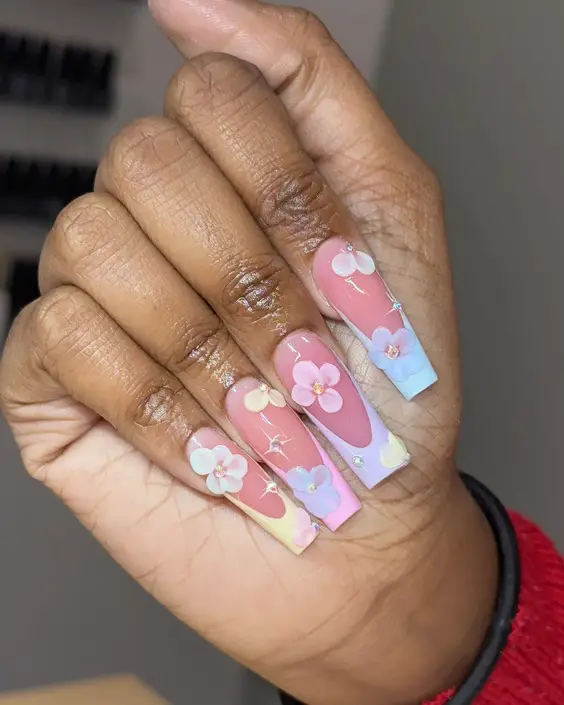
This pastel pink and blue gradient design is adorned with intricate floral accents that add a romantic and delicate touch. Perfect for spring or a special occasion, this look combines soft colors with 3D flower embellishments to create a sophisticated and enchanting manicure.
Consumables List
- Base coat: OPI Start-to-Finish Base Coat
- Pastel pink and blue polishes: Essie Spring Collection
- 3D flower embellishments
- Nail glue
- Top coat: OPI Glossy Top Coat
DIY Instructions
Start with a base coat to protect your nails. Apply a pastel pink polish as the base color. Using a sponge, blend blue polish from the tip downwards to create a smooth gradient. Attach the 3D flower embellishments using a small dot of nail glue. Finish with a glossy top coat to enhance the colors and secure the flowers.
Soft Pastel Blend
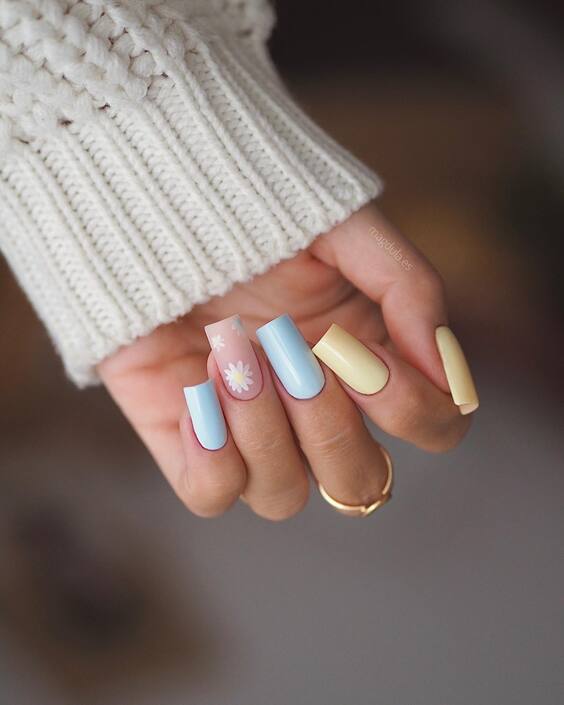
This set shows off a stunning blend of pastel blue, pink, and yellow, creating a harmonious and soothing color palette. The addition of a subtle floral design on the ring finger adds a touch of elegance, making this design versatile for both casual and formal settings.
Consumables List
- Base coat: Sally Hansen Advanced Hard as Nails
- Pastel polishes: OPI Soft Shades Collection
- White polish for floral details
- Fine detail brush
- Top coat: INM Out the Door
DIY Instructions
Apply your base coat for nail protection. Paint each nail in a different pastel shade. For the floral design, use a fine brush to delicately paint a small flower on the ring finger using white polish. Ensure each stroke is thin and precise for a clean, sophisticated look. Seal the design with a fast-drying top coat for a long-lasting finish.
Playful Pastel Art
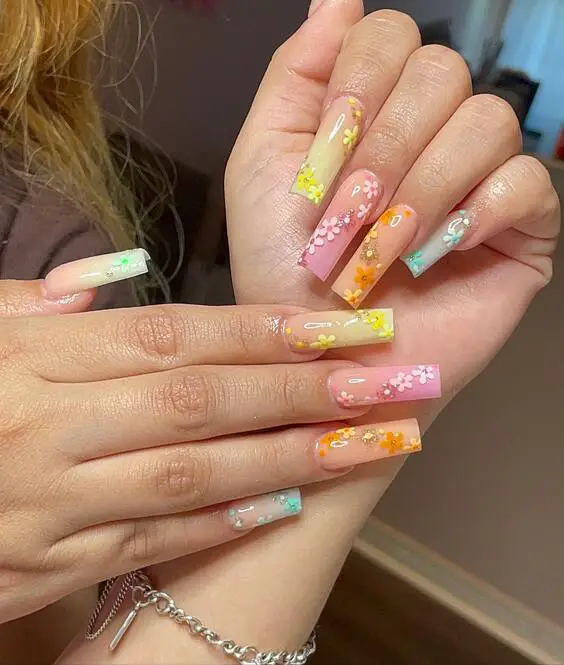
This playful design is perfect for those who love vibrant and youthful styles. Featuring a mix of pink and yellow pastel shades, the nails are decorated with white polka dots and tiny floral patterns, creating a lively and cheerful appearance that’s bound to turn heads.
Consumables List
- Base coat: Essie Here to Stay Base Coat
- Pastel pink and yellow polishes: China Glaze Pastels Collection
- White polish for details
- Dotting tool and fine brush
- Top coat: Seche Vite Dry Fast Top Coat
DIY Instructions
Begin with a base coat to ensure a smooth polish application. Alternate between pastel pink and yellow for each nail. Use a dotting tool to create white polka dots on some nails and a fine brush to paint small flowers on others. This mix of patterns adds an exciting and fun element to the manicure. Finish with a top coat for a glossy and protective layer.
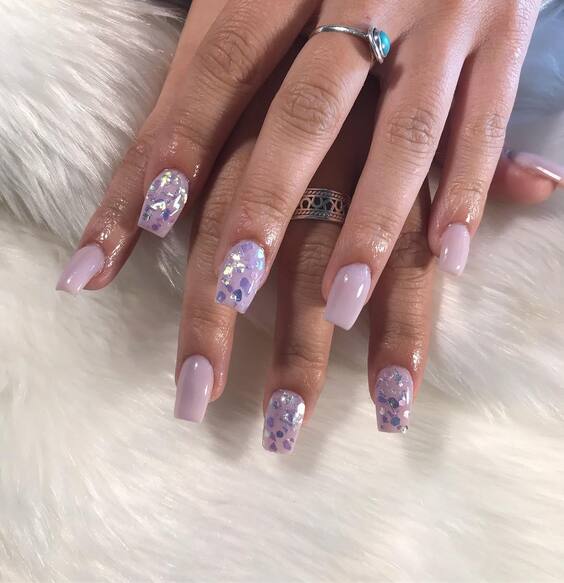
Lavender Elegance
This design showcases a luxurious blend of lavender shades, complemented by glitter and sequin accents for a touch of glamour. The alternating pattern between solid color and transparent with embellishments makes this set perfect for those who enjoy a sophisticated yet flashy look.
Consumables List
- Base coat: Butter London Nail Foundation
- Lavender polish: Essie Lilacism
- Glitter and sequins: Nail Art Glitter Sequins Mix
- Clear polish for encapsulating embellishments
- Top coat: CND Vinylux Weekly Top Coat
DIY Instructions
Apply the base coat to clean, prepped nails. Paint half of the nails with two coats of lavender polish. On the alternate nails, apply a clear base and while still tacky, place the glitter and sequins as desired. Use clear polish to encapsulate the embellishments, ensuring they lay flat and secure. Finish with a durable top coat for a glossy and protective overlay.
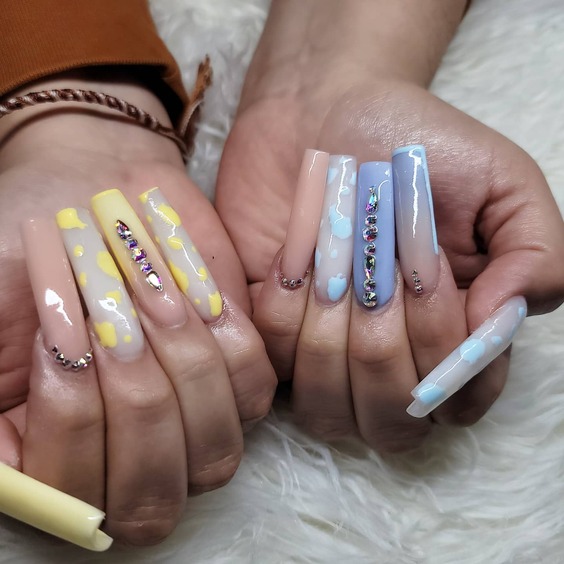
Pastel Party
This lively and bold design combines pastel yellow and blue with intricate detailing, including stripes and cloud-like patterns. It’s embellished with tiny crystals and chains, adding a unique texture and opulent feel. This style is ideal for those looking to stand out with a dynamic and decorated nail art approach.
Consumables List
- Base coat: Deborah Lippmann Hard Rock
- Pastel yellow and blue polishes: OPI Pastel Power Collection
- Nail art chains and crystals
- Detailing brush for precision work
- Strong-hold nail glue
- Top coat: Seche Vite Dry Fast
DIY Instructions
Start with a sturdy base coat to protect your nails. Apply pastel yellow polish as the base on some nails, and pastel blue on others. Use a detailing brush to add white stripes or cloud designs. Carefully place the chains and crystals using a dot of nail glue for secure attachment. Ensure each piece is firmly set before sealing with a heavy-duty top coat.
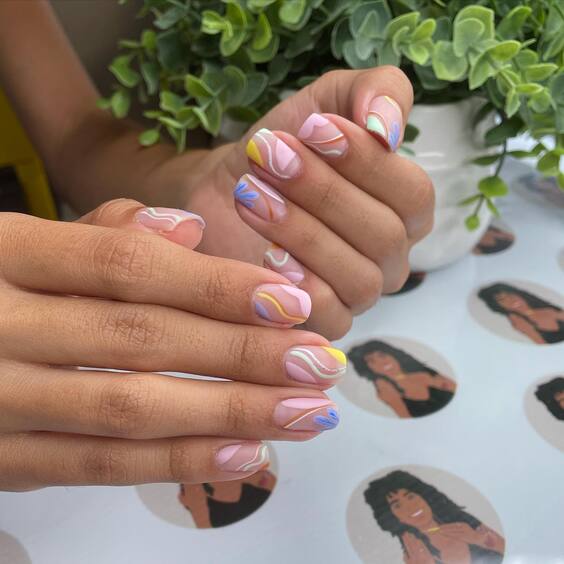
Swirled Sophistication
This nail design features a soft pink base with delicate swirls of pastel blue and yellow, creating an elegant and airy effect. It’s a perfect example of how subtle movements in design can evoke a sense of grace and sophistication, suitable for everyday wear or special occasions.
Consumables List
- Base coat: Zoya Anchor Base Coat
- Soft pink polish: China Glaze Note to Selfie
- Pastel blue and yellow polish for swirls
- Thin brush for detailed swirls
- Top coat: Essie Gel Setter
DIY Instructions
Prepare nails with a base coat for longevity. Apply a smooth layer of soft pink polish as the base. Dip a thin brush into pastel blue and yellow polishes, and gently draw swirls across each nail, mixing slightly where the colors meet to create a seamless transition. Finish with a gel-like top coat for a super shiny and long-lasting effect.
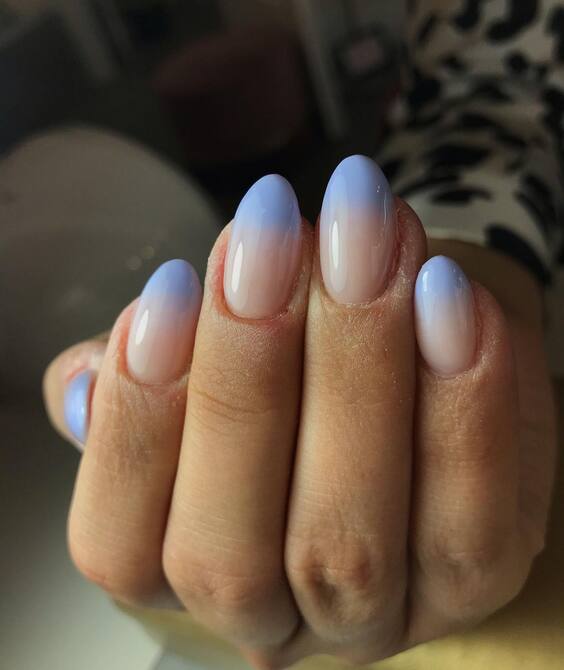
Gradient Serenity
This design exemplifies minimalistic beauty with its smooth gradient transition from soft pink to a subtle lavender. The effect is serene, making it ideal for those seeking a sophisticated, understated look that still offers a touch of color.
Consumables List
- Base coat: Deborah Lippmann Gel Lab Pro Base Coat
- Soft pink polish: Essie Ballet Slippers
- Lavender polish: OPI You’re Such a Budapest
- Sponge for gradient effect
- Top coat: ORLY Glosser
DIY Instructions
Begin with a clean base coat to protect your nails. Apply the soft pink polish as a base color. Once dry, use a sponge to gently dab on the lavender polish at the tip, blending it downwards to create a seamless gradient. Finish with a high-gloss top coat for a smooth and shiny appearance.
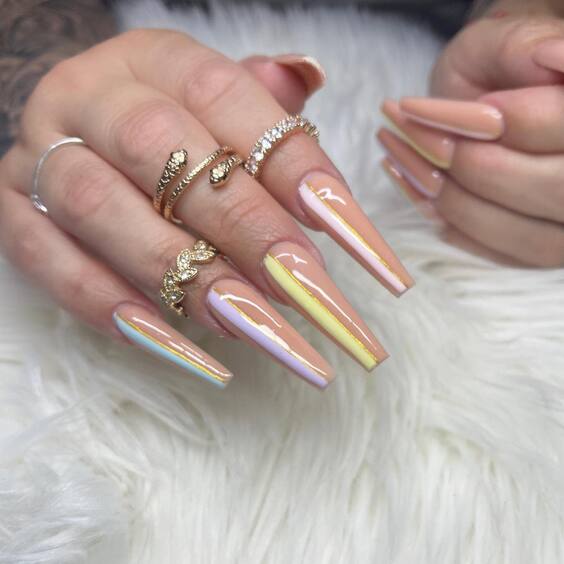
Pastel Rainbow Streaks
This vibrant design features long, slender nails each showcasing a different pastel hue streaked with a rainbow of other pastel tones. The glossy finish enhances the colors, making this a perfect choice for those who love bold and creative looks.
Consumables List
- Base coat: Essie Strong Start
- Pastel polishes: Various colors from the China Glaze Rainbow Collection
- Detailing brush for precise streaks
- Top coat: Revlon Extra Life No Chip Top Coat
DIY Instructions
Apply a base coat to prepare the nails for painting. Choose a different pastel base color for each nail. With a fine detailing brush, add streaks of various pastel tones to create a multi-colored effect. Be sure to clean the brush between colors to maintain clarity. Seal with a top coat for durability and extra gloss.
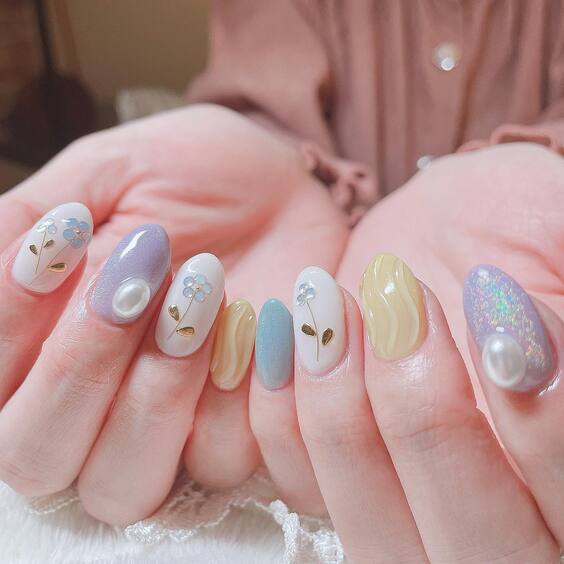
Floral Pastel Elegance
This design marries soft pastel shades with floral and pearl embellishments, creating an elegant and decorative style. It’s perfect for spring or a special event where a touch of refined artistry is desired.
Consumables List
- Base coat: Zoya Anchor Base Coat
- Pastel polishes: Light blue, cream, lavender from the OPI SoftShades Collection
- Pearl embellishments and floral decals
- Nail adhesive for secure application of embellishments
- Top coat: Sally Hansen Miracle Gel Top Coat
DIY Instructions
Start by applying the base coat. Paint each nail a different pastel shade. Once dry, apply floral decals on the nails where you want to highlight them. Use a small amount of nail adhesive to apply the pearl embellishments for a 3D effect. Finish with a gel top coat to ensure the decals and pearls are well-secured and to add a glossy finish.
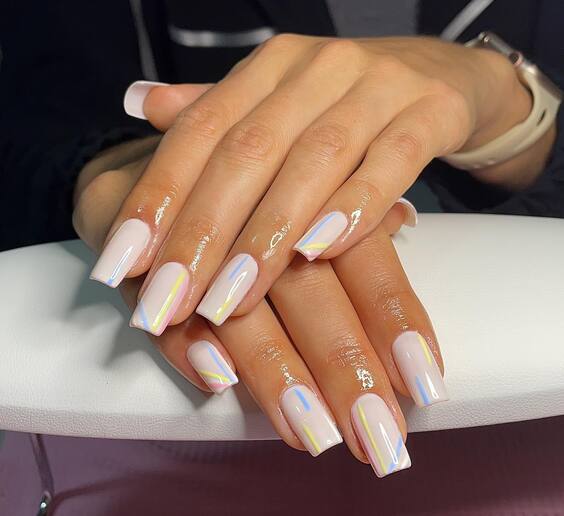
Iridescent Pastel Swirls
This nail design combines soft pastel colors with iridescent strokes to create a dynamic yet delicate appearance. The subtle sheen of the iridescent polish plays beautifully against the pastel base, ideal for those seeking a magical and whimsical touch to their manicure.
Consumables List
- Base coat: ORLY Bonder Rubberized Basecoat
- Soft pastel polishes: Light pink, lavender, and sky blue
- Iridescent top coat: ILNP Eclipse (H)
- Fine brush for detailed swirls
- Top coat: OPI High Gloss
DIY Instructions
Start with a robust base coat to enhance polish adherence. Apply a soft pastel pink as the base color. Once dry, use a fine brush to add iridescent strokes in a swirling pattern across each nail. Alternate the strokes with lavender and sky blue for added depth. Finish with a high-shine iridescent top coat to bring out the magical shimmer in different lights.
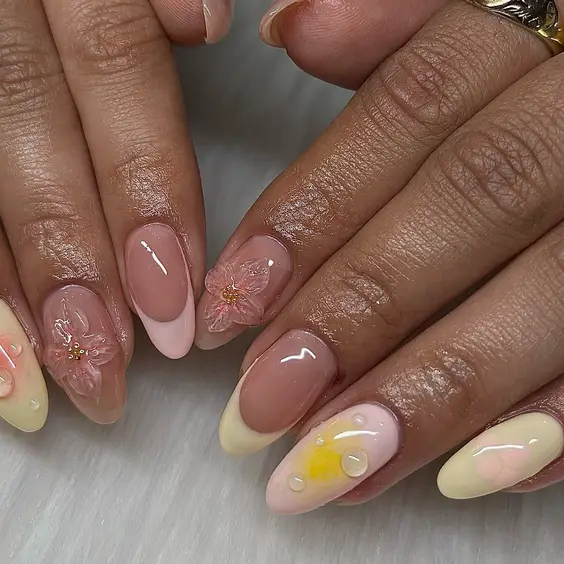
Blossom Jelly Nails
This design features a ‘jelly’ nail effect, utilizing translucent polishes combined with pastel accents to create a stained glass look. The floral embellishments are a beautiful addition, providing a three-dimensional texture that’s both elegant and eye-catching.
Consumables List
- Base coat: Essie All-in-One
- Translucent jelly polish: Dior Nail Glow
- Pastel polishes for accents: Yellow and pink
- Floral nail decals or painted flowers
- Top coat: Sally Hansen Insta-Dri
DIY Instructions
Begin by applying a comprehensive base coat to protect your nails. Apply a coat of translucent jelly polish as the base. Once set, strategically apply pastel yellow and pink polishes in splotches to mimic petals. If using decals, apply floral decals on top; if painting, use a fine brush to create delicate flowers. Secure everything with a quick-drying top coat to enhance the jelly effect and ensure the longevity of the decals.
Conclusion:
Pastel nails offer a versatile palette that can enhance any look with a touch of understated elegance or playful charm. We’ve journeyed through a myriad of designs, from serene gradients and iridescent swirls to jelly finishes and floral embellishments. Each style serves as a testament to the transformative power of pastel colors in the world of nail art. As you experiment with these inspirations, remember that the best accessory is one that reflects your individuality and creativity. So, whether you’re prepping for a special event or just looking to brighten your daily look, pastel nails are a beautiful choice that never goes out of style. Embrace these designs and make your nails a canvas for personal expression and beauty.

