21 Elegant Fall Oval Nail Designs to Elevate Your Autumn Style
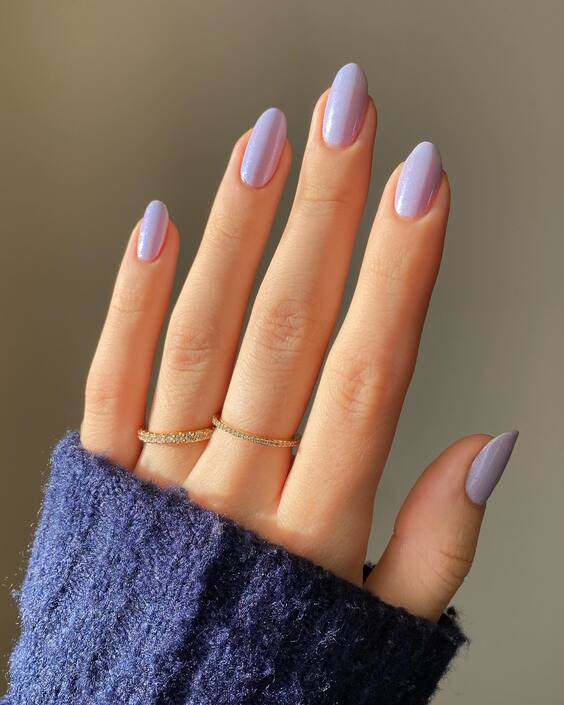
Lavender Twilight
This manicure captures the serene essence of a lavender field at dusk, making it a perfect representative of fall oval nail designs. The nails are coated in a soft lavender shade that has a subtle pearlescent finish, offering a mystical appeal. What stands out are the fine shimmer particles that catch the light beautifully, simulating the last twinkling moments of a sunset. This design not only showcases the oval shape but enhances it with a touch of elegance and sophistication.
Consumables List
- Base Coat: Essie First Base
- Lavender Polish: OPI “You’re Such a BudaPest”
- Top Coat: Seche Vite Dry Fast Top Coat
- Shimmer Powder: Sally Hansen Diamond Strength No Chip Nail Color
Recommendations: The OPI polish offers a long-lasting finish with a rich color payoff, perfect for achieving this dreamy look. Pair it with the Seche Vite top coat for a durable, glossy finish that will make the shimmer stand out.
DIY Instructions
Start with a clean, buffed nail surface. Apply the Essie base coat to protect your nails and enhance the polish’s adherence. Once dry, apply two coats of the OPI lavender polish, allowing each coat to dry thoroughly. After the second coat, lightly dust the shimmer powder over the nails while they are still tacky. Finish with a generous layer of Seche Vite top coat to seal in the design and add an extra gloss.
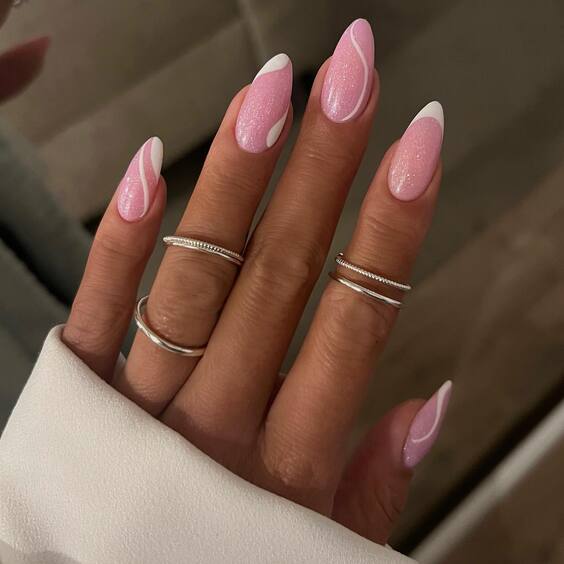
Pink Elegance
This design exudes sophistication with a gentle pink base complemented by white accents, ideal for short oval fall nails. The strategic placement of white dots along the nail bed enhances the oval shape, making the nails appear longer and more refined. The subtle gradient of pink not only embodies the warmth of fall but also adds depth to the overall look.
Consumables List
- Base Coat: CND Stickey Base Coat
- Pink Polish: Essie “Muchi, Muchi”
- White Polish: China Glaze “White on White”
- Top Coat: Sally Hansen Miracle Gel Top Coat
Recommendations: Essie’s “Muchi, Muchi” is wonderfully opaque, perfect for a solid base. Use China Glaze’s white for the dots; its high pigment concentration is ideal for precise application.
DIY Instructions
Apply the CND base coat to prep your nails. Then, paint two coats of Essie’s “Muchi, Muchi,” allowing each coat to dry. Using a dotting tool or the tip of a toothpick, apply small dots of China Glaze “White on White” starting from the base of the nail upwards. This creates an elongated effect on the oval nails. Seal everything with the Sally Hansen top coat for a gel-like finish and extended wear.
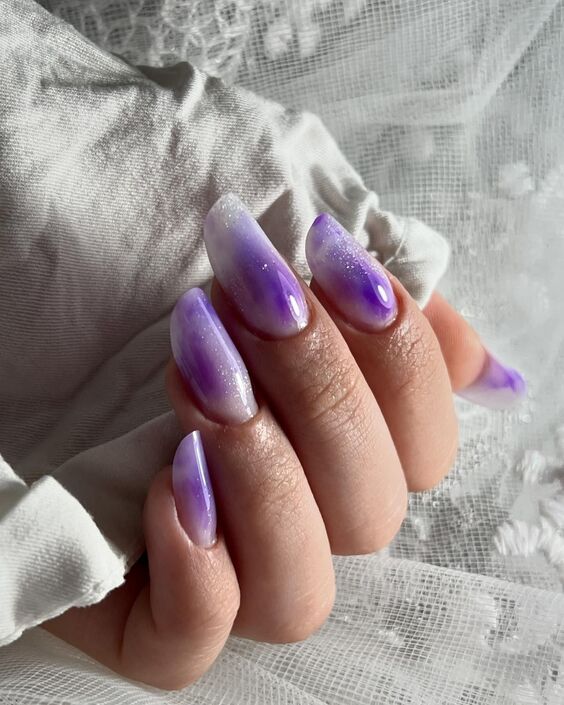
Galactic Purple
The Galactic Purple style is a bold take on oval nails designs fall, featuring a deep purple base with swirling cosmic accents. This design is a nod to the mysterious night skies of autumn, with glistening stars represented by tiny specks of glitter.
Consumables List
- Base Coat: Revlon Quick Dry Base Coat
- Purple Polish: Maybelline Color Show “Mystic Mauve”
- Glitter Topper: Essie Luxeffects Top Coat “Sparkle on Top”
- Top Coat: OPI Top Coat
Recommendations: Maybelline’s “Mystic Mauve” provides the perfect dark purple that mimics a night sky. The Essie glitter topper adds dimension and intrigue to the manicure.
DIY Instructions
Begin with Revlon’s Quick Dry Base Coat for fast preparation. Paint two coats of Maybelline’s “Mystic Mauve.” Before the second coat dries, lightly apply Essie’s glitter topper for a starry effect. Finish with OPI’s Top Coat to enhance the depth and longevity of your manicure.
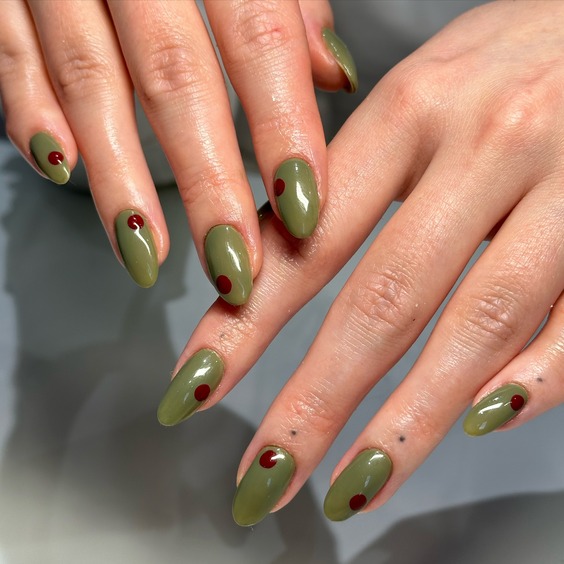
Olive Allure
The Olive Allure design reflects a sophisticated take on fall nails oval shape, featuring a rich olive green base punctuated by crimson dots centered at each nail’s tip. The strategic contrast not only highlights the elegant oval shape but also offers a modern twist to traditional fall colors. The minimalist design balances boldness and simplicity, perfect for those seeking a chic, yet understated look this season.
Consumables List
- Base Coat: Orly Bonder Rubberized Basecoat
- Olive Green Polish: Zoya “Dree”
- Crimson Polish: Essie “Fiesta”
- Top Coat: Revlon Extra Life No Chip Top Coat
Recommendations: Zoya’s “Dree” is exceptional for its deep, earthy hue and excellent coverage. The addition of Essie’s “Fiesta” provides a striking pop of color. For longevity and shine, top it off with Revlon’s Extra Life top coat.
DIY Instructions
Start with Orly’s rubberized base to ensure your polish adheres smoothly and lasts longer. Apply two coats of Zoya “Dree” as the base color. Once the second coat is nearly dry, dab a small amount of Essie “Fiesta” using a pointed tool or the end of a bobby pin at the center of the nail tip to create the crimson dot. Finish with Revlon’s top coat for a glossy and protective layer.
Winter Wonderland
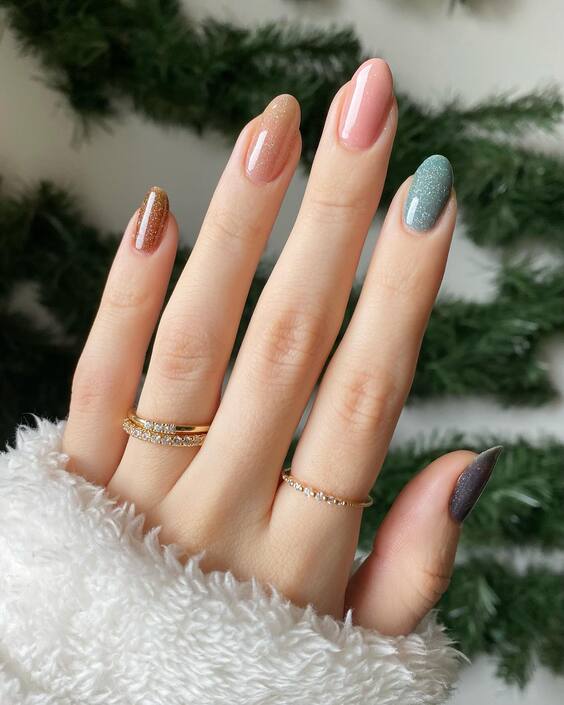
This design beautifully showcases oval nails fall colors in a winter palette, blending dusky pink, frosty blue, and muted gray with hints of gold glitter. The subtle gradient between the colors emulates the soft transition of winter skies, making this manicure ideal for transitioning from fall to winter. Each nail presents a unique combination, reflecting the individual flakes of a snowfall.
Consumables List
- Base Coat: Sally Hansen Double Duty
- Pink Polish: China Glaze “Below Deck”
- Blue Polish: OPI “Cement the Deal”
- Gray Polish: Essie “Master Plan”
- Gold Glitter: ORLY “Glitz”
- Top Coat: CND Vinylux Weekly Top Coat
Recommendations: Use China Glaze for a deeper hue and smooth application. OPI’s “Cement the Deal” and Essie’s “Master Plan” provide the perfect shades for a winter-inspired look. ORLY’s “Glitz” adds just the right amount of sparkle.
DIY Instructions
Apply Sally Hansen’s base coat for protection and longevity. Paint each nail with one of the base colors: pink, blue, or gray. While still wet, lightly sponge on the adjacent colors to create a soft blend, then sprinkle some gold glitter towards the cuticle for a sparkling effect. Seal everything with CND’s top coat for a durable and shiny finish.
Vivid Splash
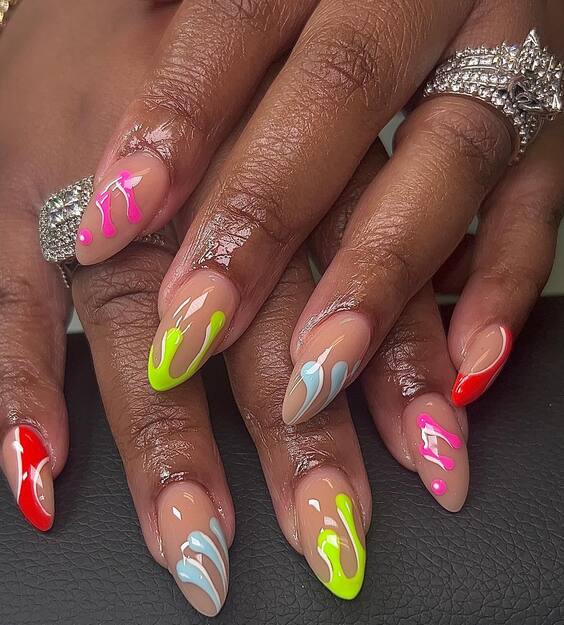
The Vivid Splash design bursts with energy, making it a lively choice among fall oval acrylic nails. It features a transparent base overlaid with vibrant streaks of neon pink, lime green, sky blue, and bright orange. This nail art looks like a painter’s palette of fall colors coming to life, ideal for those who embrace bold, expressive styles.
Consumables List
- Base Coat: OPI Natural Nail Base Coat
- Neon Polishes: OPI Color Paints Collection
- Detailing Brush: Fine tip nail art brush
- Top Coat: Essie Gel Setter Top Coat
Recommendations: OPI’s Color Paints Collection offers the perfect spectrum of neon colors that are highly pigmented and blend well on nails. The Essie Gel Setter provides a plump, gel-like finish that enhances the vibrancy of the colors.
DIY Instructions
Prepare your nails with OPI’s base coat. Apply a thin layer of clear polish as your canvas. Dip your detailing brush into each neon color and apply in swift, fluid strokes to mimic the effect of a brush on canvas. Let each color slightly overlap for a dynamic look. Once dry, apply Essie’s top coat to seal in the design and add a beautiful gloss.
Playful Polka
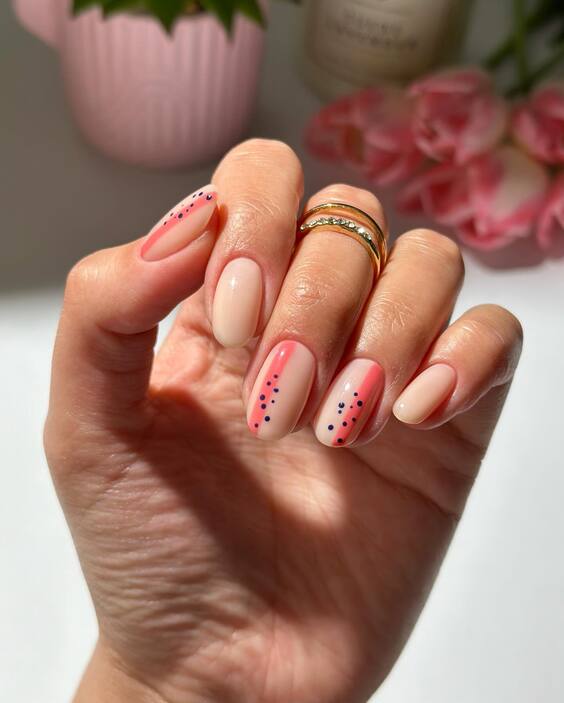
“Playful Polka” showcases a whimsical approach to fall oval nail ideas, featuring a blush pink base adorned with multicolored polka dots. The playful distribution of blue, pink, and black dots across the nails brings a youthful vibe to the classic oval shape. This design is perfect for those who enjoy a dash of fun in their manicure without compromising on elegance.
Consumables List
- Base Coat: Butter London Nail Foundation
- Blush Pink Polish: Essie “Ballet Slippers”
- Dotting Colors: Sally Hansen “Black Out,” OPI “No Room for the Blues,” Essie “Watermelon”
- Top Coat: OPI Top Coat
Recommendations: Essie’s “Ballet Slippers” provides a perfect, subtle backdrop for vibrant dots. The use of a fine dotting tool will help achieve precise and clean dots.
DIY Instructions
Begin by applying Butter London’s base coat for a smooth foundation. Apply two coats of Essie’s “Ballet Slippers” for a full-coverage look. Once dry, use a dotting tool to apply small dots of the colored polishes at random or in a desired pattern. Finish with OPI’s top coat to enhance the shine and longevity of your playful design.
Artistic Strokes
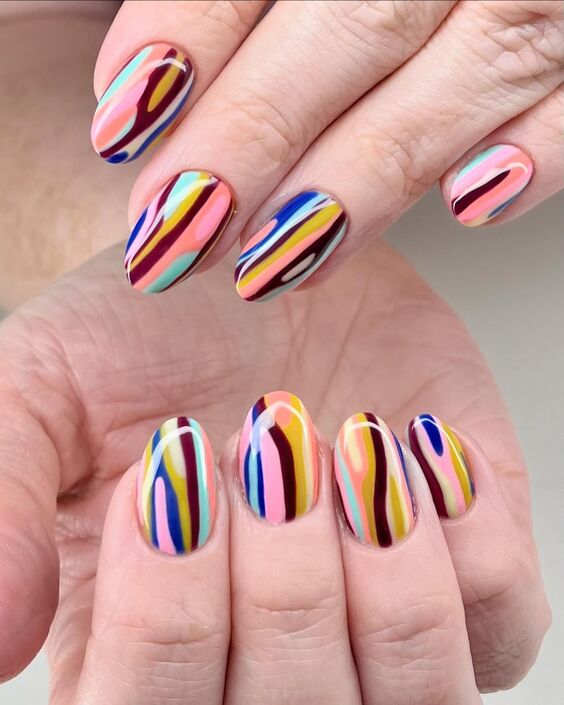
“Artistic Strokes” is a masterpiece in nail design, suitable for cute fall nails oval. It features a white base overlaid with streaks of vibrant enamel in yellow, blue, red, and pink, resembling brush strokes on a canvas. Each nail is unique, reflecting a free-spirited artistic flair that’s perfect for creative souls looking to express their artistry through their manicure.
Consumables List
- Base Coat: Deborah Lippmann Hard Rock
- White Polish: China Glaze “White on White”
- Colorful Polishes: OPI “Big Apple Red,” “Need Sunglasses?” “No Room for the Blues,” and “Pink Flamenco”
- Top Coat: Essie Gel Setter
Recommendations: Using China Glaze “White on White” ensures a bright and opaque base. The colorful polishes from OPI are ideal for this vivid design due to their high pigmentation and smooth application.
DIY Instructions
Apply Deborah Lippmann’s base coat for durability. Paint two coats of “White on White” as the base. Take each colored polish and lightly drag it across the nail in swift, jagged motions using a thin brush to create the effect of brush strokes. Each nail can be a different mix of colors or follow a specific pattern. Seal with Essie’s Gel Setter for a glossy, durable finish.
Gradient Glow
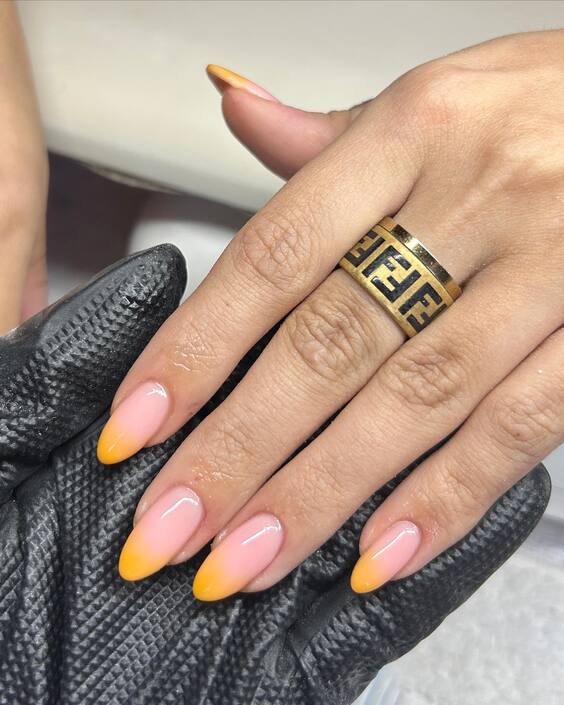
The “Gradient Glow” design is a stunning representation of oval fall nail ideas, featuring a seamless gradient from a sunny yellow at the tips to a soft pink near the cuticles. This design evokes the warm glow of a sunset and is perfect for adding a touch of warmth to cooler fall days.
Consumables List
- Base Coat: Sally Hansen Miracle Cure
- Yellow Polish: Essie “Check Your Baggage”
- Pink Polish: OPI “Mod About You”
- Sponge for Gradient: Makeup sponge
- Top Coat: Seche Vite Dry Fast Top Coat
Recommendations: For the best gradient effect, use a makeup sponge to blend the colors softly. Essie and OPI provide excellent opacity for a smooth gradient transition.
DIY Instructions
Start with Sally Hansen’s Miracle Cure to strengthen nails. Apply a light base coat of pink. Then, on a makeup sponge, apply stripes of pink and yellow polishes side by side, and dab onto the nail, blending where they meet to create a gradient effect. Repeat until desired opacity is achieved. Finish with Seche Vite top coat for a long-lasting, glossy finish.
Dark Mystique
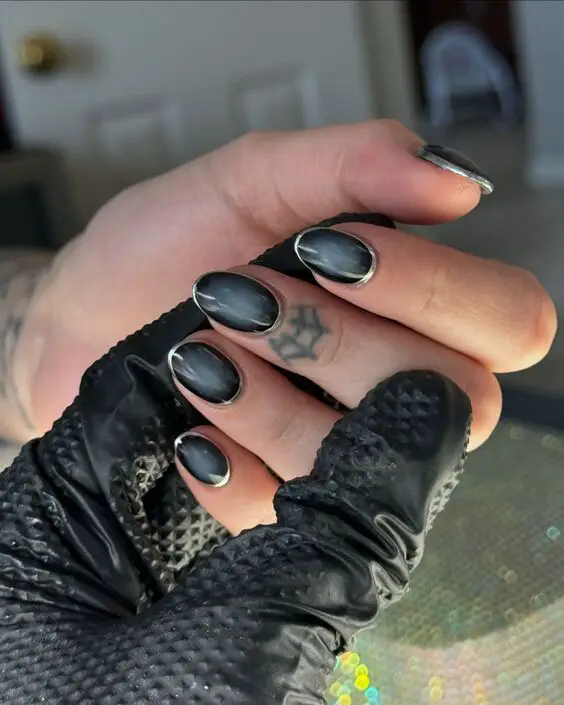
The “Dark Mystique” design is an exquisite example of fall oval nail ideas, embodying an alluring and sophisticated look with its deep, glossy black base and striking silver accents. The design features a minimalist aesthetic but delivers maximum impact, making it a popular choice for those who appreciate a chic, gothic vibe during the fall season.
Consumables List
- Base Coat: Orly Bonder Rubberized Basecoat
- Black Polish: Essie “Licorice”
- Silver Striping Tape
- Top Coat: OPI Top Coat
Recommendations: Essie’s “Licorice” is known for its deep black color and excellent opacity. The addition of silver striping tape provides a metallic contrast that catches the eye without overwhelming the design.
DIY Instructions
Start by applying Orly’s rubberized base coat for optimal adhesion. Follow with two coats of Essie’s “Licorice” for a rich, opaque finish. Once dry, carefully place thin strips of silver tape near the tips or along one side of each nail to create a clean, linear accent. Seal with OPI’s top coat for a durable, glossy finish that enhances the metallic sheen.
Emerald Network
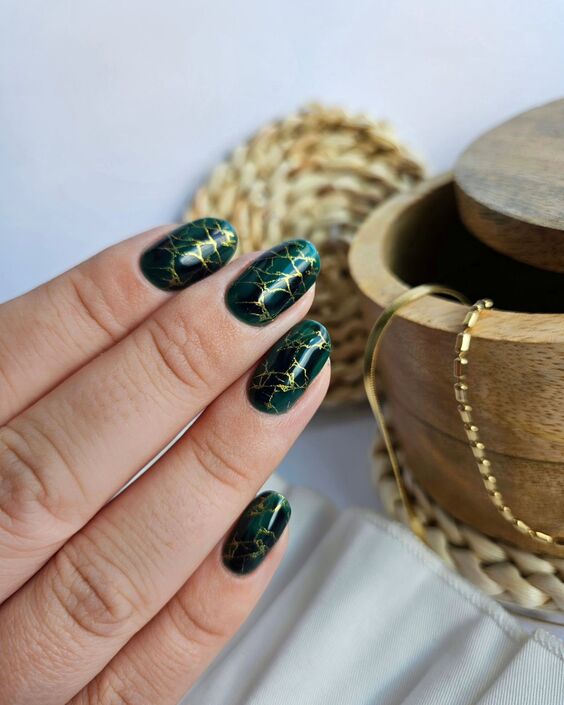
“Emerald Network” stands out in the realm of fall oval acrylic nails, featuring a deep emerald green base overlaid with intricate gold network patterns. This design mirrors the luxurious woven textures often seen in fall fashion, providing a regal and intricate look perfect for formal events or a night out.
Consumables List
- Base Coat: Sally Hansen Miracle Cure
- Emerald Green Polish: Zoya “Giovanna”
- Gold Nail Art Paint
- Fine Tip Brush
- Top Coat: Seche Vite Dry Fast Top Coat
Recommendations: Zoya’s “Giovanna” offers vibrant pigmentation and a glossy finish, creating a luxurious background for the gold detailing. The fine tip brush is essential for precision in painting the detailed gold network.
DIY Instructions
Apply Sally Hansen’s Miracle Cure for strong, protected nails. Paint two coats of Zoya’s “Giovanna” for a full, even color. Using a fine tip brush, dip into gold nail art paint and delicately draw intersecting lines to form a lattice or network pattern over each nail. Finish with Seche Vite’s top coat to seal the design and add a beautiful gloss.
Citrus Fade
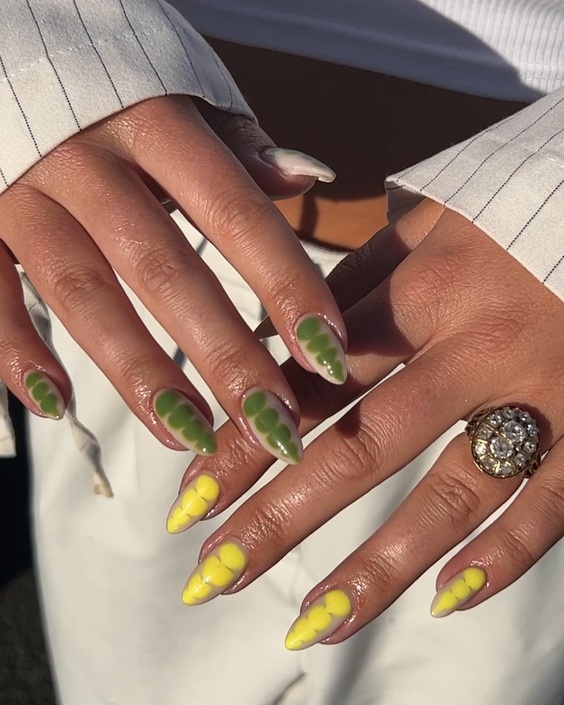
“Citrus Fade” captures the essence of early fall with its vibrant gradient transitioning from a tangy lemon yellow to a ripe lime green. This fresh, zesty design is ideal for oval nails fall colors, offering a bright and cheerful look that contrasts the typically muted fall palettes.
Consumables List
- Base Coat: OPI Natural Nail Base Coat
- Yellow Polish: Sally Hansen “Mellow Yellow”
- Green Polish: Essie “The More The Merrier”
- Sponge for Gradient: Makeup sponge
- Top Coat: CND Vinylux Weekly Top Coat
Recommendations: Sally Hansen’s “Mellow Yellow” and Essie’s “The More The Merrier” provide the perfect citrus tones for this vibrant look. Using a makeup sponge ensures a smooth, seamless gradient.
DIY Instructions
Begin by applying OPI’s Natural Nail Base Coat. Apply a coat of yellow polish as the base. On a makeup sponge, apply yellow and green polishes side by side, and dab onto the nail, blending at the meeting point to create a gradient effect. Repeat until the gradient appears smooth and fully opaque. Seal with CND’s Vinylux Weekly Top Coat for a lasting, glossy finish.
Yin and Yang Contrast
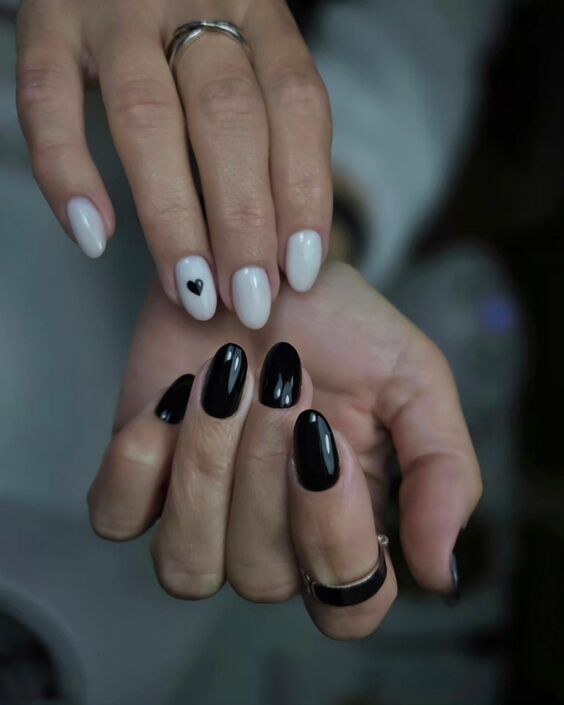
The “Yin and Yang Contrast” design embodies a striking balance between classic simplicity and bold statement, making it an exemplary choice for fall oval nail designs. Featuring alternating black and white polish on oval nails, with a singular heart accent on one nail, this style captures an elegant, yet dramatic visual contrast that’s both timeless and trendy.
Consumables List
- Base Coat: Orly Bonder Rubberized Basecoat
- Black Polish: OPI “Black Onyx”
- White Polish: Essie “Blanc”
- Detailing Tool or Small Brush
- Top Coat: Seche Vite Dry Fast Top Coat
Recommendations: OPI’s “Black Onyx” and Essie’s “Blanc” are both high-coverage, rich polishes perfect for achieving a sharp contrast. A detailing brush will help in painting the precise heart shape with ease.
DIY Instructions
Apply Orly’s base coat to ensure a smooth application. Alternate painting your nails with OPI’s “Black Onyx” and Essie’s “Blanc.” For the nail with the heart design, use a detailing tool to carefully draw the heart in black on a white base. Seal all nails with Seche Vite top coat for a glossy finish and added durability.
Rainbow Arch
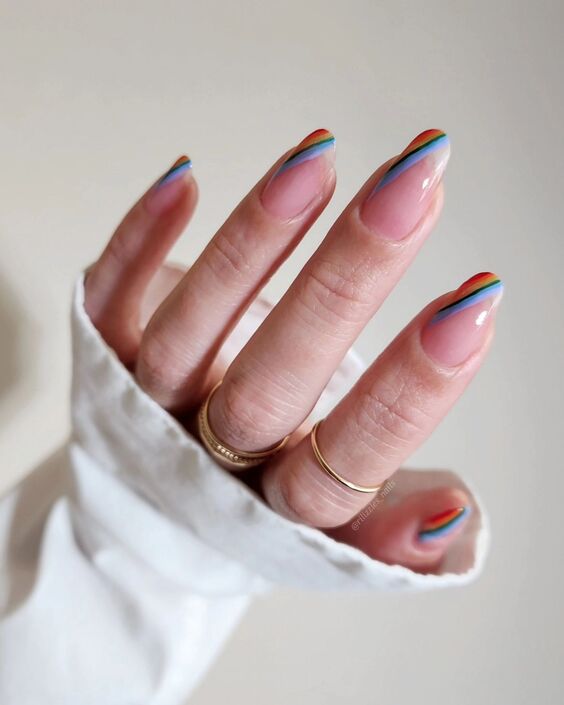
“Rainbow Arch” brings a playful and vibrant touch to fall nails oval shape with its colorful arched stripes over a sheer pink base. This design is perfect for those who like to blend creativity with subtlety, incorporating the full spectrum of a rainbow in a soft, wearable manner.
Consumables List
- Base Coat: Sally Hansen Double Duty
- Sheer Pink Polish: OPI “Bubble Bath”
- Rainbow Polishes: A set of colors from Essie’s collection
- Detailing Brush
- Top Coat: China Glaze Fast Forward Top Coat
Recommendations: OPI’s “Bubble Bath” provides a delicate pink sheen that serves as a perfect canvas. Use Essie’s colorful polishes for the rainbow stripes, as they offer a wide range of vibrant colors that are ideal for detailed work.
DIY Instructions
Start by applying Sally Hansen’s Double Duty as both a base and strengthener. Apply two coats of OPI’s “Bubble Bath” for a slight pink tint. Then, using a detailing brush, paint thin arches in rainbow colors across each nail, following the natural curve of your cuticle to the tip. Finish with China Glaze’s Fast Forward top coat for a quick-drying, shiny finish.
Pink Sparkle
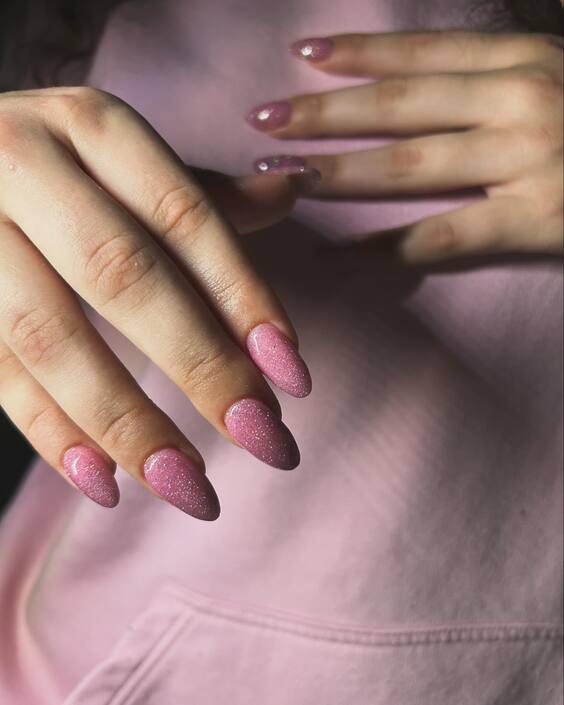
The “Pink Sparkle” design is a dazzling addition to oval nails designs fall, featuring a frosted pink base sprinkled with iridescent glitter that catches the light with every movement. This look combines the softness of pink with the festive sparkle of glitter, ideal for those who love a bit of glamour in their daily wear.
Consumables List
- Base Coat: OPI Natural Nail Base Coat
- Pink Glitter Polish: Deborah Lippmann “Some Enchanted Evening”
- Top Coat: Revlon Quick Dry Top Coat
Recommendations: Deborah Lippmann’s glitter polish is packed with varying sizes of glitter particles, providing a luxurious, dense coverage that makes the nails truly stand out.
DIY Instructions
Apply OPI’s Natural Nail Base Coat for protection and enhancement of polish adhesion. Layer on two to three coats of Deborah Lippmann’s “Some Enchanted Evening,” depending on desired glitter density. Each layer should be allowed to semi-dry before the next is applied to prevent dragging. Finish with Revlon’s Quick Dry Top Coat for a smooth, enduring finish.
Silver Lining
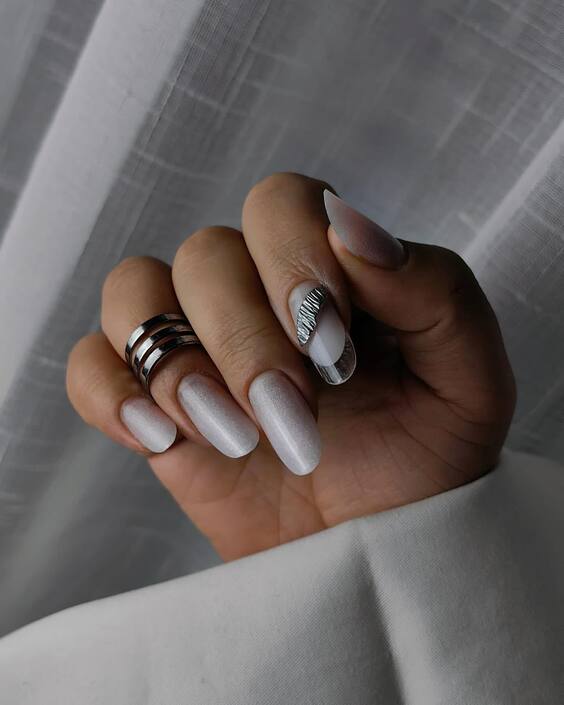
The “Silver Lining” design embodies an ethereal elegance with its shimmering white and silver gradient, accented by a single, detailed silver stripe on one nail. This style is a quintessential example of fall oval nail ideas, perfect for those seeking a sophisticated yet understated look that pairs well with any autumn outfit.
Consumables List
- Base Coat: Essie All in One Base
- White Shimmer Polish: Sally Hansen “White On”
- Silver Stripe Sticker or Silver Nail Tape
- Top Coat: Butter London Hardwear Shine UV Topcoat
Recommendations: Sally Hansen’s “White On” provides a perfect shimmering base. The silver nail tape adds a touch of refined detail without overpowering the subtle elegance of the design.
DIY Instructions
Apply Essie’s All in One Base for a smooth application. Paint two coats of “White On” for a full shimmer effect. Apply a thin silver stripe on the ring fingernail using silver nail tape or a precut sticker for precision. Seal with Butter London’s top coat for a long-lasting, glossy finish.
Emerald Elegance
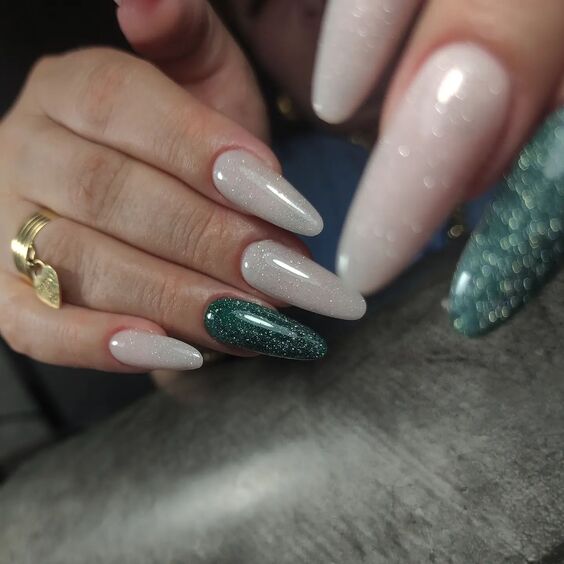
“Emerald Elegance” offers a luxurious look among fall nails oval shape, featuring a mix of sheer white and full-coverage emerald green with sparkling embellishments. This design combines the freshness of white with the richness of emerald, making it a standout choice for both casual and formal fall occasions.
Consumables List
- Base Coat: OPI Natural Nail Base Coat
- White Sheer Polish: OPI “Alpine Snow”
- Emerald Green Polish: China Glaze “Emerald City”
- Glitter Top Coat: Revlon “Galactic Pink”
- Top Coat: Seche Vite Dry Fast Top Coat
Recommendations: China Glaze’s “Emerald City” is perfect for a vibrant, eye-catching look. The glitter top coat adds a festive sparkle that enhances the depth and beauty of the emerald polish.
DIY Instructions
Start with OPI’s base coat to protect your natural nails. Apply two coats of “Alpine Snow” for a soft, sheer finish. Paint the accent nails with two layers of “Emerald City” for rich color. Add a layer of Revlon’s “Galactic Pink” glitter top coat over the green for a sparkling finish. Seal all nails with Seche Vite’s top coat for durability and shine.
Marbled Elegance
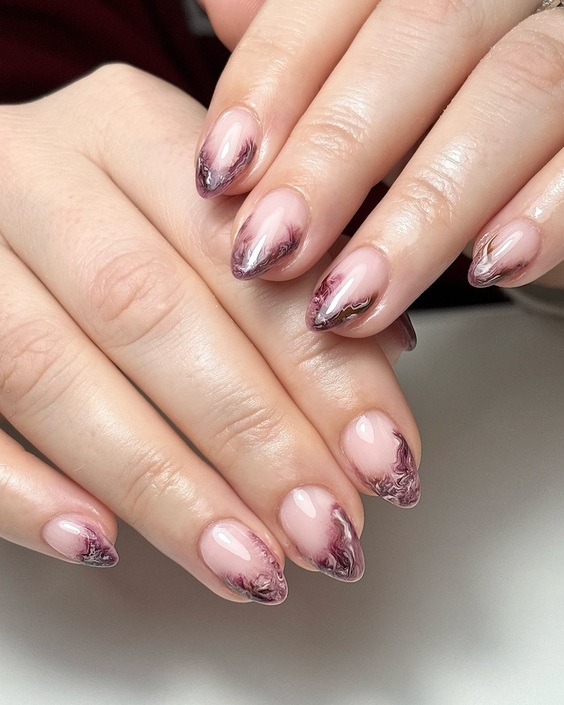
The “Marbled Elegance” design captures a delicate blend of pink and burgundy marbling, creating a fluid, artistic look on oval nails designs fall. This technique uses a water-marbling method to achieve the natural, flowing patterns, perfect for those who appreciate a unique, handcrafted appearance.
Consumables List
- Base Coat: China Glaze Strong Adhesion Base Coat
- Pink Polish: Essie “Muchi, Muchi”
- Burgundy Polish: OPI “Malaga Wine”
- Marbling Tool or Toothpick
- Top Coat: INM Out the Door Top Coat
Recommendations: Essie’s “Muchi, Muchi” and OPI’s “Malaga Wine” are excellent choices for their contrasting yet complementary colors, ideal for creating stunning marbled effects.
DIY Instructions
Apply China Glaze’s base coat for optimum polish adhesion. Paint a base of “Muchi, Muchi” on all nails. Drip droplets of “Malaga Wine” and “Muchi, Muchi” into a container of water, allowing the polishes to spread. Use a marbling tool to create designs by dragging through the polish layers. Dip each nail into the design, then clean up the edges. Seal with INM’s Out the Door top coat for a glossy, enduring finish.
Whimsical Waves
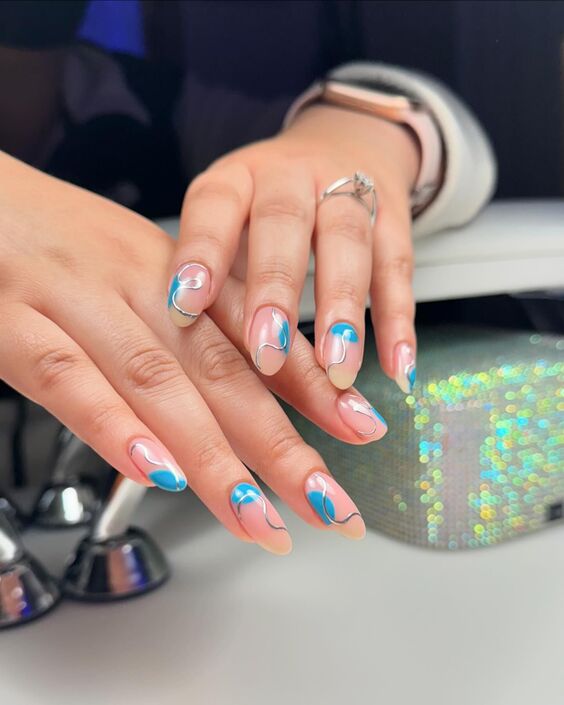
“Whimsical Waves” offers a playful yet sophisticated look with its dynamic blue and pink wave designs over a sheer nude base. This fresh approach to fall oval nail designs makes it perfect for those looking to add a pop of color and creativity to their style without going overboard.
Consumables List
- Base Coat: Revlon Quick Dry Base Coat
- Sheer Nude Polish: Essie “Bare With Me”
- Blue and Pink Nail Art Paint
- Fine Detail Brush
- Top Coat: OPI High Gloss Top Coat
Recommendations: The sheer nude polish serves as a neutral canvas that enhances the vibrancy of the blue and pink wave patterns. High-quality nail art paints are recommended for precision and color payoff.
DIY Instructions
Begin with Revlon’s Quick Dry Base Coat for fast and effective protection. Apply two coats of Essie’s “Bare With Me” for a clean, subtle background. Use a fine detail brush to paint sinuous waves with blue and pink nail art paints. The waves should flow naturally from one side of the nail to the other. Finish with OPI’s High Gloss Top Coat to seal the design and add a beautiful shine.
Marble Magic
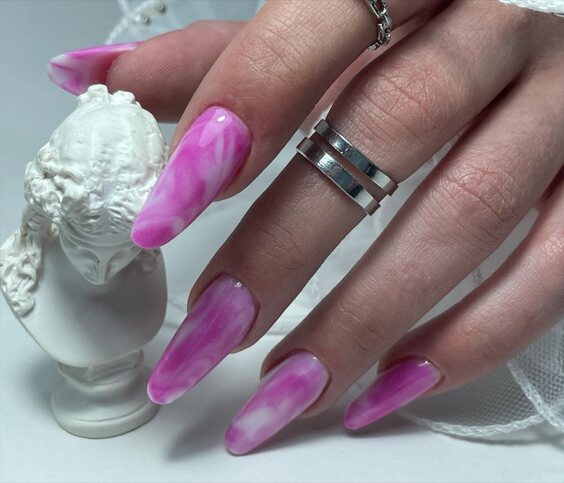
“Marble Magic” is a stunning rendition of fall nails oval shape, featuring a captivating pink and white marble effect that mimics the intricate patterns of natural stone. This design offers a luxurious feel, ideal for enhancing any fall wardrobe with an elegant touch.
Consumables List
- Base Coat: Sally Hansen Miracle Cure
- White Polish: OPI “Alpine Snow”
- Pink Marble Ink: Nail Art Marbleizing Ink
- Detailing Tool or Toothpick
- Top Coat: Essie Speed Setter
Recommendations: Use OPI’s “Alpine Snow” for a crisp white base, and nail art marbleizing ink for the pink swirls to achieve a realistic marble effect.
DIY Instructions
Start by applying Sally Hansen’s Miracle Cure to protect and strengthen nails. Apply a base of “Alpine Snow.” While the base is still tacky, drop pink marble ink onto the nail and use a toothpick to swirl the ink into a marble pattern. Let the design set before applying Essie’s Speed Setter for a quick-drying, high-shine finish.
Lavender Dreams
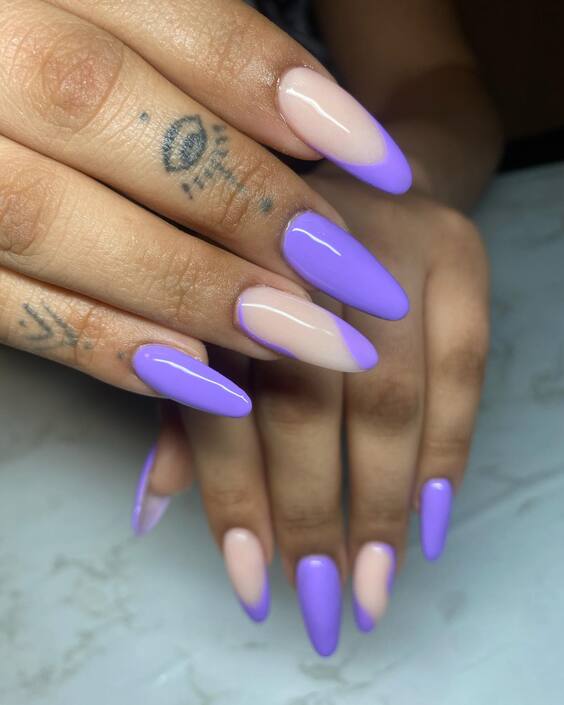
“Lavender Dreams” showcases a beautiful gradient from soft lavender to sheer pink, perfect for a subtle yet stylish oval nails designs fall. This design is especially suitable for those who prefer a more understated look but still want a touch of color and elegance in their manicure.
Consumables List
- Base Coat: China Glaze Strong Adhesion Base Coat
- Lavender Polish: Essie “Lilacism”
- Sheer Pink Polish: Essie “Mademoiselle”
- Sponge for Gradient: Makeup sponge
- Top Coat: INM Out the Door Top Coat
Recommendations: Essie’s “Lilacism” and “Mademoiselle” are excellent choices for creating a soft, dreamy gradient. The sponging technique ensures a seamless blend of colors.
DIY Instructions
Apply China Glaze’s Strong Adhesion Base Coat for a lasting manicure. Sponge on a gradient using Essie’s “Lilacism” at the tips and “Mademoiselle” near the cuticles. Carefully dab the sponge to blend the colors in the middle. Finish with INM’s Out the Door Top Coat for a durable and glossy effect.
As we conclude our journey through the vibrant world of fall oval nail designs, it’s evident that the elegance of the oval shape provides a versatile canvas for creativity. Each style, from the subtle elegance of “Silver Lining” to the playful dynamics of “Whimsical Waves,” allows for personal expression tailored to any occasion. This fall, embrace the myriad possibilities that these nail designs offer, enhancing your style with touches of color and unique artistic expressions that reflect your personal flair. Let your nails be not just an accessory, but a hallmark of your autumnal style, inviting admiration and perhaps a touch of envy.

