21 Top Fall Nail Designs 2024: Trendy Manicure Ideas
Unconventional Geometry
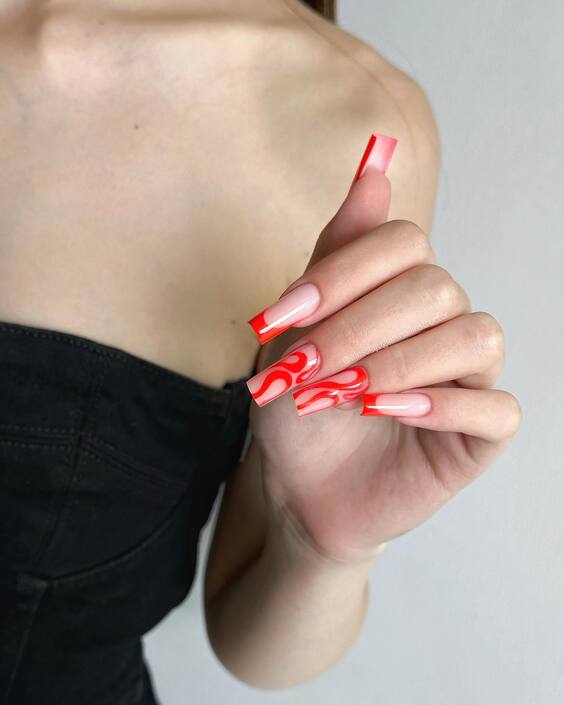
The first design that captures the essence of autumn’s innovative flair features unconventional geometric patterns with a bold, red twist. These nails are a testament to the artistic play between classic nude shades and striking red accents. The linear designs not only add a modern touch but also create a dynamic contrast that’s perfect for those who love a statement manicure.
Consumables List
- Base Coat: Sally Hansen Hard as Nails
- Nude Polish: Essie’s ‘Ballet Slippers’
- Red Polish: OPI’s ‘Big Apple Red’
- Top Coat: Seche Vite Dry Fast Top Nail Coat
- Detailing Brush: for the precise lines
DIY Instructions
Start by applying a base coat to protect your nails. Once dry, apply two coats of Essie’s ‘Ballet Slippers’ as a smooth, nude base. Using a detailing brush, paint thin, sharp lines with OPI’s ‘Big Apple Red’ to create the geometric patterns. Finish with a top coat for a glossy, long-lasting finish.
Classic Elegance with a Twist
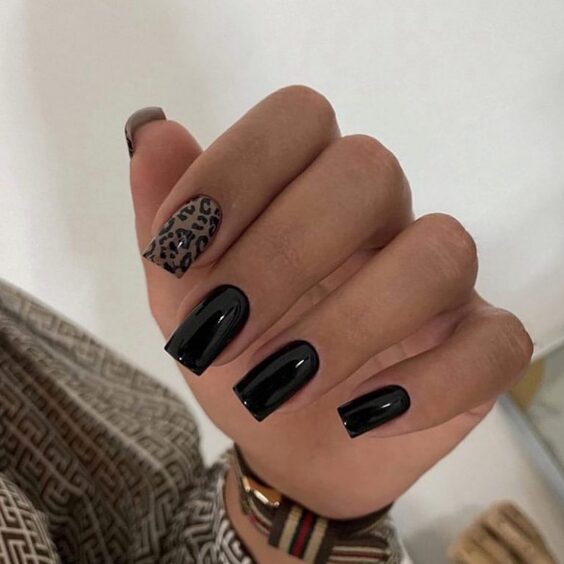
Our second design features a sleek black base with a single accent nail in a leopard print. This combination speaks to the bold and the beautiful, perfect for evening events or just adding an edge to everyday wear. The glossy black provides a deep, rich backdrop for the intricate gold and black leopard print, making it a sophisticated choice for fall.
Consumables List
- Black Polish: Chanel Le Vernis Longwear Nail Colour in ‘Noir’
- Gold Polish: Essie ‘Good as Gold’
- Matte Top Coat: Matte about You by Essie
- Dotting Tools: for the leopard spots
DIY Instructions
Apply two coats of Chanel’s ‘Noir’ on all nails, except for the accent nail. For the leopard design, use ‘Good as Gold’ to create random splotches and outline them partially with ‘Noir’ using a fine dotting tool. Seal all nails with a matte top coat to contrast the shiny leopard print with a sophisticated matte finish.
Minimalistic Chic
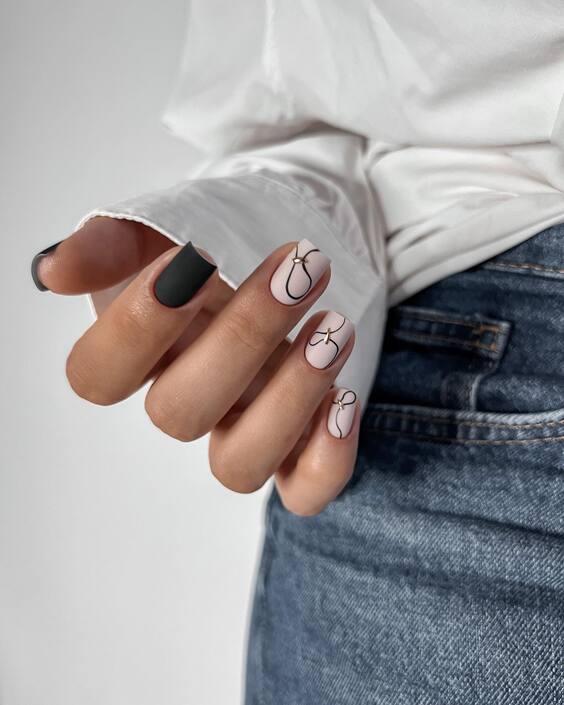
This design celebrates minimalism with a stylish twist. Featuring a matte gray on four fingers with a unique line-art on a nude base, it’s perfect for those who prefer understated elegance. The clean lines and subtle contrast between the matte and nude polish exemplify sophistication.
Consumables List
- Matte Gray Polish: OPI’s ‘Suzi Takes the Wheel’
- Nude Polish: Zoya’s ‘Chantal’
- Top Coat: Essie Matte About You
- Fine Liner Brush: for the delicate line work
DIY Instructions
After your base coat, apply two coats of Zoya’s ‘Chantal’ on all fingers. Use one finger for the accent and apply two coats of ‘Suzi Takes the Wheel’, then mattify it with a matte top coat. With a fine liner brush, draw the minimalist designs using the same gray shade over the nude base on the accent nail.
Soft Pink with Bold Accents
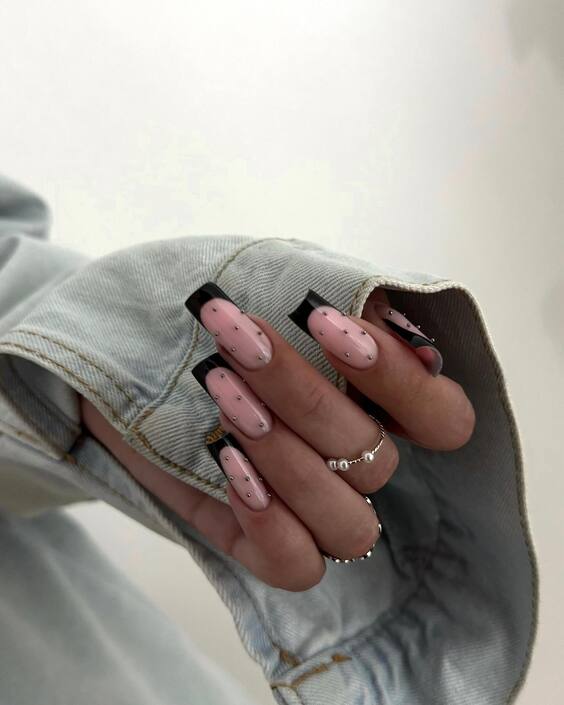
Soft pink meets bold metallic accents in this eye-catching design. The base of soft pink is enhanced with black and metallic stripes, offering a playful yet refined look. It’s an excellent choice for those looking to blend femininity with a touch of daring.
Consumables List
- Soft Pink Polish: OPI’s ‘Bubble Bath’
- Black Polish: Essie’s ‘Licorice’
- Metallic Polish: Sally Hansen’s ‘Golden-I’
- Striping Tape: for crisp lines
DIY Instructions
Apply two coats of ‘Bubble Bath’ for a flawless soft pink base. Once dry, use striping tape to mark off areas for the black and metallic stripes. Apply ‘Licorice’ and ‘Golden-I’ accordingly, remove the tape while the polish is still slightly wet, and finish with a glossy top coat for a striking effect.
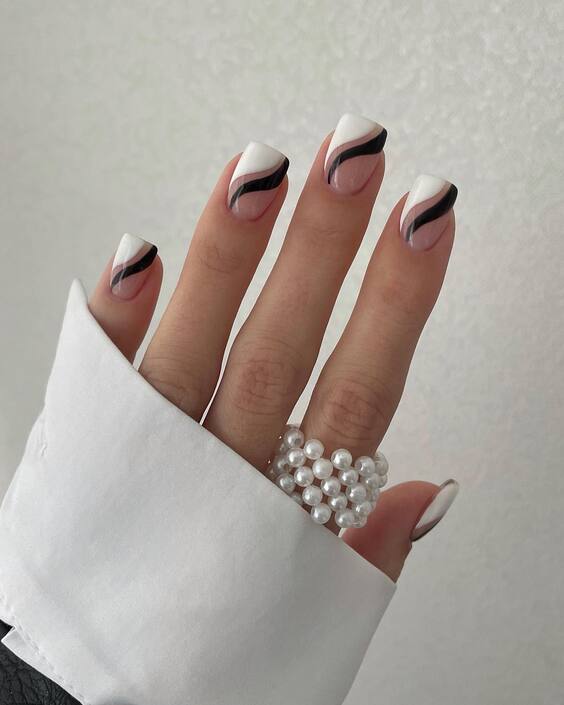
Sleek Swirls and Pearls
This design combines elegance and artistry with its interplay of soft whites, sharp blacks, and a subtle touch of gray. The swirl patterns add a creative twist, while the use of pearls as an accessory on one nail elevates the overall sophistication of the manicure. This look is ideal for those seeking a blend of classic and contemporary styles for their autumn events.
Consumables List
- White Polish: Essie ‘Blanc’
- Black Polish: OPI ‘Black Onyx’
- Gray Polish: China Glaze ‘Dove’
- Pearls: Small nail art pearls
- Top Coat: Glossy top coat for a smooth finish
DIY Instructions
Paint your nails with two coats of ‘Blanc’ for a crisp white base. Use a fine brush to create swirling black and gray designs. Strategically place pearls on the ring finger using a dot of nail glue to adhere them securely. Finish with a glossy top coat to enhance the shine and protect the design.
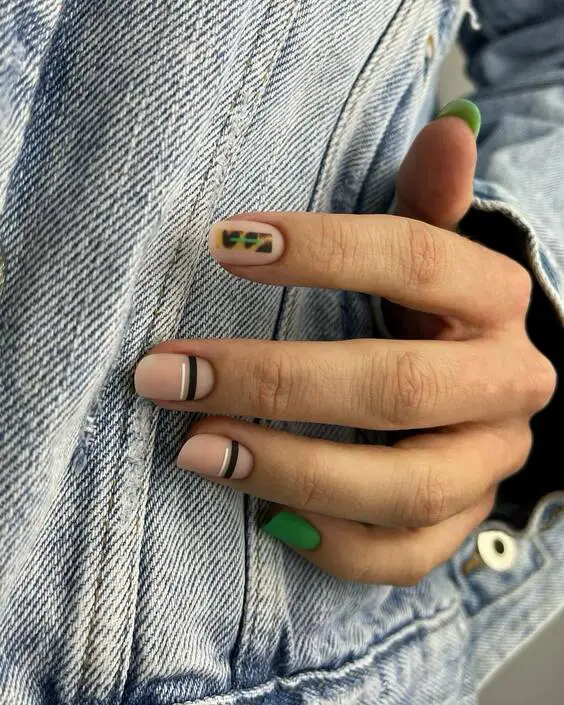
Minimalist Modern Art
Reflecting the minimalist trend, this nail design features clean lines and bold blocks of color on a nude background. The geometric precision showcases a modern art influence, making it a standout choice for the fashion-forward individual.
Consumables List
- Nude Polish: OPI ‘Bubble Bath’
- Black and White Striping Polish: For precise lines
- Green Polish: Essie ‘Mojito Madness’
- Top Coat: Matte finish for a contemporary look
DIY Instructions
Apply ‘Bubble Bath’ as the base. Once dry, use striping polish to create thin, precise black and white lines. Add a pop of ‘Mojito Madness’ on one nail to introduce a vibrant contrast. Opt for a matte top coat to finalize the modern art feel.
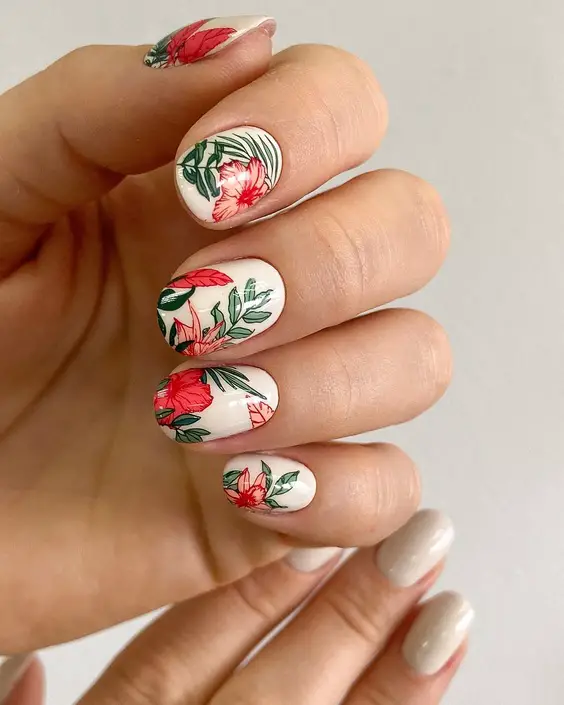
Vibrant Floral Impressions
This floral design bursts with the reds and greens of autumn, painted over a serene white base that makes the colors pop. It’s perfect for those who love to carry a bit of the garden’s vibrancy with them through the cooler months.
Consumables List
- White Polish: Sally Hansen ‘White On’
- Red and Green Polish: For the floral details
- Detailing Brushes: Fine tips for intricate designs
- Top Coat: High-gloss to enhance the vibrancy of the colors
DIY Instructions
Start with two coats of ‘White On’ to create a bright canvas. Use detailing brushes to hand-paint the red and green floral designs. This requires a steady hand and a bit of artistic flair to capture the natural beauty of flowers. Seal the design with a high-gloss top coat to make the details stand out.
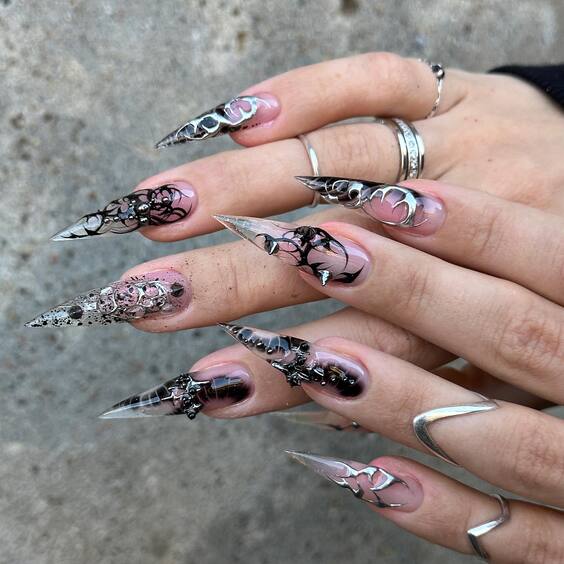
Gothic Glamour
For those who dare to make a bold statement, this design offers a gothic twist with its blend of black, pink, and silver, complemented by metallic accents and dramatic stiletto shapes. The intricate detailing and silver adornments give it a luxurious yet edgy look, perfect for fall nights out.
Consumables List
- Black Polish: Chanel ‘Vamp’
- Pink Polish: OPI ‘Pink Flamenco’
- Silver Metallic Polish: Essie ‘No Place Like Chrome’
- Stiletto Tips: Pre-shaped for convenience
- Adhesive Gems: Silver to match the polish
DIY Instructions
Apply ‘Vamp’ as the base on all nails. For the accent designs, use ‘Pink Flamenco’ and ‘No Place Like Chrome’ to create the desired patterns. Attach the stiletto tips and carefully place adhesive gems for an added touch of glamour. Finish with a durable top coat to ensure your nails are ready to dazzle through the season.
Twilight Gradient
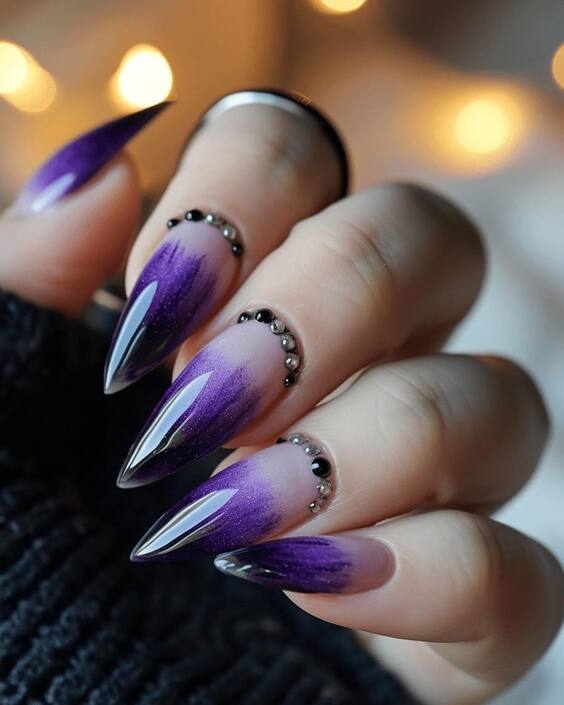
The interplay of deep purple and soft lilac in this stiletto nail design captures the essence of a twilight sky, making it a mesmerizing choice for fall evenings. The addition of small metallic beads along the cuticle line adds a touch of elegance, perfect for enhancing an autumn evening outfit.
Consumables List
- Purple Gradient Polishes: Essie ‘Play Date’ and ‘Sexy Divide’
- Metallic Beads: Small silver beads for nail art
- Top Coat: High gloss to secure beads and enhance shine
DIY Instructions
Begin with a base coat to protect your nails. Apply a gradient effect using ‘Play Date’ and ‘Sexy Divide,’ blending the colors smoothly with a sponge. Carefully place the metallic beads along the cuticle line using tweezers and a dab of clear polish. Seal everything with a high-gloss top coat for a durable finish.
Serene Skyline
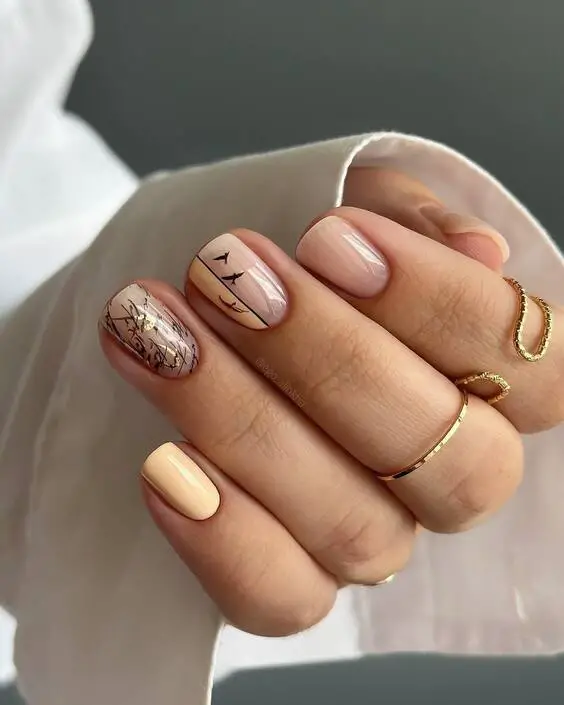
This nail design features a peaceful pastel base with a delicate black silhouette of birds and branches, evoking the serene ambiance of a quiet fall morning. It’s a subtle yet artistic choice that adds a narrative element to your manicure.
Consumables List
- Pastel Polish: OPI ‘Let’s Be Friends’
- Black Detailing Polish: For the silhouettes
- Top Coat: Matte finish for a contemporary look
DIY Instructions
Paint your nails with ‘Let’s Be Friends’ as a soft background. Use a fine detailing brush to draw the black silhouettes of birds and branches on one or two accent nails. Finish with a matte top coat to give the artwork a muted, elegant feel.
Vibrant Leopard Print
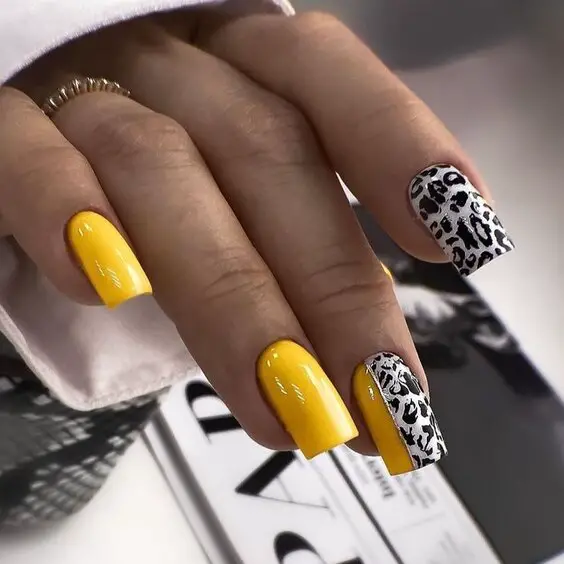
Bold and unapologetically vibrant, this yellow and black leopard print design is for those who wish to carry summer’s warmth into the fall season. The stark contrast between the bright yellow and the black and white leopard spots creates a lively and fashionable look.
Consumables List
- Yellow Polish: China Glaze ‘Sun Upon My Skin’
- Black and White Polishes: For detailing the leopard spots
- Top Coat: Glossy for a vibrant finish
DIY Instructions
Apply two coats of ‘Sun Upon My Skin’ for a bright base. Use a dotting tool to add black and white spots to create the leopard print. It’s okay if the shapes are not perfect—leopard spots are naturally irregular. Finish with a glossy top coat to make the colors pop.
Abstract Metallic
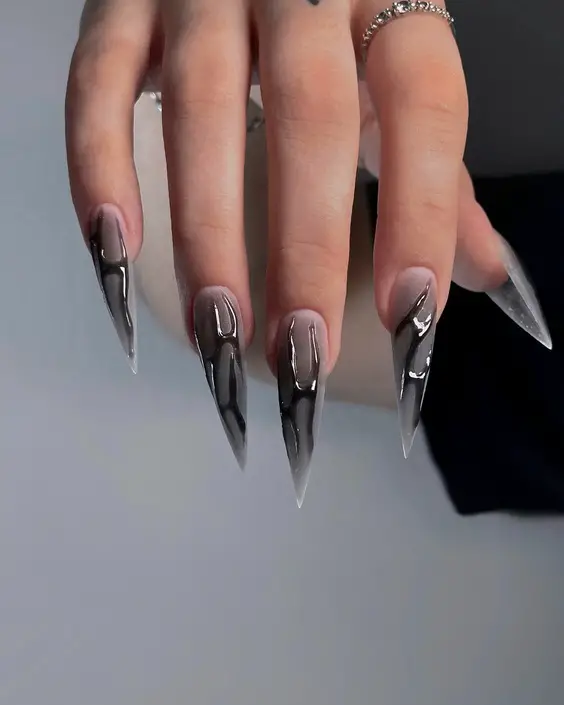
This avant-garde design uses a chrome effect on a muted base to create an abstract metallic look that’s both edgy and sophisticated. The sharp contrasts and fluid metallic strokes are perfect for making a bold statement during the fall.
Consumables List
- Metallic Chrome Polish: Sally Hansen ‘Steel a Base’
- Muted Base Polish: Essie ‘Chinchilly’
- Top Coat: High gloss for a metallic sheen
DIY Instructions
Start with two coats of ‘Chinchilly’ as the base. Once dry, use a sponge to dab on ‘Steel a Base’ to create an abstract, flowing metallic pattern. Finish with a high-gloss top coat to enhance the metallic effect and ensure durability.
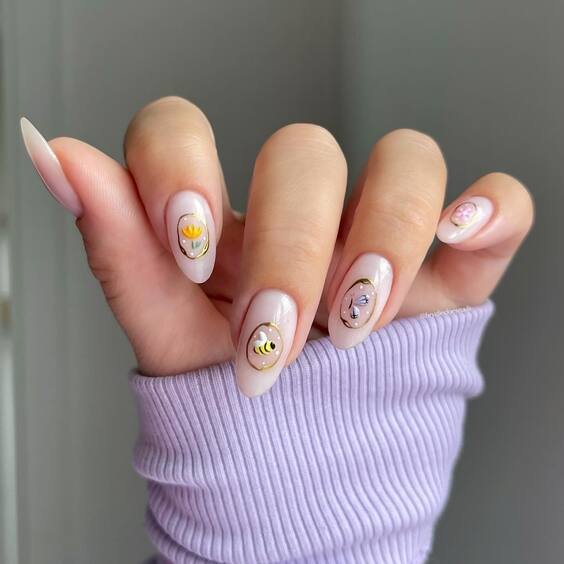
Whimsical Faces
This delightful design features subtle pastel shades adorned with whimsical face illustrations, each sporting a different expression. The playful yet sophisticated style is perfect for adding a touch of whimsy to your fall wardrobe, blending well with both casual and formal looks.
Consumables List
- Pastel Polish Base: OPI ‘Put it in Neutral’
- Black Detailing Polish: For the face illustrations
- Fine Liner Brush: For precise drawing
- Top Coat: High gloss to preserve the artwork
DIY Instructions
Start with ‘Put it in Neutral’ for a clean, pastel base. Using a fine liner brush and black detailing polish, carefully draw the whimsical faces on each nail. Each expression can be unique, adding personal flair to the design. Seal with a high-gloss top coat to ensure longevity and shine.
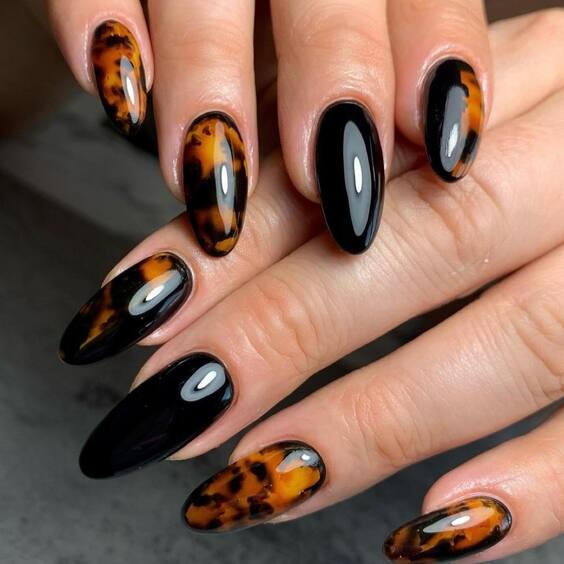
Autumnal Tortoiseshell
Tortoiseshell patterns have become a fall classic, and this design takes it up a notch with a mix of deep black and amber hues, creating a warm, rich effect that mirrors the changing leaves of autumn. This pattern is particularly striking on almond or oval-shaped nails, offering a sophisticated yet bold look.
Consumables List
- Black Polish: Essie ‘Licorice’
- Amber and Orange Polishes: For the tortoiseshell pattern
- Top Coat: Glossy finish for a smooth feel
DIY Instructions
Apply ‘Licorice’ as the base coat. While still tacky, dab on amber and orange polishes in patches to create the tortoiseshell effect. Use a small brush to softly blend the edges of each color. Finish with a glossy top coat to enhance the depth of the colors and the overall shine.
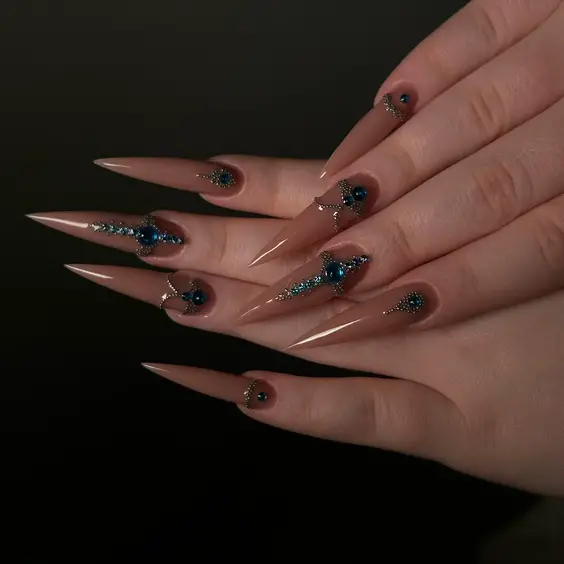
Galactic Stiletto
This design transports you to a cosmic fantasy with its deep space-inspired colors and twinkling stars. The stiletto shape enhances the dramatic effect of the dark base and sparkling blue accents, perfect for nighttime gatherings or as a statement piece in your fall nail art collection.
Consumables List
- Dark Base Polish: OPI ‘Lincoln Park After Dark’
- Sparkling Blue Accents: Rhinestones and glitter
- Fine Detail Brush: For precise placement
- Top Coat: High gloss for extra sparkle
DIY Instructions
Paint your nails with ‘Lincoln Park After Dark’ for a mysterious, dark base. Use a fine detail brush to apply sparkling blue glitter in a gradient pattern starting from the nail base. Strategically place rhinestones to mimic stars. Seal with a high-gloss top coat to maximize sparkle and ensure durability.
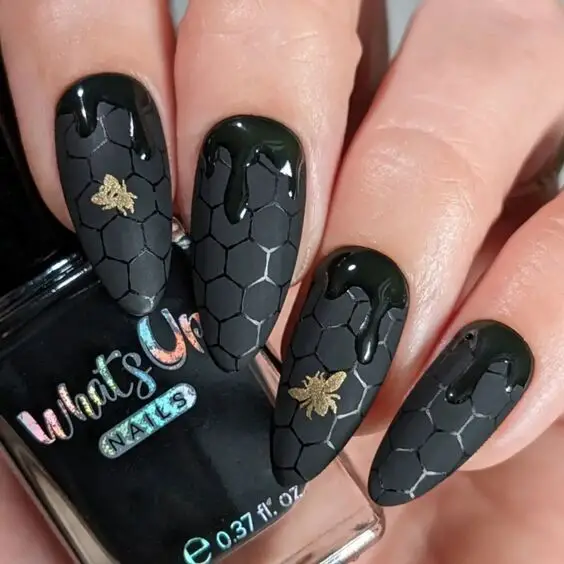
Enchanted Forest
Inspired by the mystical aspects of nature, this nail design features a dark, textured base with dripping gold accents that mimic tree sap or golden raindrops. The use of gold flakes and black polish creates a contrast that is both luxurious and intriguing, making it an ideal choice for those who enjoy bold, artistic expressions.
Consumables List
- Black Textured Polish: For the base
- Gold Flakes: For the dripping effect
- Top Coat: Matte for a unique finish
DIY Instructions
Apply the textured black polish as the base. Before it dries, gently place gold flakes along the top of the nail, allowing them to ‘drip’ downward for a gravity-defying effect. Opt for a matte top coat to contrast the shiny gold and create a compelling texture.
Abstract Expression
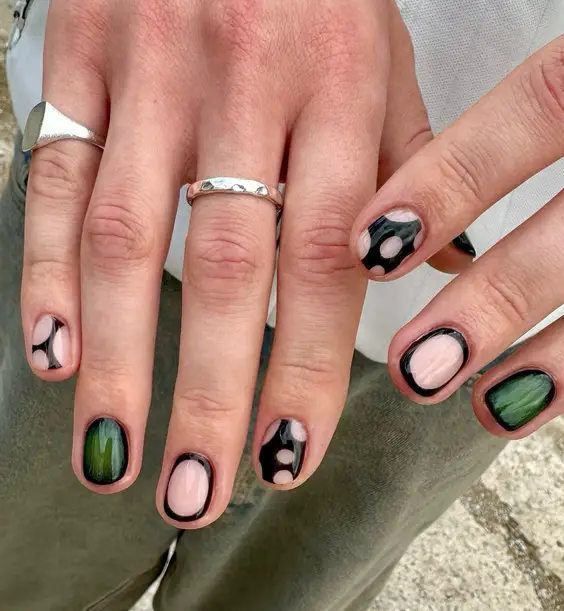
This nail art takes abstract design to the next level with a mix of green, pink, and geometric patterns. The varied use of color and shape on each nail creates a gallery-worthy look that’s both modern and stylish.
Consumables List
- Base Polishes: Green and pink shades
- Black Detailing Polish: For the geometric accents
- Top Coat: High gloss to enhance the art
DIY Instructions
Apply a light green or pink polish as the base on alternating nails. Once dry, use black polish to add geometric patterns. The randomness of the designs adds to the abstract feel. Finish with a high-gloss top coat to seal and protect your artwork.
Crystal Clear
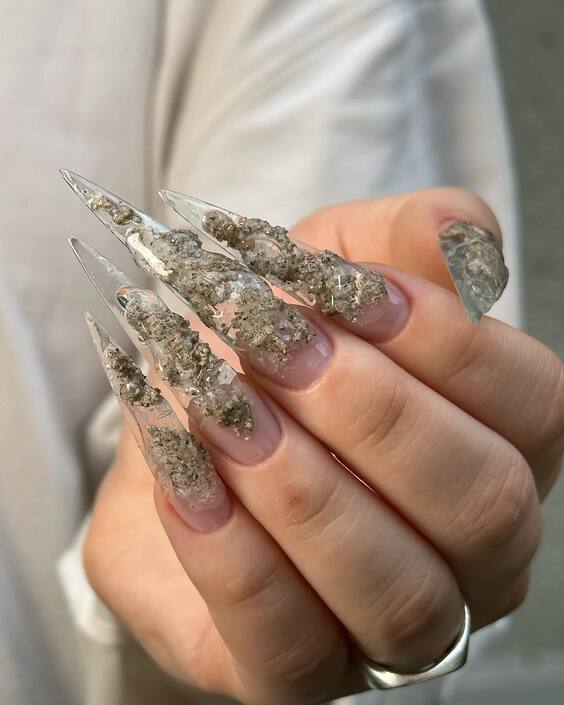
This design features crystal-clear nails embedded with real dried flowers and gold flakes, creating a stunning three-dimensional look. It’s an exquisite choice for those who prefer a touch of natural beauty with a luxurious twist.
Consumables List
- Clear Acrylic or Gel: To encapsulate the elements
- Dried Flowers: Small enough to fit on nails
- Gold Flakes: For added sparkle
- Top Coat: High gloss for a glass-like finish
DIY Instructions
Prepare your nails with a clear base of acrylic or gel. Carefully place dried flowers and gold flakes, arranging them as desired before sealing with another layer of clear acrylic or gel. Finish with a high-gloss top coat for a smooth, glassy surface.
Neon Blaze
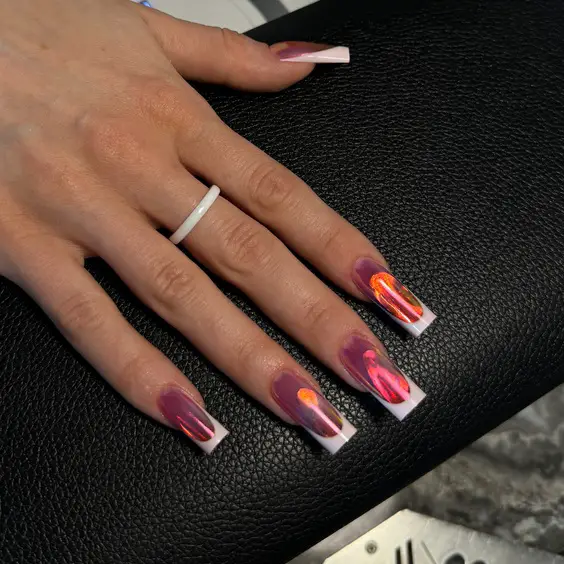
This nail design pops with a fiery blend of neon pink and orange, accented by white tips. The vibrant colors make it a perfect choice for those looking to make a bold statement during the fall season.
Consumables List
- Neon Pink and Orange Polishes: For the base
- White Polish: For the tips
- Top Coat: High gloss to maintain vibrancy
DIY Instructions
Apply a gradient of neon pink and orange across the nails. Use white polish to create a sharp, clean tip at the end of each nail. Seal with a high-gloss top coat to enhance the neon colors and ensure durability.
Serene Sky Blue
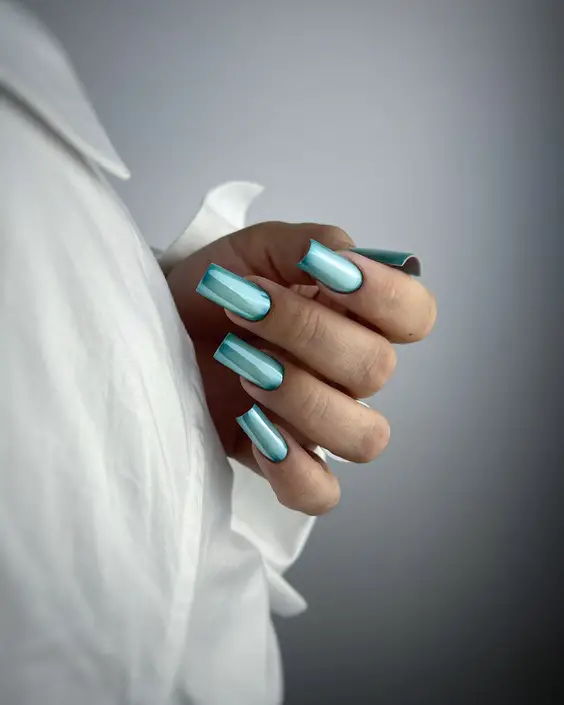
Emulating the clear, crisp autumn sky, this serene sky blue polish offers a refreshing contrast to the traditional fall colors. Its simplicity and calmness make it an excellent choice for everyday wear.
Consumables List
- Sky Blue Polish: For the base
- Top Coat: Matte for a modern finish
DIY Instructions
Paint your nails with a sky blue polish. Allow them to dry completely before applying a matte top coat for a contemporary look that softens the glossiness and adds sophistication.
Fossilized Elegance
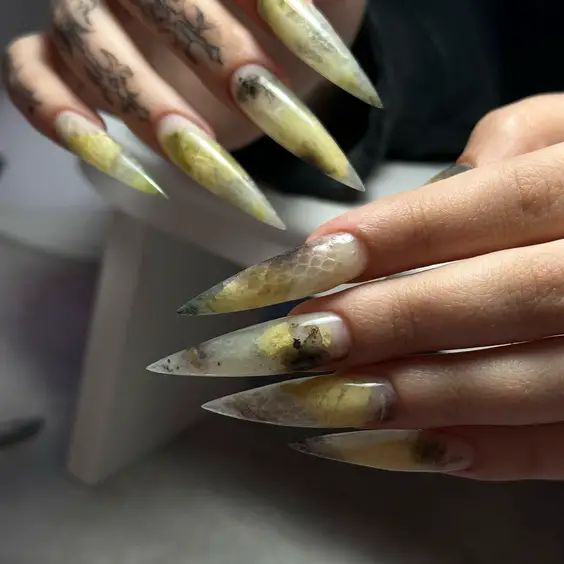
Innovative and striking, this design uses a clear acrylic base with inclusions that resemble ancient fossils or marble textures. It’s an artistic and conversation-starting piece, blending art and fashion seamlessly.
Consumables List
- Clear Acrylic: As the base
- Encapsulated Elements: Like gold leaf or smoky inclusions
- Top Coat: High gloss to encapsulate and protect
DIY Instructions
Prepare the nails with a clear acrylic base. Before it sets, embed your choice of artistic elements to mimic fossils or marble. Finish with another layer of clear acrylic and a high-gloss top coat for depth and protection.
Conclusion
These designs not only celebrate the richness of fall but also push the boundaries of traditional nail art, offering everyone the chance to express their personal style in new and exciting ways. Whether you prefer the stark simplicity of sky blue or the intricate details of encapsulated flowers, there’s a design here to inspire your next visit to the nail salon.

