23 Stunning Fall Pumpkin Nails 2024: Top Designs & Ideas for Short, Almond, and Coffin Nails
Bright Orange Pumpkin Nails
These vibrant fall pumpkin nails are a perfect blend of bold and playful. The bright orange base color immediately catches the eye, while the black pumpkin outlines add a festive touch without being too over-the-top. The glossy finish enhances the depth of the colors, making this design pop.
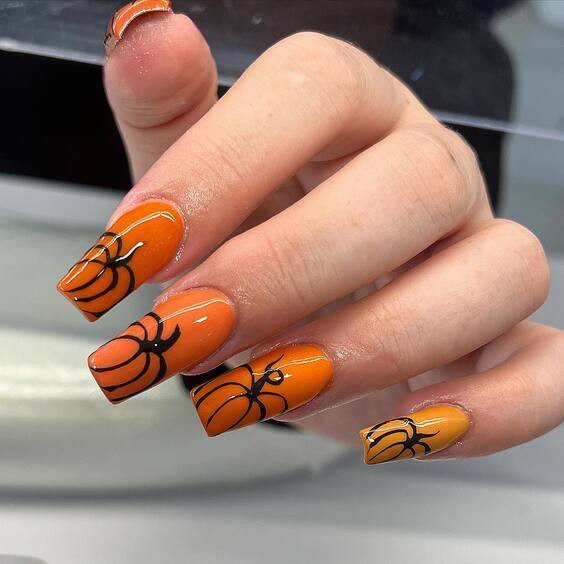
- Consumables Needed:
- Bright orange nail polish (OPI’s “A Good Man-darin is Hard to Find”)
- Black nail art pen or thin brush
- Glossy top coat (Seche Vite Dry Fast Top Coat)
- Creating This Look at Home:
- Start with a base coat to protect your nails.
- Apply two coats of bright orange nail polish and let it dry completely.
- Use a black nail art pen or thin brush to draw pumpkin outlines on each nail.
- Finish with a glossy top coat for a shiny, long-lasting effect.
Elegant Gold and White Pumpkins
For a more sophisticated take on fall pumpkin nails, these gold and white pumpkins on a nude base are perfect. The delicate gold accents elevate the design, making it suitable for both casual and formal settings. This design is simple yet chic, ideal for those who prefer understated elegance.
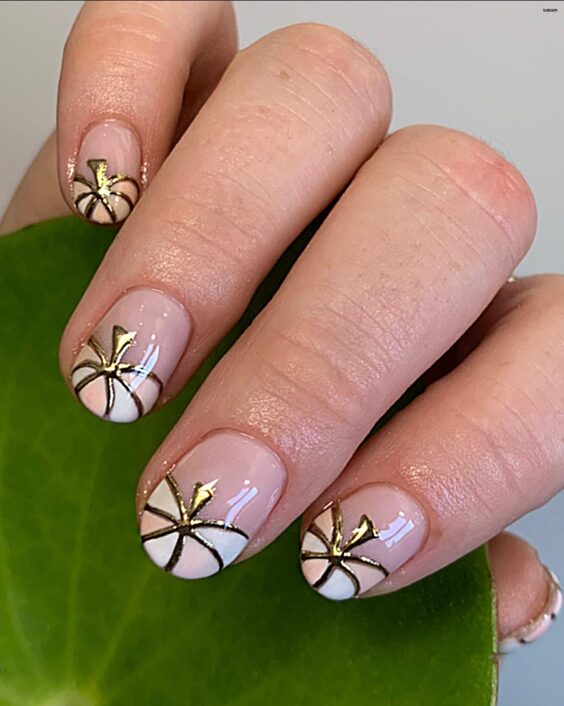
- Consumables Needed:
- Nude nail polish (Essie’s “Ballet Slippers”)
- White nail polish (OPI’s “Alpine Snow”)
- Gold nail art pen or foil (Art Club Nail Art Pen in Gold)
- Glossy top coat
- Creating This Look at Home:
- Apply a base coat to your nails.
- Paint your nails with two coats of nude polish and let them dry.
- Using a white nail polish, create pumpkin shapes on the tips of your nails.
- Outline the pumpkins with a gold nail art pen or apply gold foil for accents.
- Seal the design with a glossy top coat.
Spooky and Fun Pumpkin Designs
Embrace the spooky spirit of Halloween with these fun and quirky fall pumpkin nails. This design features a mix of pumpkins, ghosts, and stars on a vibrant orange and burgundy background. The variety of elements makes this look playful and perfect for Halloween parties.
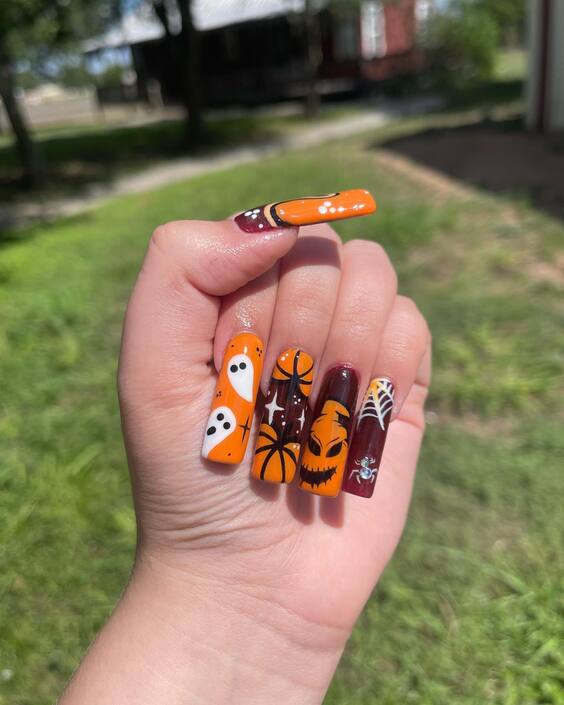
- Consumables Needed:
- Orange nail polish (China Glaze’s “Orange Knockout”)
- Burgundy nail polish (OPI’s “Malaga Wine”)
- White nail polish (Sally Hansen’s “White On”)
- Black nail art pen or thin brush
- Glossy top coat
- Creating This Look at Home:
- Begin with a base coat to protect your nails.
- Alternate painting your nails with orange and burgundy polish. Apply two coats for each color.
- Use a white nail polish to draw ghosts and a black nail art pen for pumpkins and stars.
- Finish with a glossy top coat to lock in the design and add shine.
Ghostly Gradient Pumpkin Nails
These fall pumpkin nails feature a stunning gradient effect that transitions from a shimmery peach to a deep orange. The design is adorned with cute ghost and pumpkin details, making it perfect for a festive yet elegant look. The gradient adds a dynamic touch, giving the nails depth and dimension.
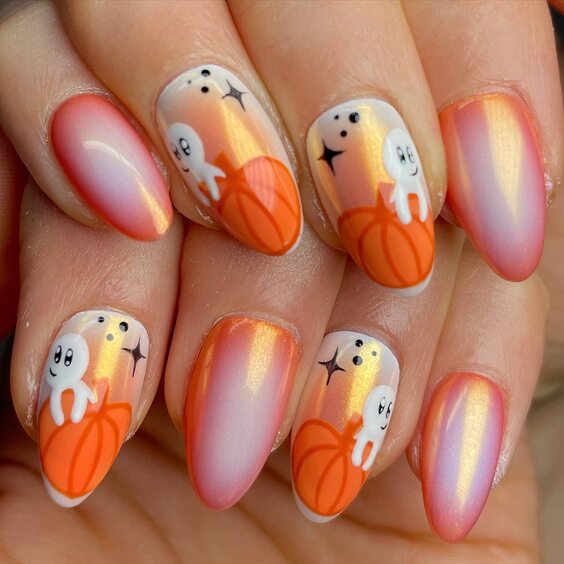
- Consumables Needed:
- Shimmery peach nail polish (Zoya’s “Astrid”)
- Deep orange nail polish (Essie’s “Playing Koi”)
- White nail polish for ghosts (OPI’s “Alpine Snow”)
- Black nail art pen for details
- Glossy top coat
- Creating This Look at Home:
- Start with a base coat.
- Apply the shimmery peach polish from the base of the nails, then use a makeup sponge to blend in the deep orange polish towards the tips for a gradient effect.
- Use white polish to paint ghosts and a black nail art pen for pumpkin outlines and other details.
- Seal the design with a glossy top coat.
Matte Jack-o’-Lantern Nails
For a more dramatic and bold look, these matte Jack-o’-Lantern nails are an excellent choice. The striking orange pumpkins with detailed black outlines and accents give a spooky yet stylish appearance. The matte finish enhances the depth of the design, making it stand out even more.
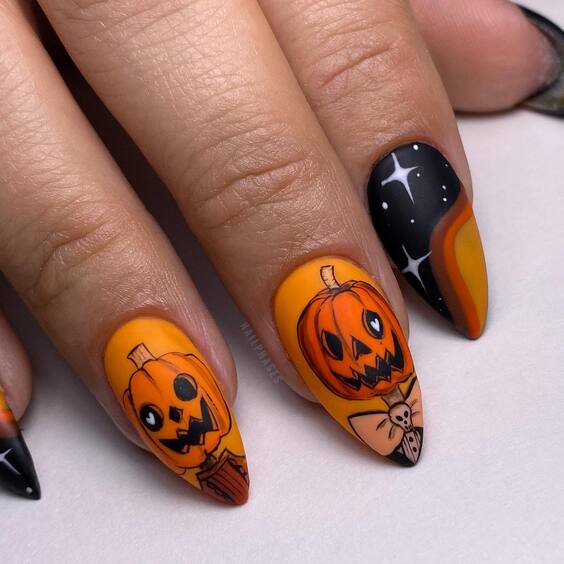
- Consumables Needed:
- Matte orange nail polish (China Glaze’s “Tangerine Heat”)
- Black nail art pen or thin brush
- Matte top coat (OPI Matte Top Coat)
- Creating This Look at Home:
- Begin with a base coat to protect your nails.
- Apply two coats of matte orange nail polish and let it dry completely.
- Use a black nail art pen to draw detailed Jack-o’-Lantern faces and other Halloween-themed elements.
- Finish with a matte top coat to maintain the non-glossy effect.
Fun Halloween Character Nails
These nails are a fun and playful take on fall pumpkin nails, featuring a variety of Halloween characters such as pumpkins, ghosts, and Frankenstein. The mix of colors and designs on each nail creates an eye-catching and unique look, perfect for those who love to experiment with their nail art.
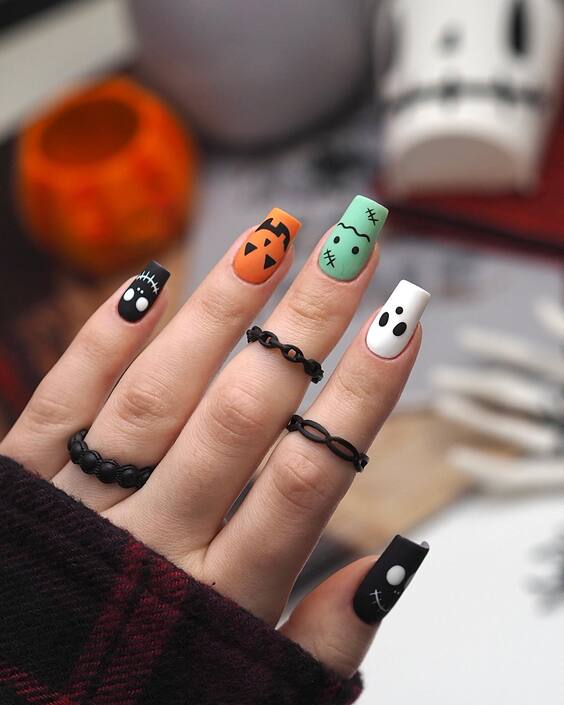
- Consumables Needed:
- Orange nail polish (Sally Hansen’s “Tangerine Tango”)
- Green nail polish (Essie’s “Mojito Madness”)
- White nail polish (China Glaze’s “White on White”)
- Black nail art pen for details
- Glossy top coat
- Creating This Look at Home:
- Apply a base coat to your nails.
- Paint each nail with a different base color: orange, green, white, or black.
- Use a black nail art pen to draw various Halloween characters and details on each nail.
- Seal the design with a glossy top coat to ensure it lasts longer.
Pastel Pumpkin Nails
This unique take on fall pumpkin nails features pastel hues, combining blue, mustard, and nude shades. The intricate leaf and pumpkin designs add a whimsical touch, perfect for those who love a subtle yet playful look. The mix of colors makes this design versatile and eye-catching.
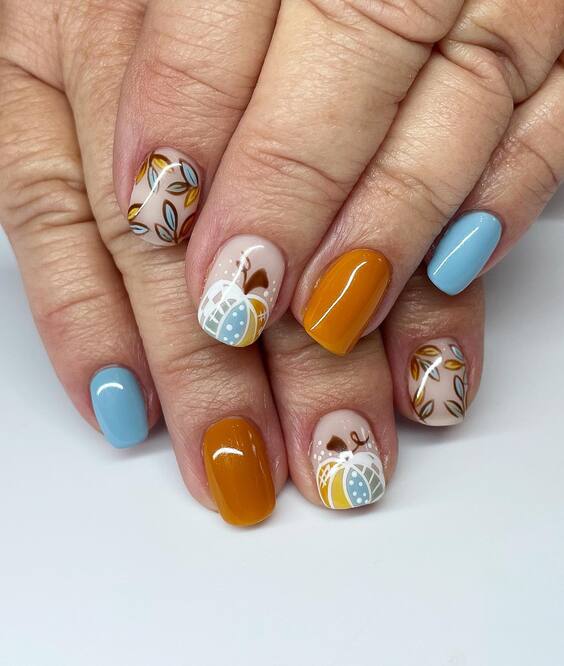
- Consumables Needed:
- Mustard nail polish (Essie’s “Fall for NYC”)
- Pastel blue nail polish (OPI’s “It’s a Boy!”)
- Nude nail polish (Zoya’s “Taylor”)
- White nail polish for pumpkin accents (OPI’s “Alpine Snow”)
- Nail art brushes for detailing
- Glossy top coat
- Creating This Look at Home:
- Begin with a base coat to protect your nails.
- Alternate painting your nails with mustard, pastel blue, and nude polishes.
- Use white polish and nail art brushes to create pumpkin and leaf designs on the nude nails.
- Finish with a glossy top coat to seal the design and add shine.
Ghost and Pumpkin French Tips
These nails put a spooky twist on the classic French tip with tiny pumpkins and ghosts adorning the tips. The nude base keeps the look elegant, while the detailed art adds a fun and festive touch, perfect for Halloween enthusiasts.
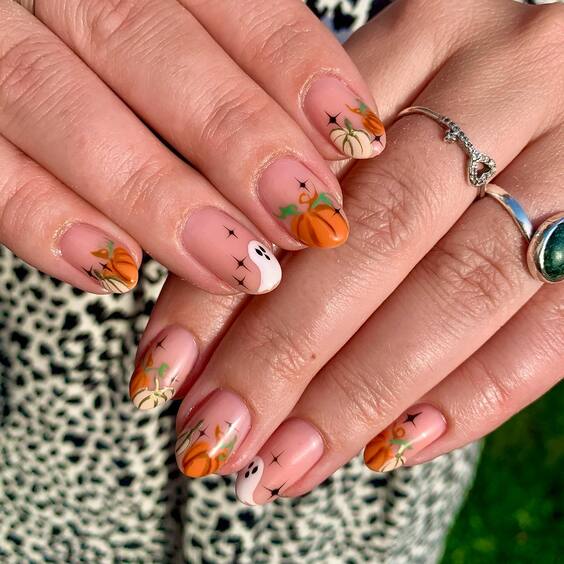
- Consumables Needed:
- Nude nail polish (Essie’s “Mademoiselle”)
- Orange nail polish for pumpkins (China Glaze’s “Orange Knockout”)
- White nail polish for ghosts (OPI’s “Alpine Snow”)
- Green and black nail art pens or brushes for detailing
- Glossy top coat
- Creating This Look at Home:
- Start with a base coat.
- Apply nude polish as the base color.
- Use orange polish to paint small pumpkins on the tips and white polish for tiny ghosts.
- Add details with green and black nail art pens.
- Seal with a glossy top coat to protect the design.
Cute Pumpkin Faces
For a charming and playful look, these nails feature cute pumpkin faces on a cream-colored background. The design is simple yet adorable, making it perfect for those who prefer a fun and light-hearted manicure.
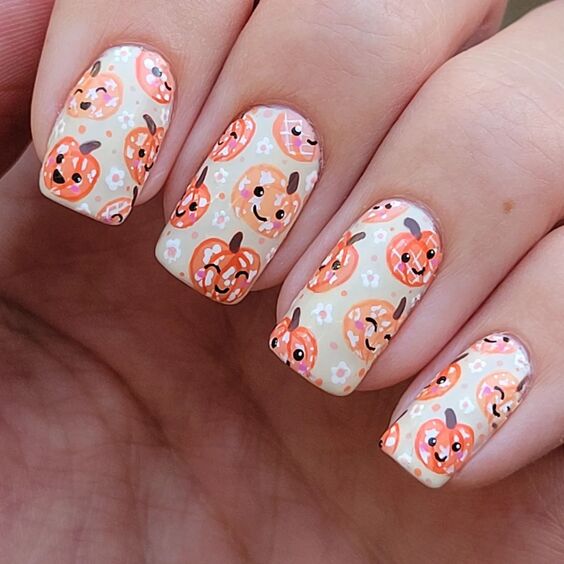
- Consumables Needed:
- Cream-colored nail polish (OPI’s “Be There in a Prosecco”)
- Orange nail polish for pumpkins (Sally Hansen’s “Tangerine Tango”)
- Black and white nail art pens for faces
- Glossy top coat
- Creating This Look at Home:
- Apply a base coat to your nails.
- Paint your nails with cream-colored polish.
- Use orange polish to create small pumpkin shapes.
- Draw cute faces on the pumpkins with black and white nail art pens.
- Finish with a glossy top coat for a long-lasting effect.
Warm Autumn Pumpkin Nails
These nails combine warm brown and creamy white tones with adorable pumpkin accents. The plaid pattern adds a cozy touch, making this design perfect for the autumn season. The mix of textures and patterns creates a visually appealing and sophisticated look.
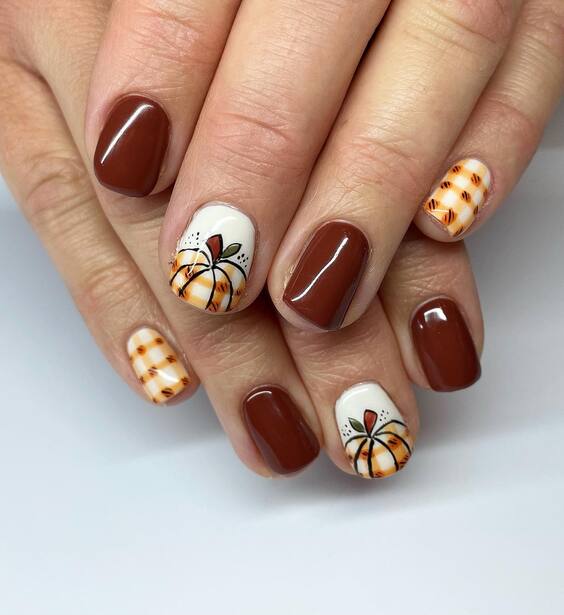
- Consumables Needed:
- Brown nail polish (OPI’s “Espresso Your Inner Self”)
- White nail polish (Essie’s “Blanc”)
- Orange nail polish for pumpkin accents (China Glaze’s “Orange Knockout”)
- Black and green nail art pens for detailing
- Nail art brushes for plaid pattern
- Glossy top coat
- Creating This Look at Home:
- Start with a base coat to protect your nails.
- Alternate painting your nails with brown and white polishes.
- Use orange polish and nail art brushes to create pumpkin shapes on the white nails, and add plaid patterns on some nails.
- Draw details with black and green nail art pens.
- Finish with a glossy top coat to seal the design and add shine.
Elegant Pumpkin French Tips
This design features classic French tips with a twist of pumpkin and ghost accents. The nude base and bright orange tips create a chic look, while the small Halloween-themed details add a playful touch. This design is perfect for those who want a sophisticated yet festive manicure.
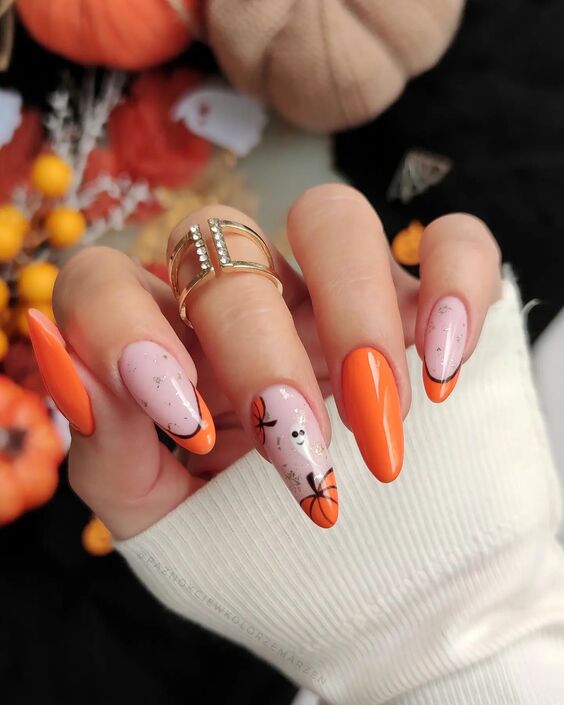
- Consumables Needed:
- Nude nail polish (Essie’s “Ballet Slippers”)
- Orange nail polish for tips (OPI’s “A Good Man-darin is Hard to Find”)
- Black and white nail art pens for pumpkin and ghost details
- Glitter for added sparkle
- Glossy top coat
- Creating This Look at Home:
- Apply a base coat to protect your nails.
- Paint the tips of your nails with orange polish for a French manicure effect.
- Use black and white nail art pens to draw pumpkin and ghost accents.
- Add a touch of glitter for sparkle.
- Seal with a glossy top coat for a shiny, long-lasting finish.
Bold Halloween Pumpkin Nails
These nails are a bold statement with vibrant orange and black colors, featuring large pumpkin designs and gold foil accents. The contrast between the colors and the glossy finish makes this design stand out, perfect for those who love to make a statement with their nails.
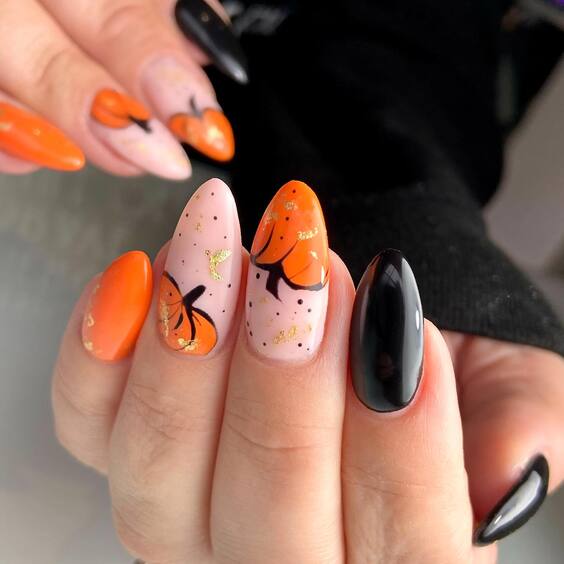
- Consumables Needed:
- Orange nail polish (China Glaze’s “Orange Knockout”)
- Black nail polish (OPI’s “Black Onyx”)
- Gold foil for accents
- Black nail art pen for pumpkin detailing
- Glossy top coat
- Creating This Look at Home:
- Start with a base coat to protect your nails.
- Alternate painting your nails with orange and black polishes.
- Use black nail art pen to create large pumpkin designs on the orange nails.
- Apply gold foil for added accents.
- Finish with a glossy top coat to seal the design and add shine.
Classic Jack-o’-Lantern Nails
These fall pumpkin nails feature classic Jack-o’-Lantern faces on a nude base, perfect for a festive yet understated look. The detailed pumpkins are fun and playful, making them a great choice for any Halloween enthusiast.
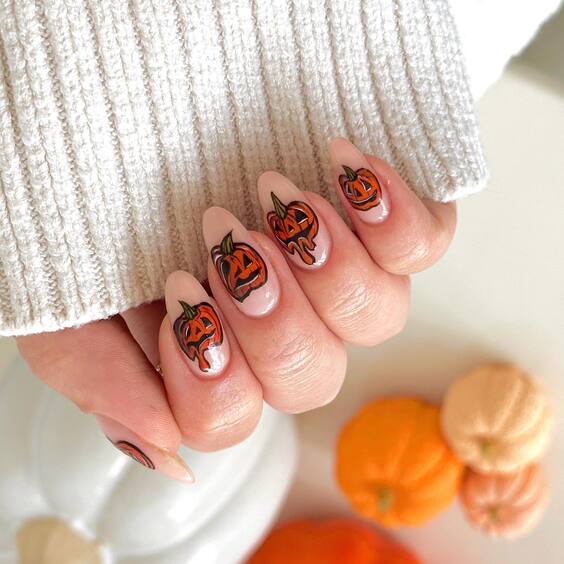
- Consumables Needed:
- Nude nail polish (Essie’s “Ballet Slippers”)
- Orange nail polish for pumpkins (OPI’s “A Good Man-darin is Hard to Find”)
- Black and green nail art pens for detailing
- Glossy top coat
- Creating This Look at Home:
- Start with a base coat.
- Apply nude polish to all nails.
- Use orange polish to paint pumpkin shapes.
- Add details with black and green nail art pens.
- Finish with a glossy top coat for a shiny finish.
Extravagant 3D Pumpkin Nails
For those who love to make a bold statement, these 3D fall pumpkin nails are perfect. The long, pointed nails are adorned with 3D pumpkin and jewel accents, creating a luxurious and dramatic look that is sure to turn heads.
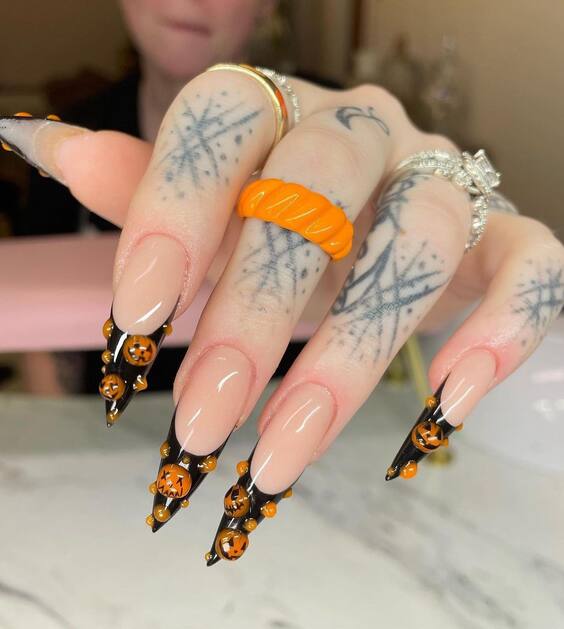
- Consumables Needed:
- Nude nail polish (Zoya’s “Taylor”)
- Black and orange nail polishes for detailing (China Glaze’s “Liquid Leather” and “Orange Knockout”)
- 3D pumpkin nail art charms
- Nail glue for attaching charms
- Glossy top coat
- Creating This Look at Home:
- Apply a base coat.
- Paint your nails with nude polish.
- Use black and orange polishes to create detailed pumpkin designs.
- Attach 3D pumpkin charms with nail glue.
- Finish with a glossy top coat to secure the design.
Playful Pumpkin and Ghost Nails
These nails feature a playful mix of pumpkins and ghosts on a nude and orange French tip base. The design is fun and festive, perfect for those who want to celebrate Halloween with a cute and whimsical manicure.
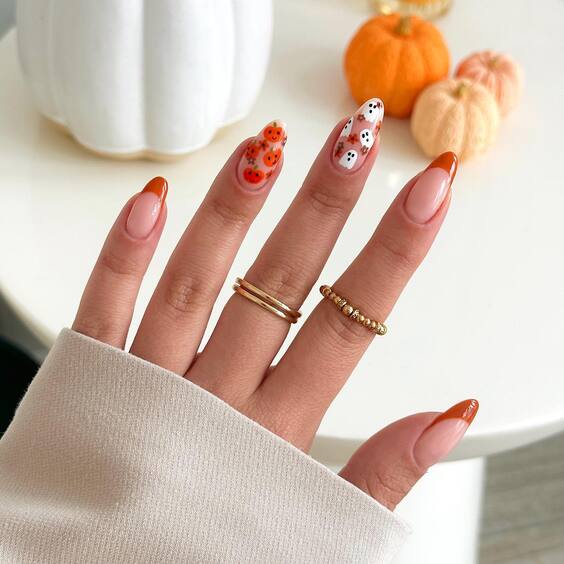
- Consumables Needed:
- Nude nail polish (OPI’s “Be There in a Prosecco”)
- Orange nail polish for tips (Essie’s “Clambake”)
- White nail polish for ghosts (Sally Hansen’s “White On”)
- Black and orange nail art pens for detailing
- Glossy top coat
- Creating This Look at Home:
- Apply a base coat.
- Create French tips with orange polish.
- Use white polish to paint small ghosts and black and orange pens for pumpkin details.
- Finish with a glossy top coat to secure the design.
Spooky Ghost and Pumpkin Nails
These fall pumpkin nails are perfect for embracing the Halloween spirit. Featuring a mix of ghosts, pumpkins, and bats on a vibrant orange background, this design is both festive and fun. The details are beautifully intricate, making these nails a standout choice for the season.
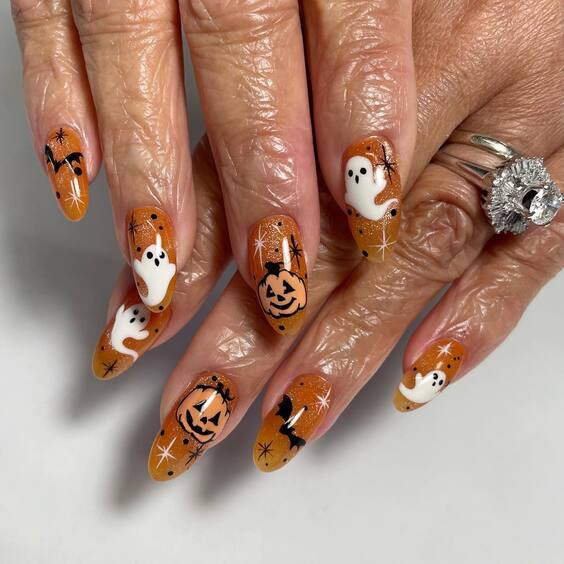
- Consumables Needed:
- Orange nail polish (OPI’s “A Good Man-darin is Hard to Find”)
- White nail polish for ghosts (Essie’s “Blanc”)
- Black nail art pen for bats and detailing
- Glossy top coat
- Creating This Look at Home:
- Start with a base coat.
- Apply two coats of orange polish and let it dry completely.
- Use white polish to paint small ghosts and a black nail art pen for bats and pumpkin details.
- Finish with a glossy top coat to seal the design and add shine.
Fun Candy Corn and Ghost Nails
This playful design features candy corn and ghost motifs on a nude base, paired with bold orange nails. The combination of matte and glossy finishes adds an extra dimension to this fun and quirky Halloween nail design.
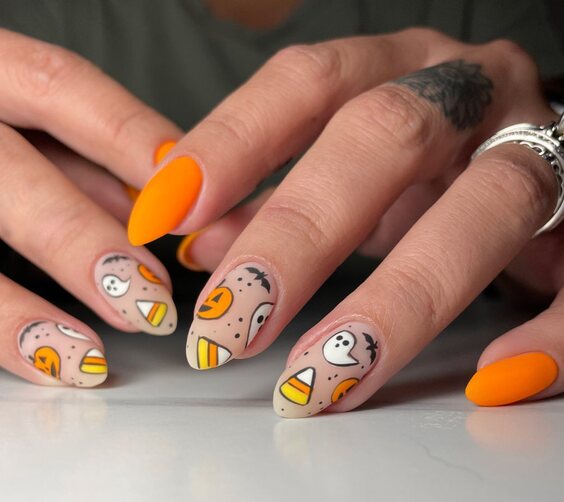
- Consumables Needed:
- Nude nail polish (OPI’s “Be There in a Prosecco”)
- Orange nail polish (China Glaze’s “Orange Knockout”)
- White, yellow, and black nail art pens for candy corn and ghost details
- Matte top coat for candy corn nails
- Glossy top coat for orange nails
- Creating This Look at Home:
- Apply a base coat to protect your nails.
- Alternate painting your nails with nude and orange polishes.
- Use white, yellow, and black nail art pens to create candy corn and ghost designs on the nude nails.
- Apply a matte top coat to the candy corn nails and a glossy top coat to the orange nails.
Cute Halloween Character Nails
These nails are adorned with cute Halloween characters like pumpkins, bats, and candy corn on a nude base, complemented by bright pink and black nails. This design is perfect for those who love a mix of playful and stylish elements in their nail art.
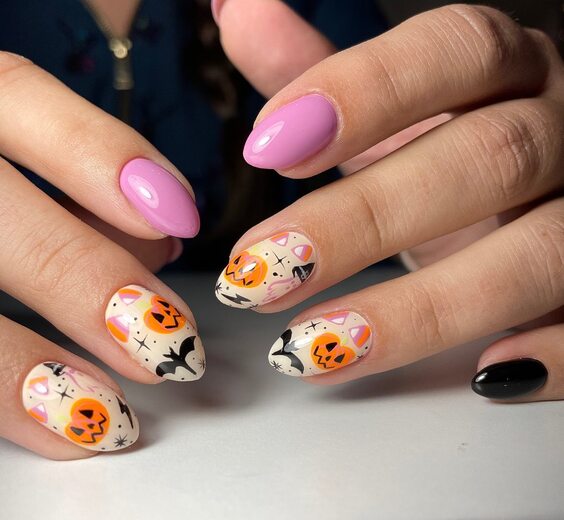
- Consumables Needed:
- Nude nail polish (Essie’s “Mademoiselle”)
- Pink nail polish (Essie’s “Cascade Cool”)
- Black nail polish (OPI’s “Black Onyx”)
- Orange and white nail art pens for Halloween characters
- Glossy top coat
- Creating This Look at Home:
- Start with a base coat.
- Alternate painting your nails with nude, pink, and black polishes.
- Use orange and white nail art pens to draw pumpkins, bats, and candy corn on the nude nails.
- Finish with a glossy top coat to seal the design.
Whimsical Pumpkin and Spider Nails
These fall pumpkin nails are a delightful mix of pumpkins, spiders, and webs on a nude base. The soft peachy hue of the background adds warmth to the design, while the black and white details create a striking contrast, making it perfect for those who enjoy a bit of whimsy in their nail art.
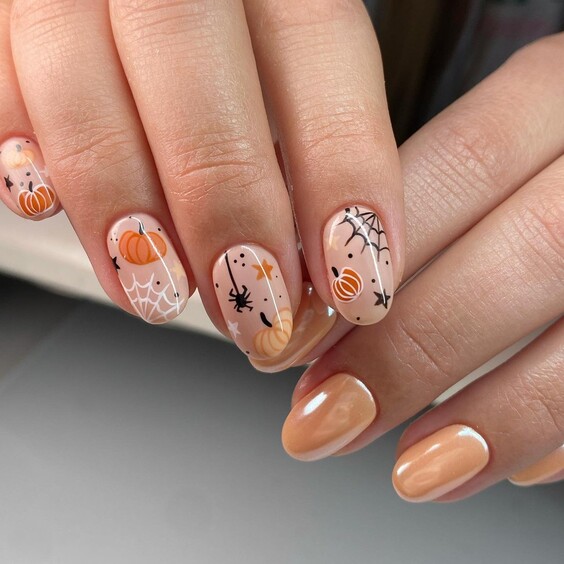
- Consumables Needed:
- Nude or peach nail polish (OPI’s “Bubble Bath”)
- Orange nail polish for pumpkins (China Glaze’s “Orange Knockout”)
- Black and white nail art pens for spider and web details
- Glossy top coat
- Creating This Look at Home:
- Start with a base coat.
- Apply nude or peach polish as the base color.
- Use orange polish to paint small pumpkins, and black and white pens to draw spiders and webs.
- Finish with a glossy top coat to seal the design.
Floral and Pumpkin Nail Art
Combining floral motifs with pumpkins, this design is both cute and festive. The flowers add a spring-like freshness to the autumnal pumpkins, creating a unique and visually appealing look. The soft colors make this design perfect for those who prefer a more subtle approach to Halloween nails.
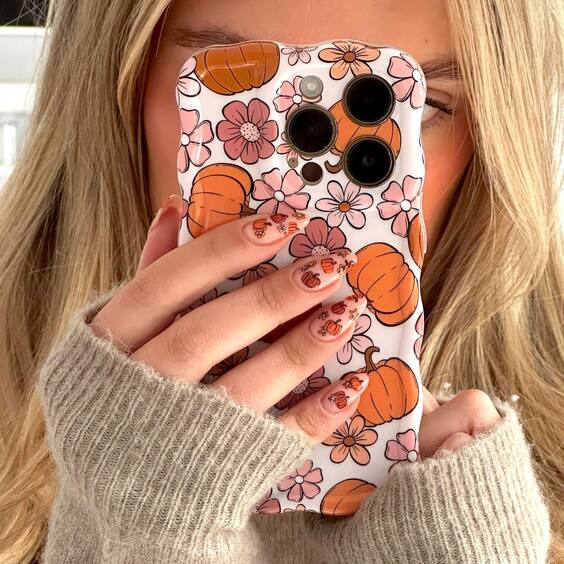
- Consumables Needed:
- Nude or light pink nail polish (Essie’s “Mademoiselle”)
- Orange and pink nail polishes for pumpkins and flowers (OPI’s “A Good Man-darin is Hard to Find” and Essie’s “Romper Room”)
- Black nail art pen for details
- Glossy top coat
- Creating This Look at Home:
- Apply a base coat.
- Paint your nails with nude or light pink polish.
- Use orange and pink polishes to create pumpkin and flower shapes.
- Add details with a black nail art pen.
- Seal the design with a glossy top coat.
Colorful Pumpkin Nails
These nails feature a variety of colorful pumpkins on a soft nude background, making them a perfect choice for a cheerful and vibrant autumn look. The simple yet effective design is ideal for those who love to experiment with colors and patterns.
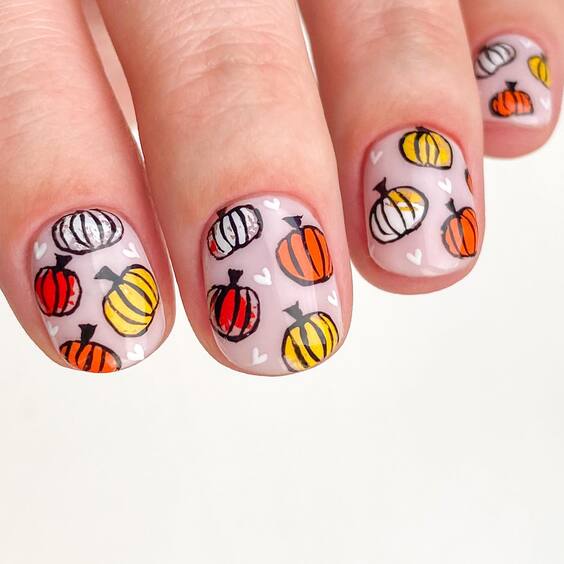
- Consumables Needed:
- Nude nail polish (Zoya’s “Taylor”)
- Orange, yellow, and white nail polishes for pumpkins (OPI’s “A Good Man-darin is Hard to Find”, Essie’s “Yellow Submarine”, and Sally Hansen’s “White On”)
- Black nail art pen for pumpkin outlines
- Glossy top coat
- Creating This Look at Home:
- Apply a base coat to protect your nails.
- Paint your nails with nude polish.
- Use orange, yellow, and white polishes to paint small pumpkins.
- Outline the pumpkins with a black nail art pen.
- Finish with a glossy top coat to ensure a long-lasting design.
Minimalist Pumpkin Nails
This minimalist design features tiny pumpkin patterns on a white background, paired with solid brown nails. The subtle yet festive look is perfect for those who prefer a more understated approach to their fall pumpkin nails.
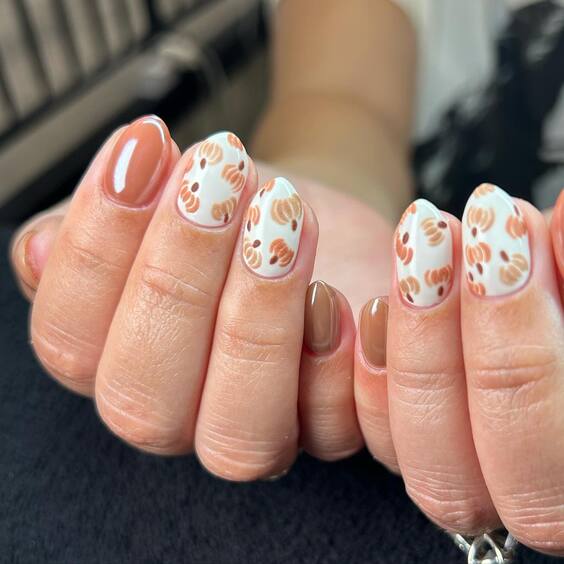
- Consumables Needed:
- White nail polish (OPI’s “Alpine Snow”)
- Brown nail polish (Essie’s “Wicked”)
- Orange and brown nail art pens for pumpkin details
- Glossy top coat
- Creating This Look at Home:
- Start with a base coat.
- Alternate painting your nails with white and brown polishes.
- Use orange and brown nail art pens to draw small pumpkins on the white nails.
- Finish with a glossy top coat to seal the design and add shine.
Detailed Halloween Nail Art
These nails feature an intricate mix of Halloween elements, including pumpkins, webs, and ghosts on a nude background. The detailed designs and variety of elements make this a standout look for the spooky season.
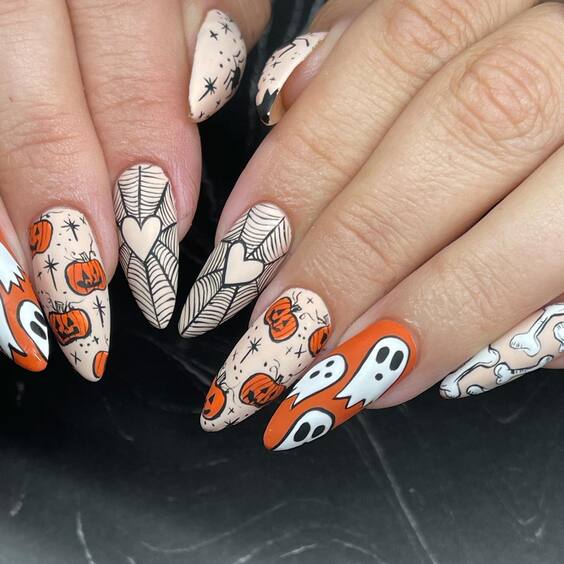
- Consumables Needed:
- Nude nail polish (Essie’s “Mademoiselle”)
- Orange and black nail polishes for details (China Glaze’s “Orange Knockout” and OPI’s “Black Onyx”)
- White nail polish for ghosts (Sally Hansen’s “White On”)
- Nail art brushes for detailing
- Glossy top coat
- Creating This Look at Home:
- Apply a base coat.
- Paint your nails with nude polish.
- Use orange and black polishes to create pumpkin and web designs, and white polish for ghost details.
- Add intricate details with nail art brushes.
- Finish with a glossy top coat to secure the design.
Conclusion
In conclusion, fall pumpkin nails 2024 offer a delightful array of designs that cater to every style preference, from subtle and sophisticated to bold and playful. Whether you prefer short, almond, or long coffin-shaped nails, these festive designs will help you embrace the autumn spirit with creativity and flair. By following the detailed instructions and utilizing the recommended products, you can easily recreate these stunning looks at home and make a statement this season. So, get inspired, pick your favorite design, and let your nails celebrate the beauty and fun of fall!

