21 Stunning Short Fall Nail Designs: Trendy Styles & Tips
Fall is just around the corner, and what better way to usher in the season than with a fresh set of nails? Are you looking for the perfect nail design to complement your autumn wardrobe? Do you want a manicure that’s both stylish and manageable? If so, you’re in the right place. Today, we’re diving into the world of short fall nails, showcasing a variety of designs that are not only beautiful but also practical for daily wear.
Fiery Autumn Elegance
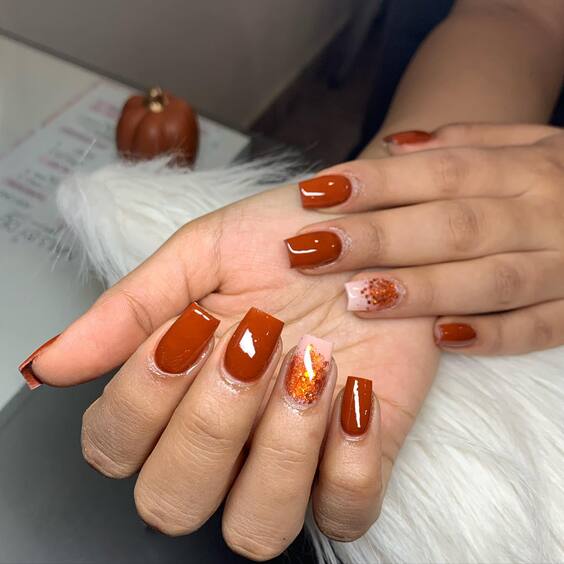
The first design captures the essence of autumn with its rich, deep red hue, reminiscent of autumn leaves. This glossy finish paired with a single accent nail adorned with autumn leaf decals exemplifies elegance. The use of subtle gold glitter on the accent nail adds a touch of sparkle, enhancing the deep red base, perfect for those who appreciate a classic look with a festive twist.
Consumables List:
- Base coat (e.g., OPI Natural Base Coat)
- Deep red nail polish (e.g., Essie’s “Bordeaux”)
- Gold glitter polish (e.g., Sally Hansen’s “Golden-I”)
- Autumn leaf nail decals
- Top coat for a glossy finish (e.g., Seche Vite Dry Fast Top Coat)
DIY Instructions:
- Start with a clean, dry nail and apply a base coat to protect your nails.
- Apply two coats of deep red nail polish, allowing each coat to dry.
- On the accent nail, apply a thin layer of gold glitter polish.
- Once the glitter polish is slightly tacky, gently place autumn leaf decals.
- Seal the design with a top coat for a long-lasting finish and extra shine.
Similar Designs
Consider exploring other rich fall colors like burgundy or chocolate brown, perhaps even experimenting with matte finishes for a modern twist.
Subtle Autumn Waves
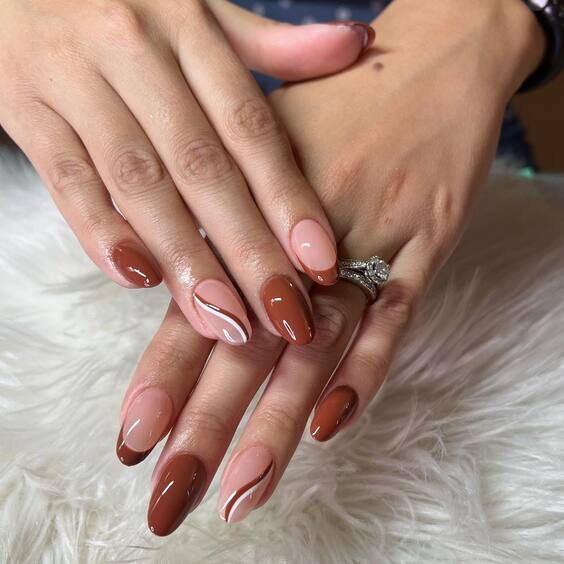
This nail design features a delicate gradient effect, blending a soft peach into a muted burgundy. The smooth transition mimics the serene fade of summer into fall. The overall look is refined and understated, making it an excellent choice for both professional environments and casual outings.
Consumables List:
- Base coat (e.g., CND Stickey Base Coat)
- Peach nail polish (e.g., OPI’s “Freedom of Peach”)
- Muted burgundy nail polish (e.g., Essie’s “Playing Koi”)
- Sponge for gradient effect
- Top coat (e.g., INM Out the Door Top Coat)
DIY Instructions:
- Apply a base coat to protect your nails.
- Paint your nails with the lighter peach polish as a base.
- Use a sponge to dab on the muted burgundy polish, starting from the tip and working towards the middle to create a gradient effect.
- Finish with a top coat to smooth out the gradient and add a glossy sheen.
Similar Designs
For a bolder look, swap peach for a vivid orange, or for a subtler appearance, use a nude shade as the base.
Chic Geometric Simplicity
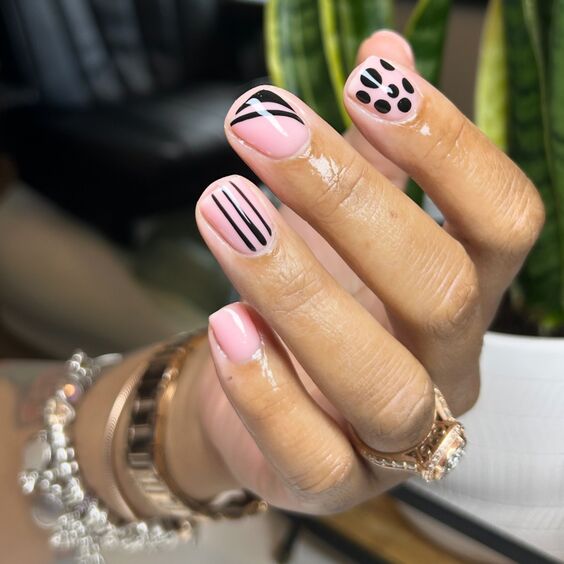
This design showcases modern artistry with its geometric patterns and a minimalist color palette. The clean lines and use of negative space give a contemporary feel, while the pink base provides a soft backdrop that complements the bold black accents.
Consumables List:
- Base coat (e.g., Orly Bonder Rubberized Basecoat)
- Light pink nail polish (e.g., Essie’s “Romper Room”)
- Black nail art pen or thin brush and black nail polish (e.g., Sally Hansen’s “Black Out”)
- Top coat (e.g., Revlon Extra Life No Chip Top Coat)
DIY Instructions:
- Apply a base coat to prep the nails.
- Paint all nails with a pale pink polish as the base color.
- Using a black nail art pen or a thin brush dipped in black polish, create geometric patterns on chosen nails.
- Finish with a top coat to ensure the design’s durability and to add a glossy effect.
Similar Designs
Experiment with other geometric shapes or add a metallic touch using silver or gold accents for a luxurious feel.
Elegant Whimsical Waves
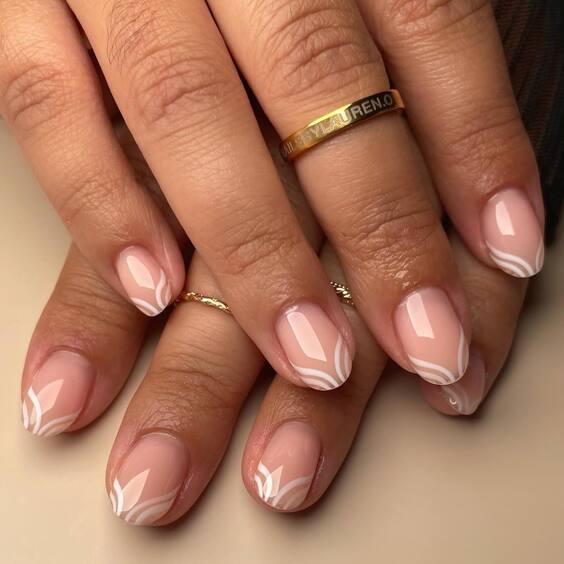
The elegance of this design lies in its simplicity and precision. Featuring soft pink as a base, adorned with delicate white line art, these nails boast a whimsical, almost ethereal look. The design utilizes negative space creatively, making it both modern and chic, suitable for everyday elegance or special autumn events.
Consumables List:
- Base coat (e.g., Butter London Nail Foundation Priming Basecoat)
- Soft pink nail polish (e.g., Essie’s “Ballet Slippers”)
- White nail art liner (e.g., Orly Instant Artist Detailer Brush)
- Top coat (e.g., Essie Gel Setter Top Coat)
DIY Instructions:
- Apply a base coat to protect your nails from staining.
- Paint all nails with two coats of soft pink polish for a full-coverage look.
- Use a white nail art liner to create flowing, abstract lines on each nail, varying the designs slightly for a unique look on each finger.
- Finish with a top coat to seal in the design and enhance durability.
Similar Designs
Experiment with other pastel shades like lavender or light blue as the base color for a subtle variation on this design.
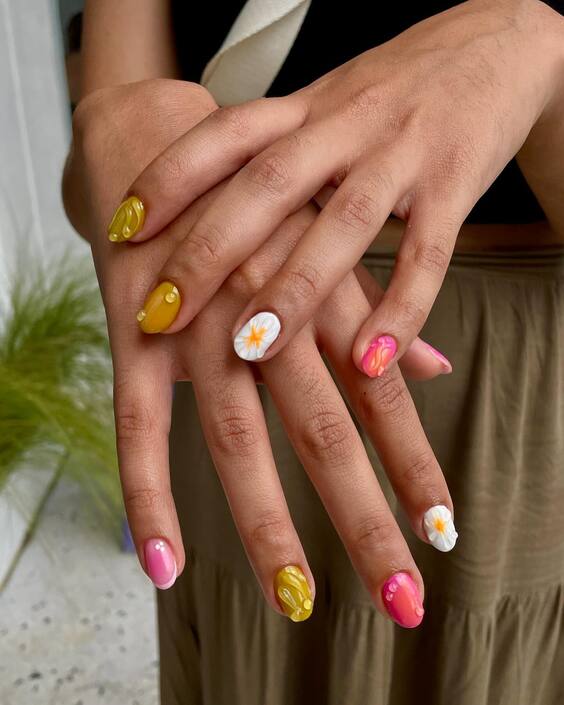
Vibrant Autumn Spectrum
This playful and vibrant design perfectly captures the lively spirit of autumn. The combination of bright pink, sunny yellow, and floral decals offers a cheerful palette that stands out. Each nail features a unique design, including swirled patterns and flower accents, reflecting the joyous and colorful essence of fall.
Consumables List:
- Base coat (e.g., Deborah Lippmann Hard Rock Nail Hardening Base and Top Coat)
- Bright pink nail polish (e.g., China Glaze’s “Bottoms Up”)
- Sunny yellow nail polish (e.g., OPI’s “Exotic Birds Do Not Tweet”)
- White nail polish for details (e.g., Sally Hansen’s “White On”)
- Floral nail decals
- Top coat (e.g., Sally Hansen Insta-Dri Anti-Chip Top Coat)
DIY Instructions:
- Start with a base coat to protect your nails.
- Paint each nail a different color or design, alternating between bright pink and sunny yellow as the base colors.
- Add small white details such as dots or swirls for added texture and interest.
- Apply floral decals to the nails to introduce an element of nature.
- Seal everything with a top coat for a glossy finish and extended wear.
Similar Designs
Consider using autumn-inspired colors like deep orange or forest green for a more traditional fall look.
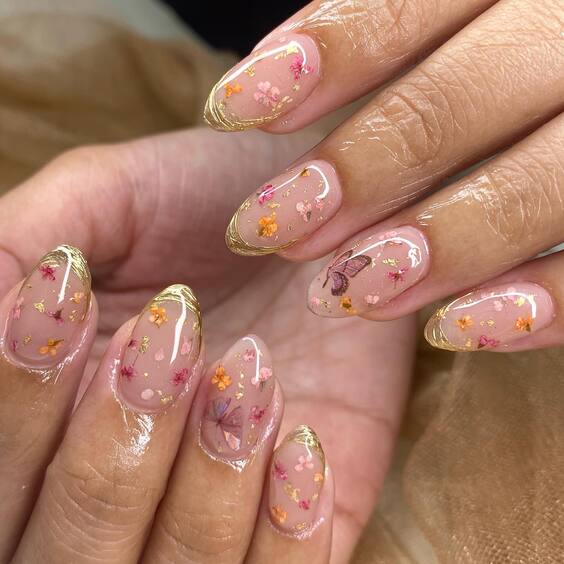
Autumnal Floral Elegance
These nails are a true artistic expression of fall, featuring a translucent pink base overlaid with delicate gold foil and tiny autumnal floral prints. The use of clear nail polish as a base gives a glass-like effect, enhancing the subtlety of the gold and floral elements, making it an ideal choice for those who prefer a sophisticated, understated style.
Consumables List:
- Clear base coat (e.g., Zoya Anchor Base Coat)
- Translucent pink nail polish (e.g., OPI’s “Bubble Bath”)
- Gold foil sheets
- Autumnal floral nail art stickers
- Top coat (e.g., OPI Top Coat)
DIY Instructions:
- Apply a clear base coat to start.
- Layer a thin coat of translucent pink polish for a sheer look.
- Carefully apply pieces of gold foil on the nails, using tweezers for precision.
- Place floral nail art stickers strategically to create a balanced design.
- Cover with a top coat to ensure longevity and add a glossy shine.
Similar Designs
For a different seasonal touch, try using silver foil instead of gold, or opt for winter-themed floral stickers as we transition from fall to winter.
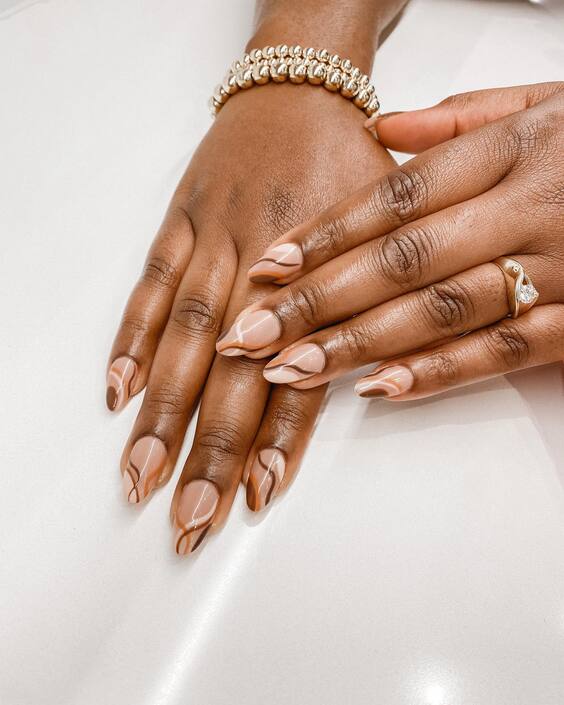
Sleek Taupe Artistry
This nail design demonstrates the beauty of minimalist art with its clean lines and the use of a soothing taupe shade. The abstract patterns in a deeper shade provide a stunning contrast against the lighter base, embodying a modern yet sophisticated look. This style is particularly suitable for an autumn palette, offering a subtle yet impactful aesthetic.
Consumables List:
- Base coat (e.g., Essie’s “Here to Stay”)
- Taupe nail polish (e.g., OPI’s “Over the Taupe”)
- Darker taupe polish for line art (e.g., OPI’s “You Don’t Know Jacques!”)
- Fine brush for detailed line work
- Top coat (e.g., CND Vinylux Long Wear Top Coat)
DIY Instructions:
- Begin with a base coat to protect the nail.
- Apply two coats of the lighter taupe polish as the base.
- Using a fine brush, create abstract lines with the darker taupe polish for a striking yet subtle design.
- Seal the design with a top coat to enhance durability and shine.
Similar Designs
Experiment with geometric shapes or dots in the same color palette for a varied yet cohesive look.
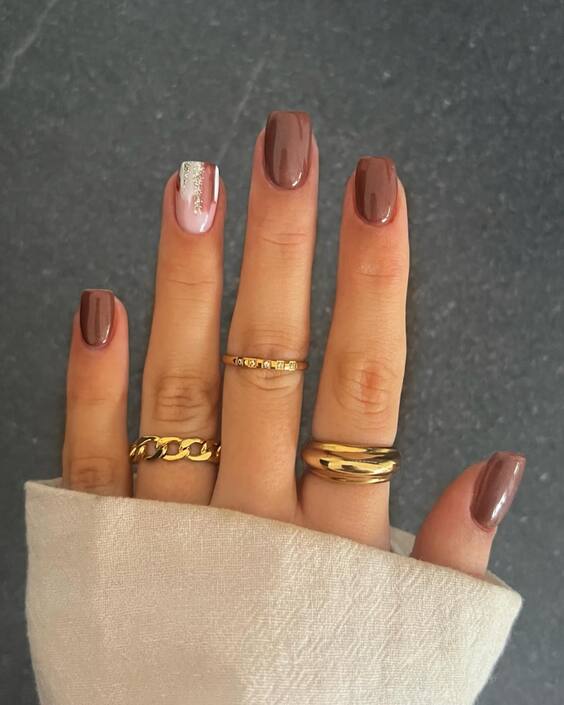
Autumnal Chocolate Richness
This design celebrates the richness of fall with its deep chocolate brown base, complemented by an accent nail featuring gold sparkle. The metallic sheen on the accent nail captures the essence of fall festivities and complements the creamy richness of the brown. This set is ideal for those who prefer bold yet elegant nail art.
Consumables List:
- Base coat (e.g., Deborah Lippmann Gel Lab Pro)
- Chocolate brown nail polish (e.g., Essie’s “Little Brown Dress”)
- Gold glitter polish for accent (e.g., OPI’s “Goldeneye”)
- Top coat (e.g., Sally Hansen Miracle Gel Top Coat)
DIY Instructions:
- Apply a base coat to each nail for lasting wear.
- Paint all nails except the accent with two coats of chocolate brown.
- Apply the gold glitter polish on the accent nail for a pop of sparkle.
- Finish with a top coat for a glossy look and added protection.
Similar Designs
Add a matte top coat to the brown nails for a modern twist, or use a silver glitter on the accent nail for a cooler tone contrast.
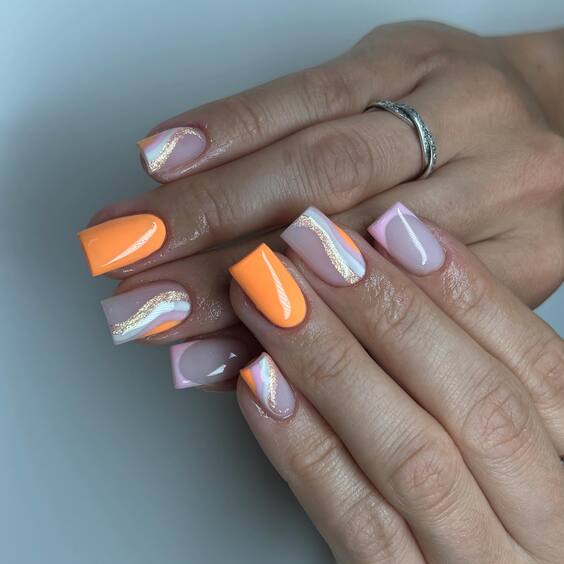
Playful Lavender Swirls
This playful design combines soft lavender and vibrant orange, accented with shimmering silver lines. The choice of colors and the swirl pattern create a fun and youthful look, ideal for adding a pop of color to your fall fashion lineup. The glossy finish brings out the vibrancy of the colors, making it a standout choice.
Consumables List:
- Base coat (e.g., OPI Natural Nail Base Coat)
- Lavender nail polish (e.g., Essie’s “Go Ginza”)
- Bright orange nail polish (e.g., China Glaze’s “Papaya Punch”)
- Silver glitter liner (e.g., NYX Professional Makeup Glitter Goals)
- Top coat (e.g., INM Out the Door Top Coat)
DIY Instructions:
- Start with a base coat to ensure nail health.
- Apply two coats of lavender nail polish as the base.
- Paint alternating swirls with the bright orange polish.
- Accent the swirls with silver glitter lines using a liner brush.
- Complete the manicure with a top coat for a smooth, shiny finish.
Similar Designs
Try using a pastel yellow instead of orange for a softer autumn feel, or add more glitter for extra sparkle and festivity.
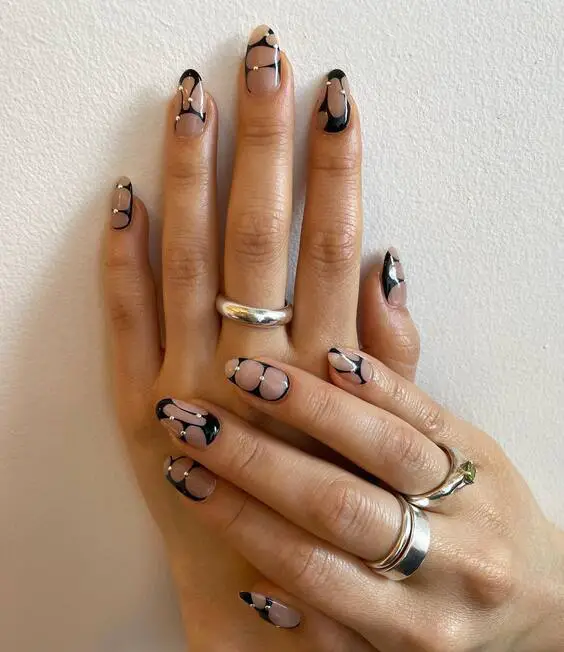
Modern Monochrome Elegance
This design epitomizes sophistication with its bold monochrome palette, blending black and nude in an intricate pattern that simulates marble or natural stone. The nails are styled in a sharp, clean almond shape, enhancing the dramatic effect of the contrasting colors, perfect for those who appreciate an edgy yet elegant look.
Consumables List:
- Base coat (e.g., Orly Bonder Rubberized Basecoat)
- Nude nail polish (e.g., Essie’s “Topless & Barefoot”)
- Black nail polish (e.g., China Glaze’s “Liquid Leather”)
- Detailing brush for intricate patterns
- Top coat (e.g., INM Out the Door Super Fast Drying Top Coat)
DIY Instructions:
- Apply a base coat to protect your nails.
- Paint all nails with a nude polish as the base color.
- Once dry, use a detailing brush to add black designs, mimicking the look of cracked marble or abstract shapes.
- Seal with a top coat for a glossy finish and to ensure longevity.
Similar Designs
For a variation, consider swapping black for a deep burgundy or navy blue to soften the look while keeping it striking and autumnal.
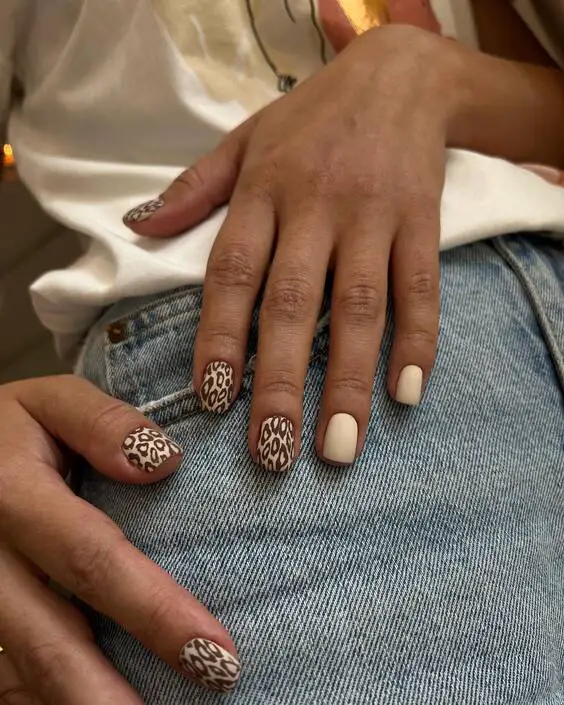
Wild Leopard Print
Leopard print remains a timeless choice, and this nail design integrates classic beige and brown tones to create a fierce yet sophisticated look. This set features a mix of full leopard print and solid color nails, providing balance and an eye-catching contrast. It’s a fun choice for a bold fall statement.
Consumables List:
- Base coat (e.g., Sally Hansen Double Duty Base & Top Coat)
- Beige nail polish (e.g., OPI’s “Samoan Sand”)
- Brown nail polish for the spots (e.g., Essie’s “Mink Muffs”)
- Black detailing polish for accenting the spots (e.g., OPI’s “Black Onyx”)
- Top coat (e.g., Seche Vite Dry Fast Top Coat)
DIY Instructions:
- Start with a base coat to prep the nails.
- Apply beige polish as the base on all nails.
- On the accent nails, use a small brush to create leopard spots with brown polish, then outline these spots partially with black polish to enhance the print effect.
- Finish with a top coat to protect the design and add a glossy sheen.
Similar Designs
Consider using a metallic gold or silver for the spots to add a glamorous twist to the traditional leopard print.
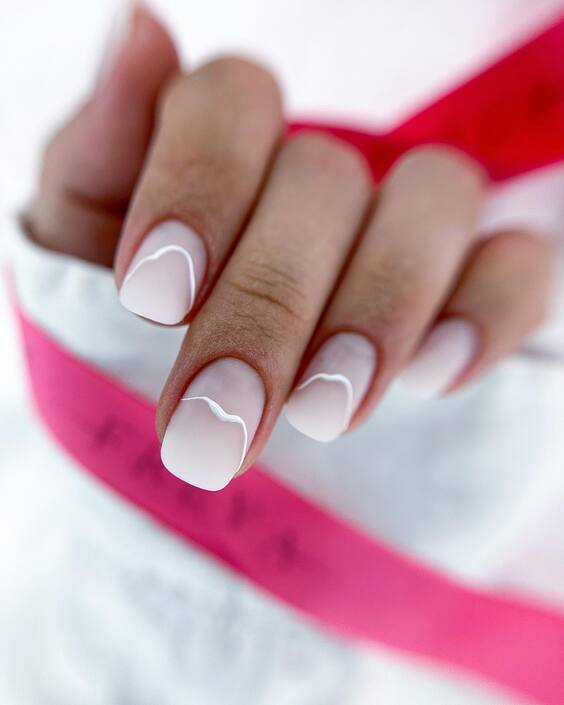
Classic French Tip with a Twist
This design refreshes the classic French tip by incorporating a unique, wavy line instead of the traditional straight line. The pristine white tips stand out against the natural nail color, offering a clean and refined look that’s both modern and timeless. This subtle twist on a classic is ideal for any fall occasion, from formal events to casual outings.
Consumables List:
- Base coat (e.g., Base Coat Nail Salon)
- Natural pink nail polish (e.g., Essie’s “Mademoiselle”)
- White nail polish for tips (e.g., OPI’s “Alpine Snow”)
- Detailing brush for wavy lines
- Top coat (e.g., Revlon Quick Dry Top Coat)
DIY Instructions:
- Apply a base coat to ensure a smooth foundation.
- Paint the entire nail with a natural pink polish for a healthy, subtle blush.
- Use a detailing brush to paint wavy, white tips, adjusting the wave’s height for a dynamic effect.
- Seal the design with a top coat for shine and durability.
Similar Designs
Experiment with colored tips—such as deep red or navy blue—for a seasonal update on this classic style.
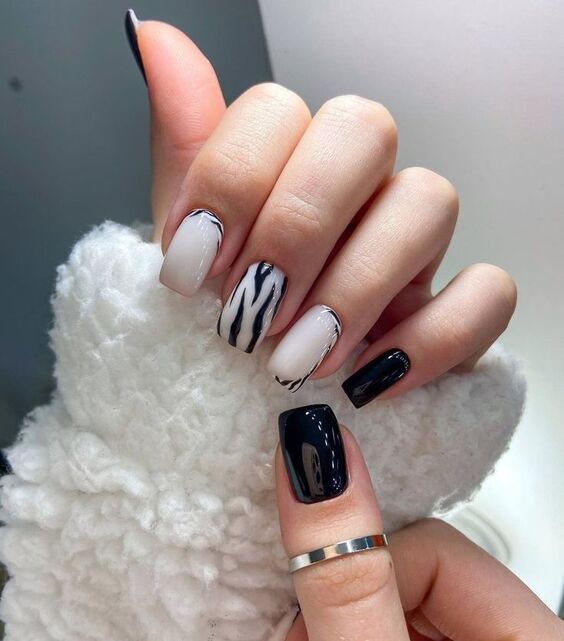
Monochrome Mix with Zebra Accent
This nail design introduces an exciting mix of monochrome shades with a standout zebra print accent nail. The combination of soft white and deep black provides a striking contrast, while the zebra pattern adds an edgy, yet sophisticated touch. It’s a bold choice for those who enjoy statement nails that retain a touch of classic elegance.
Consumables List:
- Base coat (e.g., Orly Bonder)
- White nail polish (e.g., Essie’s “Blanc”)
- Black nail polish (e.g., China Glaze’s “Liquid Leather”)
- Detailing brush for zebra stripes
- Top coat (e.g., Glisten & Glow Top Coat)
DIY Instructions:
- Apply a base coat to protect the nails.
- Paint alternating nails in white and black.
- For the zebra accent nail, use the black polish with a detailing brush to create fine stripes over the white base.
- Seal the design with a top coat for a lasting glossy finish.
Similar Designs
Try incorporating other animal prints such as leopard or cheetah for a varied wild theme.
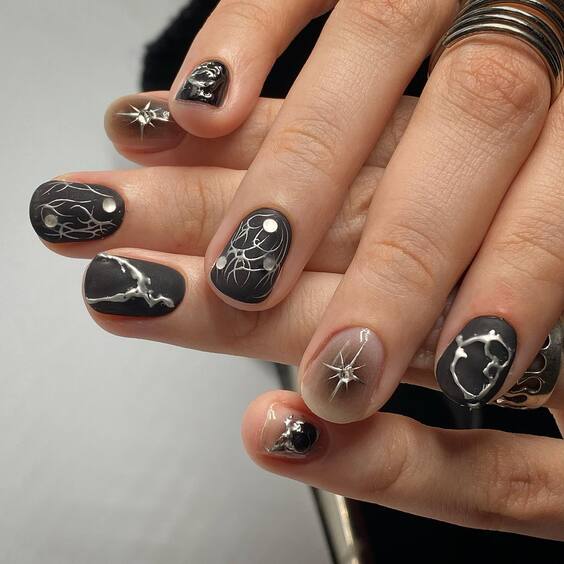
Mystical Night Sky
The mystical night sky theme captured in this design features a dark base with white and silver celestial patterns, such as stars and constellations. The overall effect is both mesmerizing and elegant, perfect for seasonal events or as a fashionable autumn statement.
Consumables List:
- Base coat (e.g., CND Stickey Base Coat)
- Dark gray or black nail polish (e.g., OPI’s “Black Onyx”)
- White and silver nail art pens (e.g., Sally Hansen Nail Art Pens in White and Silver)
- Top coat (e.g., Essie Good To Go Top Coat)
DIY Instructions:
- Begin with a base coat for nail protection.
- Apply the dark base color on all nails.
- Use nail art pens to draw stars and constellation patterns on each nail.
- Finish with a top coat to ensure the design’s longevity and enhance the shiny appearance.
Similar Designs
Consider using a blue or deep purple base for a different take on the celestial theme, adding a touch of color while keeping the mystic allure.
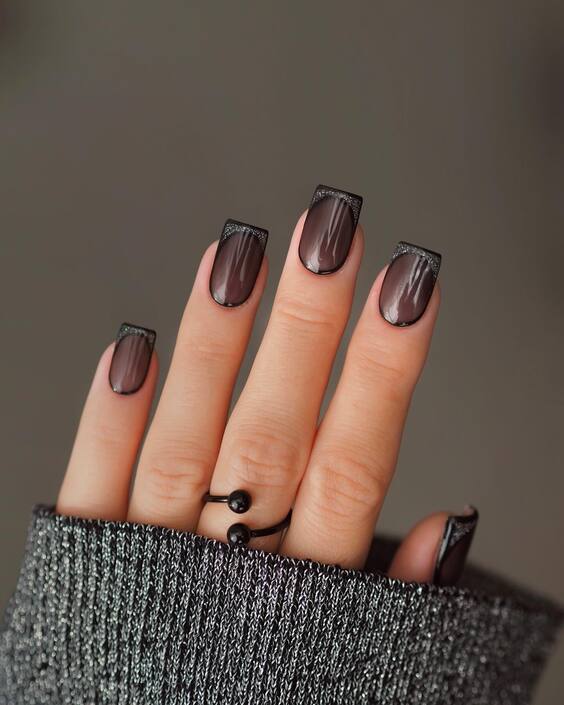
Elegant Glossy Mocha with Metallic Edges
This design features a rich mocha base with striking metallic edges, blending sophistication with a modern twist. The glossy finish on the mocha enhances its depth, while the metallic detailing adds a luxurious edge, making it a perfect choice for those who favor a chic yet bold look.
Consumables List:
- Base coat (e.g., Essie Grow Stronger Base Coat)
- Mocha nail polish (e.g., Essie’s “Mochacino”)
- Metallic silver or gold polish for edges (e.g., Revlon Metallic)
- Fine brush for precise metallic detailing
- Top coat (e.g., China Glaze Fast Forward Top Coat)
DIY Instructions:
- Apply a base coat to protect and strengthen the nails.
- Paint the nails with two coats of mocha polish for a rich color.
- Carefully apply the metallic polish along the tips or edges of the nails using a fine brush.
- Seal the design with a top coat for a durable, glossy finish.
Similar Designs
Adapt this look by changing the base color to a deep burgundy or navy blue, maintaining the metallic tips for a seasonal yet stylish variation.
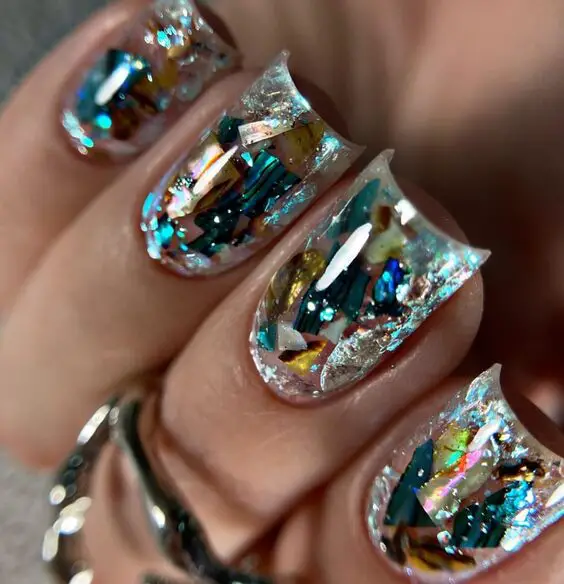
Sparkling Gemstone Splendor
This stunning design mimics the brilliance of gemstones embedded within a clear acrylic base. The nails are adorned with a dazzling array of colorful, sparkling pieces that catch the light with every movement. This look is perfect for those who wish to add a touch of glamour to their autumn style.
Consumables List:
- Base coat (e.g., Orly Rubberized Base Coat)
- Clear acrylic powder and liquid (e.g., Mia Secret Acrylic Powder)
- Multicolored gemstone pieces
- Top coat (e.g., Gelish Top It Off Gel Sealant)
DIY Instructions:
- Apply a base coat to protect the nails.
- Mix clear acrylic powder with acrylic liquid to form a bead, then apply to the nail.
- Embed various colored gemstone pieces into the wet acrylic.
- Once dry, encapsulate with another layer of clear acrylic to secure the gemstones.
- Finish with a high-gloss top coat for a smooth, shiny surface.
Similar Designs
Experiment with different gemstone colors or sizes for a customized look, or use glitter flakes for a subtler sparkle.
Zebra Print with a Pop of Color
This design showcases a playful and trendy approach to nail art by combining a classic zebra print with bold, bright colors. The white and black zebra pattern is accented with a vibrant pink that adds a modern twist to the traditional animal print. This style is perfect for adding a vibrant splash to your fall outfits.
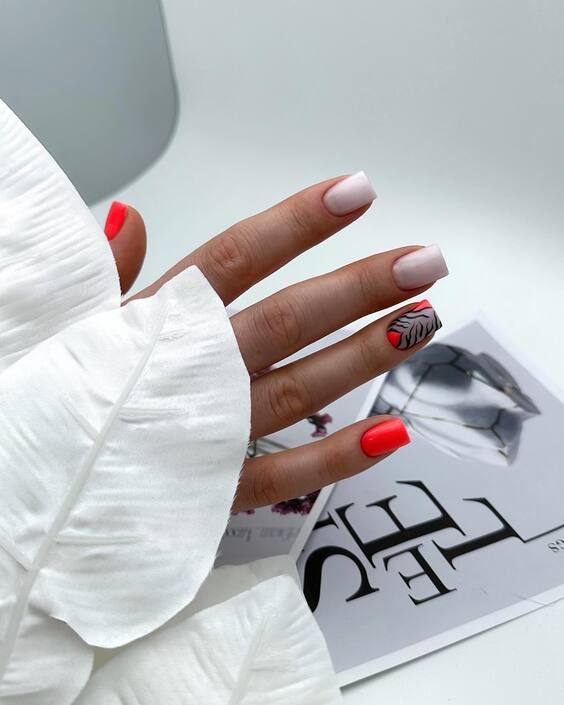
Consumables List:
- Base coat (e.g., Essie’s All in One Base)
- White nail polish (e.g., OPI’s “Alpine Snow”)
- Black nail art pen (e.g., Sally Hansen Nail Art Pen)
- Bright pink nail polish (e.g., Essie’s “Bachelorette Bash”)
- Top coat (e.g., INM Out the Door Top Coat)
DIY Instructions:
- Begin with a base coat to protect the nail.
- Apply two coats of white polish as the base.
- Use a black nail art pen to draw zebra stripes.
- Add an accent of bright pink polish on selective nails for a pop of color.
- Seal the design with a top coat for durability and gloss.
Similar Designs
Integrate other vivid colors like electric blue or neon green instead of pink for a different, equally striking look.
Monochrome Elegance with a Green Twist
This nail design blends sleek monochrome tones with a sudden splash of vivid green, creating a striking visual contrast. The smooth black and soft nude shades serve as a perfect backdrop for the bold green accent. This look is ideal for those who appreciate a mix of classic and unexpected elements in their manicure.
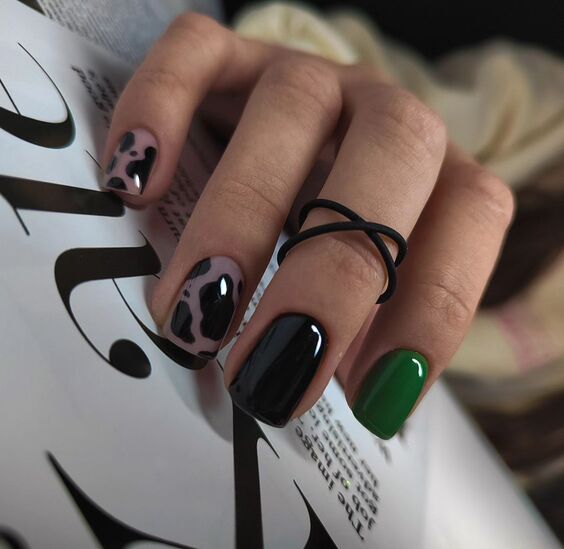
Consumables List:
- Base coat (e.g., CND Essentials Base Coat)
- Nude nail polish (e.g., OPI’s “Tiramisu for Two”)
- Black nail polish (e.g., China Glaze’s “Liquid Leather”)
- Bright green nail polish (e.g., Essie’s “Vibrant Vibes”)
- Top coat (e.g., Sally Hansen Mega Shine Top Coat)
DIY Instructions:
- Apply a base coat for a smooth foundation.
- Paint alternate nails in nude and black for a monochrome effect.
- Choose a nail to serve as the accent and apply bright green polish.
- Once all the polish is dry, apply a top coat to enhance the shine and protect the design.
Similar Designs
Swap out the green for another bold color like hot orange or deep blue to tailor the look to different styles or seasons.
Sleek Sapphire Elegance
This design showcases a sophisticated deep sapphire hue complemented with minimalist silver accents at the tips, creating a sleek and modern look. The matte finish on the sapphire base enhances the contemporary appeal, making it an ideal choice for those seeking a bold yet understated autumn style.
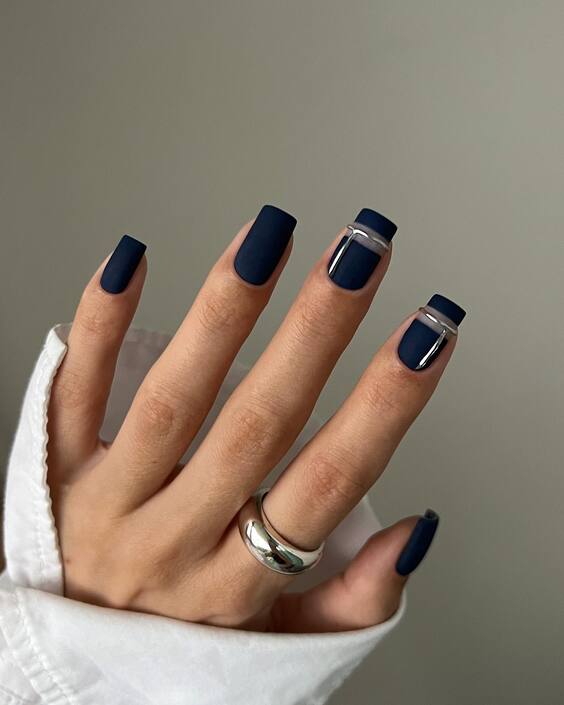
Consumables List:
- Base coat (e.g., Zoya Anchor Base Coat)
- Sapphire blue matte nail polish (e.g., OPI’s “Russian Navy” in Matte)
- Silver striping tape or thin metallic polish for accents
- Matte top coat (e.g., Essie Matte About You)
DIY Instructions:
- Apply a base coat to protect the nails.
- Paint the nails with two coats of matte sapphire polish.
- Once dry, apply silver striping tape at the tips, or use a thin brush to paint a silver line.
- Finish with a matte top coat to maintain the flat finish and prevent chipping.
Similar Designs
For a variation, swap the sapphire for a rich emerald or burgundy shade, maintaining the matte finish and metallic accents for a seasonal look.
Modern Marble Elegance
This design incorporates a soft white base with dynamic black and gold marble swirls, offering a luxurious and artistic touch. The use of gold accents adds an element of richness, enhancing the overall elegance of the manicure. This style is perfect for those who appreciate the artistry in their nail designs.
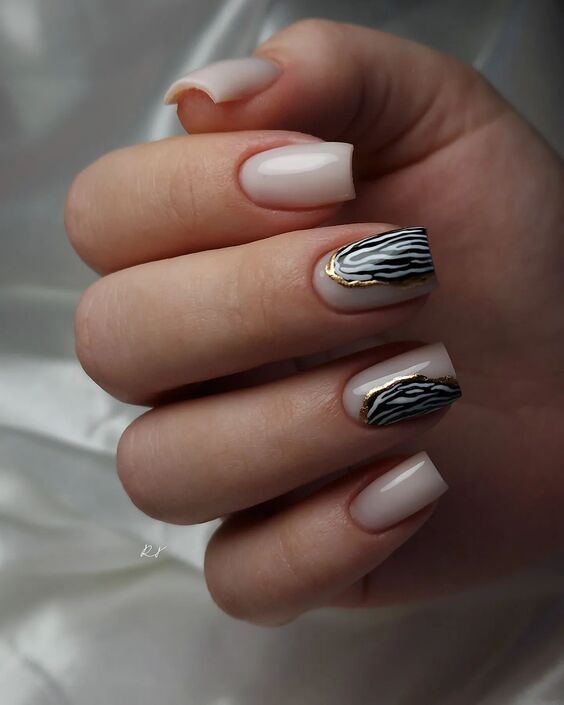
Consumables List:
- Base coat (e.g., Butter London Nail Foundation Priming Basecoat)
- White nail polish (e.g., Sally Hansen Insta-Dri in “White On Time”)
- Black and gold nail polish for marble effect (e.g., Essie’s “Licorice” and “Good as Gold”)
- Detailing brush or marbling tool
- Top coat (e.g., Seche Vite Dry Fast Top Coat)
DIY Instructions:
- Start with a base coat to protect your nails.
- Apply a white base coat on all nails.
- Use a detailing brush to add black and gold swirls, creating a marble effect.
- Swirl the colors together using a marbling tool or a clean brush.
- Seal with a top coat for gloss and protection.
Similar Designs
Experiment with different base colors like pastel pink or light blue for a softer marble effect.
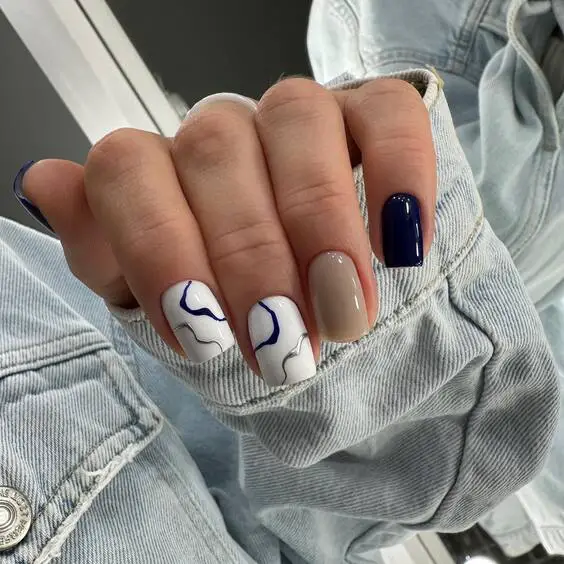
Contrasting Chic: Navy and Neutral
This nail design contrasts a vivid navy blue with neutral beige, paired with unique abstract white patterns over select nails. The arrangement is stylishly asymmetrical, providing a visually intriguing look that is both bold and balanced. This design is ideal for someone looking to make a statement while maintaining an air of sophistication.
Consumables List:
- Base coat (e.g., OPI Natural Nail Base Coat)
- Navy blue nail polish (e.g., Essie’s “After School Boy Blazer”)
- Neutral beige nail polish (e.g., OPI’s “Pale to the Chief”)
- White nail art pen for abstract designs
- Top coat (e.g., OPI Top Coat)
DIY Instructions:
- Apply a base coat to protect the nails.
- Paint some nails navy blue and others with beige.
- On the beige nails, use a white nail art pen to create abstract designs.
- Finish with a top coat to enhance the colors and ensure the longevity of your manicure.
Similar Designs
Mix up the look by choosing different contrasting colors, such as black and white or red and grey, keeping the abstract pattern for a touch of modern art.
As we wrap up our exploration of short fall nails for 2024, it’s clear that this season brings a diverse palette of styles and inspirations. From the timeless elegance of monochrome designs to the playful vibrancy of gemstone-embedded acrylics, there’s something to match every personality and occasion. These nail designs not only embrace the essence of autumn but also offer practical options for those who prefer maintaining shorter nails. Whether you’re a fan of the subtle artistry of marble effects or the bold statements of animal prints, each style is designed to enhance your autumn wardrobe and showcase your personal style.
Remember, the key to perfecting these looks is to use quality consumables and follow the step-by-step guides provided. Don’t be afraid to experiment with different colors and patterns to make each design uniquely yours. This season, let your nails be your canvas and express your fall spirit in every polish. So, embrace these trends, pick your favorite designs, and bring a touch of autumn elegance to your fingertips!

