20 Stunning Summer Nail Designs 2024: Simple, Elegant, and Bold Styles
Are you ready to dazzle this summer with nails that speak louder than words? Whether lounging by the pool or enjoying an evening out, your nails can be a reflection of your summer spirit. But where do you start? What are the hottest simple nail designs for summer? This article explores a variety of summer nail designs 2024 simple yet elegant, proving that sometimes, less really is more. Prepare to be inspired by these straightforward, chic designs that are perfect for any summer occasion.
Lavender Dreams
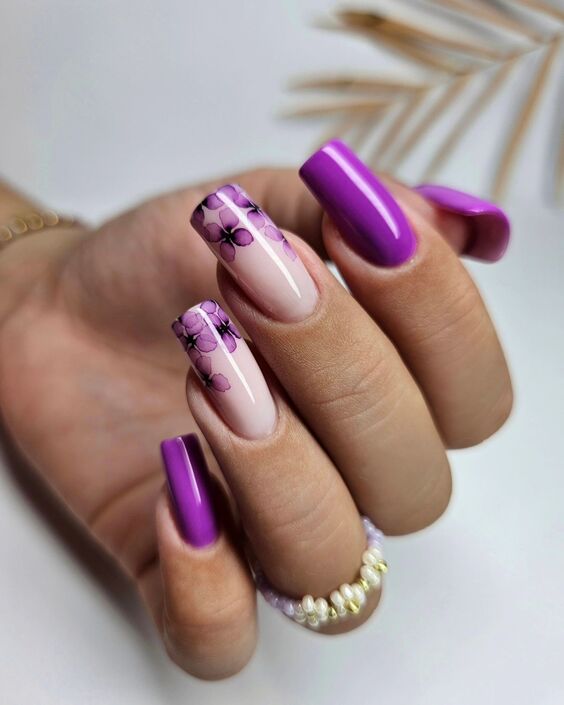
The first design captures the essence of summer with its vibrant lavender and soft nude color scheme, beautifully complemented by delicate floral accents. The striking contrast between the bold lavender and the subtle nude base allows each flower to stand out, making this design both eye-catching and elegantly understated. This manicure is perfect for those who love a pop of color without overwhelming their style.
Consumables Needed
- Base Coat: Start with a clear base coat to protect your natural nails.
- Nude Polish: Choose a high-quality nude polish for the base.
- Lavender Polish: A vibrant lavender polish for the bold accents.
- Fine Detail Brush: For painting the intricate flowers.
- Top Coat: A glossy top coat to seal in the design and enhance durability.
DIY Instructions
- Begin by applying a clear base coat to protect your nails.
- Once dry, apply two coats of the nude polish as the base color.
- Using a fine detail brush, paint small lavender flowers starting from the tip of the nail, moving downwards.
- Allow the flowers to dry completely before applying a glossy top coat to seal in the design and add a beautiful shine.
Tangerine Swirl
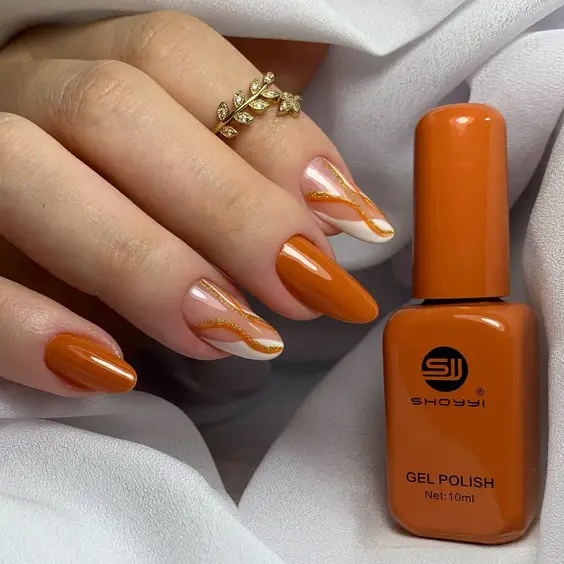
This second design features a dazzling tangerine hue with white and gold swirl accents that provide a luxurious and dynamic look. The curvy lines add a playful yet sophisticated touch, making it ideal for both day and night wear. This design is particularly suitable for those who want to make a bold statement with their nails.
Consumables Needed
- Tangerine Gel Polish: For the bright base color.
- White Gel Polish: To create the swirl patterns.
- Gold Glitter Liner: For adding a touch of glamour.
- Fine Detail Brush: Essential for intricate designs.
- Top Coat: A gel top coat for a long-lasting finish.
DIY Instructions
- Apply a base coat and cure under a UV lamp if using gel polish.
- Apply two coats of tangerine gel polish, curing between each coat.
- Using a fine detail brush, draw swirl patterns with white gel polish. Cure again.
- Add accents with the gold glitter liner and cure.
- Seal everything with a gel top coat for durability and shine.
Subtle Safari
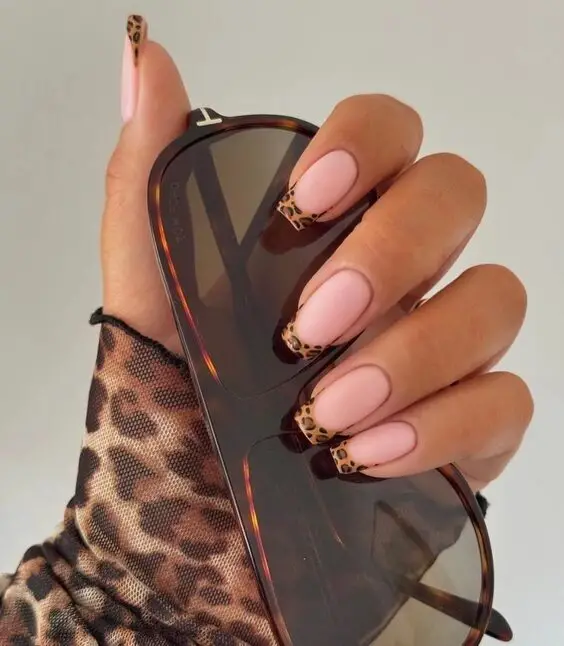
Embracing a minimalist yet adventurous style, this nail design features a soft pink base with subtle cheetah print tips that blend modern fashion with wild charm. The matte finish on the animal print provides a contemporary twist, making it an excellent choice for those who prefer a hint of edge in their style.
Consumables Needed
- Soft Pink Matte Polish: For the base.
- Black and Gold Polish: For creating the cheetah print.
- Matte Top Coat: To achieve a sleek, non-glossy finish.
- Detailing Brush: For precise print application.
DIY Instructions
- Start with a soft pink matte polish as your base and let it dry.
- Using a detailing brush, apply spots of black polish to create the cheetah print. Add small touches of gold to enhance the pattern.
- Once dry, apply a matte top coat for a modern matte finish.
Ethereal Feather
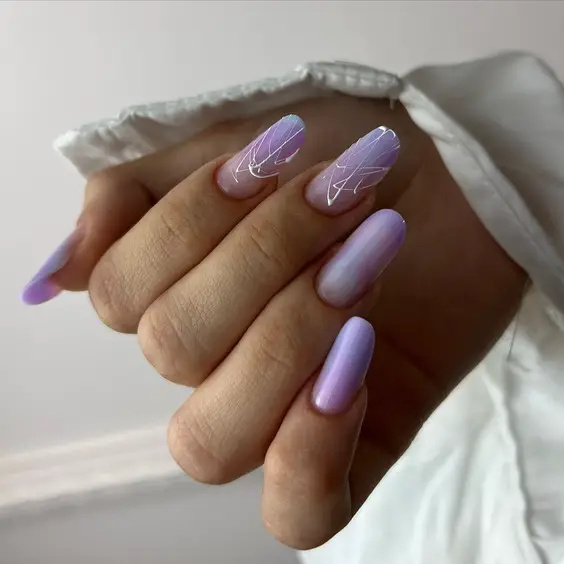
The “Ethereal Feather” design evokes a sense of delicate grace with its pastel gradient and feather-like detailing. This nail art utilizes shades of lavender that transition smoothly into a cloudy white, capped with wispy, feathered lines in a striking white hue. The overall effect is both dreamy and sophisticated, perfect for those summer days when you want your style to whisper soft elegance.
Consumables Needed
- Lavender Polish: A soft, pastel lavender shade.
- White Polish: For the feather details.
- Gradient Sponge: To blend the base colors seamlessly.
- Detailing Brush: For precise feather strokes.
- Top Coat: A glossy finish to protect your artwork.
DIY Instructions
- Apply a base coat to protect your nails.
- Use a gradient sponge to apply a soft lavender that fades into white at the tips.
- With a detailing brush, draw delicate feather-like lines using white polish from the tip downwards.
- Finish with a glossy top coat to enhance the depth and longevity of your nail art.
Summer Glow
“Summer Glow” is a radiant display of pastel ombré adorned with subtle gemstone embellishments. The use of soft pink and pale blue creates a refreshing palette, while delicate rhinestones add just the right amount of sparkle. This design is a testament to the beauty of summer, combining the playfulness of pastel hues with the sophistication of gemstone accents.
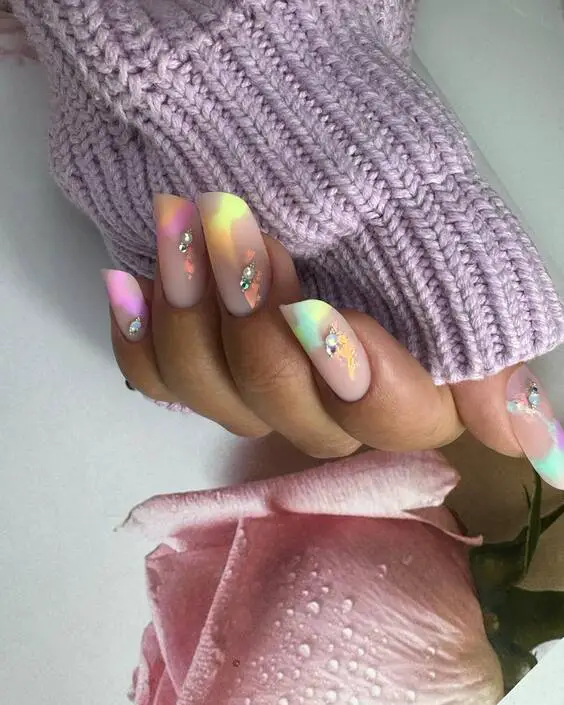
Consumables Needed
- Pastel Pink and Blue Polish: For the ombré effect.
- Rhinestones: Small sizes for a subtle shimmer.
- Adhesive: To secure the rhinestones.
- Ombré Brush: For blending the colors smoothly.
- Top Coat: To seal in the design and stones.
DIY Instructions
- After applying a base coat, layer pastel pink and blue polishes on the nail, blending them softly in the middle with an ombré brush.
- Apply a small dot of adhesive where you want each rhinestone.
- Place the rhinestones carefully and press down to secure.
- Seal everything with a top coat for a smooth, lasting finish.
Tropical Sunset
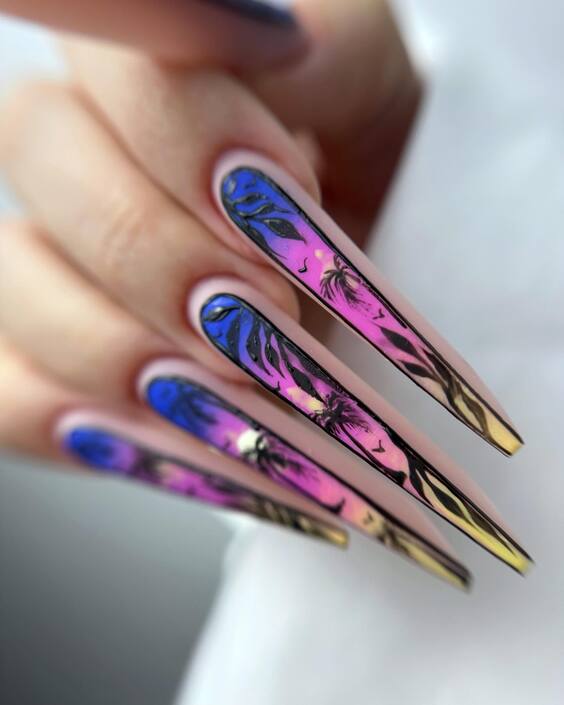
The “Tropical Sunset” design captures the vibrant colors of a sunset sky with a creative twist. Featuring a dark silhouette of palm trees against a backdrop of pink and blue gradients, this design is striking and artistic. The sharp contrast and the thematic depiction make it an ideal choice for those who love to make a statement with their nails.
Consumables Needed
- Pink and Blue Gradient Polish: For the sunset background.
- Black Polish: For the palm tree silhouettes.
- Detailing Brush: For intricate tree designs.
- Top Coat: A glossy or matte finish to enhance the artwork.
DIY Instructions
- Start with a base coat for nail protection.
- Apply a gradient of pink and blue polishes to mimic the sunset sky.
- Use a detailing brush to paint the silhouette of palm trees in black.
- Decide on either a glossy or matte top coat and apply it to finalize your design.
Iridescent Whisper
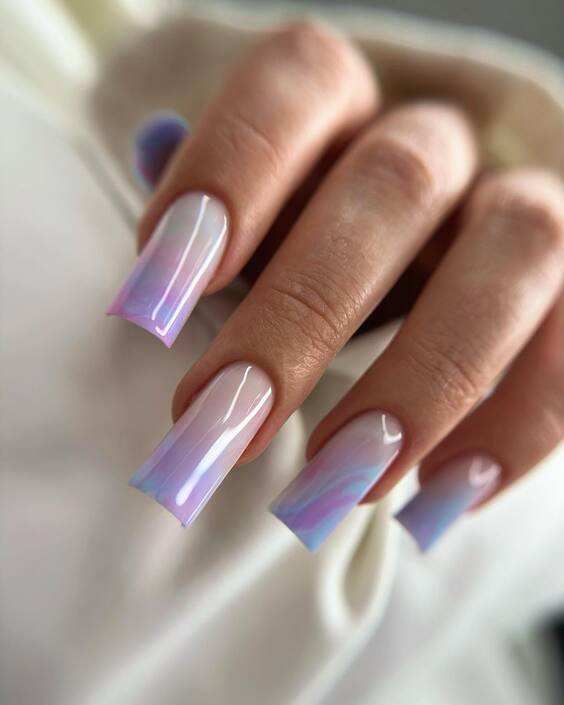
The “Iridescent Whisper” nails flaunt an exquisite blend of subtle iridescence over a clear base, featuring delicate white accents that resemble whispers of clouds. This minimalist yet captivating design is perfect for those who prefer a hint of mystique without the boldness of vibrant colors, making it ideal for both everyday wear and special occasions.
Consumables Needed
- Clear Base Polish: To achieve a clean, transparent look.
- Iridescent Topper: For that shimmering, ethereal effect.
- White Liner Polish: For drawing soft, subtle accents.
- Top Coat: A high-gloss finish to enhance the iridescence.
DIY Instructions
- Apply the clear base polish and let it dry thoroughly.
- Sweep the iridescent topper across the entire nail for a magical shimmer.
- Use the white liner polish to add delicate, whisper-like accents.
- Finish with a glossy top coat to protect and emphasize the beautiful iridescence.
Pink Marbling
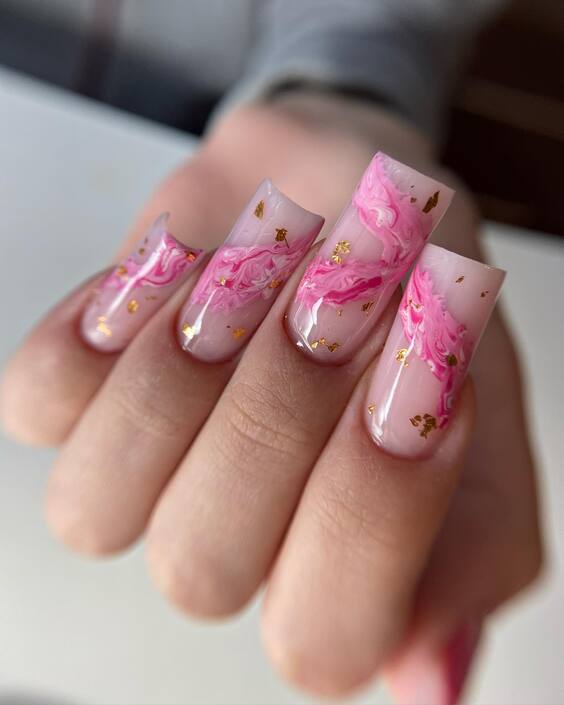
“Pink Marbling” presents a luxurious combination of rose hues and gold flakes set in a translucent jelly base. This sophisticated nail art uses a marbling technique to create fluid, organic patterns, making each nail a unique piece of art. The addition of gold flakes adds a touch of opulence, perfect for those summer weddings or evening events.
Consumables Needed
- Jelly Pink Polish: As the base color.
- Gold Leaf Flakes: For a touch of luxury.
- Marbling Tool: To create the fluid, marble effect.
- Top Coat: Ensures longevity and shine.
DIY Instructions
- Begin with a jelly pink polish base.
- While the base is still tacky, use a marbling tool to gently swirl in a second, slightly darker pink polish.
- Sprinkle gold leaf flakes over the nail while the polish is still wet.
- Seal the design with a sturdy top coat for a glossy finish and extended wear.
Sunset Dip
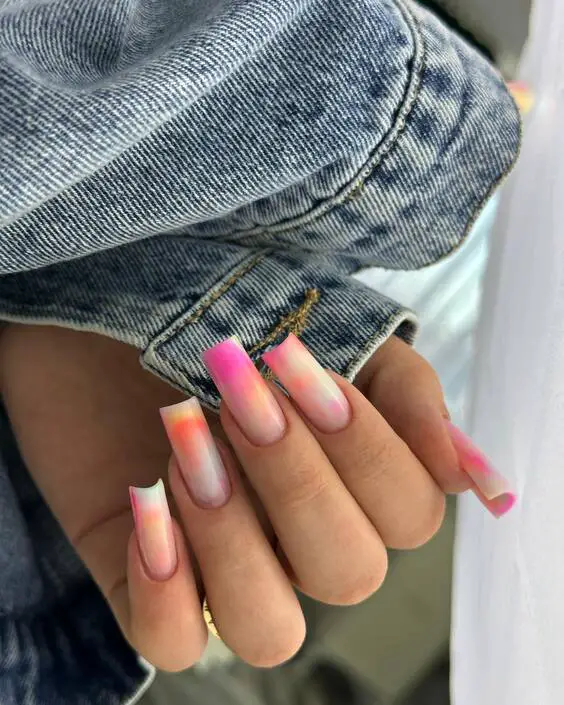
The “Sunset Dip” design captures the soft gradients of a sunset sky, transitioning from a fiery pink to a serene peach. This ombré effect is beautifully suited for the summer, offering a fresh, vibrant look that’s both stylish and fun. It’s an ideal choice for those looking to add a pop of color to their summer adventures.
Consumables Needed
- Pink and Peach Polishes: For the gradient effect.
- Sponge: For blending the ombré transition smoothly.
- Top Coat: To enhance and protect the gradient.
DIY Instructions
- Apply a clear base coat to protect your nails.
- Apply pink polish at the nail base and peach polish towards the tip.
- Use a sponge to dab and blend the colors into a smooth gradient.
- Once dry, apply a top coat to seal in the design and add shine.
Kissed by Roses
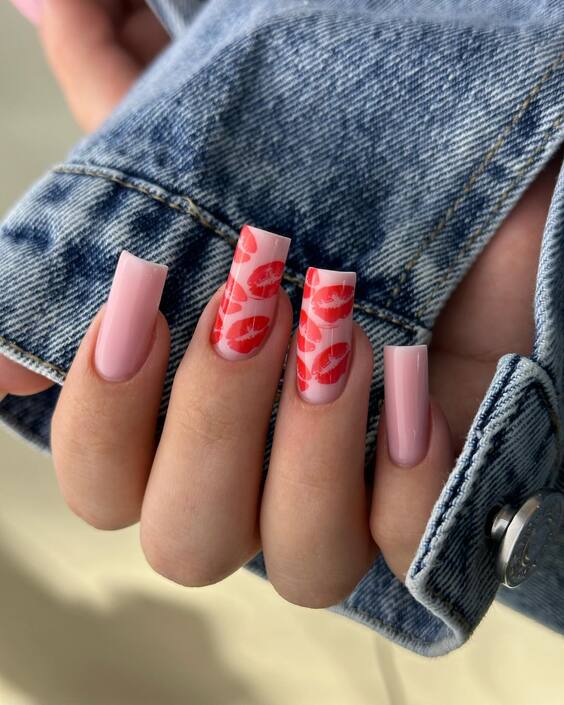
“Kissed by Roses” offers a charming blush pink base with vibrant red rose decals, creating a romantic and sophisticated look. The contrasting glossy and matte finishes add depth and intrigue, making this design particularly appealing for a date night or a special event. It’s a timeless choice that combines classic beauty with a touch of modern flair.
Consumables Needed
- Blush Pink Matte Polish: For the base color.
- Red Decal Stickers: Rose patterns for a floral touch.
- Glossy Top Coat: To highlight the decals.
- Matte Top Coat: For the overall finish.
DIY Instructions
- Apply a matte blush pink polish as the base.
- Once dry, place red rose decal stickers on the desired nails.
- Apply a glossy top coat over the decals to make them stand out.
- Finish with a matte top coat on the rest of the nails for a cohesive look.
Aquatic Elegance
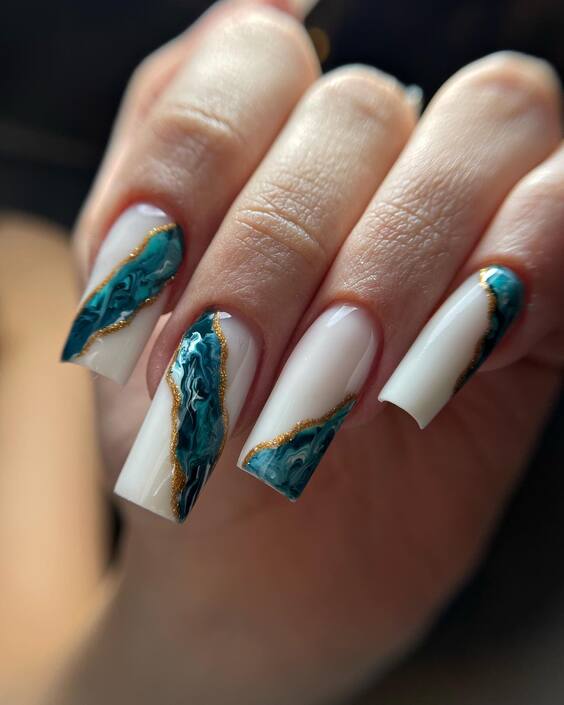
“Aquatic Elegance” features an ocean-inspired design with swirling teal and white patterns that resemble the rhythmic waves of the sea. The gold foil accents give it a luxurious touch, making it ideal for those who are drawn to the mystery and beauty of the ocean. This nail art is perfect for summer beach days or any season when you yearn for a splash of sea-inspired elegance.
Consumables Needed
- Teal and White Polish: For the wave patterns.
- Gold Foil: To add a luxurious accent.
- Detailing Brush: For precise pattern creation.
- Top Coat: A high-gloss finish to protect the design.
DIY Instructions
- Apply a base coat to protect your nails.
- Paint the base with teal polish.
- Use a detailing brush to add white swirling patterns mimicking waves.
- Apply small pieces of gold foil on the waves for an added luxurious feel.
- Seal with a high-gloss top coat for durability and shine.
Lavender Longing
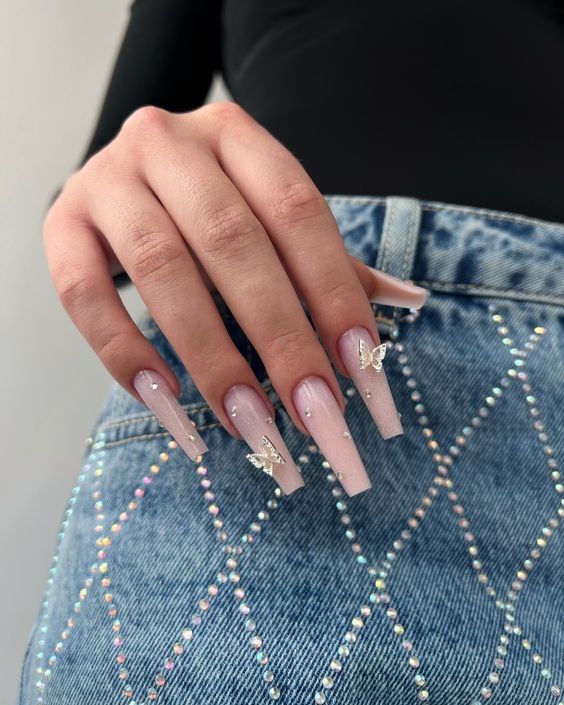
“Lavender Longing” brings a sense of calm with its long, slender silhouette and a soft lavender hue. The silver butterfly decals enhance the design, adding an element of whimsy and charm. This look is both elegant and playful, suitable for those who appreciate a touch of fantasy in their everyday style.
Consumables Needed
- Lavender Polish: For the base color.
- Silver Butterfly Decals: For a whimsical touch.
- Top Coat: To secure the decals and add a glossy finish.
DIY Instructions
- Start with a clean, smooth base of lavender polish.
- Once the base is dry, apply silver butterfly decals to the nails.
- Finish with a layer of top coat to protect the decals and enhance the overall shine.
Arctic Shimmer
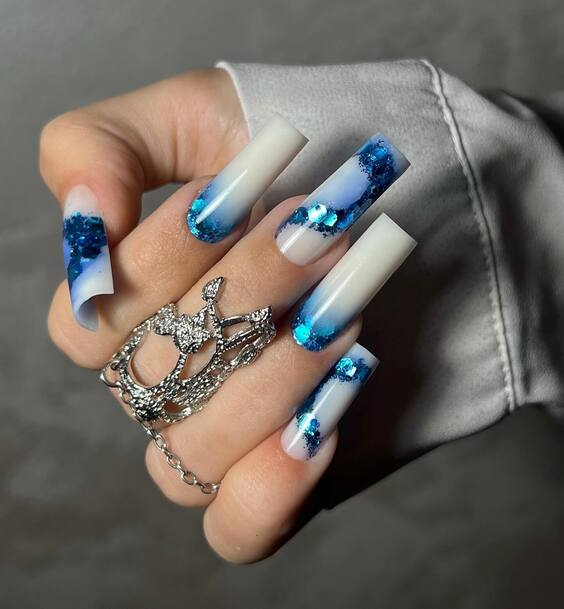
The “Arctic Shimmer” design combines stark white polish with vibrant blue glitter, creating a striking visual reminiscent of frosty winter landscapes. This design is perfect for those who appreciate bold, statement-making nails. The clear segments filled with blue glitter not only add depth but also an element of dynamic sparkle that’s sure to catch the eye.
Consumables Needed
- White Polish: For a clean, crisp base.
- Blue Glitter: For the shimmering detail.
- Clear Polish: To encapsulate the glitter.
- Top Coat: A glossy finish to enhance the overall sparkle.
DIY Instructions
- Apply two coats of white polish for a solid base.
- Place blue glitter on the tips or desired areas over still wet clear polish.
- Seal the design with a thick layer of clear polish to encapsulate the glitter.
- Finish with a glossy top coat for lasting shine and protection.
Swirling Sensation
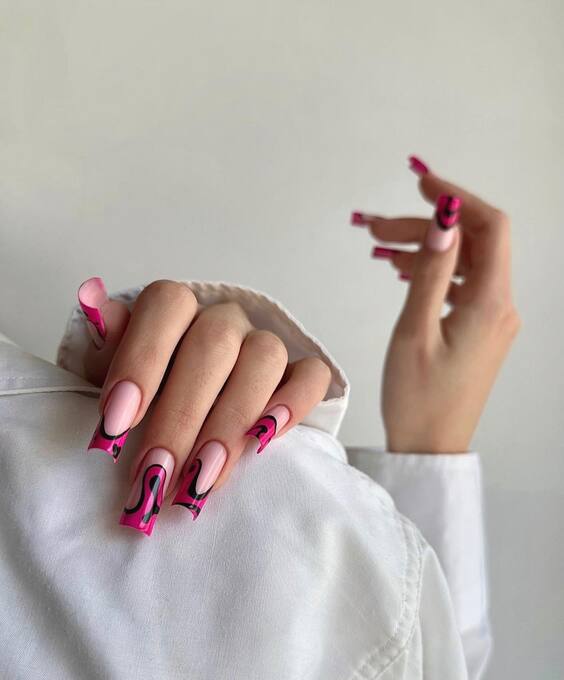
“Swirling Sensation” features an imaginative twist with swirling pink and black patterns over a nude base. This design is perfect for adding an artistic touch to your everyday style. The swirls create a sense of movement, making each nail a canvas of abstract art. It’s a fantastic choice for those who want to express their creative side through their manicure.
Consumables Needed
- Nude Polish: As the base color.
- Pink and Black Polish: For the swirling designs.
- Detailing Brush: For intricate swirls.
- Top Coat: To seal the design and enhance durability.
DIY Instructions
- Start with a nude polish as the base.
- Use a detailing brush to create freehand swirls with pink and black polish.
- Allow each layer to dry slightly before applying the next to avoid smudging.
- Finish with a top coat to ensure the design lasts and stays vibrant.
Wild Zebra
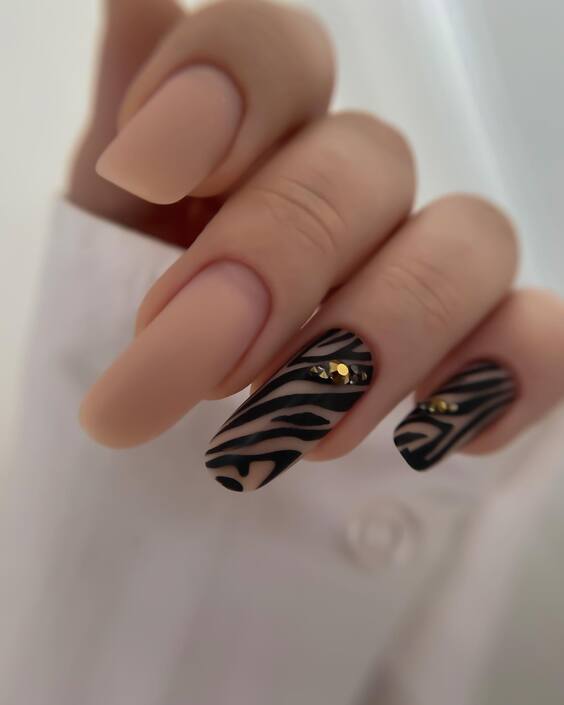
“Wild Zebra” brings the bold patterns of the savannah to your fingertips, combining nude and black zebra stripes with gold accents. This design is both stylish and daring, perfect for those looking to make a fashion statement. The zebra stripes are flawlessly executed, offering a wild yet chic look that pairs well with both casual and formal wear.
Consumables Needed
- Nude Polish: For the base.
- Black Polish: For the zebra stripes.
- Gold Studs: Small accents to enhance the design.
- Top Coat: A high-gloss finish for protection and shine.
DIY Instructions
- Apply a nude base coat.
- Paint zebra stripes with black polish using a thin brush for precision.
- Add small gold studs to the design while the polish is still tacky.
- Seal everything with a glossy top coat for a smooth, finished look.
Petal Play
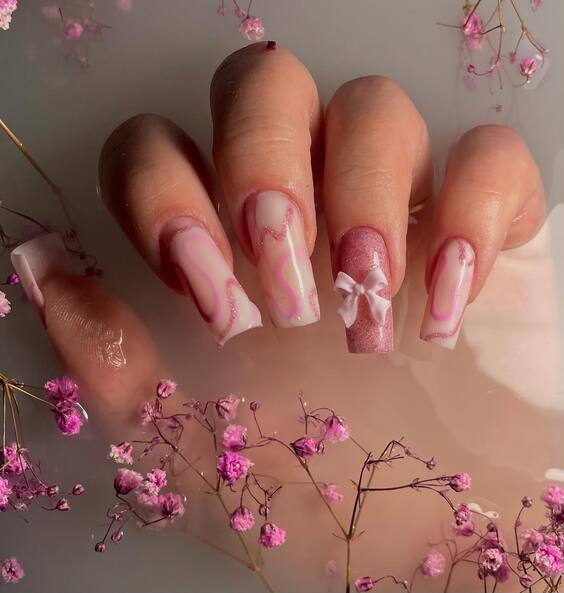
“Petal Play” artfully combines the delicate touch of floral patterns with a soft pink backdrop. The subtle flow of colors mimics petals floating in water, providing a serene and graceful appearance. This nail design is ideal for those who appreciate the beauty of nature and want to carry a piece of spring with them, no matter the season.
Consumables Needed
- Soft Pink Polish: For the gentle base.
- White and Red Acrylic Paint: For the detailed petal designs.
- Detailing Brush: For fine brushwork.
- Top Coat: A matte finish to enhance the soft look.
DIY Instructions
- Apply a soft pink polish as the base coat.
- Using a detailing brush, create petal outlines with white acrylic paint.
- Fill in the petals with soft red shades for a natural look.
- Finish with a matte top coat to give the design a velvety touch.
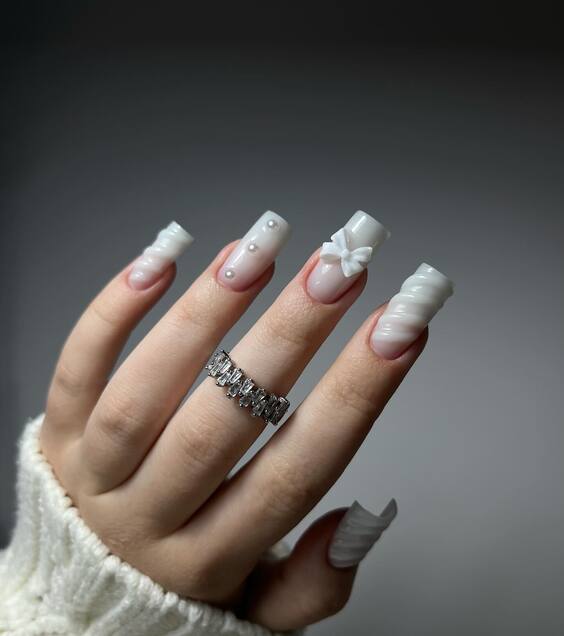
Whispering Bows
“Whispering Bows” features elegant white and translucent nails adorned with delicate bow accents. This design exudes sophistication and femininity, making it perfect for weddings or other formal occasions where a subtle yet exquisite appearance is desired. The bows add a touch of classic charm, making each nail a work of art.
Consumables Needed
- Translucent Gel Polish: For a glass-like finish.
- White Gel Polish: For the bow details.
- Top Coat: A high-gloss finish to seal and protect the design.
DIY Instructions
- Apply a translucent gel polish as the base to achieve a clean, glassy look.
- Paint small bows with white gel polish using a fine brush for precision.
- Cure under a UV lamp to set the gel polish.
- Seal with a glossy top coat for lasting shine and protection.
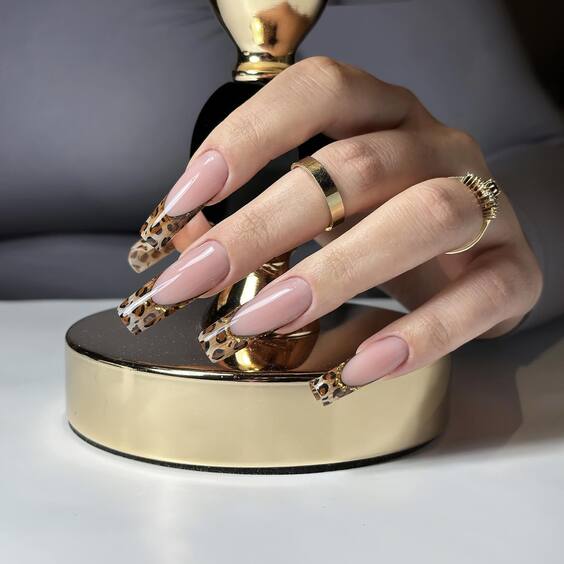
Safari Chic
“Safari Chic” brings the wild allure of animal prints into a refined context with nude base tones and bold, black zebra stripes accented by golden elements. This design is bold and adventurous, ideal for those looking to make a statement with their nails. The gold accents provide a luxurious finish that elevates the overall look.
Consumables Needed
- Nude Polish: For the base color.
- Black Polish: For the zebra stripes.
- Gold Leaf or Stickers: To add a touch of luxury.
- Top Coat: A glossy or matte finish based on preference.
DIY Instructions
- Apply a nude polish as the base.
- Paint zebra stripes using black polish with a thin detailing brush.
- Apply gold leaf or stickers strategically to enhance the design.
- Finish with a top coat to seal in the design and ensure durability.
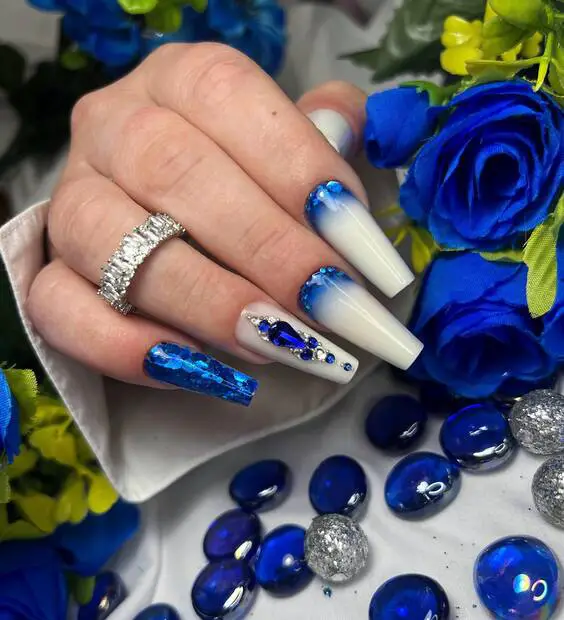
Oceanic Luxe
“Oceanic Luxe” encapsulates the dynamic beauty of ocean waves through its stunning use of blue glitters and sequins on a crisp white base. The nail design alternates between bold, glitter-loaded nails and subtly accented white nails, making it perfect for those who love a touch of glamour alongside classic simplicity. This design is especially suitable for summer events or a day by the sea, capturing the sparkling essence of the ocean.
Consumables Needed
- White Polish: For the base color.
- Blue Glitters and Sequins: To create the oceanic effect.
- Clear Gel: To embed the sequins smoothly.
- Top Coat: A high-gloss finish to seal the design and enhance durability.
DIY Instructions
- Apply a solid white base on all nails.
- On alternate nails, add a layer of clear gel and sprinkle blue glitters and sequins.
- Use a sealing top coat on glittered nails to smooth out the texture.
- Finish all nails with a glossy top coat to unify the look with a lustrous shine.
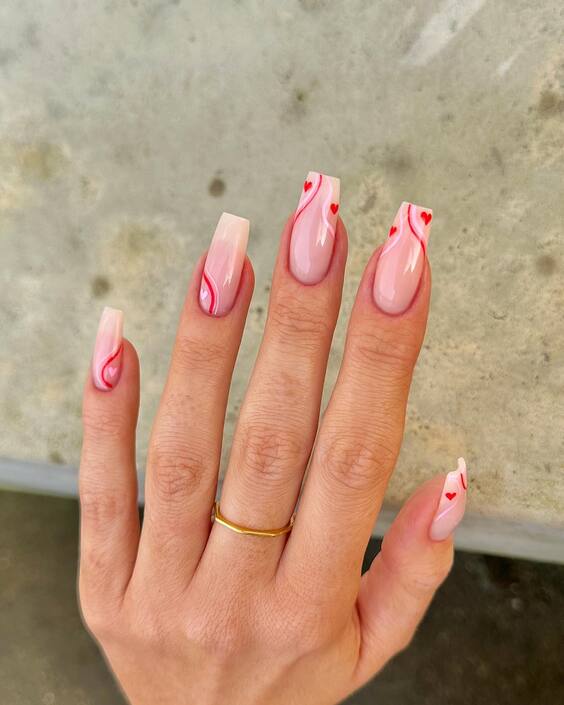
Heartfelt Strokes
“Heartfelt Strokes” offers a playful and romantic twist with minimalistic heart designs atop a soft pink base. The slender, curved lines culminating in tiny hearts are not only cute but sophisticated, making this design ideal for those who prefer a subtle yet meaningful expression of style. It’s perfect for occasions like Valentine’s Day or anniversaries, or simply for those who love a bit of romance in their everyday wear.
Consumables Needed
- Soft Pink Polish: For a gentle, romantic base.
- Red Polish: For drawing hearts and lines.
- Detailing Brush: For precision in design.
- Top Coat: A matte finish to keep the look soft and modern.
DIY Instructions
- Apply a light pink polish as the base.
- With a detailing brush, draw thin, curvy lines ending in small hearts using red polish.
- Allow the design to dry completely before applying a matte top coat for a contemporary finish.
In conclusion, this collection of nail designs showcases a splendid variety of styles that cater to every taste and occasion—from the understated elegance of “Whispering Bows” to the bold and adventurous “Safari Chic.” Each design not only highlights current trends but also encourages personal expression through the art of nail design. Whether you’re looking to dazzle at a summer party with “Oceanic Luxe” or add a touch of romance to your everyday look with “Heartfelt Strokes,” these designs provide ample inspiration to elevate your nail art game.

