20 Summer Marble Nails: Trendy Designs for Vibrant & Elegant Manicures
Are you ready to dive into the mesmerizing world of marble nails this summer? What makes these swirling patterns the go-to choice for fashion-forward nail enthusiasts during the sunny season? Whether you’re lounging by the pool or dressing up for a summer night out, marble nail designs offer a perfect blend of sophistication and fun. This article will guide you through various stunning summer marble nail designs, detailing everything you need to recreate these looks yourself. From subtle swirls to bold waves, discover the magic behind each design.
Ocean’s Whisper
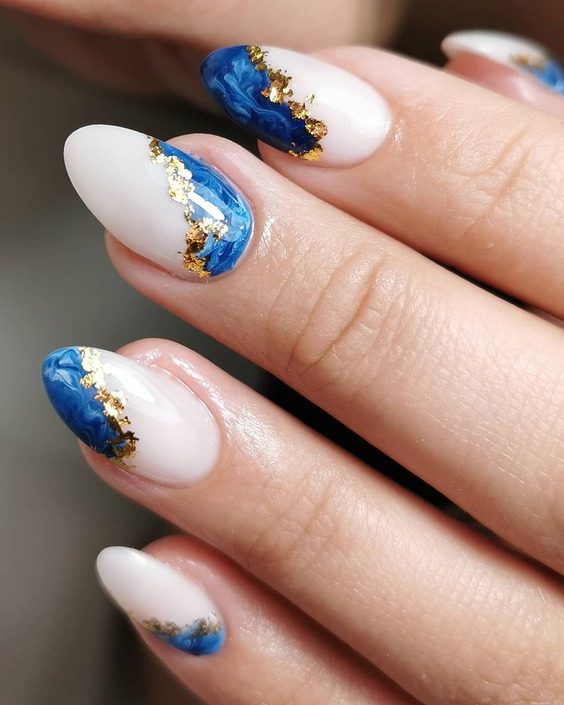
The first design captures the serene beauty of the ocean. The exquisite use of blue hues intertwined with gold flakes mimics the dynamic waves and sandy shores. This design not only evokes a sense of calm but also brings a luxurious touch to your summer style. The transition from deep ocean blue to a clear white tip is seamlessly executed, creating a sophisticated yet playful look.
Consumables Needed
- Base Coat: Essie Here to Stay
- Blue Polish: OPI Can’t Find My Czechbook
- White Polish: Sally Hansen White On
- Gold Flakes: Lucy’s Stash Gold Leaf
- Top Coat: Seche Vite Dry Fast
Expert Tip: Apply the gold flakes sparingly to maintain an elegant appearance.
DIY Instructions
- Prepare the Nails: Start with a clean, buffed nail surface. Apply a base coat to protect your nails.
- Apply the White Base: Once the base coat is dry, apply two coats of white polish.
- Creating the Marble: For the blue marble effect, drop blue polish into a bowl of water, spray with hairspray to disperse, and dip your nails.
- Adding Gold Flakes: While the polish is still tacky, gently place gold flakes using tweezers.
- Seal the Design: Finish with a top coat for a glossy, long-lasting effect.
Subtle Elegance
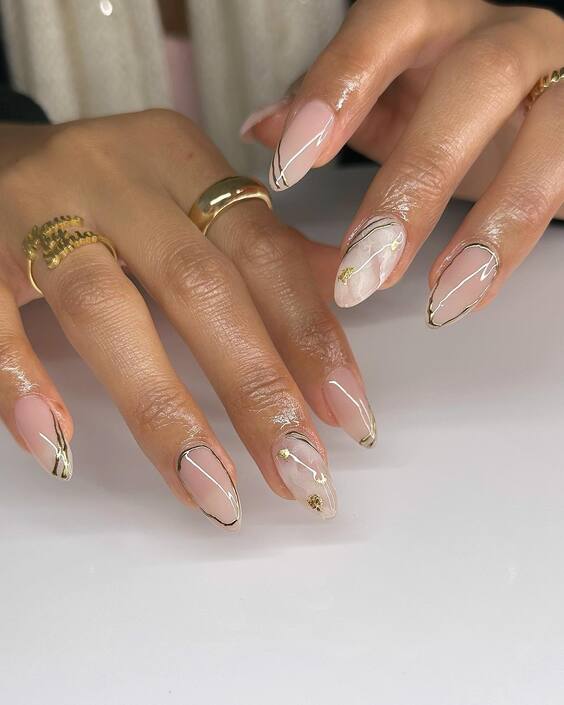
The second design showcases a minimalist approach to the marble effect. The delicate lines of gold over a nude base offer a chic and understated look that’s perfect for any summer occasion. This design is all about precision and subtlety, making it ideal for those who prefer a more refined aesthetic.
Consumables Needed
- Base Coat: OPI Natural Nail Base Coat
- Nude Polish: Zoya Loretta
- Gold Striping Tape: Thin adhesive lines
- Top Coat: CND Vinylux Long Wear Top Coat
Expert Tip: Use a fine brush or striping tape for the gold lines to achieve crisp, clean edges.
DIY Instructions
- Prepare Your Nails: Apply a base coat to protect the nail bed.
- Apply the Nude Polish: Two coats of Zoya Loretta will create a perfect canvas.
- Design with Gold Tape: Carefully place gold striping tape in gentle curves across each nail.
- Finish: Apply a top coat to seal the tape and add a glossy finish.
Golden Summer Dreams
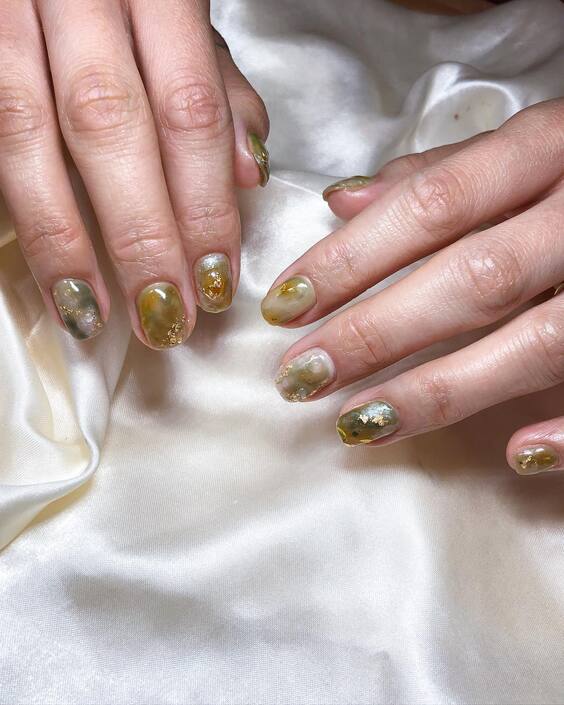
Our third design is a glamorous interpretation of summer. The warm golden tones blended with a translucent green create a jewel-like effect, reminiscent of sunlight filtering through morning dew. This look is both captivating and enchanting, perfect for evenings under the stars.
Consumables Needed
- Base Coat: Deborah Lippmann Hard Rock
- Green Jelly Polish: Essie Going Incognito
- Gold Sparkle Polish: ORLY Gilded Coral
- Top Coat: Sally Hansen Insta-Dri Anti-Chip
Expert Tip: Layer the jelly polish to adjust the depth of the green hue.
DIY Instructions
- Base Preparation: Start with a protective base coat.
- Layer the Green Jelly: Apply two layers of green jelly polish for a sheer look.
- Add Gold Sparkle: Before the second layer dries, add touches of gold sparkle polish.
- Final Touch: Seal everything with a fast-drying top coat.
Aquatic Fantasy
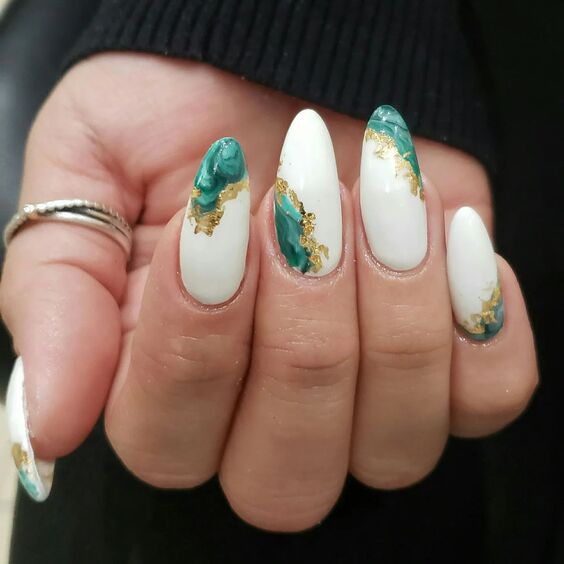
This nail design features a dreamy combination of turquoise and gold, evoking an aquatic fantasy perfect for summer. The swirling turquoise resembles waves, while the sporadic gold leaf details mimic the sparkle of sunlight on water. This design is ideal for those who wish to carry the essence of the sea on their fingertips.
Consumables Needed
- Base Coat: CND Stickey Base Coat
- Turquoise Polish: China Glaze Too Yacht to Handle
- Gold Leaf: Born Pretty Nail Art Foil
- Top Coat: Deborah Lippmann Gel Lab Pro
Expert Tip: Use a thin detailing brush to swirl the turquoise polish over the white base for a more natural water effect.
DIY Instructions
- Prepare Your Nails: Start with a clean base and apply the sticky base coat for longer-lasting wear.
- White Base: Apply two coats of a white polish as the canvas.
- Turquoise Swirls: Add drops of turquoise polish on the nail and use a detail brush to create marble effects.
- Gold Leaf Accents: Apply small pieces of gold leaf to the wet polish for an elegant touch.
- Seal the Design: Finish with a glossy top coat to enhance the depth and longevity of your manicure.
Soft Pink Marble
Featuring a soft pink base with delicate white and gold marble accents, this nail design exudes elegance and subtlety. It’s perfect for summer weddings or any formal event where a gentle, refined appearance is desired. The minimalistic use of gold flake adds a touch of luxury without overpowering the soft beauty of the pink base.
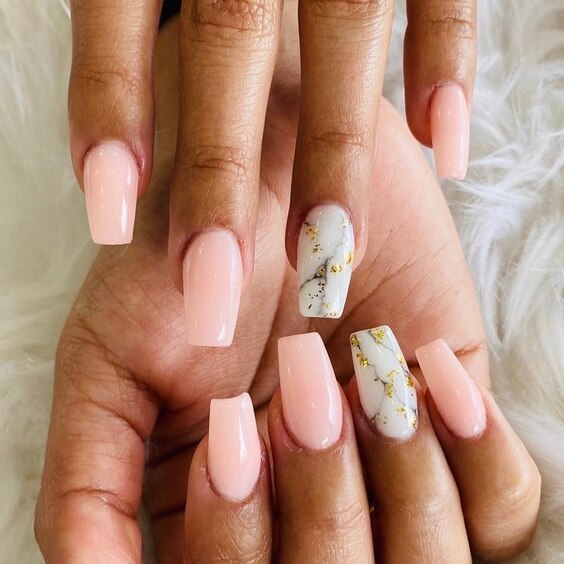
Consumables Needed
- Base Coat: Essie Grow Stronger
- Pink Polish: OPI Put it in Neutral
- White Marble Ink: Maniology Marble Ink
- Gold Flakes: Nail Artisan Cosmetics Gold Leaf
- Top Coat: Butter LONDON Hardwear Shine UV Topcoat
Expert Tip: Use a fine-tip brush for more precise control when creating marble lines.
DIY Instructions
- Base Prep: Apply a strengthening base coat to protect your nails.
- Pink Base: Layer two coats of soft pink polish for a flawless background.
- Creating Marble Effects: Use white marble ink to draw fine lines and add gold flakes before it dries.
- Final Touch: Apply a durable top coat for a glossy finish and added protection.
Vibrant Pink and Bold Marble Accent
The electrifying combination of neon pink and sophisticated marble accents in this nail design is a true representation of summer’s vibrant energy. Each nail, meticulously polished in a vivid pink shade, exudes a youthful and energetic vibe. The marble effect, achieved on alternate nails, adds an artistic twist, making the ensemble not only eye-catching but also elegantly fashionable. The glossy finish enhances the overall look, giving it a wet, fresh-from-the-salon shimmer that’s perfect for any summer event.
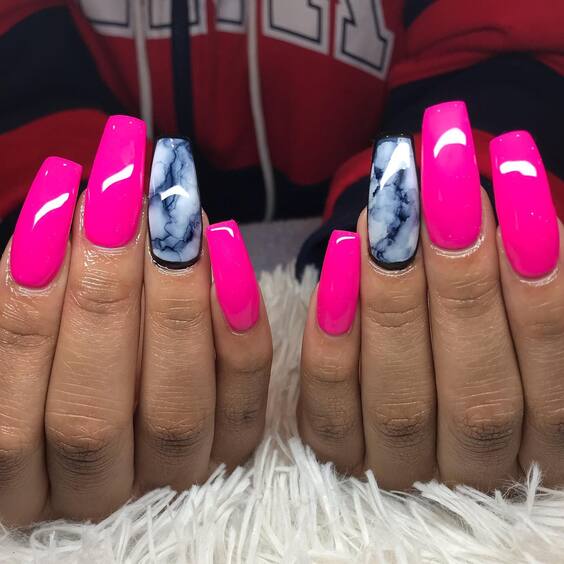
Materials Needed for This Design
- Base Coat: Opt for a high-quality base to protect your natural nails.
- Neon Pink Polish: A vibrant, high-pigment polish for the base color.
- Marble Effect Polish: White and black polish for the marble effect.
- Detailing Brush: For intricate marble detailing.
- Top Coat: A glossy top coat for a durable, shiny finish.
- Author’s Tip: Always apply thin layers of polish to prevent smudging and ensure a quicker drying time.
DIY Instructions
- Start with a clean, dry nail and apply a base coat to protect your nails.
- Apply two coats of the neon pink polish on all fingers, except for the ones you want the marble effect on.
- For the marble nails, drip small dots of white and black polish on the still-wet pink base.
- Use a detailing brush to swirl the dots into a marble pattern.
- Allow all nails to dry thoroughly before applying a glossy top coat for protection and shine.
- Voila! Your summer-ready marble nails are done.
Teal and Gold Marble Magic
This nail design is a masterpiece of depth and elegance. The deep teal base serves as the perfect oceanic backdrop for the swirling gold and lighter teal accents that mimic the natural marbling of precious stones. The use of gold flakes adds a luxurious touch, making this design suitable for both day and night wear during the summer months.
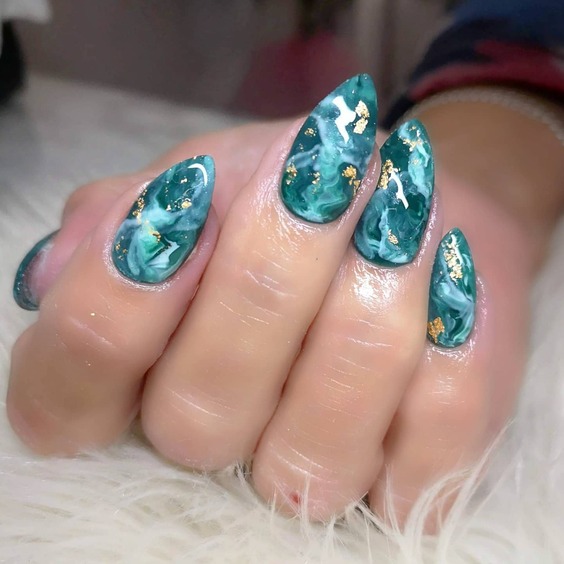
Materials Needed for This Design
- Teal Nail Polish: Choose a deep, rich teal for the base.
- Gold Leaf Flakes: For adding a touch of luxury.
- Light Teal Polish: For lighter marble effects.
- Thin Art Brush: Essential for fine details.
- Top Coat: A high-gloss finish to seal in the art.
- Author’s Tip: Incorporating gold flakes can enhance the visual texture of your nails; apply them sparingly for a subtle shimmer.
DIY Instructions
- Apply a base coat to protect the nails.
- Paint a deep teal color as the base on all nails.
- While the base is tacky, strategically place gold leaf flakes and dab light teal polish spots.
- Swirl these together with a thin brush to create the marble effect.
- Finish with a top coat for a lasting glossy finish.
Ethereal Cloud Marble
The soft, cloud-like marble effect on these nails is ideal for those who prefer a more subtle yet enchanting look. The gentle swirls of white and pale blue create an almost dreamy appearance, reminiscent of a clear summer sky. This design is perfect for adding a touch of serenity to your summer wardrobe, blending effortlessly with any color palette.
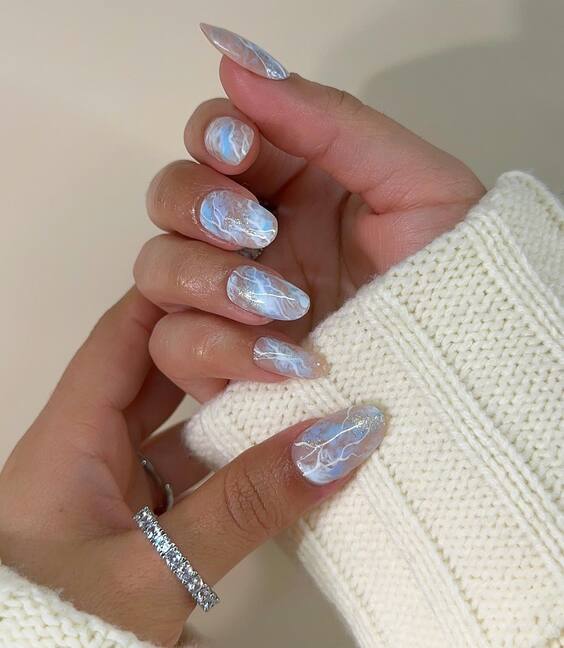
Materials Needed for This Design
- Pale Blue Polish: For the base color.
- White Marble Polish: For the cloud effects.
- Fine Detail Brush: To achieve delicate swirls.
- Top Coat: Ensures longevity and a high-gloss finish.
- Author’s Tip: Work quickly with the marble polish to achieve more natural, fluid designs before it dries.
DIY Instructions
- Begin with a base coat to protect your nails.
- Apply a pale blue polish as the base layer.
- Add small amounts of white polish and gently swirl with a detail brush to create the cloud effect.
- Seal the design with a top coat for durability and gloss.
- Enjoy your soft, summer sky-inspired nails.
Oceanic Elegance with Golden Flair
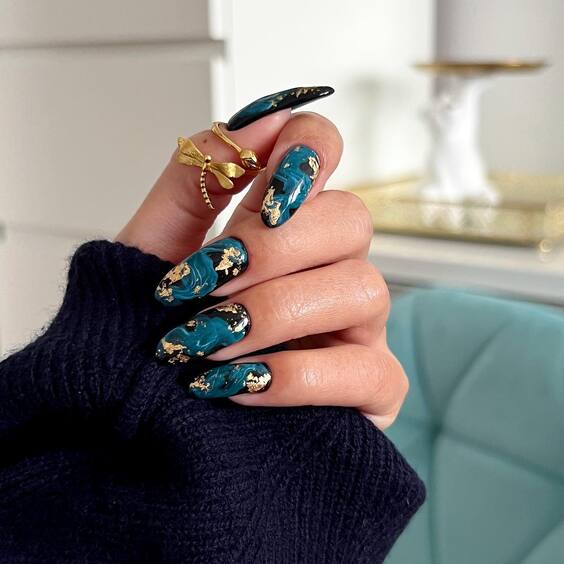
Dive into the deep blue with these luxurious marble nails, perfect for a glamorous summer evening. The rich, oceanic teal is swirled with black and highlighted with golden accents, creating a sophisticated look reminiscent of a night sea illuminated by stars. Each nail is adorned with gold foil, strategically placed to catch the light and add an extra layer of depth and luxury to the design.
Materials Needed for This Design
- Teal Nail Polish: A deep, shimmering ocean teal as the base.
- Black Marble Polish: For dark swirl effects.
- Gold Foil: Small pieces to enhance the luxury feel.
- Detailing Brush: For fine swirls and placing gold foil.
- Top Coat: A durable, glossy finish.
- Author’s Tip: Apply the gold foil with a tweezer for precise placement and minimal creasing.
DIY Instructions
- Begin with a base coat to protect your nails.
- Paint the teal polish as the base and let it slightly dry.
- Add drops of black polish and use the brush to create gentle swirls.
- While wet, place gold foil pieces using tweezers.
- Seal everything with a glossy top coat for a durable finish and radiant shine.
Peachy Marble Delight
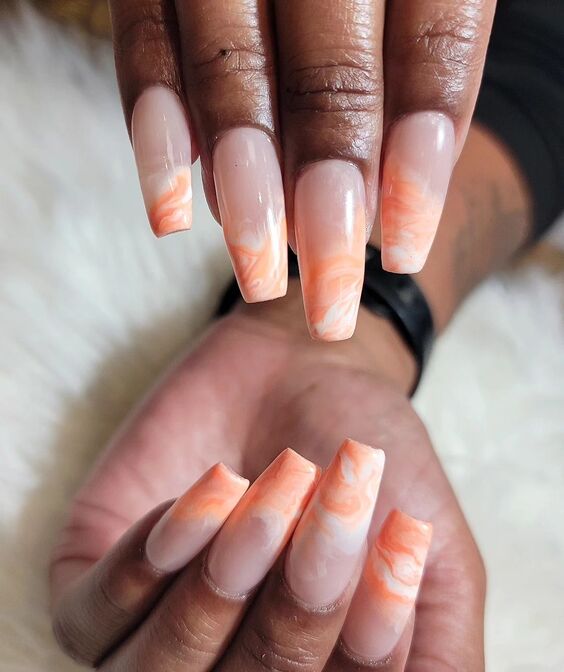
These peach-toned marble nails are the epitome of summer freshness, ideal for sunny days or casual evenings out. The soft swirls of white and peach create a creamy, dreamy look that’s both subtle and striking. This style is particularly flattering on shorter nails, offering a neat, polished appearance without overwhelming the hand.
Materials Needed for This Design
- Peach Nail Polish: A soft, pastel peach for a fresh look.
- White Marble Polish: For the delicate swirls.
- Fine Detail Brush: Essential for achieving perfect swirls.
- Top Coat: For lasting wear and extra gloss.
- Author’s Tip: Keep the swirls light and airy to maintain the softness of this design.
DIY Instructions
- Apply a base coat to protect the nails.
- Cover the nails with peach polish as the base layer.
- While still tacky, use white polish to create gentle, swirling marble patterns.
- Use a fine brush to delicately blend the colors.
- Finish with a glossy top coat to protect and enhance the design.
Passionate Pink Marble Waves
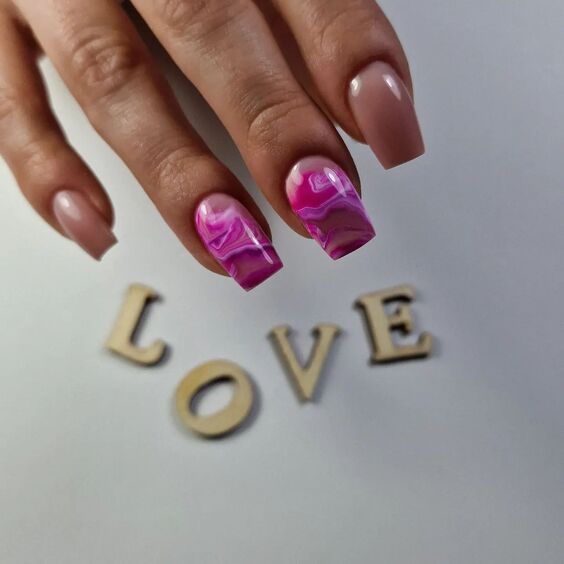
Unleash your inner romantic with these passionately pink marble nails. The striking contrast between the muted nude base and the vivid pink marble waves offers a bold yet sophisticated look. This design is perfect for those who wish to make a statement while maintaining an air of elegance.
Materials Needed for This Design
- Nude Nail Polish: A warm, natural shade for the base.
- Pink Marble Polish: A bright pink for the dramatic swirls.
- Detailing Brush: For precise marble effects.
- Top Coat: Ensures the longevity and shine of your manicure.
- Author’s Tip: For an even more dramatic effect, consider adding a hint of glitter within the pink swirls.
DIY Instructions
- Start with a clean, prepped nail and apply a base coat.
- Paint all nails with the nude polish for a clean, even base.
- Add pink polish in small amounts and use the detailing brush to create bold, wavy marble patterns.
- Allow the design to dry slightly before applying a glossy top coat for a stunning finish.
Subtle Elegance in Peach Marble
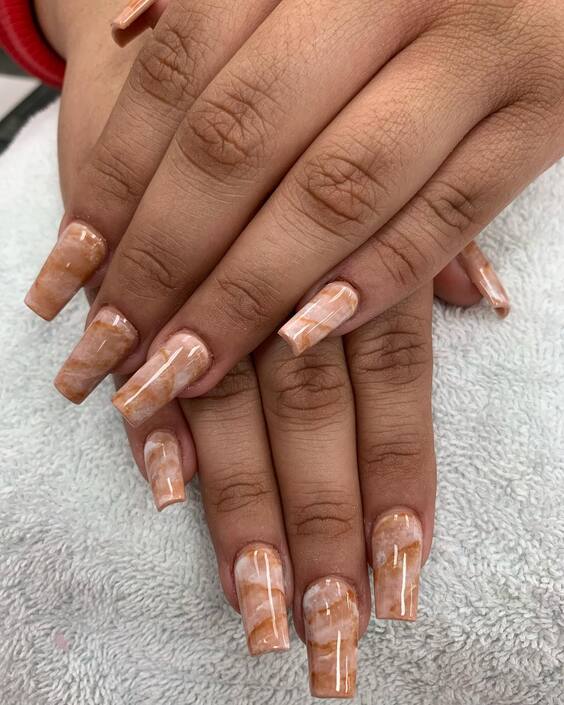
The elegance of these peach marble nails is evident through their understated yet captivating design. The soft peach base combined with white marble streaks creates a gentle, flowing appearance, making this style perfect for both everyday wear and special summer occasions. The high gloss finish adds a touch of sophistication, enhancing the delicate marble effect and making the nails look impeccably maintained.
Materials Needed for This Design
- Peach Nail Polish: A light, creamy peach for the base.
- White Nail Polish: For creating the marble effect.
- Detailing Brush: A thin brush for precise marble strokes.
- Top Coat: A glossy top coat to encapsulate the design and enhance durability.
- Author’s Tip: Layer the white polish lightly to achieve a more natural marble look.
DIY Instructions
- Start with a base coat to protect your natural nails.
- Apply the peach polish as the base color on all nails.
- While the base is still wet, gently drag white polish with a detailing brush to create marble lines.
- Allow the design to dry before applying a glossy top coat for a sleek finish.
Vibrant Summer Skies
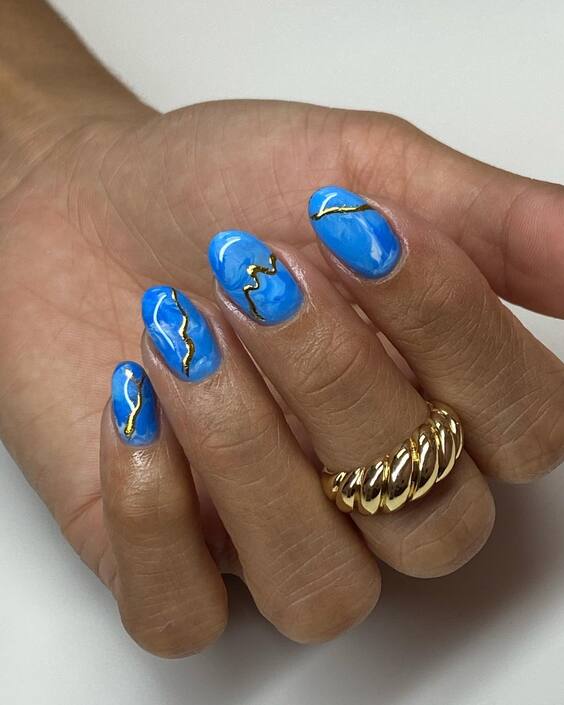
This design transports you directly to the bright blue skies of summer, accented with golden lightning bolts that add an electric touch. The vivid blue polish serves as a stunning backdrop for the thin, jagged gold streaks, creating a bold and playful look perfect for any summer adventure.
Materials Needed for This Design
- Sky Blue Nail Polish: A bright, eye-catching blue.
- Gold Striping Tape: For creating clean, precise lines.
- Top Coat: A high-gloss finish to protect the design.
- Author’s Tip: Apply the striping tape after the blue polish has dried completely to prevent it from peeling off.
DIY Instructions
- Apply a base coat to ensure longevity and protect your nails.
- Paint a vibrant sky blue on all nails as the base color.
- Once dry, apply thin strips of gold tape in jagged patterns to mimic lightning bolts.
- Seal everything with a glossy top coat for a vibrant and lasting finish.
Whisper of Pink Clouds
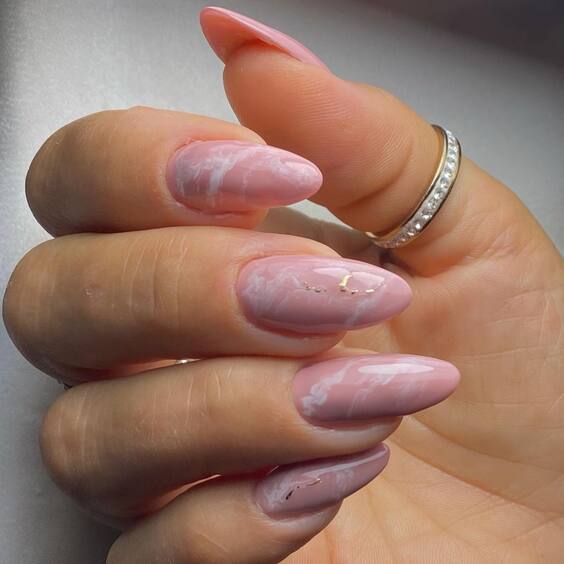
Imagine soft pink clouds at sunset—this nail design embodies that serene visual with its gentle pink hues marbled with wispy white accents. The subtle gold flakes scattered across the nails add a hint of sparkle, reminiscent of the sun’s last rays peeking through evening clouds.
Materials Needed for This Design
- Soft Pink Nail Polish: For a tranquil, airy base.
- White Marble Polish: To create soft cloud-like patterns.
- Gold Flakes: To add a sprinkle of elegance.
- Detailing Brush: For fine marbling.
- Top Coat: To ensure a smooth and shiny finish.
- Author’s Tip: Apply the gold flakes with a damp brush for precise placement and minimal waste.
DIY Instructions
- Begin with a protective base coat.
- Apply a layer of soft pink polish as the base.
- While the base is still tacky, gently swirl in white polish with a detailing brush to create a cloud effect.
- Add small gold flakes for a touch of sparkle.
- Finish with a high-gloss top coat to enhance the depth and beauty of the marble design.
Luxurious Geode Magic
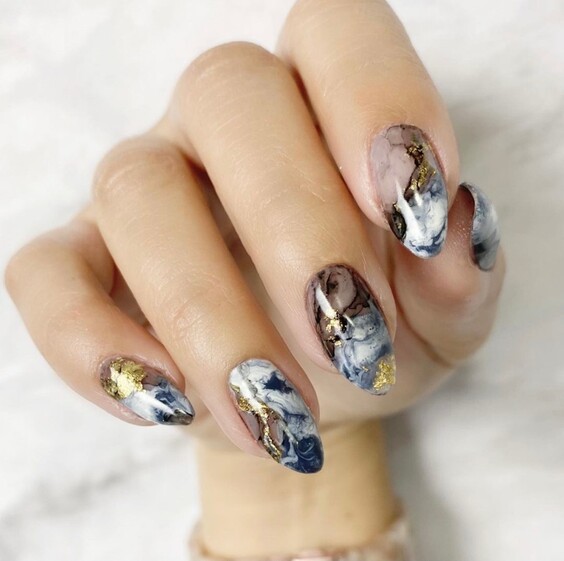
These nails transform your fingertips into miniature canvases showcasing the intricate beauty of geodes. Each nail is a blend of muted pinks and deep blues, intertwined with golden veins that mimic the natural formations found in rocks. The addition of a high-gloss finish not only enhances the visual depth but also gives a realistic geode appearance. This design is ideal for those who appreciate art and nature in their style.
Materials Needed for This Design
- Muted Pink Nail Polish: A soft base color.
- Deep Blue Nail Polish: To add contrast and depth.
- Gold Leaf: For creating rich, naturalistic veins.
- Detailing Brush: For intricate line work.
- Top Coat: A glossy finish to enhance the overall effect.
- Author’s Tip: Layer the colors lightly to achieve a more realistic geode look.
DIY Instructions
- Start with a base coat to protect your nails.
- Apply a layer of muted pink polish as the base.
- Randomly add deep blue and white strokes for a marbled effect.
- Use gold leaf and a fine brush to add golden veins.
- Seal with a top coat for durability and shine.
Vibrant Pink Marble Extravaganza
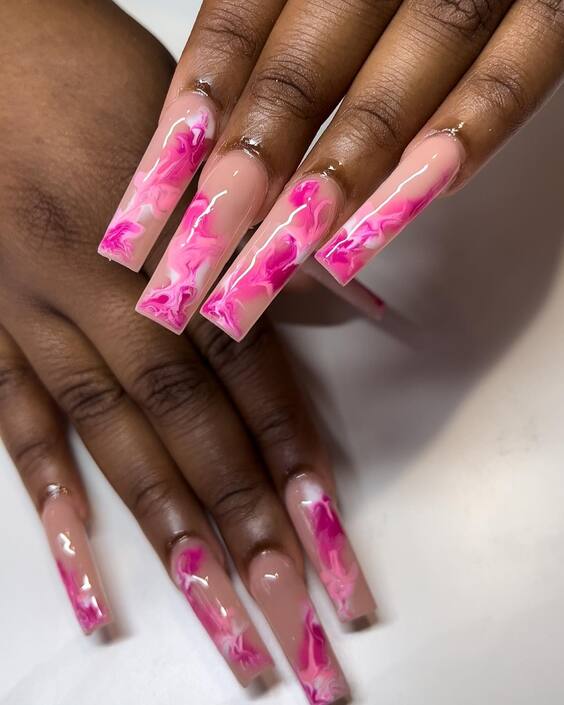
Embrace the boldness with these vibrant pink marble nails, perfect for making a striking statement this summer. The neon pink swirls energetically dance on a transparent base, giving a playful yet chic look. This design is a fantastic choice for anyone looking to add a pop of color to their outfit without overwhelming it.
Materials Needed for This Design
- Clear Nail Polish: As a smooth, transparent base.
- Neon Pink Nail Polish: For the vibrant marble effect.
- Detailing Brush: To finely swirl the pink polish.
- Top Coat: A must-have for a glossy, protective finish.
- Author’s Tip: Work quickly with the pink polish to create fluid, organic patterns.
DIY Instructions
- Apply a clear base coat to start.
- Drop neon pink polish onto the base and use a detailing brush to swirl.
- Continue adding and swirling until you achieve your desired marble effect.
- Finish with a glossy top coat for a standout look.
Celestial Blue Dreams
These nails are like a piece of the night sky captured at your fingertips. The deep blue and purple hues mixed with hints of white create a celestial look, enhanced by the sparkle of holographic glitter. This design is perfect for evening events or whenever you want to carry a bit of the galaxy with you.
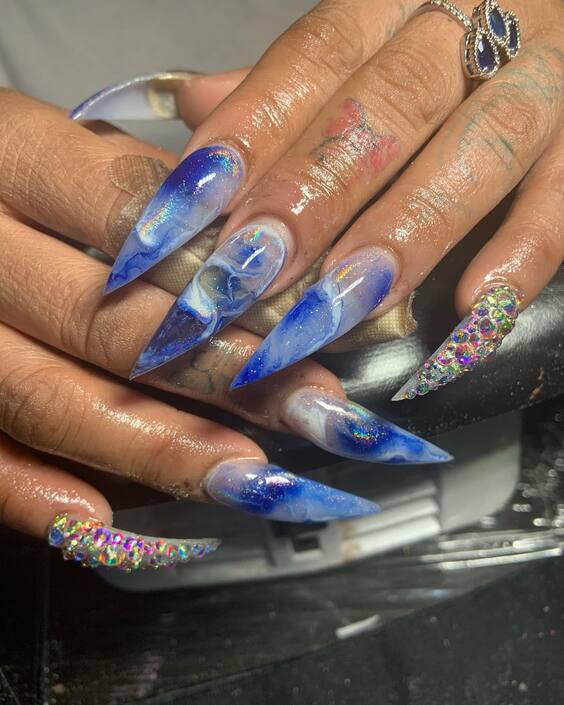
Materials Needed for This Design
- Deep Blue Nail Polish: For a cosmic background.
- Purple and White Nail Polish: For a nebula-like effect.
- Holographic Glitter: To mimic the stars.
- Detailing Brush: For delicate swirls.
- Top Coat: For a shiny, lasting finish.
- Author’s Tip: Sprinkle the glitter while the polish is still tacky to ensure it adheres well.
DIY Instructions
- Begin with a base coat for nail protection.
- Apply deep blue polish as the base layer.
- While still wet, add purple and white polish and use a detailing brush to create a nebular effect.
- Sprinkle holographic glitter over the wet polish.
- Seal with a top coat to lock in the sparkle and design.
Sophisticated Sheer Elegance
This design is the epitome of understated elegance, perfect for a summer wedding or a sophisticated evening event. The sheer pink base is beautifully accented with hints of marble and gold leaf detailing at the tips, which catch the light and add a subtle yet luxurious touch. The overall look is clean and polished, with a glossy finish that enhances the nail’s natural beauty.
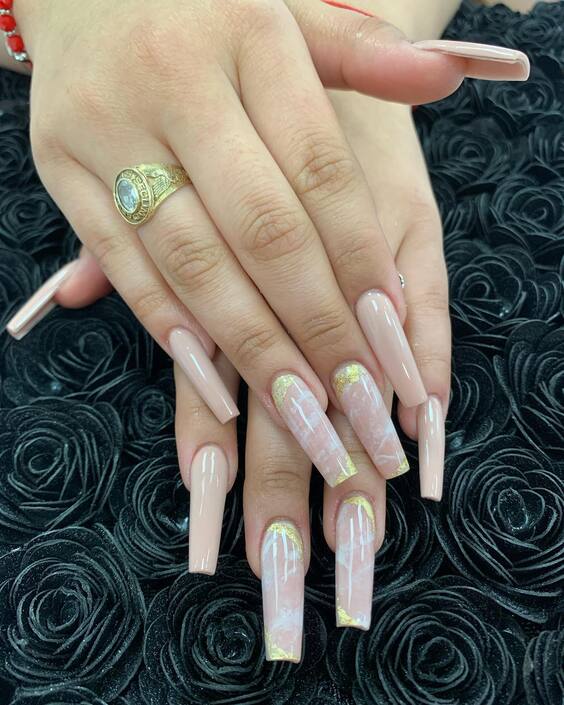
Materials Needed for This Design
- Sheer Pink Nail Polish: For a natural, polished look.
- White and Gold Marble Polish: To create subtle marble accents.
- Gold Leaf: For a hint of luxury at the tips.
- Detailing Brush: For precise marble effects.
- Top Coat: To ensure a glossy and protective finish.
- Author’s Tip: Apply the gold leaf sparingly to maintain the design’s elegance and simplicity.
DIY Instructions
- Start with a clean base coat to protect your nails.
- Apply a sheer pink polish as the base layer.
- Gently swirl white and gold marble polish at the tips using a detailing brush.
- Carefully place small pieces of gold leaf on the tips.
- Finish with a glossy top coat for a sleek and elegant look.
Pastel Perfection
These nails celebrate the playful side of summer with their pastel rainbow hues that seem to shimmer with an opalescent finish. Each nail presents a soft blend of colors that mimic the delicate shades of a summer sunrise. This design is ideal for anyone looking to add a touch of whimsy to their summer style.
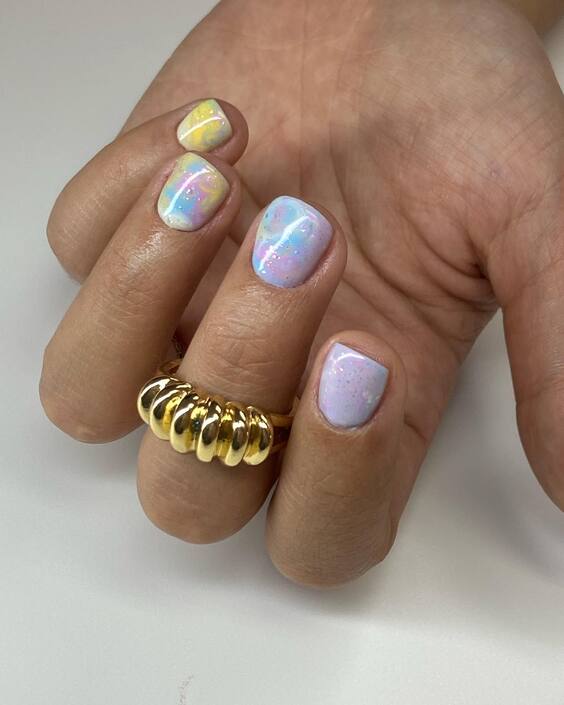
Materials Needed for This Design
- Pastel Rainbow Polishes: A selection of soft, pastel colors.
- Opalescent Top Coat: To add that ethereal shimmer.
- Sponge: For a soft blending of the colors.
- Top Coat: For a smooth and lasting finish.
- Author’s Tip: Dab the sponge lightly to achieve a seamless transition between colors.
DIY Instructions
- Apply a base coat to protect the nails.
- Use a sponge to dab on different pastel polishes, blending slightly as you go.
- Once dry, apply an opalescent top coat to enhance the colors with a magical shimmer.
- Seal everything with a clear top coat for durability.
Dreamy Sky Marble
This design takes inspiration from a clear blue sky littered with fluffy clouds, enhanced with golden accents that sparkle like the sun. The sky blue and white marble effect is perfectly executed, with gold detailing adding an element of sophistication. It’s a stunning choice for daytime events or casual summer gatherings.
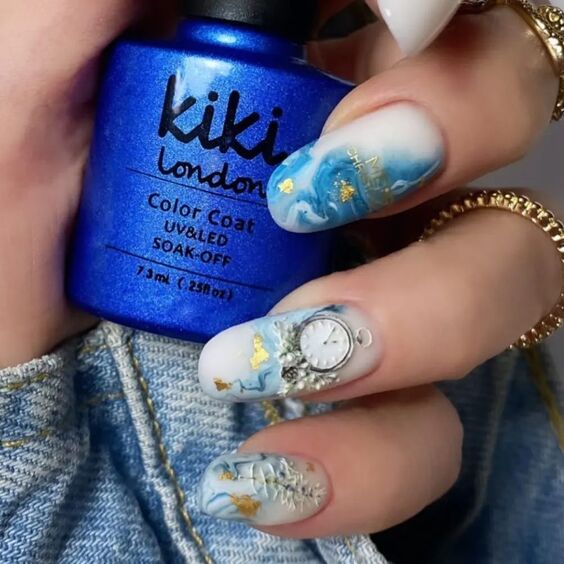
Materials Needed for This Design
- Sky Blue Nail Polish: For the base color.
- White Nail Polish: To create the cloud-like marble effect.
- Gold Paint: For delicate sun-like accents.
- Detailing Brush: For intricate marble and gold details.
- Top Coat: For a durable, glossy finish.
- Author’s Tip: Use the brush to lightly feather out the white polish to mimic clouds.
DIY Instructions
- Begin with a base coat to protect your nails.
- Apply sky blue polish as the base layer.
- Drop white polish onto the blue and use a brush to create a marble effect.
- Add small gold accents for a touch of elegance.
- Finish with a glossy top coat to enhance the depth of the design.

