2024’s Top Summer Nail Trends: Artistic, Chic & Colorful Manis
All right, let’s delve into the vibrant world of summer nail trends for 2024, focusing on fresh manicure ideas that are as sunny and exuberant as the season itself. Through a series of photos that showcase the latest styles, we’ll explore how to bring these looks from the salon to your home. With detailed descriptions and hands-on advice, this article will be your go-to guide for nails that make a splash this summer.
Trending Pastel Almond Joy
Professional Insight: Gazing at these delightful almond-shaped nails, one can’t help but feel the gentle caress of summer breezes. The pastel palette whispers of serene beach mornings, with hues of baby blue, soft lilac, and a blush pink that mimics the dawn sky. Each nail, a canvas; the color story here is one of understated elegance and playful charm.
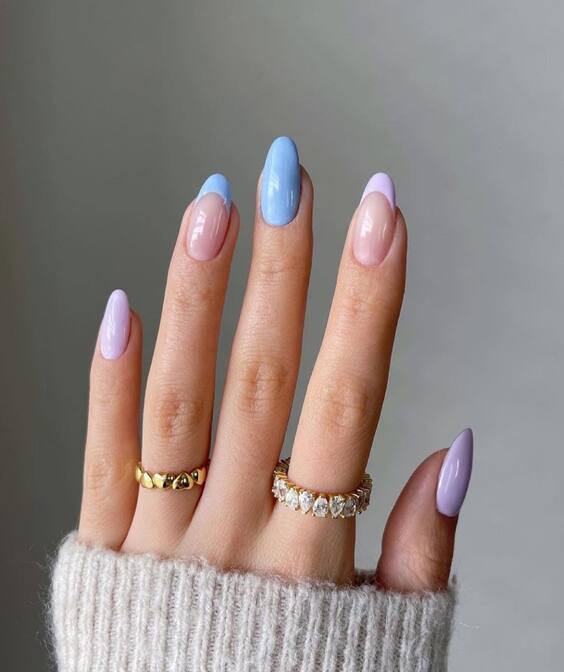
Consumables List:
- Base Coat: CND Sticky Anchoring Base Coat
- Baby Blue Polish: Essie Bikini So Teeny
- Soft Lilac Polish: OPI Do You Lilac It?
- Blush Pink Polish: Zoya Bela
- Top Coat: Seche Vite Dry Fast Top Coat
As a manicurist, I adore the harmony these shades create—perfect for those who appreciate a simple, yet enchanting design. The quality of polishes ensures a durable and glossy finish that will endure the liveliest summer escapades.
DIY Instructions:
- Apply a base coat to protect your natural nail.
- Paint each nail with the assigned pastel polish, two coats should do the trick.
- Finish with a top coat for a durable, high-gloss sheen. These colors are forgiving, making them ideal for DIY enthusiasts dipping their toes—or fingertips—into the world of at-home manicures.
Bold and Brown: The New Neutral
Professional Insight: These nails exude confidence with their deep brown hue, evoking the rich earthiness of summer’s end. The boldness of this color is a nod to 2024’s penchant for strong, yet neutral statements. Each nail is sculpted into a crisp square shape, offering a modern twist on a classic look.
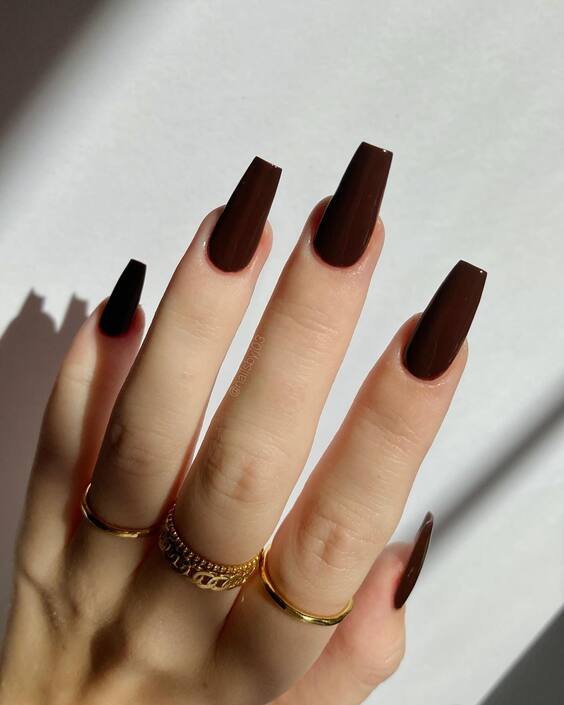
Consumables List:
- Base Coat: OPI Natural Nail Base Coat
- Dark Brown Polish: Sally Hansen Insta-Dri Cinna-Snap
- Top Coat: Sally Hansen Miracle Gel Top Coat
The polish used here is renowned for its speedy drying time, which is a godsend for the gal on the go. The square cut is a canvas for the rich, dark color, proving that simplicity can indeed be striking.
DIY Instructions:
- Begin with a base coat to prevent staining.
- Apply the dark brown polish in even strokes—two layers for full opacity.
- Seal with a gel top coat for a long-lasting wear. This design is straightforward yet powerful, suitable for both day and evening affairs.
Pink Hues with a Sparkling Twist
Professional Insight: Step into summer’s garden with these almond-shaped nails, flourishing in shades of pink. The addition of metallic foil brings a playful artistry, reminiscent of a butterfly’s wing catching the light. This design marries the art of subtlety with the glint of surprise.
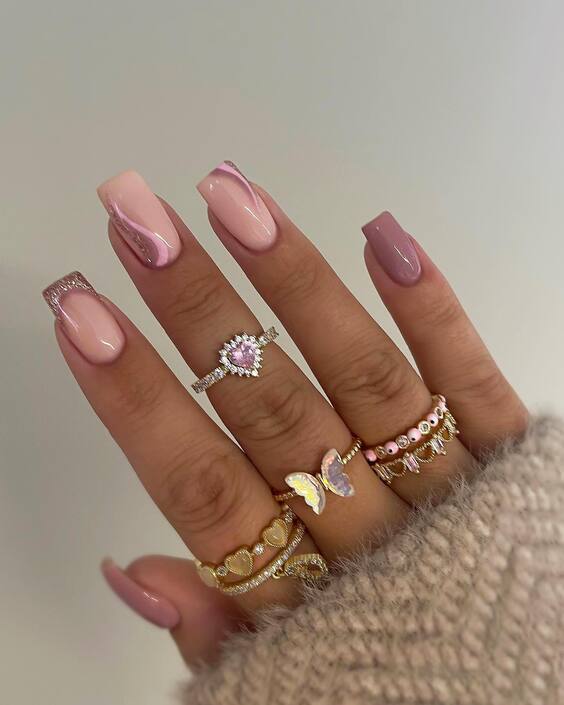
Consumables List:
- Base Coat: Orly Bonder Rubberized Basecoat
- Pink Polish: China Glaze That’s Shore Bright
- Pink Metallic Foil: Born Pretty Nail Art Foil
- Top Coat: INM Out The Door Top Coat
As a professional, I suggest the use of foil for a touch of pizzazz. It catches the eye without overwhelming the design’s inherent simplicity.
DIY Instructions:
- Apply a rubberized base coat for foil adherence.
- Paint with the bright pink polish, letting each layer dry.
- Apply adhesive for the foil, then gently press the metallic onto the nail.
- Seal with a fast-drying top coat to capture the shimmer and prevent chips. This look is ideal for those who wish to dabble in nail art without full commitment.
Chic V Tips with a Glittery Finish
Professional Insight: These nails are a striking twist on the classic V-tip, featuring a deep green that could rival the summer foliage. Framed by a sparkling gold line, the V-tip here is not just a style; it’s a statement. They are the epitome of art and elegance, blending dark, forest-inspired tones with the luxurious shimmer of gold.
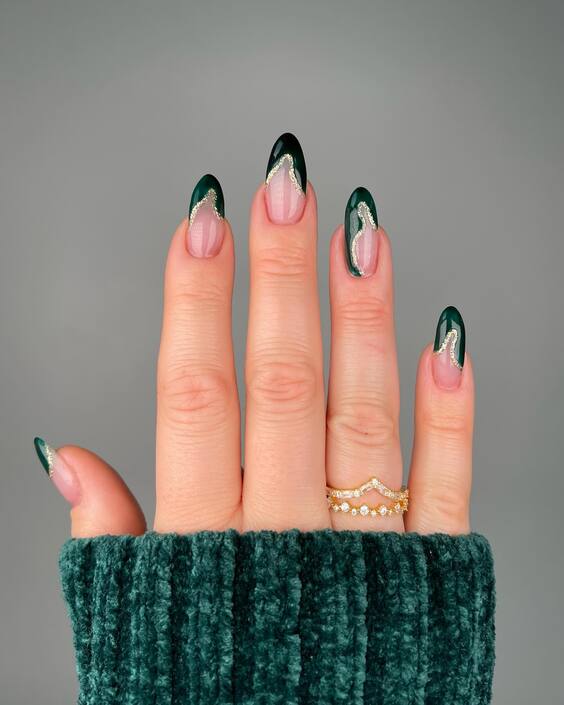
Consumables List:
- Base Coat: Deborah Lippmann Gel Lab Pro
- Deep Green Polish: CND Vinylux in Dark Dahlia
- Gold Glitter Liner: Orly Instant Artist Gold
- Top Coat: Glisten & Glow Top Coat
The polishes and gold liner selected for this look ensure vivid color and a precise, glittery edge that defines the modern V-tip.
DIY Instructions:
- Start with a base coat to protect your natural nails.
- Apply the deep green polish, stopping short of a V-shape at the tip.
- Use the gold liner to define the V-tip with a delicate line.
- Finish with a top coat to lock in the design and add a glossy sheen. This is for those who want to add a dash of glamour to their short nails while keeping the overall look simple and neat.
A Speckle of Summer Fun
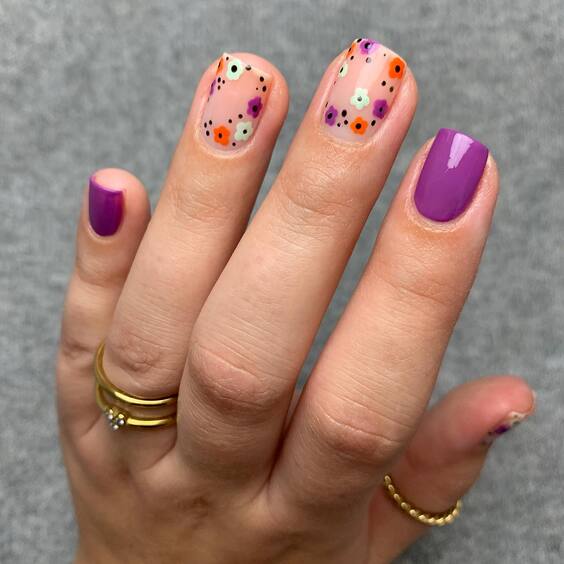
Professional Insight: Summer is all about fun, and these speckled nails scream joy! With a nude base and an explosion of colorful dots, it’s like a carnival on your fingertips. The purple accent nail provides a bold contrast, making this design an embodiment of playful sophistication.
Consumables List:
- Base Coat: Orly Bonder Rubberized Basecoat
- Nude Polish: OPI Samoan Sand
- Dotting Polishes: Various shades from the China Glaze Rainbow collection
- Purple Polish: Essie Play Date
- Dotting Tool
- Top Coat: INM Out The Door Top Coat
For those who prefer acrylic nails, these can be easily recreated with the addition of a protective clear acrylic layer over the art.
DIY Instructions:
- Apply a rubberized base coat for staying power.
- Go in with the nude polish for a clean canvas.
- With a dotting tool, speckle on the colored polishes in a random pattern.
- Paint the accent nail in a deep purple shade.
- Seal with a top coat for a durable, glossy finish. Perfect for those who want to keep it simple but still make a splash at summer festivities.
Abstract Skyline: A Hint of Summer Breeze
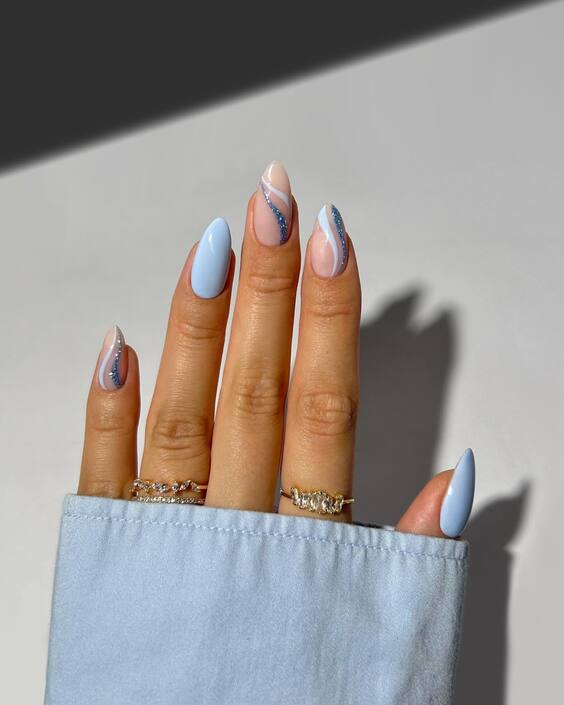
Professional Insight: Taking inspiration from a clear summer sky, these almond-shaped nails feature an art-worthy gradient with abstract lines that mimic the gentle flow of a breezy day. The soft blue and nude palette is accented by delicate silver striping, making it a tranquil yet trendy choice for the season.
Consumables List:
- Base Coat: Butter London Nail Foundation Priming Basecoat
- Soft Blue Polish: Zoya Blu
- Nude Polish: Smith & Cult Doe My Dear
- Silver Stripe Tape
- Top Coat: Butter London Hardwear Shine UV Topcoat
This design is perfect for those looking for something unique yet understated. It’s a gel-like finish without the commitment, perfect for those who love to change their nails with their moods.
DIY Instructions:
- Apply a priming base coat to prep the nails.
- Paint a gradient with the nude and blue polishes, blending them while still wet.
- Once dry, apply the silver striping tape to create abstract lines.
- Finish with a UV top coat for a lasting, high-gloss effect. Ideal for the summer dreamer looking to bring a piece of the sky to their style.
Dual-toned Pastels: A Pink Parade
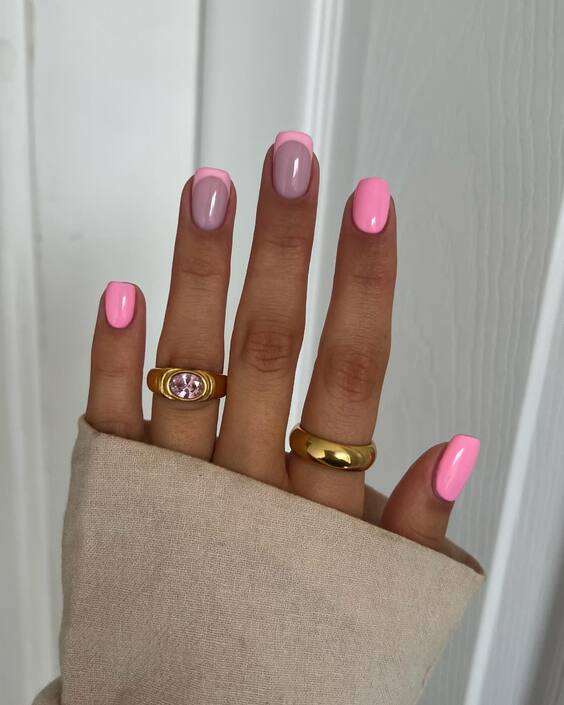
Professional Insight: These nails bring to life the dual-toned pastel trend that’s taking the summer of 2024 by storm. The juxtaposition of soft mauve with a pop of neon pink creates a playful, yet poised look. The almond shape lends a contemporary edge, making each nail a miniature work of art.
Consumables List:
- Base Coat: Smith & Cult Nail Primer
- Soft Mauve Polish: OPI Tickle My France-y
- Neon Pink Polish: China Glaze Shocking Pink
- Top Coat: Smith & Cult Nail Lacquer
Here we have a combination that speaks of creativity and vibrance, perfect for those sunny days and spontaneous summer nights.
DIY Instructions:
- Start with a base coat to ensure longevity.
- Paint alternate nails with soft mauve and neon pink.
- Once dry, apply a top coat to enhance the color depth and provide lasting wear. This manicure is for the daring soul looking to express their duality through color.
Contemporary Artistic Flair
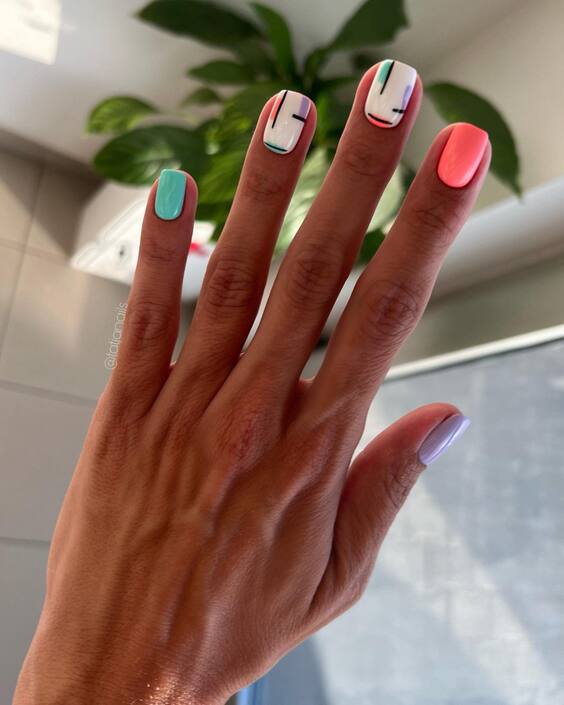
Professional Insight: This design is an ode to the modern art scene, a simple yet striking statement. The combination of a cool mint alongside warm coral hues, with precise black line art, transforms each nail into a gallery-worthy exhibit. It’s a bold expression of personality and summer’s playful side.
Consumables List:
- Base Coat: Cirque Colors Holdfast Base Coat
- Mint Polish: Essie Mint Candy Apple
- Coral Polish: OPI Crawfishin’ for a Compliment
- Black Art Liner: Sally Hansen Nail Art Pen in Black
- Top Coat: CND Vinylux Long Wear Top Coat
I recommend this design for anyone who loves to stand out and isn’t afraid to wear their art on their sleeves—or in this case, their nails.
DIY Instructions:
- Prime nails with a base coat for a solid foundation.
- Paint the base colors, mint, and coral, on alternate nails.
- Use a nail art pen to create thin, abstract lines across the color divide.
- Apply a top coat for a smooth finish and to protect the delicate line work. Great for those summer gallery hops or just adding an artistic touch to your daily look.
Summer Citrus and Florals
Professional Insight: Transport yourself to a Mediterranean orchard with these citrusy, floral nails. The warm orange base paired with delicate white floral designs brings out the essence of summer blooms and ripe fruits. A single almond nail in pure white adds a refreshing contrast and pulls the whole look together.
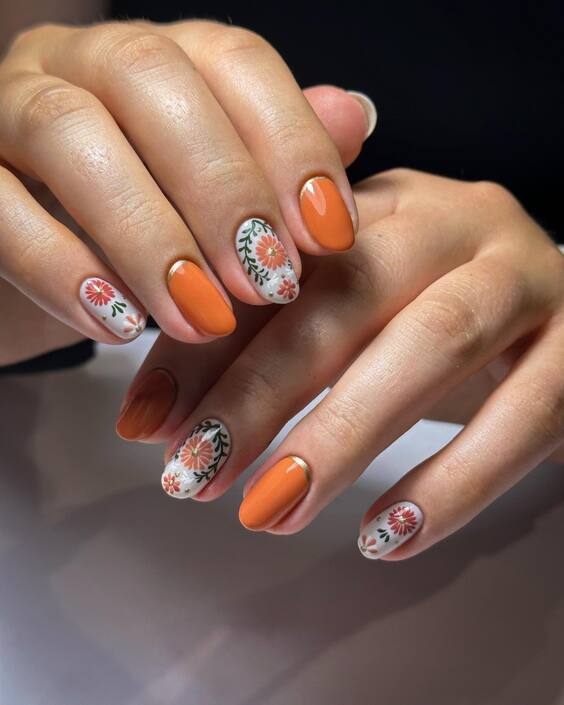
Consumables List:
- Base Coat: Zoya Anchor Base Coat
- Orange Polish: Essie Meet Me At Sunset
- White Polish for Art: Sally Hansen White On
- Detailing Brush
- Top Coat: ILNP High Gloss Top Coat
This look is a summer favorite, combining the joy of a sunny day with the allure of a fragrant, blossoming garden.
DIY Instructions:
- Lay down a base coat to protect your natural nails.
- Paint the orange base, leaving one nail for the white accent.
- With a detailing brush, hand-paint the floral designs on the orange backdrop.
- Coat the accent nail in white for a crisp, clean look.
- Seal the design with a high-gloss top coat for shine and endurance. This manicure is for anyone looking to carry the zest of summer with them, wherever they go.
Marble Elegance with a Hint of Emerald
Professional Insight: The evergreen charm of marbled design has been elevated with rich emerald accents in this set. Reflecting the depth of the ocean, the varied shades of green swirl on a creamy marble base, creating a look that’s both artistic and organic. The smooth almond shape complements the flow of the marbled pattern, giving it a natural, stone-like appearance.
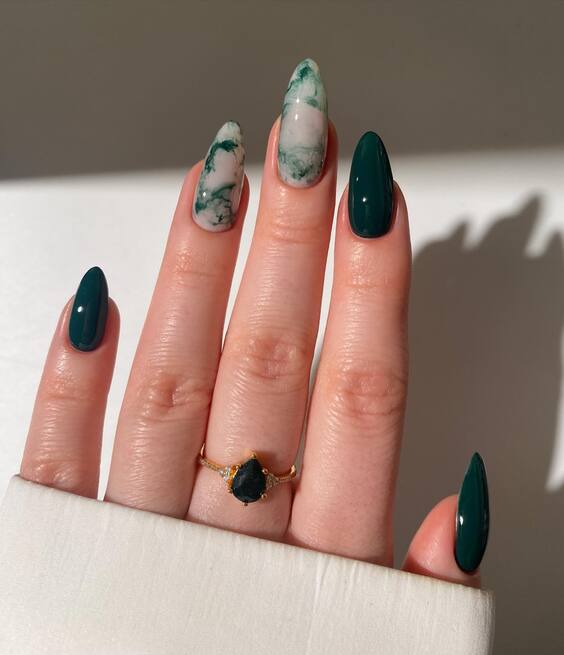
Consumables List:
- Base Coat: Orly Breathable Treatment + Color
- Marble Effect Polish: ILNP Reminisce
- Emerald Green Polish: OPI Jade is the New Black
- Detailing Brush
- Top Coat: China Glaze Fast Forward Top Coat
This design is an excellent choice for those who appreciate the natural beauty and want a touch of sophistication in their summer nail art.
DIY Instructions:
- Apply a base coat to prep the nails.
- Use a sponge to dab on the marble effect polish, creating a natural, stone-like pattern.
- With a detailing brush, add accents of emerald green to mimic the veins in marble.
- Finish with a fast-drying top coat to seal the design. It’s perfect for a summer garden party or a night out in the city.
Fresh Picked Florals
Professional Insight: Imagine the romance of a French garden brought to life on your fingertips. This design combines the deep green of summer foliage with the delicate touch of hand-painted florals. The short nails are a canvas for the natural theme, embodying the bloom of high summer.
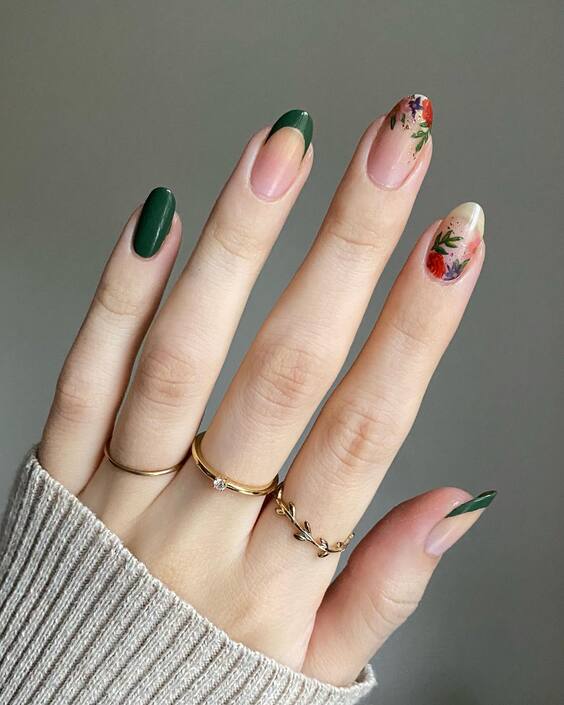
Consumables List:
- Base Coat: CND Stickey Base Coat
- Green Polish: Essie Off Tropic
- Floral Stickers or Decals
- Fine-tip Brush
- Top Coat: Sally Hansen Insta-Dri Anti-Chip Top Coat
Whether you’re walking down a Parisian boulevard or enjoying a lazy brunch in the sunshine, these nails are sure to be a conversation starter.
DIY Instructions:
- Start with a sticky base coat for lasting adhesion.
- Apply two coats of the lush green polish as the background.
- Place floral stickers or use a fine-tip brush to hand-paint flowers for a French tip effect.
- Finish with a quick-dry top coat to protect the delicate artwork. These are perfect for anyone who wants to wear a piece of summer’s splendor every day.
Swirling Sky Art
Professional Insight: This set captures the whimsicality of a summer’s twilight sky. The swirling design in shades of blue and purple, interspersed with silver glitter, mimics the captivating dance of the evening stars coming to life. The almond shape serves as an ideal backdrop for the acrylic art, adding an air of mystery and twilight enchantment.
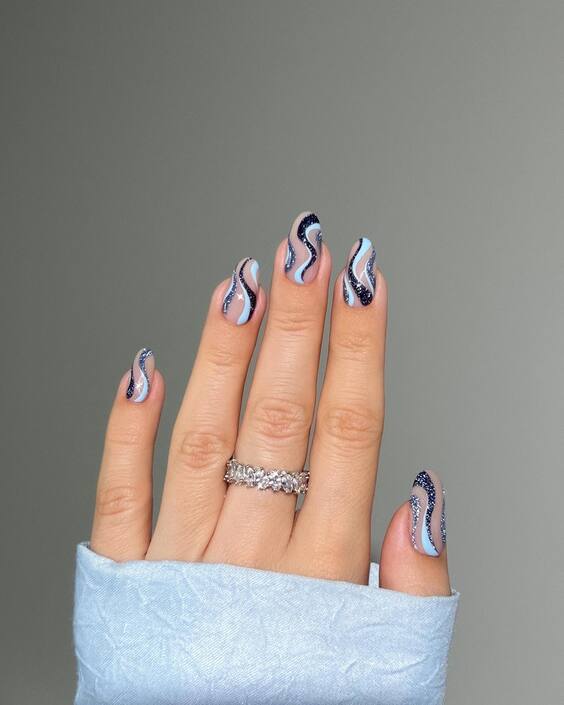
Consumables List:
- Base Coat: OPI Natural Nail Base Coat
- Blue Polish: China Glaze Secret Peri-wink-le
- Purple Polish: OPI Do You Have this Color in Stock-holm?
- Silver Glitter Polish: Essie Set in Stones
- Top Coat: Seche Vite Dry Fast Top Coat
This look is tailor-made for those balmy summer nights that you wish could last forever.
DIY Instructions:
- Begin with a base coat to protect the nail.
- Blend blue and purple polishes on the nail, using a sponge for a soft gradient.
- Add touches of silver glitter to resemble twinkling stars.
- Seal with a fast-drying top coat for a durable, shiny finish. It’s the perfect match for the dreamers and stargazers, and for any summer night when the sky is simply too beautiful to ignore.
Sprightly Spring Blossoms
Professional Insight: Just like a springtime frolic, these nails sport a burst of florals against a clear backdrop, bringing to life the playful spirit of the season. The use of translucent polish with neon flower accents in green, pink, and blue is reminiscent of a meadow in full bloom.
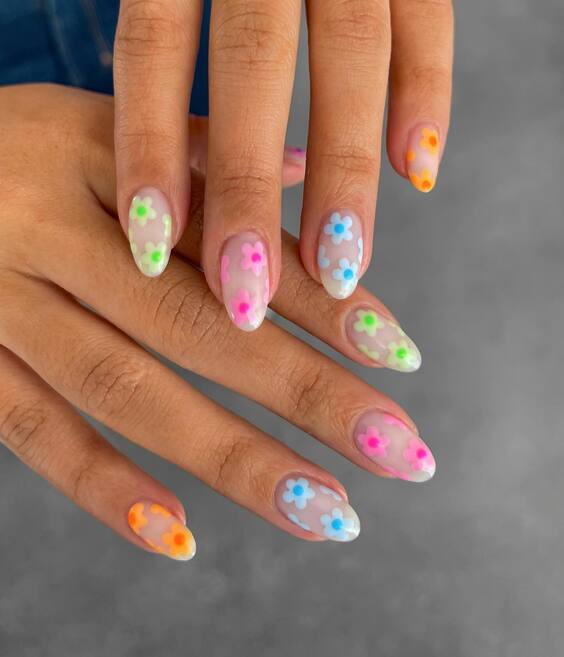
Consumables List:
- Base Coat: Essie Grow Stronger Base Coat
- Translucent Polish: OPI Sheer Tints Color-Tinted Top Coat
- Neon Acrylic Paints for Flower Details
- Detailing Brush
- Top Coat: ORLY Polishield All-in-One Ultimate Topcoat
DIY Instructions:
- Start with a fortifying base coat.
- Apply a layer of sheer tinted polish for a hint of color.
- Paint neon flowers using a fine detailing brush and acrylic paints.
- Seal the playful design with a shiny topcoat. This nail art is an ode to the vibrant energy and color of summer, fitting for all who love a touch of whimsy in their style.
Peachy Keen Swirls
Professional Insight: The fresh appeal of peach tones swirled with white offers a delicious summer treat for the eyes. These nails feature a creamy peach base with white accents in a swirl pattern that’s both artistic and appetizing.
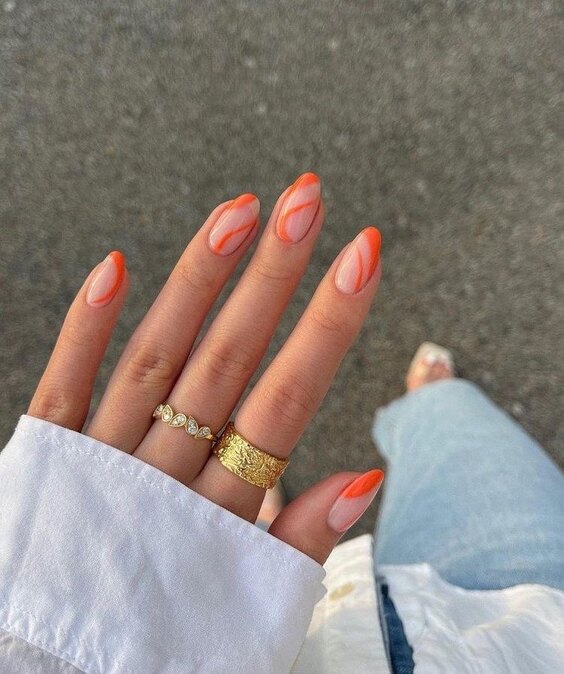
Consumables List:
- Base Coat: ORLY Bonder Rubberized Base Coat
- Peach Polish: Zoya Wendy
- White Polish: Sally Hansen White On
- Detailing Brush
- Top Coat: Essie Gel Setter Top Coat
DIY Instructions:
- Apply a rubberized base coat for polish adhesion.
- Paint a peachy base color.
- With a fine brush, swirl in white polish while the base is still tacky.
- Complete the look with a glossy gel-effect top coat. This look serves up a sweet twist on the summer palette and is perfect for those looking to blend simplicity with flair.
Summer Sorbet Fade
Professional Insight: Here’s a nod to the sheer, juicy hues of summer sorbets. These nails showcase a seamless fade of yellow, pink, and green, evoking the refreshing essence of your favorite icy treats.
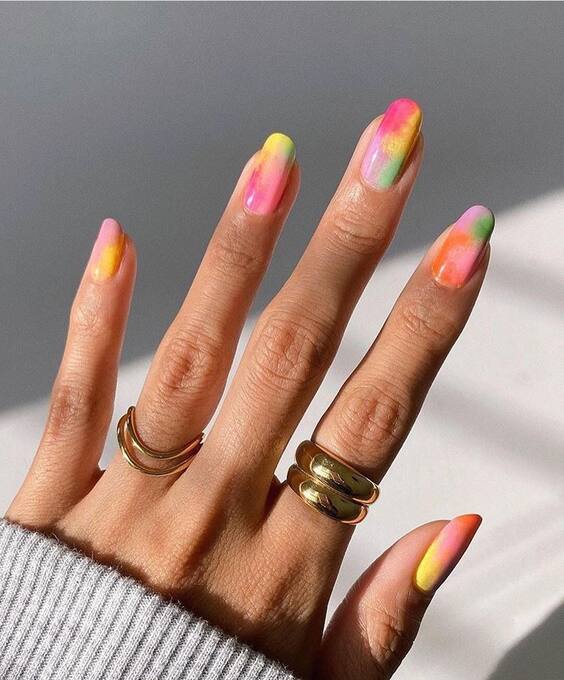
Consumables List:
- Base Coat: Zoya Anchor Base Coat
- Yellow Polish: China Glaze Lemon Fizz
- Pink Polish: OPI Elephantastic Pink
- Green Polish: Essie The More The Merrier
- Sponge for Ombre Effect
- Top Coat: China Glaze No-Chip Top Coat
DIY Instructions:
- Lay down a solid base coat to prevent staining.
- Sponge on the colors in a gradient pattern for a soft ombre effect.
- Allow it to dry, then repeat for intensity.
- Finish with a top coat for a smooth, ice-cream-smooth finish. This summery fade is for those who love a dash of pastel playfulness and want to carry the joy of summer on their nails.
Whimsical Watercolor Wonders
Professional Insight: Unleashing a feast of creativity, these nails are like a canvas with strokes of watercolor. The soft swirls and curves in a pastel palette bring a touch of the abstract painter’s studio to your fingertips, while playful shapes like hearts and clovers add a storybook charm to the overall design.
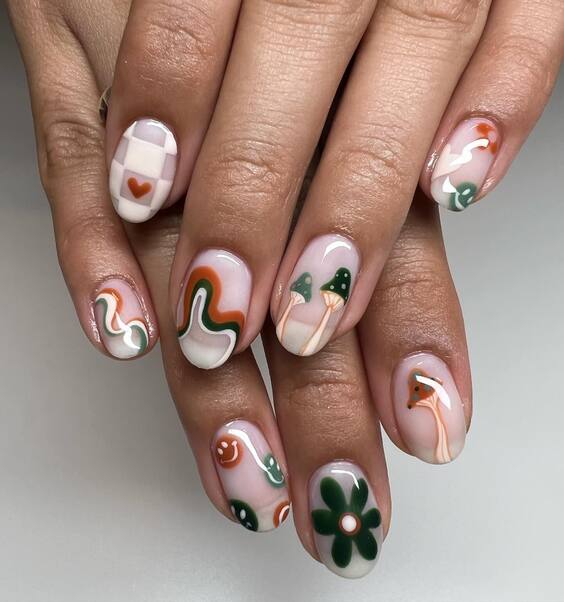
Consumables List:
- Base Coat: Deborah Lippmann All About That Base
- Pastel Gel Polishes in Various Colors
- Fine Detail Brush
- Top Coat: Gelish Top It Off Gel Sealer
DIY Instructions:
- Prep your nails with a base coat for gel polish longevity.
- Apply a sheer nude gel polish as a base color.
- With a detail brush, swirl different pastel colors on the nail, blending them slightly to achieve a watercolor effect.
- Add whimsical shapes like hearts or clovers with a fine brush.
- Cure under a UV light and seal the design with a glossy top coat. Perfect for those whimsical days of summer, ideal for a picnic in the park or a stroll by the lakeside.
Modern Neon French
Professional Insight: A twist on the classic French manicure, this design boasts vibrant neon pink tips that are perfect for the bold at heart. The look is modern, fresh, and unapologetically fun, matching the summer’s exuberant energy.
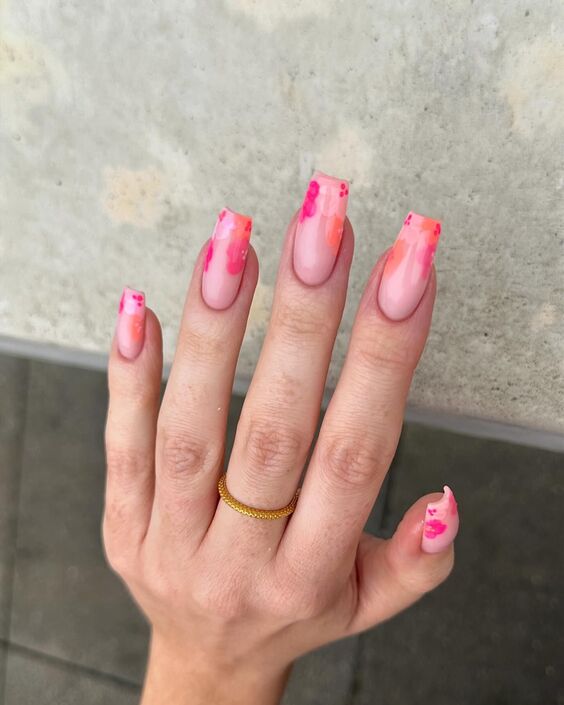
Consumables List:
- Base Coat: Essie Grow Stronger
- Sheer Pink Polish: OPI Bubble Bath
- Neon Pink Polish: China Glaze Pool Party
- Top Coat: ORLY Won’t Chip
DIY Instructions:
- Begin with a strengthening base coat.
- Apply a sheer pink polish as the base for a healthy nail look.
- Paint the tips with a neon pink polish for a pop of color.
- Finish with a chip-resistant top coat for a durable and shiny look. This manicure is a celebration of summer’s vivacity and perfect for those who want to make a statement with their nail art.
Elegant Outline French
Professional Insight: Sleek and sophisticated, this manicure features a thin gold outline that redefines the French tip for a contemporary and chic look. The short nail design is both timeless and on-trend, providing a refined touch to any summer outfit.
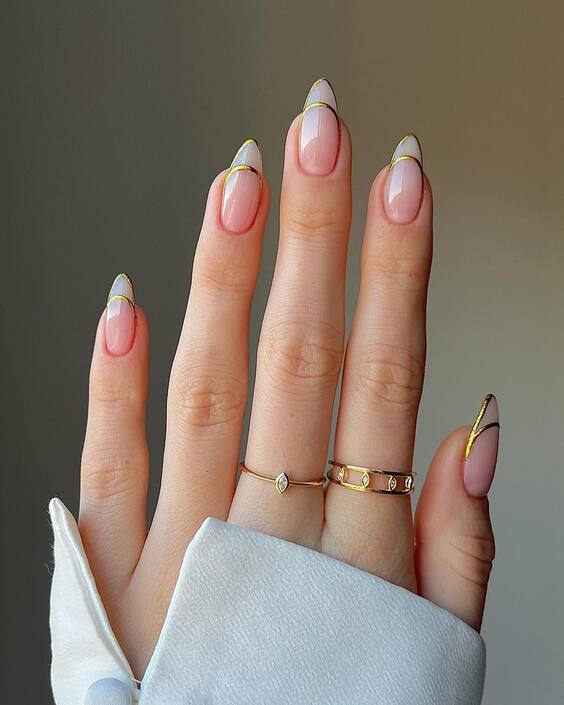
Consumables List:
- Base Coat: OPI Nail Envy
- Sheer Nude Polish: Zoya Bela
- Gold Striping Tape or Gold Nail Polish
- Top Coat: INM Out The Door
DIY Instructions:
- Start with a nail-strengthening base coat.
- Apply a sheer nude polish for a clean, natural look.
- Use gold striping tape or a striper brush with gold polish to create a precise outline at the tip.
- Finish with a fast-drying top coat to seal the design and add a glossy shine. Ideal for a classy brunch or an elegant evening event, this manicure adds a touch of luxury to your summer days.
Botanical Prints and Matte Finesse
Professional Insight: The botanical nail design serves as a tribute to the natural world with its earthy tones and leafy patterns, encapsulating the essence of a tranquil forest. The juxtaposition of a matte finish with glossy details provides a contemporary twist, reflecting a sophisticated yet down-to-earth vibe.
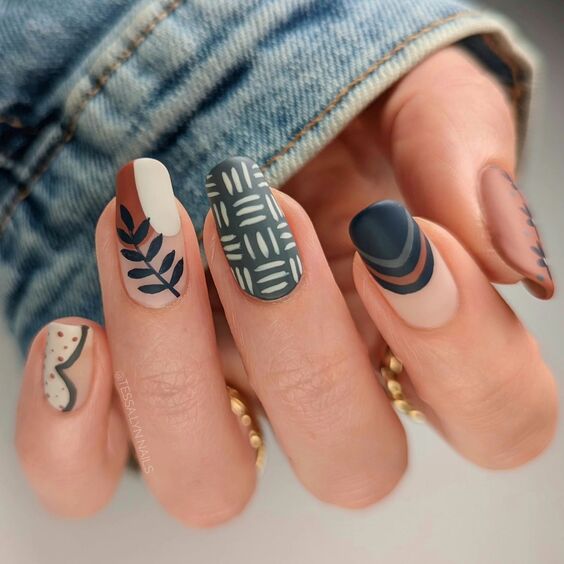
Consumables List:
- Base Coat: ORLY Breathable Treatment + Color
- Neutral Polish: Essie Topless & Barefoot
- Dark Green Polish: OPI Stay Off the Lawn!!
- Matte Top Coat: Essie Matte About You
- Glossy Top Coat (for details): INM Northern Lights Hologram Top Coat
DIY Instructions:
- Prepare nails with a nourishing base coat.
- Apply a neutral color as the base for your canvas.
- Use a dark green polish to hand-paint leafy designs, and then let it dry.
- Apply a matte top coat over the entire nail.
- Add a layer of glossy top coat over the botanical design to make it stand out. Perfect for those who want a touch of nature’s calm with their short nails, this style is versatile enough for both day-to-day wear and special summer occasions.
Pastel Florals on a Transparent Base
Professional Insight: This nail design captures the fleeting beauty of summer blossoms with a bouquet of soft pastel flowers. The transparent base allows the color to pop, creating a delicate stained glass effect that’s both whimsical and graceful.
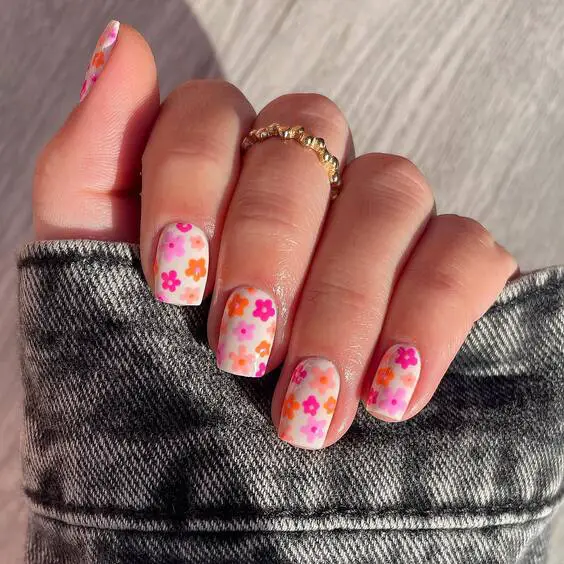
Consumables List:
- Base Coat: Sally Hansen Miracle Cure
- Pastel Polishes in Pink, Orange, and Purple
- Fine Detailing Brush
- Top Coat: Seche Vive Instant Gel Effect Top Coat
DIY Instructions:
- Strengthen nails with a protective base coat.
- Apply a clear polish to achieve a transparent look.
- With a fine brush, create pastel florals in a delicate arrangement.
- Seal the design with a gel-like top coat for durability and shine. This look is a summer favorite, akin to wearing a crown of wildflowers on your nails, and is suited for anyone who loves a soft, feminine touch to their art.
FAQ
Q: Can these designs be achieved with both gel and regular polish? A: Absolutely! Whether you prefer gel for its longevity or traditional polish for its ease of change, these designs are versatile.
Q: What tips do you have for those with short nails wanting to try these trends? A: These trends are inclusive! For short nails, focus on simple designs and solid colors. Accent nails with art or foil can make a statement without the length.

