21 Summer Cherry Nail Designs: Glam Up with Vibrant Manicures!
Summer is the perfect time to sport vibrant and playful nail designs, and what could be more delightful than cherry-themed manicures? Whether you’re lounging by the pool, enjoying a summer picnic, or just sprucing up your everyday look, cherry nails add a touch of whimsy and charm to your style. In this article, we delve into various cherry nail designs that will have you ready to embrace the warmer months with style and flair.
Classic Red Cherry Design on Nude Base
This nail design elegantly captures the essence of summer with its simple yet striking portrayal of red cherries on a soft nude base. The glossy finish adds a touch of sophistication, making it perfect for both casual outings and formal gatherings.
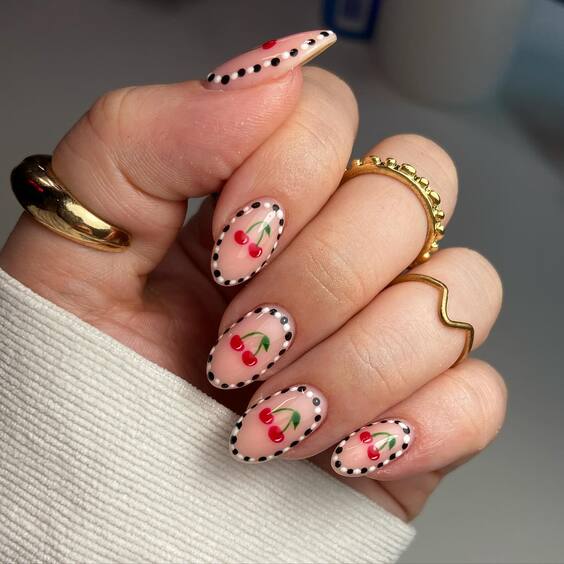
Professional Opinion and Description: The balance between the vibrant red and the subdued nude background exemplifies perfect summer nails cherry. The cherries are neatly painted with a high-gloss finish, providing a juicy appearance that’s both eye-catching and stylish.
Consumables Needed:
- Base coat: OPI Natural Nail Base Coat
- Nude polish: Essie’s “Ballet Slippers”
- Red polish for cherries: Essie’s “Russian Roulette”
- Green polish for stems: OPI “Green-wich Village”
- Top coat: Seche Vite Dry Fast Top Coat
DIY Instructions:
- Apply a base coat to protect your nails.
- Paint two coats of Essie’s “Ballet Slippers” as the base color.
- Use a dotting tool to create red cherry shapes with “Russian Roulette.”
- Draw slender stems with “Green-wich Village” using a fine brush.
- Seal the design with Seche Vite top coat for a glossy finish.
Edgy Cherry Accents on Long Stiletto Nails
For those who love a more dramatic look, these long stiletto nails featuring bold cherry accents are a must-try. The clear nail segments intertwined with solid white provide a modern twist to the classic cherry theme.
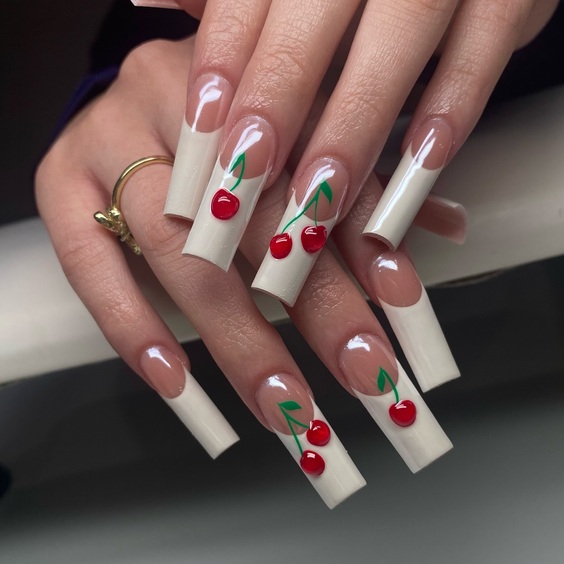
Professional Opinion and Description: The sharp contrast between the clear and white sections sets a perfect stage for the cherry accents to stand out. This design is not only trendy but also adds an edge to your summer style, making it ideal for summer nails cherries.
Consumables Needed:
- Base coat: Sally Hansen Double Duty
- White polish: China Glaze “White on White”
- Cherry red polish: OPI “Big Apple Red”
- Clear polish: OPI “Top Coat”
- Nail glue for enhancements (if using artificial stiletto tips)
DIY Instructions:
- Apply a base coat to protect your nails.
- Alternate between clear polish and white polish on each nail for a segmented look.
- Paint cherries on the white segments using “Big Apple Red.”
- Attach stiletto tips if desired, using nail glue.
- Finish with a layer of OPI Top Coat for durability and shine.
Sweet Cherry Blossoms on Short Nails
This delicate design features tiny cherry blossoms on a clear base, ideal for those who prefer a more understated yet thematic approach to their summer manicures.
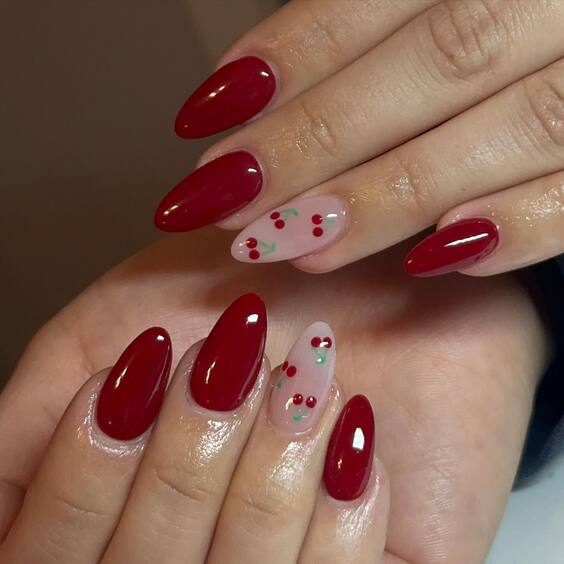
Professional Opinion and Description: The miniature cherry blossoms are intricately detailed, offering a fresh and elegant look. This design is perfect for everyday wear, providing a subtle nod to summer without being overly bold.
Consumables Needed:
- Base coat: CND Stickey Base Coat
- Clear polish: OPI “Top Coat”
- Pink polish for blossoms: Essie “Muchi, Muchi”
- Green polish for tiny leaves: Sally Hansen “Mint Sprint”
DIY Instructions:
- Apply a base coat to protect the nails.
- Use a clear polish as the base.
- With a fine brush, create small cherry blossom patterns using “Muchi, Muchi.”
- Add tiny leaves with “Mint Sprint.”
- Seal the design with a top coat for a smooth finish.
Elegant Cherry and Blossom Tips on Pink Long Coffin Nails
These long coffin nails present a stunning combination of pink tips adorned with delicate cherry and blossom designs, exuding a playful yet elegant vibe perfect for any summer event.
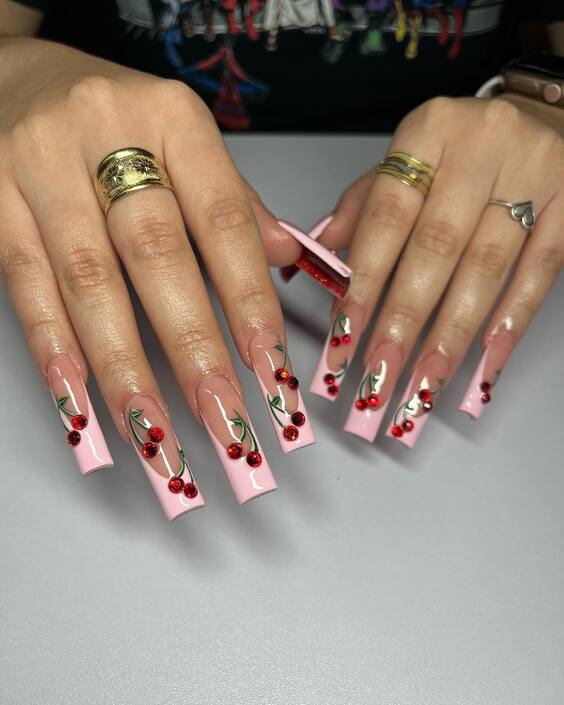
Professional Opinion and Description: The soft pink base with vibrant red cherries and subtle blossoms offers a harmonious contrast that’s visually appealing and fashion-forward. The precision in the floral and cherry details adds a bespoke charm to this manicure.
Consumables Needed:
- Base coat: Essie Here to Stay
- Pink polish: OPI “Mod About You”
- Red polish for cherries: Sally Hansen “Red Eye”
- White polish for blossoms: China Glaze “White on White”
- Green polish for details: OPI “Jade is the New Black”
- Top coat: Sally Hansen Insta-Dri Anti-Chip
DIY Instructions:
- Start with a base coat to protect your nails.
- Apply two coats of “Mod About You” for a solid pink base.
- Draw cherries using “Red Eye” and add highlights with a dot of “White on White.”
- Paint tiny blossoms and leaves using white and green polishes.
- Finish with a quick-dry top coat for a long-lasting, shiny finish.
Minimalist Cherry Accents on Almond Nails
For those who adore minimalist aesthetics, these almond-shaped nails featuring subtle cherry accents on a peachy base are the epitome of understated chic.
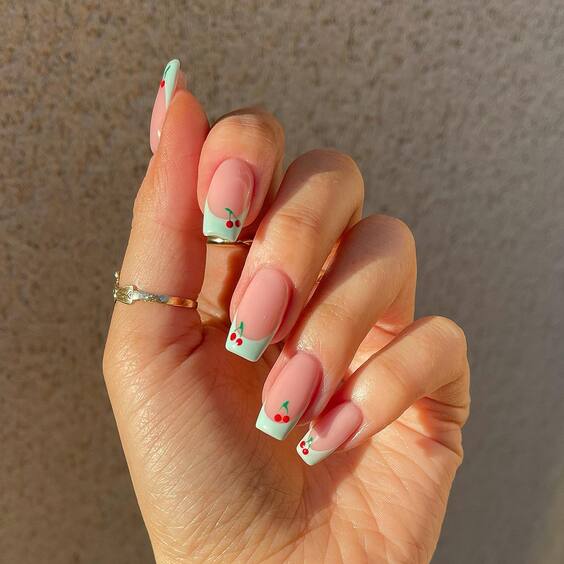
Professional Opinion and Description: This design is perfect for someone who seeks a hint of playfulness while keeping the overall look refined and sophisticated. The small cherry motifs are strategically placed for an elegant touch.
Consumables Needed:
- Base coat: Butter London Nail Foundation
- Peach polish: Essie “Peach Side Babe”
- Red polish for cherries: OPI “Big Apple Red”
- Green polish for stems: Essie “Off Tropic”
- Top coat: OPI Top Coat
DIY Instructions:
- Apply a base coat to protect your nails.
- Paint two coats of “Peach Side Babe” as the base color.
- Add small cherry designs with “Big Apple Red” and tiny stems with “Off Tropic.”
- Seal the design with OPI Top Coat for a glossy finish and enhanced durability.
Chic Cherry Art on Mixed Background Nails
This nail design blends simplicity with artistic flair, featuring cherries on alternating nude and white backgrounds, ideal for someone who loves a bit of variety in their manicure.
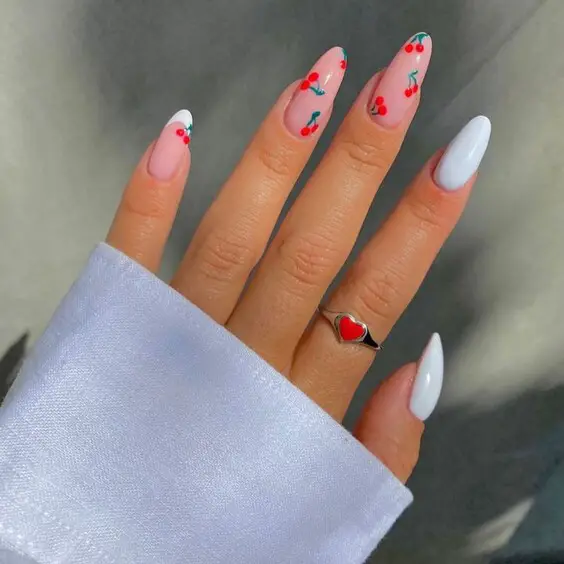
Professional Opinion and Description: The mix of nude and white bases allows each cherry to pop, creating a playful yet balanced look. This manicure is perfect for both everyday wear and special occasions.
Consumables Needed:
- Base coat: Revlon Quick Dry Base Coat
- Nude polish: Zoya “Chantal”
- White polish: OPI “Alpine Snow”
- Red polish for cherries: Revlon “Revlon Red”
- Green polish for details: Marc Jacobs “Nirvana”
- Top coat: Revlon Extra Life No Chip Top Coat
DIY Instructions:
- Begin with a base coat to protect the nails.
- Apply alternating coats of “Chantal” and “Alpine Snow” on each nail.
- Paint cherries on each nail using “Revlon Red” and add green details with “Nirvana.”
- Finish with a no-chip top coat for a smooth and lasting finish.
Softly Rendered Cherries on Glossy Pink Nails
This manicure features a beautiful glossy pink base with softly rendered cherries, making it a perfect choice for those who prefer subtle art over bold statements.
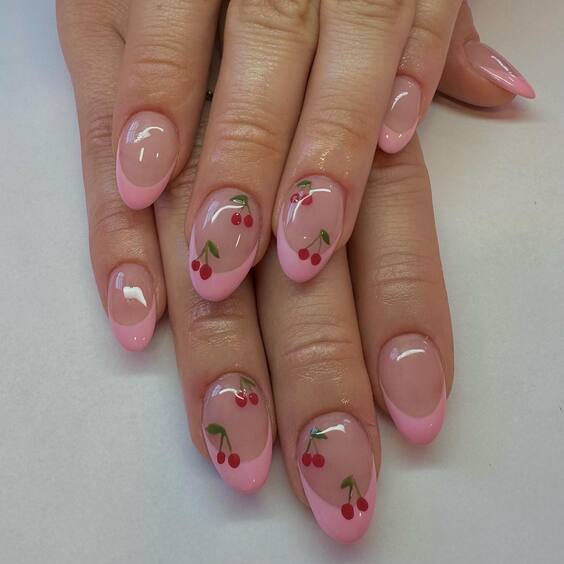
Professional Opinion and Description: The soft pink base enhances the delicate red cherries, which are detailed with tiny green leaves. The gloss finish provides a fresh and vibrant look that is ideal for summer. The use of light colors and a glossy finish make this design wonderfully wearable for both everyday and special occasions.
Consumables Needed:
- Base coat: Base Coat by Orly
- Pink polish: “Bubble Bath” by OPI
- Red polish for cherries: “Cherry Red” by Sally Hansen
- Green polish for leaves: “Leaf Green” by Essie
- Top coat: Glossy Top Coat by Seche Vite
DIY Instructions:
- Apply the base coat to protect your natural nails.
- Paint two coats of “Bubble Bath” for a full, glossy pink base.
- Using a fine brush, add cherries in “Cherry Red” and detail the leaves with “Leaf Green.”
- Finish with a glossy top coat to enhance the shine and ensure durability.
Dramatic Cherry Designs on Transparent Nails
Embrace drama with these eye-catching transparent nails adorned with bold cherry designs, perfect for those who love to make a statement with their nail art.
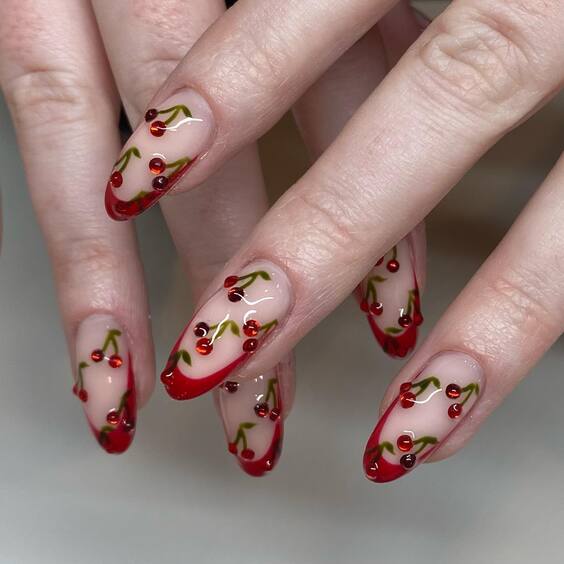
Professional Opinion and Description: The transparency of the nails creates a unique canvas for the cherry designs, which are applied in a vivid red, complemented by shiny embellishments. This design is all about bold expressions and works well for themed parties or fashion-forward events.
Consumables Needed:
- Base coat: Clear Base Coat by OPI
- Red polish for cherries: “Really Red” by Essie
- Green polish for stems: “Going Incognito” by Essie
- Rhinestones or small beads for embellishment
- Top coat: High Gloss Top Coat by China Glaze
DIY Instructions:
- Apply a clear base coat to start.
- Strategically place “Really Red” in cherry shapes over the transparent nails.
- Add “Going Incognito” for the stems.
- Embellish with rhinestones or beads to enhance the cherry centers.
- Seal everything with a high gloss top coat for a durable, shiny finish.
Playful Summer Palette with Cherry Accents
This design combines playful summer colors with charming cherry accents, featuring a delightful mix of sky blue and soft peach tones.
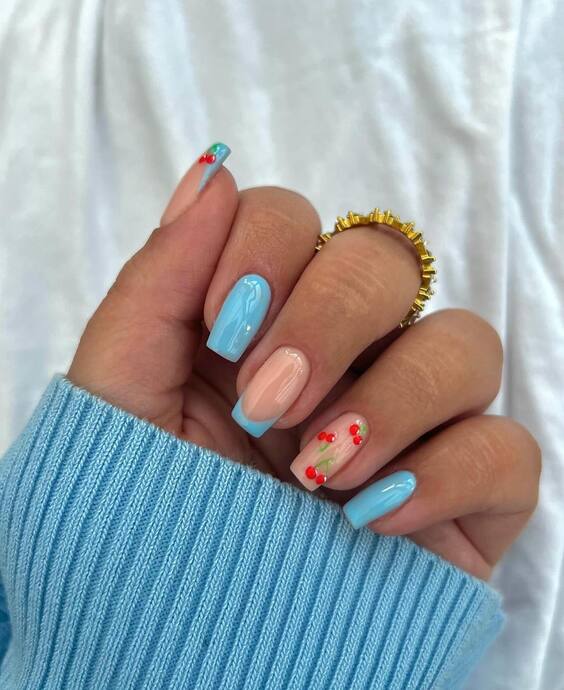
Professional Opinion and Description: The combination of sky blue and peach tones sets a cheerful, summery backdrop for the small, meticulously painted cherries. This design is perfect for beach days or casual summer gatherings, offering a fun yet sophisticated look.
Consumables Needed:
- Base coat: Quick-Dry Base Coat by Sally Hansen
- Sky blue polish: “Bikini So Teeny” by Essie
- Peach polish: “Apricot Nectar” by Revlon
- Red polish for cherries: “Watermelon” by Essie
- Green polish for details: “Mojito Madness” by Essie
- Top coat: Quick-Dry Top Coat by OPI
DIY Instructions:
- Begin with a quick-dry base coat to prepare your nails.
- Apply two coats of “Bikini So Teeny” and “Apricot Nectar” alternately on each nail.
- Draw small cherries with “Watermelon” and add tiny green details with “Mojito Madness.”
- Finish with a quick-dry top coat to lock in the color and design.
Dramatic Drip Cherry Accents on Clear Nails
This design stands out with its dramatic drip effect, featuring bold red cherries that seem to melt down the nails. It’s a stunning choice for someone who loves artistic and eye-catching manicures.
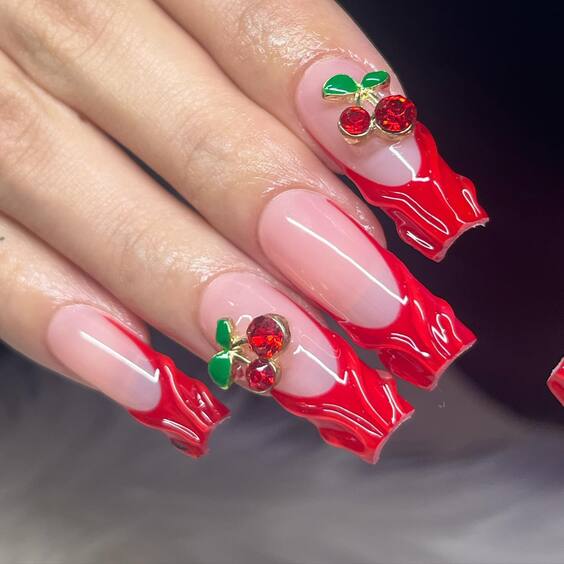
Professional Opinion and Description: The use of clear nails as a base highlights the dramatic red cherry drips, which are meticulously crafted to look as though they are melting. This bold choice is complemented by sparkling embellishments that mimic cherry reflections, creating a dynamic and stylish look perfect for summer events.
Consumables Needed:
- Base coat: Essie Strong Start
- Clear polish: OPI “Nail Envy”
- Red polish for drips: Essie “Forever Yummy”
- Green polish for leaves: China Glaze “In the Limelight”
- Red rhinestones for embellishment
- Top coat: Seche Vite Dry Fast Top Coat
DIY Instructions:
- Apply a base coat to start.
- Paint a clear coat as the base to achieve the transparent nail effect.
- Carefully paint the red drips starting from the tip using “Forever Yummy.”
- Add small green leaves with “In the Limelight.”
- Embellish with red rhinestones at the base of the drips.
- Seal with a top coat for a durable and glossy finish.
Playful Pink Cherry Nail Art
For those who love a playful and youthful look, these pink nails with vibrant cherry art provide a charming summer vibe that’s both fun and fashionable.
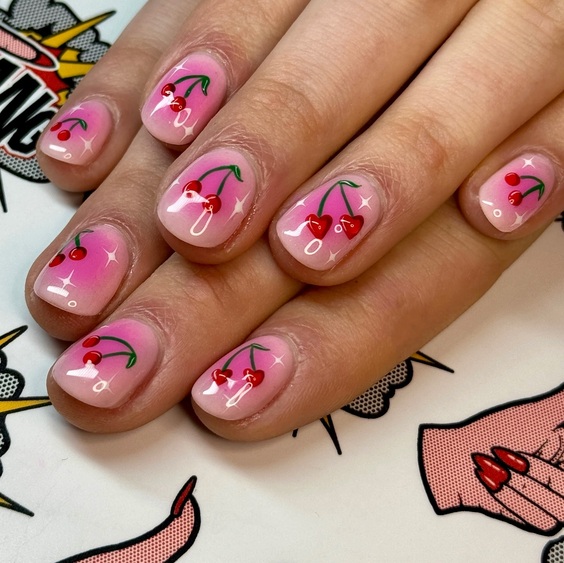
Professional Opinion and Description: The nails feature a soft pink base with bold red cherries and green stems, creating a lovely contrast that’s eye-catching yet sweet. The design is simple but effective, making it suitable for everyday wear or a casual summer party.
Consumables Needed:
- Base coat: CND Stickey Base Coat
- Pink polish: Essie “Muchi, Muchi”
- Red polish for cherries: Revlon “Revlon Red”
- Green polish for stems: OPI “Green-wich Village”
- Top coat: Sally Hansen Insta-Dri Top Coat
DIY Instructions:
- Apply a base coat to protect the nails.
- Paint two coats of “Muchi, Muchi” for a smooth pink base.
- Draw cherries with “Revlon Red” and add stems with “Green-wich Village.”
- Finish with a quick-drying top coat to maintain the manicure’s beauty and longevity.
Subtle Cherry Accents on French Tips
These nails offer a twist on the classic French manicure by incorporating subtle cherry accents atop a natural nail base, ideal for those who prefer minimal yet creative nail art.
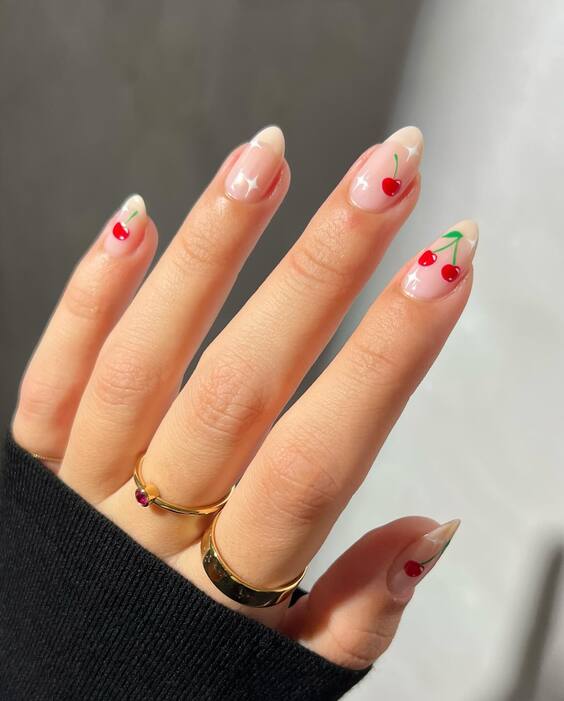
Professional Opinion and Description: The natural nail base with delicate French tips provides a perfect backdrop for the small red cherries with green stems, offering an understated yet unique look. This manicure is perfect for professional environments or for those who like their nail art to be subtly stylish.
Consumables Needed:
- Base coat: ORLY Bonder Rubberized Basecoat
- Natural polish: OPI “Bubble Bath”
- White polish for tips: Essie “Blanc”
- Red polish for cherries: Sally Hansen “Cherry Bomb”
- Green polish for stems: OPI “Jade is the New Black”
- Top coat: Essie Gel Setter Top Coat
DIY Instructions:
- Start with a protective base coat.
- Apply “Bubble Bath” for a clean, natural look.
- Create classic French tips with “Blanc.”
- Add tiny cherry designs to one corner of each nail using “Cherry Bomb” and “Jade is the New Black.”
- Finish with a gel-like top coat for extra gloss and protection.
Artistic Turquoise Drip with Cherry Accents
This innovative nail design merges vivid turquoise drips with cherry accents, creating an artistic and captivating appearance. It’s a bold choice that combines elements of fun and creativity.
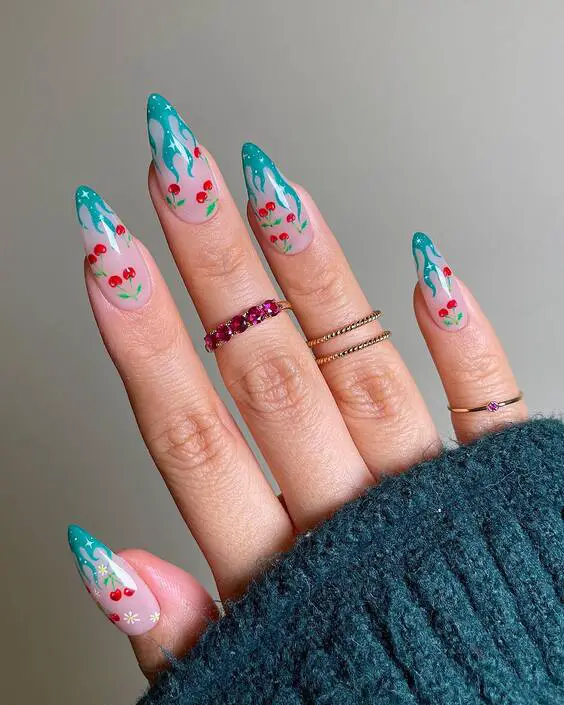
Professional Opinion and Description: The turquoise drips give a splash of color against the natural nail base, while the red cherries add a playful touch. This design is perfect for those who like to express their vibrant personality through their manicure.
Consumables Needed:
- Base coat: ORLY Bonder Rubberized Basecoat
- Natural polish: Essie “Mademoiselle”
- Turquoise polish for drips: China Glaze “Too Yacht to Handle”
- Red polish for cherries: Deborah Lippmann “My Old Flame”
- Green polish for stems: Sinful Colors “Exotic Green”
- Top coat: INM Out the Door Top Coat
DIY Instructions:
- Apply a base coat to protect your nails.
- Paint a sheer coat of “Mademoiselle” for a clean, natural look.
- Create turquoise drips from the cuticle downward with “Too Yacht to Handle.”
- Add cherry details using “My Old Flame” for the fruit and “Exotic Green” for the stems.
- Seal with a top coat for a glossy and enduring finish.
Elegant Cherry Blossom Manicure on White Coffin Nails
This design features a delicate pink and white color scheme with cherry blossoms, ideal for those who appreciate elegance and subtlety in their nail art.
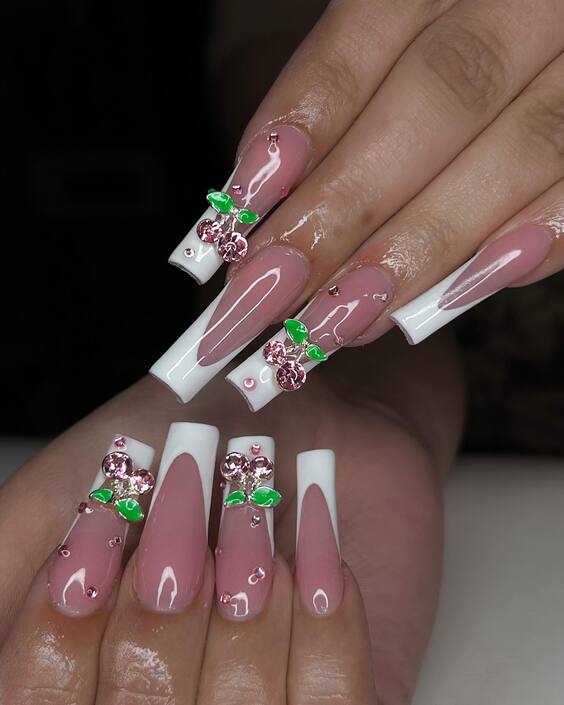
Professional Opinion and Description: The soft pink base with white tips and cherry blossom accents offers a sophisticated yet romantic look. Enhanced with sparkling embellishments, it’s perfect for formal events or a bride seeking a unique manicure for her wedding day.
Consumables Needed:
- Base coat: Essie “Grow Stronger”
- White polish for tips: Sally Hansen “White On”
- Pink polish for the base: OPI “Pink Friday”
- Rhinestones and floral stickers or hand-painted designs
- Top coat: Glisten & Glow Top Coat
DIY Instructions:
- Begin with a strong base coat to fortify your nails.
- Apply “Pink Friday” on the entire nail, leaving the tips free.
- Paint the tips with “White On.”
- Place rhinestones and floral stickers or hand-paint cherry blossoms on the intersection of pink and white.
- Finish with a glossy top coat to seal and protect the design.
Classic Cherry Design on Pink Square Nails
A timeless design, these square pink nails feature classic cherry motifs, making them suitable for any age and perfect for daily wear or special summer occasions.
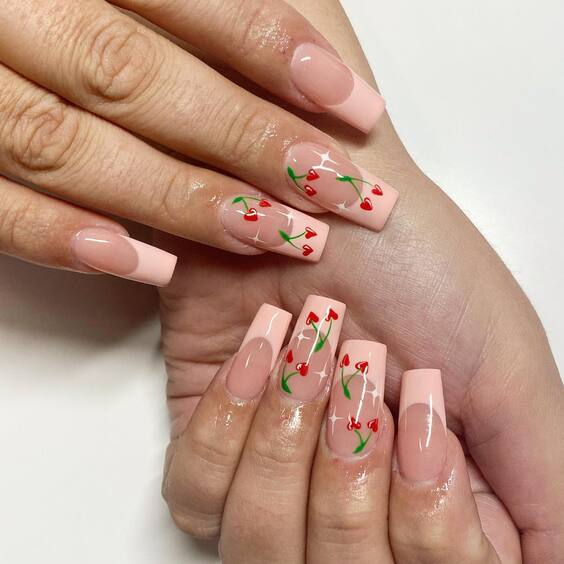
Professional Opinion and Description: The warm pink base serves as a lovely canvas for the vibrant red cherries and green stems. This design is both charming and stylish, offering a cheerful vibe that’s ideal for summer.
Consumables Needed:
- Base coat: Zoya Anchor Base Coat
- Pink polish: Essie “Fiesta”
- Red polish for cherries: Essie “Fifth Avenue”
- Green polish for stems: OPI “Jade is the New Black”
- Top coat: CND Vinylux Weekly Top Coat
DIY Instructions:
- Start with a base coat to ensure nail health.
- Apply two coats of “Fiesta” for a rich pink base.
- Paint cherries with “Fifth Avenue” and add stems with “Jade is the New Black.”
- Complete the look with a durable top coat for a glossy finish and extended wear.
Bold Stiletto Nails with Cherry and Gemstone Accents
This dramatic nail design features bold stiletto nails, combining striking white and red patterns with cherry accents and luxurious gemstones. It’s a perfect choice for those looking to make a glamorous statement.
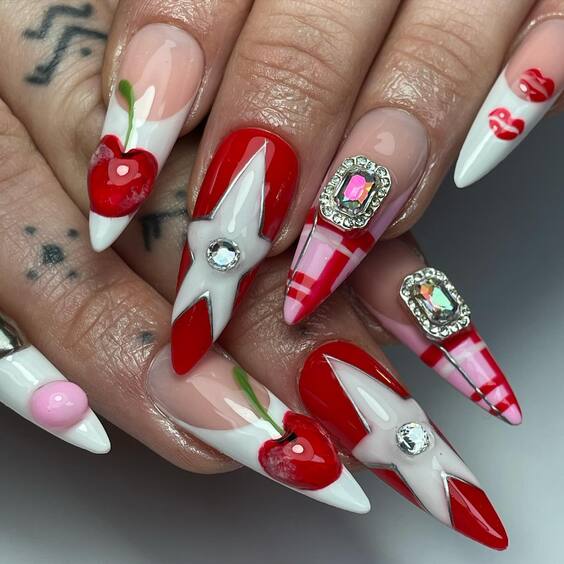
Professional Opinion and Description: The sharp contrast between the white and red, along with the detailed cherry art and gemstone embellishments, creates a luxurious and eye-catching look. This style is ideal for special events where making a stylish impact is key.
Consumables Needed:
- Base coat: Orly Rubberized Base
- White polish: Essie “Blanc”
- Red polish for details: Deborah Lippmann “Lady is a Tramp”
- Green polish for stems: Essie “Mojito Madness”
- Gemstones and adhesive for application
- Top coat: INM Out the Door
DIY Instructions:
- Apply a base coat to protect your nails.
- Paint the base with “Blanc” and add red accents with “Lady is a Tramp.”
- Carefully place cherry designs and gemstones where desired.
- Use “Mojito Madness” for any additional green details.
- Finish with a layer of top coat to secure the embellishments and enhance shine.
Chic Leopard Print with Cherry Accents
For a walk on the wild side, this design incorporates classic leopard print with vibrant cherry accents on long coffin nails, blending edginess with a touch of playfulness.
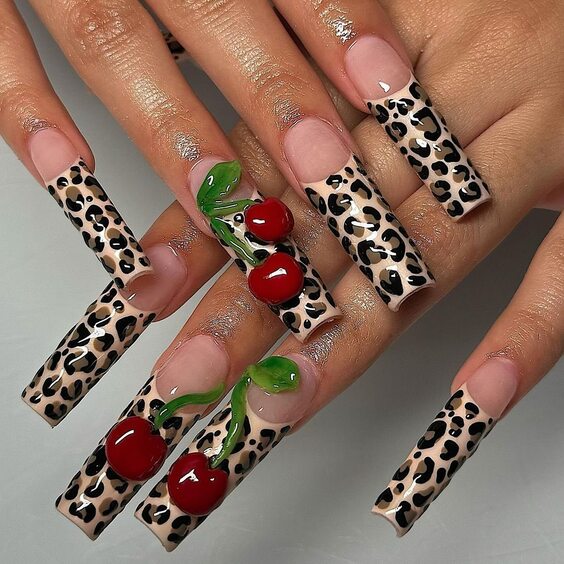
Professional Opinion and Description: The leopard print provides a bold backdrop for the bright red cherries, making this design perfect for those who love adventurous and unique nail art. It’s a great way to showcase personality and style in a fun, artistic way.
Consumables Needed:
- Base coat: Sally Hansen Hard as Nails
- Nude polish for base: OPI “Samoan Sand”
- Black and brown polishes for leopard spots: Essie “Licorice” and “Mink Muffs”
- Red polish for cherries: OPI “Big Apple Red”
- Green polish for stems: Essie “The More the Merrier”
- Top coat: Seche Vite Dry Fast Top Coat
DIY Instructions:
- Start with a base coat to protect your nails.
- Apply “Samoan Sand” as the base color.
- Create leopard spots with “Licorice” and “Mink Muffs.”
- Add cherry details using “Big Apple Red” and green stems with “The More the Merrier.”
- Finish with a fast-drying top coat to protect your design.
Subtle Sky Blue and Cherry Design
This nail art features a gentle sky blue and soft pink color scheme with delicate cherry accents, providing a refreshing and subtle look suitable for any summer day.
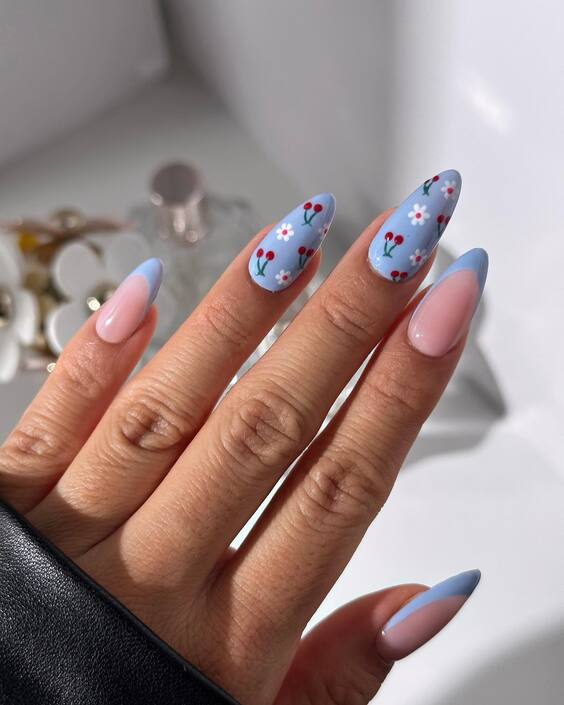
Professional Opinion and Description: The combination of sky blue and soft pink is serene and pleasing to the eye, with small cherry motifs adding a sweet and playful touch. This design is ideal for those who prefer their nail art to be understated yet charming.
Consumables Needed:
- Base coat: Essie “Grow Stronger”
- Sky blue polish: China Glaze “Kinetic Candy”
- Soft pink polish: Essie “Fiji”
- Red polish for cherries: OPI “Red My Fortune Cookie”
- Green polish for stems: China Glaze “Def Defying”
- Top coat: Butter London Hardwear P.D. Quick Topcoat
DIY Instructions:
- Apply a base coat to start.
- Paint alternating nails with “Kinetic Candy” and “Fiji.”
- Add small cherries on the pink nails using “Red My Fortune Cookie” and tiny green stems with “Def Defying.”
- Seal your artwork with a top coat for a glossy finish and extended wear.
Luxurious Pink with Cherry and Crystal Accents
These long, elegant nails feature a soft pink base accented with cherries and lavish crystals at the tips, perfect for those who desire a blend of simplicity and glamour.
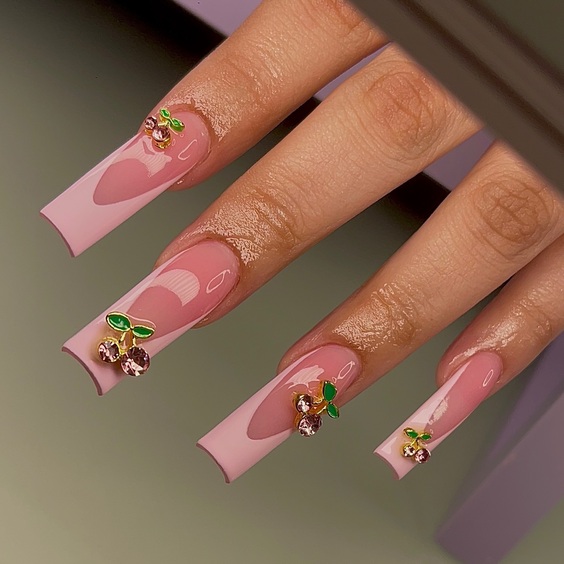
Professional Opinion and Description: The light pink base provides a subtle yet chic backdrop for the vibrant cherry designs, while the addition of crystals adds a touch of luxury, making this manicure suitable for both daytime elegance and evening glamour.
Consumables Needed:
- Base coat: OPI Natural Nail Base Coat
- Pink polish: Essie “Minimalistic”
- Red polish for cherries: Essie “Russian Roulette”
- Green polish for leaves: OPI “Green-wich Village”
- Crystals and adhesive for application
- Top coat: Sally Hansen Diamond Strength Top Coat
DIY Instructions:
- Apply a base coat to protect your nails.
- Paint the nails with “Minimalistic” to achieve a smooth, pink canvas.
- Paint cherries with “Russian Roulette” and leaves with “Green-wich Village.”
- Carefully place crystals at the nail tips using adhesive.
- Finish with a top coat to secure the embellishments and enhance the overall shine.
Playful Party Nails with Cherry and Smiley Faces
Embrace a fun and festive vibe with these colorful nails, adorned with cherry designs, smiley faces, and a variety of playful patterns, ideal for parties or cheerful summer days.
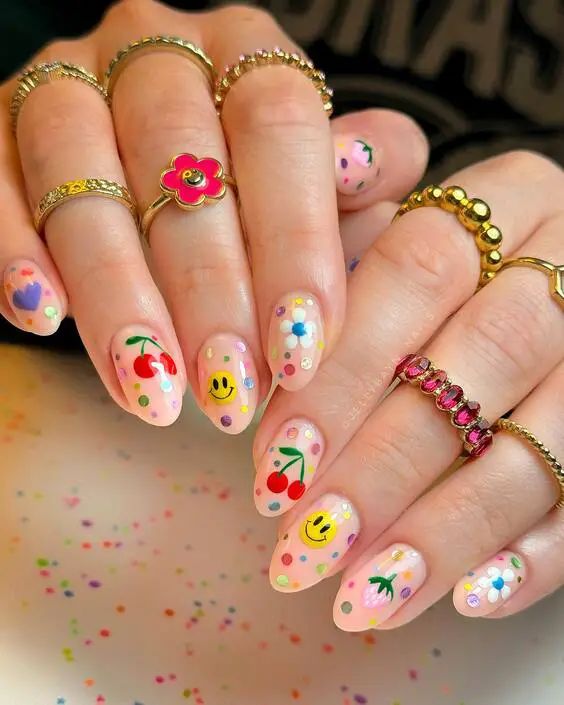
Professional Opinion and Description: This design incorporates a pastel palette with creative motifs, offering a youthful and vibrant look. The inclusion of smiley faces and cherries makes these nails a conversation starter and adds a whimsical touch to any outfit.
Consumables Needed:
- Base coat: Deborah Lippmann Hard Rock
- Pastel polishes: Various shades from OPI Pastel Collection
- Red polish for cherries: Essie “Watermelon”
- Black polish for details: Sally Hansen “Black Out”
- Top coat: CND Vinylux Long Wear Top Coat
DIY Instructions:
- Start with a strong base coat to protect the nails.
- Apply a different pastel shade to each nail.
- Use “Watermelon” to add cherry designs and “Black Out” for smiley faces and other details.
- Finish with a top coat for durability and a glossy appearance.
Edgy Casino-Themed Nails with Cherry Accents
For those who love a touch of daring style, these casino-themed nails feature card suits, dice, and bold cherry accents, perfect for a night out or a themed party.
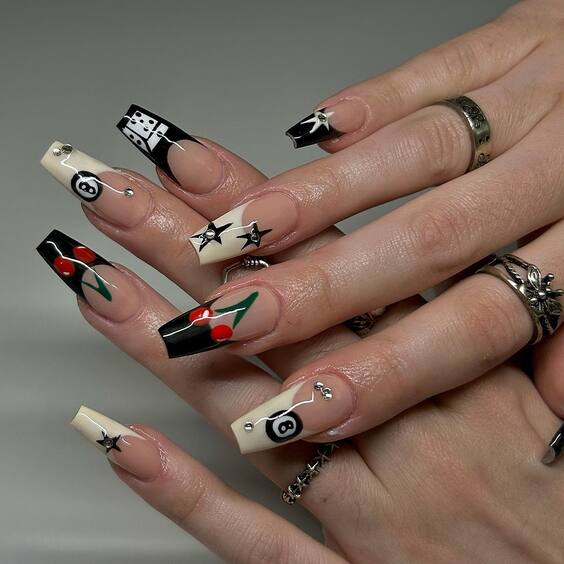
Professional Opinion and Description: The monochrome base with thematic elements like cards and dice is enhanced by bright cherry accents, offering an edgy yet playful manicure option. This design is sure to draw attention and complement a bold personality.
Consumables Needed:
- Base coat: Essie “Grow Stronger”
- White polish: Essie “Blanc”
- Red and black polishes for details: OPI “Big Apple Red” and “Black Onyx”
- Green polish for cherry stems: China Glaze “In the Limelight”
- Top coat: Seche Vite Dry Fast Top Coat
DIY Instructions:
- Apply a base coat to ensure nail health.
- Paint the base with “Blanc.”
- Hand-paint card suits, dice, and cherries using “Big Apple Red,” “Black Onyx,” and “In the Limelight.”
- Seal your design with a fast-drying top coat to protect and add shine.

