
Are your nails ready to say goodbye to summer with a splash of style? Whether you’re looking for a subtle nod to the fading warm days or a vibrant celebration of the season’s last hurrah, our collection of end of summer nails ideas will inspire you. What better way to transition into the cooler days ahead than with a fresh manicure that captures the essence of summer with a twist? From the simplicity of ocean blues to the excitement of colorful art, discover how each design can reflect your personal style and the seasonal shift.
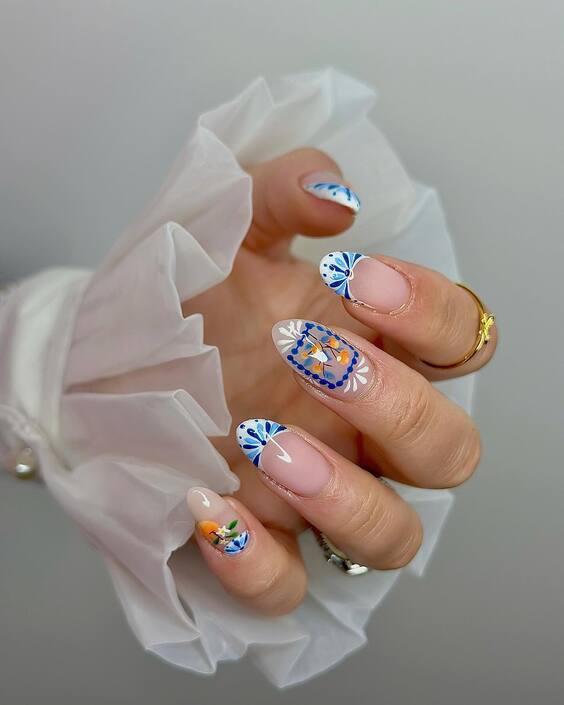
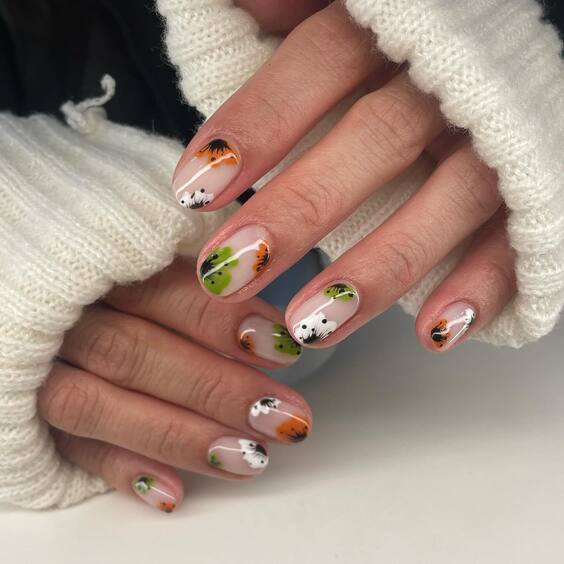
Elegant Pastel Flair
Delicate and dreamy, this manicure embodies the gentle transition from summer to fall. The soft pastel base paired with bold, graphic patterns offers a refreshing twist on classic end of summer nails. The design features intricate floral and geometric accents in a palette of serene blues and vibrant oranges, perfect for capturing the whimsical days of late summer.
Materials Needed
- Base coat: Essie First Base
- Pastel polish: OPI ‘It’s a Boy!’
- Orange polish: Sally Hansen ‘Sun Kissed’
- Blue polish: China Glaze ‘Capacity to See Beyond’
- Top coat: Seche Vite Dry Fast
- Nail art brushes
- Dotting tools
DIY Tips Start with a clean, prepped nail and apply a base coat for protection. Once dry, layer on the pastel polish as your base color. Using a fine nail art brush, create the floral patterns with the orange polish. For the geometric details, use a different brush or a dotting tool dipped in blue polish. Seal your artwork with a top coat for a glossy finish and extended wear.
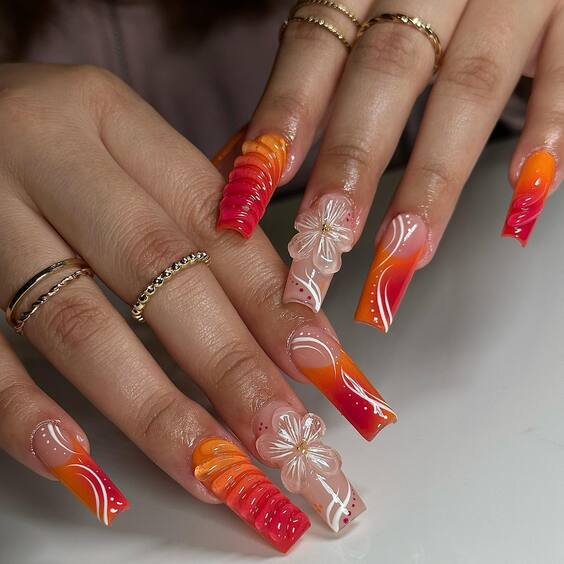
Sunset Ombré Waves
This design is a fiery representation of a summer sunset, blending hot pinks and deep oranges in a flawless ombré effect. Accentuated with delicate white waves, these end of summer nails ideas are a vibrant way to keep the spirit of summer alive.
Materials Needed
- Base coat: CND Sticky Base
- Pink polish: Essie ‘Watermelon’
- Orange polish: OPI ‘Hot & Spicy’
- White polish: Zoya ‘Snow White’
- Sponge for ombré effect
- Fine brush for detailing
- Top coat: CND Super Shiny
DIY Tips Apply your base coat to protect your nails. For the ombré effect, apply pink and orange polish in side-by-side stripes on a sponge and dab onto the nail until satisfied with the color blend. Use a fine brush to draw the waves with white polish. Finish with a top coat for a smooth, long-lasting look.
Tropical Neon Splash
Bright, bold, and utterly playful, these nails make a statement with their neon hues and tropical patterns. Ideal for an end of summer nails party, the design includes pops of neon pink, green, and yellow, accented with black details to enhance the tropical theme.

Materials Needed
- Base coat: Orly Bonder
- Neon pink polish: China Glaze ‘Pool Party’
- Neon green polish: Orly ‘Glowstick’
- Neon yellow polish: Essie ‘Short Shorts’
- Black polish for detailing: Sinful Colors ‘Black on Black’
- Top coat: Sally Hansen Insta-Dri
DIY Tips Prepare your nails with a base coat. Apply two coats of neon pink as the base color. With a thin brush, create tropical patterns using neon green and yellow. Outline or add details with black polish to define the designs. Finish with a quick-dry top coat to lock in the color and add shine.
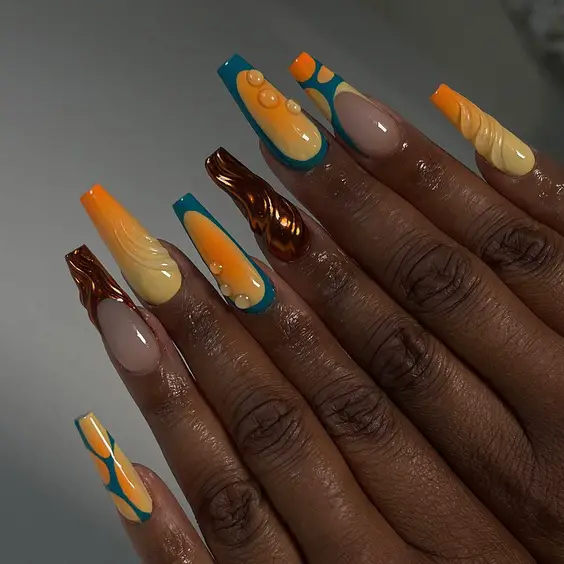
Fluid Art Magic
This vibrant design is a mesmerizing mix of fluid art and sleek geometry. The bold orange and soft yellow swirls are perfectly framed by turquoise outlines, creating a look that’s as dynamic as a late summer sunset. These end of summer nails acrylic showcase a beautiful interplay between color and form, ideal for making a statement.
Materials Needed
- Base coat: Orly Bonder
- Orange polish: Essie ‘Tangerine’
- Yellow polish: China Glaze ‘Lemon Fizz’
- Turquoise polish: OPI ‘Can’t Find My Czechbook’
- Top coat: Revlon Extra Life No Chip
- Striping tape
- Detailing brush
DIY Tips Begin with a base coat to protect your nails. Apply a layer of orange polish as the base. Once dry, add yellow polish in a swirling pattern. Use striping tape to create precise turquoise borders. Finish with a high-gloss top coat to enhance the design’s vibrancy and longevity.
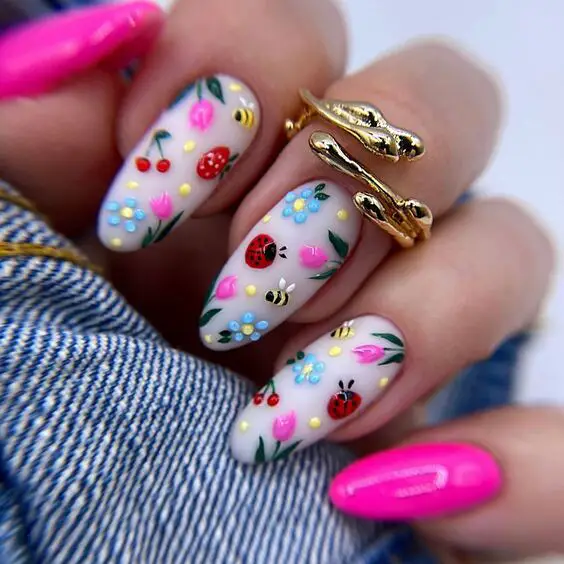
Cottagecore Dream
These nails are a picturesque portrayal of the cottagecore aesthetic, adorned with hand-painted florals and tiny insect details. The design’s pastel background with vibrant reds, blues, and yellows brings the bucolic charm right to your fingertips, perfect for those who love their end of summer nails to tell a story.
Materials Needed
- Base coat: Sally Hansen Miracle Cure
- White polish: Zoya ‘Purity’
- Acrylic paints: Various colors for detailed art
- Fine detail brush
- Top coat: Essie Good To Go
DIY Tips Start with a protective base coat, followed by a white polish for a neutral canvas. Use acrylic paints and a detail brush to hand-paint the floral and insect designs. Each element should be layered carefully to achieve depth and detail. Seal your artwork with a fast-drying top coat for durability and shine.
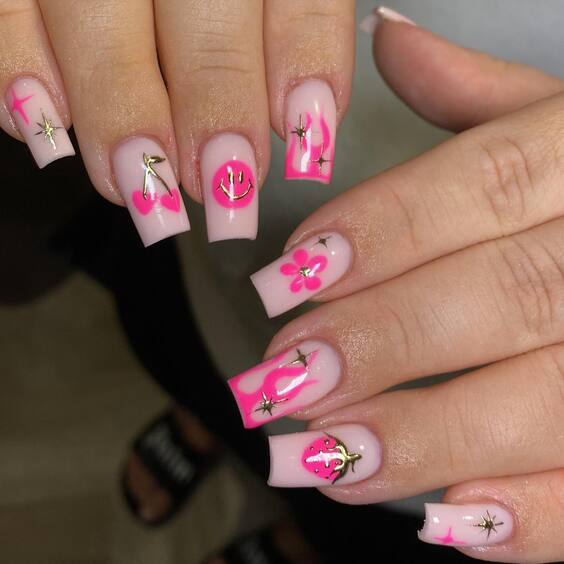
Pink Euphoria
Capturing the essence of youthful exuberance, these end of summer nails color gel are a blend of vibrant pink shades, adorned with creative decals like stars, hearts, and flowers. This design is all about celebrating the playful side of summer with a touch of whimsy.
Materials Needed
- Base coat: OPI Natural Base Coat
- Pink gel polish: Gelish ‘Molly’ for the gradient
- Nail decals: Stars, hearts, and flowers
- Nail adhesive
- Top coat: Gelish Top It Off
DIY Tips Apply a base coat to start. For the gradient effect, use a sponge to blend various shades of pink gel polish on the nail. Apply decals using a tiny dab of nail adhesive. Cure under a UV lamp after each layer and finish with a glossy top coat to seal the decals and enhance the overall look.
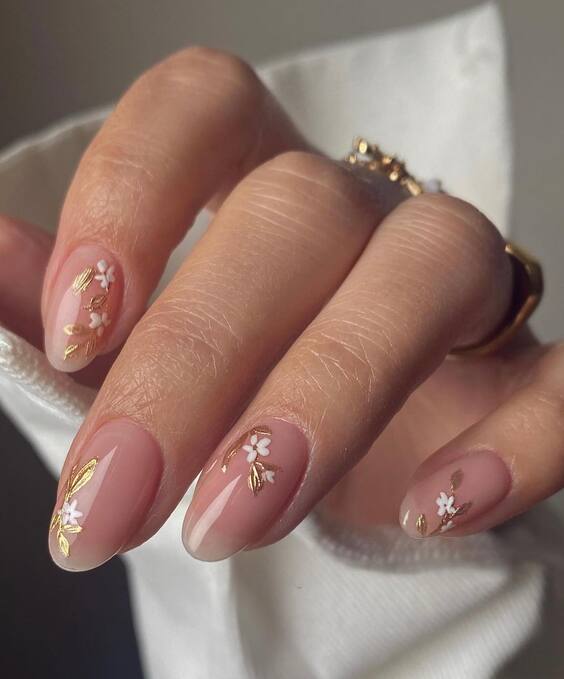
Subtle Elegance
This nail design epitomizes understated elegance with its transparent base and delicate gold floral accents. Perfect for those who prefer a subtle yet sophisticated look, these nails are an ideal choice for celebrating the serene end of summer. The minimalistic approach with golden touches adds just the right amount of flair to your end of summer nails.
Materials Needed
- Base coat: Butter London Nail Foundation
- Clear polish: OPI ‘Don’t Touch My Tutu!’
- Gold foil or gold nail polish for details: Essie ‘Good as Gold’
- Fine detail brush
- Top coat: OPI Top Coat
DIY Tips Start by applying a smooth layer of base coat. Add a coat of clear polish for a clean, glossy surface. Using a fine detail brush, apply gold foil or gold polish to create delicate floral patterns. Finish with a durable top coat to ensure your design lasts as long as your end-of-summer adventures.
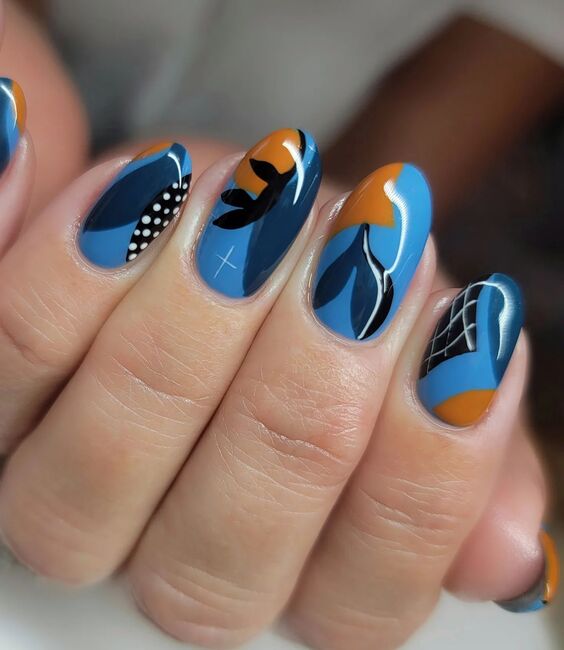
Abstract Artistry
Dynamic and artistic, this design features a captivating mix of blue, black, and orange with abstract shapes and detailed accents. It’s a bold statement piece that reflects the vibrant energy of summer’s final days. This look is perfect for those who love to express their personality through their end of summer nails.
Materials Needed
- Base coat: Essie ‘Grow Stronger’
- Blue polish: China Glaze ‘Too Yacht to Handle’
- Black polish: Sally Hansen ‘Black Out’
- Orange polish: Orly ‘Melt Your Popsicle’
- Dotting tools and striping tape
- Top coat: Seche Vite Dry Fast Top Coat
DIY Tips Apply your base coat for strength and protection. Layer the base color in blue. Use striping tape to mark off areas for black and orange sections. Fill these sections carefully with the respective colors. Utilize dotting tools for added detail. Seal everything with a fast-drying top coat for a smooth, glossy finish.
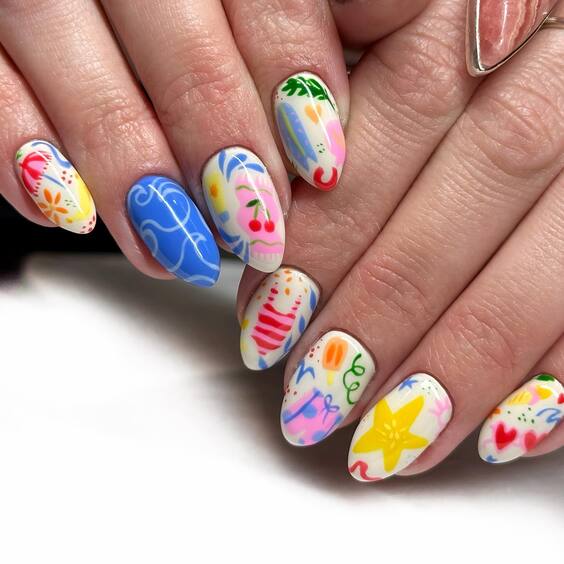
Festival of Colors
Celebrating the spectrum of summer, this colorful design is a festival on your fingertips. Featuring an array of vivid hues and playful patterns, these nails are designed for the bold and spirited. Ideal for a closing summer party, these end of summer nails ideas 2024 encapsulate the joy and freedom of the season.
Materials Needed
- Base coat: Revlon Quick Dry Base Coat
- White polish as base: Essie ‘Blanc’
- Various colored polishes for designs: OPI Color Paints Collection
- Detailing brushes
- Top coat: Sally Hansen Mega Shine
DIY Tips Begin with a base coat to protect your nails. Apply a white polish as the base to make the colors pop. Use different colored polishes to freehand the various designs, utilizing detailing brushes for precision. Allow each color to dry slightly before applying the next to avoid smudging. Finish with a protective top coat to maintain the vibrancy of your design.
Floral Whispers
The epitome of grace, these nails feature a translucent base adorned with vibrant orange flowers and delicate green foliage, giving the impression of a serene garden on your fingertips. This design is perfect for those who appreciate a natural and subtle end of summer nails style, combining the beauty of flora with artful elegance.
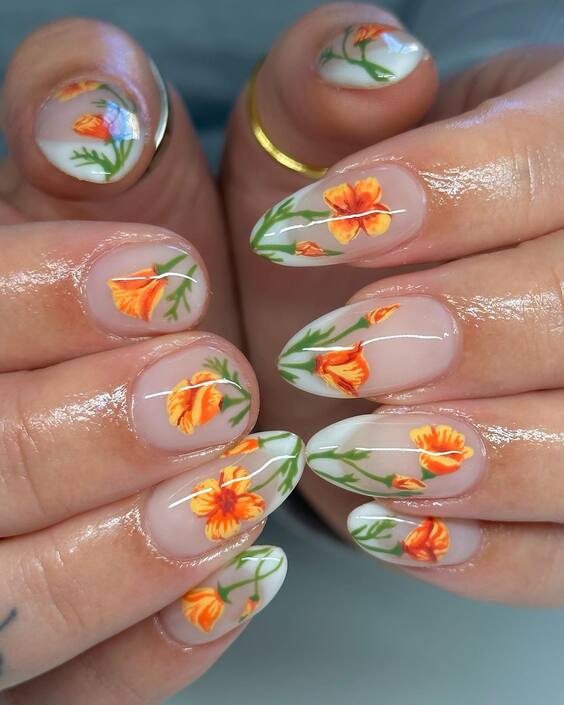
Materials Needed
- Base coat: Zoya Anchor Base Coat
- Sheer pink polish: Essie ‘Ballet Slippers’
- Orange and green acrylic paints for floral art
- Fine detailing brush
- Top coat: OPI High Gloss Top Coat
DIY Tips Apply the base coat to protect your nails. Next, use the sheer pink polish for a natural, clean look. With fine detailing brushes, paint the orange blossoms and green leaves. This design requires a steady hand and a bit of artistic flair. Seal with a high gloss top coat to enhance the colors and ensure durability.
Playful Pastels
This playful and charming design blends soft pastel tones with vivid floral and geometric patterns, creating a cheerful and youthful look. Perfect for capturing the carefree spirit of the final summer days, these nails mix simplicity with creativity, featuring end of summer nails ideas that are both cute and trendy.

Materials Needed
- Base coat: Sally Hansen Hard as Nails
- Pastel polishes: Various shades (light pink, sky blue, mint green)
- White polish for detailing
- Fine brushes for intricate designs
- Top coat: Essie Gel Setter
DIY Tips Start with a base coat to strengthen your nails. Apply a light pink polish as the base. Use other pastel polishes to add geometric and floral designs. White polish can help highlight these patterns. Apply each color one at a time, allowing them to dry to prevent smudging. Finish with a gel-like top coat for a glossy and lasting finish.
Liquid Dreams
These nails are a true work of art, featuring a mesmerizing swirl of colors that resemble a fluid painting. Adorned with gemstone embellishments and gold rings, this design is perfect for those who want to make a bold statement. These end of summer nails acrylic are ideal for anyone looking to stand out at a season-ending celebration.
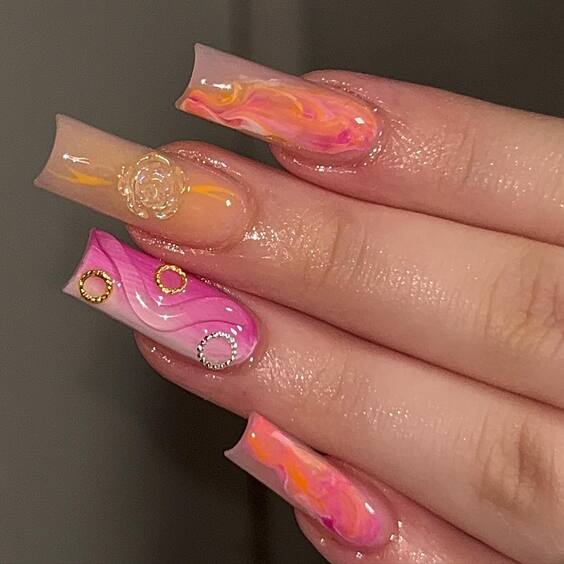
Materials Needed
- Base coat: CND Stickey Base Coat
- Neon pink and orange gel polish for the base swirl
- Clear gel for encapsulating
- Rhinestones and gold ring embellishments
- Fine detail brush
- Top coat: CND Super Shiney Top Coat
DIY Tips Apply a sticky base coat to ensure all layers adhere properly. Begin with a base layer of neon pink and orange gel polish, blending them on the nail for a fluid look. Use a clear gel over the top to create a smooth, dome-like finish. While the clear gel is still tacky, carefully place rhinestones and gold ring embellishments. Cure under a UV light and seal with a super shiny top coat for extra gloss and protection.
Lime Light
These nails bring a burst of vibrant lime green tips to an otherwise classic French manicure, adding a modern twist to a timeless style. This design is perfect for those who wish to hold onto the brightness of summer while stepping into a new season. The clear, sharp contrast with the natural nail base epitomizes the fresh feel of end of summer nails.
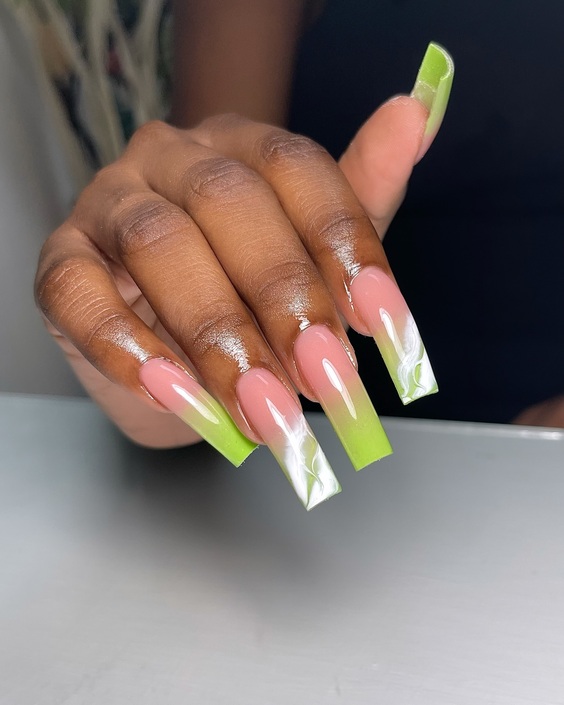
Materials Needed
- Base coat: OPI Natural Nail Base Coat
- Natural pink polish: Essie ‘Mademoiselle’
- Lime green polish: China Glaze ‘I’m With the Lifeguard’
- Top coat: Essie ‘Speed Setter’
DIY Tips Start with a clean, prepped nail and a base coat. Apply two coats of a natural pink polish for a subtle pink hue. Carefully paint the tips with vibrant lime green polish, creating a crisp edge for the French tip design. Seal the look with a fast-drying top coat for a glossy finish and extended wear.
Tropical Blossom
Featuring vivid pink blossoms on a pale yellow background, this nail design is a tropical delight. It’s perfect for extending the summer vibe into the cooler months. The floral pattern is not only eye-catching but also artistically detailed, making it a fantastic choice for anyone looking to express their love for end of summer nails color and art.
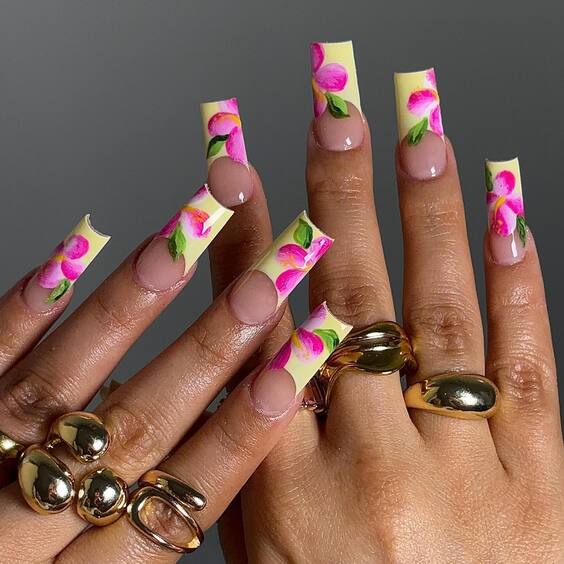
Materials Needed
- Base coat: CND Stickey
- Pale yellow polish: OPI ‘Need Sunglasses?’
- Pink and green acrylic paint for blossoms and leaves
- Fine detailing brush
- Top coat: Sally Hansen Insta-Dri
DIY Tips Begin with a base coat to protect your nails. Apply the pale yellow polish as the base color. Using fine detailing brushes, create pink tropical blossoms and green foliage. The key is to layer the paint for a more vibrant and dimensional look. Finish with a quick-drying top coat to protect your design and add shine.
Aqua Dreams
These nails feature a smooth, glossy teal color that mimics the serene waters of a tropical getaway. Perfect for those who prefer a more uniform look but still want a pop of summer color. The solid color design is simple yet elegant, making it a versatile choice for end of summer nails ideas.
Materials Needed
- Base coat: Essie ‘Grow Stronger’
- Teal polish: China Glaze ‘Aquadelic’
- Top coat: OPI ‘Top Coat’
DIY Tips Ensure your nails are clean and apply a strengthening base coat. Paint two coats of teal polish for a deep, opaque finish. Each layer should be allowed to dry completely to avoid smudging. Finish with a protective top coat to enhance the shine and prolong the durability of your manicure.
Enchanted Garden
These nails are a dazzling display of creativity, featuring a deep blue base embellished with intricate white floral patterns and sparkling accents. Each nail is a canvas for miniature art, adorned with butterflies and delicate flowers, making it a perfect choice for those who appreciate end of summer nails with a touch of whimsy and elegance.
Materials Needed
- Base coat: Orly Rubberized Base
- Deep blue polish: Essie ‘After School Boy Blazer’
- White acrylic paint for floral details
- Rhinestones and butterfly decals
- Top coat: INM Out the Door
DIY Tips Start with a rubberized base coat for a smooth foundation. Apply the deep blue polish as the base color. Use a fine brush and white acrylic paint to create detailed floral and butterfly patterns. Adorn with rhinestones and decals for added dimension and sparkle. Seal with a fast-drying top coat to protect your detailed work.
Blossom Delight
This design is a celebration of spring in the midst of summer’s end. The nails feature a sheer pink base with 3D pink blossoms that seem to bloom right off the nails. Each flower is centered with golden studs, adding an exquisite touch to these already stunning end of summer nails.
Materials Needed
- Base coat: Essie ‘All in One’
- Sheer pink polish: OPI ‘Bubble Bath’
- Pink resin for 3D flowers
- Gold studs
- Top coat: Seche Vite Dry Fast
DIY Tips Apply a base coat to protect the nails. Paint a sheer pink base to create a subtle, natural look. Use pink resin to mold 3D flowers directly on the nails. Place a gold stud at the center of each blossom before the resin sets. Finish with a layer of top coat to ensure longevity and enhance the glossy finish.
Whimsical Waves
Whimsical and colorful, these nails blend pink and blue swirls with golden accents, creating a dreamlike effect. This design is perfect for expressing a fun and artistic side while transitioning from the vibrant summer to the more subdued tones of fall. These end of summer nails capture the playful spirit of summer with a sophisticated twist.
Materials Needed
- Base coat: CND Sticky Base Coat
- Pink and blue gel polishes for the swirls
- Gold leaf for accents
- Top coat: Gelish Top It Off
DIY Tips Begin with a sticky base coat for optimal polish adherence. Apply pink and blue gel polishes, swirling them together while still wet to create a marbled effect. Add small pieces of gold leaf for a touch of luxury. Cure under a UV lamp, and seal with a gel top coat for a durable, glossy finish.
Olive Tones & Metallic Swirls
This design showcases an innovative use of olive green tones paired with metallic swirls, creating a sophisticated and modern look. The geometric shaping of the swirls on each nail provides a unique aesthetic that’s both contemporary and stylish. These nails are perfect for anyone looking to make a bold statement with their end of summer nails.
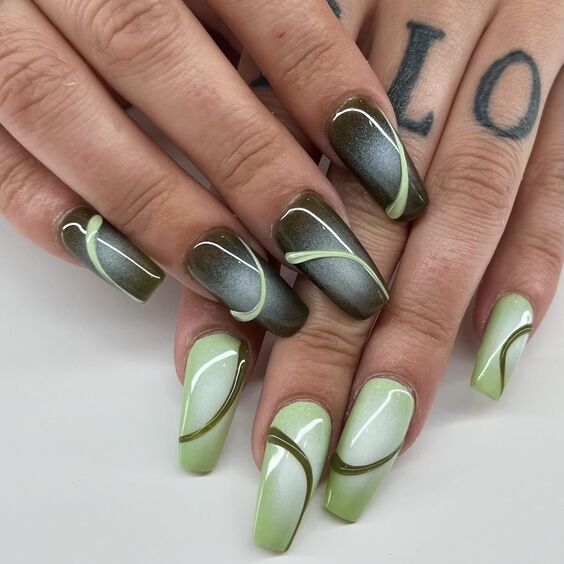
Materials Needed
- Base coat: Essie ‘Grow Stronger’
- Olive green polish: OPI ‘Suzi – The First Lady of Nails’
- Metallic silver polish: Sally Hansen ‘Celeb City’
- Top coat: OPI ‘Top Coat’
- Striping tape for precise lines
DIY Tips Apply a base coat to protect your nails and ensure a smooth application. Paint the base with olive green polish. Once dry, use striping tape to outline the areas for metallic swirls. Apply metallic silver polish within these areas. Carefully remove the tape before the polish dries to ensure clean lines. Finish with a top coat for a glossy effect and extended wear.
Jungle Glam
Embrace your wild side with these vibrant jungle-inspired nails. The design features a mix of green tones with bold animal prints and golden chain embellishments, making it a stunning choice for end-of-summer gatherings. This look is all about fun and flair, combining end of summer nails color with adventurous patterns.

Materials Needed
- Base coat: CND Stickey Base Coat
- Light green and dark green polish: Essie ‘Mojito Madness’ and ‘Off Tropic’
- Gold polish for detailing: Essie ‘Good as Gold’
- Gold chain embellishments
- Top coat: Seche Vite Dry Fast
DIY Tips Start with a sticky base coat for longevity. Apply a gradient of light and dark green polishes for the jungle background. Use gold polish to add animal print details. Attach gold chain embellishments with nail glue for a 3D effect. Finish with a quick-dry top coat to seal the design and add shine.
Autumn Transition
Perfect for transitioning into the cooler seasons, these nails blend autumnal orange tones with hints of green, capturing the essence of fall while reminiscing about summer. The intricate leaf and animal patterns offer a playful yet elegant vibe, suitable for both everyday wear and special occasions.
Materials Needed
- Base coat: Orly Bonder Rubberized Basecoat
- Orange and green polishes: China Glaze ‘Peachy Keen’ and ‘Starboard’
- White polish for detailing: Essie ‘Blanc’
- Top coat: INM Out the Door
DIY Tips Apply a rubberized base coat to prevent chipping. Use orange polish as the base, and add green accents. With a fine brush and white polish, create detailed leaf and animal patterns to enhance the thematic design. Conclude with a high-quality top coat for durability and a smooth finish.
Sunset Marbles
Capturing the vibrant, fluid colors of a sunset, these nails are a swirl of warm oranges, deep reds, and gentle pinks, mimicking the mesmerizing colors of the sky as the sun dips below the horizon. The glossy, marbled effect is achieved through a clever technique that blends these colors while still wet, creating a seamless transition across each nail. This design is perfect for holding onto the last warm hues of summer as we transition into autumn.

Materials Needed
- Base coat: Deborah Lippmann Gel Lab Pro Base Coat
- Orange, red, and pink polishes: Essie ‘At the Helm’, ‘Russian Roulette’, and ‘Muchi, Muchi’
- Dotting tool or toothpick for marbling
- Top coat: Deborah Lippmann Gel Lab Pro Top Coat
DIY Tips Begin by applying a base coat to protect your nails. Then, while the base is still tacky, drop small beads of orange, red, and pink polish onto the nail. Using a dotting tool or toothpick, gently swirl the colors together to create the marbled effect. Work quickly to blend the colors before they dry. Finish with a top coat to enhance the shine and ensure the longevity of your design.
Conclusion
As summer fades and autumn approaches, your nails can still celebrate the vibrant colors and playful spirit of the warmer months. Each of these end of summer nails designs offers a unique way to express your style, whether through intricate patterns, bold color combinations, or subtle elegance. Embrace these creative ideas and let your nails make a statement during the seasonal transition!
