23 Stunning Summer Almond Shape Nails: Trendy Designs for 2024
Are you ready to dazzle this summer with the most fashionable nail designs? Whether you’re lounging by the pool, enjoying a summer night out, or just want to add a splash of fun to your daily look, almond shaped nails are the way to go. But what makes almond shape nails a cut above the rest for this sunny season? Let’s explore some stunning designs that not only capture the essence of summer but also offer a chic sophistication to your style.
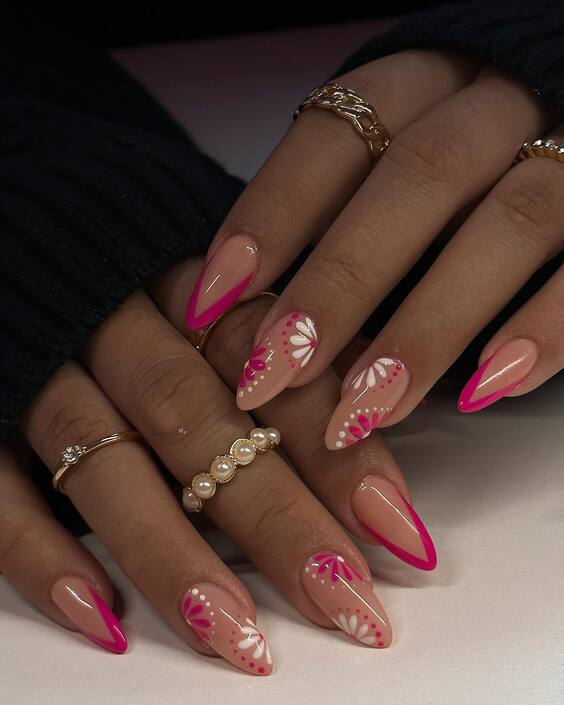
Vibrant Pink with Floral Artistry
The first design features a stunning almond-shaped nail in a vibrant pink hue, which instantly grabs attention. The artistry is meticulous, with delicate white floral patterns adorning the ring fingers. This design is perfect for those who appreciate a pop of color combined with subtle elegance. The glossy finish not only enhances the visual appeal but also adds a touch of sophistication.
Consumables List
- Base coat: OPI Natural Nail Base Coat
- Pink polish: Essie “Watermelon”
- White polish for detailing: Sally Hansen “White On”
- Top coat: Seche Vite Dry Fast Top Coat
- Dotting tools and fine brushes for the floral design
DIY Instructions Start with a clean, prepped nail with a base coat to protect your natural nails. Apply two coats of the pink polish, letting it dry completely. Using a fine brush, create the floral designs on the ring fingers. Start with simple dots to form the flowers, then use thin strokes to draw petals. Seal your artwork with a fast-drying top coat for a glossy finish and added durability.
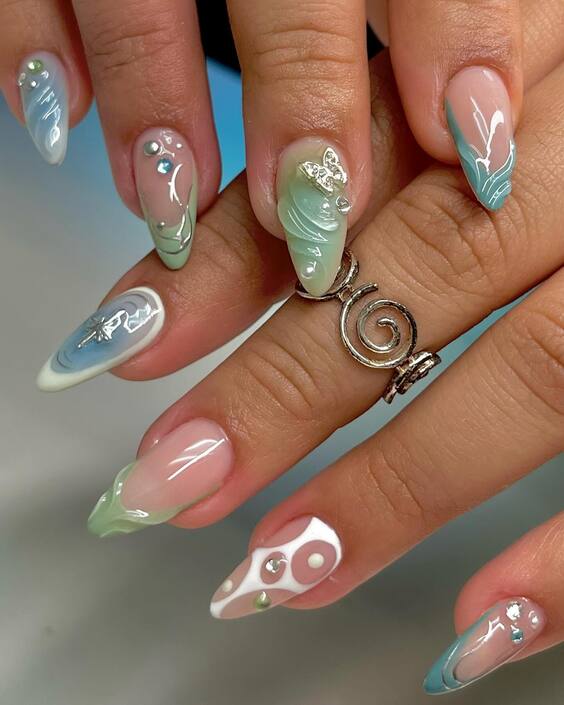
Serene Green with Metallic Accents
This nail design brings a serene green base with soft transitions to pale blue at the tips, reminiscent of a clear summer sky. Metallic accents and a whimsical swirl pattern on select nails add an enchanting touch. This look is ideal for those seeking a unique, yet understated elegance in their summer nail designs.
Consumables List
- Base coat: CND Stickey Base Coat
- Green polish: China Glaze “Re-fresh Mint”
- Blue polish: China Glaze “For Audrey”
- Metallic silver polish: Revlon “Silver Dollar”
- Top coat: Seche Vite Dry Fast Top Coat
- Thin brush and sponge for gradient effect
DIY Instructions Apply a base coat to protect the nails. For the gradient effect, apply the green polish as the base layer. While still slightly wet, use a sponge to dab the blue polish starting from the tip, blending it toward the middle. Use a thin brush to add metallic swirls on alternating nails. Finish with a top coat for a smooth, lasting finish.
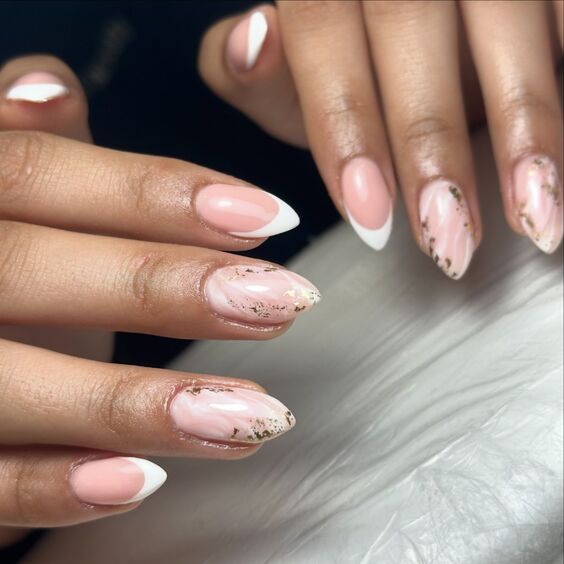
Sophisticated Nude with Golden Flakes
The elegance of nude almond-shaped nails is undeniable, and this design elevates it with the addition of gold flakes and white accents. The look is sophisticated and perfectly suited for any summer occasion, providing a chic complement to any outfit.
Consumables List
- Base coat: Essie “Here to Stay”
- Nude polish: OPI “Samoan Sand”
- Gold leaf flakes
- White polish: Sally Hansen “White On”
- Top coat: Seche Vite Dry Fast Top Coat
- Tweezers and a fine brush
DIY Instructions Begin with a base coat to ensure longevity. Apply two coats of the nude polish. Carefully place gold flakes on the nails using tweezers for precision. Add minimal white accents to enhance the design. Seal everything with a top coat for a glossy, durable finish.
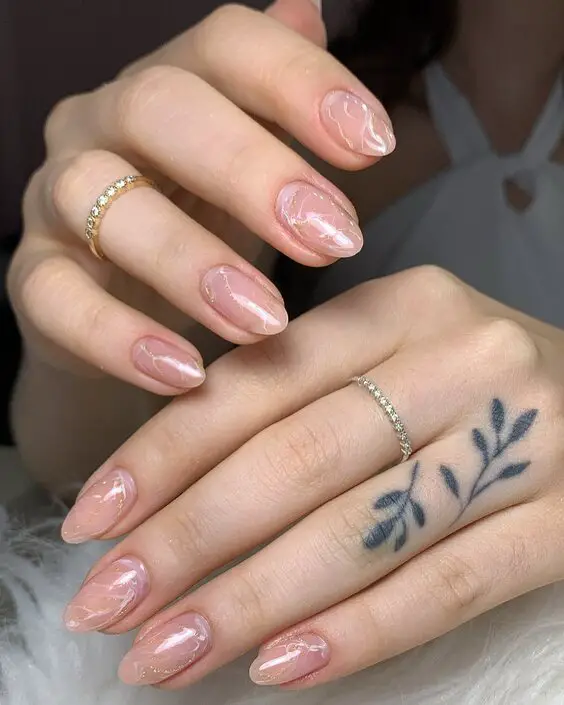
Elegant Marbled Pink Sheer
This design epitomizes understated elegance with its soft, pink sheer background and white marbled effect, creating a look of delicate swirls like fine porcelain. Perfect for both casual brunches and formal gatherings, these nails add a touch of class without overwhelming the overall outfit.
Consumables List
- Base coat: Essie “Grow Stronger”
- Pink sheer polish: OPI “Bubble Bath”
- White marbling polish: Essie “Blanc”
- Top coat: Seche Vite Dry Fast Top Coat
- Detailing brush
DIY Instructions Start by applying a base coat to protect your nails. Apply two coats of the pink sheer polish, allowing each to dry thoroughly. Dip your detailing brush in white polish and gently drag it across your nails to create the marbled effect. Finish with a durable top coat for a glossy, long-lasting finish.
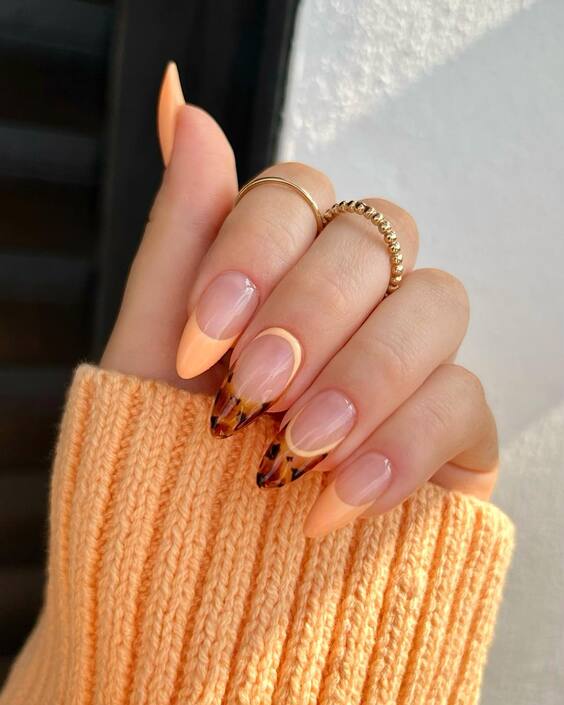
Autumnal Flair with Bold Tips
Transitioning from the typical summer vibes, this design introduces an autumnal flair with its almond shape. The nails are coated in a warm, nude base while the tips are dramatically accented with a bold, leopard print pattern. This style is for those who dare to be different and make a bold statement.
Consumables List
- Base coat: CND Stickey Base Coat
- Nude polish: OPI “Samoan Sand”
- Leopard print colors: Black and gold polish
- Top coat: Seche Vite Dry Fast Top Coat
- Detailing brush and dotting tool
DIY Instructions Apply a base coat for nail protection. Paint your nails with the nude base color. For the leopard tips, apply a small blob of gold polish and then outline parts of each blob with black polish using a fine brush. Use a dotting tool for precision. Seal the design with a top coat to ensure it stands the test of time.
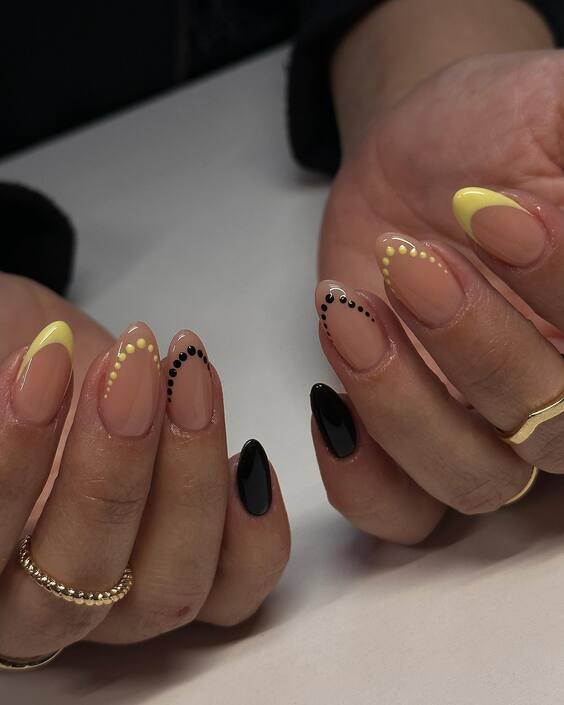
Playful Pastel Ombré with Polka Dots
This playful design blends soft pastel yellow fading into natural pink, topped with delicate black polka dots for a whimsical effect. It’s a fun, youthful look that’s perfect for summer festivals or a sunny day out.
Consumables List
- Base coat: OPI Natural Nail Base Coat
- Yellow polish: Sally Hansen “Mellow Yellow”
- Pink polish: Essie “Muchi, Muchi”
- Black polish for dots: China Glaze “Liquid Leather”
- Top coat: Seche Vite Dry Fast Top Coat
- Sponge for ombré effect and a fine dotting tool
DIY Instructions Begin with a base coat to protect the nail surface. Apply the yellow polish at the base of your nails. Use a sponge to apply the pink polish, blending it into the yellow to create an ombré effect. Once dry, use a dotting tool to add polka dots with the black polish. Finish with a top coat for a glossy look and extended wear.
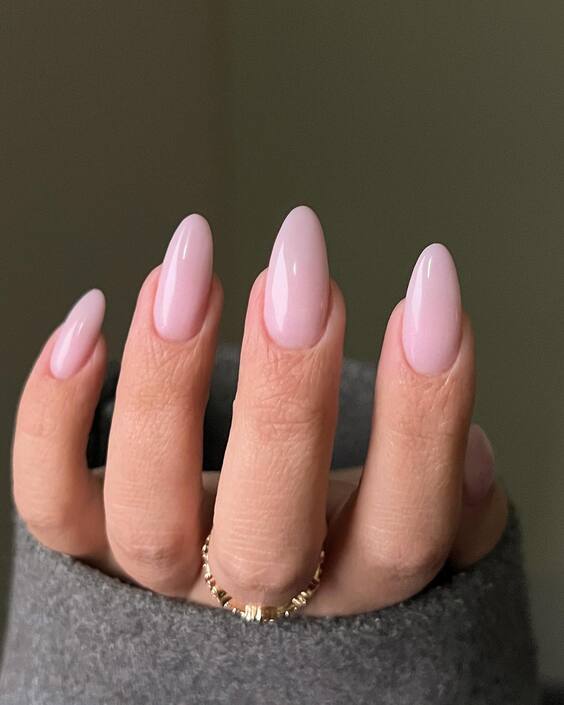
Classic Soft Pink Elegance
This set exemplifies the timeless beauty of soft pink nails in an almond shape, perfect for any summer occasion. The glossy finish adds a refined elegance, making it a versatile choice that pairs seamlessly with both casual and formal wear.
Consumables List
- Base coat: Essie “Grow Stronger”
- Soft pink polish: OPI “Put it in Neutral”
- Top coat: Seche Vite Dry Fast Top Coat
DIY Instructions Begin by applying a base coat to protect your nails. Follow with two coats of soft pink polish, ensuring each layer is thin to avoid smudging. Finish with a top coat for a glossy sheen and extended wear.
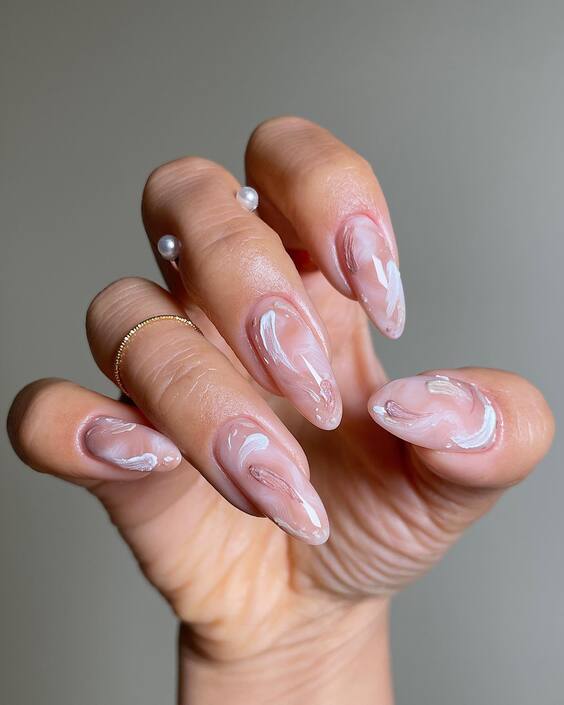
Artistic White Marble Swirls
These nails feature a stunning white marble design with swirls that look like abstract art. Each nail acts as a canvas displaying unique patterns, making this set a true piece of wearable art, ideal for those who love to stand out.
Consumables List
- Base coat: OPI Natural Nail Base Coat
- White polish: Essie “Blanc”
- Detailing brush
- Top coat: Seche Vite Dry Fast Top Coat
DIY Instructions Start with a base coat. Apply a layer of white polish as the background. While wet, use a detailing brush to swirl a slightly darker shade of white into the base to create a marble effect. Seal with a top coat for durability and shine.
Vibrant Summer Splash
This bold and vibrant design captures the playful spirit of summer with its array of hot pink, orange, and purple hues. The unique texture and the raised droplet effect add a dynamic dimension that is both eye-catching and stylish.
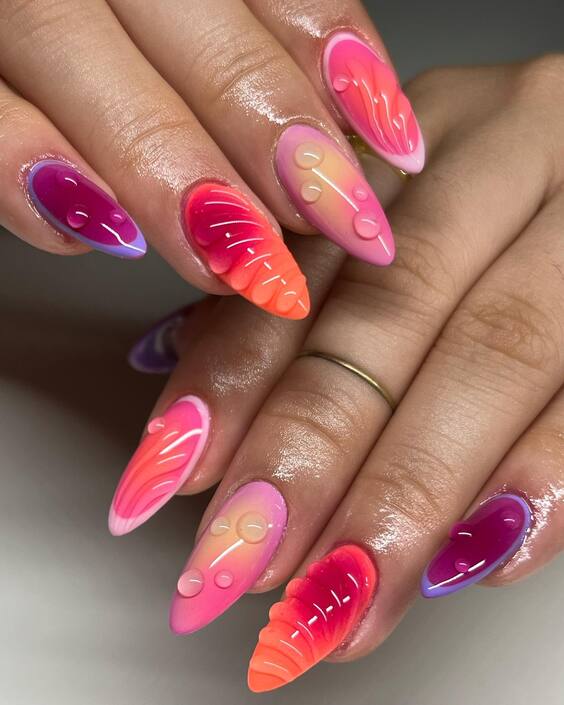
Consumables List
- Base coat: OPI Natural Nail Base Coat
- Colors: Neon pink, orange, and purple polishes
- 3D gel for droplet effect
- Top coat: UV top coat for curing
DIY Instructions Apply a base coat to prep the nails. Use the neon polishes to create a blended base of colors. While the base is still tacky, apply the 3D gel in droplets and cure under a UV lamp to achieve the raised effect. Finish with a UV top coat for a glossy and durable finish.
Minimalistic Chic with Geometric Accents
This design perfectly combines the simplicity of nude tones with bold geometric accents. The subtle addition of green gemstones on select nails provides a pop of color, making this style not only sophisticated but also playful. It’s a great choice for those who want a unique yet understated look.
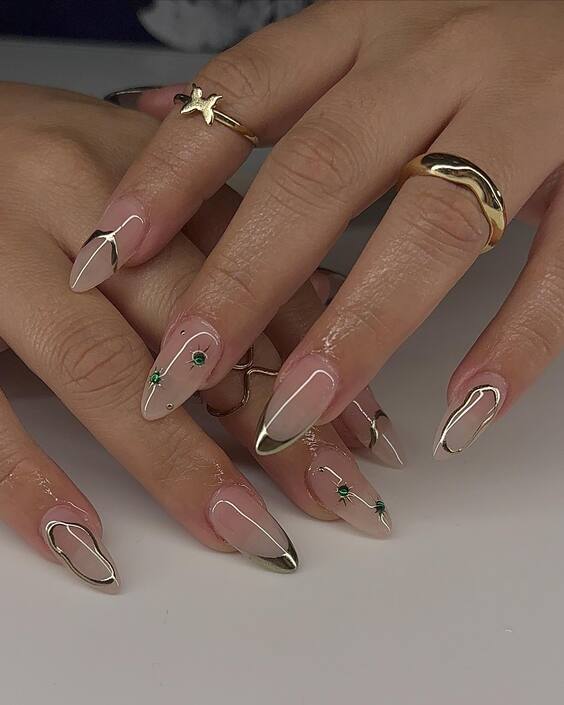
Consumables List
- Base coat: OPI Natural Nail Base Coat
- Nude polish: OPI “Bare My Soul”
- White polish for accents: Sally Hansen “White On”
- Green gemstones
- Top coat: Seche Vite Dry Fast Top Coat
- Tweezers for gemstone application
DIY Instructions Begin with a base coat to protect your nails. Apply two coats of nude polish for a clean base. Use white polish to create geometric designs. Carefully place green gemstones using tweezers for precision. Finish with a top coat to secure the gemstones and enhance durability.
Elegant Gold-Tipped Elegance
These nails scream elegance with a modern twist. The nude base paired with gold-tipped edges provides a luxurious feel, perfect for any high-end event or an elegant night out. The subtle leopard print on one finger adds an edgy touch to the overall sophisticated look.
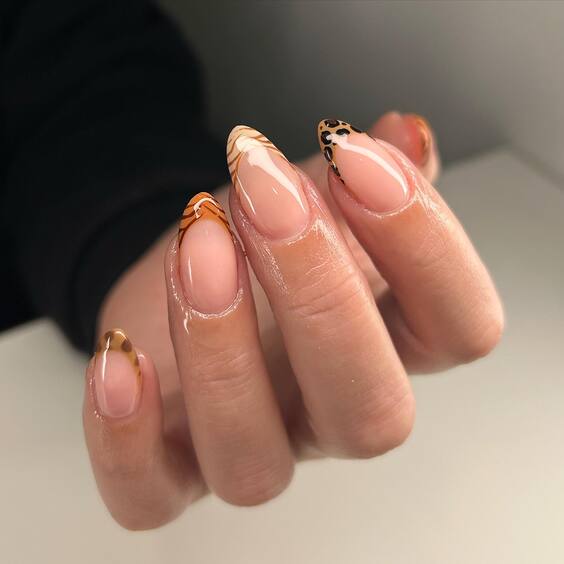
Consumables List
- Base coat: CND Stickey Base Coat
- Nude polish: OPI “Pale to the Chief”
- Gold polish for tips: Essie “Good as Gold”
- Black polish for leopard spots: OPI “Black Onyx”
- Top coat: Seche Vite Dry Fast Top Coat
DIY Instructions Apply a base coat to protect the nails. Paint a nude base on all nails. Use gold polish to carefully paint the tips. For the leopard print, add small spots of black polish on one finger. Finish with a top coat for a seamless and shiny look.
Playful Pastel Swirls with Golden Embellishments
This nail design features delightful pastel swirls that merge seamlessly with golden embellishments, creating a playful yet refined look. The soft pastel tones are perfect for summer, and the gold adds a touch of glamour, making this set a fabulous choice for seasonal festivities.
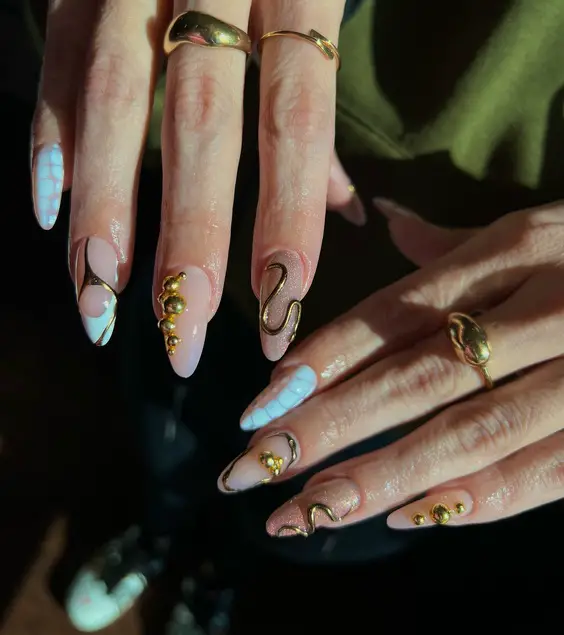
Consumables List
- Base coat: Essie “Here to Stay”
- Pastel polishes: Blue, pink, and lavender
- Gold embellishments
- Top coat: UV top coat for curing
- Fine brush for swirls
DIY Instructions Start with a base coat for protection. Apply a light pastel base color. Use a fine brush to add swirls of other pastel colors. While the polish is still wet, carefully place gold embellishments. Cure under a UV lamp and finish with a UV top coat for extra gloss and durability.
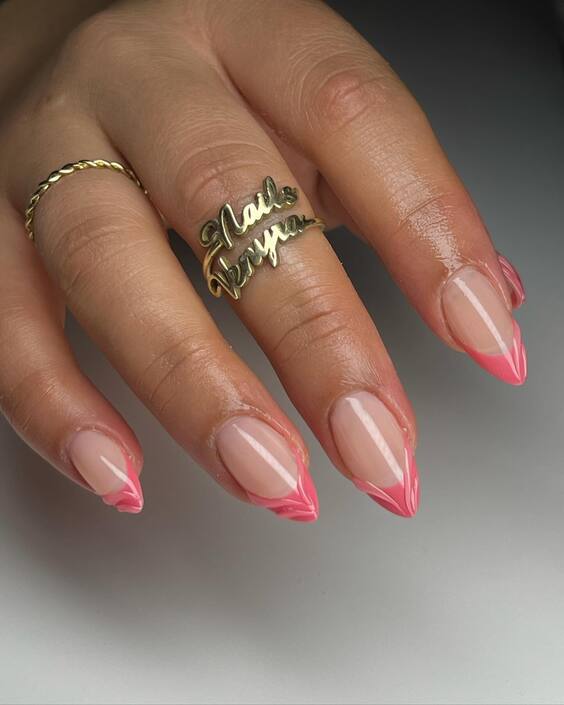
Subtle Pink Flames
This look combines a subtle nude base with vibrant pink flame accents at the tips, offering a fiery yet sophisticated aesthetic. The pink flames are meticulously crafted, providing a dynamic contrast that’s both eye-catching and stylish.
Consumables List
- Base coat: OPI Natural Nail Base Coat
- Nude polish: Essie “Topless & Barefoot”
- Pink polish for flames: Essie “Fiesta”
- Detailing brush
- Top coat: Seche Vite Dry Fast Top Coat
DIY Instructions Start with a protective base coat. Apply a smooth, even coat of the nude polish. Once dry, use a detailing brush to paint the pink flame designs starting from the tips. Carefully layer to ensure opacity and vibrancy. Seal with a top coat for a glossy finish and extended durability.
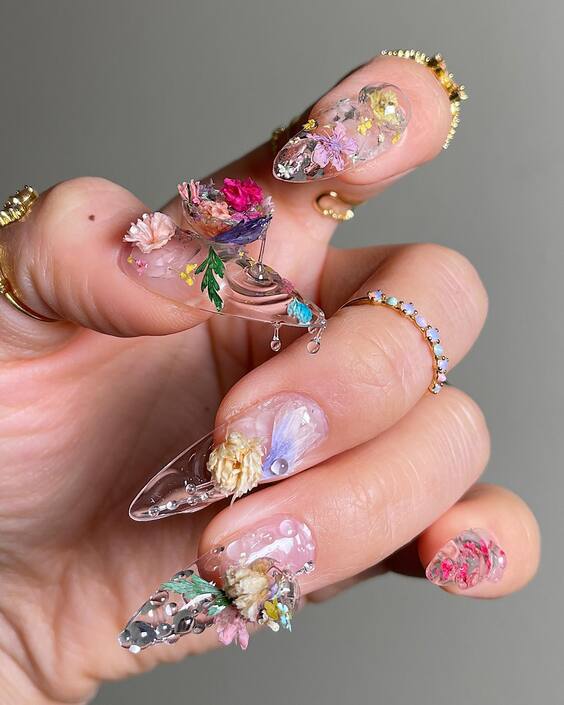
Enchanted Garden Encapsulated
These nails are a true masterpiece, featuring a unique encapsulation of real dried flowers and golden flakes within a clear acrylic. The design evokes a miniature enchanted garden, perfect for those who appreciate detailed, artful expressions in their manicure.
Consumables List
- Clear acrylic powder and liquid
- Dried flowers and golden flakes
- Encapsulation tools
- UV top coat for curing
DIY Instructions Prepare the nails with a base layer of clear acrylic. Before curing, strategically place dried flowers and golden flakes onto the tacky surface. Carefully encase with another layer of clear acrylic, ensuring the elements are fully embedded. Cure under UV light and finish with a UV top coat for brilliance and protection.
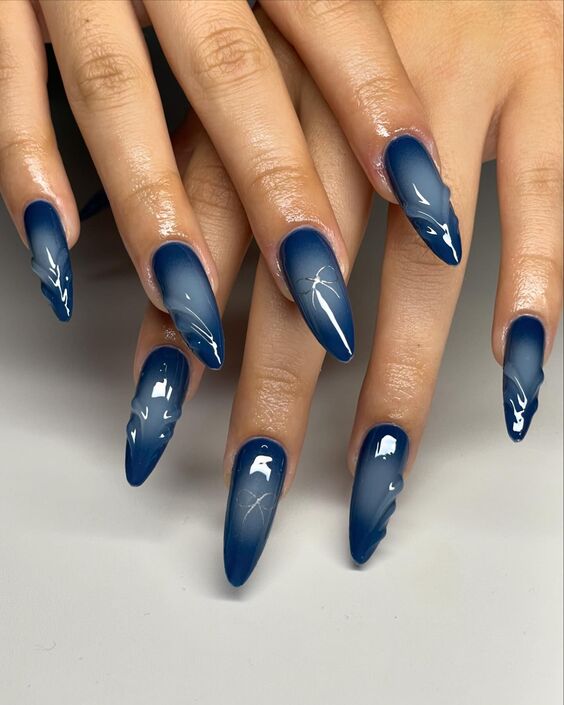
Deep Blue Lightning
This design features a deep blue base with striking white lightning bolts, creating a powerful and electrifying look. The glossy finish enhances the depth of the blue and makes the white bolts pop, perfect for a bold summer statement.
Consumables List
- Base coat: Essie “Grow Stronger”
- Deep blue polish: Sally Hansen “Blue My Mind”
- White polish for lightning bolts: OPI “Alpine Snow”
- Detailing brush
- Top coat: Seche Vite Dry Fast Top Coat
DIY Instructions Apply a base coat to protect your nails. Paint two coats of the deep blue polish as the background. Use a fine detailing brush to draw white lightning bolts across each nail. Finish with a glossy top coat to enhance the colors and ensure longevity.
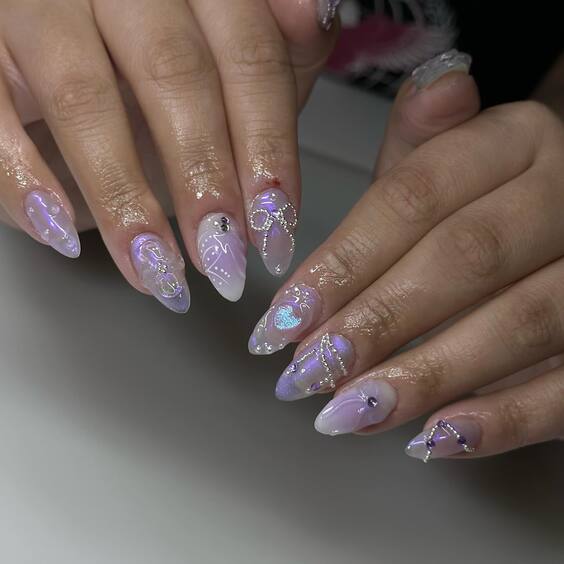
Ethereal Lilac Dreams
These nails feature a stunning lilac base with delicate white and silver accents that swirl over each nail, reminiscent of ethereal clouds. The subtle addition of fine glitter gives a dreamy sparkle, perfect for a magical summer evening.
Consumables List
- Base coat: OPI Natural Nail Base Coat
- Lilac polish: Essie “Lilacism”
- White and silver striping polish
- Fine glitter
- Top coat: Seche Vite Dry Fast Top Coat
DIY Instructions Apply a base coat to protect the nails. Paint a base of soft lilac and let it dry. Use white and silver striping polish to create swirling designs across each nail. Sprinkle a bit of fine glitter while the design is still tacky. Seal with a top coat for a smooth, lasting finish.
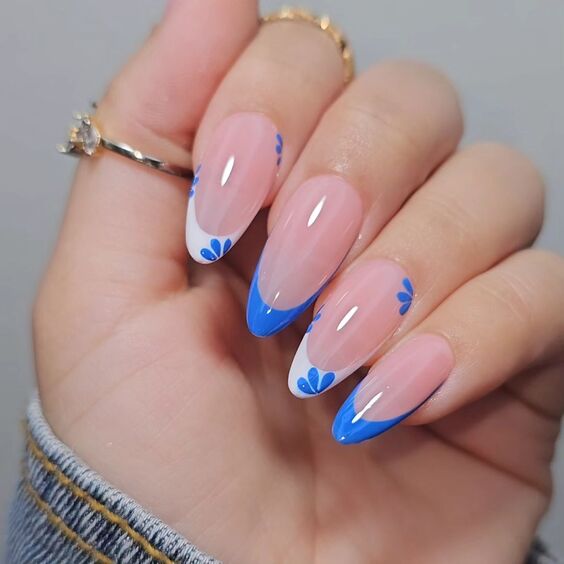
Playful Blue Petal Tips
This design combines a sheer pink base with playful blue petal tips. The petals are strategically placed to appear as if they are blooming directly from the nail tips, adding a vibrant and playful touch to a classic summer look.
Consumables List
- Base coat: Essie “Grow Stronger”
- Sheer pink polish: OPI “Bubble Bath”
- Blue polish for petals: Sally Hansen “Pacific Blue”
- Detailing brush
- Top coat: Seche Vite Dry Fast Top Coat
DIY Instructions Start with a base coat. Apply two coats of sheer pink polish for a clean, subtle background. Using a detailing brush, paint blue petals starting from each nail tip, curving slightly towards the center. Finish with a top coat to enhance the design’s durability and shine.
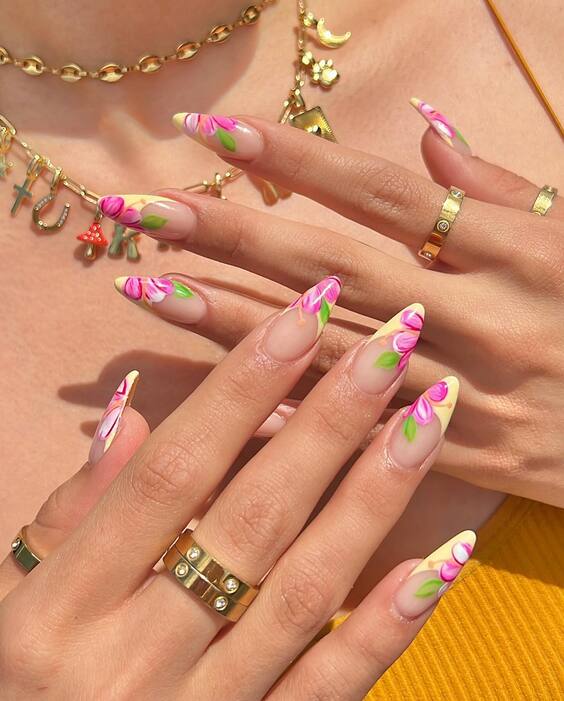
Vibrant Floral Twist
Embracing the essence of summer, this design showcases vibrant floral twists against a clear base. The bold colors of pink, green, and yellow make the floral details pop, perfect for beach days or festive summer gatherings.
Consumables List
- Base coat: OPI Natural Nail Base Coat
- Clear polish as the base
- Colored acrylic paints for floral design: pink, green, and yellow
- Fine brush for detailed art
- Top coat: Seche Vite Dry Fast Top Coat
DIY Instructions Apply a base coat followed by a layer of clear polish. Using colored acrylic paints, meticulously paint floral designs starting at the nail base and twisting up towards the tip. Each stroke should be fine and precise to capture the beauty of the flowers. Seal the design with a top coat to ensure longevity and a glass-like finish.
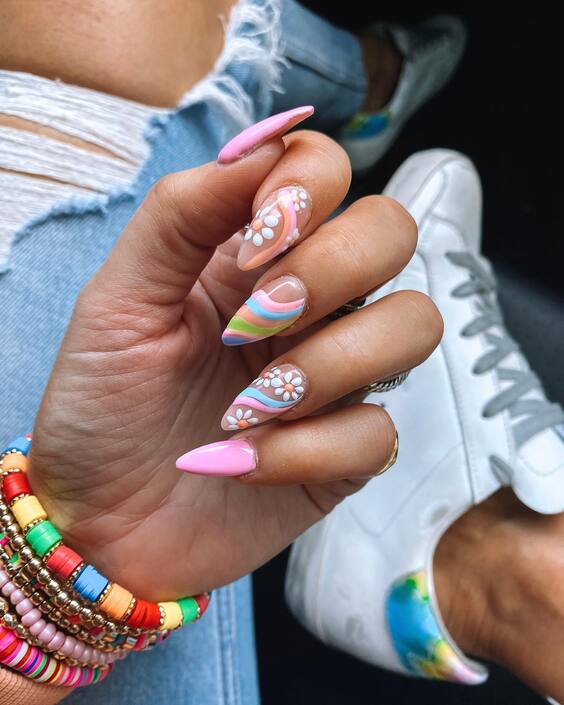
Candy Pastel Play
These nails are a fun mix of candy pastel colors with playful patterns and white daisy accents, offering a youthful and vibrant summer vibe. Each nail features a unique design, combining stripes, color blocks, and floral art that together provide a whimsical look.
Consumables List
- Base coat: OPI Natural Nail Base Coat
- Pastel polishes in pink, green, and blue
- White polish for daisy accents: Sally Hansen “White On”
- Top coat: Seche Vite Dry Fast Top Coat
- Detailing brush and dotting tool
DIY Instructions Start with a base coat to protect your nails. Apply a pastel base color, varying the shades for each nail. Use a detailing brush to add stripes and color blocks. Draw daisy accents with white polish using a dotting tool. Seal with a top coat for a glossy and durable finish.
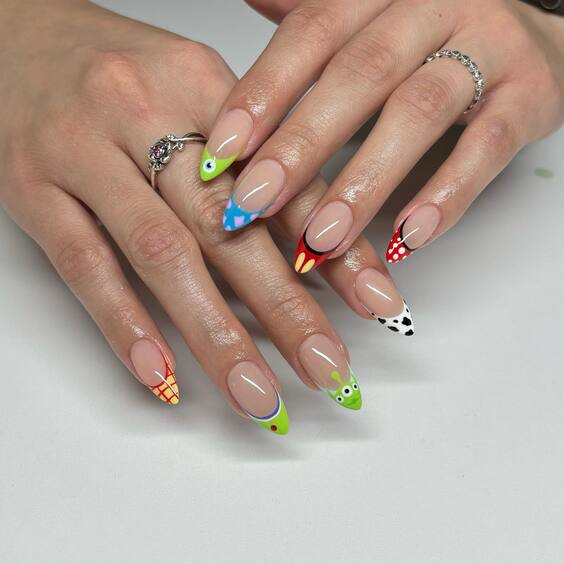
Modern Art Inspired
This design is inspired by modern art with its abstract patterns and a bold mix of colors. Each nail is a canvas displaying vibrant shapes and designs, including hearts, checks, and polka dots, in a playful and artistic arrangement that’s perfect for those who love to stand out.
Consumables List
- Base coat: Essie “Here to Stay”
- Variety of polishes in green, blue, red, and black
- Top coat: Seche Vite Dry Fast Top Coat
- Fine brushes for detailed artwork
DIY Instructions Apply a base coat to protect the nails. Paint a neutral base color. Use fine brushes to create various shapes and patterns in different colors, making each nail distinct. Finish with a top coat to enhance the colors and ensure the design’s longevity.
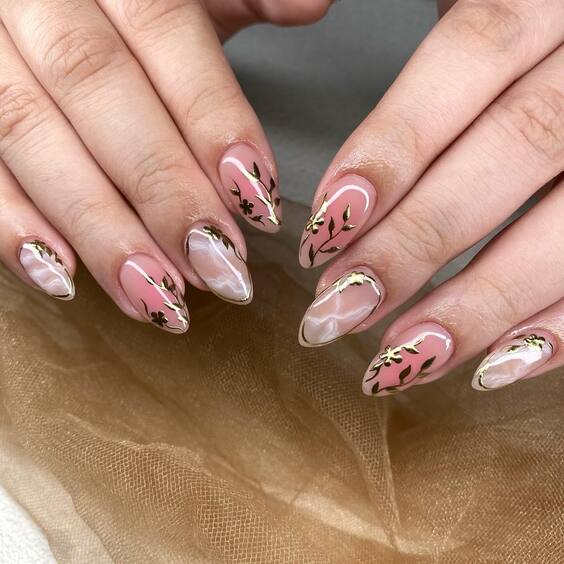
Floral Elegance
These nails exude elegance with their sheer pink base and delicate black floral patterns. Gold embellishments subtly enhance the floral motifs, adding a touch of luxury and sophistication, making them ideal for a formal event or a romantic evening.
Consumables List
- Base coat: OPI Natural Nail Base Coat
- Sheer pink polish: OPI “Bubble Bath”
- Black polish for floral designs: OPI “Black Onyx”
- Gold studs
- Top coat: Seche Vite Dry Fast Top Coat
- Fine brush for floral patterns
DIY Instructions Begin with a base coat to protect the nails. Apply a sheer pink polish as the base. Use a fine brush to paint delicate black floral patterns. Add gold studs to the center of each flower for a luxurious touch. Seal with a top coat for a smooth and glossy finish.
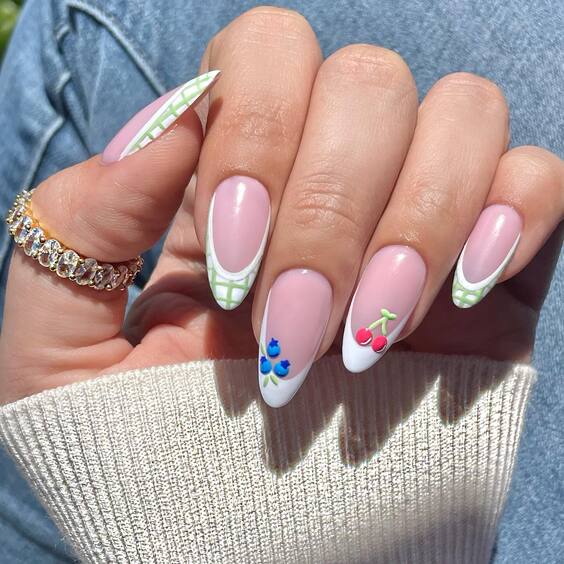
Pastel Picnic Charm
These nails embody the charm of a summer picnic, featuring a soft pink base with playful green lattice designs and adorable fruit motifs. The attention to detail, including tiny blueberries and cherries, adds a delightful touch, making this design both fun and fashionable for a day out in the sun.
Consumables List
- Base coat: OPI Natural Nail Base Coat
- Pink polish: Essie “Muchi, Muchi”
- Green, blue, and red acrylic paints for lattice and fruit designs
- Top coat: Seche Vite Dry Fast Top Coat
- Fine brush for detailed art
DIY Instructions Begin with a base coat to protect the nails. Apply a smooth layer of pink polish as the base. Use green paint to create lattice patterns. With a fine brush, add fruit designs in blue and red. Detail each fruit carefully to enhance its appearance. Finish with a top coat for a glossy and lasting effect.
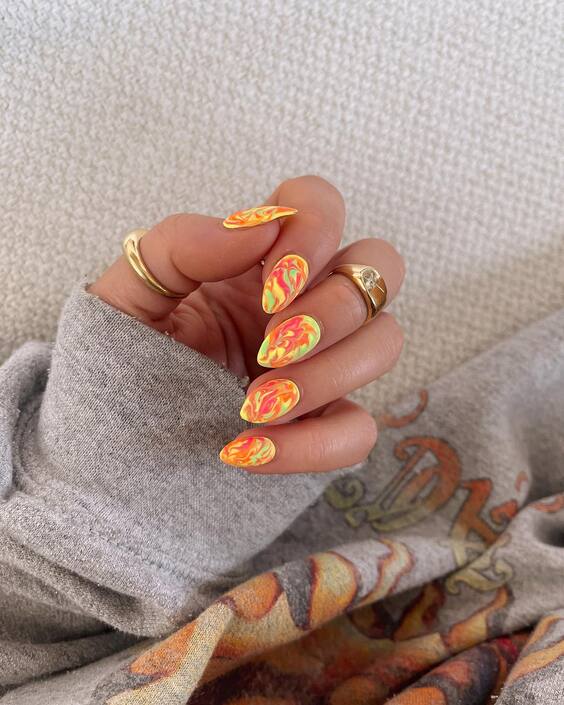
Neon Flame Artistry
Capturing the dynamic energy of summer, these nails feature a swirling neon pattern that resembles vibrant flames. The mix of orange, yellow, and red swirls creates an intense visual impact, perfect for those looking to make a bold statement at any summer festival or night out.
Consumables List
- Base coat: Essie “Here to Stay”
- Neon polishes in orange, yellow, and red
- Top coat: Seche Vite Dry Fast Top Coat
- Sponge for blending the neon colors
DIY Instructions Apply a base coat to prepare the nails. Begin with a base of orange polish, then use a sponge to dab on yellow and red, blending the colors to create a flame effect. Work quickly to blend while the polish is wet to achieve a smooth gradient. Seal the design with a top coat for vibrancy and protection.
Whether you’re a seasoned nail artist looking for new inspiration or a beginner eager to try your hand at some of the trendiest designs, the variety of styles we’ve showcased promises to spark creativity and enhance your summer wardrobe. Remember, each design not only adds a splash of color and fun to your daily look but also speaks volumes about your personal style.

