23 Stunning Summer Nail Designs: Eclectic, Elegant & Playful Ideas
As the sun shines brighter and our outfits get lighter, it’s time to think about the perfect accessory for the sunny season: our nails! What better way to express the joy and color of summer than through fun and vibrant nail designs? Are you ready to dive into the world of cute summer nails 2024? Whether you’re lounging by the pool, enjoying a backyard BBQ, or simply soaking up the sun, these nail ideas will add a splash of color and style to your summer days
Marble and Gold Flakes Elegance
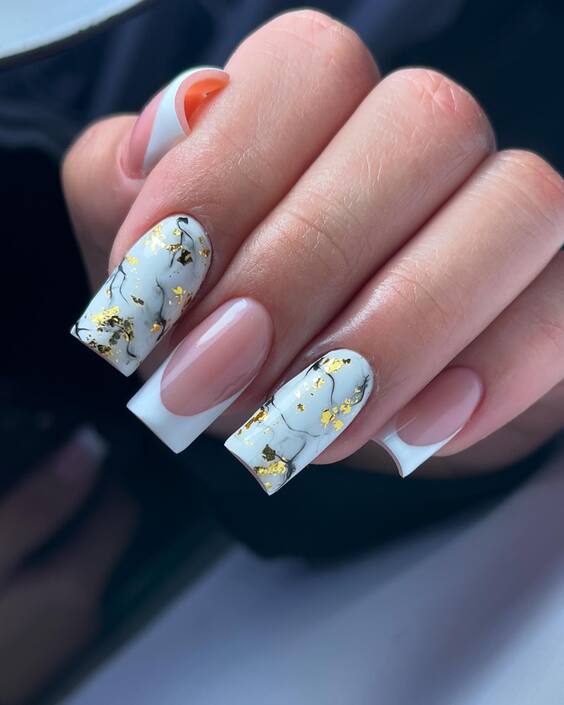
This nail design screams summer luxury. Featuring a soft grey base with stunning gold flakes, the nails are a perfect blend of sophistication and festive flair. The marble effect adds an artistic touch, making each nail a unique masterpiece. The gold accents provide that extra sparkle, essential for any summer activity from day to night.
- Consumables Needed:
- Grey gel polish
- Gold leaf flakes
- Clear top coat
- Marbleizing tool
- Recommendations: Opt for a high-quality gel polish like OPI or Essie for durability and a glossy finish.
DIY Instructions
- Apply two coats of grey gel polish as the base.
- While the second coat is still tacky, gently place gold leaf flakes using tweezers.
- Use a dotting tool to swirl a small amount of black or white polish to create the marble effect.
- Seal everything with a clear top coat for a long-lasting finish.
Advice: Practice the marble effect on a paper before applying it on your nails to perfect your technique.
Soft Pink with Feather Detail
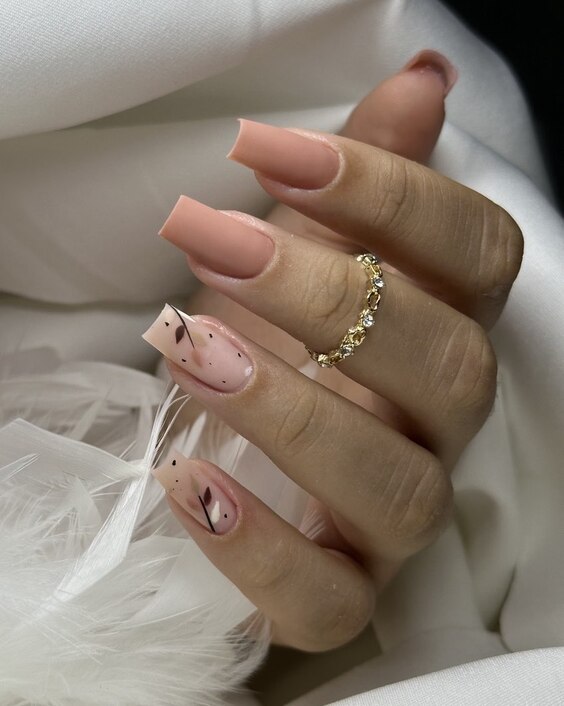
This look features a beautiful soft pink base with subtle feather accents, ideal for those who prefer a minimalist yet chic style. The feather, drawn in a darker shade, adds a touch of whimsy and artistic flair, making it a perfect choice for a serene summer evening.
- Consumables Needed:
- Soft pink nail polish
- Black fine liner polish
- Matte top coat
- Recommendations: Sally Hansen’s matte top coat will give a flawless finish.
DIY Instructions
- Apply the soft pink polish as the base.
- Once dry, use a fine brush to draw the feather in a dark hue.
- Finish with a matte top coat for a contemporary look.
Advice: Keep a steady hand for the feather details, or use a stencil for more precision.
Playful Pastels and Patterns
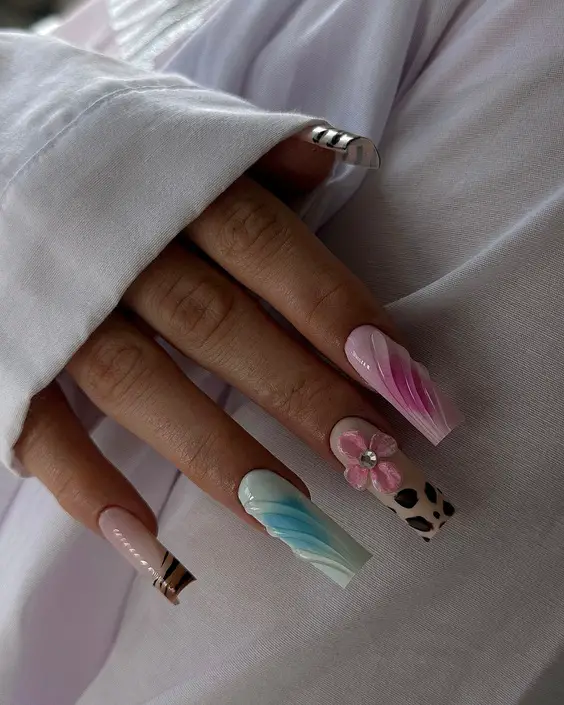
Here we have an eclectic mix of pastels that are vibrant and playful, perfect for the lively summer vibes. From a delicate pink to a soft sky blue, combined with bold patterns like stripes and polka dots, this design is for those who love to stand out.
- Consumables Needed:
- Pastel pink, blue, and white polishes
- Striping tape
- Dotting tool
- Glossy top coat
- Recommendations: Use Seche Vite for the top coat for a quick drying and glossy finish.
DIY Instructions
- Apply your choice of pastel polish as the base.
- Use striping tape to create clean lines for stripes.
- Add polka dots or other patterns with a dotting tool.
- Finish with a glossy top coat to protect your design.
Advice: Be playful with the patterns. Summer is the perfect time to experiment with bold and fun designs!
Ocean Waves and Gold Touch
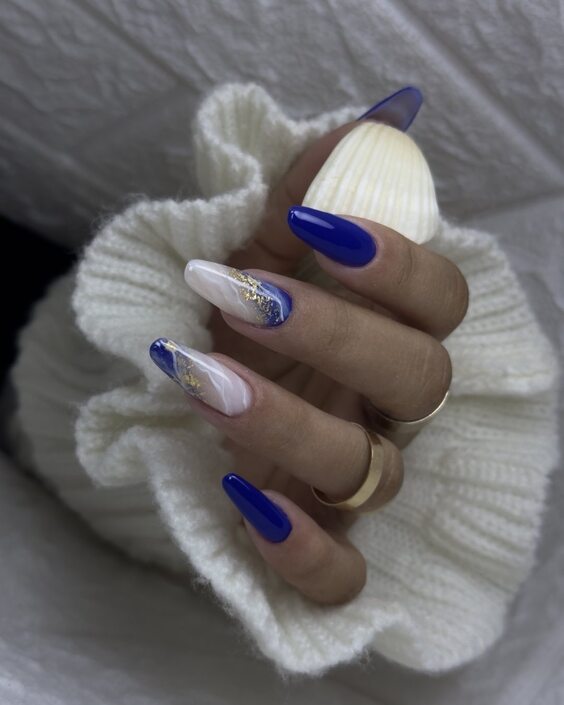
This design captures the essence of the ocean with its deep blue tones, contrasted beautifully with delicate white and gold leaf accents. The use of bold blue represents the ocean’s depth, while the white mimics the soft waves, and gold leaf fragments add a luxurious touch, perfect for any summer event by the sea.
- Consumables Needed:
- Deep blue nail polish
- White nail polish for detailing
- Gold leaf
- High-gloss top coat
- Recommendations: Choose a fast-drying polish to prevent smudges, like those from Essie’s quick-dry collection.
DIY Instructions
- Paint your nails with the deep blue polish as the base.
- Once dry, use a thin brush to add white wave patterns.
- Apply small pieces of gold leaf for an elegant touch.
- Finish with a high-gloss top coat to enhance the shine and ensure longevity.
Advice: Apply the gold leaf sparingly to maintain elegance and avoid overpowering the serene blue base.
Citrus Swirls
These nails are as vibrant as a summer day is long, featuring fiery orange tones swirled with white for a fresh, zesty look. This design is not only eye-catching but also evokes the feel of enjoying a refreshing citrus drink under the hot sun.
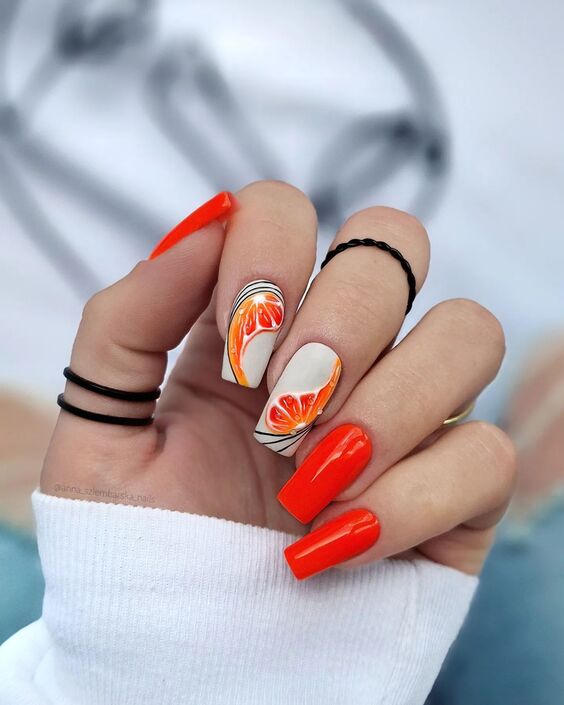
- Consumables Needed:
- Bright orange gel polish
- White gel polish
- Detailing brush
- Matte top coat
- Recommendations: Gel polishes are preferred for their long-lasting finish; consider using Gelish for its vibrant color payoff.
DIY Instructions
- Apply two coats of bright orange gel polish.
- Before the second coat dries, swirl in white polish using a detail brush.
- Allow it to dry thoroughly, then apply a matte top coat for a modern finish.
Advice: Work quickly with the gel polish to swirl the white in before it dries for the best effect.
Tropical Floral Fantasy
Embrace the summer vibes with these bright red nails adorned with white tropical flowers. This design is perfect for a beach vacation or any festive summer gathering, providing a bold yet sophisticated look.
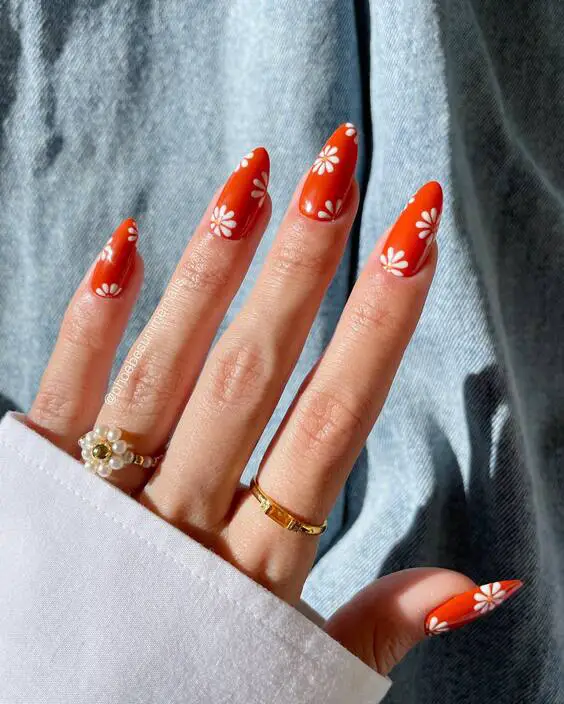
- Consumables Needed:
- Bright red nail polish
- White nail polish for floral details
- Small detailing brush
- Glossy top coat
- Recommendations: Use a quick-dry top coat to keep the flowers crisp and prevent smudging.
DIY Instructions
- Paint your nails with the bright red as the base color.
- Use a small brush to carefully paint white flowers on each nail.
- Apply a glossy top coat to seal in the design and add a beautiful shine.
Advice: For the flowers, you might want to practice on paper first to ensure each one turns out lovely and consistent.
Sunshine Smiles
Capture the essence of a cheerful summer day with these bright yellow nails adorned with smiling faces. This playful and uplifting design is a conversation starter and a perfect choice for spreading positivity wherever you go.
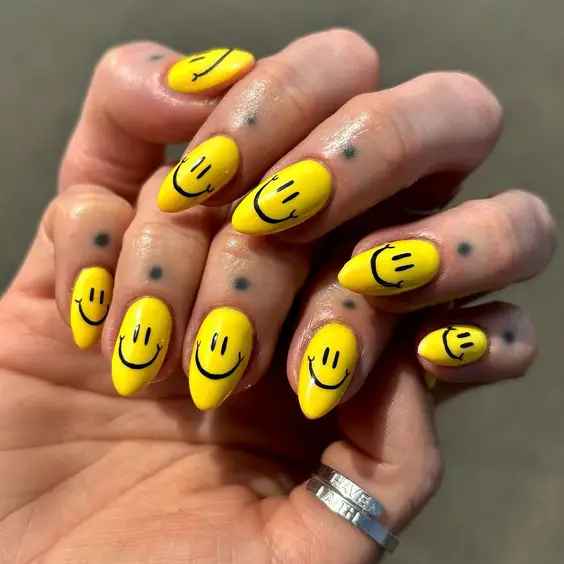
- Consumables Needed:
- Bright yellow nail polish
- Black nail art pen
- Top coat for a glossy finish
- Recommendations: Opt for a high-pigment yellow like Sally Hansen’s “Mellow Yellow” for vibrant color pay-off.
DIY Instructions
- Apply two coats of bright yellow nail polish for a solid base.
- Use a black nail art pen to draw simple smiley faces on each nail.
- Seal the design with a glossy top coat to enhance durability and shine.
Advice: Keep the designs simple and space out the smiley faces to maintain the nails’ cheerful vibe.
Sunset Gradient
This nail design mirrors the mesmerizing colors of a summer sunset with its smooth gradient transition from pink to yellow. The sleek white tips add a modern twist to the classic French manicure, making it a sophisticated yet fun choice for summer evenings.
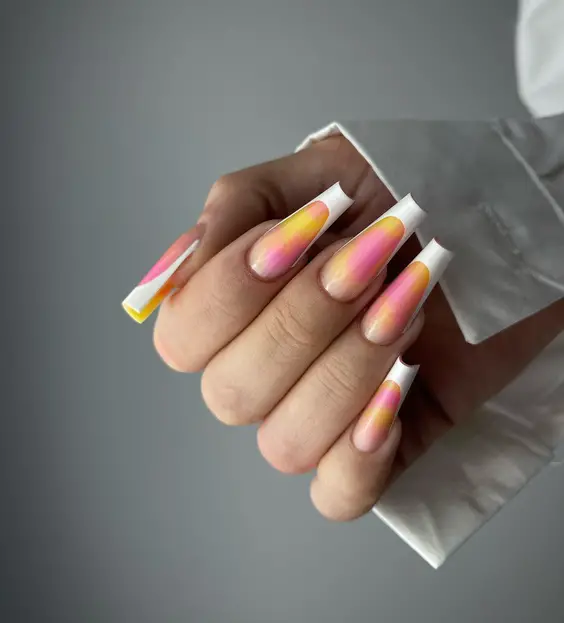
- Consumables Needed:
- Pink and yellow nail polish
- White nail polish for the tips
- Sponge for the gradient effect
- Glossy top coat
- Recommendations: Use a makeup sponge for a seamless gradient effect.
DIY Instructions
- Apply a base coat of pink polish.
- Use a sponge to dab on a blend of pink and yellow polishes, creating the gradient effect.
- Once dry, apply white polish on the tips.
- Finish with a glossy top coat to make the gradient pop and last longer.
Advice: Practice the gradient on a paper first to ensure the colors blend smoothly before applying to nails.
Chic Leopard Hearts
These nails blend romance and edgy style with a soft pink base and bold leopard-print hearts. This design is not just striking; it’s a fashion statement, perfect for those who love to stand out with a touch of wild sophistication.
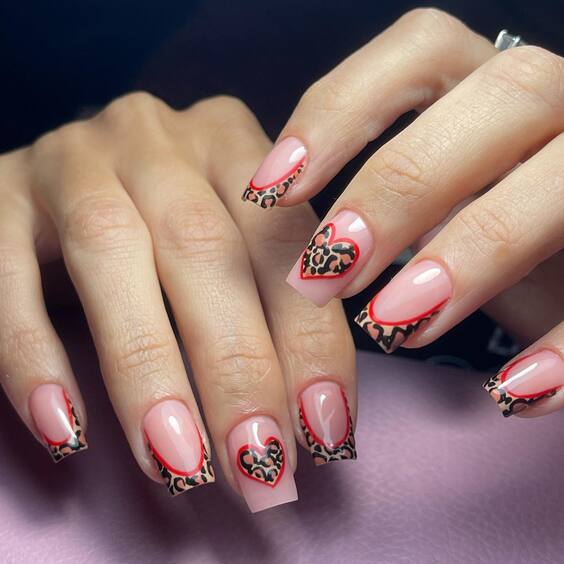
- Consumables Needed:
- Soft pink nail polish
- Black and brown polish for leopard print
- Heart stencil or freehand brush
- Matte top coat
- Recommendations: Consider a long-wearing polish like OPI for the base to ensure the intricate design lasts.
DIY Instructions
- Apply the soft pink polish as the base.
- Position a heart stencil on the nail or freehand draw heart shapes using a fine brush.
- Fill in the hearts with leopard prints using black and brown polish.
- Seal the design with a matte top coat for a modern finish.
Advice: For leopard prints, use a dotting tool to create irregular spots and surround them partially with black to achieve the iconic pattern.
Enchanted Pink Stardust
These nails are adorned with a delicate pink base and sprinkled with stardust and tiny celestial accents, perfect for those who love a fairy-tale touch to their style. The slight transparency of the pink enhances the dreamy, magical vibe, making it ideal for summer nights under the stars.
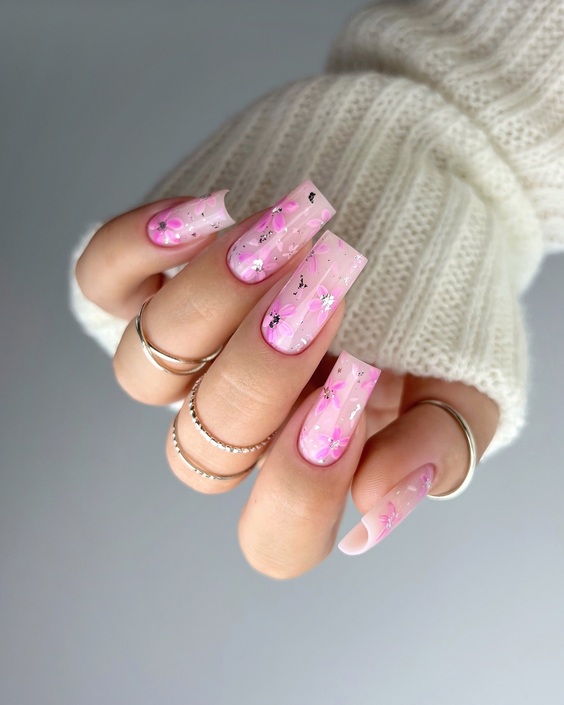
- Consumables Needed:
- Light pink translucent nail polish
- Small star and moon decals
- Fine glitter dust
- Top coat for sealing
- Recommendations: Choose decals that are thin and flexible to conform perfectly to the nail curve.
DIY Instructions
- Apply a light coat of the translucent pink polish.
- While the polish is tacky, gently place star and moon decals.
- Sprinkle a small amount of glitter dust over the nails.
- Seal with a top coat to keep everything in place and to add a glossy finish.
Advice: For a more pronounced effect, use a sponge to dab on the glitter, focusing on the nail tips for a gradient look.
Mermaid Dreams
This nail design captures the essence of mermaid scales with a beautiful gradient of sea blues and purples, accented with a fish scale pattern over some nails and adorned with tiny gems. The overall effect is both mystical and glamorous, perfect for making a splash at any summer party.
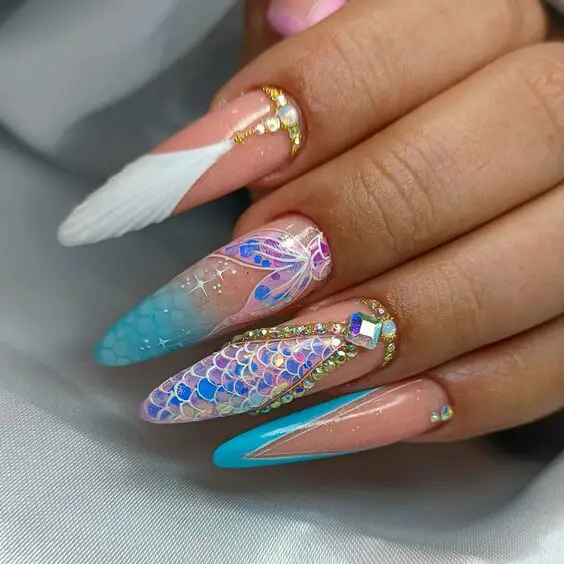
- Consumables Needed:
- Sea blue and purple nail polishes
- Fish scale stencil
- Small gems and jewels
- Top coat for a smooth finish
- Recommendations: Use a fine-tip brush for precise gem placement and a long-lasting top coat to secure the embellishments.
DIY Instructions
- Paint a gradient with sea blue and purple polishes.
- Place the fish scale stencil over the nail and apply a lighter shade over the top.
- Remove the stencil and apply small gems on the base of some nails.
- Cover with a top coat to ensure the gems stay in place and enhance the design’s depth.
Advice: Experiment with different sizes of gems to mimic the varied texture of natural scales.
Sophisticated Scarlet Elegance
These stunning red nails feature a matte finish with glossy black and silver accents creating a modern and luxurious look. The contrast between the matte and glossy finishes adds depth and sophistication, making this design perfect for evening events or a bold daytime statement.
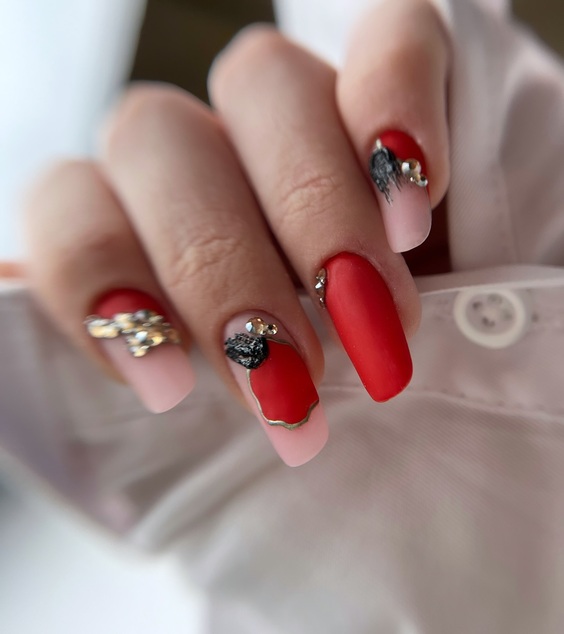
- Consumables Needed:
- Red matte nail polish
- Black and silver nail polish for accents
- Matte top coat
- Glossy top coat for details
- Recommendations: Invest in high-quality matte and glossy top coats to achieve a perfect finish.
DIY Instructions
- Apply two coats of red matte nail polish.
- Use a thin brush to add glossy black and silver accents.
- Apply a matte top coat over the red areas.
- Finish the accents with a glossy top coat to make them stand out.
Advice: Keep the lines clean and precise for the accents to ensure a chic and polished look.
Gentle Pink Frost
This nail design features a beautifully soft gradient of pink, transitioning into a frosted glitter at the tips. Perfect for those who appreciate a subtle yet sparkling look, it’s like the gentle kiss of morning dew on blossoms, ideal for serene summer days or elegant evening events.
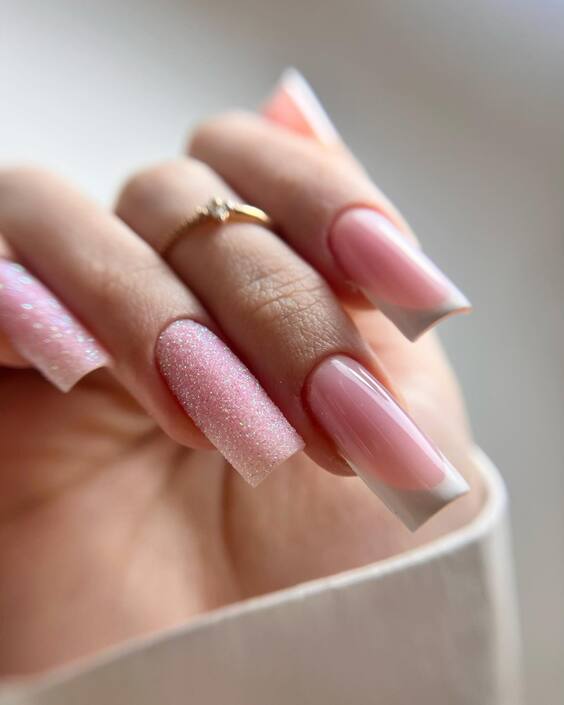
- Consumables Needed:
- Light pink nail polish
- Pink glitter dust
- Sponge for application
- Top coat for a seamless finish
- Recommendations: Use a fine glitter dust for a more sophisticated sparkle.
DIY Instructions
- Apply a light pink base coat.
- Use a sponge to gently dab pink glitter on the tips, blending slightly downward.
- Finish with a top coat to blend the glitter seamlessly into the base color.
Advice: For a more dramatic effect, increase the concentration of glitter towards the tips.
Modern Pink Swirls
This design brings a modern twist to the classic pink with bold, white swirls creating a dynamic contrast. The swirls give the illusion of motion, making this a standout choice for anyone looking to make a statement with their nails this summer.
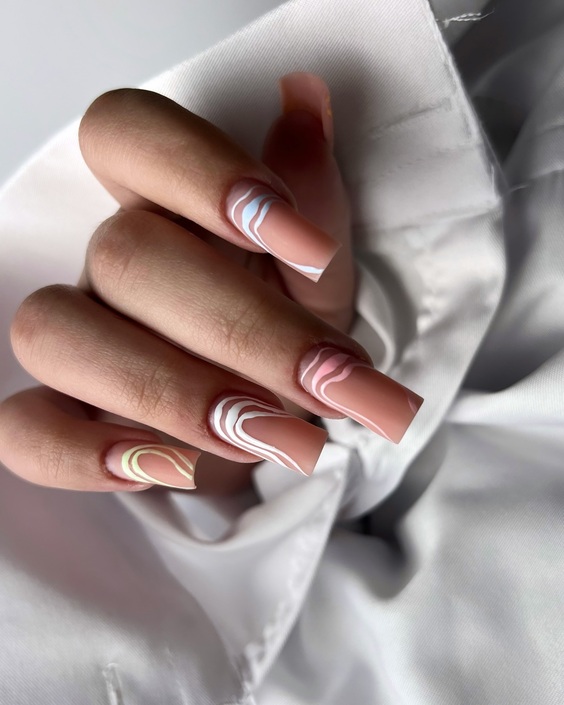
- Consumables Needed:
- Pink nail polish
- White nail polish
- Thin detailing brush
- Top coat for durability
- Recommendations: Use a steady hand or stencil for precise swirls.
DIY Instructions
- Paint the nails with a pink base.
- Using a thin brush, draw white swirls on each nail.
- Apply a top coat to protect the design and add a glossy finish.
Advice: Experiment with the swirls’ thickness to add depth and interest to the design.
Sophisticated Pink Marble
Emulate the intricate patterns of marble with this sophisticated nail design. Featuring a pink base with gray and white marbling, it’s accented with subtle gold flecks that catch the light beautifully. This design is perfect for those who love a touch of luxury in their everyday look.
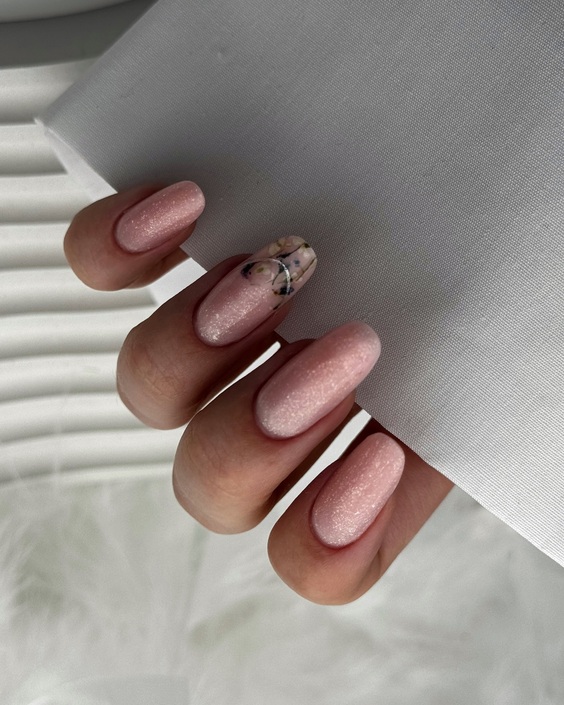
- Consumables Needed:
- Light pink nail polish
- White and gray nail polish
- Gold leaf flakes
- Detailing brush
- Top coat for a glossy finish
- Recommendations: Use a water-marbling technique for a more fluid and realistic marble effect.
DIY Instructions
- Apply a light pink base.
- Drop white and gray polishes into water and swirl gently to create a marbling effect.
- Dip the nails into the water to transfer the design.
- Add small pieces of gold leaf for an elegant touch.
- Seal with a top coat for durability and shine.
Advice: Practice the water-marbling technique on a test surface first to perfect your method before applying it to your nails.
Botanical Greenery
This design brings a touch of the outdoors to your fingertips with a serene palette of greens and whites, reminiscent of a peaceful garden. The intricate leaf patterns, set against a variety of green shades and adorned with subtle glitters, make this look ideal for anyone who loves a natural, earthy style.
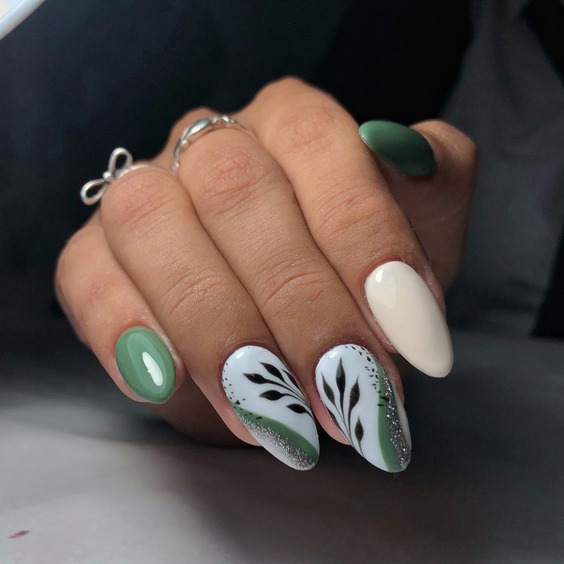
- Consumables Needed:
- Various shades of green nail polish
- White nail polish for detailing
- Fine glitter dust
- Thin brush for precision
- Top coat for a glossy finish
- Recommendations: Opt for eco-friendly nail polishes to stay in tune with the nature theme.
DIY Instructions
- Paint each nail with a different shade of green.
- Use a thin brush to draw delicate leaf patterns on select nails.
- Add a touch of glitter for a dew-like effect.
- Seal with a glossy top coat to enhance the vibrancy of the greens and protect the design.
Advice: Mix matte and glossy finishes on different nails for a more dynamic look.
Pastel Pink Flow
These nails feature a light pastel pink base with dynamic black and white swirls that provide a modern twist on a classic soft color. The flow of the swirls gives a sense of movement, perfect for adding an artistic flair to your summer wardrobe.
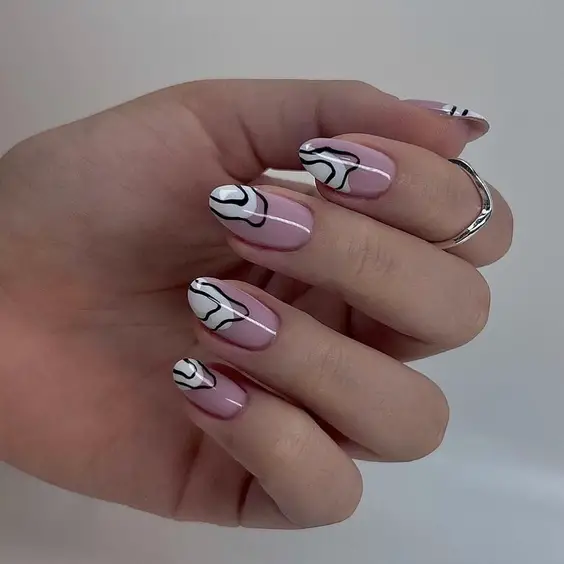
- Consumables Needed:
- Pastel pink nail polish
- Black and white nail polish for swirls
- Detailing brush
- Top coat for a smooth finish
- Recommendations: Ensure the swirls are thin and delicate for a subtle yet impactful design.
DIY Instructions
- Apply a pastel pink base coat.
- Draw black and white swirls using a detailing brush.
- Finish with a top coat to smooth out the swirls and add a beautiful shine.
Advice: Practice the swirl patterns on paper first to achieve the perfect flow on your nails.
Pink Lattice Elegance
This vibrant pink design is elevated with a black lattice pattern over a glossy pink base, creating a striking contrast. The addition of delicate black lines adds sophistication and makes this a perfect choice for those who want to combine bold colors with elegant patterns.
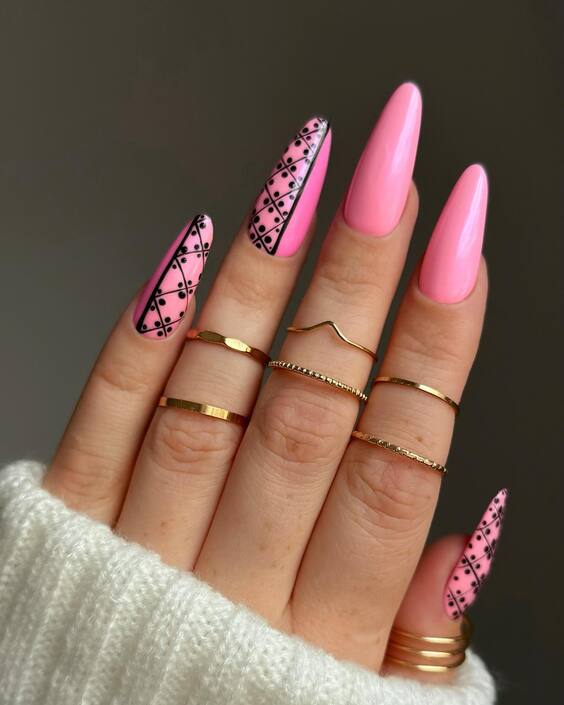
- Consumables Needed:
- Bright pink nail polish
- Black nail polish for the lattice
- Fine brush or stencil for precision
- Top coat for durability
- Recommendations: Use a stencil for the lattice design to ensure neat and uniform patterns.
DIY Instructions
- Apply two coats of bright pink polish for a vivid base.
- Use a fine brush or stencil to create the black lattice design on each nail.
- Seal the design with a top coat to enhance the color contrast and ensure longevity.
Advice: Keep the lattice lines thin to maintain the elegance of the overall design.
Speckled Pink Delight
These nails offer a playful look with a pink base flecked with darker speckles, mimicking the appearance of candy sprinkles. This fun and girlish style is perfect for those who enjoy a bit of whimsy in their everyday look, embodying the carefree spirit of summer.
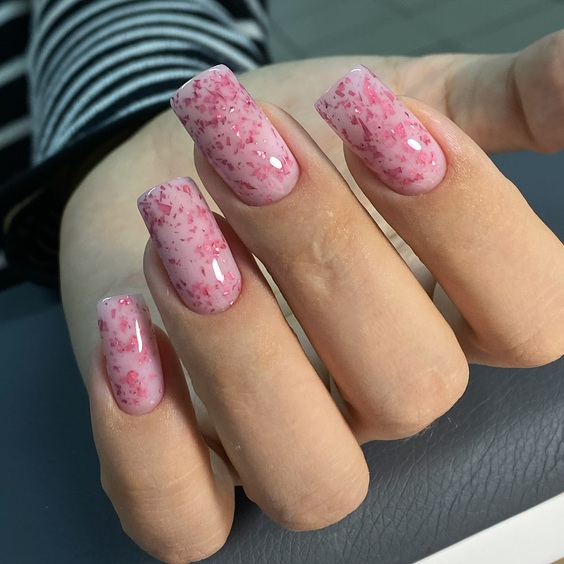
- Consumables Needed:
- Light pink nail polish
- Dark pink speckle polish or small brush for speckles
- Top coat for a smooth finish
- Recommendations: Use a speckle polish for an easier application or a thin brush to dot on the speckles manually for more control.
DIY Instructions
- Apply a light pink base coat.
- Dot on the darker pink speckles with a small brush or speckle polish.
- Seal with a top coat to smooth the texture and enhance durability.
Advice: Focus the speckles more towards the tips for a gradient effect that looks like natural flower petals.
Floral Pink Charm
These nails are adorned with delicate white flowers and yellow dots, set against a vibrant pink background. The design is reminiscent of a spring meadow and perfect for those who appreciate a floral aesthetic with a bright, cheerful vibe.
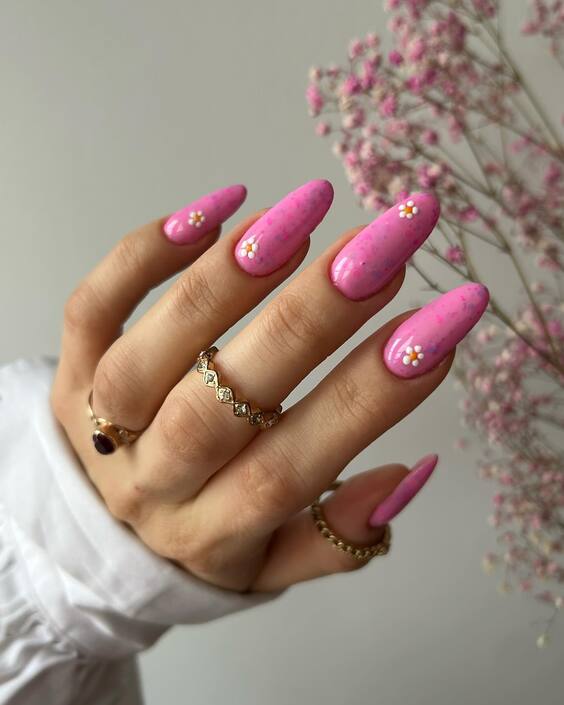
- Consumables Needed:
- Vibrant pink nail polish
- White and yellow nail polish for detailing
- Fine brush for flowers
- Top coat for protection
- Recommendations: Use a high-gloss top coat to make the colors pop and the details shine.
DIY Instructions
- Paint the nails with a vibrant pink polish.
- Use a fine brush to paint small white flowers, adding a yellow dot in the center of each.
- Apply a top coat to seal the design and add a beautiful shine.
Advice: Keep the floral designs small and scattered to enhance the naturalistic look without overpowering the vibrant base color.
Elegant Floral Tip
This design offers an elegant approach to nail art, featuring a soft pink base with green floral accents precisely applied to the tips. The subtle addition of gold glitter outlines adds a refined touch, perfect for occasions that call for a sophisticated yet understated look.
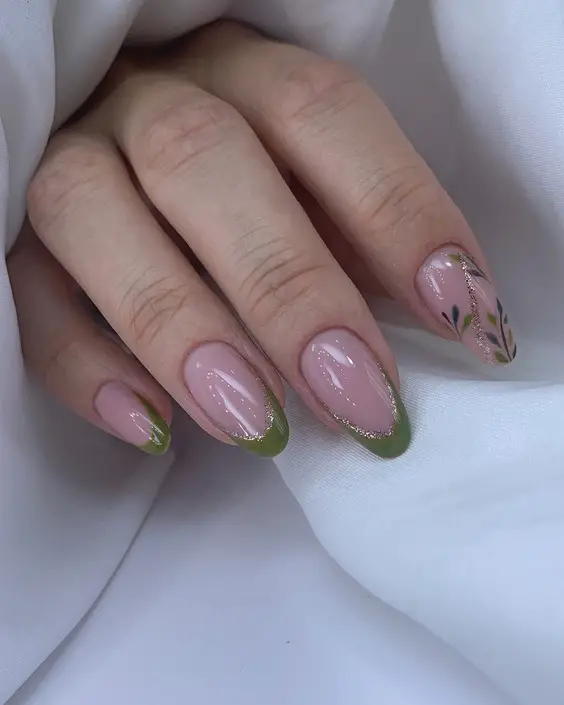
- Consumables Needed:
- Soft pink nail polish
- Green and black polish for floral detail
- Gold glitter polish for accents
- Fine brush for precision
- Top coat for a glossy finish
- Recommendations: Opt for a fine-tip glitter pen for precise application of the gold accents.
DIY Instructions
- Apply a soft pink base to the nails.
- Paint green leaves and black floral accents on the tips using a fine brush.
- Add a thin line of gold glitter around the floral design for a luxurious touch.
- Seal with a top coat to enhance the details and ensure longevity.
Advice: Practice the floral tip design on paper before applying to the nails to ensure precision and balance in the pattern.
Eclectic Summer Mix
This vibrant nail design is a celebration of color and creativity, perfect for expressing a bold, individualistic style. It features an eclectic mix of hot pink, zebra stripes, and abstract art, each nail telling its own story of summer adventures and fun.
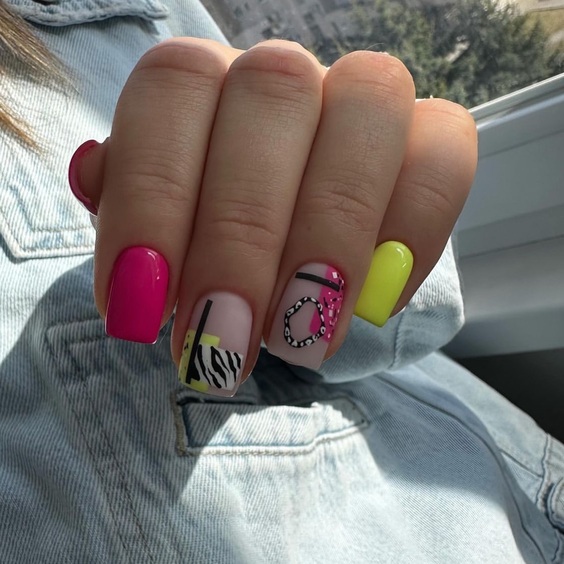
- Consumables Needed:
- Bright pink nail polish
- Black and white nail polish for zebra and abstract details
- Yellow and gray polish for additional accents
- Fine brushes for detailed work
- Top coat for a glossy finish
- Recommendations: Use acrylic paints for the fine art details as they can provide better control and opacity over nail polish.
DIY Instructions
- Apply a base coat of varying colors, choosing one color per nail.
- For the zebra stripes, use a fine brush to paint black stripes over white polish.
- Add abstract patterns on other nails using contrasting colors.
- Seal all designs with a glossy top coat to protect and enhance the art.
Advice: Don’t be afraid to mix patterns and colors. This design is all about personal expression and creativity!
Elegant Keyhole Mystery
This design pairs a gentle pink ombre with a sophisticated keyhole detail, perfect for those seeking a refined yet intriguing nail look. The keyhole motif, outlined with delicate black lines, adds a unique element of mystery and charm to the soft pink background.
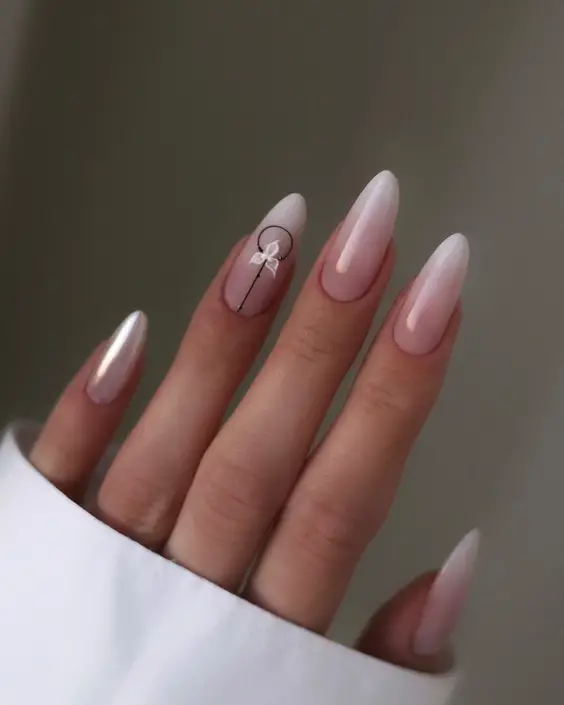
- Consumables Needed:
- Light pink and white polish for the ombre effect
- Black nail polish for the keyhole design
- Detailing brush
- Top coat for a smooth, glossy finish
- Recommendations: Use a sponge to blend the pink and white polishes for a seamless ombre effect.
DIY Instructions
- Apply a base of white nail polish.
- Sponge on light pink polish from the tip towards the middle to create an ombre effect.
- Paint a keyhole design using black polish and a fine brush.
- Finish with a glossy top coat to smooth out the ombre and highlight the keyhole detail.
Advice: The keyhole should be small and subtle, adding an elegant touch without overpowering the delicate ombre background.
These designs conclude our series on cute summer nail designs, each tailored to showcase personality and style while embracing the vibrant or subtle themes of the season. Whether you’re drawn to the playful, the floral, or the elegantly simple, these nail ideas are perfect for enhancing your summer wardrobe and expressing your individual flair. Enjoy the warmth and creativity of the season with these inspiring styles!

