Have you ever wondered what makes summer june nail color so captivating? As the warmth of June unfurls, the colors on our nails reflect vibrant sunsets and blooming gardens. In this article, I’ll guide you through a selection of stunning summer June nail designs, each promising to be a conversation starter. Curious about how to achieve these looks? Stick around as I unravel the secrets behind these enchanting manicures, perfect for your next summer adventure!
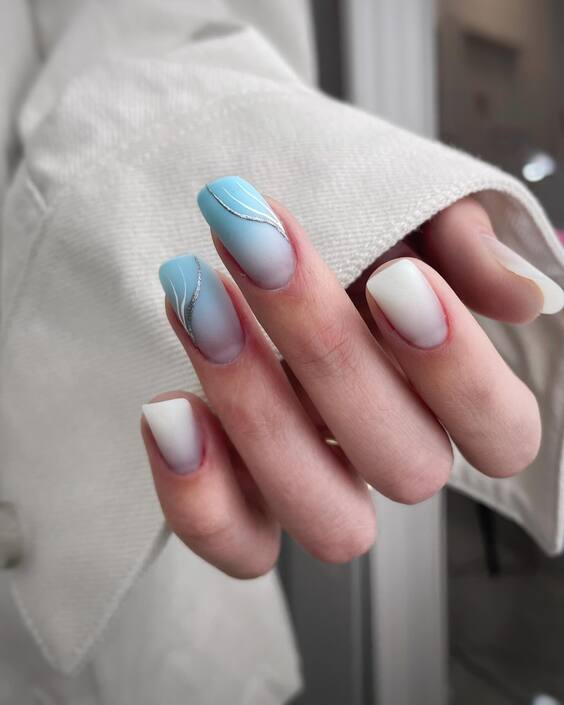
Tranquil Blue Skies and Delicate Waves
The first design captures the serene essence of a clear June sky with its soft blue hues and subtle white accents mimicking gentle clouds. The meticulous use of a thin silver line adds a hint of sophistication, reminiscent of a horizon where the sky meets the sea. This design not only speaks of tranquility but also showcases an elegant artistry, making it a perfect match for both casual outings and formal gatherings.
Consumables for Creating This Nail Design
- Base Coat: Opt for a durable base like Essie’s Here to Stay.
- Blue Polish: Sally Hansen’s Blue My Mind for that vivid sky blue.
- White Polish: OPI’s Alpine Snow for crisp white details.
- Silver Striping Tape: A fine tape for precise lines.
- Top Coat: Seche Vite Dry Fast Top Coat for a glossy finish.
Professional tip: Always start with a thin base coat to protect your natural nails and enhance the longevity of your polish.
DIY Instructions
Begin by applying a base coat to clean, filed nails. Once dry, paint two coats of the sky blue polish. When completely dry, gently place the silver striping tape across each nail to mimic the horizon. Use a fine brush to add white cloud-like accents. Seal everything with a top coat for a lasting finish.
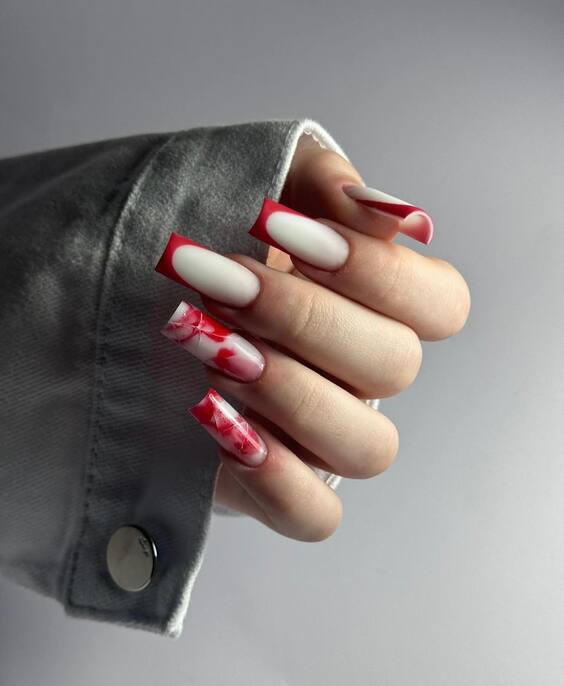
Bold Red Accents with Floral Charm
This design is a bold statement with its striking red tips and delicate floral patterns over a matte white base. It’s a playful yet chic look that captures the lively spirit of June. The use of matte and glossy finishes provides a contemporary contrast, ideal for those looking to add a dynamic twist to their nail art.
Consumables for Creating This Nail Design
- Matte White Polish: Essie’s Matte About You.
- Red Polish: China Glaze’s Red Pearl for glossy tips.
- Floral Stickers: Choose pre-made designs for ease.
- Matte Top Coat: For a modern matte finish.
Professional tip: Applying a matte top coat over any glossy polish can instantly transform the look, adding a sophisticated touch.
DIY Instructions
Apply a base coat, followed by two layers of matte white polish. Once dry, apply glossy red polish to the tips. Add floral stickers as desired. Finish with a matte top coat to blend the textures.
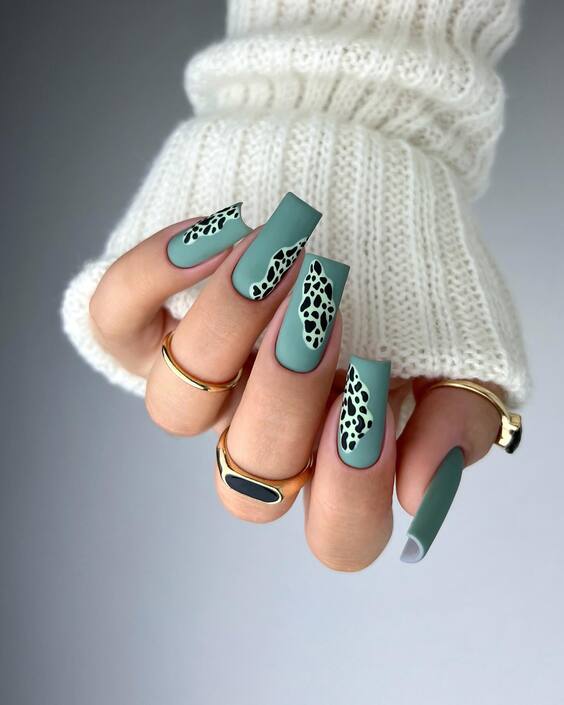
Chic Leopard Print on Pastel Green
Embrace your wild side with this chic leopard print set against a soothing pastel green background. The muted green offers a fresh perspective, while the black leopard spots provide a touch of the exotic. This design is perfect for those who love to express their boldness through their style.
Consumables for Creating This Nail Design
- Pastel Green Polish: CND Vinylux in Taffy.
- Black Polish: Revlon’s Black Magic.
- Dotting Tool: For perfect leopard spots.
- Top Coat: A high-gloss finish to protect your design.
Professional tip: Use a dotting tool for precise spot placement, making each dot irregular to mimic natural leopard patterns.
DIY Instructions
Start with a base coat to protect your nails. Apply two coats of the pastel green polish as the base. Once dry, dip your dotting tool in black polish and gently dot on the leopard patterns. Finish with a glossy top coat for durability and shine.
Elegant Minimalism with a Golden Touch
This nail design embodies sophistication with its minimalist nude base punctuated by golden geometric accents and delicate white lines. The gold foil used in the leaf patterns exudes luxury, making this manicure an ideal choice for those who prefer a subtle yet impactful aesthetic. It’s a perfect blend of modern art and timeless elegance.
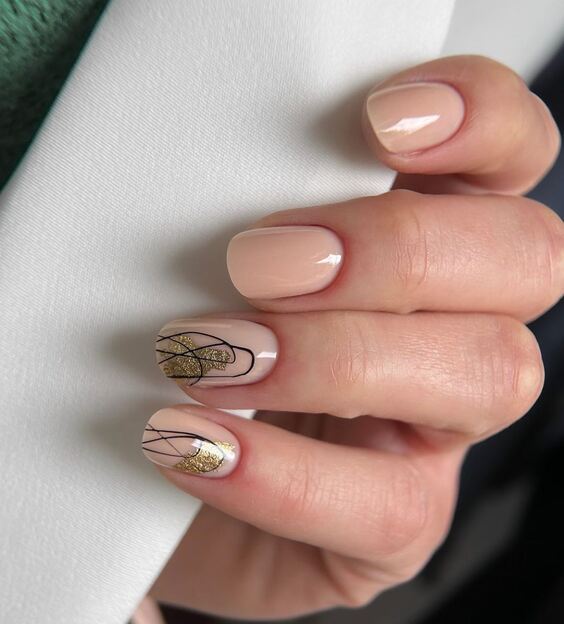
Consumables for Creating This Nail Design
- Nude Polish: Essie’s Ballet Slippers for a clean, subtle base.
- Gold Foil: For the leaf detailing.
- White Striping Polish: Sally Hansen’s Get it White for thin lines.
- Top Coat: Seche Vite for a long-lasting glossy finish.
Professional tip: Apply the gold foil gently to avoid tearing and achieve a flawless finish.
DIY Instructions
Start with a base coat to protect your nails. Apply two coats of the nude polish and let it dry completely. Cut small pieces of gold foil and place them on the nails, using tweezers for precision. Add white lines with a striping brush or tool. Finish with a top coat to seal the design.
Playful Cherries on Matte Green
This charming design features playful cherry illustrations on a matte green background, ideal for a fun summer outing. The matte finish on the green accentuates the vivid red and green of the cherries, creating a striking contrast. This look is not only cute but also creatively vibrant, perfect for those looking to add a fun twist to their summer wardrobe.
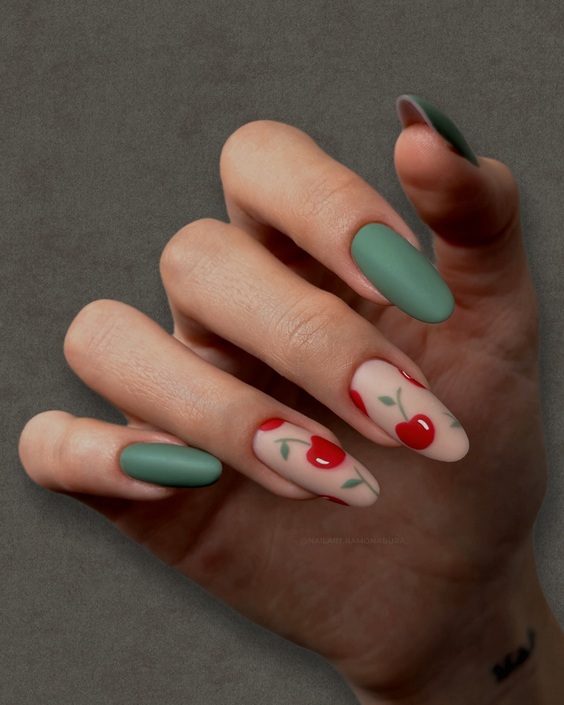
Consumables for Creating This Nail Design
- Matte Green Polish: OPI’s Envy the Adventure.
- White and Red Polish: For the cherries.
- Matte Top Coat: Essie’s Matte About You.
Professional tip: Use a small dotting tool to perfect the cherry and stem shapes for a more professional finish.
DIY Instructions
Apply your base coat, followed by two coats of the matte green polish. Once dry, use a small brush to paint cherries in red and add small white highlights. Draw stems with a fine brush dipped in green polish. Finish with a matte top coat to emphasize the matte texture.
Vibrant Pink with Leopard Accents
This design screams fun with its bright pink base and bold leopard spots on a white background. It’s a perfect summer look that combines classic femininity with a wild twist. The vibrant pink is eye-catching, while the leopard print adds an edgy vibe, making it a perfect choice for those who love to stand out.
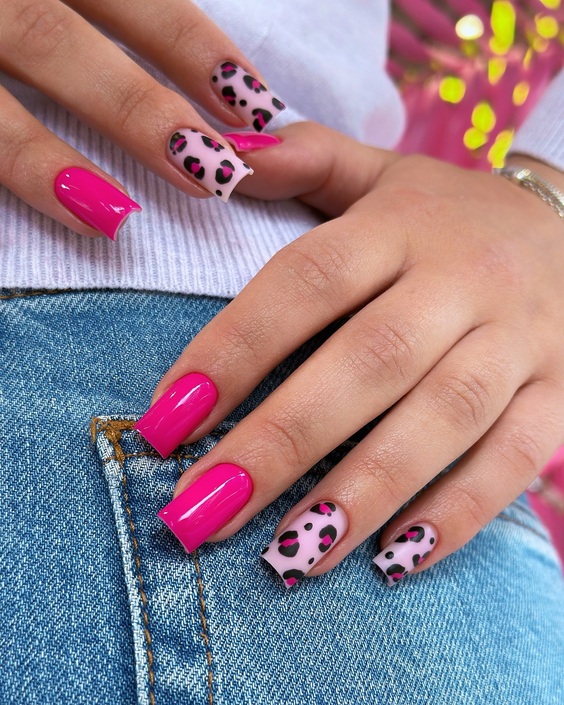
Consumables for Creating This Nail Design
- Bright Pink Polish: China Glaze’s Shocking Pink.
- White Polish: OPI’s Alpine Snow.
- Black Polish: For the leopard spots.
- Top Coat: A glossy finish to enhance the colors.
Professional tip: Keep the spots irregular and spaced to mimic natural leopard print.
DIY Instructions
Begin with a base coat. Paint your nails with two coats of bright pink, except for the accent nails, which should be white. Use a dotting tool to add black spots for the leopard print on the white base. Finish with a glossy top coat for a dazzling look.
Ethereal Opal Essence
This design showcases an ethereal opal essence with a captivating blend of soft white and lavender hues that shimmer with a subtle iridescence. It’s reminiscent of early summer mornings when the sky is painted with pastel colors. The gentle gradient effect creates a dreamy appearance, perfect for those seeking a magical, mystical look.
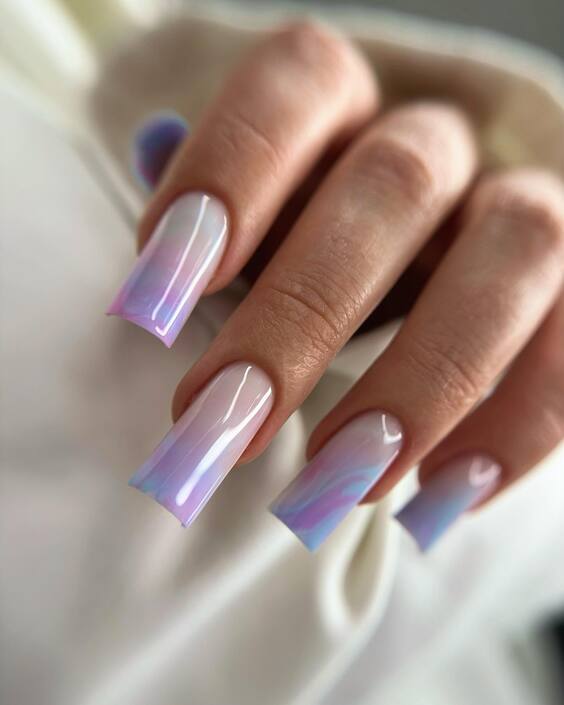
Consumables for Creating This Nail Design
- White Polish: OPI’s Alpine Snow as a base.
- Lavender Iridescent Polish: Essie’s Lilacism for the gradient.
- Sponge: For the gradient application.
- Top Coat: Sally Hansen’s Insta-Dri Top Coat for a smooth finish.
Professional tip: Apply the iridescent polish with a sponge to achieve a smooth gradient effect.
DIY Instructions
Start with a white base coat. Once dry, dab the sponge lightly into the lavender iridescent polish and gently press onto the nails, moving from the tip to the middle. Repeat until you achieve the desired gradient effect. Seal with a top coat for durability and extra shine.
Classic Pink with a Modern Twist
This vibrant pink manicure combines a classic color with a modern twist, featuring a glossy finish that’s undeniably eye-catching. The bold, saturated hue is perfect for a bright summer day. The slightly curved tips add a contemporary flair, setting this design apart from the traditional straight-across cut.
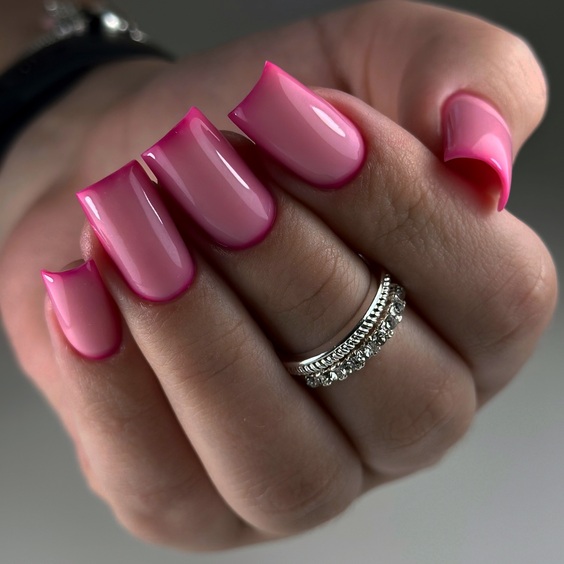
Consumables for Creating This Nail Design
- Vibrant Pink Polish: Revlon’s Fuchsia Fever.
- Top Coat: A high-gloss finish to really make the pink pop.
Professional tip: Apply two thin coats of polish rather than one thick coat to prevent bubbling and ensure a smoother finish.
DIY Instructions
Prepare your nails with a base coat to protect and smooth your natural nails. Apply two coats of the vibrant pink polish, allowing each coat to dry thoroughly. Finish with a glossy top coat to enhance the vibrancy and longevity of your manicure.
Delicate Daisy Details on Sheer White
Embrace the subtle charm of summer with this delicate design featuring tiny daisies on a sheer white base. The simplicity of the white enhances the daisy details, making them stand out beautifully. This manicure is ideal for those who appreciate minimalistic beauty with a touch of whimsy.
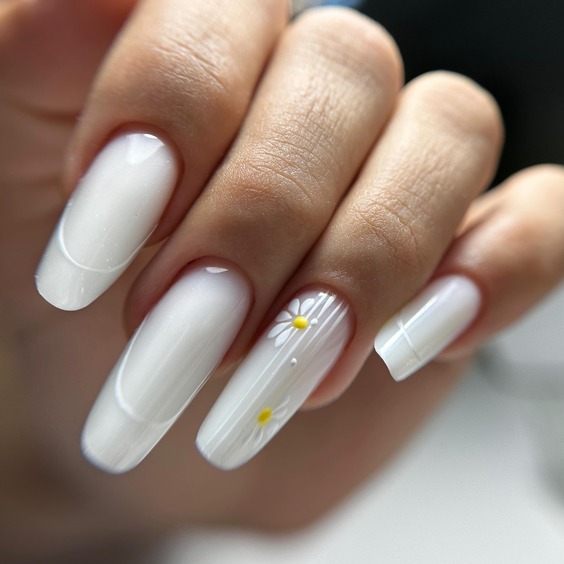
Consumables for Creating This Nail Design
- Sheer White Polish: Essie’s Marshmallow.
- Yellow Polish: For the daisy centers.
- Fine Brush: For detailed petal painting.
- Top Coat: A matte finish to keep the look soft and subtle.
Professional tip: Use a fine brush to carefully paint each petal, ensuring they’re evenly spaced and symmetrical.
DIY Instructions
Apply a base coat followed by two layers of sheer white polish. Use a fine brush dipped in yellow polish to dot the centers of your daisies, then use the same brush with white polish to draw small petals around each center. Apply a matte top coat to finish the design, giving it a sophisticated, soft look.
Sophisticated Black and White Elegance
This design is a testament to the timeless elegance of black and white. The glossy white base paired with bold black zebra stripes offers a dramatic contrast that’s both sophisticated and striking. This manicure is perfect for those who appreciate classic styles with a bold twist, making it a versatile choice for both day and evening wear.
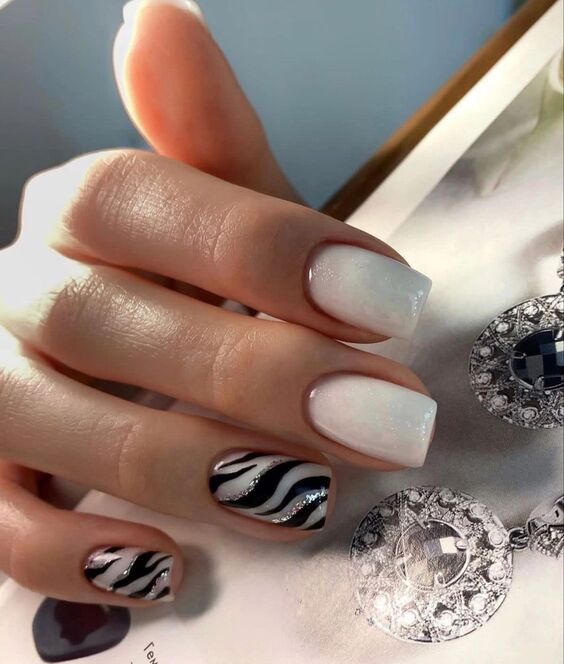
Consumables for Creating This Nail Design
- White Polish: Essie’s Blanc for a pure white base.
- Black Polish: OPI’s Black Onyx for sharp, defined stripes.
- Detail Brush: For precise stripe application.
- Top Coat: A glossy finish to enhance the contrast and durability.
Professional tip: Use a detail brush to paint the stripes, allowing each stripe to slightly curve for a more natural zebra pattern.
DIY Instructions
Begin with a base coat to protect your nails. Apply two coats of white polish and let them dry completely. Using a detail brush, paint black zebra stripes on selected nails. Finish with a glossy top coat to protect your design and add shine.
Floral Fantasy in Spring Tones
This delightful design features intricate floral patterns over a sheer white base, adorned with tiny pink blossoms and delicate greenery. It’s reminiscent of a spring garden in bloom, ideal for anyone looking to carry the freshness of spring into summer. The meticulous detail in the flowers shows a high level of craftsmanship and artistic flair.
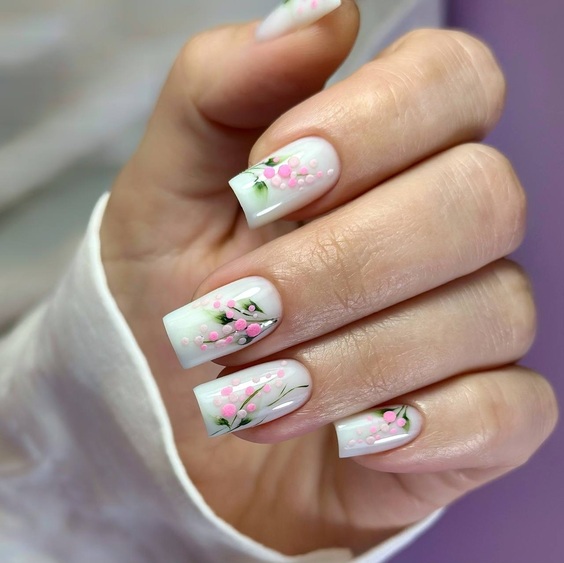
Consumables for Creating This Nail Design
- Sheer White Polish: Essie’s Marshmallow for a translucent base.
- Pink and Green Polish: For the flowers and leaves.
- Fine Detail Brush: For painting intricate designs.
- Top Coat: A matte finish to keep the design understated and elegant.
Professional tip: Layer the polish to create depth in the flowers and use very fine strokes to add detail to the leaves.
DIY Instructions
Apply a base coat followed by one layer of sheer white polish. Using the fine detail brush, paint small pink flowers and add green leaves around them. Apply a second thin layer of sheer white polish over the flowers for a soft, embedded look. Finish with a matte top coat for a refined, modern matte appearance.
Bold Geometric Lines in Emerald
This striking design combines sharp geometric lines in a rich emerald green over a glossy white base, creating a bold and modern look. The angular lines provide a dynamic contrast to the soft white, making this manicure an excellent choice for those seeking a statement piece that’s both chic and commanding.
Consumables for Creating This Nail Design
- White Polish: OPI’s Alpine Snow.
- Emerald Green Polish: Essie’s Off Tropic for the vivid lines.
- Tape: For crisp, straight lines.
- Top Coat: A high-gloss finish to seal and protect the design.
Professional tip: Use tape to mask off areas where you want the lines, ensuring they are perfectly straight and evenly spaced.
DIY Instructions
Start with a base coat to protect your nails. Apply two coats of white polish as the base. Once dry, place strips of tape to outline where you want the green lines. Paint over the tape with the emerald polish, remove the tape carefully while the polish is still wet, and let dry. Apply a glossy top coat to enhance the colors and add a professional finish.
Trendy Taupe with Leopard Print
This design is a chic nod to the wild side with its trendy taupe base overlaid with bold leopard prints. The warm taupe provides a perfect backdrop for the detailed black and brown spots, offering a sophisticated yet adventurous vibe. This manicure is ideal for those who want to make a fashion statement while keeping their look elegant and understated.
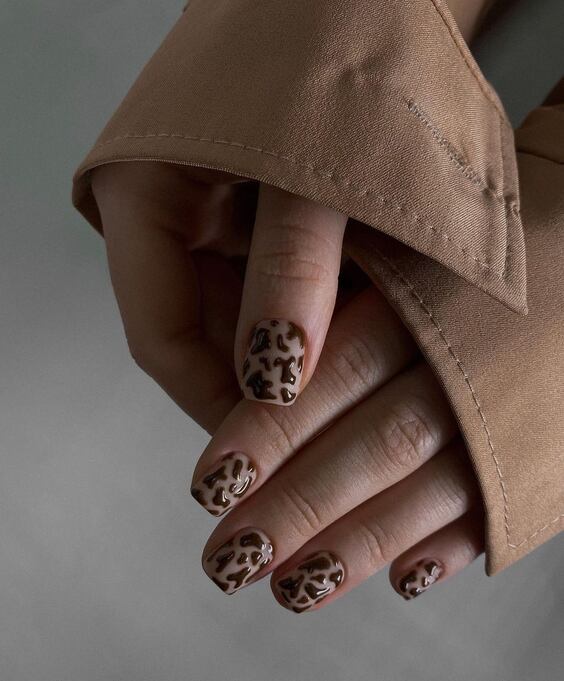
Consumables for Creating This Nail Design
- Taupe Polish: Essie’s Mink Muffs.
- Black and Brown Polish: For the leopard spots.
- Detail Brush: For intricate spot detailing.
- Top Coat: A glossy finish to enhance the design’s depth.
Professional tip: Space the leopard spots randomly to mimic the natural irregularity of animal print.
DIY Instructions
Start with a taupe base on all nails. Use a detail brush to add leopard spots with brown polish, then outline parts of each spot with black for definition. Finish with a glossy top coat to seal the design and add shine.
Electrifying Green Metallic
This electrifying green metallic design captures the essence of vibrant summer energy. The high-gloss metallic finish reflects light beautifully, making it a standout choice for summer parties or night-outs. The deep, rich shade of green is both bold and beautiful, perfect for those looking to add a pop of color to their look.
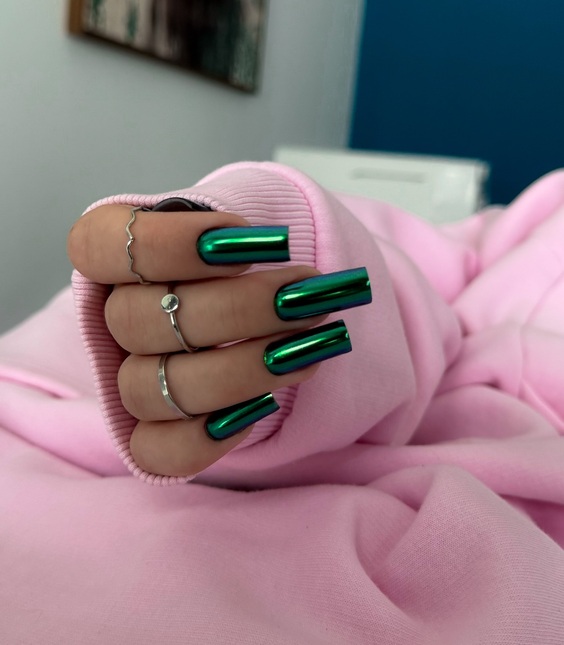
Consumables for Creating This Nail Design
- Metallic Green Polish: OPI’s My Gecko Does Tricks.
- Top Coat: A high-gloss top coat to maximize the metallic sheen.
Professional tip: Apply the polish in thin layers to avoid streaking and ensure even coverage.
DIY Instructions
Apply a base coat to protect your nails. Then, apply two coats of the metallic green polish, waiting a few minutes between each coat to prevent dragging. Finish with a high-gloss top coat to enhance the metallic effect and prolong the wear.
Classic Green with Modern Zebra Twist
This manicure combines a classic rich green base with a modern twist of white zebra stripes. The look is dynamic and eye-catching, blending classic elegance with contemporary artistry. It’s a versatile design that can transition effortlessly from daytime casual to evening sophistication.
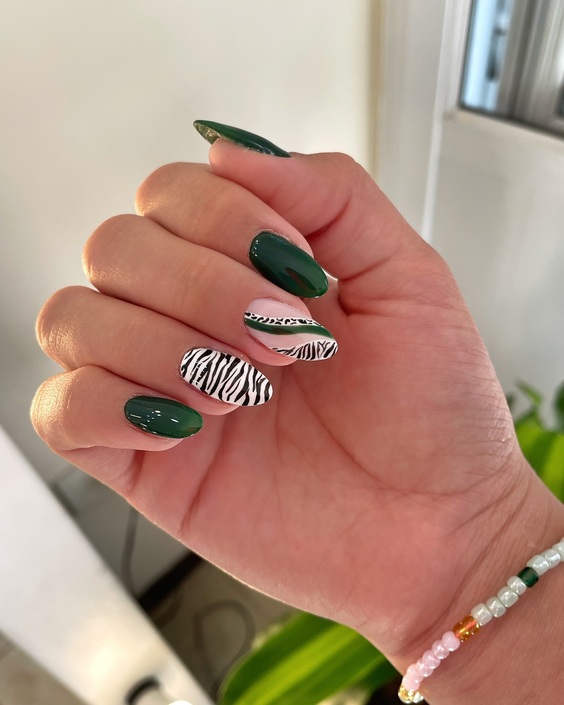
Consumables for Creating This Nail Design
- Green Polish: Sally Hansen’s Jungle Gem.
- White Polish: For the zebra stripes.
- Striping Tape: To achieve clean, precise lines.
- Top Coat: A layer of glossy top coat for a seamless finish.
Professional tip: Use striping tape to create the zebra patterns for a neat and professional look.
DIY Instructions
Paint your nails with two coats of the green polish as the base. Once dry, apply striping tape in zebra patterns and paint over it with white polish. Remove the tape carefully before the polish dries completely. Seal with a glossy top coat for a smooth finish.
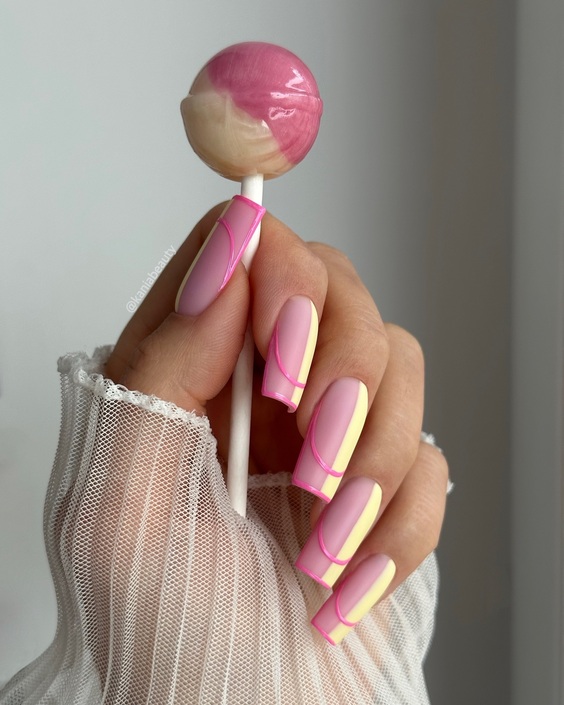
Playful Pastels with Geometric Accents
This nail design is a fresh take on summer fun, combining vibrant pastel yellow and pink with bold geometric accents. The design is playful and energetic, ideal for lively summer days or festive occasions. The clean lines and contrasting colors make it a visually captivating choice that’s sure to draw attention.
Consumables for Creating This Nail Design
- Pastel Yellow Polish: Sally Hansen’s Mellow Yellow.
- Pastel Pink Polish: Essie’s Mod Square.
- White Polish: For the geometric detailing.
- Striping Tape: For precise lines.
- Top Coat: A glossy finish to enhance the colors and longevity.
Professional tip: Use striping tape to create sharp, clean lines for the geometric patterns.
DIY Instructions
Apply a base coat to protect your nails. Paint all nails with two coats of pastel yellow. For the accent nails, use striping tape to section off areas and fill them in with pastel pink and white. Carefully remove the tape while the polish is still slightly wet, then finish with a glossy top coat for a smooth and vibrant look.
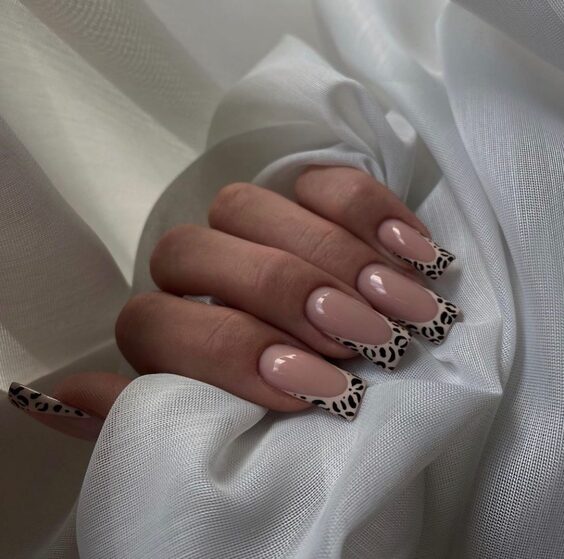
Classic Nude with Leopard Print Edges
This design offers a sophisticated twist on the classic nude manicure by incorporating bold leopard print edges. It combines the subtlety of a nude base with the wildness of leopard print, making it perfect for those who enjoy a touch of the exotic without overwhelming their style. This manicure is both versatile and chic, suitable for both office environments and social gatherings.
Consumables for Creating This Nail Design
- Nude Polish: OPI’s Samoan Sand.
- Black and Brown Polish: For the leopard details.
- Detail Brush: For precise spot painting.
- Top Coat: A glossy finish to ensure durability and shine.
Professional tip: Paint the leopard spots along the edge of the nail for a unique take on a French tip.
DIY Instructions
Start with a base coat, then apply two coats of nude polish. Using a detail brush, create small leopard spots along the tip edges of each nail with brown polish, then outline them lightly with black. Finish with a glossy top coat to seal the design and add a polished look.
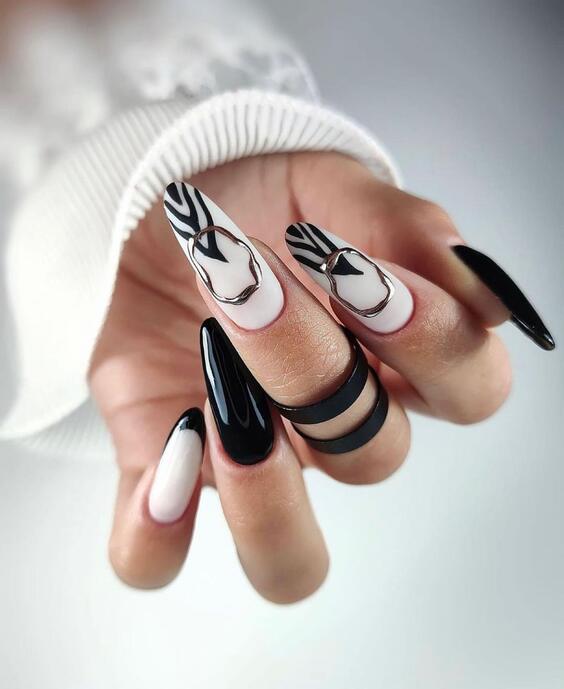
Bold Black and White with Artistic Flair
This striking design blends bold black with pure white, accented with artistic zebra stripes and abstract shapes. The manicure is a statement piece, combining classic colors with a modern artistic twist. It’s perfect for fashion-forward individuals who want to make a statement with their nail art.
Consumables for Creating This Nail Design
- White Polish: OPI’s Alpine Snow.
- Black Polish: Essie’s Licorice.
- Striping Brush: For detailed line work.
- Top Coat: A glossy finish to protect the art and enhance the contrast.
Professional tip: Use a very fine striping brush to achieve the delicate lines and shapes with precision.
DIY Instructions
Paint your nails with two coats of white polish as the base. Use a striping brush to draw bold black patterns and zebra stripes on the accent nails. Allow each design to dry thoroughly before applying a top coat to avoid smudging. Finish with a layer of glossy top coat for a dramatic, eye-catching effect.
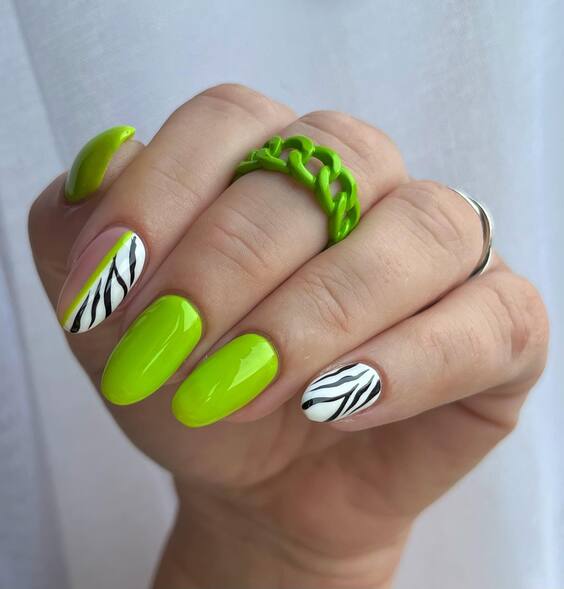
Vibrant Zebra Stripes with Neon Green
This nail design pairs the electric vibrancy of neon green with the timeless pattern of zebra stripes, creating a bold and energetic look. The neon green nails serve as a striking backdrop for the dramatic white and black zebra patterns on the accent nails. This design is perfect for those who love to stand out and express their unique style through vibrant colors and dynamic patterns.
Consumables for Creating This Nail Design
- Neon Green Polish: China Glaze’s Lime After Lime.
- White and Black Polish: For the zebra stripes.
- Detail Brush: For precise stripe detailing.
- Top Coat: A glossy finish to protect and enhance the design.
Professional tip: Paint the zebra stripes freehand with a detail brush to add a personal artistic touch.
DIY Instructions
Apply a base coat to protect your nails. Paint all but the accent nails with neon green. For the zebra stripes, use a detail brush to alternate between white and black stripes on the remaining nails. Finish with a glossy top coat to ensure longevity and brilliance.
Soft Blue and Pink Gradient with Crystals
This design showcases a delicate gradient from soft blue to pale pink, adorned with sparkling crystal accents for a touch of luxury. The smooth transition between colors evokes a serene, dreamy vibe, while the crystals add a hint of glamour, making this manicure ideal for both day-to-day elegance and special occasions.
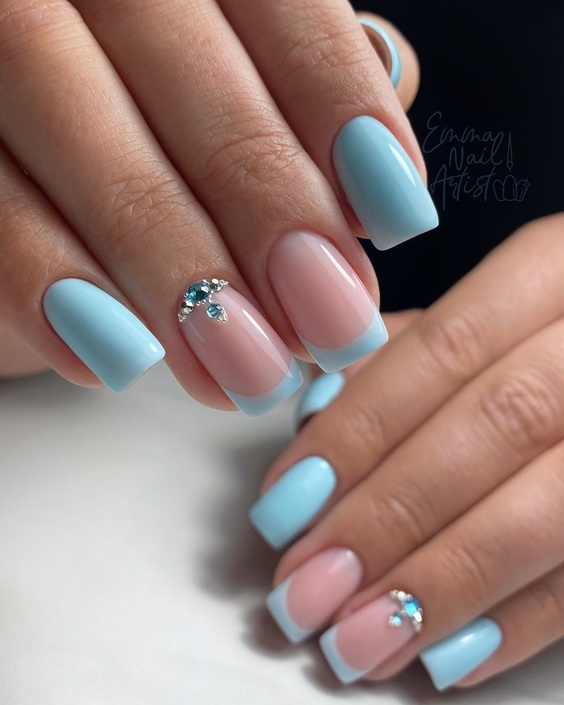
Consumables for Creating This Nail Design
- Soft Blue Polish: Essie’s Bikini So Teeny.
- Pale Pink Polish: OPI’s Bubble Bath.
- Crystals: Small rhinestones for nail art.
- Top Coat: A thick top coat to secure the crystals.
Professional tip: Use a makeup sponge to dab the gradient effect smoothly onto the nails.
DIY Instructions
Start with a pale pink base, then use a sponge to apply soft blue at the tips, blending into the pink for a gradient effect. Carefully place crystals near the cuticle area or on the color transition line for a decorative touch. Seal with a top coat to secure the crystals and enhance the gradient’s smoothness.
Royal Blue with Golden Marble Accents
This regal design features deep royal blue with luxurious golden marble accents, creating a sophisticated and opulent look. The vibrant blue provides a rich canvas for the swirling gold patterns, which are highlighted with white to add depth and dimension. This manicure is perfect for anyone wanting to add a splash of majestic elegance to their nail art.
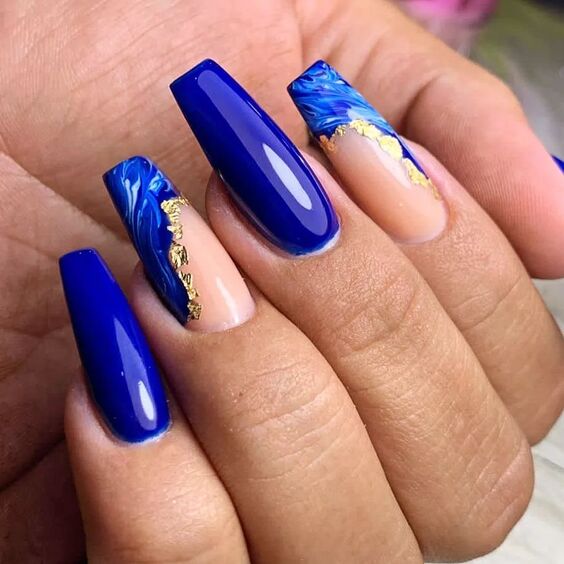
Consumables for Creating This Nail Design
- Royal Blue Polish: Sally Hansen’s Royal Hue.
- Gold and White Polish: For the marble effect.
- Detail Brush and Dotting Tool: For marble detailing.
- Top Coat: A glossy finish to protect and enhance the design.
Professional tip: Use a detail brush to swirl the gold and white together while still wet to achieve a natural marble effect.
DIY Instructions
Paint your nails with the royal blue as the base. Drop small dots of gold and white polish onto the nail and use a detail brush or toothpick to swirl the colors together for a marble effect. Work quickly before the polish dries to ensure smooth marbling. Finish with a glossy top coat to set and shine the design.
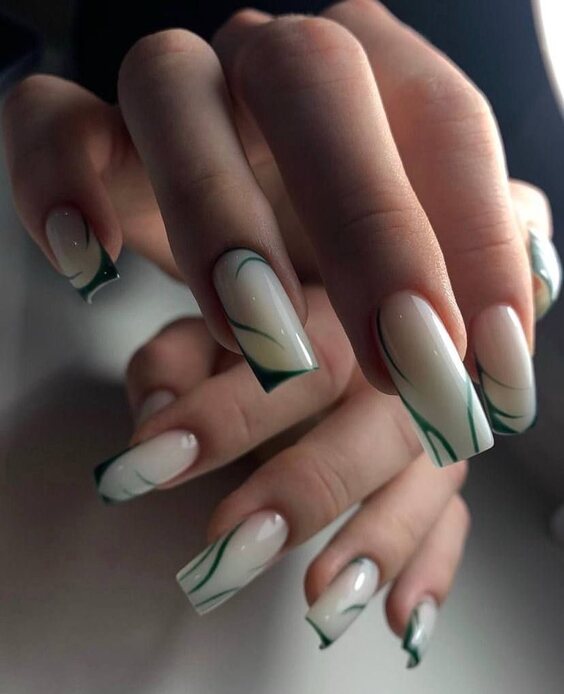
Fresh Green and White Abstract Art
This innovative design features a captivating mix of fresh green hues with abstract white patterns over a translucent base, creating a dynamic and artistic look. The abstract swirls mimic the natural flow of marble or the ripples on water, offering a refreshing and serene vibe that’s perfect for any summer day.
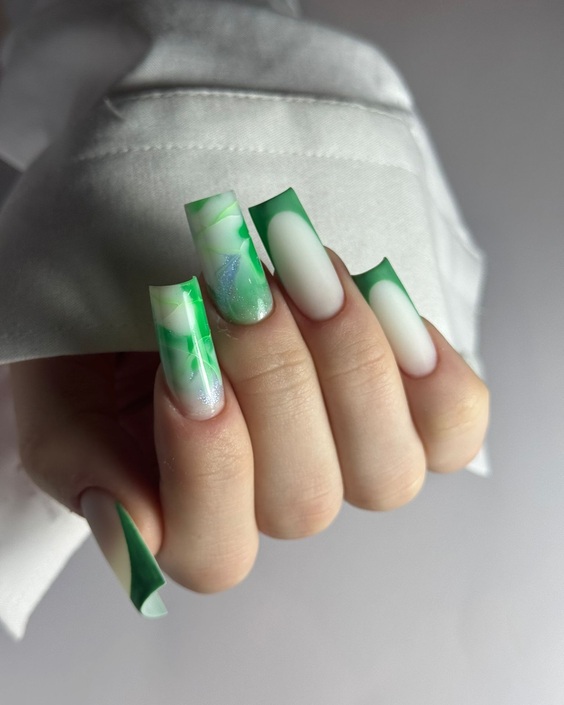
Consumables for Creating This Nail Design
- Translucent White Polish: Essie’s Marshmallow.
- Green Polish: A variety of green shades for the gradient effect.
- Detail Brush: For intricate swirls and lines.
- Top Coat: A glossy finish to protect the design and enhance the colors.
Professional tip: Blend different shades of green while they are still wet to achieve a smooth and natural gradient effect.
DIY Instructions
Start with a base coat to protect your nails. Apply a thin layer of translucent white polish as the base. Use a detail brush to drop different shades of green polish onto the nail and swirl them together with a clean brush to create abstract patterns. Finish with a glossy top coat for a smooth and shiny appearance.
Moody Cloud Marble in Shades of Gray
This manicure draws inspiration from stormy skies, featuring a marbled effect in various shades of gray. The cloudy marble pattern is elegantly spread across each nail, offering a look that’s both mysterious and sophisticated. This design is perfect for those who appreciate a more subdued, yet strikingly artistic nail art style.
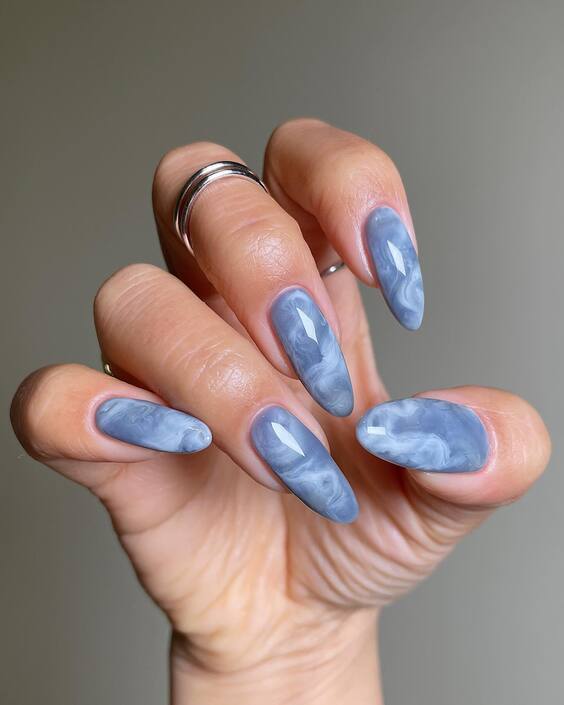
Consumables for Creating This Nail Design
- Gray Polish: Multiple shades of gray for the marbled effect.
- Detail Brush: For creating fine marble lines.
- Blending Sponge: To softly blend the grays together.
- Top Coat: A matte finish to mimic the soft, diffuse look of clouds.
Professional tip: Use a dry brush technique to lightly drag the polish across the nail, creating soft, wispy lines that resemble marble.
DIY Instructions
Apply a base coat to protect your nails. Paint a light gray base, then while wet, add drops of darker gray polish. Use a detail brush or a clean, dry sponge to softly blend and drag the colors into a marbled pattern. Finish with a matte top coat to enhance the cloud-like appearance of the marble.