22 Stunning American Flag Nails: Patriotic Manicure Designs for the 4th of July

Who says patriotism can’t be stylish? With American Flag Nails, you can wear your pride right at your fingertips. Whether gearing up for the 4th of July or simply celebrating your love for the USA, these nail designs offer a creative way to showcase your spirit. But what makes American flag nails so special? Let’s dive into some stunning designs and find out how you can achieve these looks at home.
Celebrating with Classic Reds and Bold Blues
The nails featured in this design scream celebration with their vibrant hues of red and electric blue, accented with gleaming white stars. The combination not only reflects the American flag but also brings out a sense of festivity and pride. The glossy finish adds an extra layer of sophistication, making these nails perfect for both a casual barbecue and a formal celebration.
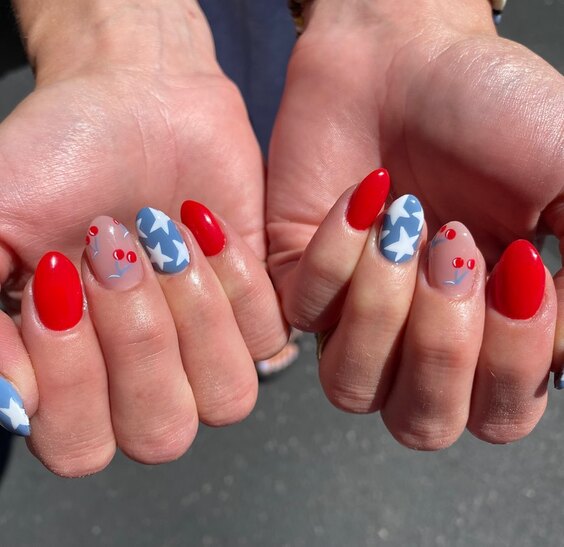
Photo credit by: @nailsby.syd
2. Consumables Needed:
- Base Coat: OPI Natural Base Coat
- Red Polish: Essie’s “Really Red”
- Blue Polish: Sally Hansen’s “Pacific Blue”
- White Polish for Stars: China Glaze’s “White on White”
- Top Coat: Seche Vite Dry Fast Top Coat
- Thin Art Brush or Dotting Tool for star details
3. DIY Instructions: Start with a clean, prepped nail with a base coat to protect your nails. Apply two coats of ‘Really Red’ on all nails except for one accent nail, which will be in ‘Pacific Blue’. Once dry, use a thin art brush to paint white stars on the blue nail. Finish all nails with a fast-drying top coat for a lasting glossy look.
Subtle Patriotism: American Flag French Tips
This design takes a minimalist approach by incorporating the flag theme into the classic French tip. The delicate stripes and tiny stars on the tips make it a subtler nod to patriotism, ideal for those who prefer understated elegance. The matte finish juxtaposes brilliantly with the bright colors, offering a modern twist on the traditional flag colors.
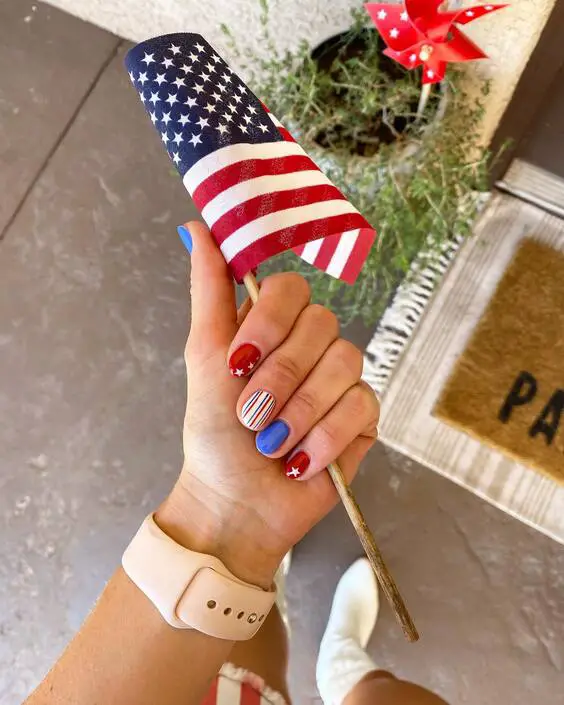
Photo credit by: @bestbang4yourbuck
2. Consumables Needed:
- Base Coat: CND Stickey Base Coat
- Matte Top Coat: Matte Look Top Coat by OPI
- Red, White, and Blue Polish: Same as above
- Striping Tape for precise lines
- Fine Detail Brush for stars
3. DIY Instructions: After the base coat, apply a matte nude polish as the background. Use striping tape to section off the tips, then paint alternating stripes of red and white. For a single blue stripe at the edge of the nail, use a fine brush to add small white stars. Finish with a matte top coat for a chic look.
Vibrant Party Ready: Bold Stripes and Stars
Perfect for a party or festive event, these nails use bold, bright stripes and contrasting stars to create a lively and eye-catching design. The use of a shimmering blue adds a playful element to the otherwise straightforward stripes, making the stars stand out even more.
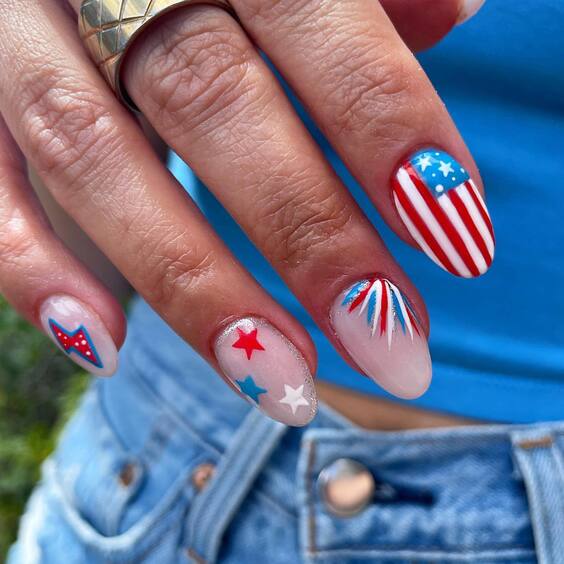
Photo credit by: @nailpromagazine
2. Consumables Needed:
- Base Coat and Top Coat: Same as above
- Shimmering Blue Polish: Revlon’s “Urban”
- Red and White Polish: Same as above
- Silver Glitter for a touch of sparkle
3. DIY Instructions: Prepare your nails with a base coat. Apply two coats of ‘Really Red’ on alternating nails, and ‘Urban’ blue on others. Once dry, use striping tape to help paint precise white stripes. On blue nails, add a coat of silver glitter before placing white star stickers or hand-painting stars. Seal everything with a glossy top coat.
Fun and Festive: Mixed Design Manicure
This lively manicure set showcases a delightful assortment of designs, each nail telling its own patriotic story. The contrast between the bold stripes, delicate stars, and the speckled blue nail provides a dynamic and fun visual array that’s perfect for any celebration. This look is ideal for those who love a bit of variety and creativity on their nails.
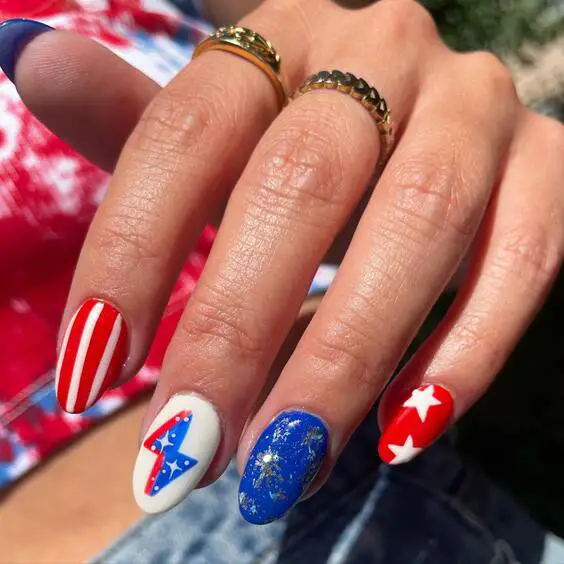
Photo credit by: @beautybyles
2. Consumables Needed:
- Base Coat: Essie’s “Here to Stay”
- Red Polish: OPI’s “Big Apple Red”
- Blue Glitter Polish: Deborah Lippmann’s “Across the Universe”
- White Polish: Sally Hansen’s “White On”
- Detailing Brush for intricate designs
- Glitter Top Coat for a sparkling finish
3. DIY Instructions: Begin with a base coat to protect your nails. For the striped nails, use ‘Big Apple Red’ and ‘White On’ with a detailing brush to create clean lines. For the star-themed nail, apply a white base and use a small brush to draw red and blue stars. The speckled blue nail can be achieved by applying ‘Across the Universe’, finishing with a glitter top coat for a festive sparkle.
Sophisticated Celebrations: Almond-Shaped Artistry
The almond-shaped nails offer a sophisticated canvas for showcasing intricate American flag-inspired art. This design features detailed patterns including a fireworks effect, which symbolically captures the excitement and beauty of Independence Day celebrations. The use of soft pastels alongside vivid reds and blues adds a unique twist to the patriotic theme.
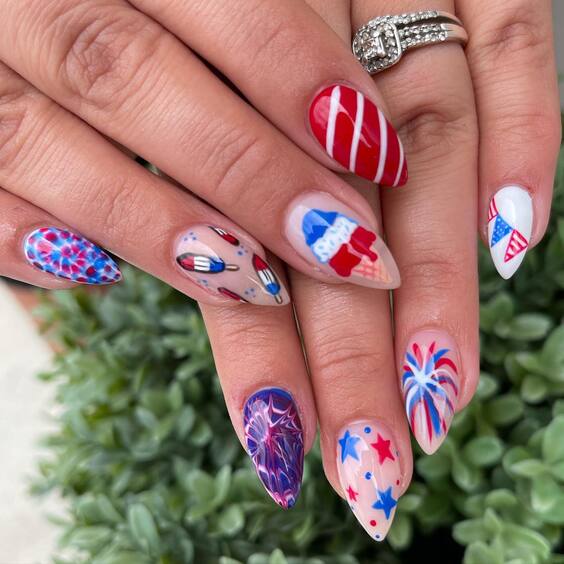
Photo credit by: @nailsby_amberg
2. Consumables Needed:
- Base Coat: Butter London Nail Foundation
- Pastel Blue and Red Polishes: Ciaté London’s range
- White Liner Polish: Orly’s “White Tips”
- Detailing Brushes for fine lines
- Matte Top Coat for a modern finish
3. DIY Instructions: Apply a base coat to start. Use pastel blue and red polishes to create the base colors on different nails. Employ detailing brushes to add intricate designs such as fireworks and stripes. Use white liner polish for highlights and stars. Finish with a matte top coat to enhance the detailed artwork without high shine.
Bold and Blue: Classic with a Twist
This design reinvents the classic American flag theme by focusing on blue as the dominant color, accented with striking red and white details. The inclusion of stripes and stars in a varied arrangement gives this design a fresh and modern feel, perfect for those looking to make a bold statement during patriotic events.
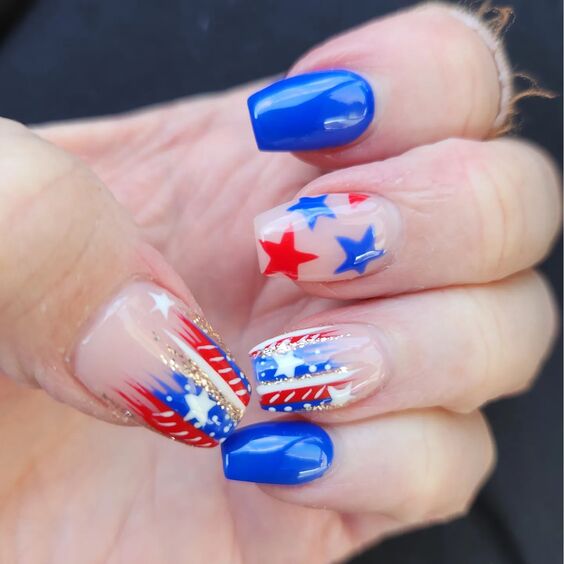
Photo credit by: @sawsquash
2. Consumables Needed:
- Base Coat: OPI Nail Envy
- Blue Polish: Essie’s “Butler Please”
- Red and White Striping Polish: Stripe Rite
- Gold Glitter Stripes: using a fine glitter liner
- Glossy Top Coat for shine and protection
3. DIY Instructions: Prepare the nails with a base coat. Apply two coats of ‘Butler Please’ for a solid blue base. Use Stripe Rite in red and white to create alternating stripes and star patterns. Add a touch of gold glitter stripes for an elegant contrast. Seal the design with a glossy top coat for durability and shine.
Classic Elegance: Red, White, and Blue Perfection
This design captures the essence of patriotic elegance with its clean lines and classic color palette. The alternating red and white stripes paired with a bold blue with white stars on the accent nails embodies the American flag. The glossy finish adds to the overall crisp and polished appearance, making it a great choice for any patriotic gathering or everyday wear.
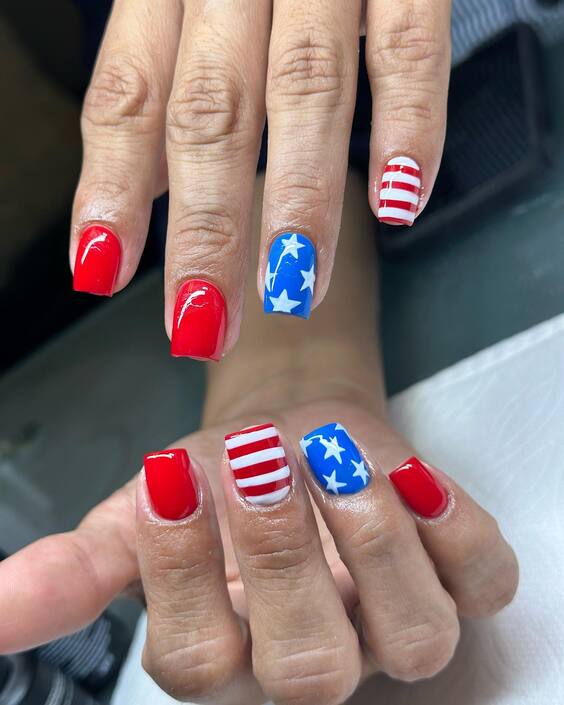
Photo credit by: @esme25sz
2. Consumables Needed:
- Base Coat: Deborah Lippmann Gel Lab Pro Base Coat
- Red Polish: OPI’s “Big Apple Red”
- White Polish: Sally Hansen’s “White On”
- Blue Polish: Essie’s “Butler Please”
- Top Coat: Seche Vite Dry Fast Top Coat
- Detailing Brush for stripes and stars
3. DIY Instructions: Start with a base coat to protect the nails. Apply ‘Big Apple Red’ and ‘White On’ alternately on each nail for the stripes. Use ‘Butler Please’ on the accent nails, and with a detailing brush, create small white stars. Apply a top coat for a glossy finish that lasts.
Artistic Flair: Glamorous Detailed Designs
This set goes beyond traditional designs by incorporating intricate detailing with rhinestones and gradients. The combination of sparkling embellishments and vivid, gradient stripes creates a luxurious and eye-catching display that’s sure to turn heads. This design is perfect for those who want to celebrate with a touch of glamour.
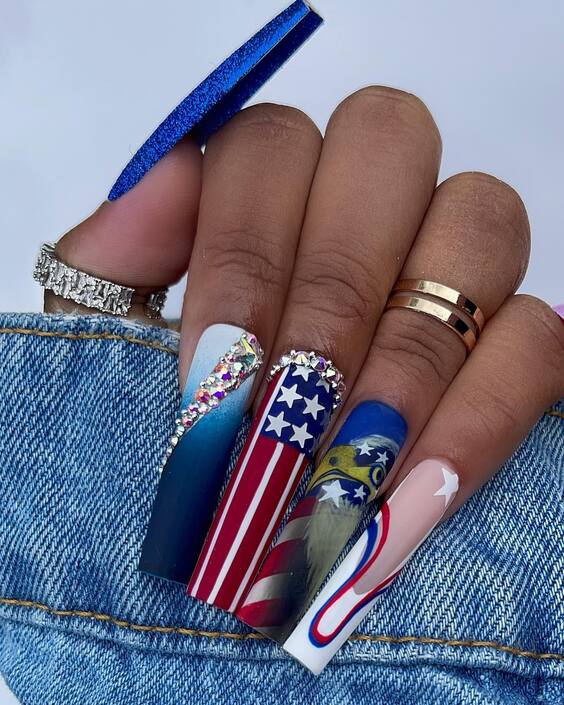
Photo credit by: @nailsbyyjenn__
2. Consumables Needed:
- Base Coat: OPI Natural Nail Base Coat
- Gradient Polishes: Red to blue gradient using OPI’s “Big Apple Red” and “Russian Navy”
- White Acrylic Paint for detailed art
- Rhinestones and Gems: Assorted sizes for embellishment
- Top Coat: INM Out the Door Top Coat for sealing designs
3. DIY Instructions: Apply a base coat to protect the nails. For the gradient effect, use a sponge to dab on the transition from ‘Big Apple Red’ to ‘Russian Navy’. Once dry, use white acrylic paint for fine details. Adorn with rhinestones and seal with a fast-drying top coat.
Bold and Beautiful: A Tribute to Freedom
This vibrant design pairs deep blues with bright reds, accented by playful stripes and polka dots to celebrate freedom and independence. The clever use of space with the asymmetrical placement of stars adds a modern twist to the traditional flag elements. This design is both fun and festive, ideal for a celebration or as a bold everyday look.
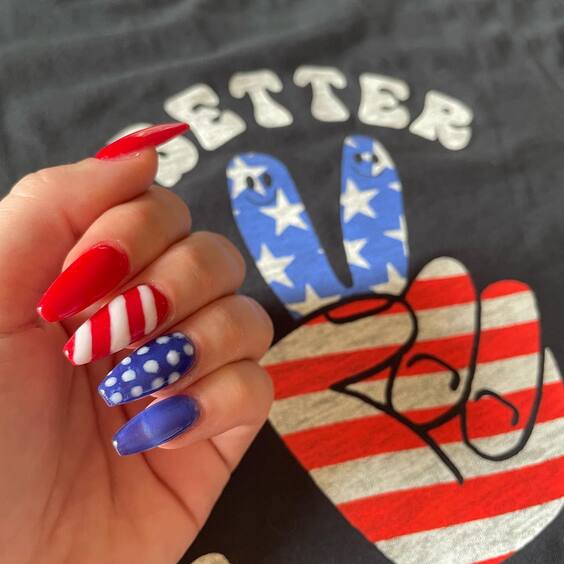
Photo credit by: @tundradip
2. Consumables Needed:
- Base Coat: CND Sticky Base Coat
- Blue Polish: Essie’s “Mesmerize”
- Red Polish: China Glaze’s “With Love”
- White Polish: Orly’s “White Tips”
- Polka Dot Tool or small brush
- Top Coat: Essie’s Gel Setter Top Coat
3. DIY Instructions: Begin with a base coat to prep the nails. Apply ‘Mesmerize’ on the base, and ‘With Love’ for stripes using a striping brush. Add white polka dots on the blue sections using a dotting tool or small brush. Place asymmetrical stars using ‘White Tips’. Finish with a top coat for a glossy and durable finish.
Flowing Flags: Waves of Patriotism
This set features a mesmerizing flow of red, white, and blue waves that mirror the fluidity and grace of the American flag blowing in the breeze. The sinuous lines create a dynamic visual effect, symbolizing the enduring spirit of the nation. This design is perfect for those who want to express their patriotism in a unique and artistic way.
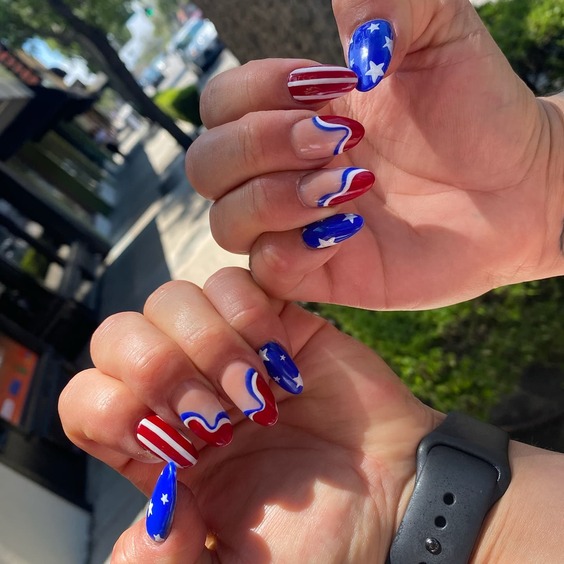
Photo credit by: @polishmeprettynailbar
2. Consumables Needed:
- Base Coat: Orly Bonder Rubberized Base Coat
- Red, White, and Blue Polishes: Essie’s “Really Red,” “Blanc,” and “Mesmerize”
- Detailing Brush for drawing waves
- Top Coat: Essie’s Good to Go Top Coat
3. DIY Instructions: Begin with a base coat to ensure your manicure lasts. Paint a base layer with ‘Blanc’ to brighten the colors that will follow. Use the detailing brush to paint intertwining waves of ‘Really Red’ and ‘Mesmerize.’ Finish with a top coat to protect the design and add a glossy sheen.
High Gloss and High Glamour: Long and Luxurious
The long stiletto nails provide a dramatic backdrop for this glamorous interpretation of the American flag. The glossy finish and precise detailing with rhinestones enhance the striking contrast of red and blue, while the sparkling accents emulate the stars of the flag, adding an element of luxury and festivity.
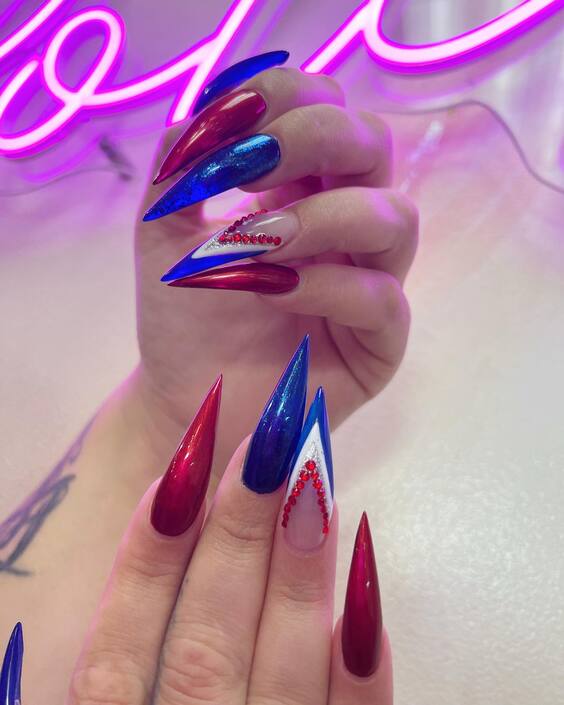
Photo credit by: @polishmenaillounge
2. Consumables Needed:
- Base Coat: CND Sticky Base Coat
- Red and Blue Gel Polishes: Gelish “Red Roses” and “Caution”
- Rhinestones: Varying sizes for accent
- Gel Top Coat: Gelish Top It Off Sealer Gel for a durable shine
3. DIY Instructions: Apply a base coat followed by two coats of gel polish in ‘Red Roses’ and ‘Caution.’ Use a fine-tip brush to add detailed accents. Embellish with rhinestones for a touch of sparkle. Cure under a UV lamp and seal with a gel top coat for longevity and gloss.
Simple Yet Striking: A Modern Minimalist Take
This design offers a minimalist approach with clean lines and simple color blocks. The red, white, and blue are arranged in a straightforward yet effective pattern, making it a versatile choice that pairs well with any outfit, ideal for both casual gatherings and more formal patriotic events.
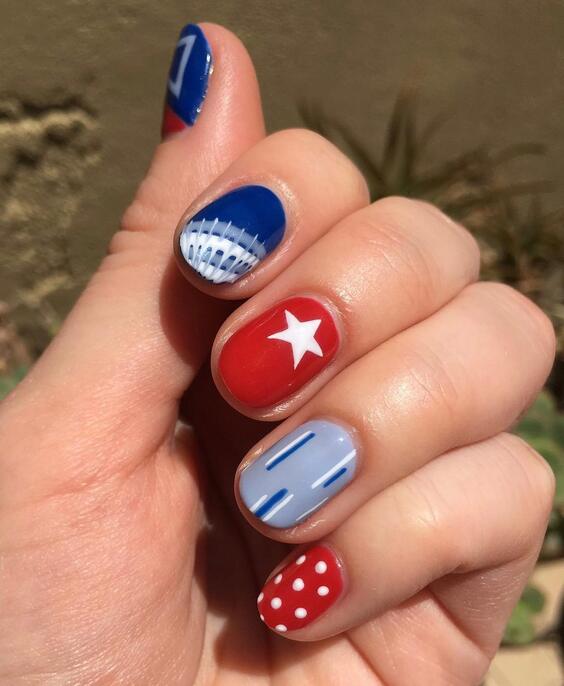
Photo credit by: @lollipopnailstudio
2. Consumables Needed:
- Base Coat: Essie Here to Stay Base Coat
- Polishes: OPI’s “Alpine Snow,” “Big Apple Red,” and “Yoga-ta Get This Blue”
- Striping Tape for precise lines
- Top Coat: OPI Rapidry Top Coat
3. DIY Instructions: After applying the base coat, use ‘Alpine Snow’ as a base color. Once dry, use striping tape to section off areas for ‘Big Apple Red’ and ‘Yoga-ta Get This Blue.’ Carefully paint each section, remove the tape while the polish is still tacky, and finish with a quick-drying top coat for a sleek finish.
Stately Stripes and Starry Accents
This design perfectly balances boldness and tradition, featuring classic red and blue hues with crisp white accents. The star-spangled nails complement the bold stripes, embodying the flag’s essence with a stylish twist. This manicure is ideal for any patriotic event, offering a chic yet spirited look.
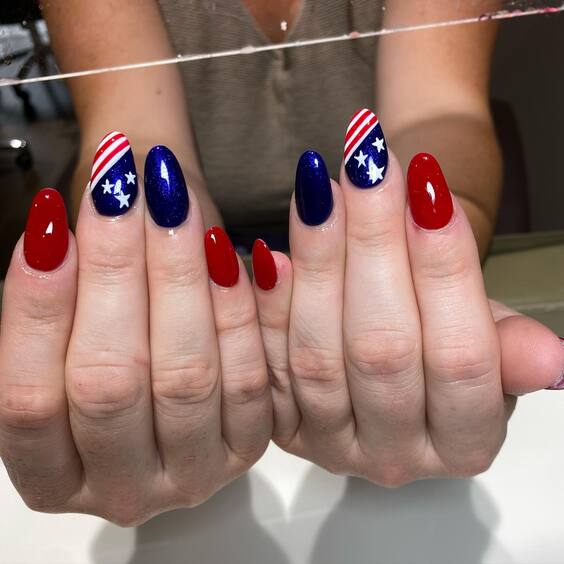
Photo credit by: @lilysfantasynails
2. Consumables Needed:
- Base Coat: Sally Hansen Double Duty
- Red, White, and Blue Polishes: Essie’s “Geranium,” “Blanc,” and “Butler Please”
- Top Coat: OPI Top Coat for a smooth, lasting finish
- Star Stickers or decals for precise star shapes
3. DIY Instructions: Apply a base coat to protect your nails. Paint all nails in ‘Geranium.’ For the striped nails, use tape as guides and paint over with ‘Blanc.’ For the starry accent, apply ‘Butler Please’ and place star stickers. Finish with a clear top coat to seal in the design and add gloss.
Sparkling Celebration: Fireworks and Festivity
Inspired by the dazzling fireworks of Independence Day, this design mixes glitter with traditional colors for a celebratory explosion of style. The silver glitter nail acts as a sparkling centerpiece, surrounded by bold red and dynamic blue nails, creating a spectacular display reminiscent of a Fourth of July night.
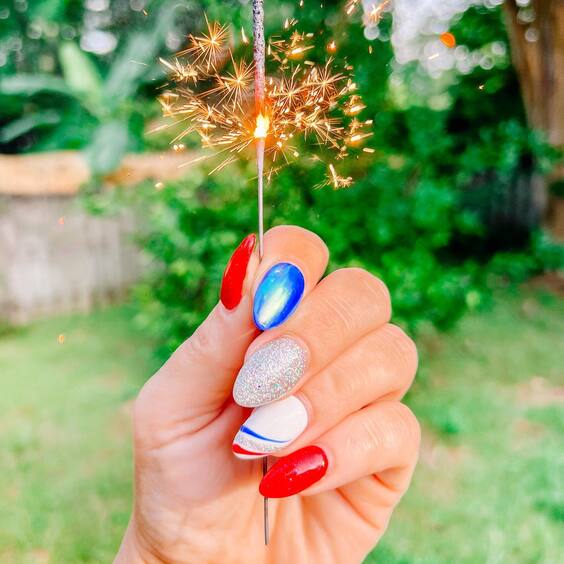
Photo credit by: @alylee.official
2. Consumables Needed:
- Base Coat: Orly Bonder
- Glitter Polish: Silver – OPI’s “Silver on Ice”
- Red and Blue Polishes: Essie’s “Forever Yummy” and “Avenue Maintain”
- Detailing Tool for fine accents
- Glossy Top Coat: INM Out the Door
3. DIY Instructions: Start with the Orly Bonder base coat. Apply ‘Forever Yummy’ and ‘Avenue Maintain’ on alternate nails. Use ‘Silver on Ice’ for the glitter effect on the central nail. Employ a detailing tool to add fine silver lines on the blue and red nails for extra sparkle. Finish with a glossy top coat.
Elegant Minimalism: Modern Patriotic Chic
This set elevates the American flag theme with a modern twist, using sharp lines and geometric shapes to create an understated yet striking design. The incorporation of subtle star accents and fine striping offers a sophisticated nod to patriotic themes, perfect for those who prefer elegance over extravagance.
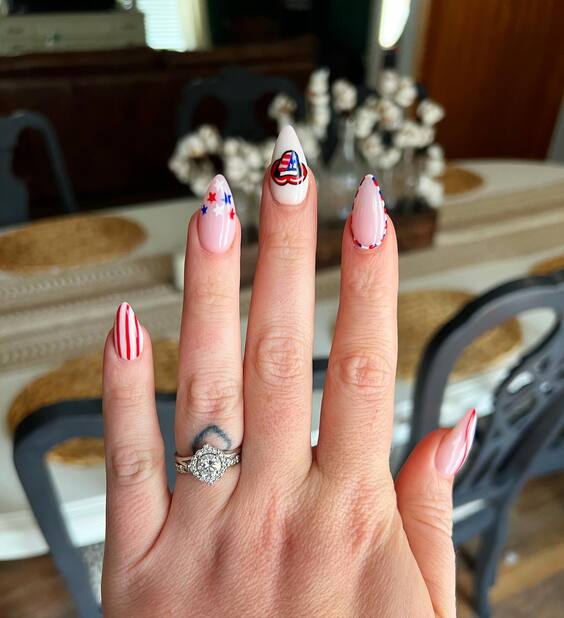
Photo credit by: @alexandrabuenotx
2. Consumables Needed:
- Base Coat: Essie’s Grow Stronger
- Polishes: OPI’s “Alpine Snow,” “Big Apple Red,” and “Yoga-ta Get This Blue”
- Striping Tape for geometric precision
- Small Stars Stencils
- Matte Top Coat: Matte About You by Essie
3. DIY Instructions: Apply a base coat for nail protection. Use ‘Alpine Snow’ as a base color. Strategically place striping tape and paint over with ‘Big Apple Red’ and ‘Yoga-ta Get This Blue’ for crisp lines. Apply small stars stencils for a delicate touch. Complete the design with a matte top coat for a contemporary look.
Delicate Artistry: Sleek and Chic
This design exudes elegance and creativity with a sleek base adorned with delicate swirls and star accents. The transparent nails with understated patriotic colors offer a modern, chic interpretation of the American flag, making it perfect for those who appreciate subtle yet fashionable nail art.
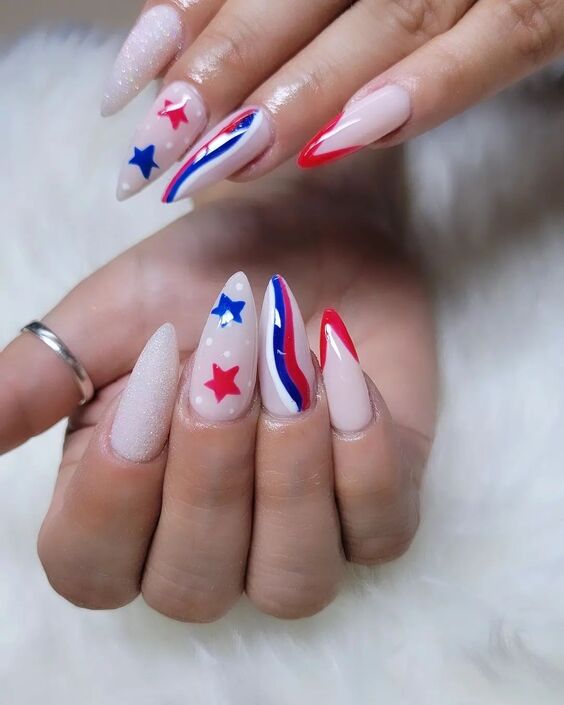
Photo credit by: @arte_nailstudio
2. Consumables Needed:
- Base Coat: Deborah Lippmann Gel Lab Pro Base Coat
- Clear Gel Polish: CND Shellac Clear Polish
- Red, White, and Blue Nail Art Paint: For detailed swirls and stars
- Thin Art Brush: For precise detail work
- Glossy Top Coat: Seche Vite Dry Fast Top Coat
3. DIY Instructions: Start with a base coat for a smooth foundation. Apply a layer of clear gel polish. With a thin art brush, gently draw swirls and stars using red, white, and blue nail art paint. This requires a steady hand and a bit of artistic flair. Seal the design with a glossy top coat to enhance durability and shine.
Playful Patriotism: Celebratory Symbols
Featuring a lively variety of patterns, from gingham checks to cartoon-inspired motifs, this set is all about fun and festivity. Each nail serves as a canvas for different symbols of American culture, making it an excellent choice for themed parties or national holidays.
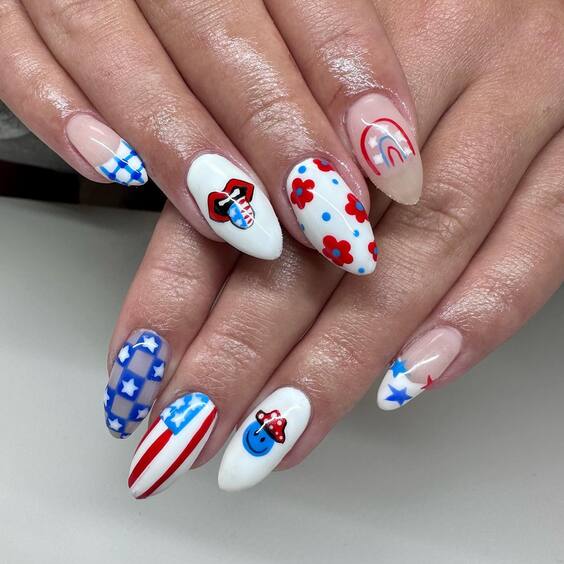
Photo credit by: @polishedbyjayy_
2. Consumables Needed:
- Base Coat: OPI Natural Nail Base Coat
- Polishes: A variety of colors for a multicolored design
- Detailing Brushes: For intricate designs
- Dotting Tools: For perfect dots and shapes
- Matte Top Coat: Matte Finish Top Coat for a contemporary look
3. DIY Instructions: Apply a base coat to protect your nails. Use different colors to create a base for each nail. With detailing brushes and dotting tools, add designs such as stripes, stars, gingham checks, and cartoon motifs. Consider using a matte top coat to give the playful designs a modern edge.
Unified Elegance: USA in Style
This design combines elegance with patriotism, featuring a sophisticated palette of red, white, and blue. The inclusion of the ‘USA’ letters on individual nails adds a direct nod to national pride, while the varied designs on each nail—from stripes to stars—keep the look dynamic and engaging.
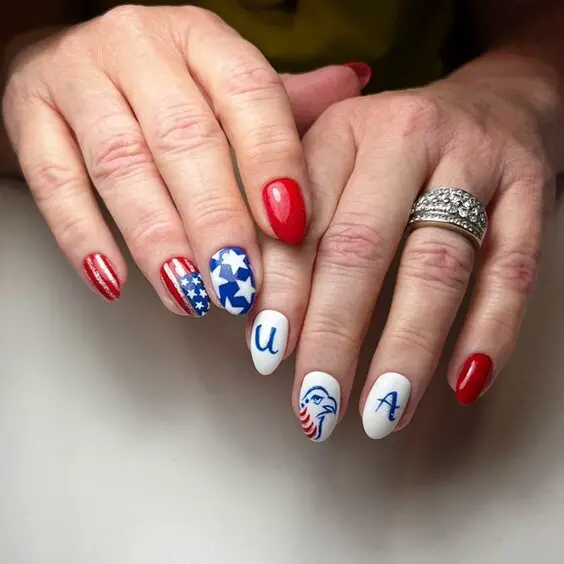
Photo credit by: @polishedpinkiespro
2. Consumables Needed:
- Base Coat: Essie All in One Base
- White, Red, and Blue Polishes: Essie’s “Blanc,” “Russian Roulette,” and “Butler Please”
- Fine Detail Brush: For lettering and intricate patterns
- Glossy Top Coat: INM Out the Door
3. DIY Instructions: Begin with a base coat to ensure a smooth canvas. Apply ‘Blanc’ as the base color on nails intended for detailed artwork. Use ‘Russian Roulette’ and ‘Butler Please’ to create stripes and fill in the lettering for ‘USA’. Utilize a fine detail brush to achieve precise lines and shapes. Finish with a glossy top coat for a shiny, protective layer.
Patriotic Precision: Bold and Bright
This nail design showcases classic American flag elements with a touch of elegance. The deep blue with white stars provides a striking contrast against the vibrant red, while the white stripes on a red base add a crisp, clean look. This arrangement symbolizes the flag with a fresh, modern twist.
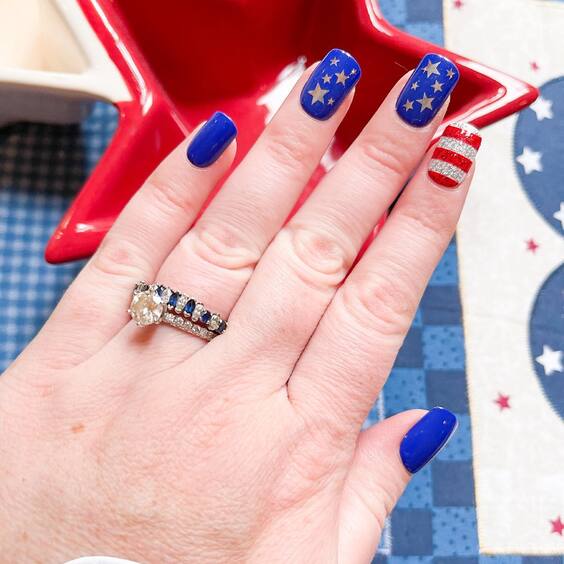
Photo credit by: @coffeeandscents
2. Consumables Needed:
- Base Coat: Essie All-in-One Base Coat
- Red, White, and Blue Polishes: OPI’s “Big Apple Red,” “Alpine Snow,” and “Russian Navy”
- Striping Tape: For neat, precise lines
- Star Stickers or a detail brush for the star designs
- Glossy Top Coat: Seche Vite for a durable finish
3. DIY Instructions: Apply a base coat to protect your nails. For the striped design, paint your nails red and use striping tape to create thin white stripes. For the blue nails, apply a blue base coat and then either stick on white star stickers or hand-paint stars with a detail brush. Seal everything with a glossy top coat for a stunning finish.
Festive Freedom: A Whimsical Array
This design combines playfulness and patriotism with its varied patterns and vibrant colors. From bold stripes to playful polka dots and everything in between, these nails are perfect for a joyful Fourth of July celebration or any patriotic event, capturing the spirit of freedom and fun.
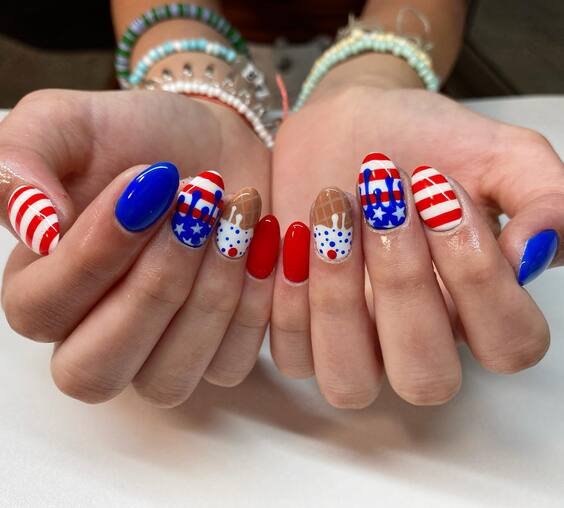
Photo credit by: @twilldidmynails
2. Consumables Needed:
- Base Coat: OPI Natural Nail Base Coat
- Polishes: Multiple colors including red, white, and blue
- Detailing Brushes and Dotting Tools: For intricate patterns and designs
- Matte Top Coat: Matte Finish by Essie to give a modern touch
3. DIY Instructions: Start with a base coat to protect your nails. Use different colors to create various designs such as stripes, polka dots, and stars. Employ detailing brushes and dotting tools to add precision and creativity to each nail. Consider finishing with a matte top coat to modernize the playful designs.
Classic Meets Contemporary: Chic Flag Designs
This set blends traditional flag imagery with contemporary nail art techniques. The sharp contrast of the red stripes against the natural nail base, paired with a detailed American flag and blue star patterns, showcases a refined approach to patriotic themes. It’s a perfect example of how classic elements can be transformed into modern chic.
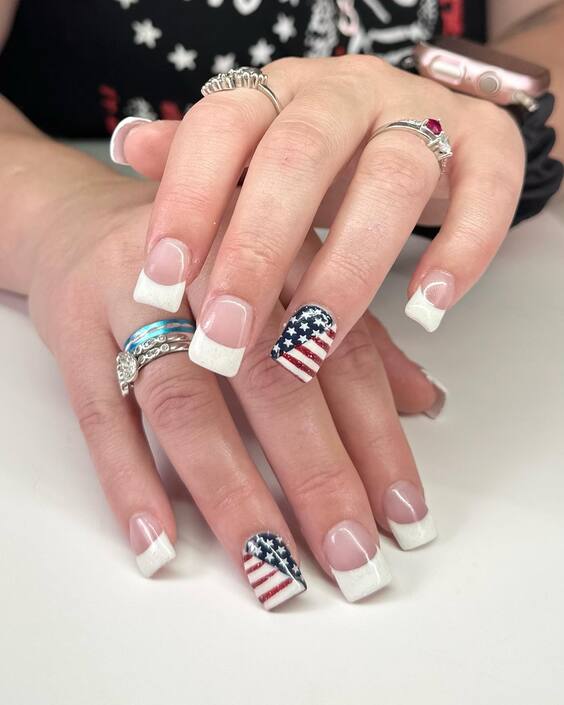
Photo credit by: @pinkandinknailsalon
2. Consumables Needed:
- Base Coat: Sally Hansen Hard as Nails
- White, Red, and Blue Polishes: Essie’s “Blanc,” “Really Red,” and “Avenue Maintain”
- Fine Detail Brush: For intricate flag and star designs
- Glossy Top Coat: INM Out the Door for a high-shine finish
3. DIY Instructions: Apply a protective base coat. Use ‘Blanc’ for the base on accent nails, with ‘Really Red’ for bold stripes on others. Paint a detailed American flag on one nail using all three colors. Add blue star designs on other nails with a fine detail brush. Finish with a glossy top coat for shine and protection.
Subtle Sophistication: Soft Hues and Bold Accents
This nail design offers a softer take on patriotic themes with its use of pastel pink as a base and vibrant red and blue for accents. The creative use of negative space and geometric patterns alongside delicate stars gives a contemporary and elegant twist to the traditional American flag motifs, making it ideal for those who prefer subtle yet striking nail art.
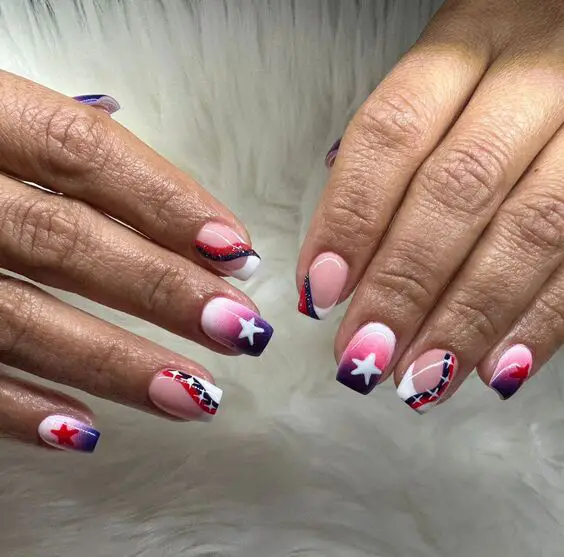
Photo credit by: @mirandasbeautynailssalon
2. Consumables Needed:
- Base Coat: CND Stickey Base Coat
- Pastel Pink Polish: OPI’s “Put it in Neutral”
- Red and Blue Polishes: Essie’s “Really Red” and “Butler Please”
- Detailing Brush: For precise line work and star details
- Top Coat: Seche Vite Dry Fast Top Coat for a lasting glossy finish
3. DIY Instructions: Apply the base coat to clean, prepared nails. Paint a soft pastel pink as the base color. Using a detailing brush, create thin red and blue lines to form geometric patterns. Add small stars with the same brush for a subtle nod to the American flag. Seal the design with a top coat for durability and an extra gloss.

