23 Vibrant Tropical Nail Designs for Stylish Summer Looks

Are you ready to dive into the colorful and vivacious world of tropical nail designs? Perfect for beach vacations, these designs bring the spirit of summer right to your fingertips. Whether you’re looking for simple, bright colors to match your beachwear or acrylic enhancements that last through your holiday adventures, tropical nail designs offer a stylish spectrum of options. How do tropical motifs stand out in nail art? What makes them ideal for both long escapes and weekend getaways? This article explores stunning tropical nail designs perfect for every nail length and occasion, guiding you through professional insights, product recommendations, and DIY tips to recreate these vibrant looks at home.
Polka Dots and Bright Splashes: A Tropical Fiesta on Your Fingertips
The first design features a playful arrangement of polka dots scattered across an almond-shaped nail, showcasing a blend of bright colors like orange, blue, and green on a clear base. This manicure captures the essence of tropical vibrancy and joy, perfect for adding a pop of color to any summer outfit. The glossy finish not only enhances the visual impact but also emulates the glistening clear waters of a tropical beach.
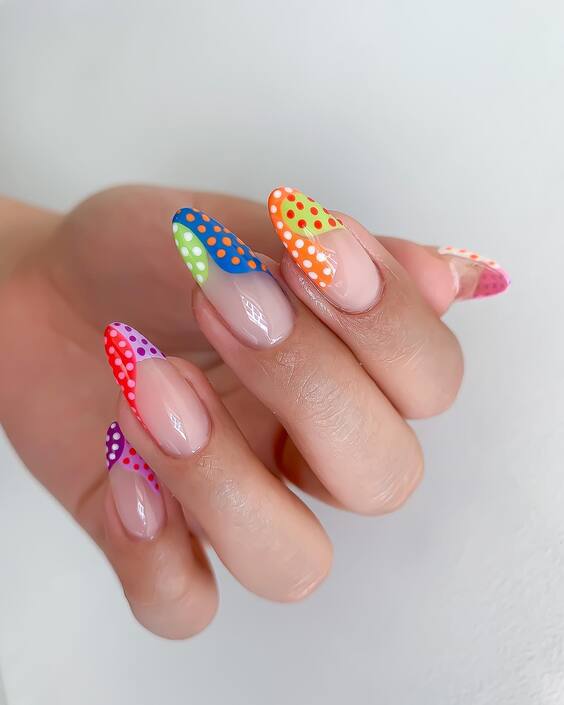
Photo credit by: @nails_and_soul
Materials List:
- Base Coat: Seche Clear Crystal Clear Base Coat
- Polka Dot Colors: OPI Neon Collection (bright orange, vivid blue, lime green)
- Top Coat: Essie Gel Setter Top Coat
- Dotting Tool: Dotting pens for precise application
DIY Instructions: Start by applying a clear base coat to protect your nails. Once dry, use a dotting tool to apply small dots of various neon polishes across each nail. Vary the size and spacing of the dots to create a playful, scattered effect. Finish with a high-gloss top coat to seal in the design and add a professional finish.
Neon Waves: Summer Surf at Your Fingertips
Embracing the dynamic movements of ocean waves, this design features wavy stripes of neon pink, yellow, and blue across each nail. The use of bright colors against a muted pastel backdrop makes this design a standout for beach vacations. Each wave is layered intricately, suggesting motion and flow, ideal for those who wish to make a splash with their summer style.
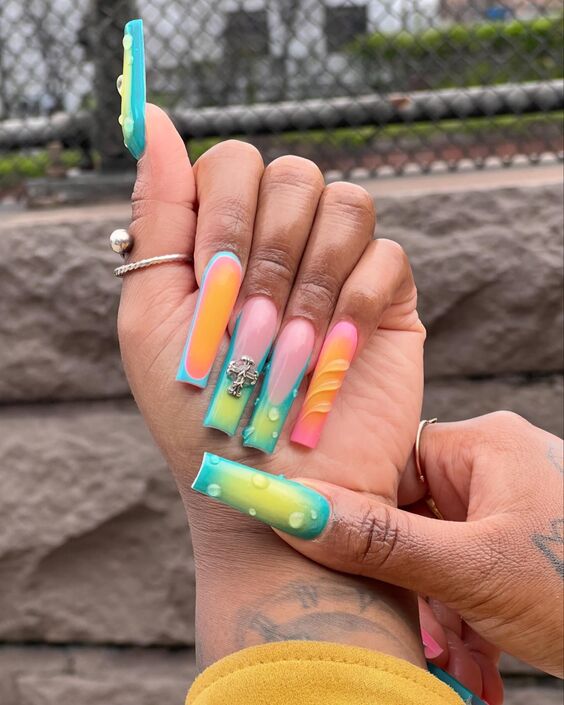
Photo credit by: @autumnelegance
Materials List:
- Base Coat: Sally Hansen Double Duty
- Colors: Sally Hansen Insta-Dri (neon pink, sunny yellow, sky blue)
- Detailing Brush: Fine nail art brush for precise wave patterns
- Top Coat: OPI Top Coat for a lasting finish
DIY Instructions: Apply a smooth base coat to prep your nails. Use a fine brush to paint alternating waves of neon colors, starting with the lightest shade. Allow each color to slightly overlap the previous one to achieve a seamless transition. Seal your artwork with a top coat for durability and shine.
Floral Elegance: Tropical Blooms in Soft Hues
This design showcases a delicate floral pattern in soft white and pink hues, evoking the serene beauty of tropical flowers. The art is sophisticated and uses acrylic to achieve depth and dimension, making each petal appear lifelike. Suitable for both short nails and almond nails, this manicure blends simplicity with elegance.
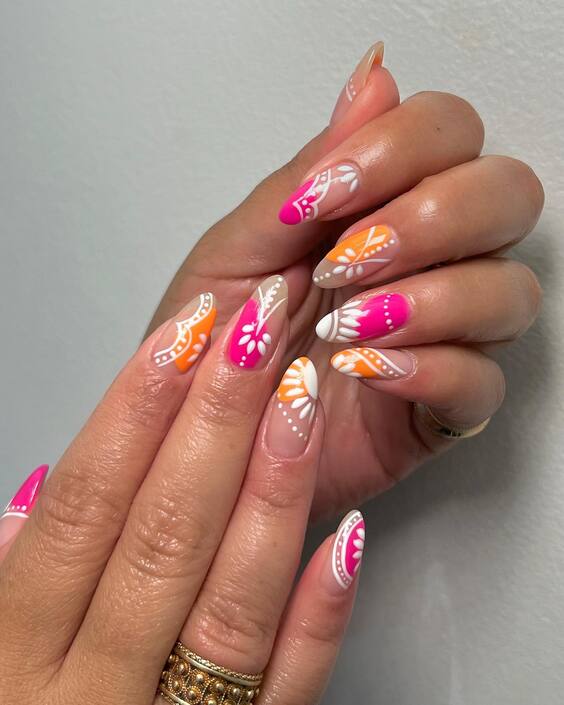
Photo credit by: @nailartbyqueenie
Materials List:
- Base Coat: CND Stickey Base Coat
- Acrylic Paints: White and pink for flowers
- Detailing Brush: Thin liner brush for intricate floral patterns
- Top Coat: Seche Vite Dry Fast Top Coat
DIY Instructions: After your base coat, use a thin brush and white acrylic paint to sketch the outline of tropical flowers. Fill in with soft pink, adding strokes to simulate petals. Once dry, apply a layer of fast-drying top coat to protect and enhance the design.
Lush Greenery: A Touch of the Tropics
This design celebrates the essence of the tropics with its rich, vibrant green shade that mirrors the lush foliage found in tropical paradises. The glossy finish of the nails enhances the depth of the color, making it a striking choice for those who prefer a bold, yet simple look. Ideal for both short and long nails, this monochromatic approach is both chic and timeless.
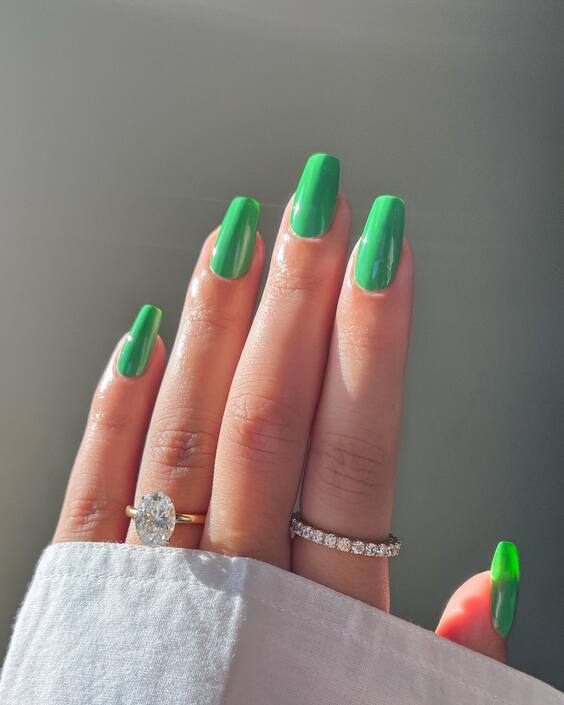
Photo credit by: @jadeandpolished
Materials List:
- Base Coat: OPI Natural Base Coat
- Nail Polish: Essie’s ‘Off Tropic’
- Top Coat: Sally Hansen Insta-Dri Anti-Chip Top Coat
- Moisturizer: Hand and Nail Harmony’s Mango Hand Lotion for after-care
DIY Instructions: Apply a base coat to clean, filed nails to ensure a smooth polish application. Paint two coats of Essie’s ‘Off Tropic’ for full, lush coverage. Allow each coat to dry thoroughly before applying the next to avoid smudging. Finish with a quick-drying top coat for a long-lasting, high-gloss finish. Moisturize your hands and cuticles after the manicure to keep them soft and hydrated.
Oceanic Dreams: Floral and Wave Fusion
This intricate design features a mesmerizing blend of ocean waves and tropical flowers, capturing the dynamic beauty of the sea and the delicate aesthetics of beach flora. The nails utilize a combination of acrylic techniques to layer colors vividly, creating a 3D effect that brings the art to life. This manicure is perfect for beach vacations and is sure to be a conversation starter.
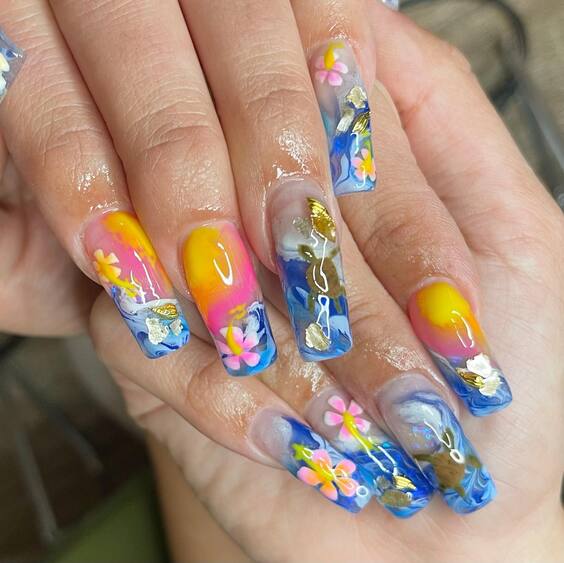
Photo credit by: @southtxnails
Materials List:
- Base Coat: China Glaze Strong Adhesion Base Coat
- Acrylic Colors: Bright yellow, sky blue, and pink
- Clear Gel: CND Shellac Top Coat for encapsulation
- Nail Art Tools: Brushes and dotting tools for detailed design work
DIY Instructions: Begin with a base coat to protect your nails. Layer the acrylic colors using a brush to form the wave and floral patterns. Use a dotting tool to add detailed accents and highlights. Once the design is complete, apply a layer of clear gel to encapsulate the artwork, ensuring its longevity and depth. Cure under a UV lamp to set.
Twilight Palms: Sunset Silhouettes
This stunning nail design is inspired by tropical sunsets, featuring silhouettes of palm trees against a gradient of blue to purple hues, reminiscent of a twilight sky. The use of glow-in-the-dark polish adds an unexpected twist, making the nails illuminate under low light—a magical touch for evening beach vacations.
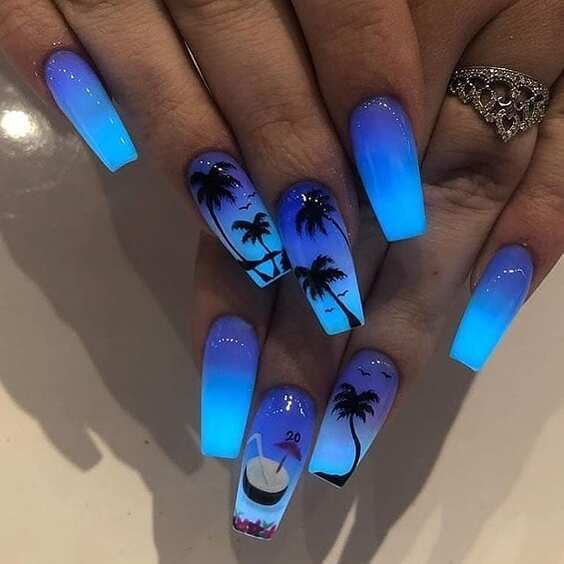
Photo credit by: @nailsandroll
Materials List:
- Base Coat: Revlon Quick Dry Base Coat
- Gradient Polishes: Light blue and purple
- Black Acrylic Paint for the palm trees
- Glow-in-the-Dark Top Coat: INM Northern Lights
- Sponge: For gradient effect
DIY Instructions: Start with a base coat to prepare your nails. Apply the light blue polish as a base color. Using a sponge, dab on the purple polish to create a smooth gradient effect. Paint the silhouettes of palm trees using black acrylic paint. Finish with a glow-in-the-dark top coat to add a unique nighttime effect. Allow each layer to dry completely to maintain the crispness of the design.
Vivid Pink Tropics: Bold and Beautiful
Dive into a bold tropical aesthetic with this stunning nail design featuring vibrant pink as its base and black palm silhouettes. The vivid pink not only embodies the lively spirit of tropical climates but also sets a striking backdrop for the intricate black accents. This manicure is ideal for those looking to make a statement with their nails, blending bright colors and bold patterns for a truly eye-catching look.
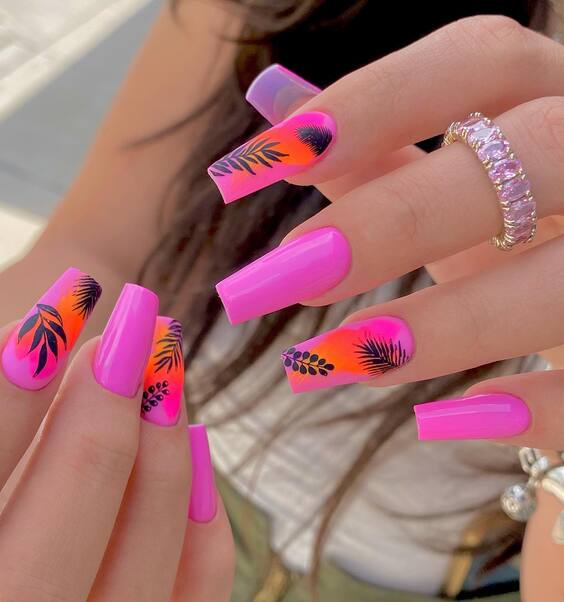
Photo credit by: @kleidys_nails
Materials List:
- Base Coat: Base Coat by Butter London
- Pink Polish: Essie’s ‘Bachelorette Bash’
- Black Design Paint: Sally Hansen Nail Art Pen in Black
- Top Coat: Revlon Extra Life No Chip Top Coat
- Detailing Brush: For precise palm design
DIY Instructions: Start with a protective base coat to preserve nail health. Apply two coats of Essie’s ‘Bachelorette Bash’ for a bright pink base. Use a detailing brush and the Sally Hansen Nail Art Pen to draw palm designs on alternating nails. Seal the design with a top coat for durability and a glossy finish that enhances the color’s vibrancy.
Soft Tropical Breezes: Pastel Perfection
This manicure captures the soft, serene vibes of a tropical morning with pastel orange and white gradients embellished with subtle floral designs. The soft transition of colors mimics the peaceful transition from dawn to day, making it a perfect choice for those who prefer simple, elegant nail designs. The added white floral accents provide a delicate contrast, ideal for beach vacations or casual outings.
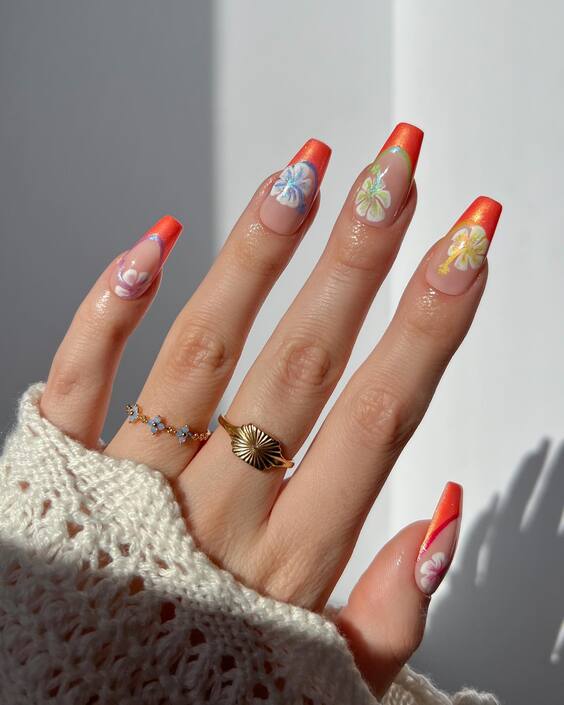
Photo credit by: @pop_polished
Materials List:
- Base Coat: OPI Natural Nail Base Coat
- Pastel Orange Polish: China Glaze ‘Peach Keen’
- White Polish: OPI ‘Alpine Snow’
- Top Coat: Seche Vite Dry Fast Top Coat
- Detailing Tool: Fine nail art brush for the flowers
DIY Instructions: Apply a base coat to protect the nails. For the gradient effect, use a sponge to dab the transition between pastel orange and white. Once dry, use a fine brush to add floral details in white. Finish with a fast-drying top coat to protect and enhance the nail art.
Hawaiian Floral Fantasy: Colorful and Captivating
This creative and colorful design is a tribute to the vibrant flowers of Hawaii. Featuring a brilliant blue gradient background with pink and orange tropical flowers, this nail art is both bold and beautiful. Accented with gold embellishments and 3D flowers, it’s an exquisite choice for those looking to bring the tropical vibe to their everyday style, especially suitable for tropical nail designs beach Hawaii.
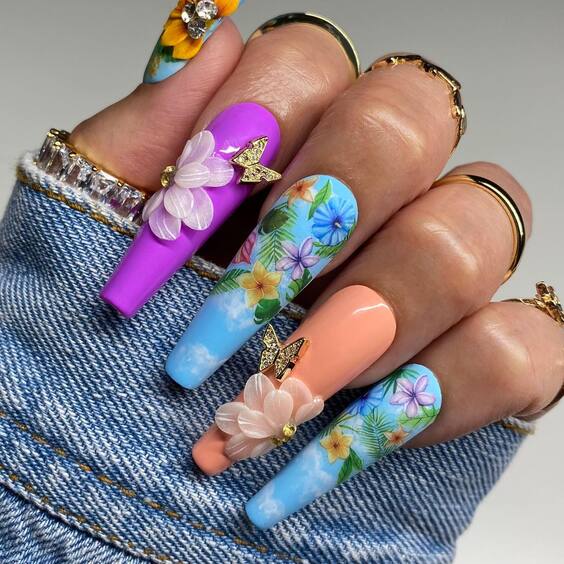
Photo credit by: @nailboxy
Materials List:
- Base Coat: Essie Grow Stronger Base Coat
- Gradient Polishes: Light blue and deep blue
- Floral Acrylic Paints: Pink and orange for flowers
- 3D Flower Embellishments: Pre-made from nail supply stores
- Gold Glitter: For detailing around flowers
- Top Coat: INM Out The Door Top Coat for a lasting shine
DIY Instructions: Begin with a strengthening base coat. Apply a gradient of blue using a sponge for a seamless sky effect. Hand-paint the tropical flowers using acrylic paints. Attach 3D flower embellishments with a drop of nail glue. Detail with gold glitter around the edges of the flowers. Seal everything with a high-quality top coat to ensure longevity and shine.
Gradient Florals: Cooling Blue and Pink Skies
This enchanting nail design combines cooling shades of blue and pink, adorned with delicate white floral patterns that evoke a breezy, tropical atmosphere. The gradient effect resembles the stunning skies at sunrise or sunset on a tropical beach, creating a tranquil backdrop for the detailed floral artwork. Perfect for tropical nail designs beach summer, this look offers a refreshing twist to your summer aesthetic.
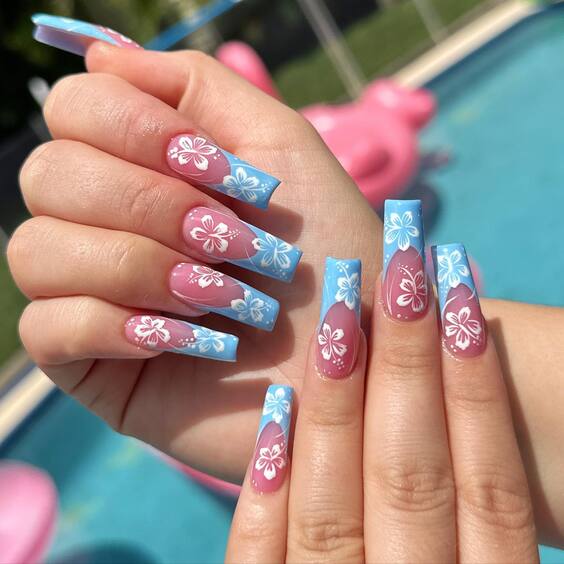
Photo credit by: @vicecitynails
Materials List:
- Base Coat: Deborah Lippmann Gel Lab Pro Base Coat
- Gradient Polishes: Light blue and soft pink
- White Acrylic Paint for floral designs
- Top Coat: Chanel Le Gel Coat Longwear Top Coat
- Sponge: For a smooth gradient application
DIY Instructions: Prepare your nails with a base coat. Use a sponge to blend light blue and pink polishes for a gradient effect. Once dry, use a fine brush and white acrylic paint to add floral designs. Seal the design with a durable top coat for a glossy finish that lasts.
Vibrant Abstract Art: A Tropical Canvas
This bold and artistic nail design showcases vibrant abstract patterns in primary colors, creating a lively and energetic look that’s perfect for those who love to stand out. The combination of sharp reds, deep blues, and playful dots evokes a sense of fun and creativity, ideal for tropical nail designs bright colors and making a statement during beach parties or summer outings.
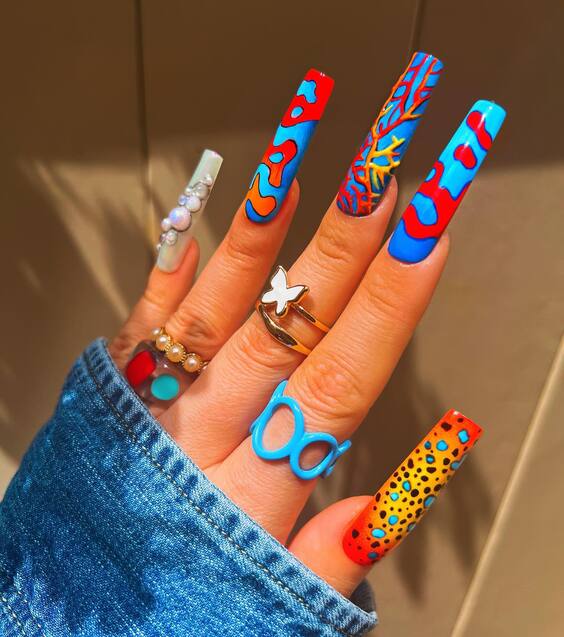
Photo credit by: @hollywiththegoodnails
Materials List:
- Base Coat: Essie All in One Base
- Color Polishes: Red, Blue, Yellow (OPI Color Paints)
- Detailing Brush and Dotting Tools for precise application
- Top Coat: Sally Hansen Mega Shine Top Coat
- Matte Finish: Matte top coat for a contemporary look
DIY Instructions: Begin with a protective base coat. Apply the primary colors in abstract patterns using a fine brush. Add dots and finer details with a dotting tool for additional texture. Optionally, apply a matte top coat to give the vibrant colors a modern, flat finish.
Tropical Minimalism: Simple Green Leaf Patterns
Embrace minimalism with this elegant design featuring simple green leaf patterns over a sheer pink base. The subtle design is sophisticated yet understated, making it perfect for those who prefer a cleaner, more simple tropical nail design. The leaf motifs are reminiscent of tropical foliage, suitable for any summer setting or a beach vacation.
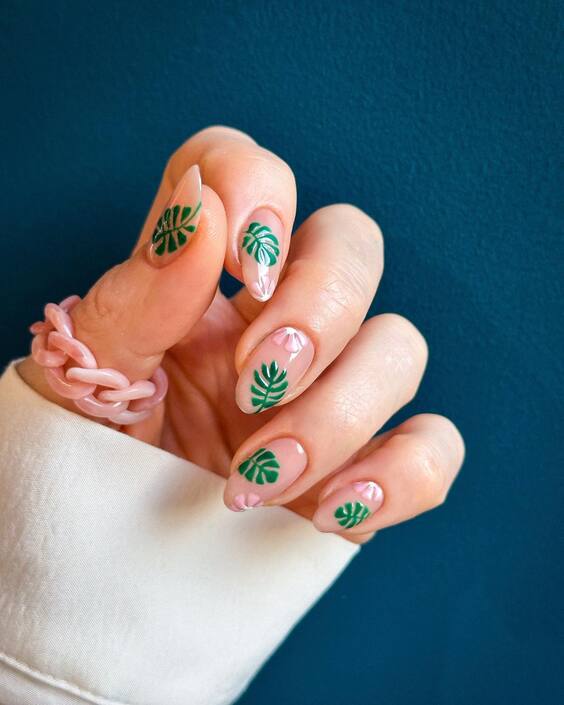
Photo credit by: @paiwaloves
Materials List:
- Base Coat: OPI Natural Nail Base Coat
- Sheer Pink Polish: Dior Nail Glow
- Green Acrylic Paint for leaf designs
- Top Coat: Seche Vite Dry Fast Top Coat
- Fine Brush: For detailed leaf painting
DIY Instructions: Start with a clear base coat to protect your nails. Apply one or two coats of Dior Nail Glow for a healthy, pink sheen. Use a fine brush and green acrylic paint to carefully draw leaf patterns on each nail. Finish with a quick-drying top coat to seal in the design and enhance the overall shine.
Floral Elegance on Sheer Pink: Delicate Tropical Touch
This nail design features a sheer pink base elegantly paired with vibrant tropical flowers positioned at the tips. The use of contrasting colors highlights the delicate shapes of the flowers, making this design both subtle and striking. This manicure is a perfect blend of simplicity and sophistication, ideal for those who prefer a more understated yet distinctly tropical aesthetic.
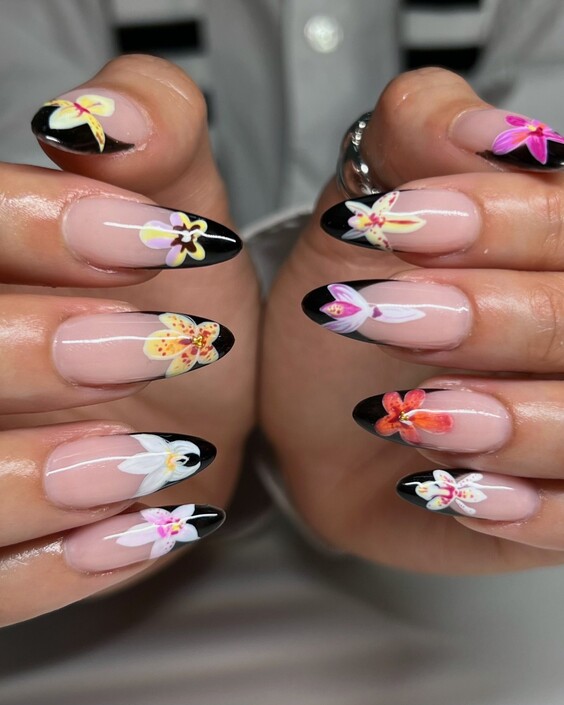
Photo credit by: @gelestialnails
Materials List:
- Base Coat: Essie Strong Start Base Coat
- Sheer Pink Polish: Zoya ‘Bela’
- Floral Decals or Hand-Painted with Acrylic Paints
- Black Polish for floral outlines
- Top Coat: CND Vinylux Weekly Top Coat
DIY Instructions: Apply the base coat to protect your nails. Follow with a layer of sheer pink polish for a clean, natural look. Place floral decals near the tips or hand-paint flowers using acrylic paints and a fine brush. Outline the flowers in black for definition. Seal the design with a top coat for durability and shine.
Psychedelic Swirls: A Colorful Twist on Tropical Art
Dive into a playful and colorful world with this psychedelic swirl design that uses a kaleidoscope of colors to create a striking visual effect. This design is particularly appealing for adventurous spirits looking to incorporate bold and bright elements into their nail art, making it a standout choice for tropical nail designs bright colors.
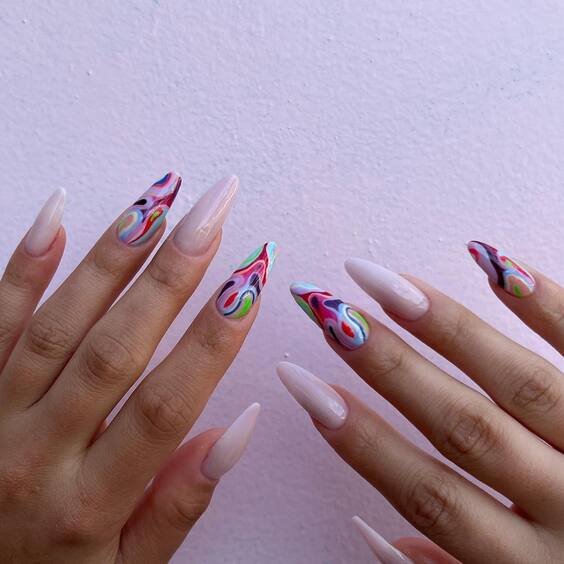
Photo credit by: @nailpromagazine
Materials List:
- Base Coat: Orly Bonder Rubberized Basecoat
- Swirl Colors: Various vibrant gel polishes
- Detailing Brush: For intricate swirl patterns
- Top Coat: Gelish Top It Off Gel Sealer
DIY Instructions: Start with a base coat to ensure a smooth canvas. Apply a light color as the base shade. While the base is still tacky, add drops of different colored polishes. Use a detailing brush to gently drag and swirl these colors to create a psychedelic pattern. Cure under a UV lamp if using gel polish, then seal with a gel top coat for a glossy finish.
Oceanic Marbling: Serene Tropical Waters
This manicure captures the serene and soothing essence of tropical waters through a beautiful marbling technique that combines shades of white and turquoise. The fluid, organic patterns mimic the movement of water, creating a tranquil and refreshing look perfect for beach vacations or relaxed summer days.
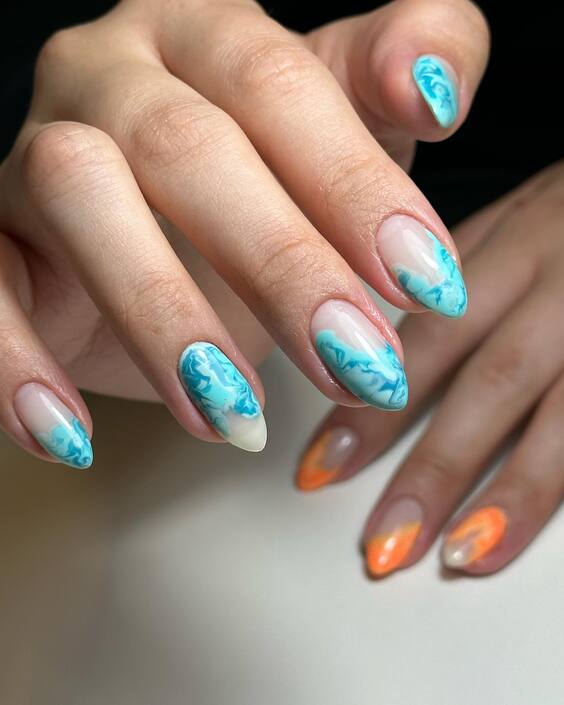
Photo credit by: @selfish_london
Materials List:
- Base Coat: Butter London Nail Foundation Priming Basecoat
- Marbling Colors: Turquoise and white nail polish
- A small cup of water for the water marbling technique
- Toothpick or fine brush for marbling
- Top Coat: Essie Good To Go Top Coat
DIY Instructions: Prepare nails with a base coat. Fill a small cup with water and carefully drop in your chosen colors. Use a toothpick or fine brush to swirl the colors together. Dip each fingernail into the cup to transfer the marbling effect onto the nails. Allow it to dry completely and apply a top coat for a smooth, lasting finish.
Sunny Delight: Vibrant Orange Tropical Charm
Capture the essence of a sun-drenched tropical getaway with this vibrant orange nail design. The single accent nail featuring a playful tropical bird adds a unique and whimsical touch, making this manicure perfect for tropical nail designs beach vacations. The striking orange hue embodies the energy and warmth of the sun, ideal for any summer adventure.
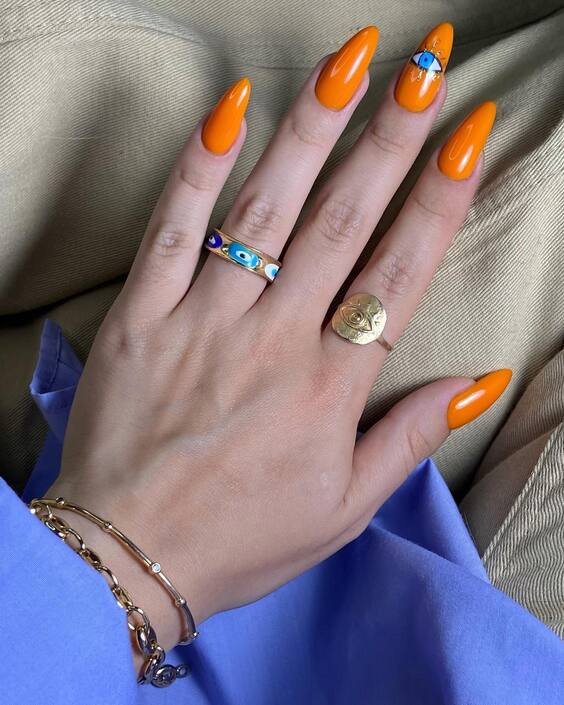
Photo credit by: @jas_nails_bar
Materials List:
- Base Coat: OPI Natural Base Coat
- Orange Polish: China Glaze ‘Sunset Sail’
- Black and White Paint for bird detail
- Top Coat: Glisten & Glow Top Coat
- Detailing Brush: For the bird design
DIY Instructions: Begin with a base coat to protect your nails. Apply two coats of the vibrant orange polish for a solid base. On the accent nail, use a detailing brush to paint a tropical bird. Use black for the outline and white for highlights. Finish with a glossy top coat to enhance the vibrant color and protect your design.
Tropical Artistry: Delicate Floral Overlays
This nail design features a translucent base overlaid with intricate floral patterns in a blend of bright and pastel hues, creating a stunning visual depth that mimics the diverse flora of tropical regions. This design is perfect for those who appreciate detailed artistry and a soft yet colorful aesthetic, ideal for tropical nail designs acrylic.
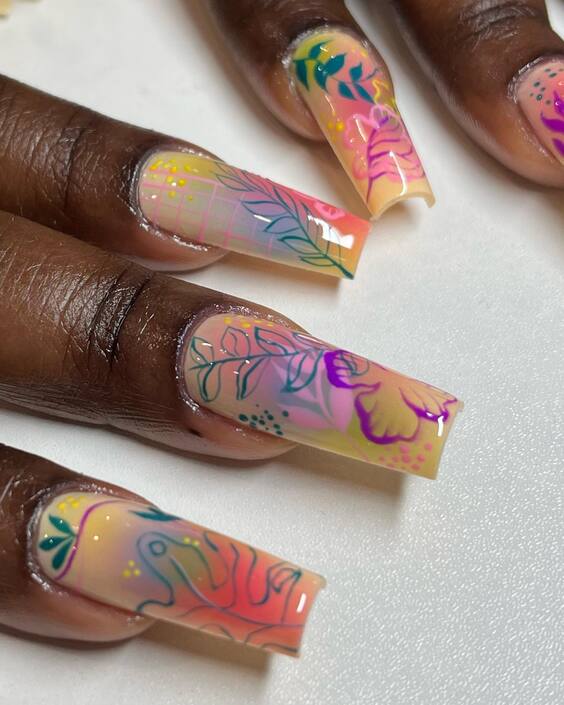
Photo credit by: @supervillebeaute
Materials List:
- Base Coat: Essie Here to Stay Base Coat
- Translucent Pink Polish: Essie ‘Treat Love & Color’
- Acrylic Paints: For floral designs
- Top Coat: Orly Won’t Chip
- Fine Detail Brush: For intricate floral patterns
DIY Instructions: Apply a base coat to ensure longevity. Use a translucent pink polish as the base. Paint detailed floral designs using acrylic paints and a fine detail brush. Each flower should feature different colors to highlight the diversity of a tropical garden. Seal with a top coat for a smooth finish and durability.
Golden Palms: Luxurious Tropical Elegance
These nails offer a luxurious take on tropical themes with a creamy white base and golden palm leaf accents. The metallic gold used for the palm designs adds a touch of elegance and sophistication, making this manicure perfect for more formal beach vacations or evening events in tropical locales.
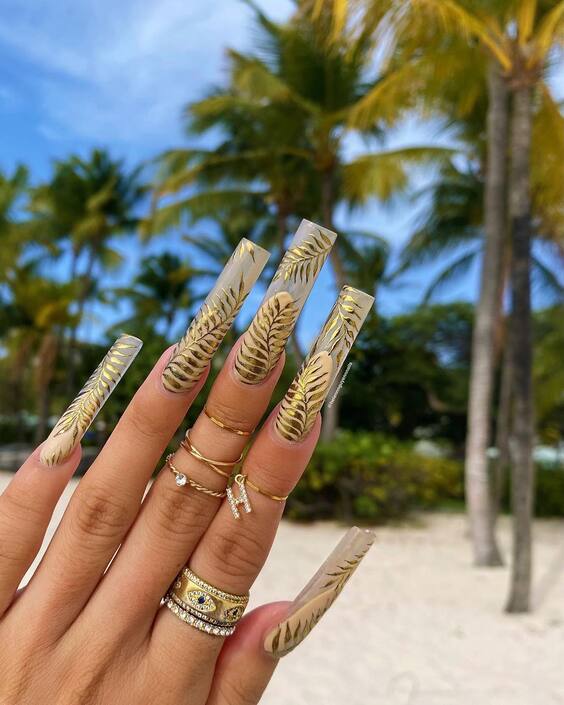
Photo credit by: @daily_charme
Materials List:
- Base Coat: Deborah Lippmann Gel Lab Pro
- White Polish: OPI ‘Alpine Snow’
- Gold Leaf Polish or Gold Foil for palm accents
- Top Coat: Chanel Le Top Coat Quick Dry and Shine
- Detailing Brush or Foil Adhesive for precise application
DIY Instructions: Start with a clean, smooth base coat. Apply two coats of white polish as the background. Carefully place gold leaf polish or apply gold foil in palm leaf shapes using a detailing brush or foil adhesive. Ensure each design element is crisp and clear. Finish with a high-quality top coat for a glossy, protective finish that enhances the metallic detailing.
Playful Papaya: Fruity Fun on Your Fingertips
This lively nail design features a sunny yellow base interspersed with playful papaya and polka dot patterns over a sheer overlay, creating a fun and fruity tropical look. The choice of vibrant yellow reflects the sunny, joyous themes of summer, making it perfect for tropical nail designs bright colors.
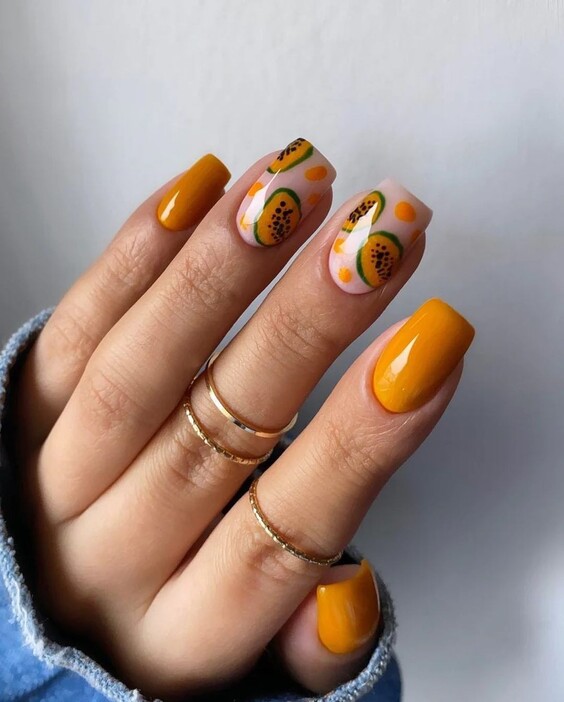
Photo credit by: @didierlab_espana
Materials List:
- Base Coat: OPI Natural Nail Base Coat
- Yellow Polish: Sally Hansen ‘Mellow Yellow’
- Sheer Pink Polish: Essie ‘Ballet Slippers’
- Acrylic Paints for papaya and polka dots
- Top Coat: Essie Gel Setter Top Coat
DIY Instructions: Start by applying a base coat to protect your nails. Apply a bright yellow polish as the base color. Once dry, overlay with a sheer pink polish. Use acrylic paints to add papaya and polka dot designs. Seal the design with a glossy top coat for a vibrant and durable finish.
Cosmic Colors: A Vibrant Universe at Your Fingertips
Embrace the boldness with these nails that feature a cosmic blend of vibrant metallic colors, creating an effect reminiscent of a colorful nebula. This design is perfect for those who love to stand out with tropical nail designs bright colors and is sure to draw attention with its vivid, sparkling finish.
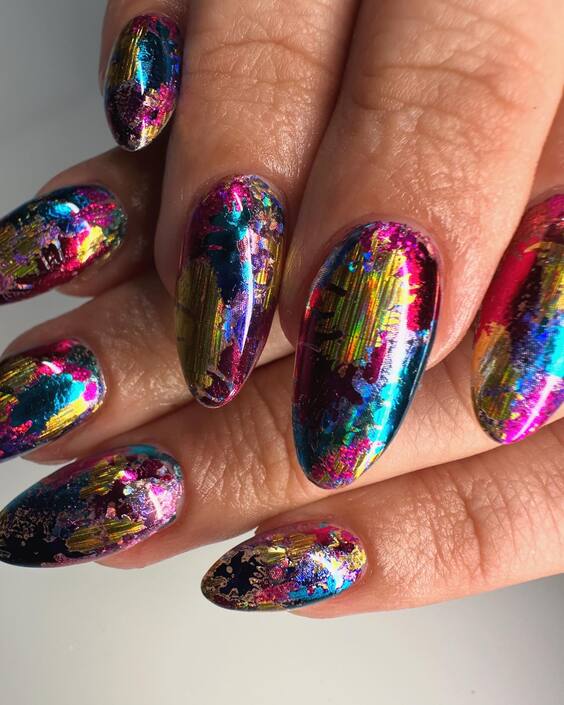
Photo credit by: @bees.knees.nails
Materials List:
- Base Coat: Revlon Quick Dry Base Coat
- Metallic Polishes: Various shades (purple, blue, pink)
- Sponge: For dabbing and blending the metallic colors
- Top Coat: Seche Vite Dry Fast Top Coat
DIY Instructions: Apply a base coat for nail protection. Use a sponge to dab on various metallic polishes, blending them together to create a cosmic effect. Each nail can feature a different blend of colors to enhance the uniqueness. Finish with a quick-drying top coat to seal in the vibrant colors and provide a long-lasting shine.
Modern Art Deco: Green Swirls on White
This design brings a modern twist to tropical themes with its white base and bold green swirl patterns, interspersed with delicate dots. The clean and crisp lines provide a contemporary look, making this design suitable for a sophisticated summer outing or a casual beach vacation.
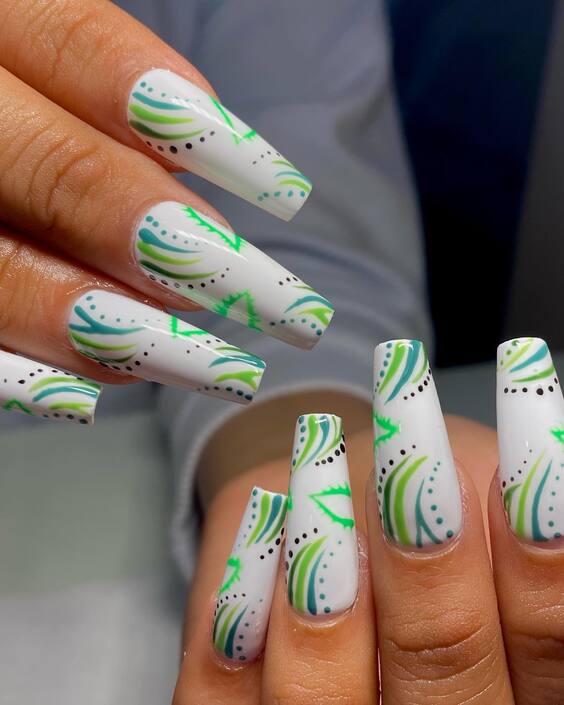
Photo credit by: @nailsxjazmarie
Materials List:
- Base Coat: CND Stickey Base Coat
- White Polish: OPI ‘Alpine Snow’
- Green Acrylic Paint for swirls and dots
- Top Coat: OPI Top Coat for a flawless finish
- Dotting Tool and Fine Brush for detailed patterns
DIY Instructions: Begin with a base coat to protect the nails. Apply a white polish as the background. Use green acrylic paint with a fine brush to create swirls and dots, ensuring precision in every stroke. Use a dotting tool to add uniformity to the dots. Finish with a high-quality top coat to enhance the design’s durability and shine.
Serene Summer Pastels: Gentle Breeze and Tropical Leaves
This design features a soft pastel pink base with white and green tropical leaf accents, capturing the essence of a gentle summer breeze. The understated elegance of the pastel tones paired with vibrant leaf motifs provides a refreshing and serene appearance, making it a perfect choice for a subtle yet stylish tropical nail design.
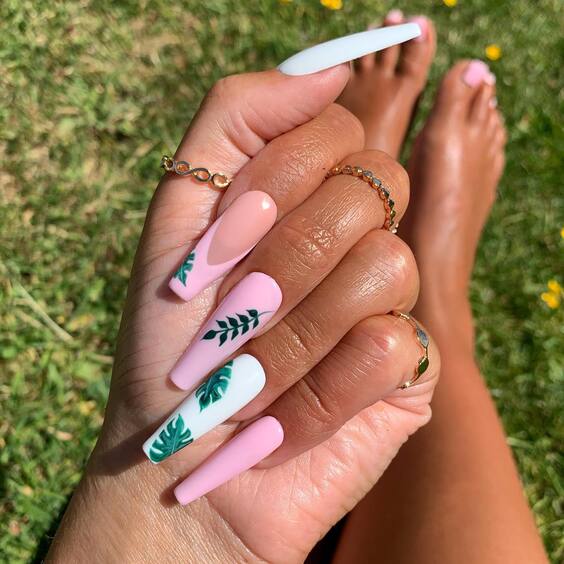
Photo credit by: @polishedbyellie
Materials List:
- Base Coat: Essie All in One Base Coat
- Pastel Pink Polish: OPI ‘Put it in Neutral’
- Green and White Acrylic Paint for leaf details
- Top Coat: China Glaze Fast Forward Top Coat
- Fine Detail Brush: For painting leaves
DIY Instructions: Apply the base coat to protect your nails. Paint two coats of the pastel pink polish as the base. Use green and white acrylic paints with a fine brush to add leaf designs for a touch of nature-inspired art. Finish with a top coat to seal the design and add shine.
Rainbow Bright: A Spectrum of Tropical Hues
This vibrant design features nails painted in a rainbow of bright, bold colors, each nail a different hue to create a full spectrum effect. This playful and colorful approach is great for summer festivities, embodying the fun and spirited nature of tropical nail designs bright colors.
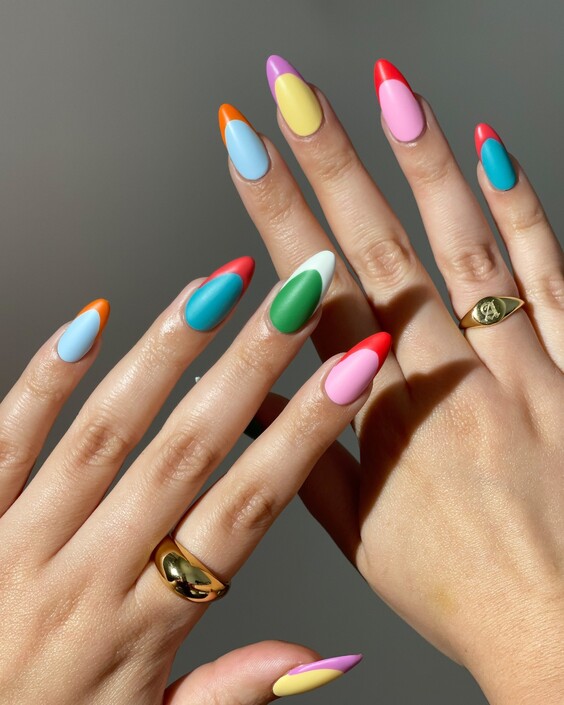
Photo credit by: @lightslacquer
Materials List:
- Base Coat: OPI Natural Nail Base Coat
- Various Polishes: A range of bright colors (e.g., orange, pink, yellow, green, blue)
- Top Coat: Seche Vite Dry Fast Top Coat
DIY Instructions: Start with a base coat to protect your nails. Paint each nail a different color, choosing vibrant hues to cover the entire spectrum of a rainbow. This design allows for creativity—feel free to choose any colors that suit your style or mood. Finish with a glossy top coat to enhance the colors and ensure longevity.

